MITSUBISHI ENDEAVOR 2004 Service Repair Manual
ENDEAVOR 2004
MITSUBISHI
MITSUBISHI
https://www.carmanualsonline.info/img/19/57105/w960_57105-0.png
MITSUBISHI ENDEAVOR 2004 Service Repair Manual
Trending: brake pads, immobilizer, radiator, Rear differential gear oil plug, Battery terminals, oil pressure, valve cover
Page 731 of 3870
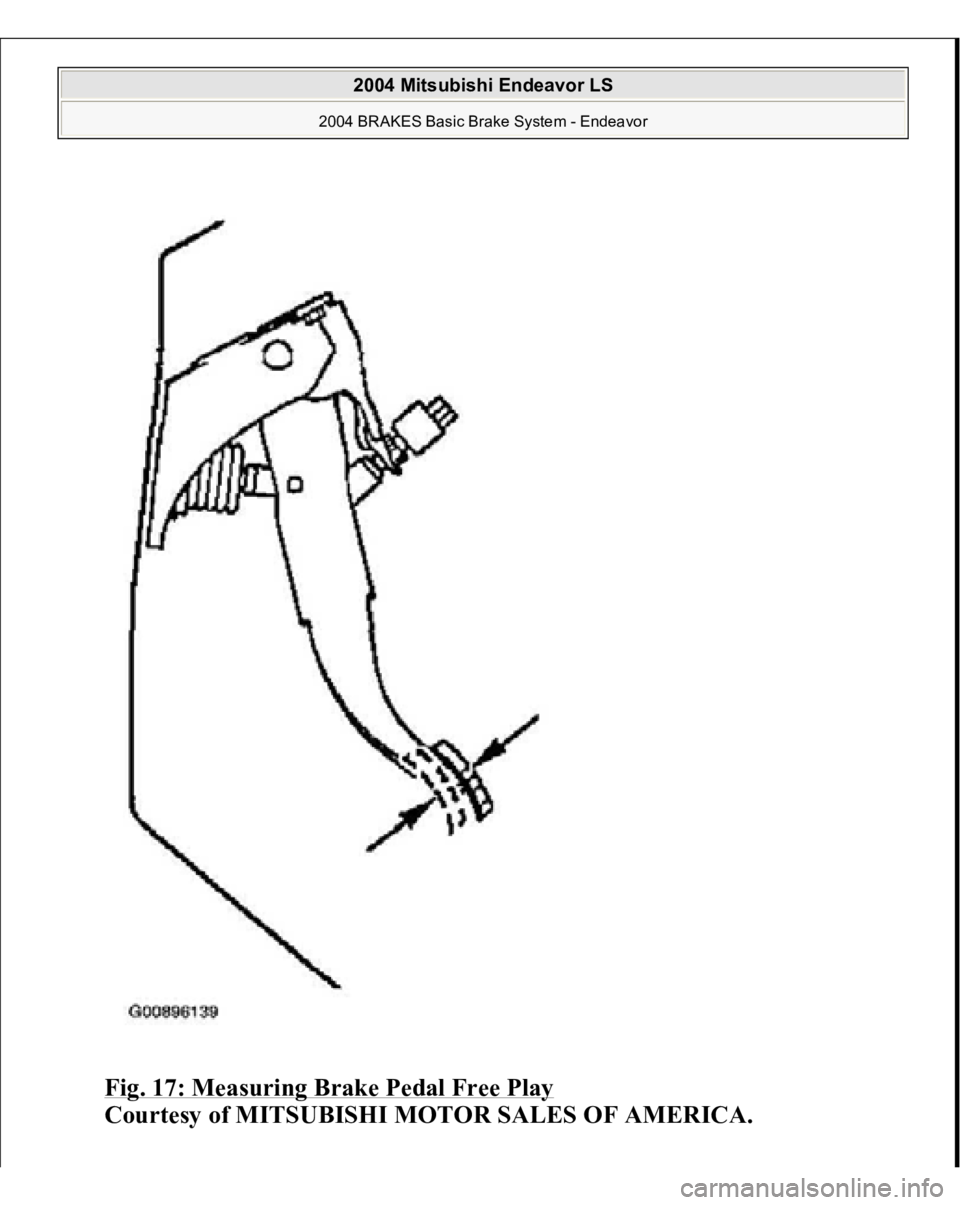
Fig. 17: Measuring Brake Pedal Free Play
Courtesy of MITSUBISHI MOTOR SALES OF AMERICA.
2004 Mitsubishi Endeavor LS
2004 BRAKES Basic Brake System - Endeavor
Page 732 of 3870
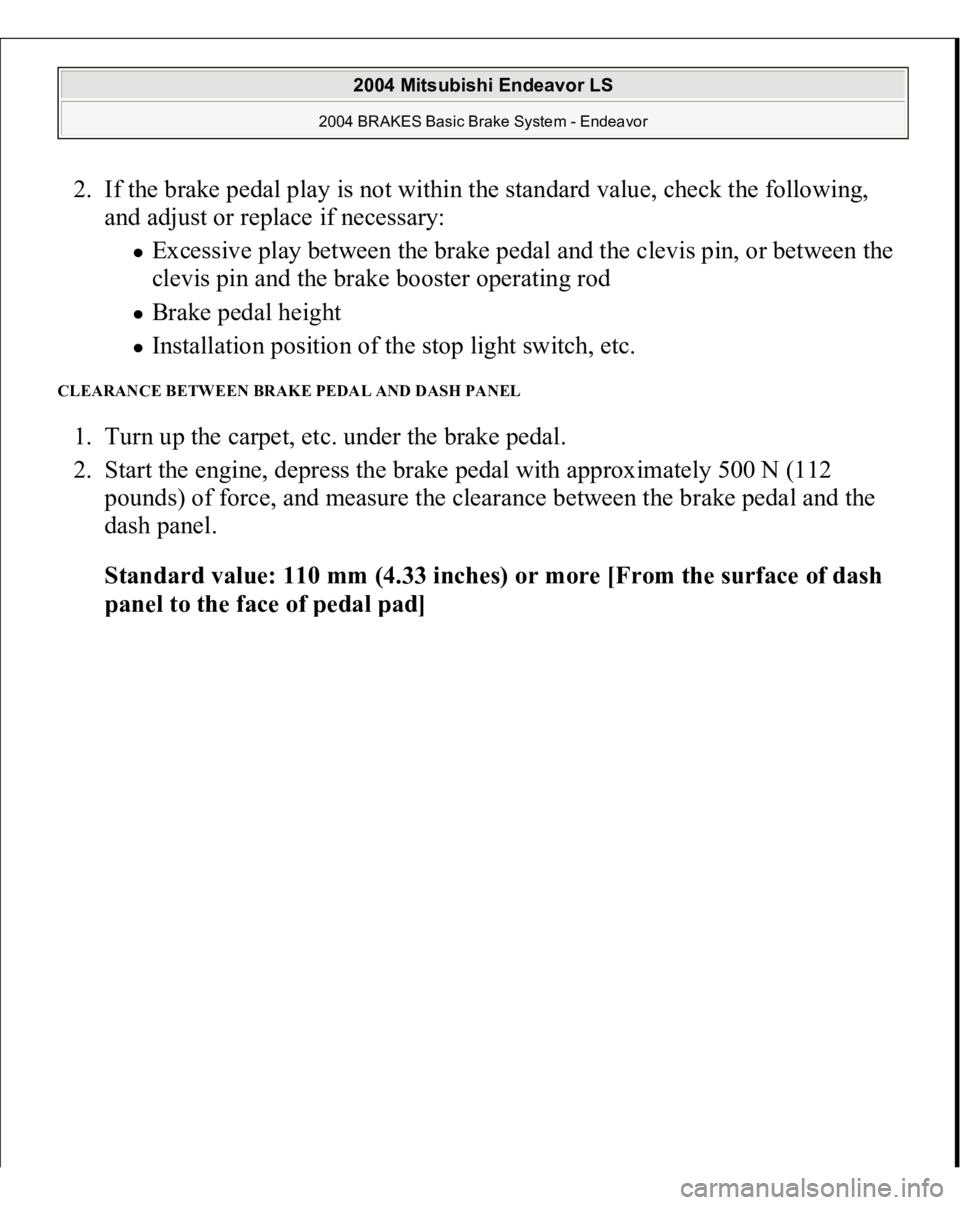
2. If the brake pedal play is not within the standard value, check the following,
and adjust or replace if necessary:
Excessive play between the brake pedal and the clevis pin, or between the
clevis pin and the brake booster operating rod Brake pedal height Installation position of the stop light switch, etc.
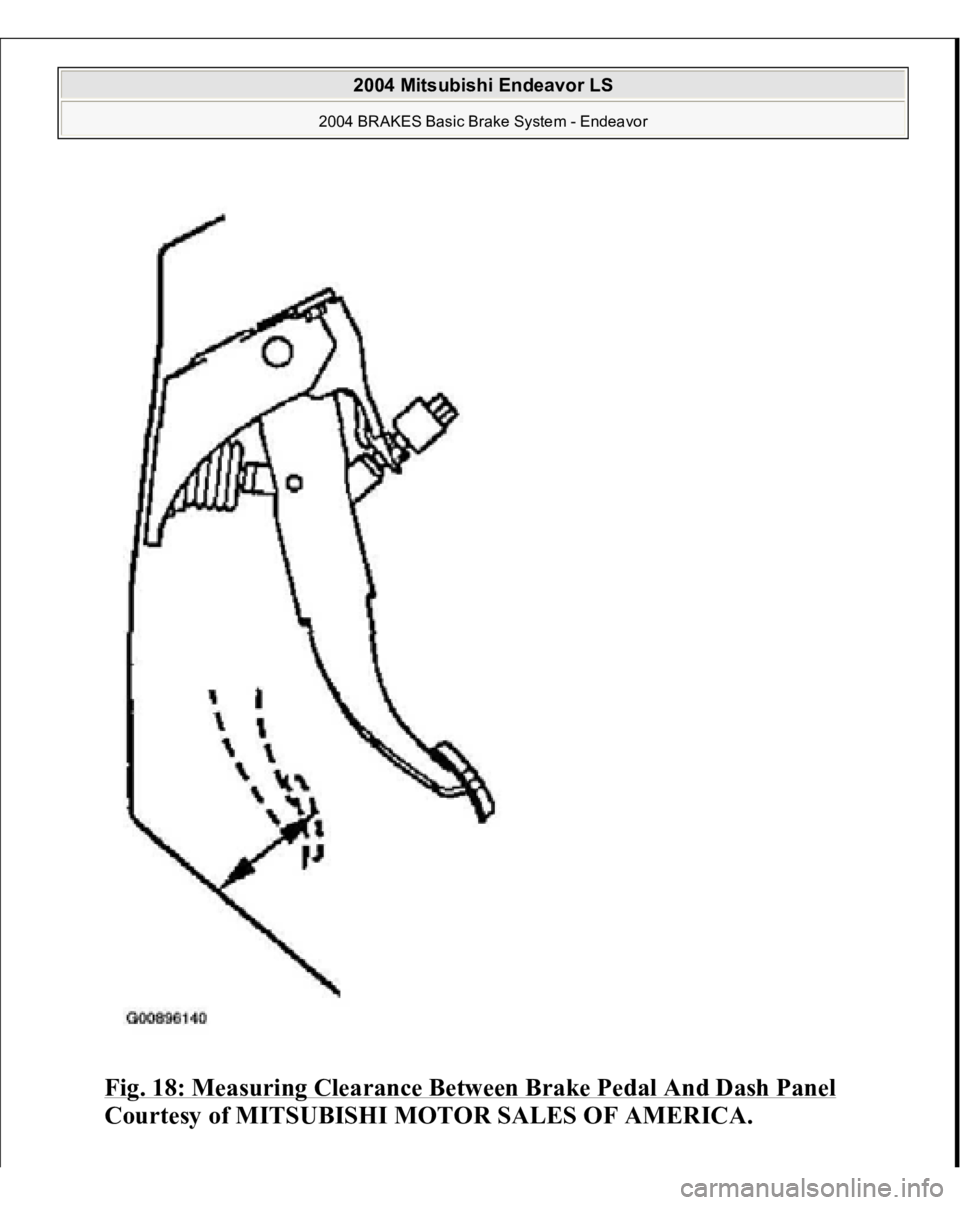
CLEARANCE BETWEEN BRAKE PEDAL AND DASH PANEL 1. Turn up the carpet, etc. under the brake pedal.
2. Start the engine, depress the brake pedal with approximately 500 N (112
pounds) of force, and measure the clearance between the brake pedal and the
dash panel.
Standard value: 110 mm (4.33 inches) or more [From the surface of dash
panel to the face of
pedal
pad]
2004 Mitsubishi Endeavor LS
2004 BRAKES Basic Brake System - Endeavor
Page 733 of 3870
Fig. 18: Measuring Clearance Between Brake Pedal And Dash Panel
Courtesy of MITSUBISHI MOTOR SALES OF AMERICA.
2004 Mitsubishi Endeavor LS
2004 BRAKES Basic Brake System - Endeavor
Page 734 of 3870
3. If the clearance is outside the standard value, check for air trapped in the brake
line and thickness of the disc brake pad. And then adjust and replace defective
parts as required.
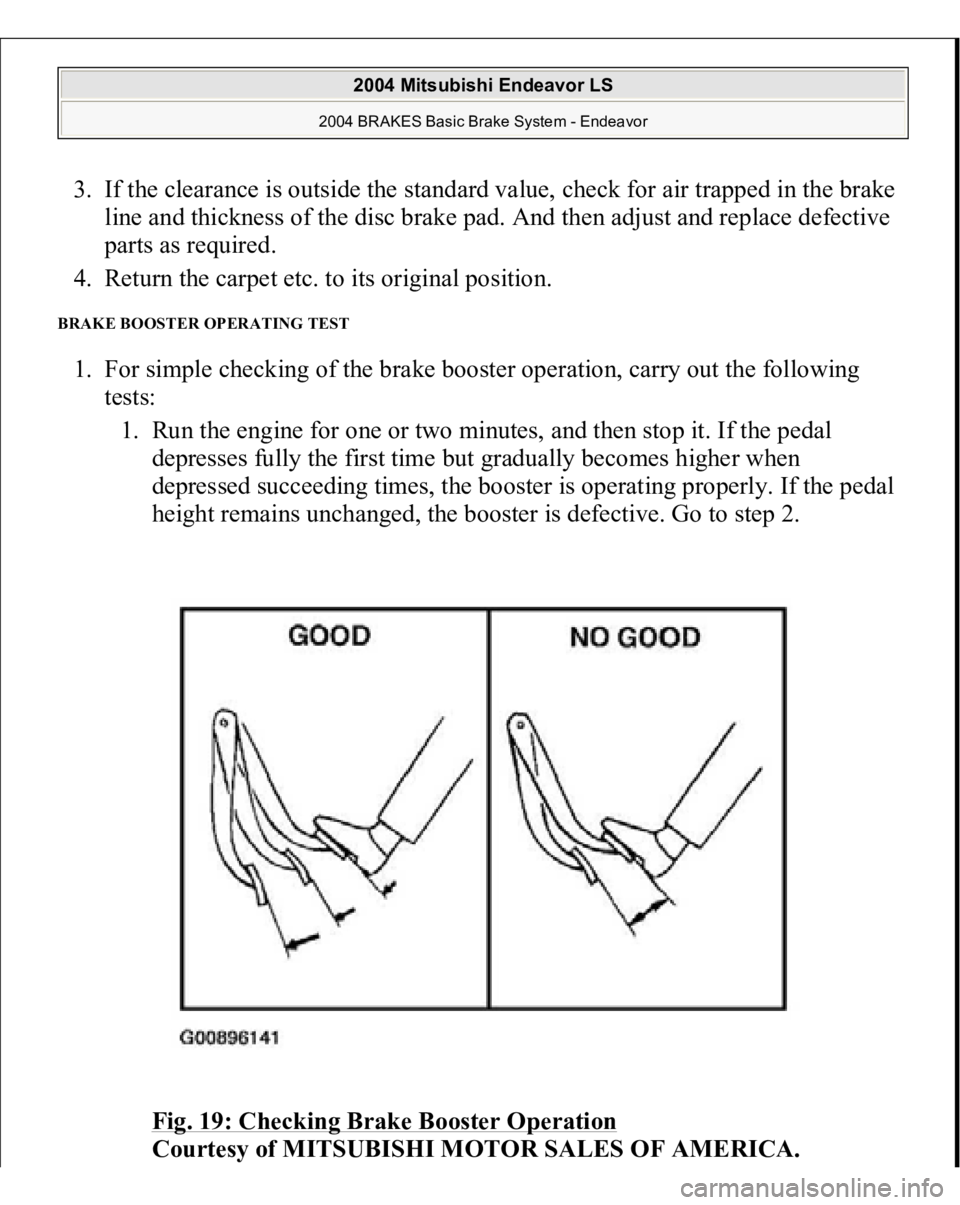
4. Return the carpet etc. to its original position. BRAKE BOOSTER OPERATING TEST 1. For simple checking of the brake booster operation, carry out the following
tests:
1. Run the engine for one or two minutes, and then stop it. If the pedal
depresses fully the first time but gradually becomes higher when
depressed succeeding times, the booster is operating properly. If the pedal
height remains unchanged, the booster is defective. Go to step 2.
Fig. 19: Checking Brake Booster Operation
Courtesy of MITSUBISHI MOTOR SALES OF AMERICA.
2004 Mitsubishi Endeavor LS
2004 BRAKES Basic Brake System - Endeavor
Page 735 of 3870
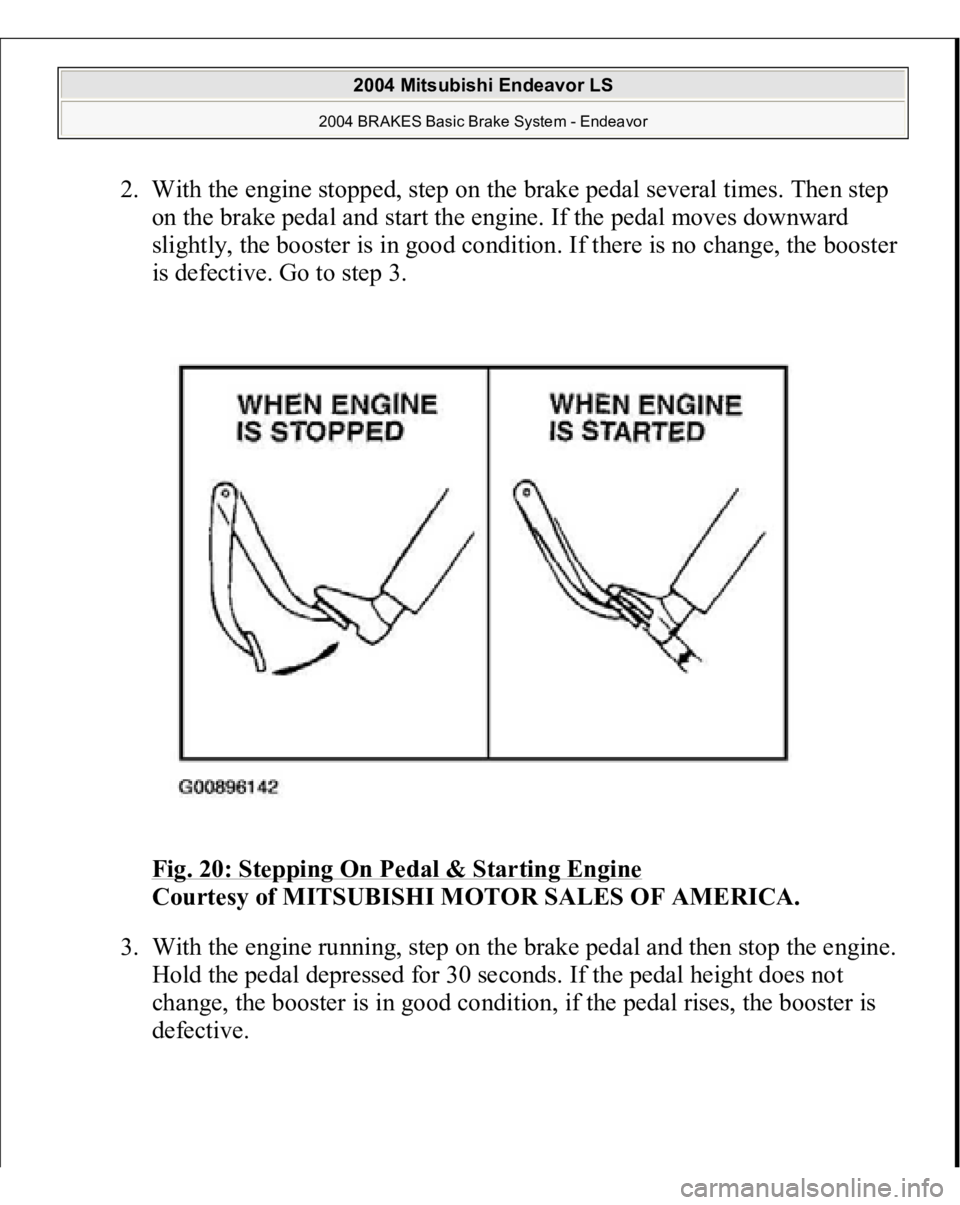
2. With the engine stopped, step on the brake pedal several times. Then step
on the brake pedal and start the engine. If the pedal moves downward
slightly, the booster is in good condition. If there is no change, the booster
is defective. Go to step 3.
Fig. 20: Stepping On Pedal & Starting Engine
Courtesy of MITSUBISHI MOTOR SALES OF AMERICA.
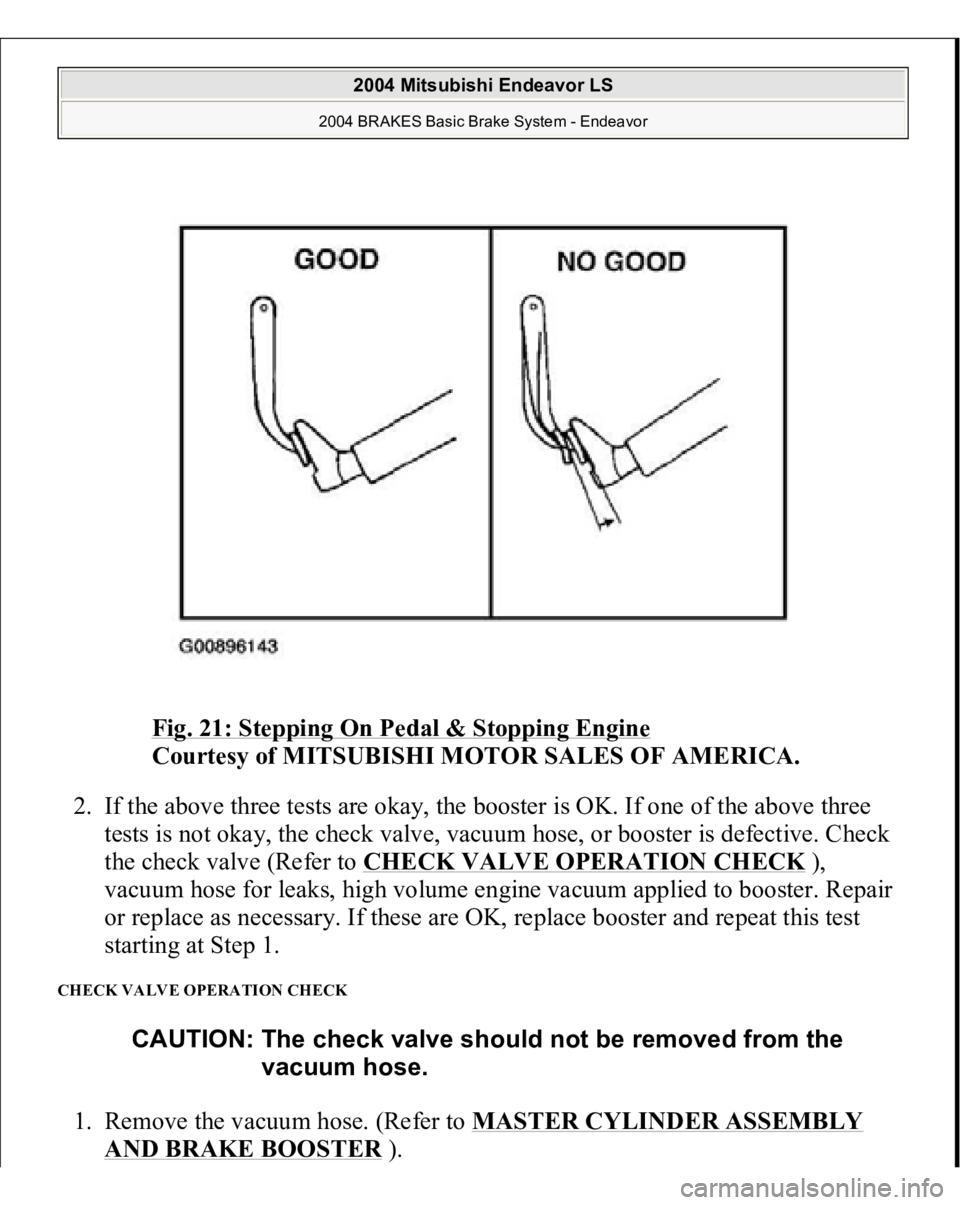
3. With the engine running, step on the brake pedal and then stop the engine.
Hold the pedal depressed for 30 seconds. If the pedal height does not
change, the booster is in good condition, if the pedal rises, the booster is
defective.
2004 Mitsubishi Endeavor LS
2004 BRAKES Basic Brake System - Endeavor
Page 736 of 3870
Fig. 21: Stepping On Pedal & Stopping Engine
Courtesy of MITSUBISHI MOTOR SALES OF AMERICA.
2. If the above three tests are okay, the booster is OK. If one of the above three
tests is not okay, the check valve, vacuum hose, or booster is defective. Check
the check valve (Refer to CHECK VALVE OPERATION CHECK
),
vacuum hose for leaks, high volume engine vacuum applied to booster. Repair
or replace as necessary. If these are OK, replace booster and repeat this test
starting at Step 1.
CHECK VALVE OPERATION CHECK 1. Remove the vacuum hose. (Refer to MASTER CYLINDER ASSEMBLY
AND BRAKE BOOSTE
R).
CAUTION: The check valve should not be removed from the
vacuum hose.
2004 Mitsubishi Endeavor LS
2004 BRAKES Basic Brake System - Endeavor
Page 737 of 3870
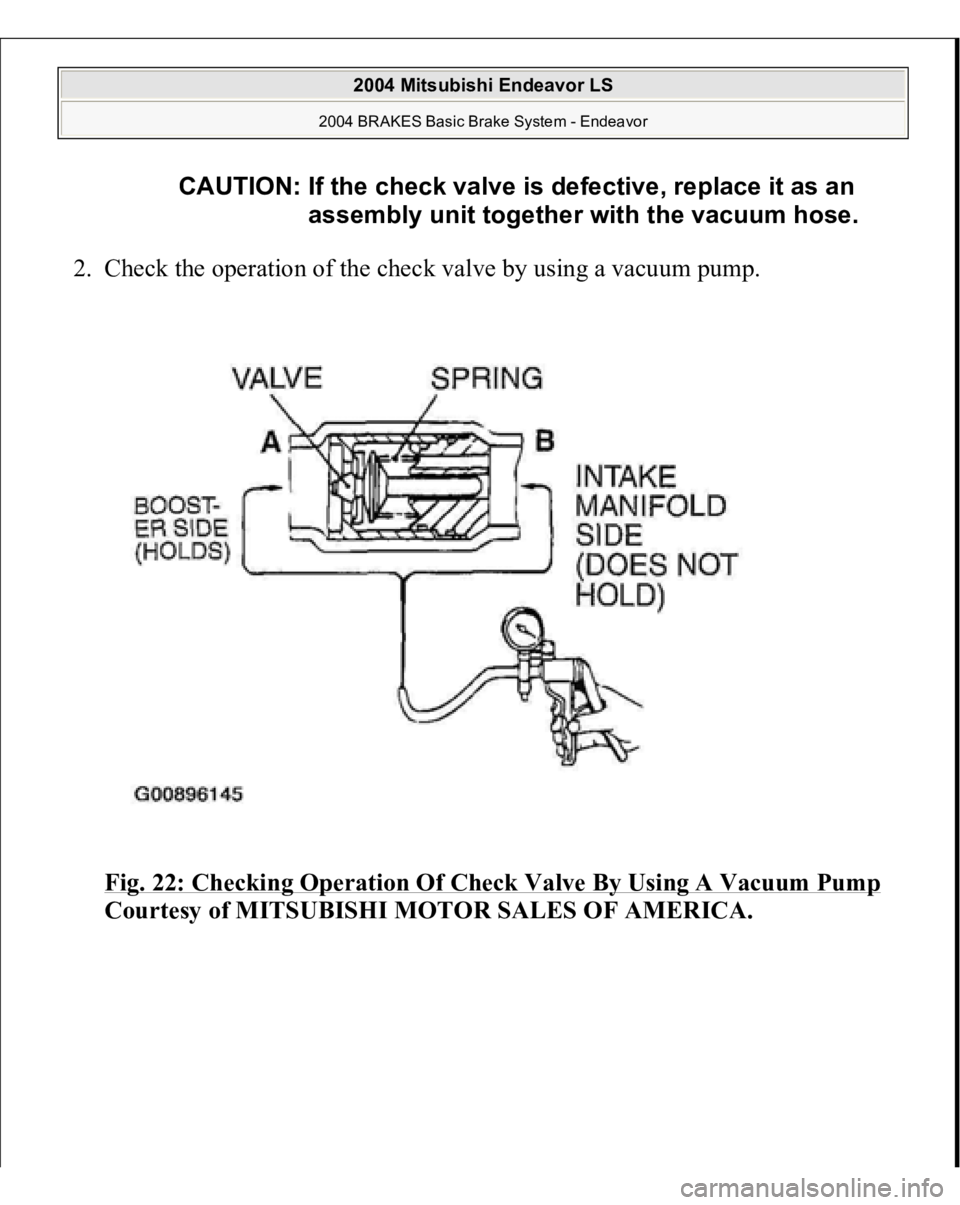
2. Check the operation of the check valve by using a vacuum pump.
Fig. 22: Checking Operation Of Check Valve By Using A Vacuum Pump
Courtesy of MITSUBISHI MOTOR SALES OF AMERICA.
CAUTION: If the check valve is defective, replace it as an
assembly unit together with the vacuum hose.
2004 Mitsubishi Endeavor LS
2004 BRAKES Basic Brake System - Endeavor
Page 738 of 3870
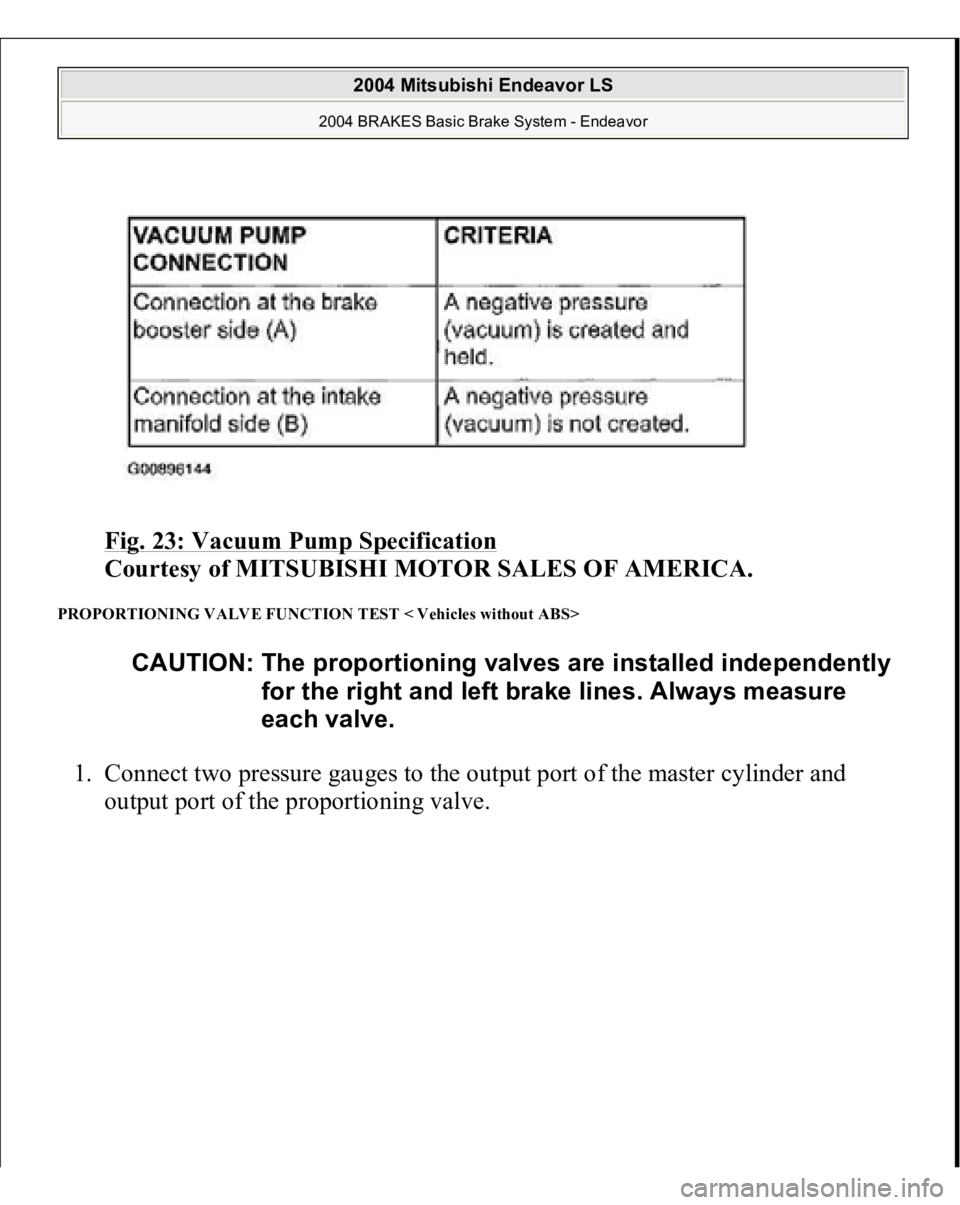
Fig. 23: Vacuum Pump Specification
Courtesy of MITSUBISHI MOTOR SALES OF AMERICA.
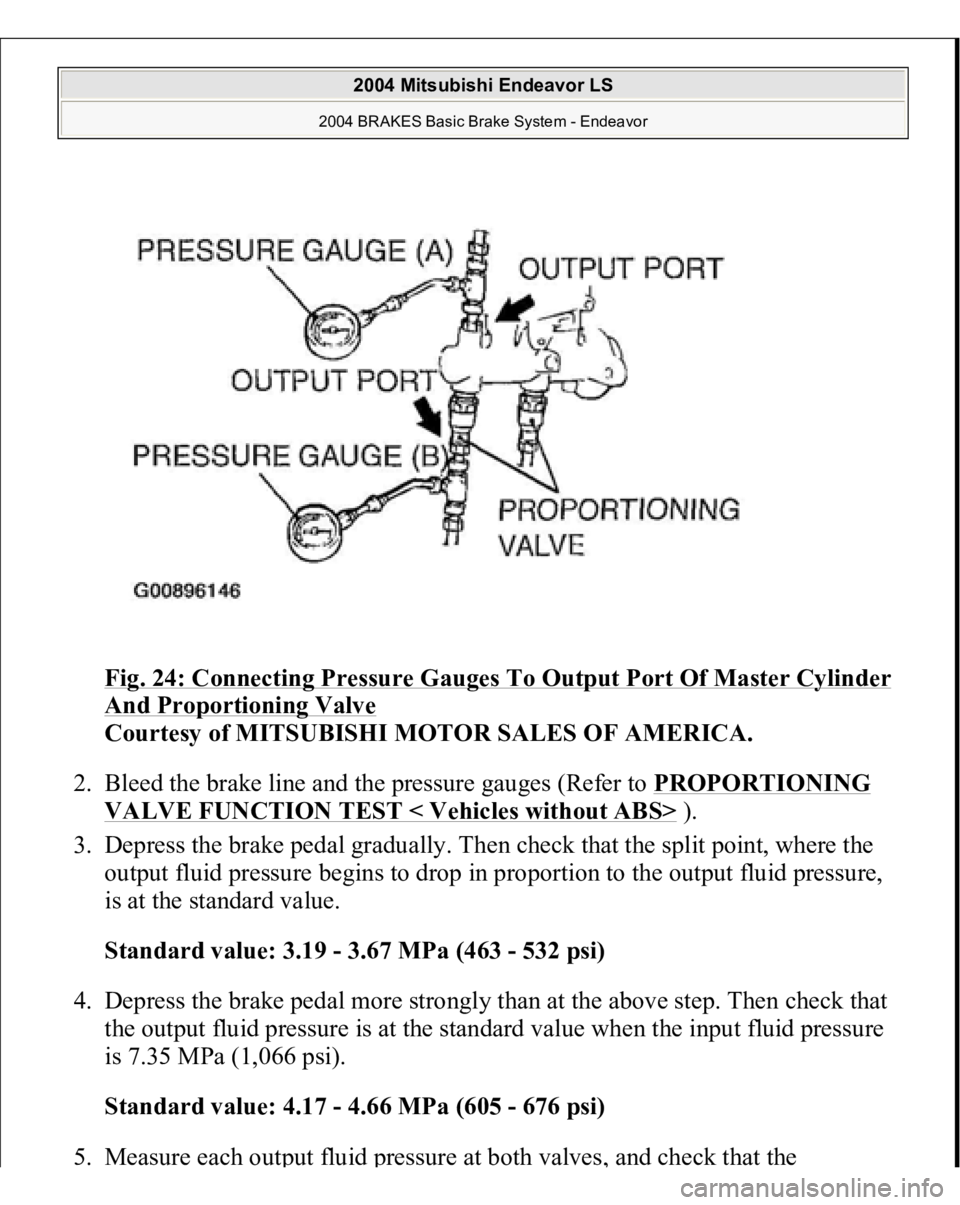
PROPORTIONING VALVE FUNCTION TEST < Vehicles without ABS> 1. Connect two pressure gauges to the output port of the master cylinder and
output port of the proportioning valve.
CAUTION: The proportioning valves are installed independently
for the right and left brake lines. Always measure
each valve.
2004 Mitsubishi Endeavor LS
2004 BRAKES Basic Brake System - Endeavor
Page 739 of 3870
Fig. 24: Connecting Pressure Gauges To Output Port Of Master Cylinder And Proportioning Valve
Courtesy of MITSUBISHI MOTOR SALES OF AMERICA.
2. Bleed the brake line and the pressure gauges (Refer to PROPORTIONING
VALVE FUNCTION TEST < Vehicles without ABS>
).
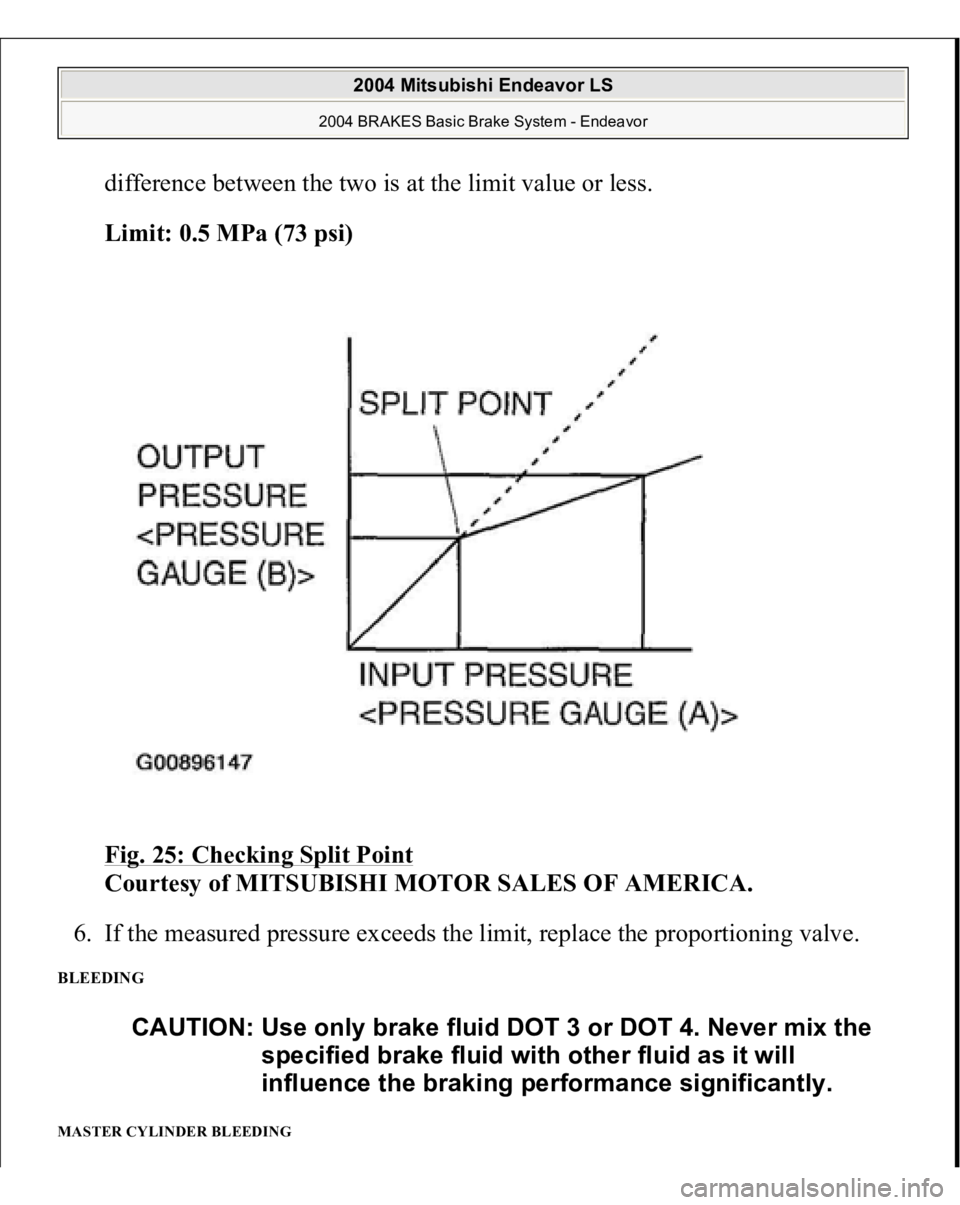
3. Depress the brake pedal gradually. Then check that the split point, where the
output fluid pressure begins to drop in proportion to the output fluid pressure,
is at the standard value.
Standard value: 3.19 - 3.67 MPa (463 - 532 psi)
4. Depress the brake pedal more strongly than at the above step. Then check that
the output fluid pressure is at the standard value when the input fluid pressure
is 7.35 MPa (1,066 psi).
Standard value: 4.17 - 4.66 MPa (605 - 676 psi)
5. Measure each out
put fluid
pressure at both valves
, and check that the
2004 Mitsubishi Endeavor LS
2004 BRAKES Basic Brake System - Endeavor
Page 740 of 3870
difference between the two is at the limit value or less.
Limit: 0.5 MPa (73 psi)
Fig. 25: Checking Split Point
Courtesy of MITSUBISHI MOTOR SALES OF AMERICA.
6. If the measured pressure exceeds the limit, replace the proportioning valve.
BLEEDING MASTER CYLINDER BLEEDING
CAUTION: Use only brake fluid DOT 3 or DOT 4. Never mix the
specified brake fluid with other fluid as it will
influence the braking performance significantly.
2004 Mitsubishi Endeavor LS
2004 BRAKES Basic Brake System - Endeavor
Trending: four wheel drive, tow bar, purge valve, hood open, transmission oil, seats, headlight assembly
