MITSUBISHI GALANT 1989 Service Repair Manual
Manufacturer: MITSUBISHI, Model Year: 1989, Model line: GALANT, Model: MITSUBISHI GALANT 1989Pages: 1273, PDF Size: 37.62 MB
Page 171 of 1273
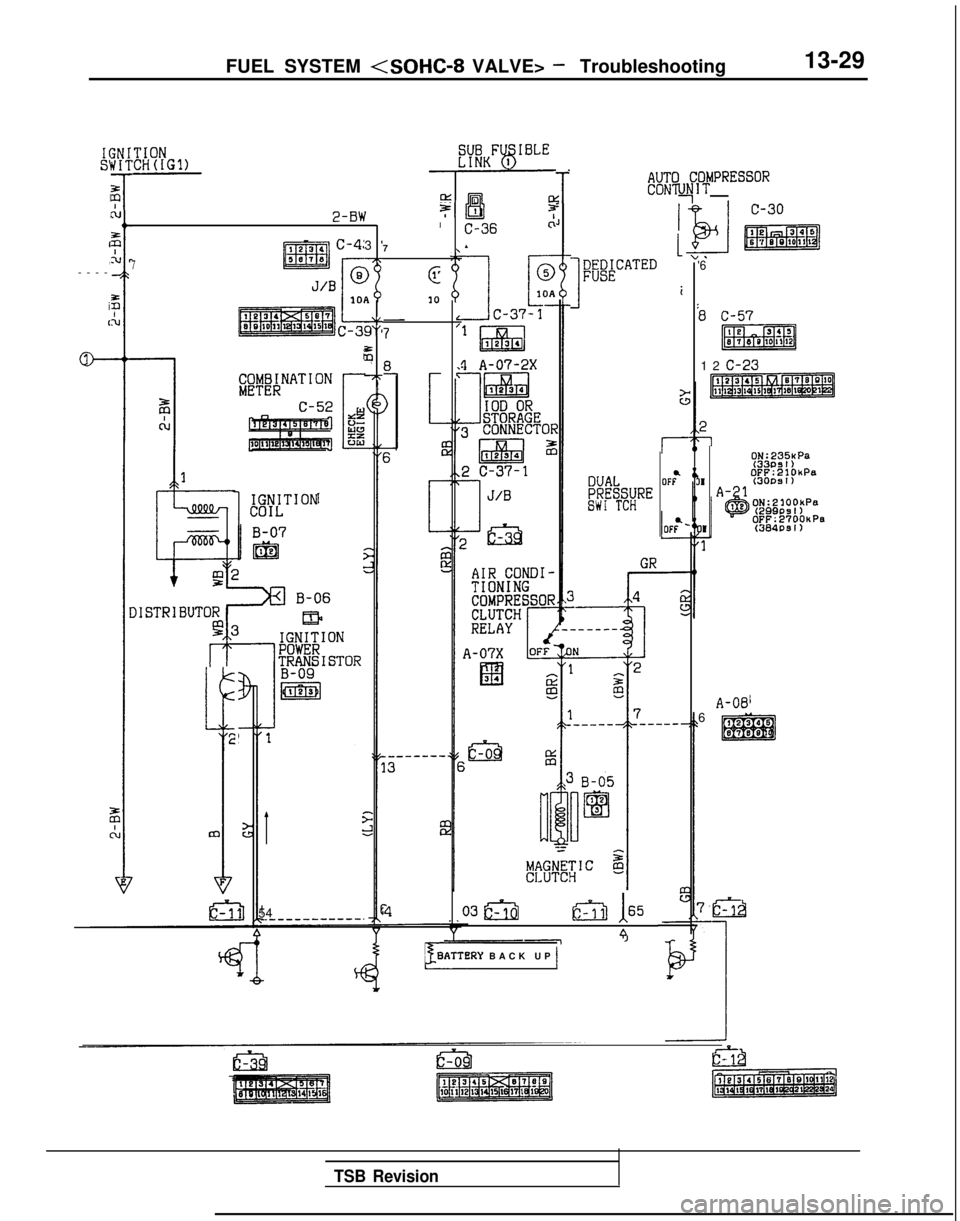
FUEL SYSTEM
13-29
;NIr(IT
zis-N2-BW?I
I
1234 c-4:3 a7
7mlss7.3 -77
J/BGi>
I
@
101RIO
2‘c-39'0
5
77
I,
r
,---
-
i
r
AUTO COMPRESSORCONTROLUYIT ITqIf3Cl36
5
c:
'61
I
!aACATEDi
b c-57
f?J%aq
12
C-23
1
IGNITIONCOIL
? A-07-2X i4
ON:235uPa
" A-21
l%M;“PaDUALOF:PRESSURESW1 TCH
2
rm
A-086
54
-.-----------.0355!j ,1165cd 4
pATTERY BACK UP )1
TSB Revision
Page 172 of 1273
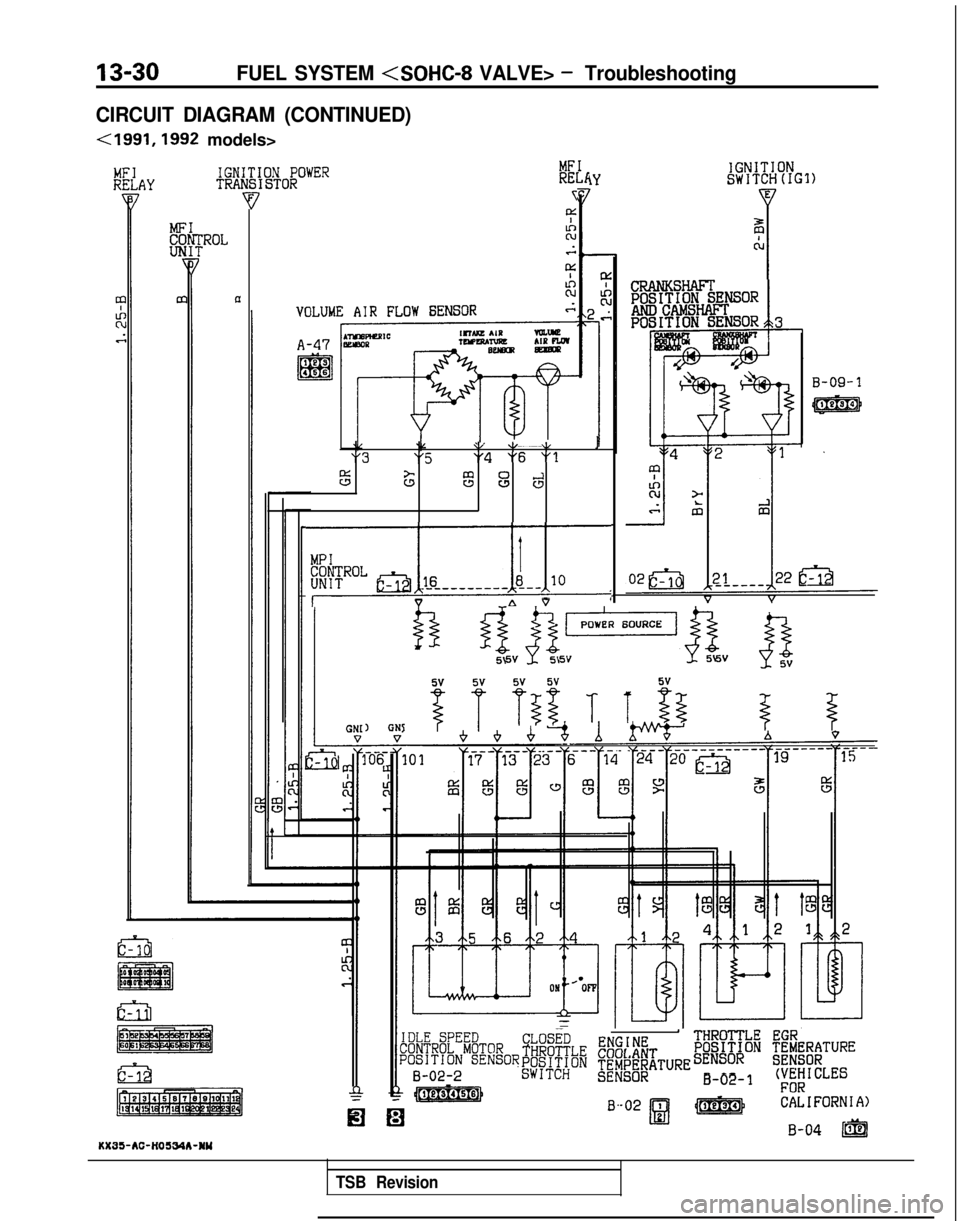
13-30FUEL SYSTEM
CIRCUIT DIAGRAM (CONTINUED)
<1991,1992 models>
IGNITIONSWITCH(IG1)IGNITION POWERTRANSISTOR
FROL
91
\lxI
z;.
F
R
VOLUME AIR FLOW SENSORs
LYAYE
z m
1
rl
\I\I/ ,,I"3"5"4 "6 "1
E
stz
8
d
j,
Y4Y (
gj ~~p=q~ @
5v5v5v
) f $ T$z T T $5$ $GNI
CLOSED'
THROTTLE :;:/,fT
THROTTLE EGRPOSITION ;;;;!;TURE
@~#ON ~&~~~~ATUREsENSoRB-02-1(VEHICLESFOR
B-02
1 4-1RI
CALIFORNIA)
B-04 /@KX35-AC-HOSWA-NY
TSB Revision
Page 173 of 1273
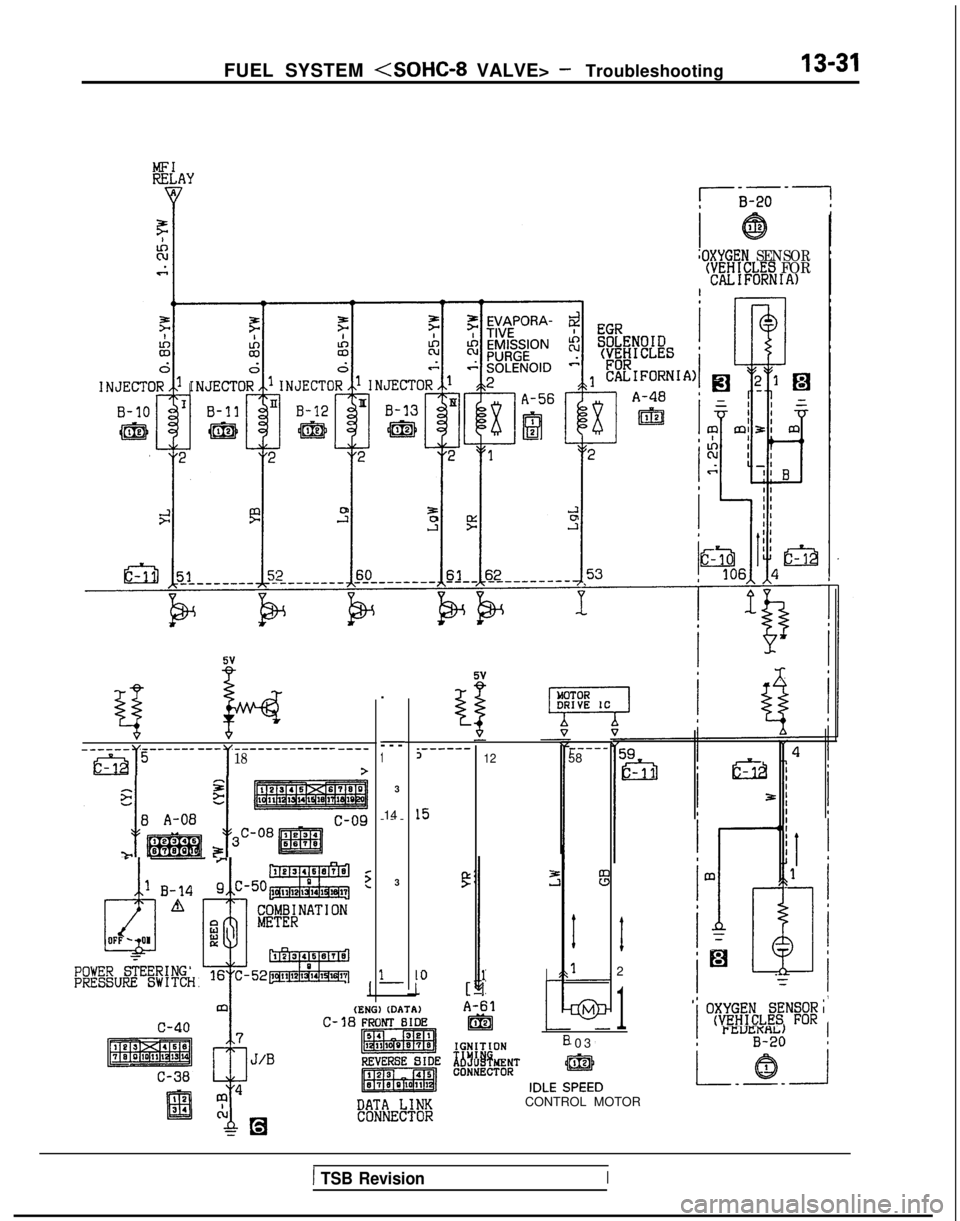
FUEL SYSTEM
MFIRELAY
IIOXYGEN SENSOR(VEHICLES FORCALIFORNIA)
g k______ -___----__ -------------
mlI
----518>
EF
!, -I
s A-08c-09
f@p&g~,,-yg@
POWER STEERINGPRESSURE SWITCH
.
---
-
1
3
14
--
-
3
1-
I
_------3
15
P
10
I [
12 t-----58
(ENG)
(DATA)
c-40-0
3
1
2
1
C-38
DATA LINKCONTROL MOTORCONNECTOR
' OXYGEN SENSOR'(VEHICLES FOR
1 TSB RevisionI
Page 174 of 1273
13-32
FUEL SYSTEM
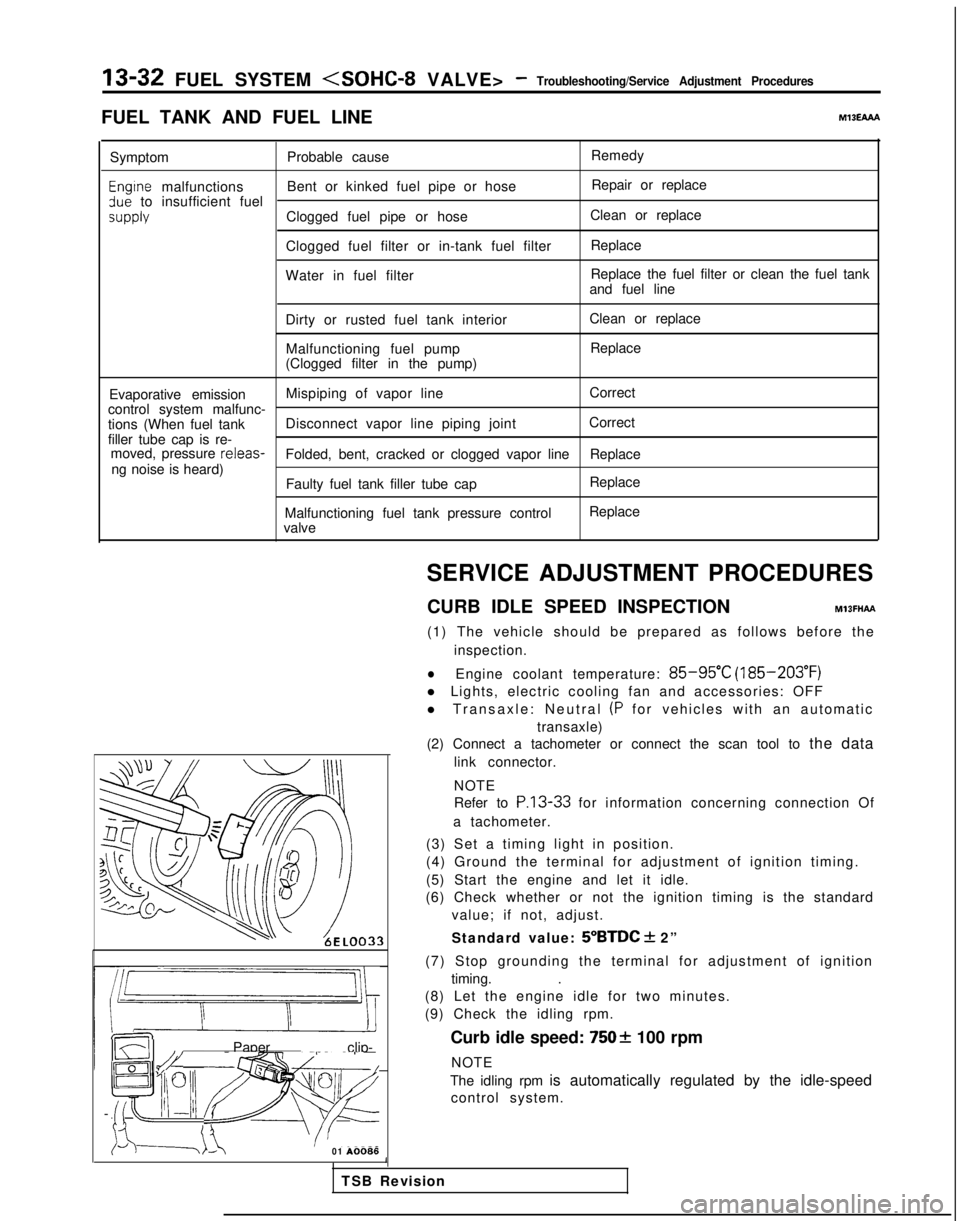
FUEL TANK AND FUEL LINEMlBEAAA
Symptom Probable cause Remedy
Engtne malfunctions
Bent or kinked fuel pipe or hose Repair or replace3ue to insufficient fuel
SUPPlYClogged fuel pipe or hoseClean or replace
Clogged fuel filter or in-tank fuel filter Replace
Water in fuel filter Replace the fuel filter or clean the fuel tank
and fuel line
Dirty or rusted fuel tank interior Malfunctioning fuel pump
(Clogged filter in the pump) Clean or replace
Replace
Evaporative emission Mispiping of vapor line
Correct
control system malfunc-
tions (When fuel tank Disconnect vapor line piping joint Correct
filler tube cap is re- moved, pressure releas-
Folded, bent, cracked or clogged vapor line Replace
ng noise is heard) Faulty fuel tank filler tube cap
Malfunctioning fuel tank pressure control
valve Replace
Replace
LL
m ~~ : Paper clip-
F l!;“I /yFp- -
izd--_7-01
A0086SERVICE ADJUSTMENT PROCEDURES
CURB IDLE SPEED INSPECTION
MlBFHAFt
(1) The vehicle should be prepared as follows before the inspection.
lEngine coolant temperature: 85-95°C (185-203°F)
l Lights, electric cooling fan and accessories: OFF
l Transaxle: Neutral
(P for vehicles with an automatic
transaxle)
(2) Connect a tachometer or connect the scan tool to the data
link connector.
NOTE
Refer to
P.13-33 for information concerning connection Of
a tachometer.
(3) Set a timing light in position.
(4) Ground the terminal for adjustment of ignition timing.
(5) Start the engine and let it idle.
(6) Check whether or not the ignition timing is the standard
value; if not, adjust.
Standard value:
5”BTDC + 2”
(7) Stop grounding the terminal for adjustment of ignition timing. .
(8) Let the engine idle for two minutes.
(9) Check the idling rpm.
Curb idle speed:
7502 100 rpm
NOTE
The idling rpm is automatically regulated by the idle-speed control system.
1
TSB Revision
Page 175 of 1273
FUEL SYSTEM
For a female
pin
For a male pin
(insert at side (Insert at lock tab side.,
opposite from lock tab.)
OlLO246
(10)lf not within the standard value range, refer to the CHECK
CHART CLASSIFIED BY PROBLEM SYMPTOMS and check the
MFI component.
BASIC IDLE SPEED ADJUSTMENT
MlBFHBA
(1) The vehicle should be prepared as follows before the inspection and adjustment.
l Engine coolant temperature:
85-95°C (185-205°F)
l Lights, electric cooling fan and accessories: OFF
l Transaxle: Neutral
(P for vehicles with an automatic
transaxle)
(2) Slacken the accelerator cable enough.
(3) Connect the scan tool to the data link connector (white).
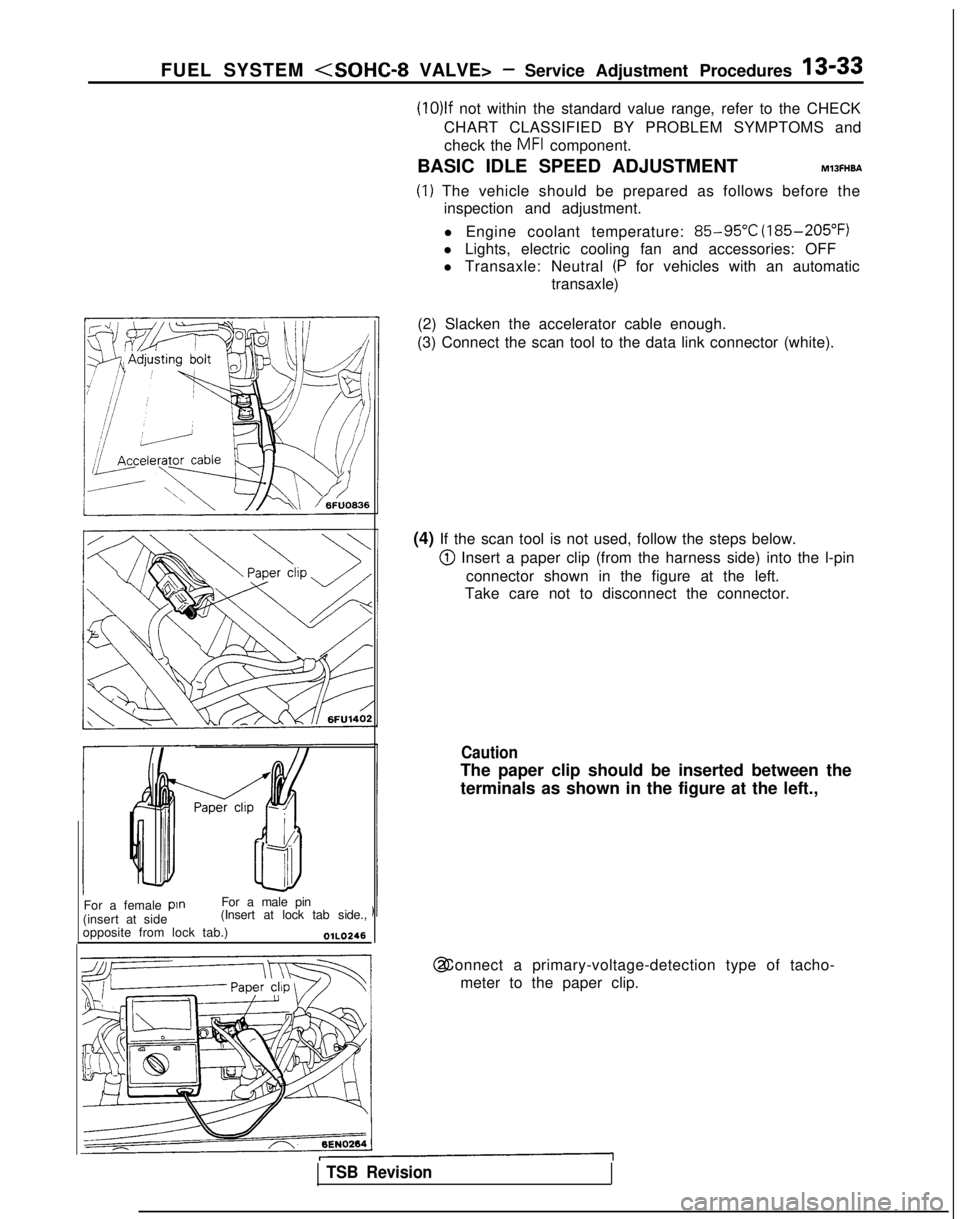
(4) If the scan tool is not used, follow the steps below.
@I Insert a paper clip (from the harness side) into the l-pin connector shown in the figure at the left.
Take care not to disconnect the connector.
Caution
The paper clip should be inserted between the
terminals as shown in the figure at the left., @ Connect a primary-voltage-detection type of tacho-
meter to the paper clip.
TSB Revision
Page 176 of 1273
13-34 FUEL SYSTEM
(5) Switch ON the ignition switch (but do not start the engine)and leave as if for 15 seconds or longer.
NOTE
When the ignition switch is switched ON, the idle speed
control plunger extends to the fast-idle opening degree,
and, after 15 seconds have passed, contracts to the initialposition and stops there.
Initial position: the suitable idling position at which the idle speed control motor position sensor output
voltage is
0.9V.
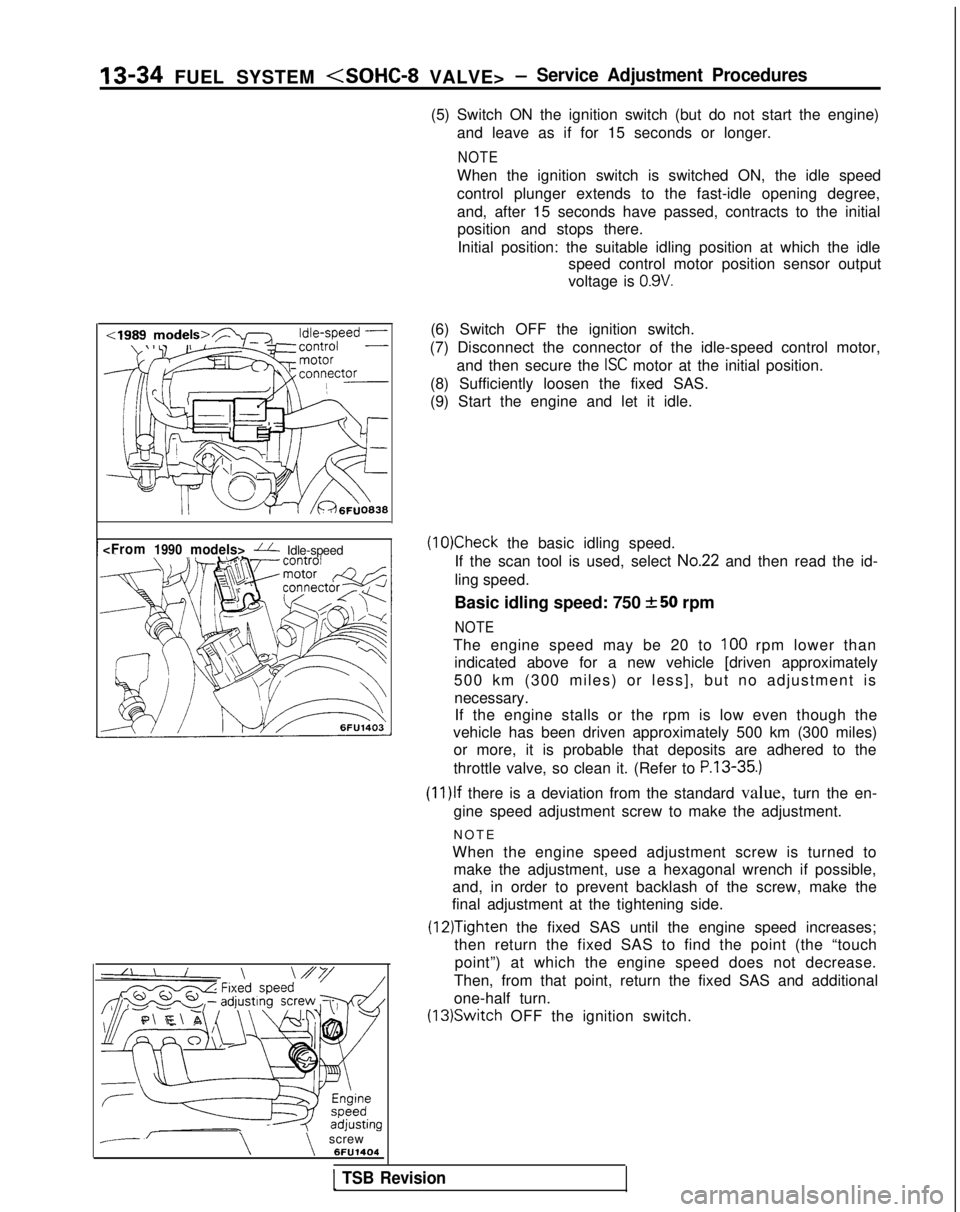
--\\screw 6FU1404(6) Switch OFF the ignition switch.
(7) Disconnect the connector of the idle-speed control motor, and then secure the
ISC motor at the initial position.
(8) Sufficiently loosen the fixed SAS.
(9) Start the engine and let it idle.
(10)Check the basic idling speed.
If the scan tool is used, select
No.22 and then read the id-
ling speed.
Basic idling speed: 750
+-50 rpm
NOTE
The engine speed may be 20 to 100 rpm lower than
indicated above for a new vehicle [driven approximately
500 km (300 miles) or less], but no adjustment is necessary.If the engine stalls or the rpm is low even though the
vehicle has been driven approximately 500 km (300 miles) or more, it is probable that deposits are adhered to the
throttle valve, so clean it. (Refer to
P.13-35.)
(1l)lf there is a deviation from the standard value, turn the en-
gine speed adjustment screw to make the adjustment.
NOT
E
When the engine speed adjustment screw is turned to make the adjustment, use a hexagonal wrench if possible,
and, in order to prevent backlash of the screw, make the
final adjustment at the tightening side.
(12)Tighten the fixed SAS until the engine speed increases;
then return the fixed SAS to find the point (the “touch
point”) at which the engine speed does not decrease.
Then, from that point, return the fixed SAS and additional
one-half turn. (13)Switch
OFF the ignition switch.
1 TSB Revision
Page 177 of 1273
FUEL SYSTEM
(14)Adjust the play of the accelerator cable. (Refer to P.13-
329.)
(15)Connect the idle-speed control motor’s connector.
(16)Adjust the throttle-position sensor.
(17)Start the engine again and let it run at idle speed for about
ten minutes; check to be sure that the idling condition is
normal.
THROTTLE BODY (THROTTLE VALVE AREA)
CLEANING
MllFlCK
(1)Start the engine and warm it up until the temperature of the
engine coolant reaches
80°C (176°F) or higher; then stop
the engine.
(2) Disconnect the air intake hose at the throttle body side.
(3) Spray cleaning liquid (from the intake port of the throttle body) onto the valve, and then leave as is for about fiveminutes.
(4) Start the engine and race it a few times; then let it run at idle speed for about one minute.
NOTE
If the engine idling speed is unstable (or the engine stalls),
let the engine run with the throttle valve slightly open.
(5) If deposits are not removed from the throttle valve, repeat steps (3) and (4).
(6) Connect the air intake hose.
(7) Using the scan tool, erase the diagnostic trouble code, or disconnect the battery’s ground cable for ten seconds orlonger and then reconnect it.
(8) Adjust the basic idle speed (engine speed adjusting screw). (Refer to
P.13-33.)
(9) Adjust the throttle position sensor.
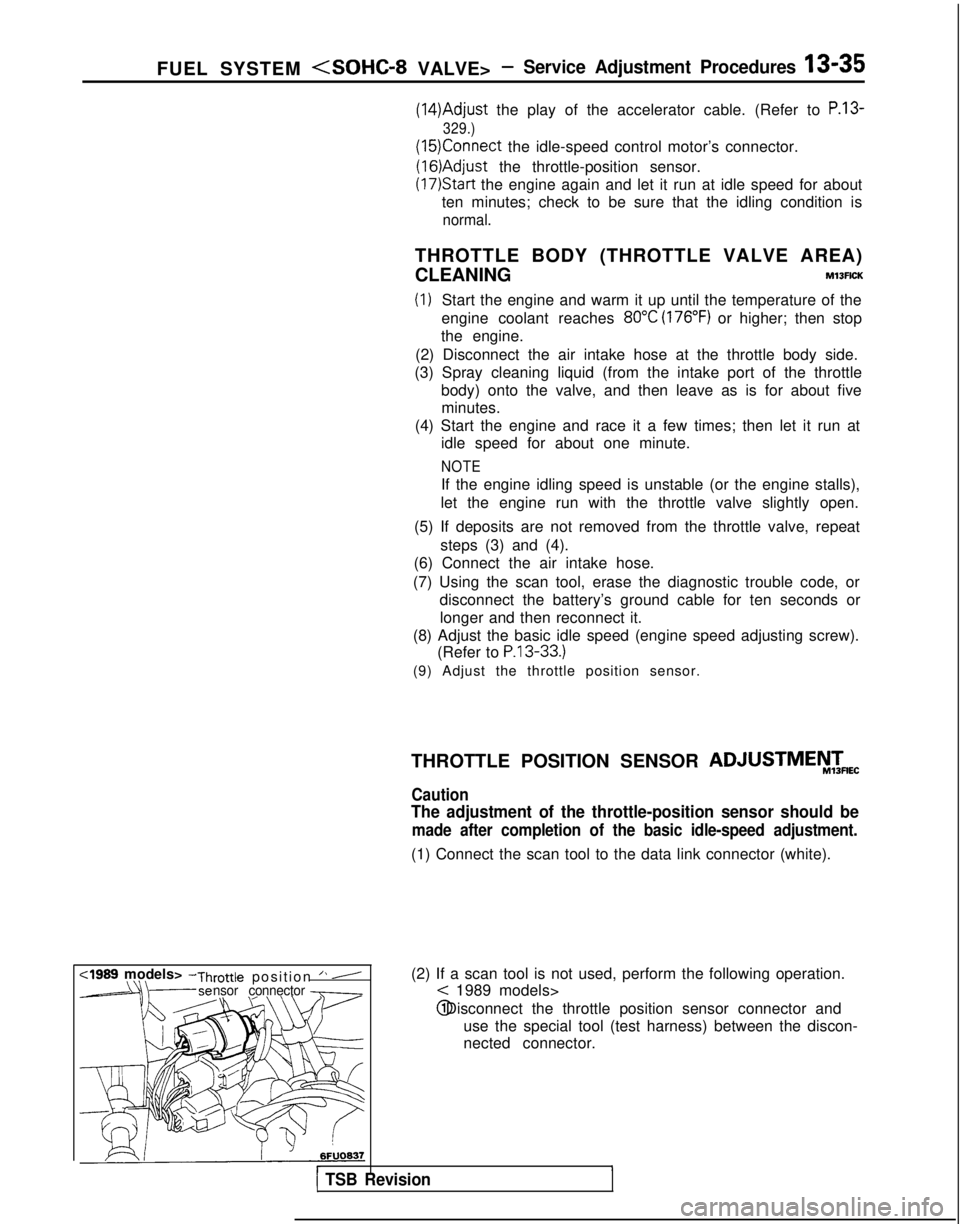
(2) If a scan tool is not used, perform the following operation.
< 1989 models> @ Disconnect the throttle position sensor connector and
use the special tool (test harness) between the discon-
nected connector.
r1 TSB Revision
THROTTLE POSITION SENSOR ADJUSTMEiW&
Caution
The adjustment of the throttle-position sensor should be
made after completion of the basic idle-speed adjustment.
(1) Connect the scan tool to the data link connector (white).
,
Page 178 of 1273
13-36 FUEL SYSTEM
:I989 models>
M
D9684783FUO179
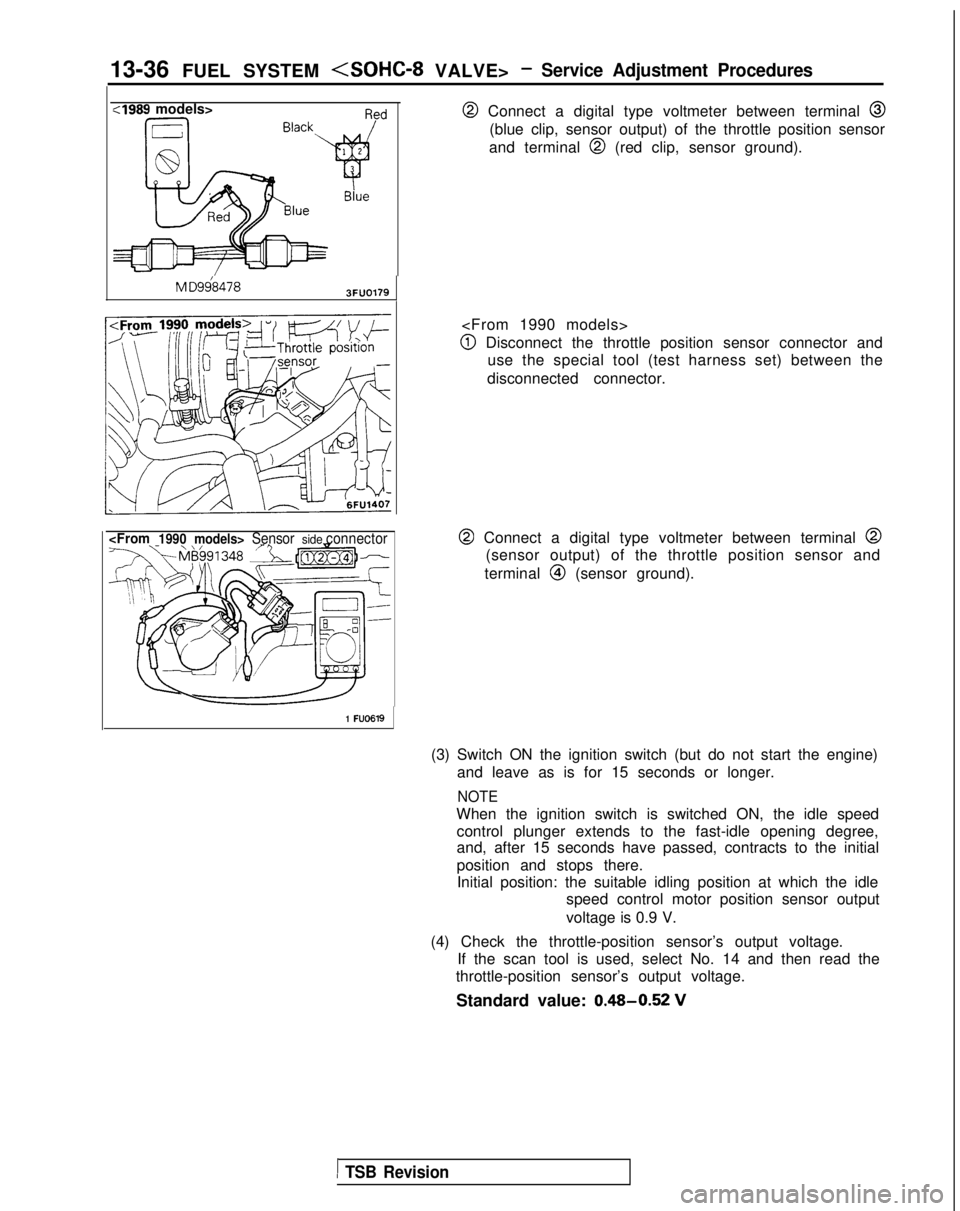
@ Connect a digital type voltmeter between terminal @
(blue clip, sensor output) of the throttle position sensor
and terminal
@I (red clip, sensor ground).
@I Disconnect the throttle position sensor connector and use the special tool (test harness set) between the
disconnected connector.
@ Connect a digital type voltmeter between terminal @
(sensor output) of the throttle position sensor and
terminal
@I (sensor ground).
1 FU0619
(3) Switch ON the ignition switch (but do not start the engine) and leave as is for 15 seconds or longer.
NOTE
When the ignition switch is switched ON, the idle speedcontrol plunger extends to the fast-idle opening degree,
and, after 15 seconds have passed, contracts to the initial
position and stops there.Initial position: the suitable idling position at which the idle speed control motor position sensor output
voltage is 0.9 V.
(4) Check the throttle-position sensor’s output voltage. If the scan tool is used, select No. 14 and then read the
throttle-position sensor’s output voltage.
Standard value: 0.48-0.52
V
1 TSB Revision
Page 179 of 1273
FUEL SYSTEM (SOHC-8 VALVE> -Service Adjustment Procedures 13-37
MO-L
6FU1405
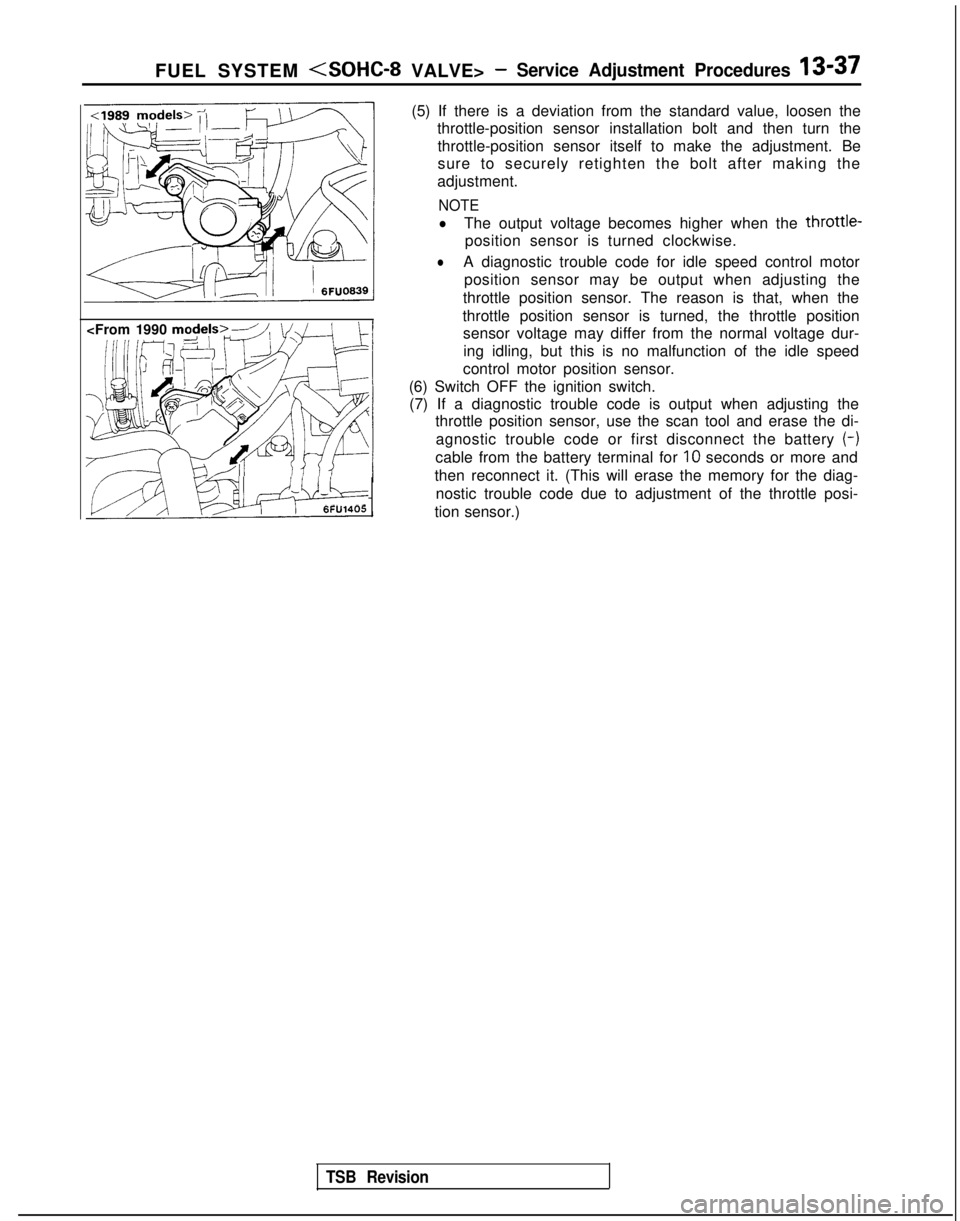
(5) If there is a deviation from the standard value, loosen the
throttle-position sensor installation bolt and then turn the
throttle-position sensor itself to make the adjustment. Be
sure to securely retighten the bolt after making the
adjustment.
NOTE
lThe output voltage becomes higher when the throttle-
position sensor is turned clockwise.
lA diagnostic trouble code for idle speed control motor position sensor may be output when adjusting the
throttle position sensor. The reason is that, when the
throttle position sensor is turned, the throttle position sensor voltage may differ from the normal voltage dur-
ing idling, but this is no malfunction of the idle speed
control motor position sensor.
(6) Switch OFF the ignition switch. (7) If a diagnostic trouble code is output when adjusting the throttle position sensor, use the scan tool and erase the di-
agnostic trouble code or first disconnect the battery (-)
cable from the battery terminal for IO
seconds or more and
then reconnect it. (This will erase the memory for the diag- nostic trouble code due to adjustment of the throttle posi-
tion sensor.)
TSB Revision
Page 180 of 1273
13-38
FUEL SYSTEM
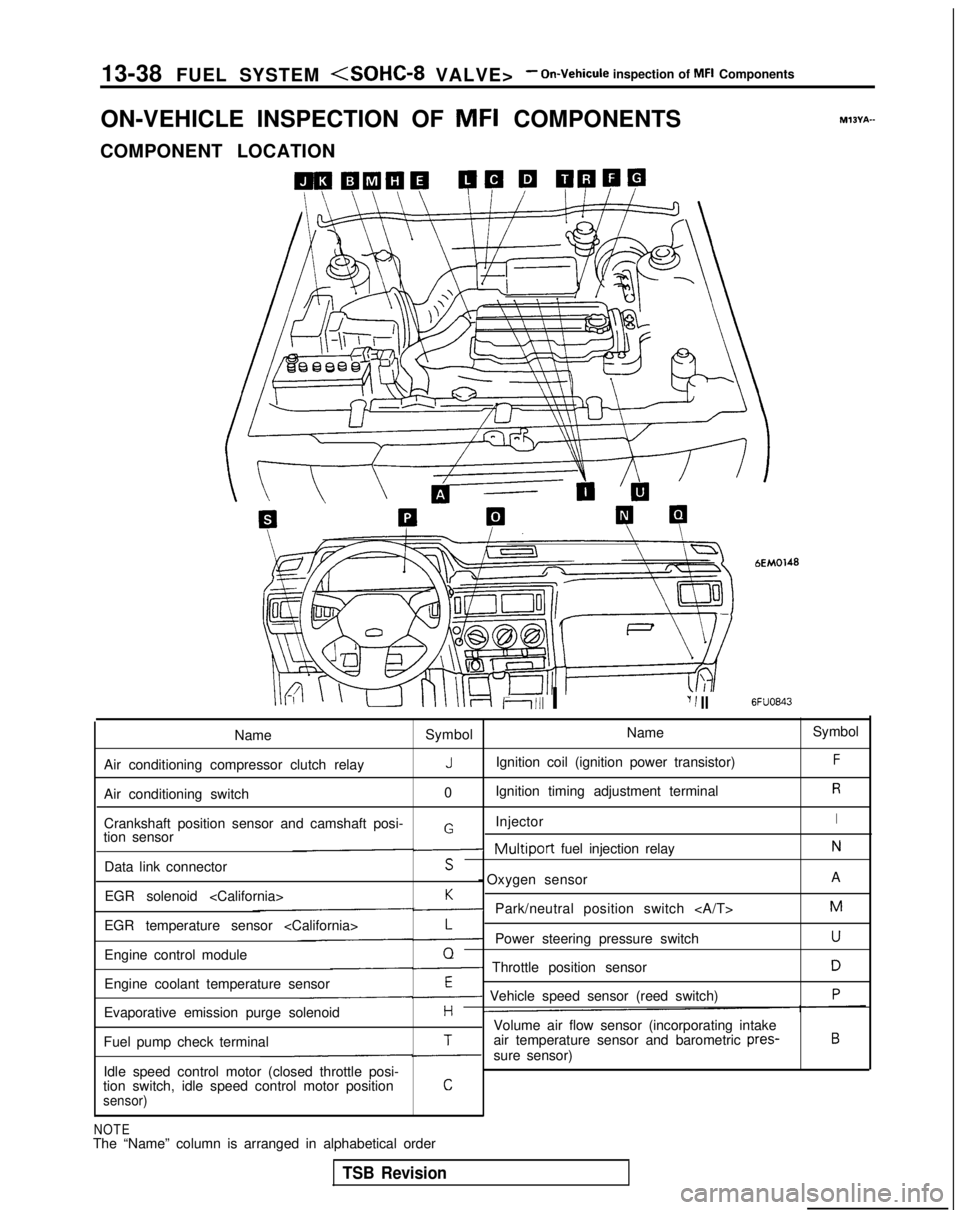
ON-VEHICLE INSPECTION OF MFI
COMPONENTS
COMPONENT LOCATION
Ii111 I‘I 1 II
bEM0148
6FUO843
M?BYA-
Name Symbol Name
Symbol
Air conditioning compressor clutch relay
JIgnition coil (ignition power transistor)F
Air conditioning switch 0Ignition timing adjustment terminalR
Crankshaft position sensor and camshaft posi- InjectorIGtion sensor-Multiport fuel injection relayN
Data link connectorS - Oxygen sensor
A
EGR solenoid
K-Park/neutral position switch M
EGR temperature sensor
L-Power steering pressure switchU
Engine control moduleQ- Throttle position sensorD
Engine coolant temperature sensorE- Vehicle speed sensor (reed switch)P
Evaporative emission purge solenoidHVolume air flow sensor (incorporating intake
Fuel pump check terminalTair temperature sensor and barometric pres-B
-sure sensor)
Idle speed control motor (closed throttle posi-
tion switch, idle speed control motor position
Csensor)
NOTEThe “Name” column is arranged in alphabetical order
TSB Revision