MITSUBISHI GALANT 1989 Service Repair Manual
Manufacturer: MITSUBISHI, Model Year: 1989, Model line: GALANT, Model: MITSUBISHI GALANT 1989Pages: 1273, PDF Size: 37.62 MB
Page 791 of 1273
AUTOMATIC TRANSAXLE - Service Adjustment Procedures23-85
ection A-A09*0111
Switch body
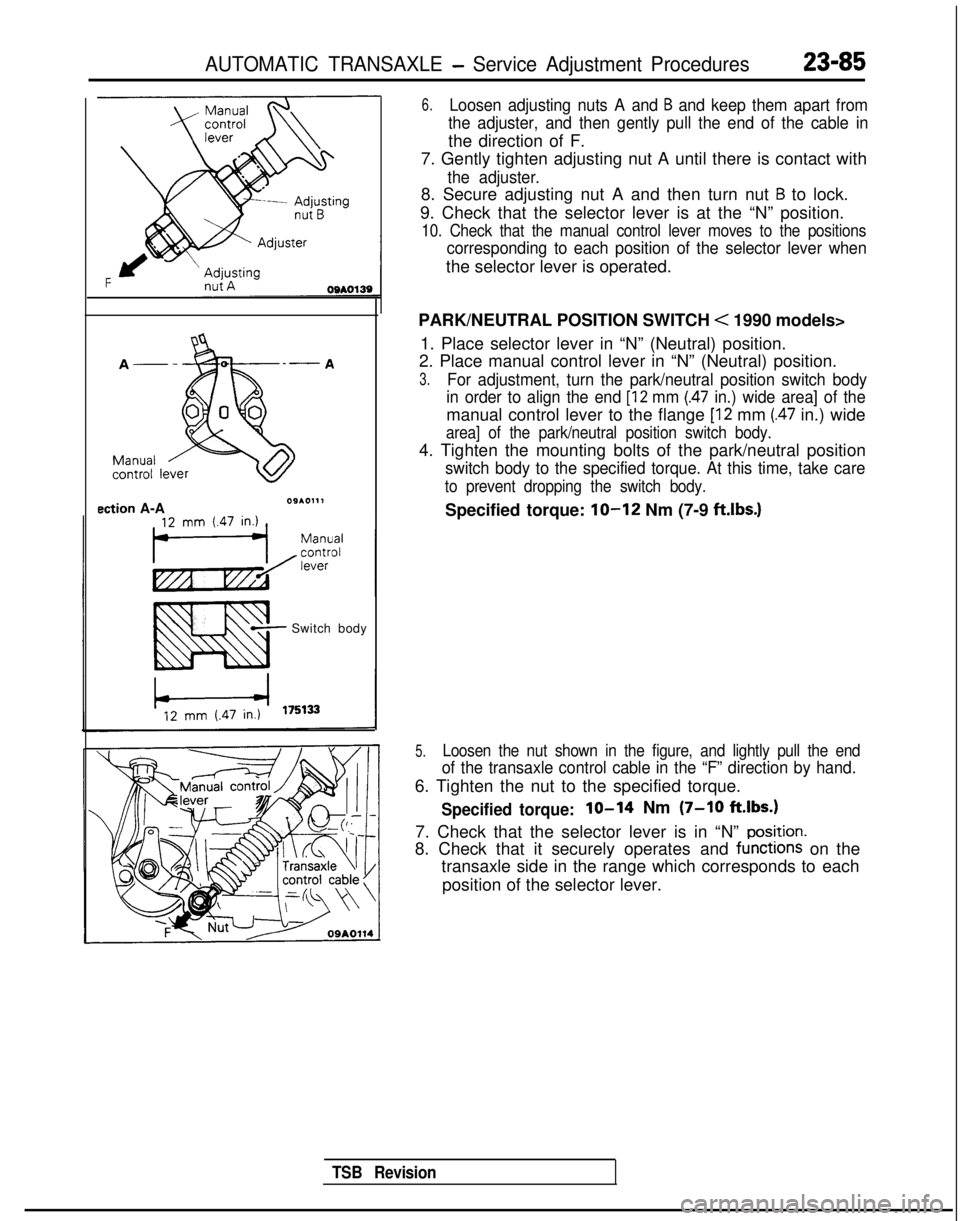
6.Loosen adjusting nuts A and B and keep them apart from
the adjuster, and then gently pull the end of the cable in
the direction of F.
7. Gently tighten adjusting nut A until there is contact with
the adjuster.
8. Secure adjusting nut A and then turn nut B to lock.
9. Check that the selector lever is at the “N” position.
10. Check that the manual control lever moves to the positions
corresponding to each position of the selector lever when
the selector lever is operated.
PARK/NEUTRAL POSITION SWITCH
< 1990 models>
1. Place selector lever in “N” (Neutral) position.
2. Place manual control lever in “N” (Neutral) position.
3.For adjustment, turn the park/neutral position switch body
in order to align the end
[12 mm (.47 in.) wide area] of the
manual control lever to the flange [I2 mm (.47 in.) wide
area] of the park/neutral position switch body.
4. Tighten the mounting bolts of the park/neutral position
switch body to the specified torque. At this time, take care
to prevent dropping the switch body.
Specified torque: lo-12 Nm (7-9 ft.lbs.)
5.Loosen the nut shown in the figure, and lightly pull the end
of the transaxle control cable in the “F” direction by hand.
6. Tighten the nut to the specified torque.
Specified torque:lo-14 Nm (7-10 ft.lbs.)
7. Check that the selector lever is in “N” po?ition.
8. Check that it securely operates and functions on the
transaxle side in the range which corresponds to each
position of the selector lever.
TSB Revision
Page 792 of 1273
23-86AUTOMATIC TRANSAXLE -Service Adjustment Procedures
09A0179control lever
control lever
5 mm
Section A-A i.2 in.)Manual
Switch body
175133
,PARK/NEUTRAL POSITION SWITCH
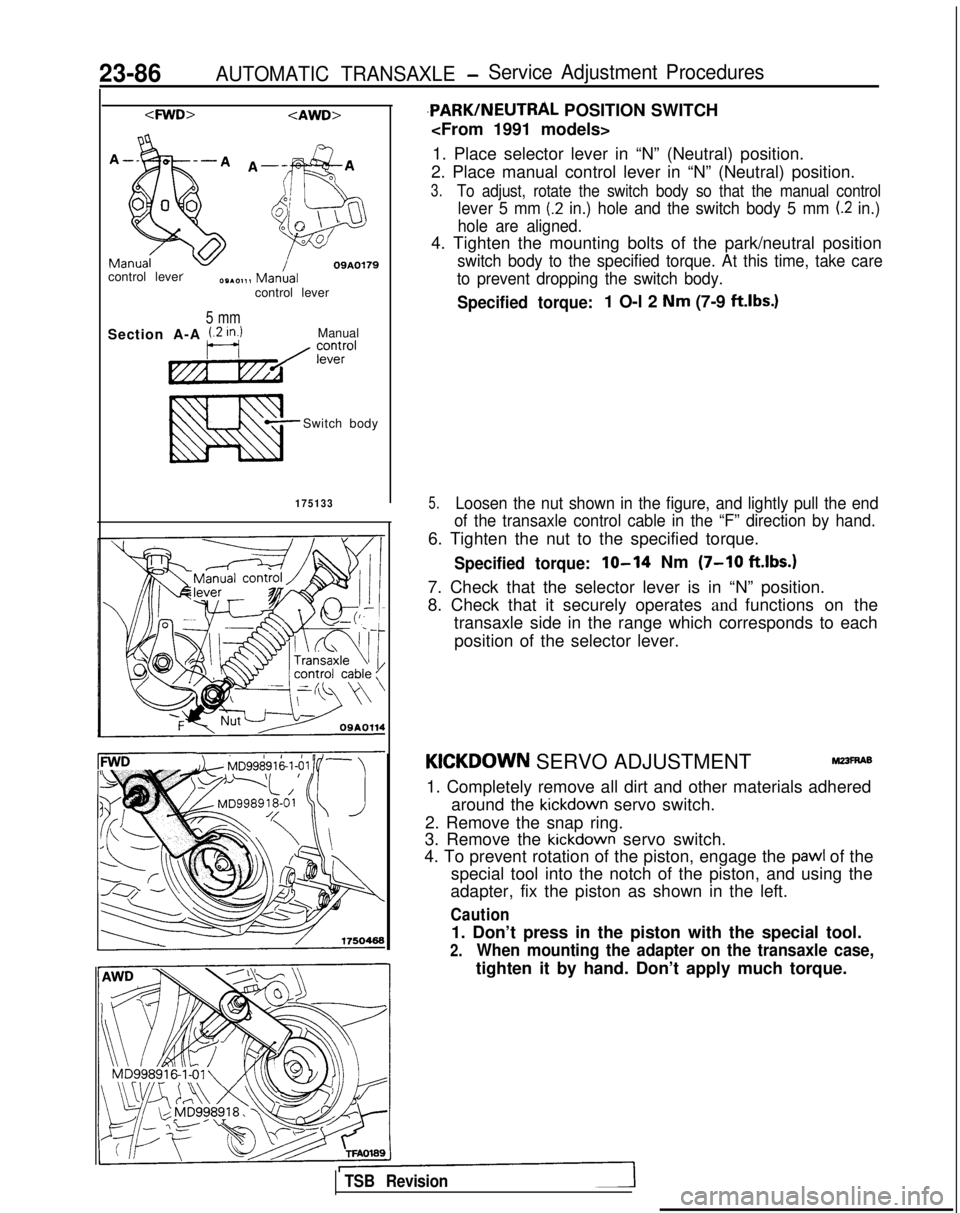
1. Place selector lever in “N” (Neutral) position.
2. Place manual control lever in “N” (Neutral) position.
3.To adjust, rotate the switch body so that the manual control
lever 5 mm (.2 in.) hole and the switch body 5 mm (.2 in.)
hole are aligned.
4. Tighten the mounting bolts of the park/neutral position
switch body to the specified torque. At this time, take care
to prevent dropping the switch body.
Specified torque:1 O-l 2 Nm (7-9 ftlbs.)
5.Loosen the nut shown in the figure, and lightly pull the end
of the transaxle control cable in the “F” direction by hand.
6. Tighten the nut to the specified torque.
Specified torque:lo-14 Nm (7-10 ft.lbs.1
7. Check that the selector lever is in “N” position.
8. Check that it securely operates and functions on the
transaxle side in the range which corresponds to each
position of the selector lever.
KICKDOWN SERVO ADJUSTMENTr&?3~6
1. Completely remove all dirt and other materials adhered around the
kickdown servo switch.
2. Remove the snap ring.
3. Remove the
kickdown servo switch.
4. To prevent rotation of the piston, engage the
pawl of the
special tool into the notch of the piston, and using the
adapter, fix the piston as shown in the left.
Caution
1. Don’t press in the piston with the special tool.
2.When mounting the adapter on the transaxle case,
tighten it by hand. Don’t apply much torque.
TSB Revision
Page 793 of 1273
AUTOMATIC TRANSAXLE - Service Adjustment Procedures23-87
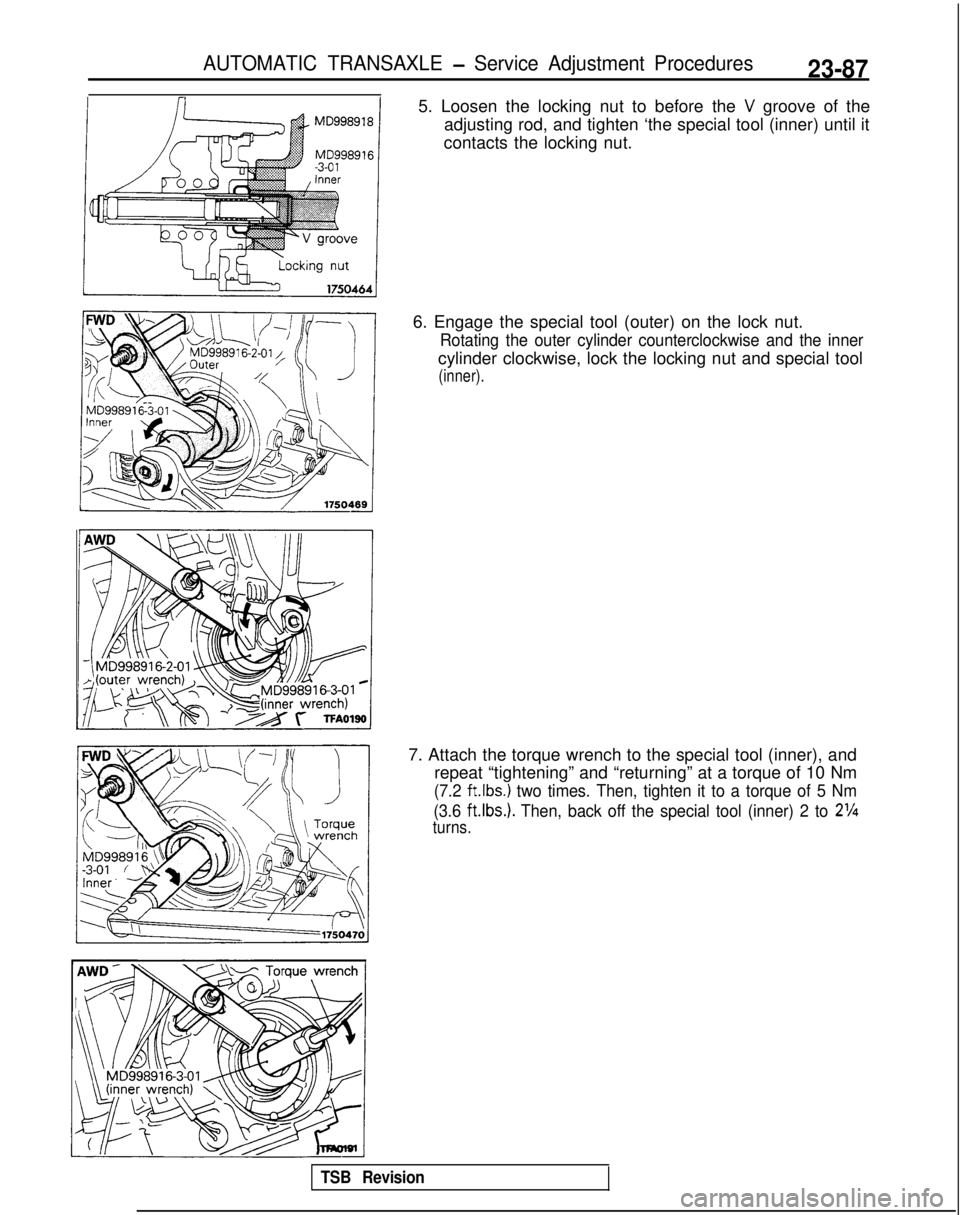
5. Loosen the locking nut to before the V groove of the
adjusting rod, and tighten ‘the special tool (inner) until it
contacts the locking nut.
6. Engage the special tool (outer) on the lock nut.
Rotating the outer cylinder counterclockwise and the inner
cylinder clockwise, lock the locking nut and special tool
(inner).
7. Attach the torque wrench to the special tool (inner), and repeat “tightening” and “returning” at a torque of 10 Nm
(7.2 ft.lbs.) two times. Then, tighten it to a torque of 5 Nm
(3.6
ft.Ibs.). Then, back off the special tool (inner) 2 to 2%
turns.
TSB Revision
Page 794 of 1273
23-88AUTOMATIC TRANSAXLE - Service Adjustment Procedures
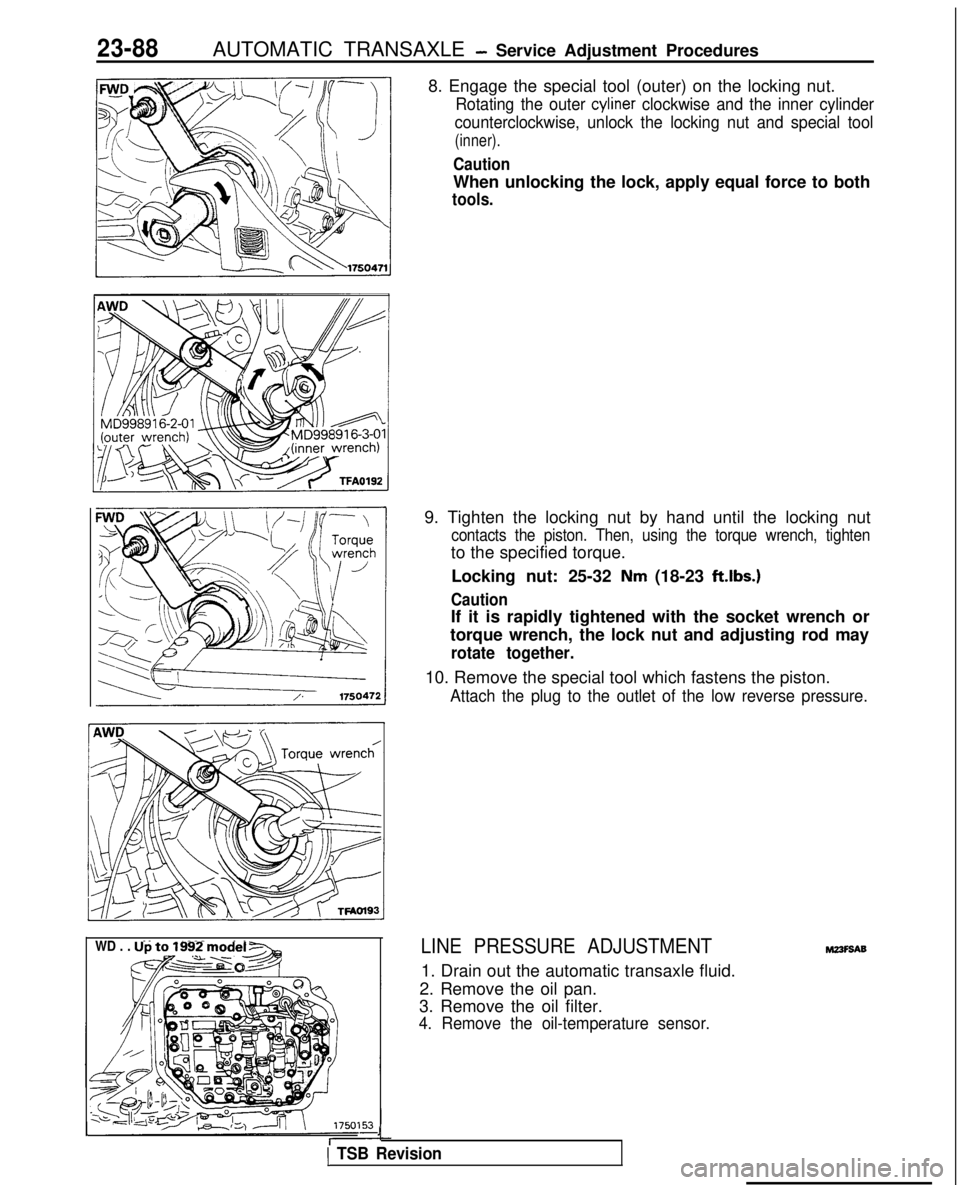
8. Engage the special tool (outer) on the locking nut.
Rotating the outer cyliner clockwise and the inner cylinder
counterclockwise, unlock the locking nut and special tool
(inner).
Caution
When unlocking the lock, apply equal force to both
tools.
WD . . . Up to 1992 model -
&@~o-&q
9. Tighten the locking nut by hand until the locking nut
contacts the piston. Then, using the torque wrench, tighten
to the specified torque.
Locking nut: 25-32
Nm (18-23 ft.lbs.)
Caution
If it is rapidly tightened with the socket wrench or
torque wrench, the lock nut and adjusting rod may
rotate together.
10. Remove the special tool which fastens the piston.
Attach the plug to the outlet of the low reverse pressure.
LINE PRESSURE ADJUSTMENT
1. Drain out the automatic transaxle fluid.
2. Remove the oil pan.
3. Remove the oil filter.
4. Remove the oil-temperature sensor.
J
1 TSB Revision
M23F9A9
Page 795 of 1273
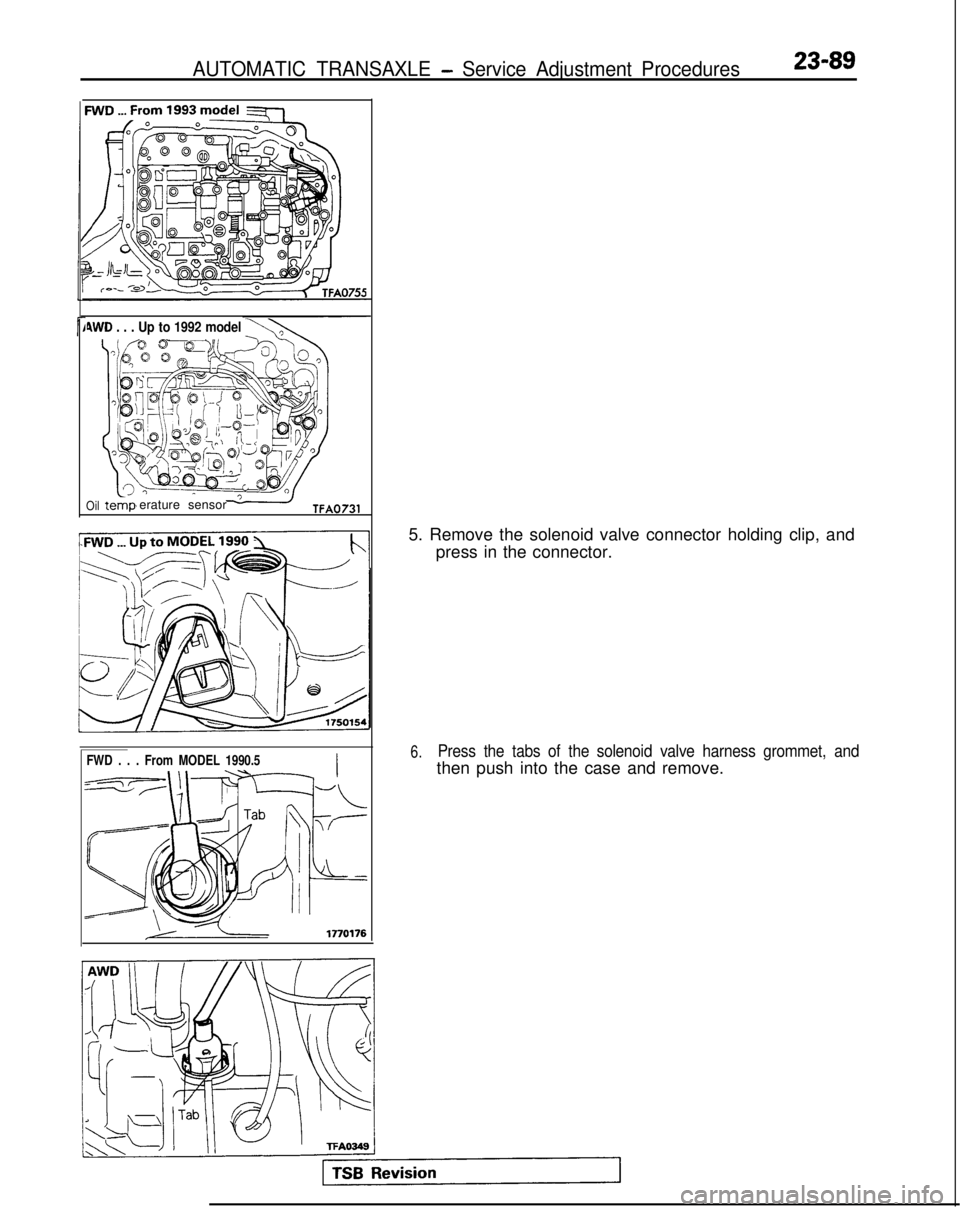
AUTOMATIC TRANSAXLE - Service Adjustment Procedures23-89
4WD . . . Up to 1992 model
Oilerature sensor
FWD . . . From MODEL 1990.5
5. Remove the solenoid valve connector holding clip, andpress in the connector.
6.Press the tabs of the solenoid valve harness grommet, and
then push into the case and remove.
Page 796 of 1273
AUTOMATIC TRANSAXLE - Service Adjustment Procedures
1_DTZii+!ilz$F~
I
\
B
-g----J a
----- .f-
iL (i
&Fgi
Tit\I;; ;gTjqy ?“,,,,,,
FWD . . . Up to MODEL 1990IOil pan gasketsurface
case0
1750435
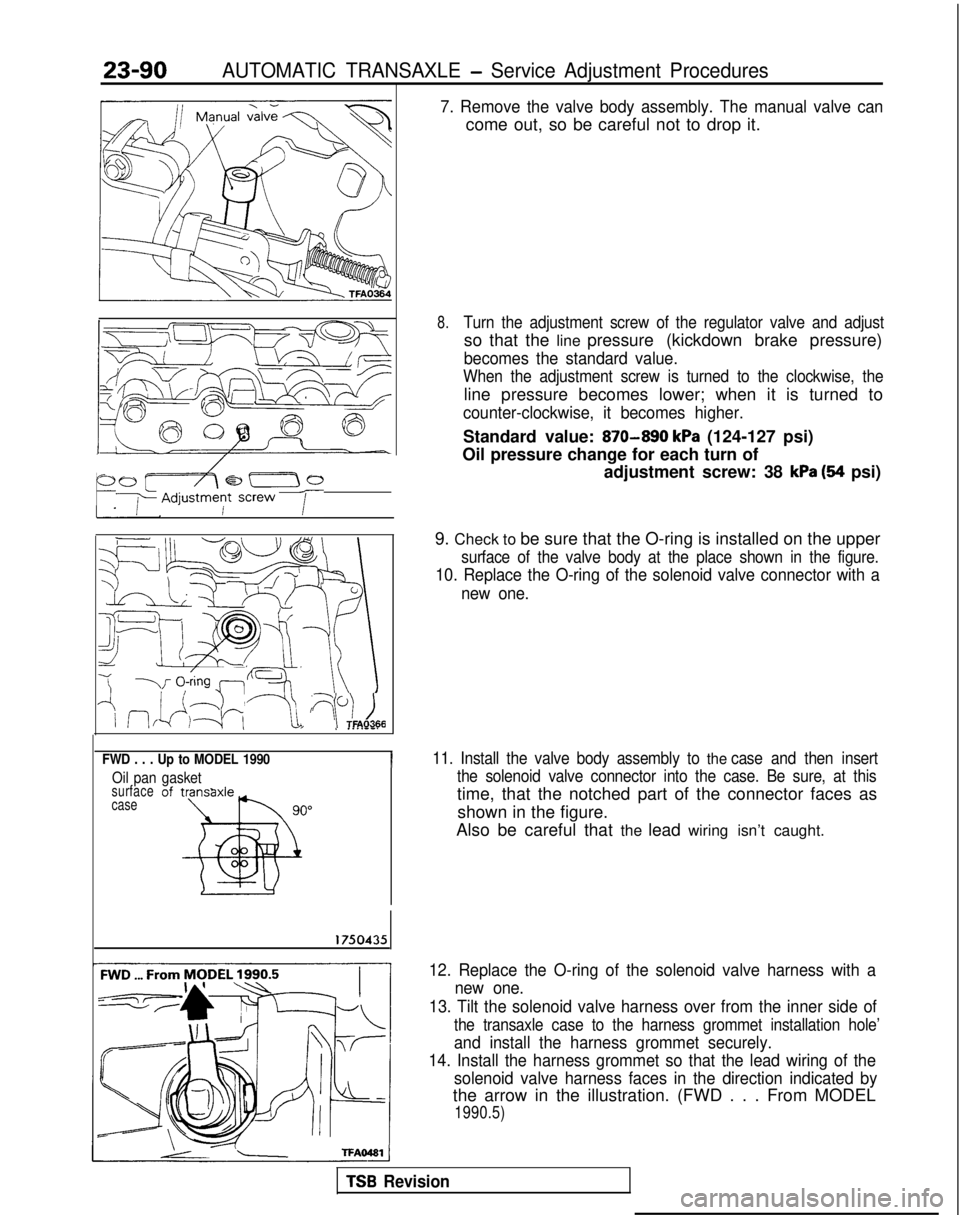
7. Remove the valve body assembly. The manual valve can
come out, so be careful not to drop it.
8.Turn the adjustment screw of the regulator valve and adjust
so that the line pressure (kickdown brake pressure)
becomes the standard value.
When the adjustment screw is turned to the clockwise, the
line pressure becomes lower; when it is turned to
counter-clockwise, it becomes higher.
Standard value: 870-890 kPa (124-127 psi)
Oil pressure change for each turn of adjustment screw: 38
kPa (94 psi)
9. Check to be sure that the O-ring is installed on the upper
surface of the valve body at the place shown in the figure.
10. Replace the O-ring of the solenoid valve connector with a new one.
11. Install the valve body assembly to the case and then insert
the solenoid valve connector into the case. Be sure, at this
time, that the notched part of the connector faces as
shown in the figure.
Also be careful that the lead wiring isn’t caught.
TSB Revision
12. Replace the O-ring of the solenoid valve harness with a new one.
13. Tilt the solenoid valve harness over from the inner side of
the transaxle case to the harness grommet installation hole’
and install the harness grommet securely.
14. Install the harness grommet so that the lead wiring of the solenoid valve harness faces in the direction indicated by
the arrow in the illustration. (FWD . . . From MODEL
1990.5)
Page 797 of 1273
AUTOMATIC TRANSAXLE -Service Adjustment Procedures23-91
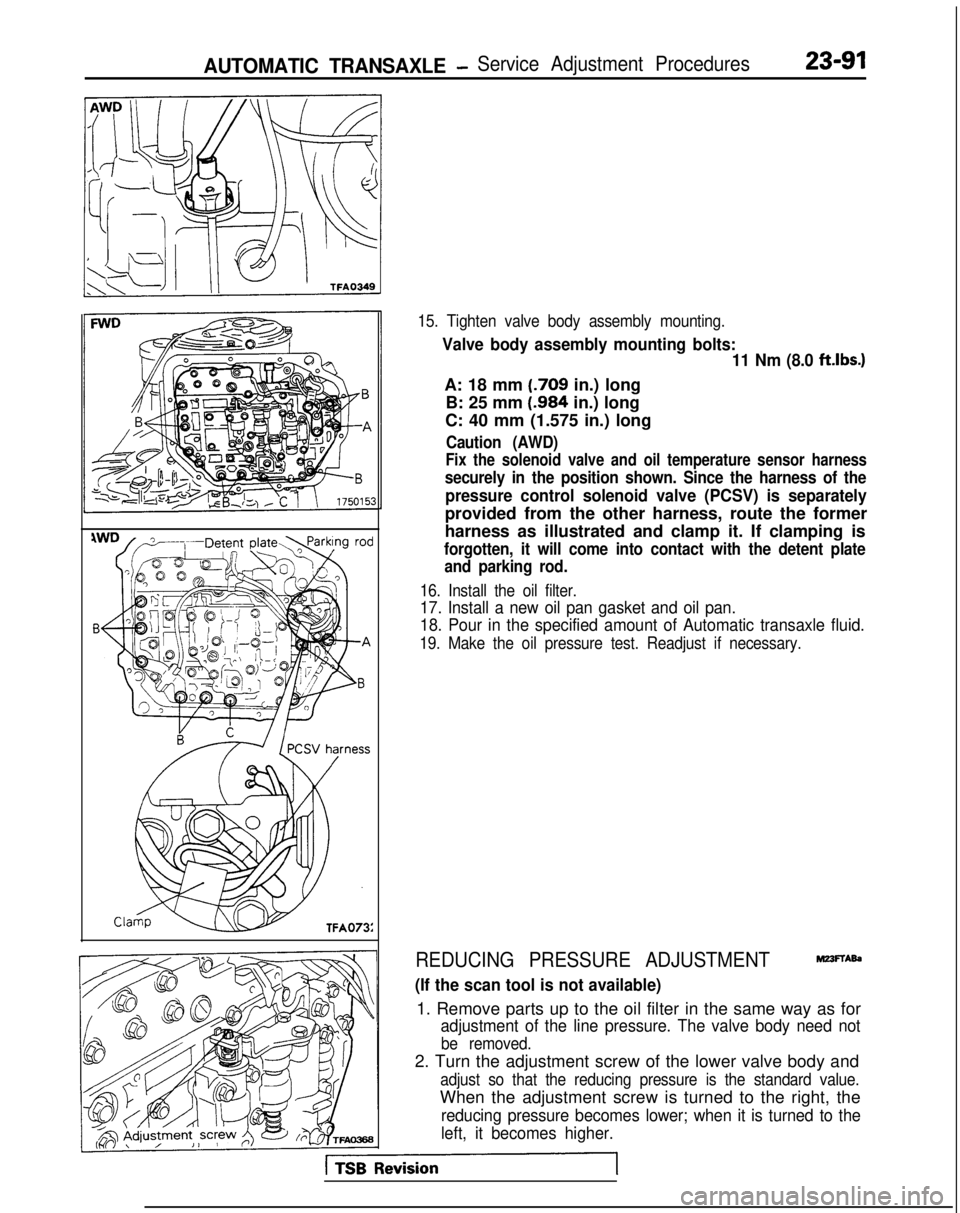
15. Tighten valve body assembly mounting.
Valve body assembly mounting bolts:11 Nm (8.0 ftlbs.)
A: 18 mm (.709
in.) long
B: 25 mm (.984
in.) long
C: 40 mm (1.575 in.) long
Caution (AWD)
Fix the solenoid valve and oil temperature sensor harness
securely in the position shown. Since the harness of the
pressure control solenoid valve (PCSV) is separately
provided from the other harness, route the former
harness as illustrated and clamp it. If clamping is
forgotten, it will come into contact with the detent plate and parking rod.
16. Install the oil filter.
17. Install a new oil pan gasket and oil pan.
18. Pour in the specified amount of Automatic transaxle fluid.
19. Make the oil pressure test. Readjust if necessary.
REDUCING PRESSURE ADJUSTMENTMZ3FTAb
(If the scan tool is not available)
1. Remove parts up to the oil filter in the same way as for
adjustment of the line pressure. The valve body need not
be removed.
2. Turn the adjustment screw of the lower valve body and
adjust so that the reducing pressure is the standard value.
When the adjustment screw is turned to the right, the
reducing pressure becomes lower; when it is turned to the
left, it becomes higher.
Page 798 of 1273
23-92AUTOMATIC TRANSAXLE - Service Adjustment Procedures
NOTE
When adjusting the reducing pressure, aim for the center
value (425 kPa, 60 psi) of the standard value allowance.
Standard value: 415-435
kPa (59-62 psi)
Oil pressure change for each turn of adjustment screw: 22
kPa (3.1 psi) . . . FWD (Up to MODEL 1990)
45
kPa (6.4 psi) . . . FWD (From MODEL 1990.5, AWD)
3. Install the oil filter and oil pan in the same way as for adjustment of the line pressure.
4. Make the oil pressure test. Readjust if necessary.
(If the scan tool is used)
1. Using the scan tool, forcibly drive the pressure control
solenoid valve at 50% duty, and measure the kick-down
brake apply pressure.
If the kick-down brake apply pressure does not exist within
the standard value width, adjust the pressure with the
reducing pressure adjustment screw.
Standard value: 275 + 10 kPa (39 + 1 psi)
Oil pressure change for each turn of adjustment screw:
25 kPa (3.6 psi) FWD (Up to MODEL 1990)
22
kPa (3.1 psi) FWD (From MODEL 1990.5), AWD
2. Check to be sure that the reducing pressure (after the
adjustment is completed) is within the range of 360-480
kPa (51 -68 psi.).
Caution
This adjustment should be made at an oil
temperature
of 70- 80°C
(160- 180°F).
If the adjustment is made at a temperature that is too
high, the line pressure will drop during idling, with the
result that it might not be possible to make the correct
adjustment.
I / Oii
seal09K561
THROTTLE-POSITION SENSOR ADJUSTMEF&
Refer to GROUP 13-On-Vehicle Inspection of MFI Compo-
nents.
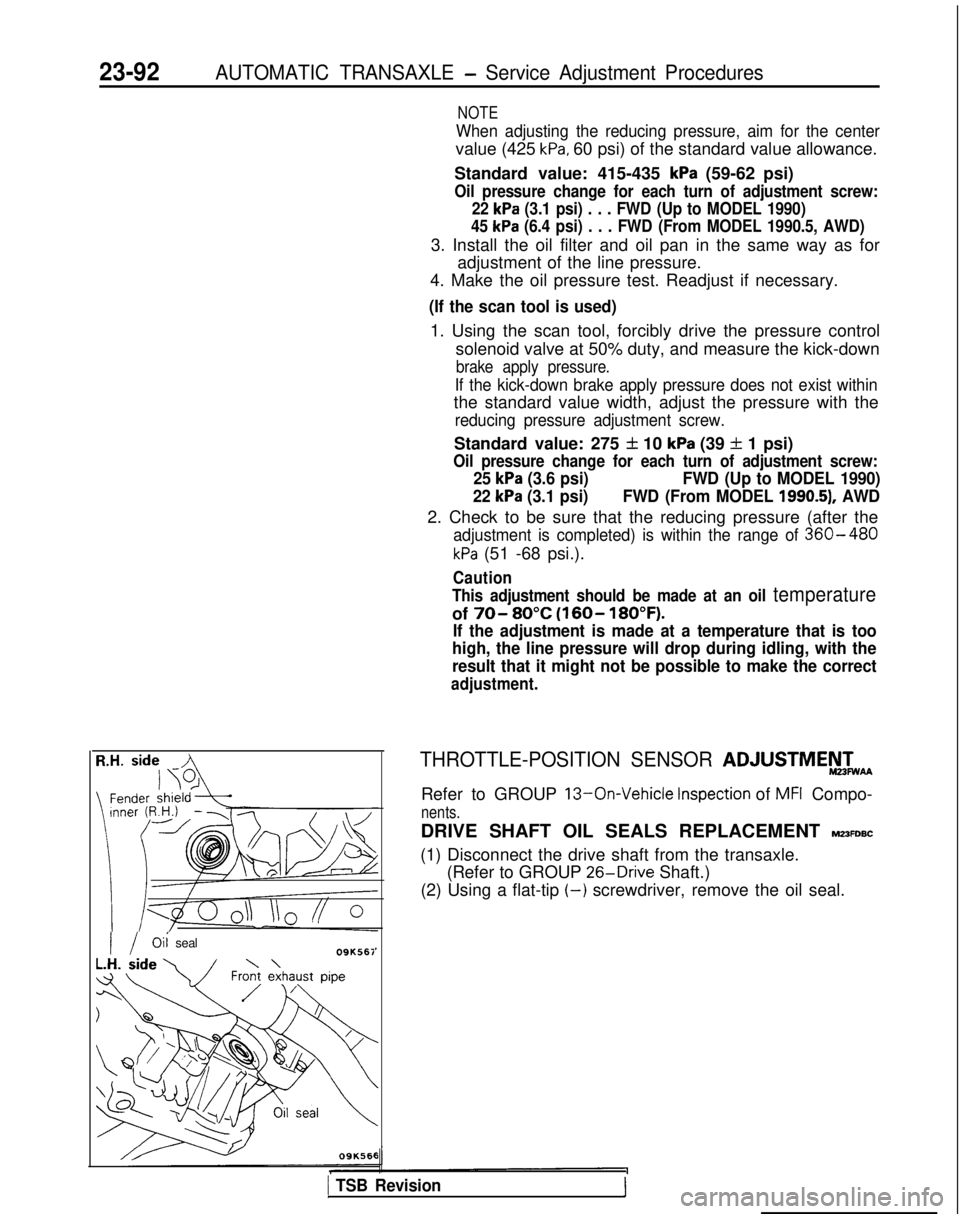
DRIVE SHAFT OIL SEALS REPLACEMENT MZ3FDBC
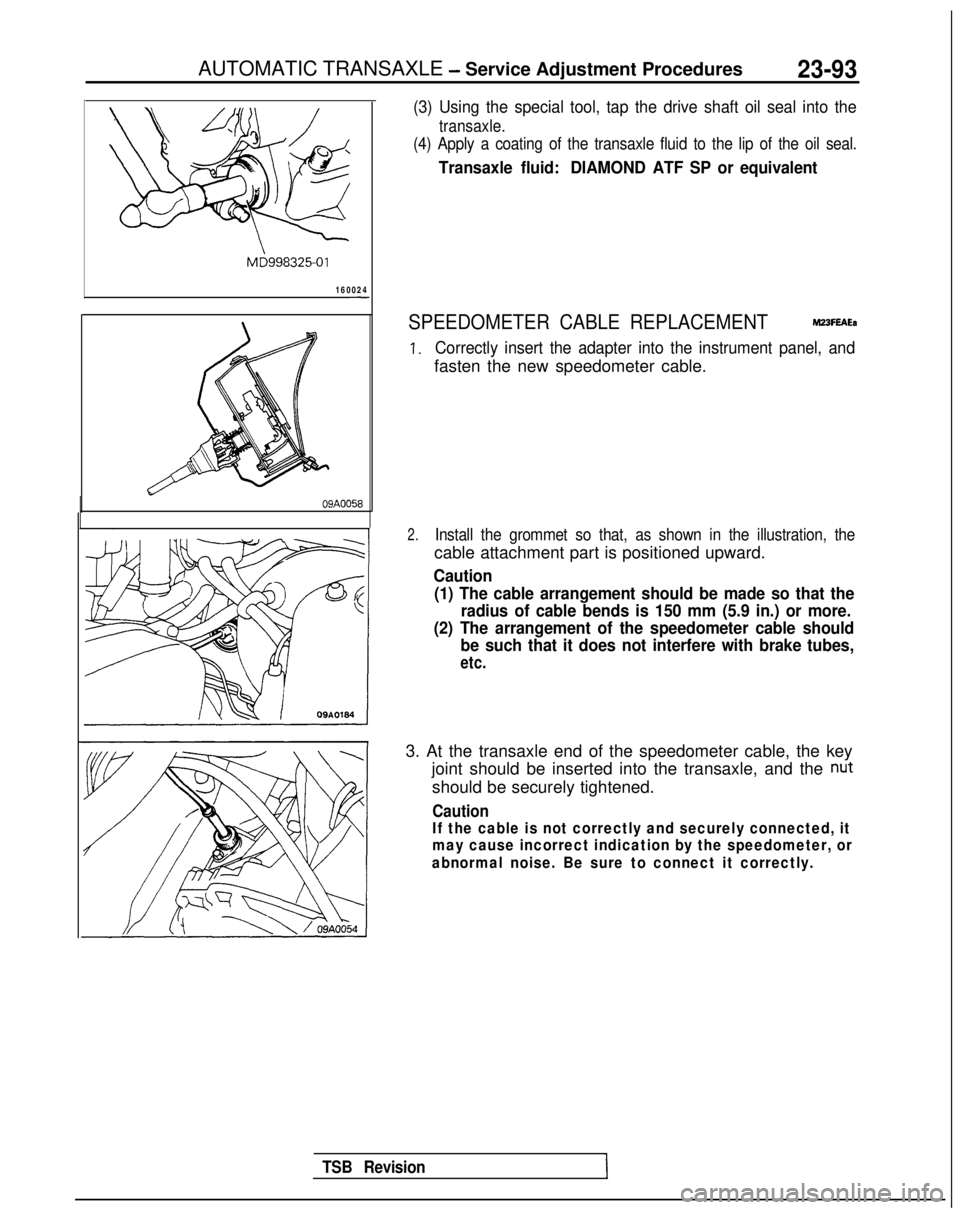
(1) Disconnect the drive shaft from the transaxle. (Refer to GROUP 26-Drive
Shaft.)
(2) Using a flat-tip
(-) screwdriver, remove the oil seal.
1 TSB Revision1
Page 799 of 1273
AUTOMATIC TRANSAXLE - Service Adjustment Procedures23-93
MD998325-01
160024
-
(3) Using the special tool, tap the drive shaft oil seal into the
transaxle.
(4) Apply a coating of the transaxle fluid to the lip of the oil seal.\
Transaxle fluid: DIAMOND ATF SP or equivalent
SPEEDOMETER CABLE REPLACEMENTMUFEAEa
1.Correctly insert the adapter into the instrument panel, and
fasten the new speedometer cable.
TSB Revision
2.Install the grommet so that, as shown in the illustration, the
cable attachment part is positioned upward.
Caution
(1) The cable arrangement should be made so that the radius of cable bends is 150 mm (5.9 in.) or more.
(2) The arrangement of the speedometer cable should be such that it does not interfere with brake tubes,
etc.
3. At the transaxle end of the speedometer cable, the key
joint should be inserted into the transaxle, and the
nut
should be securely tightened.
Caution
If the cable is not correctly and securely connected, it
may cause incorrect indication by the speedometer, or
abnormal noise. Be sure to connect it correctly.
Page 800 of 1273
23-94AUTOMATIC TRANSAXLE - Transaxle Control
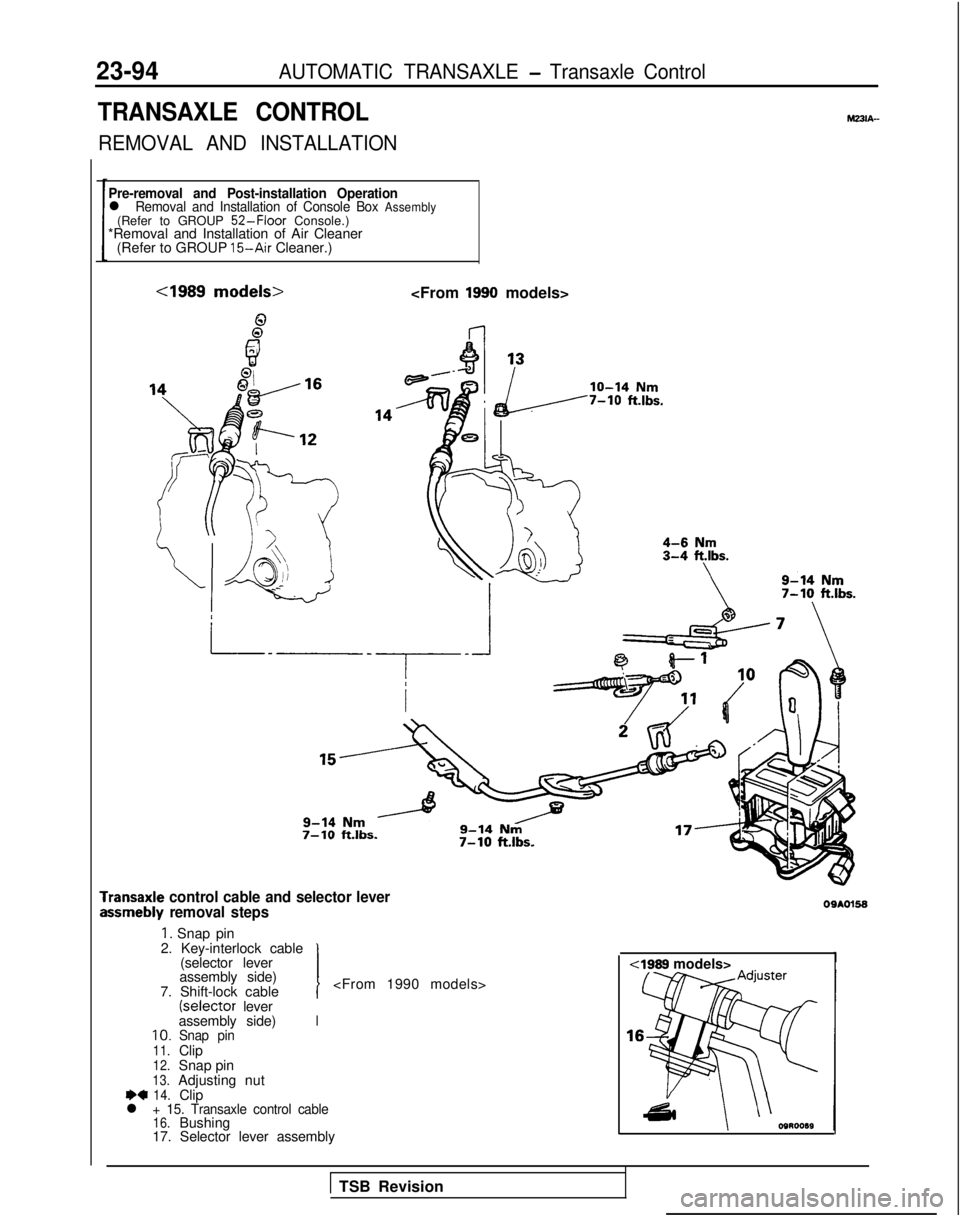
TRANSAXLE CONTROL
REMOVAL AND INSTALLATION
Pre-removal and Post-installation Operationl Removal and Installation of Console Box Assembly(Refer to GROUP 52-Floor Console.)
*Removal and Installation of Air Cleaner
(Refer to GROUP
15-Air Cleaner.)
cl989 models>
MUIA-
7-10 ft.lbs.
7-10
ft.lbs.
‘ransaxle control cable and selector leverssmebly removal steps
1. Snap pin
2. Key-interlock cable (selector lever
1assembly side)
7. Shift-lock cable I
lever
assembly side)
I10.Snap pin11.Clip12.Snap pin13.Adjusting nut+*14.Clipl + 15. Transaxle control cable16.Bushing
17. Selector lever assembly
4999 models>
0910158
1 TSB Revision