MITSUBISHI GRANDIS 2008 (in English) Owners Manual
Manufacturer: MITSUBISHI, Model Year: 2008, Model line: GRANDIS, Model: MITSUBISHI GRANDIS 2008Pages: 458, PDF Size: 18.52 MB
Page 91 of 458
Seat and seat belts
2-43
2
Infants and small children
E00406600579
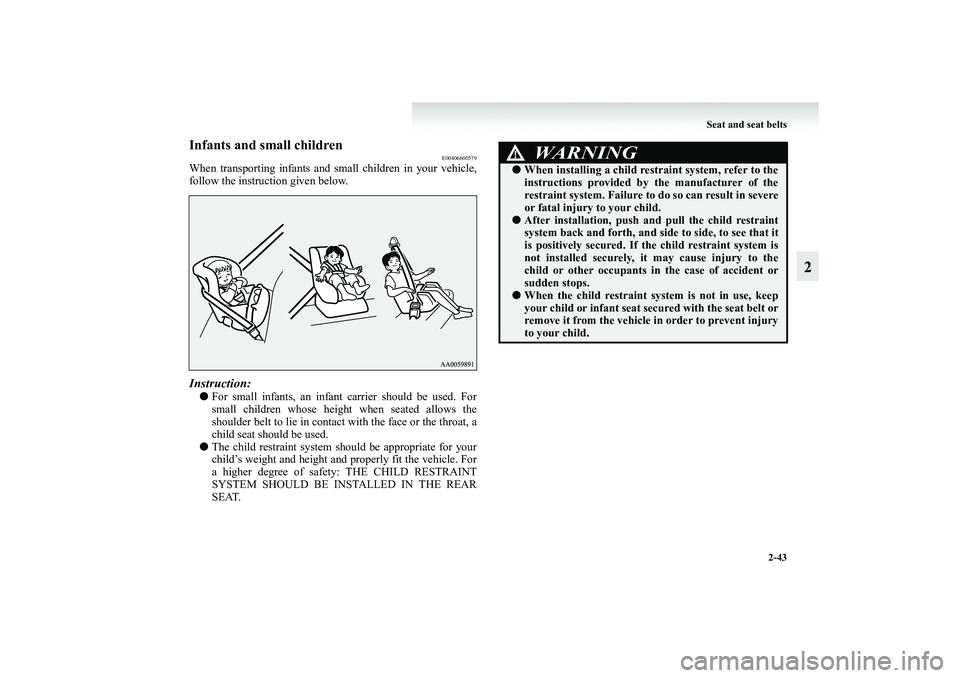
When transporting infants and small children in your vehicle,
follow the instruction given below.Instruction:●For small infants, an infant carrier should be used. For
small children whose height when seated allows the
shoulder belt to lie in contact with the face or the throat, a
child seat should be used.
●The child restraint system should be appropriate for your
child’s weight and height and properly fit the vehicle. For
a higher degree of safety: THE CHILD RESTRAINT
SYSTEM SHOULD BE INSTALLED IN THE REAR
SEAT.
WARNING
!●When installing a child restraint system, refer to the
instructions provided by the manufacturer of the
restraint system. Failure to do so can result in severe
or fatal injury to your child.●After installation, push and pull the child restraint
system back and forth, and side to side, to see that it
is positively secured. If the child restraint system is
not installed securely, it may cause injury to the
child or other occupants in the case of accident or
sudden stops.●When the child restraint system is not in use, keep
your child or infant seat secured with the seat belt or
remove it from the vehicle in order to prevent injury
to your child.
BK-XP08E1ENUK.en-uk.book Page 43 Monday, August 13, 2007 2:20 PM
Page 92 of 458
2-44 Seat and seat belts
2
NOTE●Before purchasing a child restraint system, try installing it
in the rear seat to make sure there is a good fit. Because of
the location of the seat belt buckles and the shape of the
seat cushion, it may be difficult to securely install some
manufacturer’s child restraint systems.
If the child restraint system can be pulled forward or to
either side easily on the seat cushion after the seat belt has
been tightened, choose another manufacturer’s child
restraint system.
Depending on the seating position in the vehicle and the
child restraint system that you have, the child restraint can
be attached using one of the following 2 locations:
• To the lower anchorage in the rear seat ONLY if the
child restraint has ISOFIX mountings (See page 2-49).
• To the seat belt (See page 2-51).
Older children
E00406700192
Children who have outgrown the child restraint system should
be seated in the rear seat and wear combination lap shoulder
belt.
The lap portion of the belt should be snug and positioned low
on the abdomen so that it is below the top of the hip-bone. Oth-
erwise, the belt could intrude into the child’s abdomen during
an accident and cause injury.
WARNING
!●Children who are not buckled up can be thrown out
of the vehicle in an accident.●Children who are not buckled up can strike other
people in the vehicle in an accident.●A child should never be left unattended in your vehi-
cle. When you leave the vehicle, take the child with
you.
BK-XP08E1ENUK.en-uk.book Page 44 Monday, August 13, 2007 2:20 PM
Page 93 of 458
Seat and seat belts
2-45
2
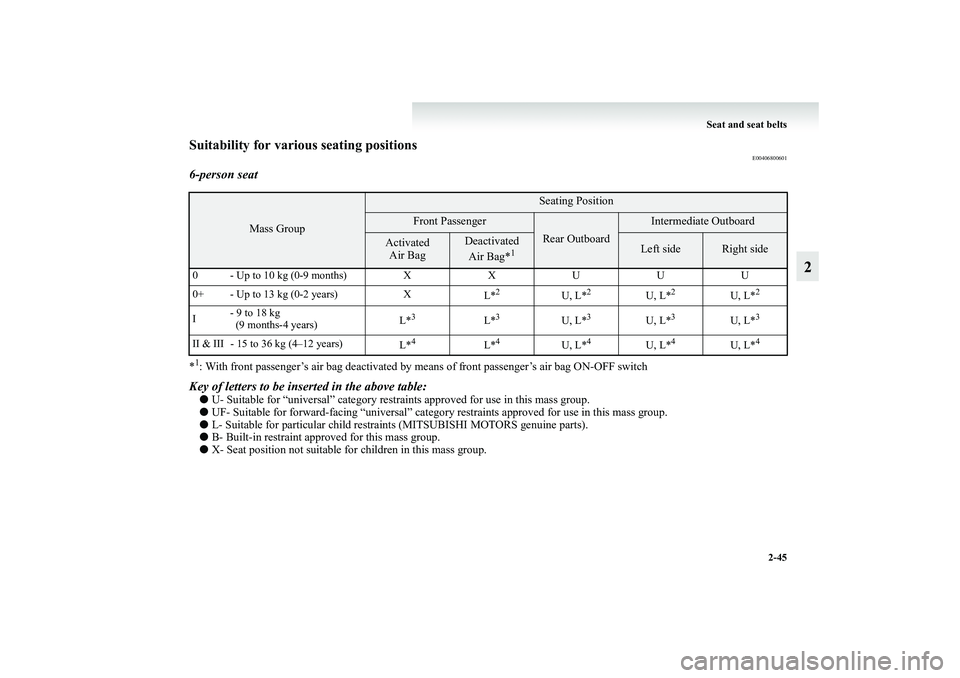
Suitability for various seating positions
E00406800601
6-person seat*1: With front passenger’s air bag deactivated by means of front passenger’s air bag ON-OFF switchKey of letters to be inserted in the above table:●U- Suitable for “universal” category restraints approved for use in this mass group.
●UF- Suitable for forward-facing “universal” category restraints approved for use in this mass group.
●L- Suitable for particular child restraints (MITSUBISHI MOTORS genuine parts).
●B- Built-in restraint approved for this mass group.
●X- Seat position not suitable for children in this mass group.
Mass Group
Seating Position
Front Passenger
Rear Outboard
Intermediate Outboard
Activated
Air Bag
Deactivated
Air Bag*
1
Left side
Right side
0 - Up to 10 kg (0-9 months) X X U U U
0+ - Up to 13 kg (0-2 years) X
L*
2
U, L*
2
U, L*
2
U, L*
2
I- 9 to 18 kg
(9 months-4 years)L*
3
L*
3
U, L*
3
U, L*
3
U, L*
3
II & III - 15 to 36 kg (4–12 years)
L*
4
L*
4
U, L*
4
U, L*
4
U, L*
4
BK-XP08E1ENUK.en-uk.book Page 45 Monday, August 13, 2007 2:20 PM
Page 94 of 458
2-46 Seat and seat belts
2
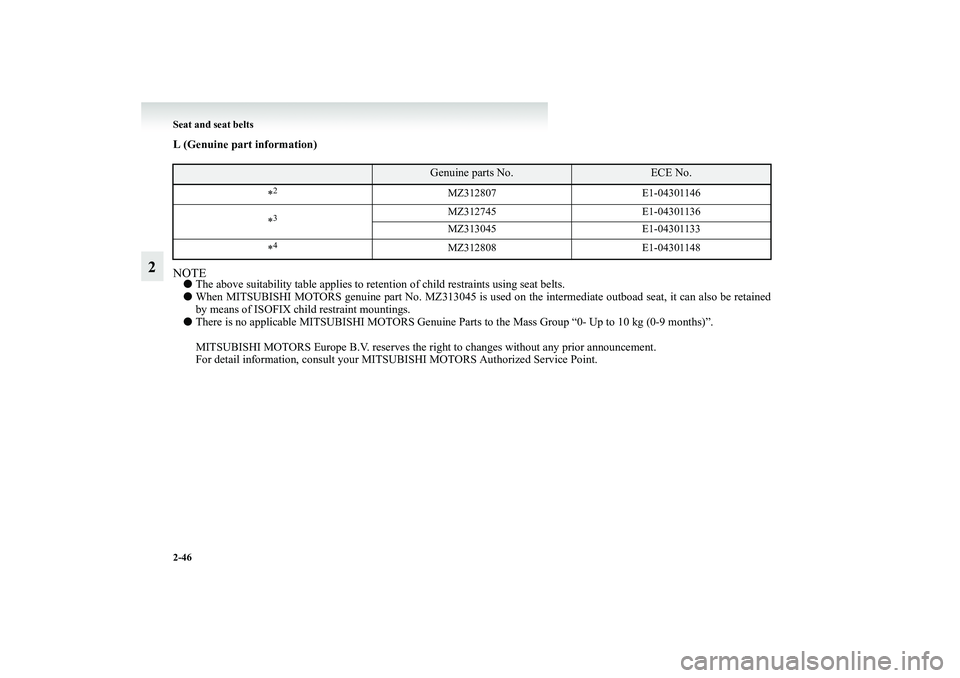
L (Genuine part information)
NOTE●The above suitability table applies to retention of child restraints using seat belts.
●When MITSUBISHI MOTORS genuine part No. MZ313045 is used on the intermediate outboad seat, it can also be retained
by means of ISOFIX child restraint mountings.
●There is no applicable MITSUBISHI MOTORS Genuine Parts to the Mass Group “0- Up to 10 kg (0-9 months)”.
MITSUBISHI MOTORS Europe B.V. reserves the right to changes without any prior announcement.
For detail information, consult your MITSUBISHI MOTORS Authorized Service Point.
Genuine parts No.
ECE No.
*2
MZ312807 E1-04301146
*
3
MZ312745 E1-04301136
MZ313045 E1-04301133
*
4
MZ312808 E1-04301148
BK-XP08E1ENUK.en-uk.book Page 46 Monday, August 13, 2007 2:20 PM
Page 95 of 458
Seat and seat belts
2-47
2
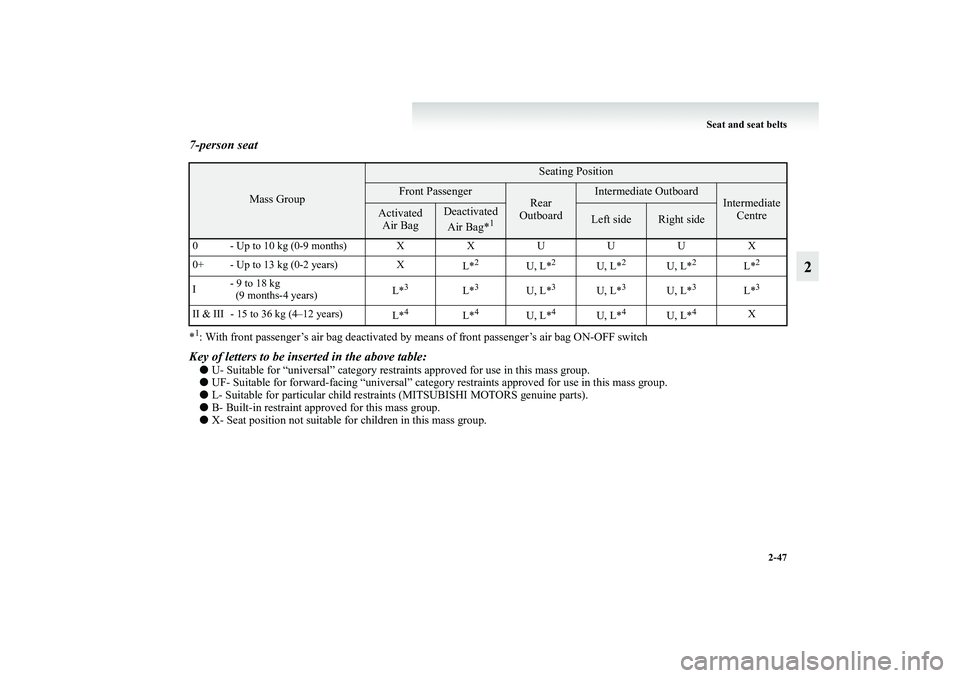
7-person seat*1: With front passenger’s air bag deactivated by means of front passenger’s air bag ON-OFF switchKey of letters to be inserted in the above table:●U- Suitable for “universal” category restraints approved for use in this mass group.
●UF- Suitable for forward-facing “universal” category restraints approved for use in this mass group.
●L- Suitable for particular child restraints (MITSUBISHI MOTORS genuine parts).
●B- Built-in restraint approved for this mass group.
●X- Seat position not suitable for children in this mass group.
Mass Group
Seating Position
Front Passenger
Rear
Outboard
Intermediate Outboard
Intermediate
Centre
Activated
Air Bag
Deactivated
Air Bag*
1
Left side
Right side
0- Up to 10 kg (0-9 months)XXUUUX
0+ - Up to 13 kg (0-2 years) X
L*
2
U, L*
2
U, L*
2
U, L*
2
L*
2
I- 9 to 18 kg
(9 months-4 years)L*
3
L*
3
U, L*
3
U, L*
3
U, L*
3
L*
3
II & III - 15 to 36 kg (4–12 years)
L*
4
L*
4
U, L*
4
U, L*
4
U, L*
4
X
BK-XP08E1ENUK.en-uk.book Page 47 Monday, August 13, 2007 2:20 PM
Page 96 of 458
2-48 Seat and seat belts
2
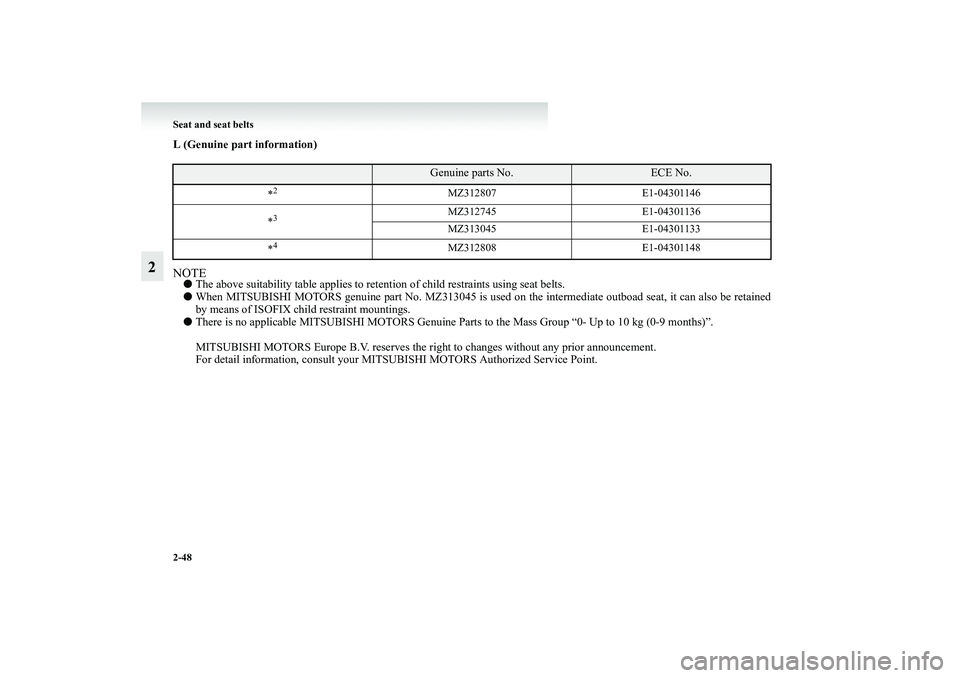
L (Genuine part information)
NOTE●The above suitability table applies to retention of child restraints using seat belts.
●When MITSUBISHI MOTORS genuine part No. MZ313045 is used on the intermediate outboad seat, it can also be retained
by means of ISOFIX child restraint mountings.
●There is no applicable MITSUBISHI MOTORS Genuine Parts to the Mass Group “0- Up to 10 kg (0-9 months)”.
MITSUBISHI MOTORS Europe B.V. reserves the right to changes without any prior announcement.
For detail information, consult your MITSUBISHI MOTORS Authorized Service Point.
Genuine parts No.
ECE No.
*2
MZ312807 E1-04301146
*
3
MZ312745 E1-04301136
MZ313045 E1-04301133
*
4
MZ312808 E1-04301148
BK-XP08E1ENUK.en-uk.book Page 48 Monday, August 13, 2007 2:20 PM
Page 97 of 458
Seat and seat belts
2-49
2
Installing a child restraint system to the lower
anchorage (ISOFIX child restraint mountings)
E00408900042
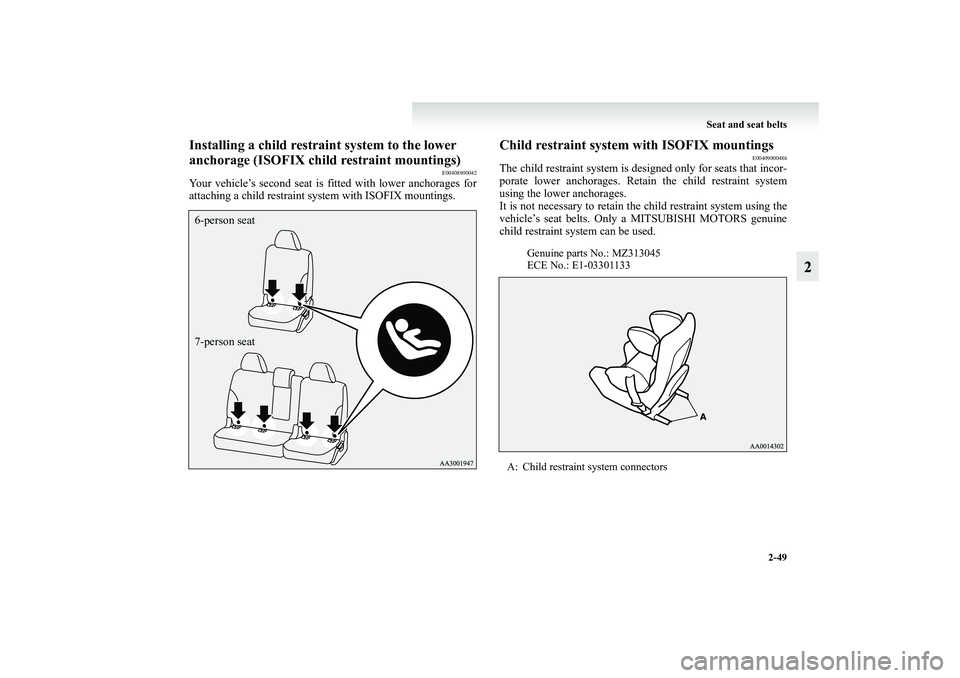
Your vehicle’s second seat is fitted with lower anchorages for
attaching a child restraint system with ISOFIX mountings.
Child restraint system with ISOFIX mountings
E00409000486
The child restraint system is designed only for seats that incor-
porate lower anchorages. Retain the child restraint system
using the lower anchorages.
It is not necessary to retain the child restraint system using the
vehicle’s seat belts. Only a MITSUBISHI MOTORS genuine
child restraint system can be used.
6-person seat
7-person seat
Genuine parts No.: MZ313045
ECE No.: E1-03301133
A: Child restraint system connectors
BK-XP08E1ENUK.en-uk.book Page 49 Monday, August 13, 2007 2:20 PM
Page 98 of 458
2-50 Seat and seat belts
2
To i n s t a l l
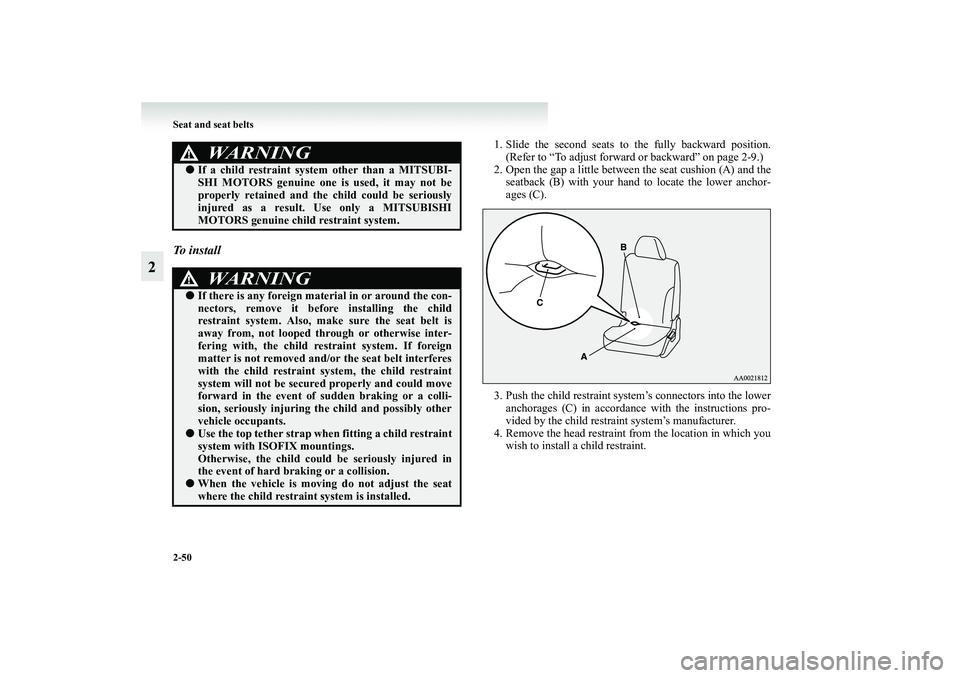
1. Slide the second seats to the fully backward position.
(Refer to “To adjust forward or backward” on page 2-9.)
2. Open the gap a little between the seat cushion (A) and the
seatback (B) with your hand to locate the lower anchor-
ages (C).
3. Push the child restraint system’s connectors into the lower
anchorages (C) in accordance with the instructions pro-
vided by the child restraint system’s manufacturer.
4. Remove the head restraint from the location in which you
wish to install a child restraint.
WARNING
!●If a child restraint system other than a MITSUBI-
SHI MOTORS genuine one is used, it may not be
properly retained and the child could be seriously
injured as a result. Use only a MITSUBISHI
MOTORS genuine child restraint system.
WARNING
!●If there is any foreign material in or around the con-
nectors, remove it before installing the child
restraint system. Also, make sure the seat belt is
away from, not looped through or otherwise inter-
fering with, the child restraint system. If foreign
matter is not removed and/or the seat belt interferes
with the child restraint system, the child restraint
system will not be secured properly and could move
forward in the event of sudden braking or a colli-
sion, seriously injuring the child and possibly other
vehicle occupants.●Use the top tether strap when fitting a child restraint
system with ISOFIX mountings.
Otherwise, the child could be seriously injured in
the event of hard braking or a collision.●When the vehicle is moving do not adjust the seat
where the child restraint system is installed.
BK-XP08E1ENUK.en-uk.book Page 50 Monday, August 13, 2007 2:20 PM
Page 99 of 458
Seat and seat belts
2-51
2
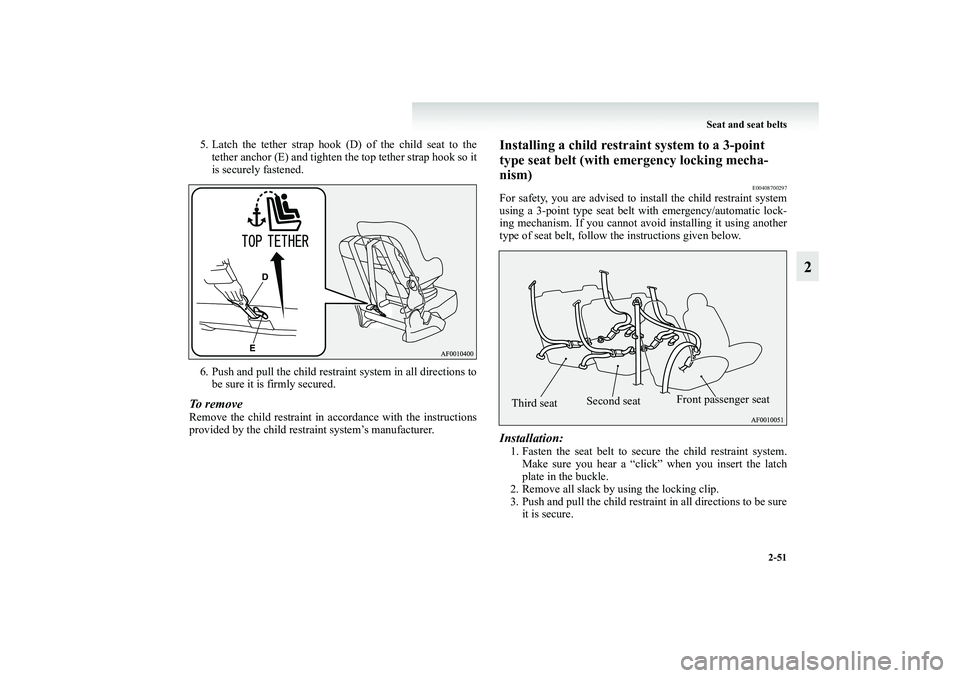
5. Latch the tether strap hook (D) of the child seat to the
tether anchor (E) and tighten the top tether strap hook so it
is securely fastened.
6. Push and pull the child restraint system in all directions to
be sure it is firmly secured.To removeRemove the child restraint in accordance with the instructions
provided by the child restraint system’s manufacturer.
Installing a child restraint system to a 3-point
type seat belt (with emergency locking mecha-
nism)
E00408700297
For safety, you are advised to install the child restraint system
using a 3-point type seat belt with emergency/automatic lock-
ing mechanism. If you cannot avoid installing it using another
type of seat belt, follow the instructions given below.Installation:1. Fasten the seat belt to secure the child restraint system.
Make sure you hear a “click” when you insert the latch
plate in the buckle.
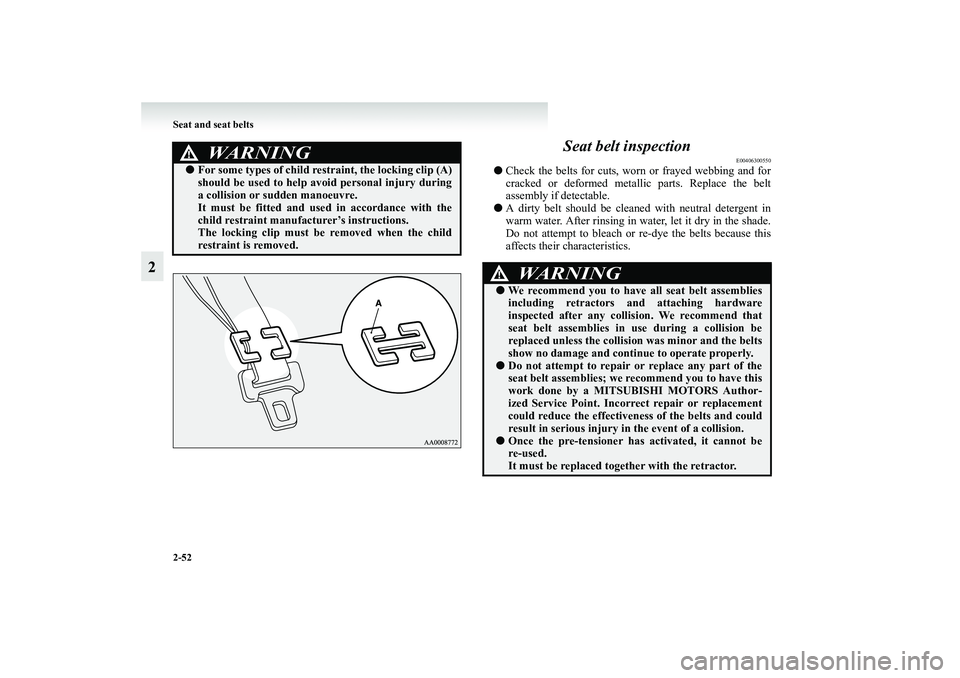
2. Remove all slack by using the locking clip.
3. Push and pull the child restraint in all directions to be sure
it is secure.
Front passenger seat
Second seat
Third seat
BK-XP08E1ENUK.en-uk.book Page 51 Monday, August 13, 2007 2:20 PM
Page 100 of 458
2-52 Seat and seat belts
2Seat belt inspection
E00406300550
●Check the belts for cuts, worn or frayed webbing and for
cracked or deformed metallic parts. Replace the belt
assembly if detectable.
●A dirty belt should be cleaned with neutral detergent in
warm water. After rinsing in water, let it dry in the shade.
Do not attempt to bleach or re-dye the belts because this
affects their characteristics.
WARNING
!●For some types of child restraint, the locking clip (A)
should be used to help avoid personal injury during
a collision or sudden manoeuvre.
It must be fitted and used in accordance with the
child restraint manufacturer’s instructions.
The locking clip must be removed when the child
restraint is removed.
WARNING
!●We recommend you to have all seat belt assemblies
including retractors and attaching hardware
inspected after any collision. We recommend that
seat belt assemblies in use during a collision be
replaced unless the collision was minor and the belts
show no damage and continue to operate properly.●Do not attempt to repair or replace any part of the
seat belt assemblies; we recommend you to have this
work done by a MITSUBISHI MOTORS Author-
ized Service Point. Incorrect repair or replacement
could reduce the effectiveness of the belts and could
result in serious injury in the event of a collision.●Once the pre-tensioner has activated, it cannot be
re-used.
It must be replaced together with the retractor.
BK-XP08E1ENUK.en-uk.book Page 52 Monday, August 13, 2007 2:20 PM