electrical MITSUBISHI LANCER 2005 Owners Manual
[x] Cancel search | Manufacturer: MITSUBISHI, Model Year: 2005, Model line: LANCER, Model: MITSUBISHI LANCER 2005Pages: 788, PDF Size: 45.98 MB
Page 435 of 788
COMBINATION METER ASSEMBLY
CHASSIS ELECTRICAL54A-47
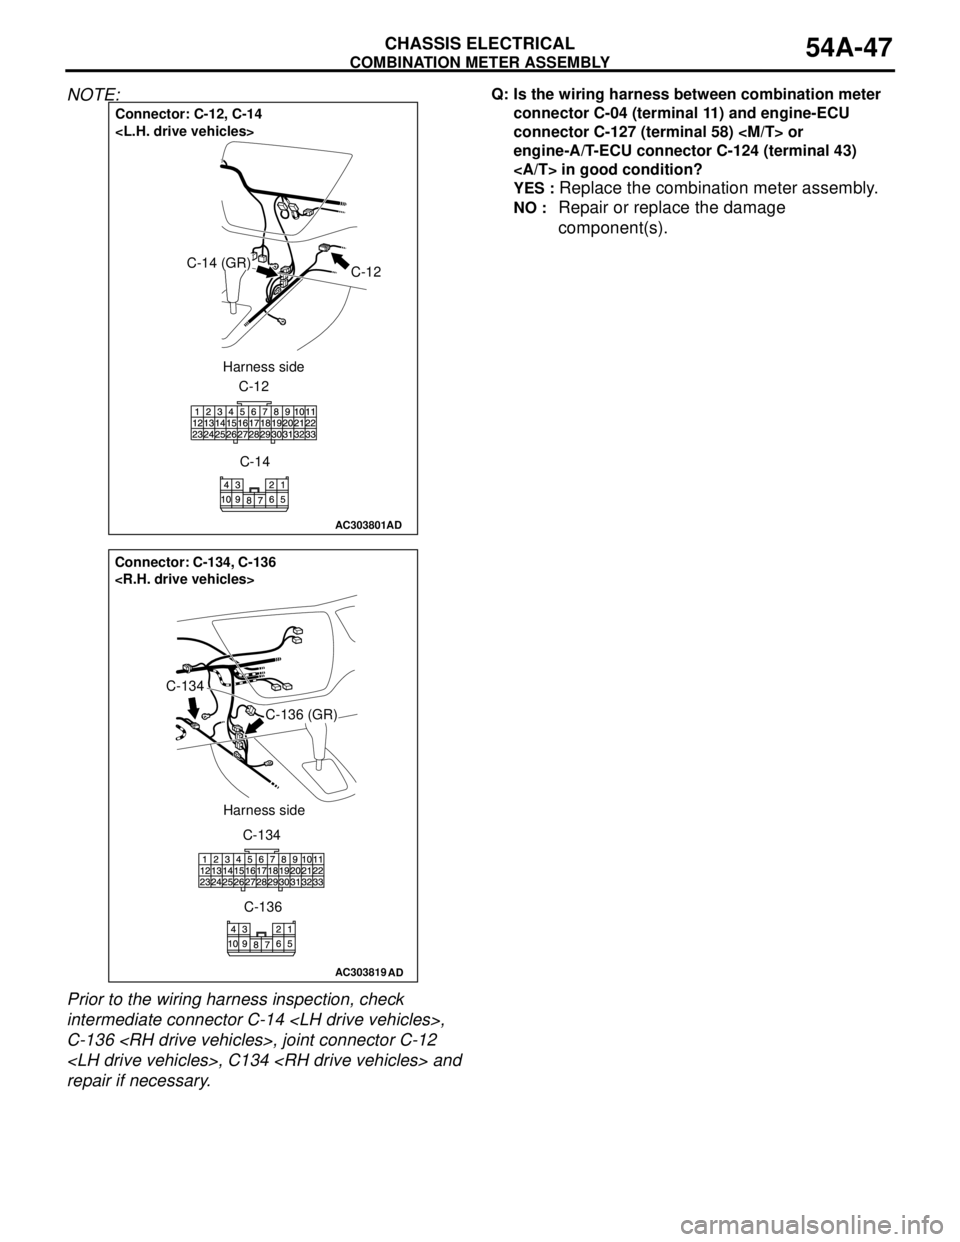
NOTE:
Prior to the wiring harness inspection, check
intermediate connector C-14
C-136
repair if necessary.Q: Is the wiring harness between combination meter
connector C-04 (terminal 11) and engine-ECU
connector C-127 (terminal 58)
engine-A/T-ECU connector C-124 (terminal 43)
in good condition?
YES :
Replace the combination meter assembly.
NO : Repair or replace the damage
component(s).
AC303801
Connector: C-12, C-14
C-12C-14 (GR)
C-12
C-14 Harness side
AD
AC303819
Connector: C-134, C-136
C-136 (GR)
C-134
C-134
C-136 Harness side
AD
Page 436 of 788
COMBINATION METER ASSEMBLY
CHASSIS ELECTRICAL54A-48
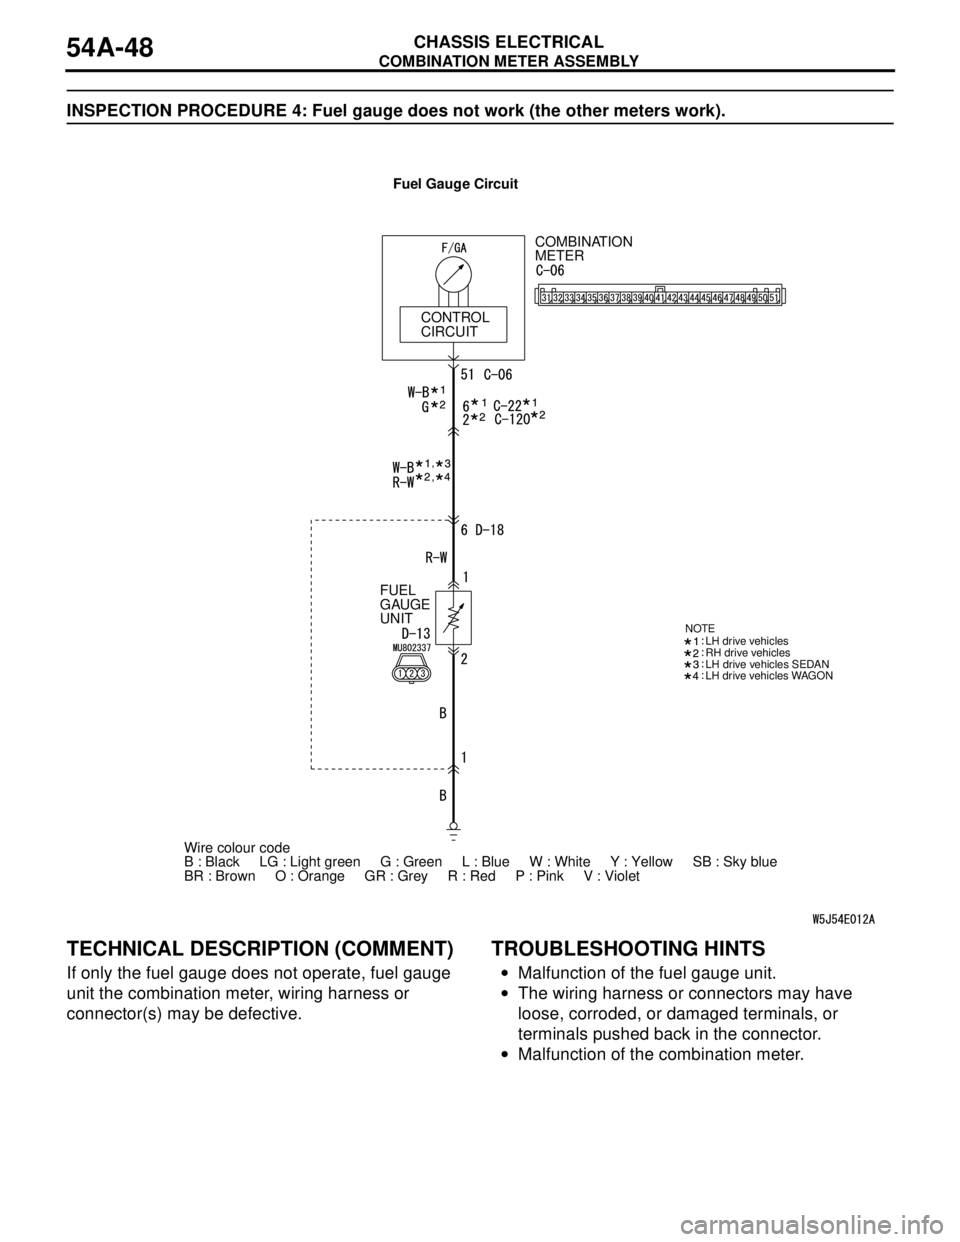
INSPECTION PROCEDURE 4: Fuel gauge does not work (the other meters work).
TECHNICAL DESCRIPTION (COMMENT)
If only the fuel gauge does not operate, fuel gauge
unit the combination meter, wiring harness or
connector(s) may be defective.
TROUBLESHOOTING HINTS
•Malfunction of the fuel gauge unit.
•The wiring harness or connectors may have
loose, corroded, or damaged terminals, or
terminals pushed back in the connector.
•Malfunction of the combination meter.
COMBINATION
METER
CONTROL
CIRCUIT
FUEL
GAUGE
UNIT
LH drive vehicles SEDAN
LH drive vehicles WAGON NOTE
LH drive vehicles
RH drive vehicles
,,
Wire colour code
B : Black LG : Light green G : Green L : Blue W : White Y : Yellow SB : Sky blue
BR : Brown O : Orange GR : Grey R : Red P : Pink V : VioletFuel Gauge Circuit
Page 437 of 788
COMBINATION METER ASSEMBLY
CHASSIS ELECTRICAL54A-49
DIAGNOSIS PROCEDURE
STEP 1. Check the fuel gauge circuit.
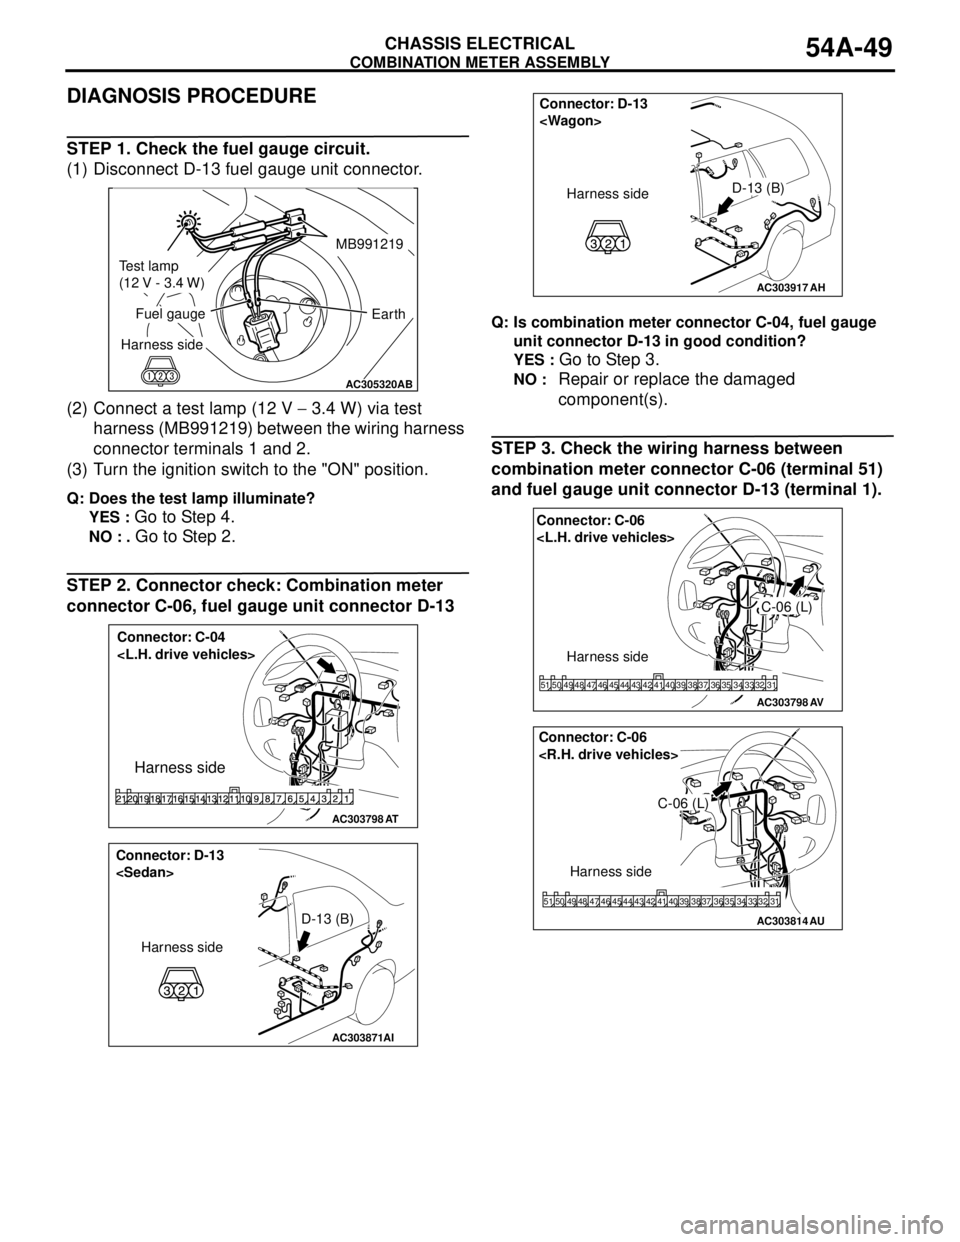
(1) Disconnect D-13 fuel gauge unit connector.
(2) Connect a test lamp (12 V − 3.4 W) via test
harness (MB991219) between the wiring harness
connector terminals 1 and 2.
(3) Turn the ignition switch to the "ON" position.
Q: Does the test lamp illuminate?
YES :
Go to Step 4.
NO : . Go to Step 2.
STEP 2. Connector check: Combination meter
connector C-06, fuel gauge unit connector D-13
Q: Is combination meter connector C-04, fuel gauge
unit connector D-13 in good condition?
YES :
Go to Step 3.
NO : Repair or replace the damaged
component(s).
STEP 3. Check the wiring harness between
combination meter connector C-06 (terminal 51)
and fuel gauge unit connector D-13 (terminal 1).
AC305320
AB
Test lamp
(12 V - 3.4 W)
MB991219
Harness side
Fuel gauge
Earth
AC303798
Connector: C-04
Harness side
AT
AC303871
Connector: D-13
Harness sideD-13 (B)
AI
AC303917
D-13 (B) Connector: D-13
Harness side
AH
AC303798
Connector: C-06
Harness side
C-06 (L)
31 32 33 34 35 36 37 38 39 40 41 42 43 44 45 46 47 48 49 50 51
AV
AC303814AU
Connector: C-06
Harness side
31 32 33 34 35 36 37 38 39 40 41 42 43 44 45 46 47 48 49 50 51
C-06 (L)
Page 438 of 788
COMBINATION METER ASSEMBLY
CHASSIS ELECTRICAL54A-50
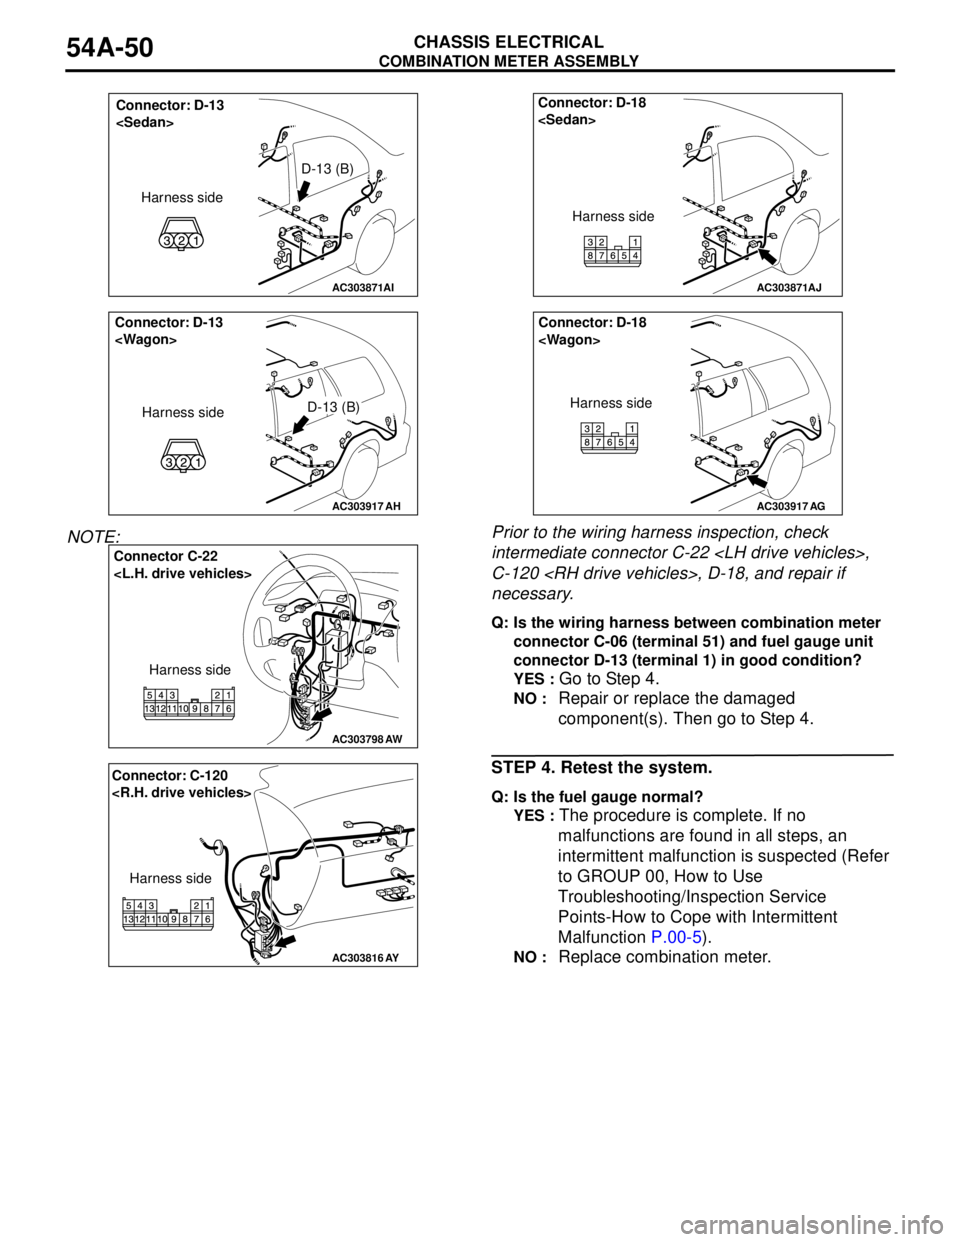
NOTE: Prior to the wiring harness inspection, check
intermediate connector C-22
C-120
necessary.
Q: Is the wiring harness between combination meter
connector C-06 (terminal 51) and fuel gauge unit
connector D-13 (terminal 1) in good condition?
YES :
Go to Step 4.
NO : Repair or replace the damaged
component(s). Then go to Step 4.
STEP 4. Retest the system.
Q: Is the fuel gauge normal?
YES :
The procedure is complete. If no
malfunctions are found in all steps, an
intermittent malfunction is suspected (Refer
to GROUP 00, How to Use
Troubleshooting/Inspection Service
Points-How to Cope with Intermittent
Malfunction P.00-5).
NO : Replace combination meter.
AC303871
Connector: D-13
Harness sideD-13 (B)
AI
AC303917
D-13 (B) Connector: D-13
Harness side
AH
AC303798
Harness side Connector C-22
AW
AC303816AY
Connector: C-120
Harness side
AC303871
Connector: D-18
AJ
Harness side
AC303917
Connector: D-18
Harness side
AG
Page 439 of 788
COMBINATION METER ASSEMBLY
CHASSIS ELECTRICAL54A-51
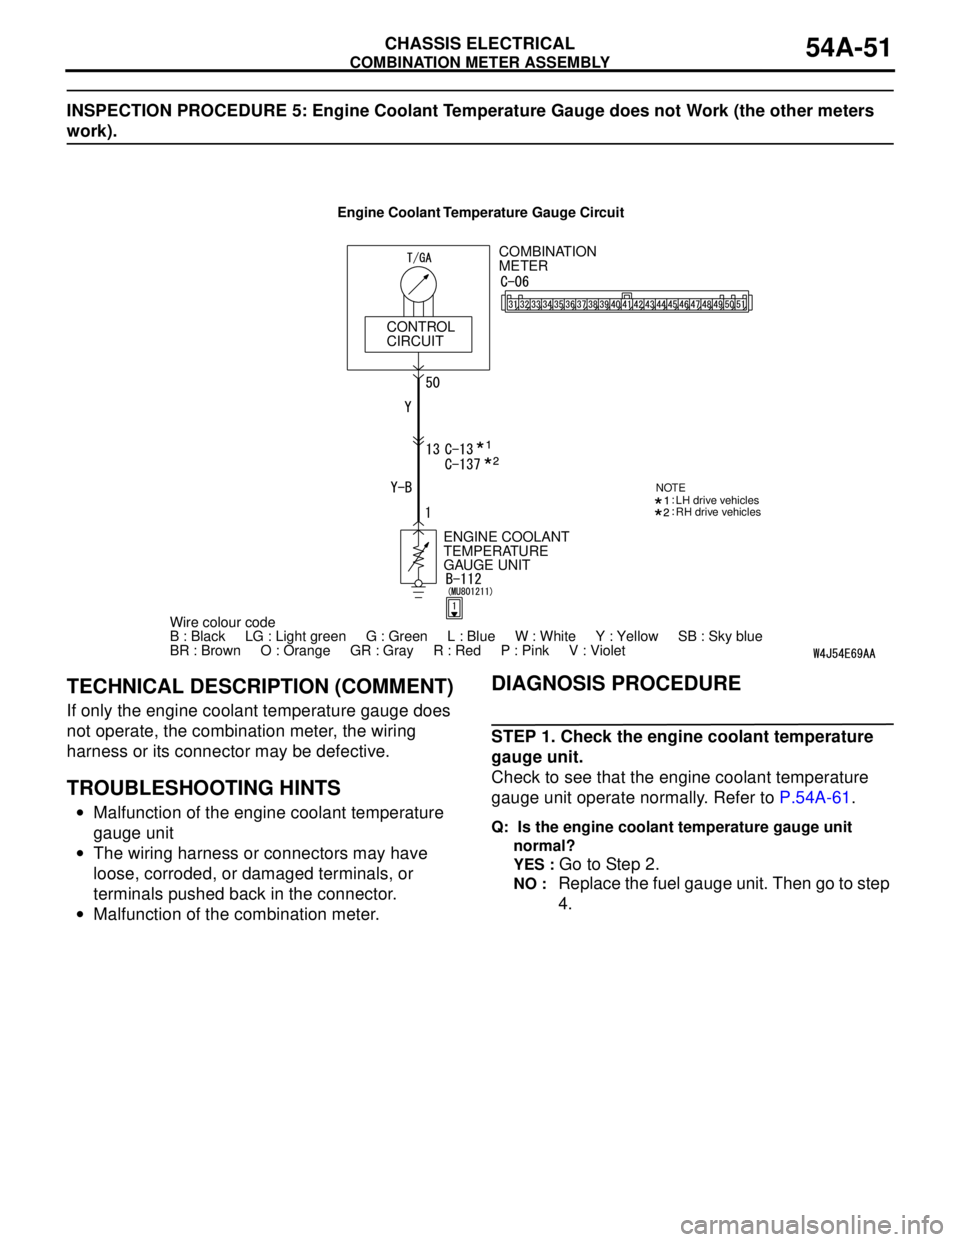
INSPECTION PROCEDURE 5: Engine Coolant Temperature Gauge does not Work (the other meters
work).
TECHNICAL DESCRIPTION (COMMENT)
If only the engine coolant temperature gauge does
not operate, the combination meter, the wiring
harness or its connector may be defective.
TROUBLESHOOTING HINTS
•Malfunction of the engine coolant temperature
gauge unit
•The wiring harness or connectors may have
loose, corroded, or damaged terminals, or
terminals pushed back in the connector.
•Malfunction of the combination meter.
DIAGNOSIS PROCEDURE
STEP 1. Check the engine coolant temperature
gauge unit.
Check to see that the engine coolant temperature
gauge unit operate normally. Refer to P.54A-61.
Q: Is the engine coolant temperature gauge unit
normal?
YES :
Go to Step 2.
NO : Replace the fuel gauge unit. Then go to step
4.
COMBINATION
METER
CONTROL
CIRCUIT
Wire colour code
B : Black LG : Light green G : Green L : Blue W : White Y : Yellow SB : Sky blue
BR : Brown O : Orange GR : Gray R : Red P : Pink V : Violet ENGINE COOLANT
TEMPERATURE
GAUGE UNIT
NOTELH drive vehicles
RH drive vehicles
Engine Coolant Temperature Gauge Circuit
Page 440 of 788

COMBINATION METER ASSEMBLY
CHASSIS ELECTRICAL54A-52
STEP 2. Connector check: Combination meter
connector C-06 and engine coolant temperature
gauge unit connector B-112
Q: Is combination meter connector C-06 and engine
coolant temperature gauge unit connector B-112 in
good condition?
YES :
Go to Step 3.
NO : Repair or replace the damage
component(s).
STEP 3. Check the wiring harness between
combination meter connector C-06 (terminal 50)
and engine coolant temperature gauge unit
connector B-112 (terminal 1).
AC303784
Connector: B-112
<4G1-MPI>
Harness side
B-112 (B)
AF
AC303792
AE
Connector: B-112
<4G6-MPI>
B-112 (B) Harness side
AC303798
Connector: C-06
Harness side
C-06 (L)
31 32 33 34 35 36 37 38 39 40 41 42 43 44 45 46 47 48 49 50 51
AV
AC303814AU
Connector: C-06
Harness side
31 32 33 34 35 36 37 38 39 40 41 42 43 44 45 46 47 48 49 50 51
C-06 (L)
Page 441 of 788
COMBINATION METER ASSEMBLY
CHASSIS ELECTRICAL54A-53
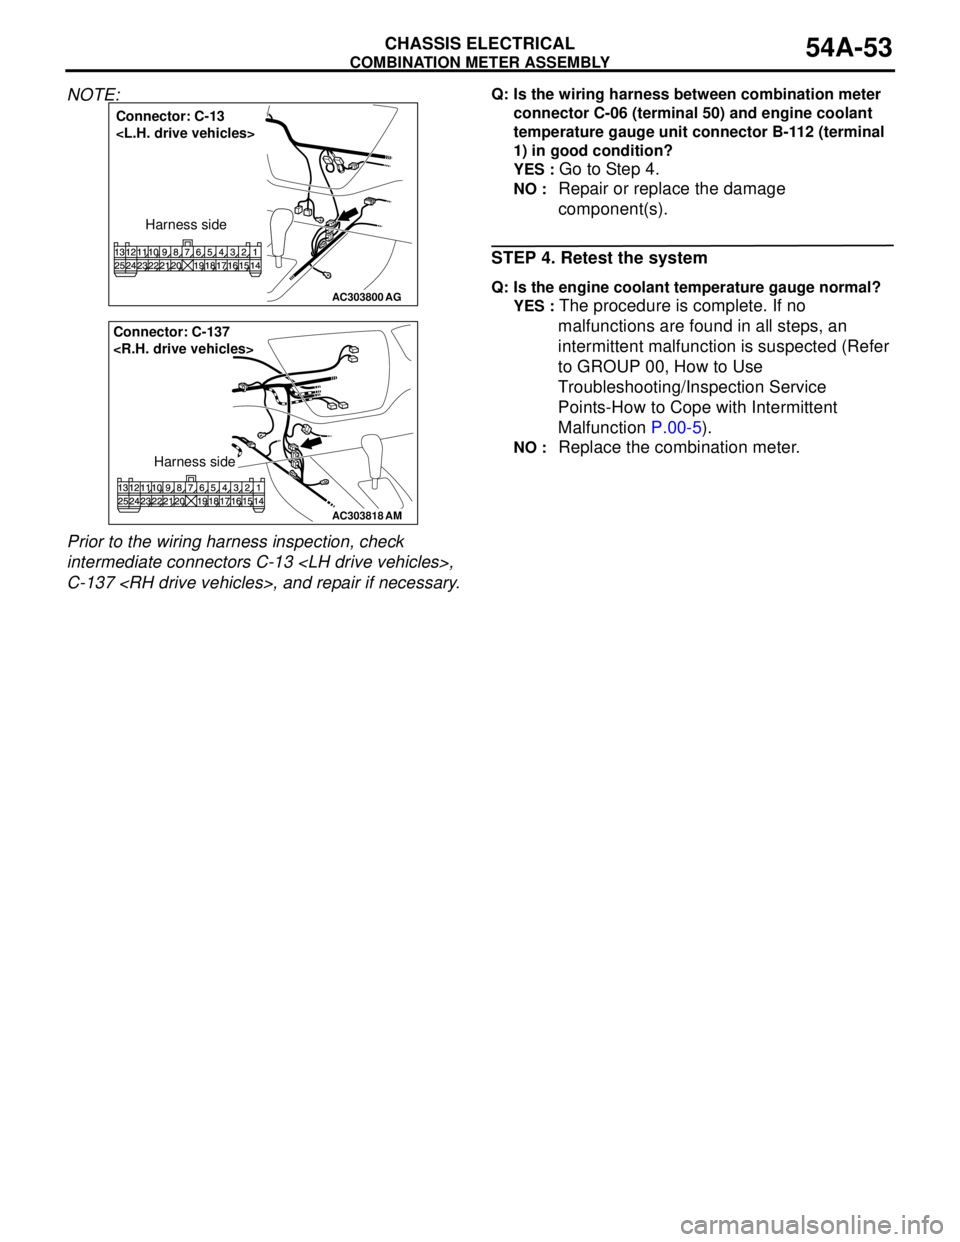
NOTE:
Prior to the wiring harness inspection, check
intermediate connectors C-13
C-137
connector C-06 (terminal 50) and engine coolant
temperature gauge unit connector B-112 (terminal
1) in good condition?
YES :
Go to Step 4.
NO : Repair or replace the damage
component(s).
STEP 4. Retest the system
Q: Is the engine coolant temperature gauge normal?
YES :
The procedure is complete. If no
malfunctions are found in all steps, an
intermittent malfunction is suspected (Refer
to GROUP 00, How to Use
Troubleshooting/Inspection Service
Points-How to Cope with Intermittent
Malfunction P.00-5).
NO : Replace the combination meter.
AC303800
Connector: C-13
Harness side
AG
AC303818
AM
Connector: C-137
Harness side
Page 442 of 788
COMBINATION METER ASSEMBLY
CHASSIS ELECTRICAL54A-54
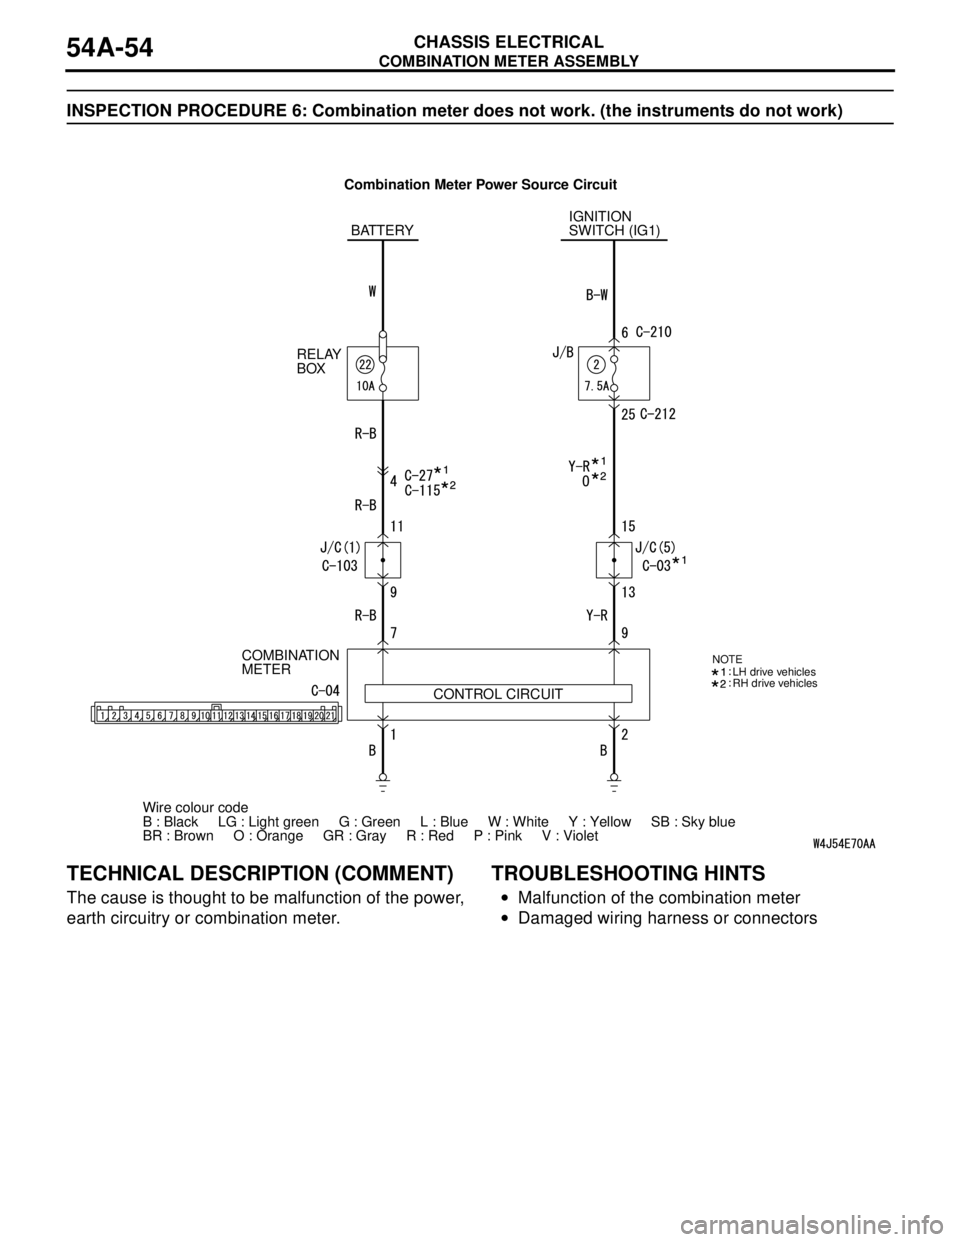
INSPECTION PROCEDURE 6: Combination meter does not work. (the instruments do not work)
TECHNICAL DESCRIPTION (COMMENT)
The cause is thought to be malfunction of the power,
earth circuitry or combination meter.
TROUBLESHOOTING HINTS
•Malfunction of the combination meter
•Damaged wiring harness or connectors
Wire colour code
B : Black LG : Light green G : Green L : Blue W : White Y : Yellow SB : Sky blue
BR : Brown O : Orange GR : Gray R : Red P : Pink V : Violet IGNITION
SWITCH (IG1)
COMBINATION
METER
CONTROL CIRCUIT BATTERY
RELAY
BOX
NOTELH drive vehicles
RH drive vehicles
Combination Meter Power Source Circuit
Page 443 of 788
COMBINATION METER ASSEMBLY
CHASSIS ELECTRICAL54A-55
DIAGNOSIS PROCEDURE
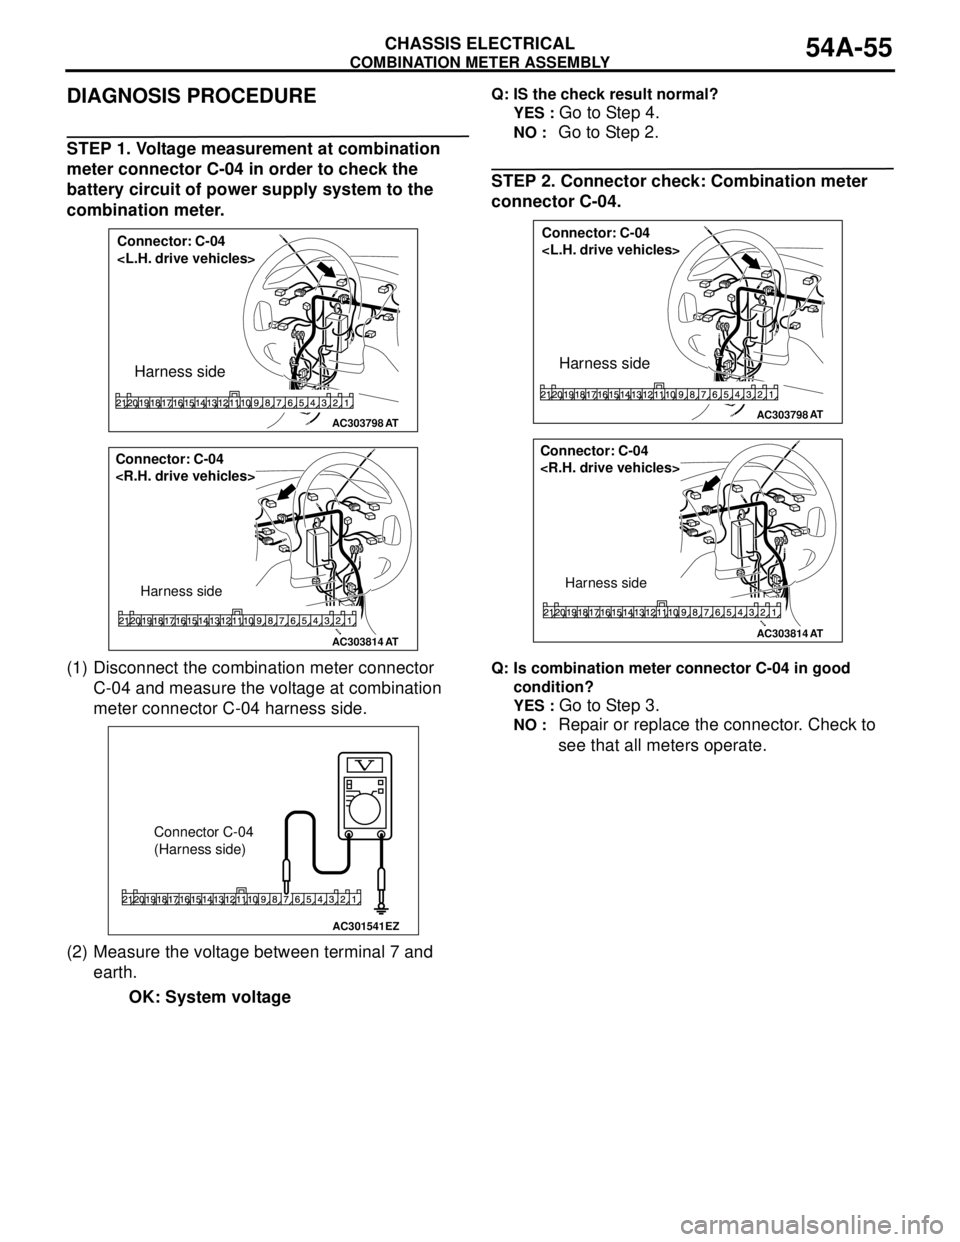
STEP 1. Voltage measurement at combination
meter connector C-04 in order to check the
battery circuit of power supply system to the
combination meter.
(1) Disconnect the combination meter connector
C-04 and measure the voltage at combination
meter connector C-04 harness side.
(2) Measure the voltage between terminal 7 and
earth.
OK: System voltage
Q: IS the check result normal?
YES :
Go to Step 4.
NO : Go to Step 2.
STEP 2. Connector check: Combination meter
connector C-04.
Q: Is combination meter connector C-04 in good
condition?
YES :
Go to Step 3.
NO : Repair or replace the connector. Check to
see that all meters operate.
AC303798
Connector: C-04
Harness side
AT
AC303814
Connector: C-04
Harness side
AT
AC301541
Connector C-04
(Harness side)
EZ
AC303798
Connector: C-04
Harness side
AT
AC303814
Connector: C-04
Harness side
AT
Page 444 of 788
COMBINATION METER ASSEMBLY
CHASSIS ELECTRICAL54A-56
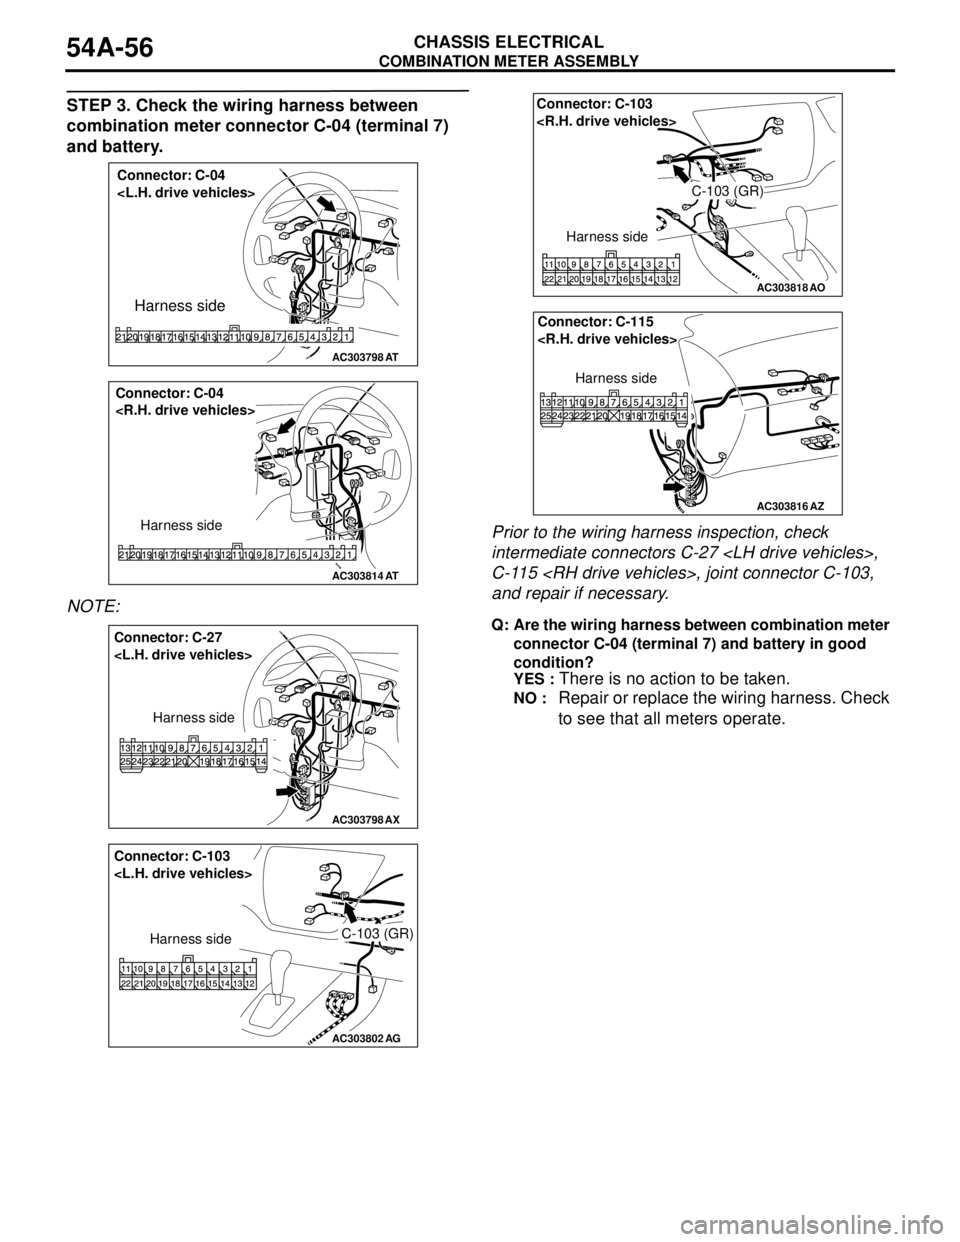
STEP 3. Check the wiring harness between
combination meter connector C-04 (terminal 7)
and battery.
NOTE: .Prior to the wiring harness inspection, check
intermediate connectors C-27
C-115
and repair if necessary.
Q: Are the wiring harness between combination meter
connector C-04 (terminal 7) and battery in good
condition?
YES :
There is no action to be taken.
NO : Repair or replace the wiring harness. Check
to see that all meters operate.
AC303798
Connector: C-04
Harness side
AT
AC303814
Connector: C-04
Harness side
AT
AC303798AX
Connector: C-27
Harness side
AC303802
Connector: C-103
Harness sideC-103 (GR)
AG
AC303818
AO
Connector: C-103
Harness side
C-103 (GR)
AC303816
Connector: C-115
Harness side
AZ