Top MITSUBISHI LANCER 2016 8.G User Guide
[x] Cancel search | Manufacturer: MITSUBISHI, Model Year: 2016, Model line: LANCER, Model: MITSUBISHI LANCER 2016 8.GPages: 392, PDF Size: 13.12 MB
Page 35 of 392
Seat
belts
Seat and restraint systems
4-11
4
tion
switch
was
turned
on,
the
warning
light
will
come
on
and
blink
repeatedly
and
the
tone
will
sound
intermittentl
y.
The
warning
light
and
the
tone
will
stop
after
approximately 90 seconds.If
you
then
repeatedly
stop
and
start
your
vehicle
with
the
seat
belt
unfastened,
the
warning
light/display
and
tone
will
remind
you
to
fasten
your
seat
belt
every
time
the
vehicle
starts
moving.
You
will
also
be
reminded
to fasten
your
seat
belt
in this
way
when
you
remove
your
seat
belt
while
driv-
ing.
The
warning
light
and
the
tone
go
off
when
the
seat
belt
is fastened.
N00418300
165
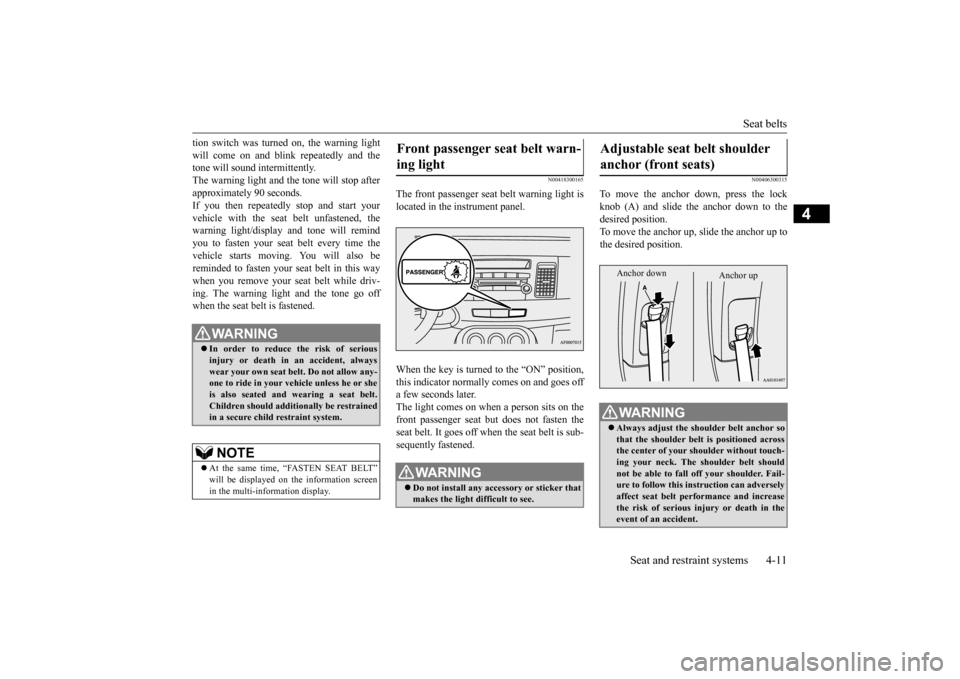
The
front
passenger
seat
belt
warning
light
is
located in the instrument panel.When
the
key
is turned
to the
“ON”
position,
this
indicator
normally
comes
on
and
goes
off
a few seconds later
.
The
light
comes
on
when
a person
sits
on
the
front
passenger
seat
but
does
not
fasten
the
seat
belt.
It goes
off when
the
seat
belt
is sub-
sequently fastened.
N00406300
315
To move
the
anchor
down,
press
the
lock
knob
(A)
and
slide
the
anchor
down
to
the
desired position. To move
the
anchor
up,
slide
the
anchor
up
to
the desired position.
W
AR
NING
In
order
to
reduce
the
risk
of
serious
injury
or
death
in
an
accident,
always
wear
your own
seat belt. Do
not
allow
any-
one to ride in your vehicle unless he or she is also
seate
d and
wearing
a seat
belt.
Child
ren sho
uld addition
ally
be restrain
ed
in a secu
re child
restraint syste
m.
NOTE
At the same
time,
“FASTEN
SEAT BELT”
will be display
ed on
the information
screen
in the multi-information
display
.
Fr
ont passenger seat belt warn-
ing light
W
AR
NING
Do not install
any accessory
or stick
er that
makes the light difficult to see.
Adjustable seat belt shoulder anchor (fr
ont seats)
W
AR
NING
Always
adjust
the
shoulder
belt
anchor
so
that
the
shoul
der belt is posi
tione
d across
the
center
of your
shoul
der without
touc
h-
ing
your
neck.
The
shoul
der
belt shoul
d
not
be able
to fall
off
your
shoul
der. Fail-
ure to follow
this instr
uction
can
advers
ely
affect
seat belt perfor
mance
and
increase
the
risk
of serious
injur
y or death
in the
event of an accident.Anchor
down
Anchor
up
Page 38 of 392
Child
restraint
systems
4-14
Seat and restraint systems
4
All
children
should
be
properly
restrained
in
a restraint
device
that
offers
the
maximum
protection
for
their
size
and
age.
Be
sure
to
check
local,
state,
or
provincial
requirements
for
child
size
and
age
that
may
vary from the recommendations listed below
.
Children
less
than
1 year
old
and
who
weigh
22
pounds
(10
kg)
or
less
MUST
ride
in a rear
-facing
child
safety
seat
that
MUST ONL
Y be used in the rear seat.
Children
older
than
1 year
of age
and
who
weigh
less
than
40
pounds
(18
kg)
or who
are
less
than
40
inches
(100
cm)
tall
must
be
in a forward-facing
restraint
used
only
in the rear seat.Children
who
weigh
more
than
40
pounds
(18
kg)
or
who
are
more
than
40
inches
(100
cm)
tall,
regardless
of
age,
should
use
a suitable
child
seat
or
a booster
seat
in
the
rear
seat
until
the
vehicle’
s
lap/shoulder belt fits them properly
.
Guidelines for child
restraint
system selection
W
AR
NING
All
childr
en must
be
seated
in
the
rear
seat,
and
properly
restrained.
Accident
statistics
show
that
childr
en
of
all
sizes
and
ages
are safer
when
properly
restrained in the
rear
seat, rather
than
in
the
front
seat.
Any
child who
is too
large to use
a child
restraint
system
should
ride
in
the
rear
seat
and
wear
the lap
and
sho
ulder
belt
properly
. The
shoulder
belt
must
be
posi-
tion
ed over
the
shoul
der
and
acr
oss
the
chest,
not
acr
oss their
neck
, and
with
the
lap
belt posi
tione
d low
on
the
child’s hips,
not
acr
oss their
stomach.
If necessary
, a
booster
seat sho
uld be use
d to help
achieve
a proper
seat
belt
fit.
Follow
the
booster
seat
manufac
tur
er’s instr
uctions.
Only use
a booster
seat
that
is certified
as
comply-
ing
with
Federal
Motor
Vehicle
Safety
Standards
or Motor
Vehicle
Restraint
Sys-
tems
and
Booster
Seats
Safety
Regula-
tions. Never
hold
an
infant
or child
in your
arms
or on
your
lap
when
riding
in this
vehicle,
even
whe
n you are wearin
g your seat belt.
Never
place
any par
t of the
seat
belt you
are wearing
around
an
infant
or
child.
Failur
e to follow
these
simple
instructions
create
s a risk
of serious
injury
or death
to
your
child
in the
event
of an
accident
or
sudden
stop.
W
AR
NING
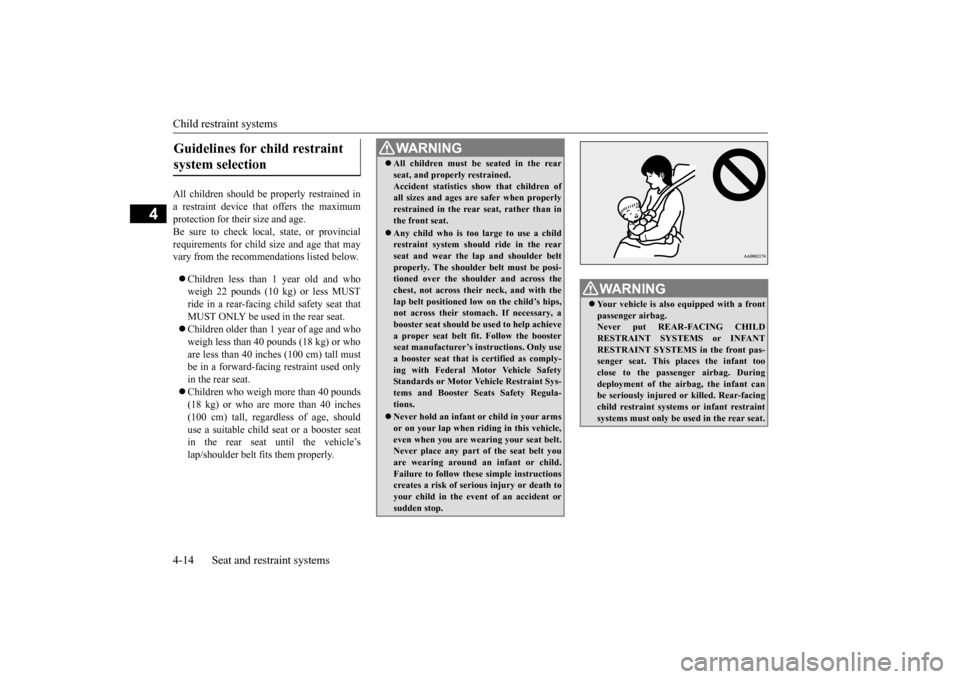
Your vehicle
is also equi
ppe
d with a front
passe
nger
airbag.
Never
put
REAR-
FACING
CHILD
RESTRAINT
SYSTEM
S or INF
ANT
RESTRAINT
SYSTEM
S in the
front
pas-
senger
seat.
Thi
s places
the
infant
too
close
to
the
passe
nger
airbag.
Durin
g
deployme
nt
of
the
airbag,
the
infant
can
be
seriously
injur
ed or
killed.
Rear
-facing
child
restraint
systems
or
infant
restraint
systems
must
only be use
d in the rear
seat.
Page 39 of 392
Child restraint systems
Seat and restraint systems
4-15
4
W
AR
NING
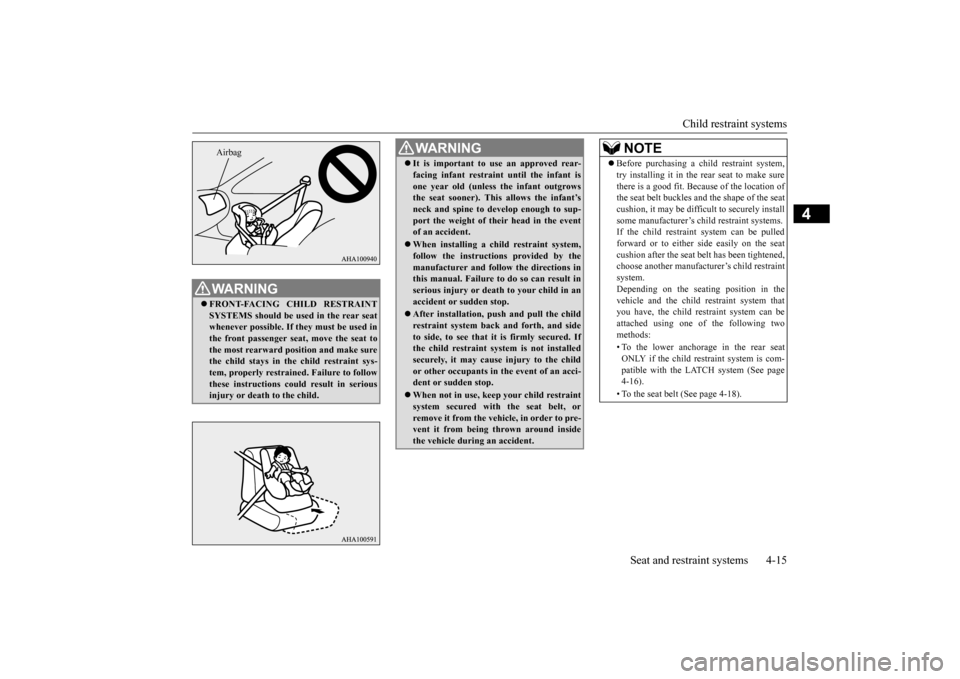
FRONT-FACING
CHILD RESTRAINT
SYSTEMS
sho
uld be use
d in the rear
seat
whe
never possi
ble. If the
y must
be use
d in
the front passenger
seat,
move
the seat
to
the
most
rearward
position
and
make
sur
e
the child stays
in the child restrain
t sys-
tem,
properly
restrained. Failure to follo
w
these
instructions
could
result
in
serious
injury
or d
eath to the
child.
Airbag
W
AR
NING
It is imp
ortan
t to
use
an appr
oved
rear
-
facing
infant
restraint
until
the
infant
is
one year
old
(unless
the infan
t outgr
ows
the seat
soon
er).
This allows
the infan
t’s
neck
and
spi
ne to develop
enough to sup-
por
t the
weight
of their
head
in the
event
of an
accid
ent.
Whe
n installing
a child restraint
syste
m,
follow
the
instr
uctions
provi
ded by
the
manufac
tur
er and
follow
the
directions
in
this manual
. Failure to do
so can
resul
t in
serious
injury or death
to you
r child in an
accid
ent or sudde
n stop
.
After
installat
ion,
push
and
pull
the
child
restraint
system
back
and
forth,
and
side
to side,
to see
that
it is firmly
secur
ed. If
the
child restraint
syste
m is not installed
secu
rely, it may
cause
injury
to the
child
or other
occupa
nts
in the
event of an
acci-
dent or sudde
n stop.
Whe
n not
in use
, keep
your
child restraint
syste
m secu
red with
the
seat
belt,
or
remove
it from
the
vehicle,
in order to pre-
vent
it from
being
thr
own
around
inside
the vehicle during an accident.
NOTE
Bef
ore purchasing
a child
restraint
system,
try
installing
it in the
rear
seat
to make
sure
there
is a good
fit.
Because
of the
location
of
the seat
belt
buckles and the shape
of the seat
cushion,
it may
be difficu
lt to secur
ely
install
some manufacturer
’s child restraint systems.
If the
child
restraint
system
can
be
pulled
forwa
rd
or
to eith
er side
eas
ily on
the
seat
cushion
after the
seat
belt
has been
tigh
ten
ed,
choo
se ano
ther
manufacture
r’s child
restrain
t
system. Depending
on
the
seating
pos
ition
in
the
vehicle
and
the
child
restraint
system
that
you
have,
the
child
restraint
system
can
be
attached
using
one
of
the
follow
ing
two
methods
:
•To the
low
er
anchorage
in
the
rear
seat
ONL
Y if the
child
restraint
system
is com-
patible
with
the
LATCH
system
(See
page
4-16).•To the
seat
belt
(See
page
4-18).
Page 40 of 392
Child
restraint
systems
4-16
Seat and restraint systems
4
N0041880
0131
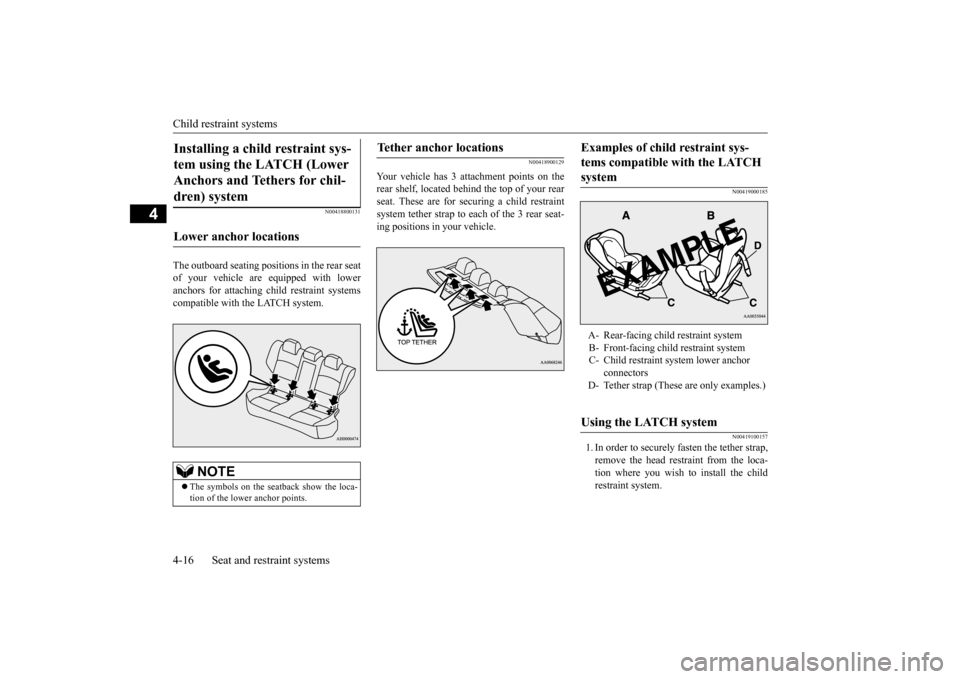
The
outboard
seating
positions
in the
rear
seat
of
your
vehicle
are
equipped
with
lower
anchors
for
attaching
child
restraint
systems
compatible with the LA
TCH system.
N0041890
0129
Your
vehicle
has
3 attachment
points
on
the
rear
shelf,
located
behind
the
top
of your
rear
seat.
These
are
for
securing
a child
restraint
system
tether
strap
to each
of
the
3 rear
seat-
ing
positions
in your
vehicle.
N0041900
0185
N0041910
0157
1.In order
to securely
fasten
the
tether
strap,
remove
the
head
restraint
from
the
loca-
tion
where
you
wish
to
install
the
child
restraint system.
Installing a child r
estraint sys-
tem using the LA
TCH (Lower
Anchors and
Tethers for chil-
dr
en) system
Lower anchor locations
NOTE
The
symbols
on
the
seatback
show
the
loca-
tion
of the
low
er anchor
points.
Tether anchor locations
Examples of child r
estraint sys-
tems compatible with the LA
TCH
system A-
Rear
-facing
child
restraint
system
B-
Front-facing child restraint system
C-
Child restraint system lower anchor connectors
D-
Tether
strap
(These
are
only
examples.)
Using the LA
TCH system
Page 41 of 392
Child restraint systems
Seat and restraint systems
4-17
4
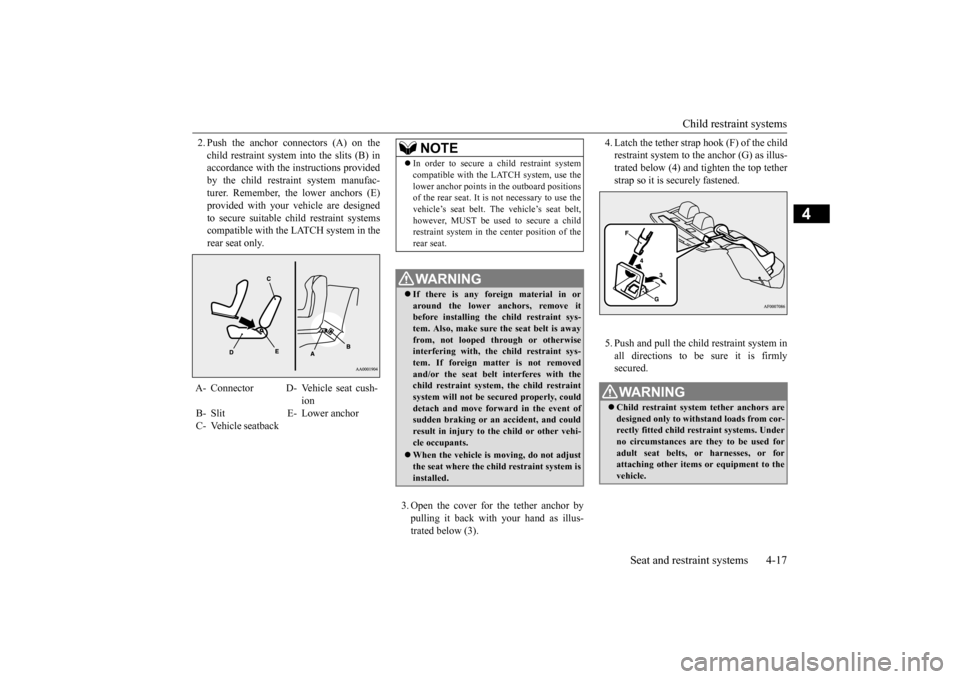
2.Push
the
anchor
connectors
(A)
on
the
child
restraint
system
into
the
slits
(B)
in
accordance
with
the
instructions
provided
by
the
child
restraint
system
manufac-
turer
. Remembe
r, the
lower
anchors
(E)
provided
with
your
vehicle
are
designed
to
secure
suitable
child
restraint
systems
compatible
with
the
LA
TCH
system
in the
rear seat onl
y.
3.Open
the
cover
for
the
tether
anchor
by
pulling
it back
with
your
hand
as
illus-
trated below
(3).
4.Latch
the
tether
strap
hook
(F)
of the
child
restraint
system
to the
anchor
(G)
as illus-
trated
below
(4)
and
tighten
the
top
tether
strap so it is securely fastened.5.Push
and
pull
the
child
res
traint
system
in
all
directions
to
be
sure
it
is
firmly
secured.
A-
Connector
D-
Vehicle
seat
cush-
ion
B-
Slit
E-
Lower anchor
C-
Vehicle
seatback
NOTE
In
orde
r to secure
a child restrain
t system
compatib
le with the LATCH
system,
use
the
low
er anchor
points
in the
outboard
pos
itions
of the rear seat.
It is not
necessa
ry to use
the
vehicle’
s seat
belt.
The
vehicle’
s seat
belt,
howe
ver, MUST
be use
d to secure
a child
restraint
system
in the
center
position
of the
rear
seat.
W
AR
NING
If
the
re is any
for
eign
materia
l in or
around
the
lower
anc
hor
s,
remove
it
befor
e installing
the
child restraint
sys-
tem. Also, make
sure the
seat
belt
is away
from,
not
looped
thr
ough
or
otherwise
interfering
with,
the
child
restraint
sys-
tem.
If
for
eign
matter
is
not
removed
and/
or the
seat
belt interf
eres with
the
child restrain
t system,
the child restrain
t
system
will not be secu
red properly
, cou
ld
detach
and
move
forw
ard
in the even
t of
sudden
braking
or
an
accident,
and
could
resul
t in injury
to the
child or other
veh
i-
cle
occupa
nts.
Whe
n the
vehicle
is movi
ng, do
not
adjust
the
seat
whe
re the
child restraint syste
m is
installed
.
W
AR
NING
Child
restraint
system tether
anc
hor
s are
designed
only
to withstand
loads
from
cor
-
rectly fitted
child restrain
t systems
. Unde
r
no circumstan
ces
are they
to be use
d for
adul
t seat
belts,
or har
nesses,
or for
attac
hing
other
items
or equi
pme
nt to the
vehicle.
Page 42 of 392
Child
restraint
systems
4-18
Seat and restraint systems
4
N0040730
1508
With
the
exception
of
the
driver
, the
seat
belt
in all other
seating
positions
can
be
converted
from
normal
Eme
rgency
Locking
Retractor
(ELR)
mode
to Automatic
Locking
Retractor
(ALR)
mode.
This
means
that
when
you
pull
the
seat
belt
fully
out
of
the
retractor
, the
retractor
will
switch
to its
ALR
child
restraint
installation
function.
Always
use
the
ALR
child
restraint
installation
function
when
you
install
a child
restraint
system
using
the
seat
bel
t.
Children
12
years
old
and
under
should
always
be
restrained
in
the
rear
seat,
when-
ever
possible,
although
the
front
passenger
seat belt can also be converted to ALR mode.
1.Place
the
child
restraint
system
on
the
seat
where you wish to install it.To help
assure
proper
fitting
of
the
child
restraint
system,
always
remove
the
head
restraint.2.Route
the
seat
belt
through
the
child
restraint
system
according
to
the
instruc-
tions
provided
by
the
child
restraint
sys-
tem
manufacturer
. Then
insert
the
seat
belt
latch
plate
into
the
buckle.
Make
sure
you
hear
a “click”
when
you
insert
the
latch plate into the buckle.
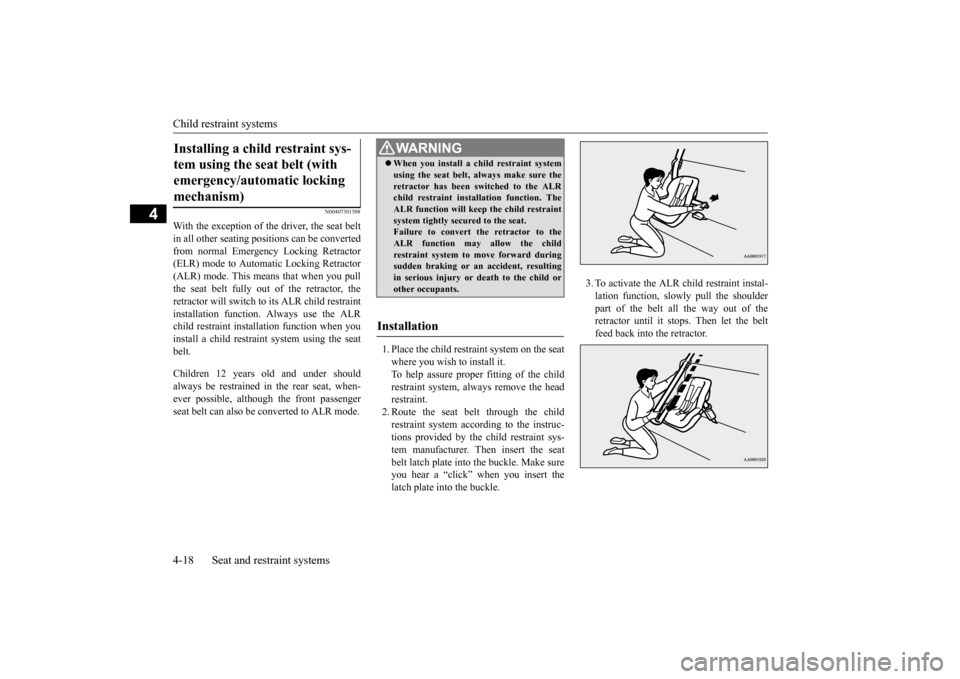
3.To activate
the
ALR
child
restraint
instal-
lation
function,
slow
ly
pull
the
shoulder
part
of
the
belt
all
the
way
out
of
the
retractor
until
it stops.
Then
let
the
belt
feed back into the retractor
.
Installing a child r
estraint sys-
tem using the seat belt (with emergency/automatic locking mechanism)
W
AR
NING
Whe
n you
install
a child restraint
syste
m
usi
ng
the
seat belt,
always
make
sur
e the
retractor
has
been
swi
tched to
the
ALR
child restraint
installati
on
func
tion.
The
ALR
func
tion
will keep
the
child restraint
system
tightly
secur
ed to the
seat.
Failur
e to
convert
the
retractor
to
the
ALR func
tion
may allow
the
child
restraint
system to move
for
war
d durin
g
sudden
braking
or
an
accident,
resulting
in serious
injury
or
death
to the
child
or
other
occupa
nts.
Installation
Page 43 of 392
Child restraint systems
Seat and restraint systems
4-19
4
4.After
the
belt
has
retracted,
tug
on
it.
If
the
belt
is in
the
ALR
function,
you
will
not
be
able
to
pull
it out.
If the
webbing
can
be
pulled
out
from
retracto
r, the
ALR
function
has
not
been
activated
and
you
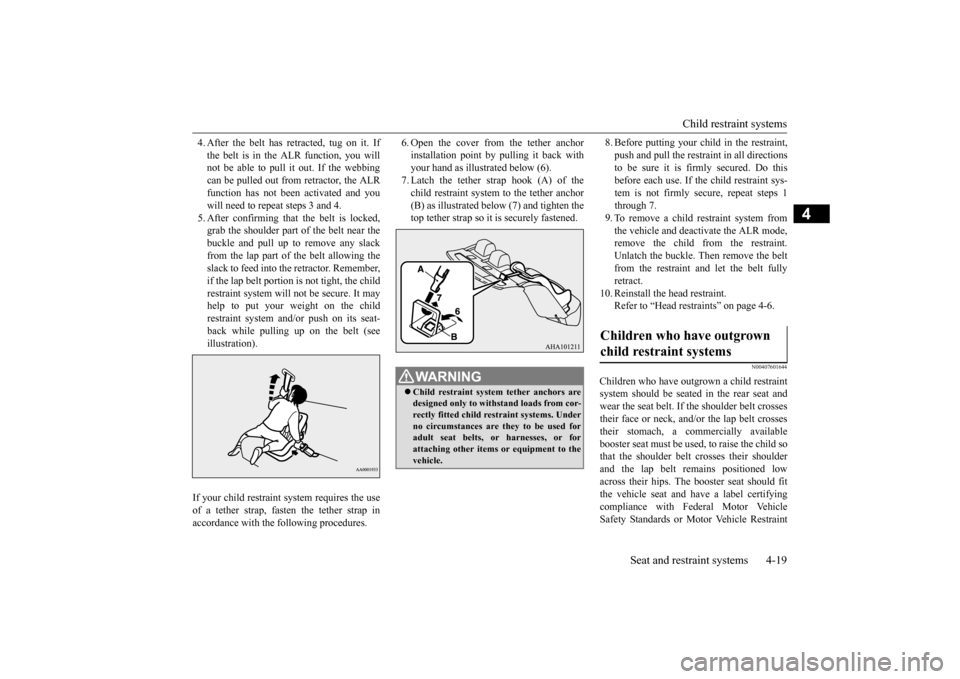
will need to repeat steps 3 and 4.5.After
confirming
that
the
belt
is locked,
grab
the
shoulder
part
of
the
belt
near
the
buckle
and
pull
up
to
remove
any
slack
from
the
lap
part
of
the
belt
allowing
the
slack
to feed
into
the
retractor
. Remember
,
if the
lap
belt
portion
is not
tight,
the
child
restraint
system
will
not
be
secure.
It may
help
to
put
your
weight
on
the
child
restraint
system
and/or
push
on
its
seat-
back
while
pulling
up
on
the
belt
(see
illustration).
6.Open
the
cover
from
the
tether
anchor
installation
point
by
pulling
it back
with
your hand as illustrated below (6).7.Latch
the
tether
strap
hook
(A)
of
the
child
restraint
system
to the
tether
anchor
(B)
as illustrated
below
(7)
and
tighten
the
top tether strap so it is securely fastened.
8.Before
putting
your
child
in the
restraint,
push
and
pull
the
restraint
in all directions
to
be
sure
it is
firmly
secured.
Do
this
before
each
use.
If the
child
restraint
sys-
tem
is
not
firmly
secure,
repeat
steps
1
through 7.9.To remove
a child
restraint
system
from
the
vehicle
and
deactivate
the
ALR
mode,
remove
the
child
from
the
restraint.
Unlatch
the
buckle.
Then
remove
the
belt
from
the
restraint
and
let
the
belt
fully
retract.
10.
Reinstall the head restraint.Refer to “Head restraints” on page 4-6.
N00407601
644
Children
who
have
outgrown
a child
restraint
system
should
be
seated
in
the
rear
seat
and
wear
the
seat
belt.
If the
shoulder
belt
crosses
their
face
or
neck,
and/or
the
lap
belt
crosses
their
stomach,
a
commercially
available
booster
seat
must
be
used,
to raise
the
child
so
that
the
shoulder
belt
crosses
their
shoulder
and
the
lap
belt
remains
positioned
low
across
their
hips.
The
booster
seat
should
fit
the
vehicle
seat
and
have
a label
certifying
compliance
with
Federal
Motor
Vehicle
Safety
Standards
or
Motor
Vehicle
Restraint
If your
child
restraint
system
requires
the
use
of
a tether
strap,
fasten
the
tether
strap
in
accordance with the following procedures.
W
AR
NING
Child
restraint
syste
m tether
anc
hors
are
designed
only
to withstand
loads
from
cor
-
rectly fitted child r
estraint systems. Under
no circumsta
nces
are the
y to be use
d for
adul
t seat
belts,
or
har
nesses,
or for
attach
ing
other
items
or
equi
pme
nt to the
vehicle.
Childr
en who have outg
rown
child r
estraint systems
Page 63 of 392
5
Features and controlsBreak-in recommendation
s ..............................................................
5-3
Keys
..........................................
.......................................................
5-3
Electronic
immobilizer
(Anti-thef
t starting system)
........................
5-4
Keyless entry system (if so equipped)
..............................................
5-7
Free-hand Advanced Security T
ransmitter
(F.A.S.T
.-key)
(if
so
equipped
)..................................................
5-12
Door locks
.......................
...............................................................
5-34
Power door locks
............
...............................................................
5-37
“Child safety locks” for
rear door
..................................................
5-38
Trunk lid
...................................
.....................................................
5-39
Inside emer
gency trunk lid
release
................................................
5-40
Theft-alarm system
................................................
........................
5-41
Power windows
...............
...............................................................
5-43
Sunroof (if so equipped
).........................................
........................
5-46
Parking brake
..................
...............................................................
5-48
Steering wheel tilt lock lever
.........................................................
5-49
Inside
day/night
rearview
mirror
...................................................
5-50
Outside
rearview
mirr
ors
...............................................................
5-51
Ignition switch
......
.................................................
........................
5-52
Steering wheel lock
................................................
........................
5-54
Starting
and
stopping
the
engine
....................................................
5-55
Manual transaxle (if so equipped)
..................................................
5-57
Continuously variable transmissi
on
(CVT)
(if
so
equipped)
..........
5-59
Electronically controlled 4WD system (if so equipped)
.................
5-68
All-wheel driving opera
tion
...........................................................
5-70
Cautions on handling of all-wheel drive vehicles
..........................
5-71
Service brake
..................
...............................................................
5-72
Brake assist system
................................................
........................
5-73
Anti-lock
braking
syst
em
.....................................
.........................
5-74
Active
Stability Control (ASC
) (if
so
equipped
)............................
5-76
Power
steering
system
..........................................
.........................
5-79
Cruise control (if so eq
uipped)
.......................................................
5-80
Tire pressure monitoring
system
...................................................
5-84
Rear
-view camera (if so
equipped
)..............
...................................
5-88
Instrument cluster
.................................................
.........................
5-90
Multi-information
disp
lay
....................................
.........................
5-91
Indicator light, warning light, and information screen display list
.................................................
..........................................
5-1
12
Indicators
.................................
....................................................
5-123
Warning lights
................
.................................................
.............
5-124
Information screen disp
lay
...................................
.......................
5-125
Combination headlights and dimmer switch
...............................
5-127
Headlight leveling switch (if
so equipped)
...................................
5-132
Turn signal lever
...................................................
.......................
5-133
Hazard warning flasher
switch
....................................................
5-133
Front fog light switch (if so
equipped)
.........................................
5-134
Wiper and washer swit
ch
......................................
.......................
5-134
Electric rear window def
ogger switch
.........................................
5-138
Horn switch
.............................
....................................................
5-139
Link System (if so equi
pped)
.......................................................
5-139
Bluetooth
® 2.0 interface (if so
equipped)
.....................................
5-139
USB input terminal
...............................................
.......................
5-162
Sun visors
......................
.................................................
.............
5-166
12 V power outlet
..........
.................................................
.............
5-166
Interior
lights
.................
.................................................
.............
5-167
Storage spaces ................
.................................................
.............
5-169
Page 66 of 392
![MITSUBISHI LANCER 2016 8.G User Guide Electronic immobilizer (Anti-theft starting system)5-4
Features and controls
5
N0050910
1804
[For
vehicles
equipped
with
the
Free-hand
Advanced
Security
Trans
mitter
(F.A.S.T.-
key)]For
infor](/img/19/7463/w960_7463-65.png "MITSUBISHI LANCER 2016 8.G User Guide Electronic immobilizer (Anti-theft starting system)5-4
Features and controls
5
N0050910
1804
[For
vehicles
equipped
with
the
Free-hand
Advanced
Security
Trans
mitter
(F.A.S.T.-
key)]For
infor")
Electronic immobilizer (Anti-theft starting system)5-4
Features and controls
5
N0050910
1804
[For
vehicles
equipped
with
the
Free-hand
Advanced
Security
Trans
mitter
(F.A.S.T.-
key)]For
information
on
operations
for
vehicles
equipped
with
the
Free-hand
Advanced
Secu-
rity
Transmitter
(F.A.S.T
.-key),
refer
to
“Free-hand
Advanced
Security
Transmitter
(F.A.S.T
.-key)”:
“Electronic
immobilizer
(Anti-theft starting system)” on page 5-27.[Except
for
vehicles
equipped
with
the
Free-
hand
Advanced
Security
Transmitter
(F.A.S.T
.-key)]
The
electronic
immobilizer
is designed
to sig-
nificantly
reduce
the
possibility
of
vehicle
theft.
The
purpose
of
the
system
is to immo-
bilize
the
vehicle
if
an
invalid
start
is
attempted.
A valid
start
attempt
can
only
be
achieved
(subject
to certain
conditions)
using
a key “registered” to the immobilizer system.All
of the
keys
provided
with
your
new
vehi-
cle
have
been
programmed
to
the
vehicle’
s
electronics.
1-
Free-hand
Advanced
Security
Transmit-
ter (F
.A.S.T
.-key)
(with
electronic
immo
bilizer
and
keyless
entry system function)
2-
Emer
gency key
3-
Key number plateNOTE
The key
is a precis
ion
electronic
device
with
a built-in sign
al trans
mitter
. Pleas
e obse
rve
the following in order to prevent damage.•Do
not
leav
e whe
re it may
be expose
d to
heat
cause
d by
direct
sunlight
, suc
h as on
top
of the dashboa
rd.
•Do
not
tak
e the remo
te cont
rol transmitter
apart.•Do
not
excessi
vely
bend
the key or subject
it to strong
impacts.
•Keep
the
remote
control
transmitter
dry
.
•Keep
away
from
magnetic
objects
such
as
key
holders
.
•Keep
away from
devices
that
produce
mag-
netis
m, suc
h as audi
o systems,
computer
s
and
televis
ions
.
•Keep
away
from
devices
that
emit
strong
electromagnetic
waves
, such
as cellular
phones,
wireless
devices
and
high
fre-
quency equip
ment
(inclu
ding
med
ical
devices).•Do
not
clean
with
ultrasonic
cleaners.
•Do not
leave
the
key
where
it may
be
expos
ed to high
temperature
or high
humid-
ity.
If you
lose
your
key
, to prevent
the
theft
of
the vehicle
immed
iately
contact
an autho-
rized Mitsubi
shi Mot
ors dealer
.
If
you
notify
an authorized
Mitsubi
shi
Mot
ors
dealer
of
the key num
ber, they can
make
a new
key
. The
key
number
is stamped
on
the
key
number
plate.
Keep
the
key
num-
ber
plate
in a safe
place
separate
from
the
key
itself.
No keys
oth
er than
those
registered in
adv
ance can b
e us
ed to s
tart th
e eng
ine.
Ref
er to “Electronic
immobilizer
(Anti-
theft
starting system)” on page 5-4. Ref
er to
“Free-
hand
Adva
nced
Security
Trans
mitter
(F.A.S.T
.-key)
”:
“Electr
onic
immobilizer
(Anti-theft
starting
system)”
on
page
5-27.
NOTE
Electr
onic immobilizer
(Anti-theft starting system)
Page 76 of 392
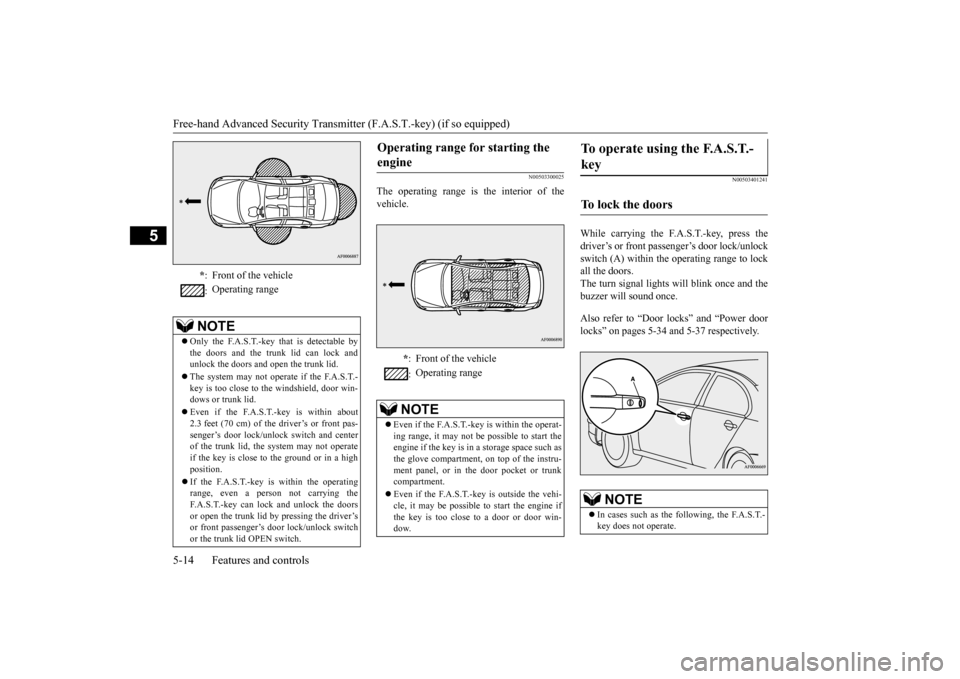
Free-hand Advanced Security Transmitter (F.A.S.T.-key) (if so equipped)5-14
Features and controls
5
N0050330
0025
The
operating
range
is
the
interior
of
the
vehicle.
N0050340
1241
While
carrying
the
F.A.S.T
.-key
, press
the
driver
’s or front
passenger
’s door
lock/unlock
switch
(A)
within
the
operating
range
to lock
all the doors. The
turn
signal
lights
will
blink
once
and
the
buzzer will sound once. Also
refer
to
“Door
locks”
and
“Power
door
locks” on pages 5-34 and 5-37 respectively
.
*:Front of the vehicle
:Operating range
NOTE
Only
the
F.A.S.T
.-key
that
is detectable
by
the
doors
and
the
trunk
lid
can
lock
and
unlock
the
doors
and
open
the
trunk
lid.
The system
may
not
ope
rate
if the F.A.S.T
.-
key is too
close
to the windshield,
door
win-
dows
or trunk
lid.
Even if the
F.A.S.T
.-key
is within
abou
t
2.3feet
(70
cm)
of the driver
’s or front pas-
senger
’s door lock/un
lock
switch
and
cen
ter
of the
trunk
lid,
the
system
may
not
operate
if the
key
is close
to the
ground
or in a high
position.If the
F.A.S.T
.-key
is within
the
operating
range,
even
a person
not
carrying
the
F.A.S.T
.-key
can
lock
and
unl
ock
the doors
or open
the
trunk
lid
by
pressing
the
driver
’s
or front
passenger
’s door lock/u
nlock
switch
or the trunk
lid
OPE
N switch.
Operating range for starting the engine
*:
Front of the vehicle
:Operating range
NOTE
Even
if the F.A.S.T
.-ke
y is within the
oper
at-
ing
range,
it may
not
be
possible
to start
the
engi
ne if the key is in a stora
ge space suc
h as
the glove
compartmen
t, on
top
of the instru-
ment
panel,
or
in the
door
pocket
or
trunk
compartment.Even
if the
F.A.S.T.-key
is outs
ide
the
vehi-
cle,
it may
be
possible
to start
the
engine
if
the key is too
close
to a door
or door
win-
dow
.
To operate using the F
.A.S.T
.-
key
To lock the doors
NOTE
In cas
es such
as the
follow
ing,
the
F.A.S.T.-
key does not operate.