lock MITSUBISHI LANCER EVOLUTION 2007 Service Service Manual
[x] Cancel search | Manufacturer: MITSUBISHI, Model Year: 2007, Model line: LANCER EVOLUTION, Model: MITSUBISHI LANCER EVOLUTION 2007Pages: 1449, PDF Size: 56.82 MB
Page 404 of 1449

GENERAL -Support Locations for Lifting and Jacking00-26
PLATE TYPE LIFT
To avoid damaging the side sill garnish, put a wooden block between the side sill and a lift.
NOTE
The wooden block should be 100 mm wide and 50 mm high.
SUPPORT POSITIONS AND SUPPORT METHOD
FOR AN H-BAR LIFT
Caution
When service procedures require removing the rear
suspension, fuel tank, spare tyre and rear bumper, place
additional weight on rear end of vehicle or anchor vehicle
to hoist to prevent tipping of centre of gravity changes.
When H-bar lift is used to lift up vehicles, use of metallic
attachment attached to the H-bar lift may cause damage
to the suspension arm etc. Therefore, lift up the vehicle by
the following procedure.
1. Place the vehicle on the H-bar lift (same direction).
2. Place attachments on the H-bar lift at the designated
chassis-support positions. When making the attachments,
refer to the section concerning making them.
Caution
If support is at any location other than the designated
positions, the body or suspension might be deformed
or otherwise damaged, so care should be taken to
support only at the correct (designated) positions.
3. Raise the H-bar lift to the height at which the vehicle
is slightly raised and check to be sure that the vehicle
is correctly and sufficiently secured; then raise the vehicle.
H-bar lift
H-bar lift
A
Chassis-sup-
port position
(side sill)
Attachment
H-bar liftSection A - A
Side sill
AttachmentH-bar lift
A
Page 405 of 1449

GENERAL -Support Locations for Lifting and Jacking00-27
PREPARATION OF “ATTACHMENTS”
1. Prepare the blocks (wooden) and nails as shown in the
figure.
ItemDimensions mmQuantity
Block (A)90×95×1,8002
Block (B)60×100×954
Block (C)140×40×958
Nail70 or more32
Caution
The wood selected for the blocks must be hard.
2. For the (B) blocks and (C) blocks, use a saw and chisel
or similar tool to make grooves of the dimensions shown
in the figure.
3. Make four “ATTACHMENTS” such as shown in the figure
nailing (B) and (C) blocks so that each (B) blocks is
sandwiches between (C) blocks.
Block (A)mm
1,800
90
95
Block (B) Block (C)
15
40
60
10040
2015
40
14040
20
40
Block (C)
140100
Block (C)
Nail
Block (B)
Finished attachment
Movable according
to vehicle width
Page 406 of 1449

GENERAL -Standard Part/Tightening-Torque Table00-28
STANDARD PART/TIGHTENING-TORQUE TABLE
Each torque value in the table is a standard value
for tightening under the following conditions.
(1) Bolts, nuts and washers are all made of steel
and plated with zinc.
(2) The threads and bearing surface of bolts and
nuts are all in dry condition.The values in the table are not applicable:
(1) If toothed washers are inserted.
(2) If plastic parts are fastened.
(3) If bolts are tightened to plastic or die-cast
inserted nuts.
(4) If self-tapping screws or self-locking nuts are
used.
Standard bolt and nut tightening torque
Thread sizeTorque N·m
Bolt nominal
diameter (mm)Pitch (mm)Head mark “4”Head mark “7”Head mark “8”
M50.82.50.55.01.06.01.0
M61.05.01.09.02.0102
M81.25122224254
M101.252444410537
M121.2541883129812
M141.573121402015525
M161.511 0202103023535
M181.5165253004034050
M201.5225354106048070
M221.5300405558564595
M241.539555735105855125
Flange bolt and nut tightening torque
Thread sizeTorque N·m
Bolt nominal
diameter (mm)Pitch (mm)Head mark “4”Head mark “7”Head mark “8”
M61.05.01.0102122
M81.25132244275
M101.25264499587
M101.52444585510
M121.25468951510515
M121.7543883129812
NOTE
1. Be sure to use only the specified bolts and nuts, and always tighten them to the specified torques.
2. Bolts marked with indications such as 4T or 7T are reinforced bolts. The larger the number, the
greater the bolt strength.
Page 413 of 1449

ENGINE -On-vehicle Service11A-7
ON-VEHICLE SERVICE
DRIVE BELT TENSION CHECK
1. Check that the indicator marking of the auto-tensioner
is within the range as shown in the illustration A of the
tensioner bracket.
Caution
Inspection must be carried out after turning the
crankshaft clockwise for more than once.
2. If the marking is outside the range as shown in the
illustration A, replace the drive belt.
NOTE
Due to the adoption of the auto-tensioner, no adjustment
for belt tension is required.
AUTO-TENSIONER CHECK
1. Check that the driver belt stays within the width of the
pulley of the auto-tensioner after turning off the engine
at idle.
2. Remove the drive belt.(Refer to P.11C-15.)
3. Use the 12.7sq. spinner handle and etc. to check that
the auto-tensioner is not stuck by turning it in both
directions.
4. If there is any abnormality in the above - mentioned 1
or 3, replace the auto-tensioner.
5. Install the drive belt.(Refer to P.11C-15.)
To determine whether the auto-tensioner is acceptable can
be done by checking the drive belt tension.
1. Use the following procedure to check the drive belt tension.
(1) Connect the special tool (MB991668) to the MUT-II.
(2) Connect the MUT-IIto the diagnosis connector.
Caution
Connection and disconnection of the MUT-IImust
be carried out after turning the ignition switch
to the “LOCK” (OFF) position.
(3) Turn the ignition switch to the “ON” position and select
“Belt Tension Measurement” from the menu screen.
Indicator
marking
A
Page 415 of 1449

ENGINE -On-vehicle ServiceENGINE -On-vehicle Service11A-9
IGNITION TIMING CHECK
1. Before inspection, set the vehicle to the pre-inspection
condition.
2. Turn the ignition switch to “LOCK” (OFF) position and
then connect the MUT-IIto the diagnosis connector.
3. Set up a timing light.
4. Start the engine and run at idle.
5. Check that engine idle speed is within the standard value.
Standard value: 850±100 r/min
6. Select No.17 of the MUT-IIActuator test.
7. Check that basic ignition timing is within the standard
value.
Standard value: 5_BTDC±3_
8. If the basic ignition timing is outside the standard value,
inspect the MPI system while referring to GROUP 13A
- Troubleshooting.
9. Press the MUT-IIclear key (Select a forced driving cancel
mode) to release the Actuator test.
Caution
If the test is not cancelled, a forced driving will
continue for 27 minutes. Driving under this condition
may damage the engine.
10. Check that ignition timing is at the standard value.
Standard value: approximately 5_BTDC
NOTE
(1) Ignition timing is variable within about±7, even under
normal operating.
(2) And it is automatically further advanced by
approximately 5_from standard value at higher
altitudes.
11. Remove the timing light.
12. Turn the ignition switch to “LOCK” (OFF) position and
then remove the MUT-II.
IDLE SPEED CHECK
1. Before inspection, set the vehicle to the pre-inspection
condition.
2. Turn the ignition switch to “LOCK” (OFF) position, and
then connect the MUT-IIto the diagnosis connector.
3. Set the timing light.
4. Check that the basic ignition timing is within the standard
value.
MUT-II
MUT-II
Page 416 of 1449

ENGINE -On-vehicle ServiceENGINE -On-vehicle Service11A-10
Standard value: 5_BTDC±3_
5. Run the engine at idle for 2 minutes.
6. Check the idle speed. Select item No. 22 and take a
reading of the idle speed.
Curb idle speed: 850±100 r/min
NOTE
The idle speed is controlled automatically by the idle speed
control (ISC) system.
7. If the idle speed is outside the standard value, check
the MPI components by referring to GROUP 13A -
Troubleshooting.
8. Remove the timing light.
9. Turn the ignition switch to the “LOCK” (OFF) position
and then remove the MUT-II.
IDLE MIXTURE CHECK
1. Before inspection, set the vehicle to the pre-inspection
condition.
2. Turn the ignition switch to the “LOCK” (OFF) position,
and then connect the MUT-IIto the diagnosis connector.
3. Set the timing light.
4. Check that the basic ignition timing is within the standard
value.
Standard value: 5_BTDC±3_
5. Run the engine at 2,500 r/min for 2 minutes.
6. Set the CO, HC tester.
7. Check the CO contents and the HC contents at idle.
Standard value
CO contents: 0.1% or less
HC contents: 100 ppm or less
8. If there is a deviation from the standard value, check the
following items:
DDiagnosis output
DClosed-loop control (When the closed-loop control
is normal, the output signal of the oxygen sensor
changes between 0 - 400 mV and 600 - 1,000 mV
at idle.)
DFuel pressure
DInjector
DIgnition coil, spark plug cable, spark plug
DEvaporative emission control system
DCompression pressure
NOTE
Replace the three way catalyst when the CO and HC
contents are not within the standard value, even though
the result of the inspection is normal on all items.
9. Remove the timing light.
MUT-II
Page 417 of 1449

ENGINE -On-vehicle ServiceENGINE -On-vehicle ServiceENGINE -On-vehicle Service11A-11
10. Turn the ignition switch to the “LOCK” (OFF) position
and then remove the MUT-II.
COMPRESSION PRESSURE CHECK
1. Before inspection, check that the engine oil, starter and
battery are normal. In addition, set the vehicle to the
pre-inspection condition.
2. Remove the ignition coils and spark plug cables.
3. Remove all of the spark plugs.
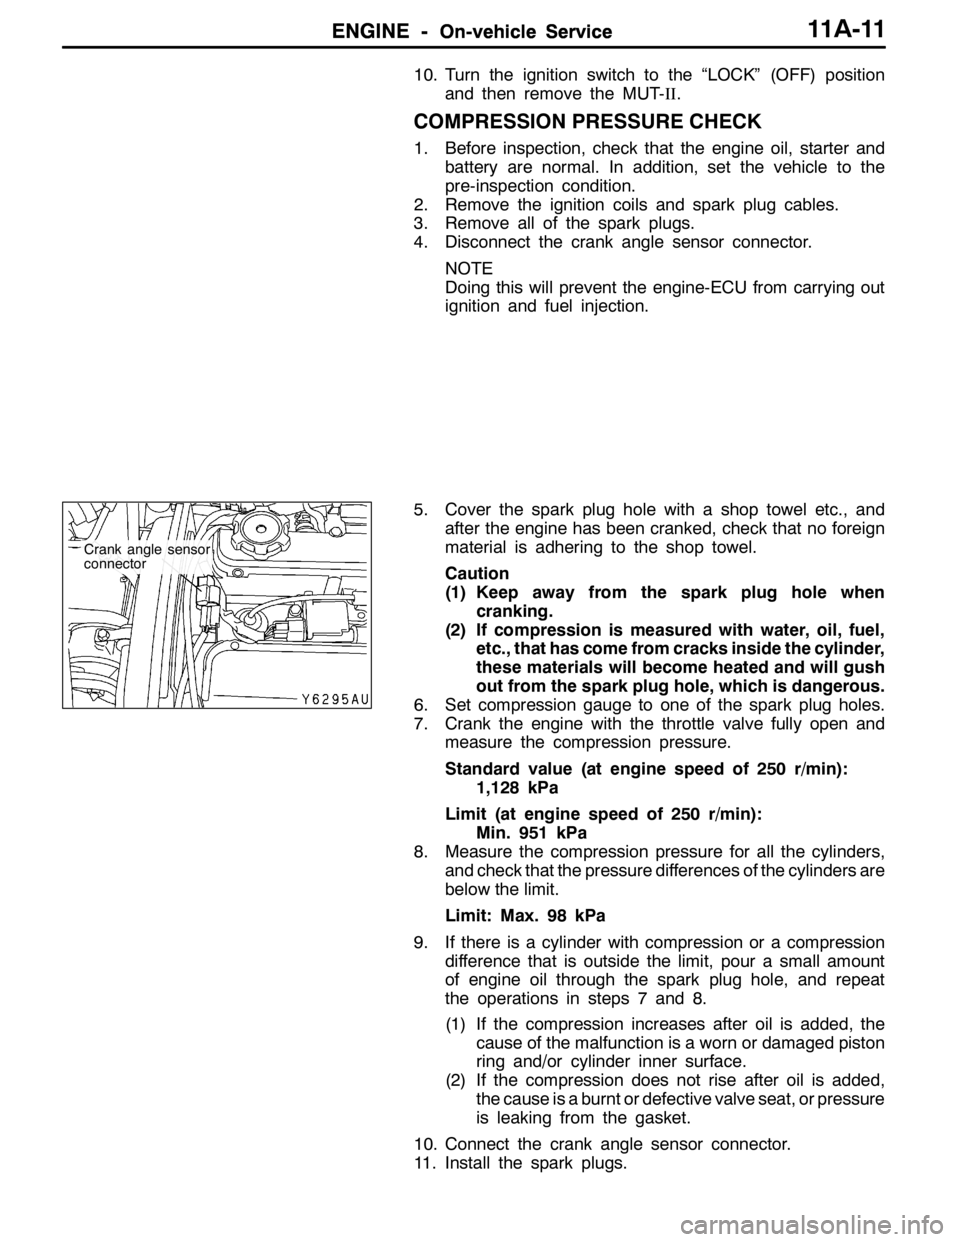
4. Disconnect the crank angle sensor connector.
NOTE
Doing this will prevent the engine-ECU from carrying out
ignition and fuel injection.
5. Cover the spark plug hole with a shop towel etc., and
after the engine has been cranked, check that no foreign
material is adhering to the shop towel.
Caution
(1) Keep away from the spark plug hole when
cranking.
(2) If compression is measured with water, oil, fuel,
etc., that has come from cracks inside the cylinder,
these materials will become heated and will gush
out from the spark plug hole, which is dangerous.
6. Set compression gauge to one of the spark plug holes.
7. Crank the engine with the throttle valve fully open and
measure the compression pressure.
Standard value (at engine speed of 250 r/min):
1,128 kPa
Limit (at engine speed of 250 r/min):
Min. 951 kPa
8. Measure the compression pressure for all the cylinders,
and check that the pressure differences of the cylinders are
below the limit.
Limit: Max. 98 kPa
9. If there is a cylinder with compression or a compression
difference that is outside the limit, pour a small amount
of engine oil through the spark plug hole, and repeat
the operations in steps 7 and 8.
(1) If the compression increases after oil is added, the
cause of the malfunction is a worn or damaged piston
ring and/or cylinder inner surface.
(2) If the compression does not rise after oil is added,
the cause is a burnt or defective valve seat, or pressure
is leaking from the gasket.
10. Connect the crank angle sensor connector.
11. Install the spark plugs.
Crank angle sensor
connector
Page 418 of 1449

ENGINE -On-vehicle Service11A-12
12. Install the ignition coils and spark plugs.
13. Use the MUT-IIto erase the self-diagnosis codes or
disconnect the battery cable from the battery ( - ) terminal
for 10 seconds or more and then reconnect the cable.
NOTE
This will erase the diagnosis code resulting from the crank
angle sensor connector being disconnected.
MANIFOLD VACUUM CHECK
1. Set the vehicle to the pre-inspection condition.
2. Turn the ignition switch to the “LOCK” (OFF) position.
3. Set the engine tachometer or connect the MUT-II.
4. Check that the idle speed is within the standard value.
NOTE
When using the MUT-II, select the code No.22.
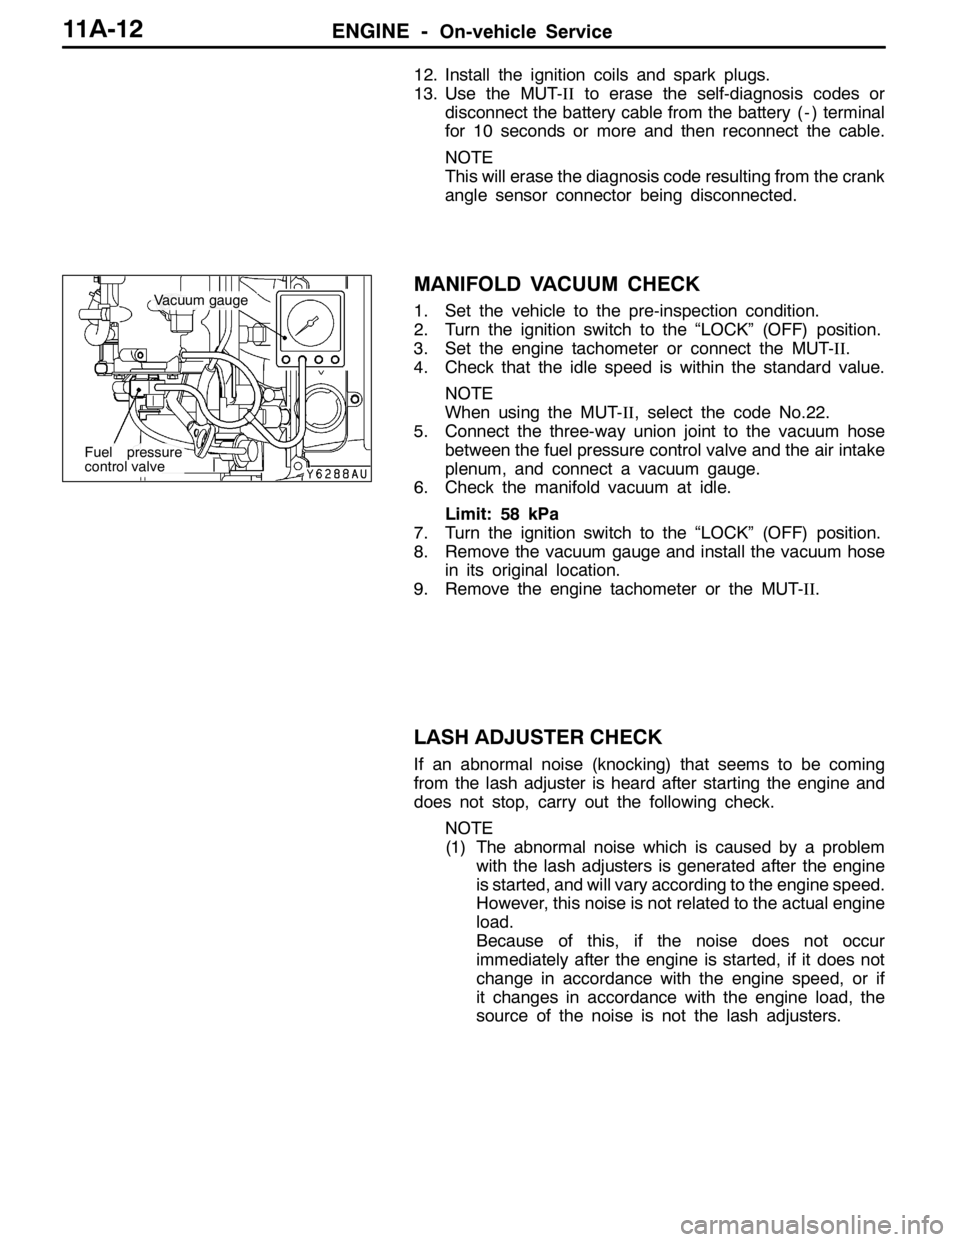
5. Connect the three-way union joint to the vacuum hose
between the fuel pressure control valve and the air intake
plenum, and connect a vacuum gauge.
6. Check the manifold vacuum at idle.
Limit: 58 kPa
7. Turn the ignition switch to the “LOCK” (OFF) position.
8. Remove the vacuum gauge and install the vacuum hose
in its original location.
9. Remove the engine tachometer or the MUT-II.
LASH ADJUSTER CHECK
If an abnormal noise (knocking) that seems to be coming
from the lash adjuster is heard after starting the engine and
does not stop, carry out the following check.
NOTE
(1) The abnormal noise which is caused by a problem
with the lash adjusters is generated after the engine
is started, and will vary according to the engine speed.
However, this noise is not related to the actual engine
load.
Because of this, if the noise does not occur
immediately after the engine is started, if it does not
change in accordance with the engine speed, or if
it changes in accordance with the engine load, the
source of the noise is not the lash adjusters.
Vacuum gauge
Fuel pressure
control valve
Page 422 of 1449

ENGINE -Crankshaft Pulley/Camshaft and Camshaft Oil Seal11A-16
REMOVAL SERVICE POINT
AA"DRIVE BELT REMOVAL
Due to the adoption of the Serpentine drive system with the
auto-tensioner, the following operation is required:
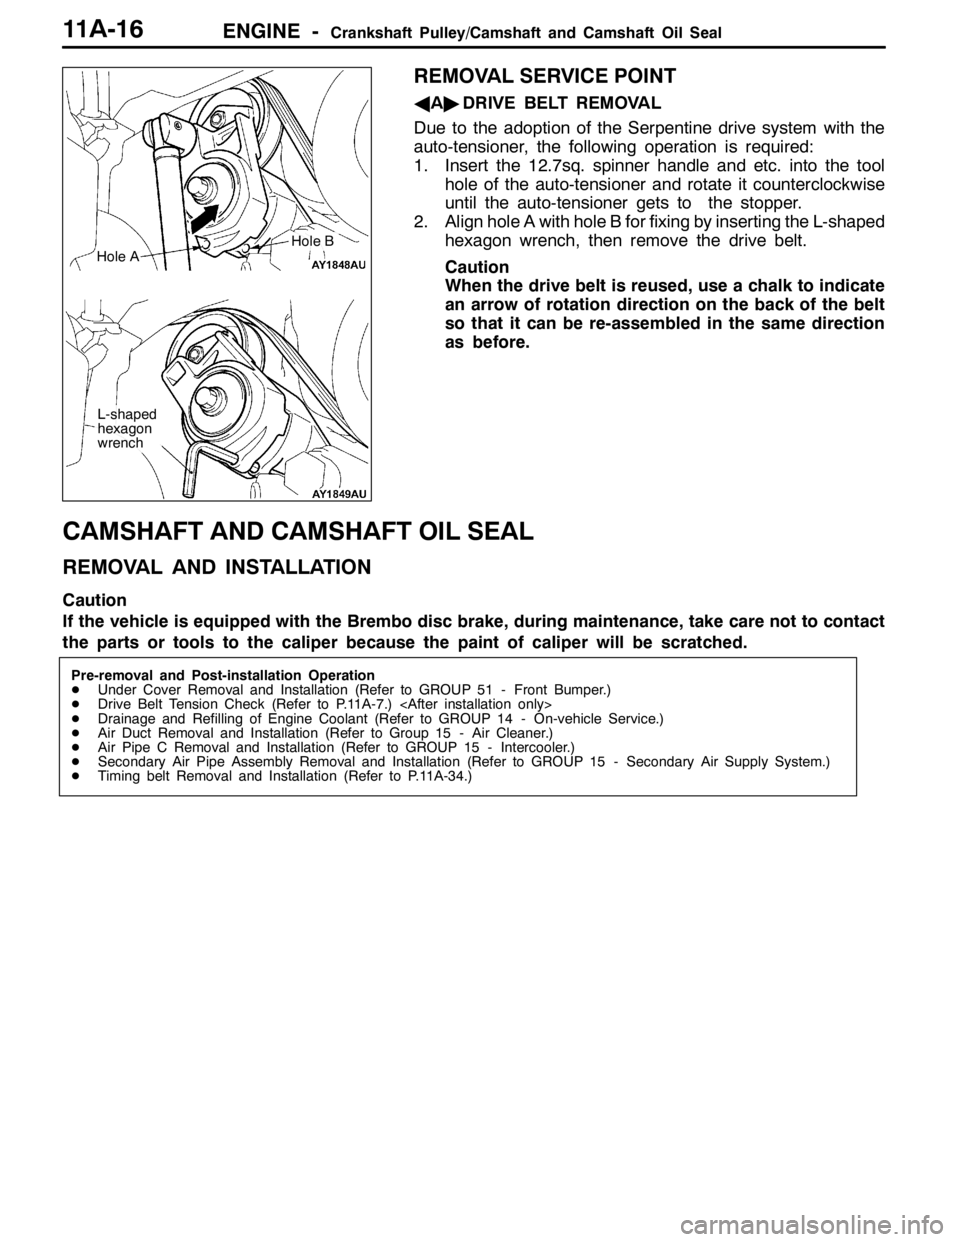
1. Insert the 12.7sq. spinner handle and etc. into the tool
hole of the auto-tensioner and rotate it counterclockwise
until the auto-tensioner gets to the stopper.
2. Align hole A with hole B for fixing by inserting the L-shaped
hexagon wrench, then remove the drive belt.
Caution
When the drive belt is reused, use a chalk to indicate
an arrow of rotation direction on the back of the belt
so that it can be re-assembled in the same direction
as before.
CAMSHAFT AND CAMSHAFT OIL SEAL
REMOVAL AND INSTALLATION
Caution
If the vehicle is equipped with the Brembo disc brake, during maintenance, take care not to contact
the parts or tools to the caliper because the paint of caliper will be scratched.
Pre-removal and Post-installation Operation
DUnder Cover Removal and Installation (Refer to GROUP 51 - Front Bumper.)
DDrive Belt Tension Check (Refer to P.11A-7.)
DDrainage and Refilling of Engine Coolant (Refer to GROUP 14 - On-vehicle Service.)
DAir Duct Removal and Installation (Refer to Group 15 - Air Cleaner.)
DAir Pipe C Removal and Installation (Refer to GROUP 15 - Intercooler.)
DSecondary Air Pipe Assembly Removal and Installation (Refer to GROUP 15 - Secondary Air Supply System.)
DTiming belt Removal and Installation (Refer to P.11A-34.)
Hole A
L-shaped
hexagon
wrench
Hole B
Page 428 of 1449

ENGINE -Camshaft and Camshaft Oil Seal11A-22
"FACAMSHAFT POSITION SENSOR SUPPORT
INSTALLATION
1. Remove sealant remained on the camshaft position
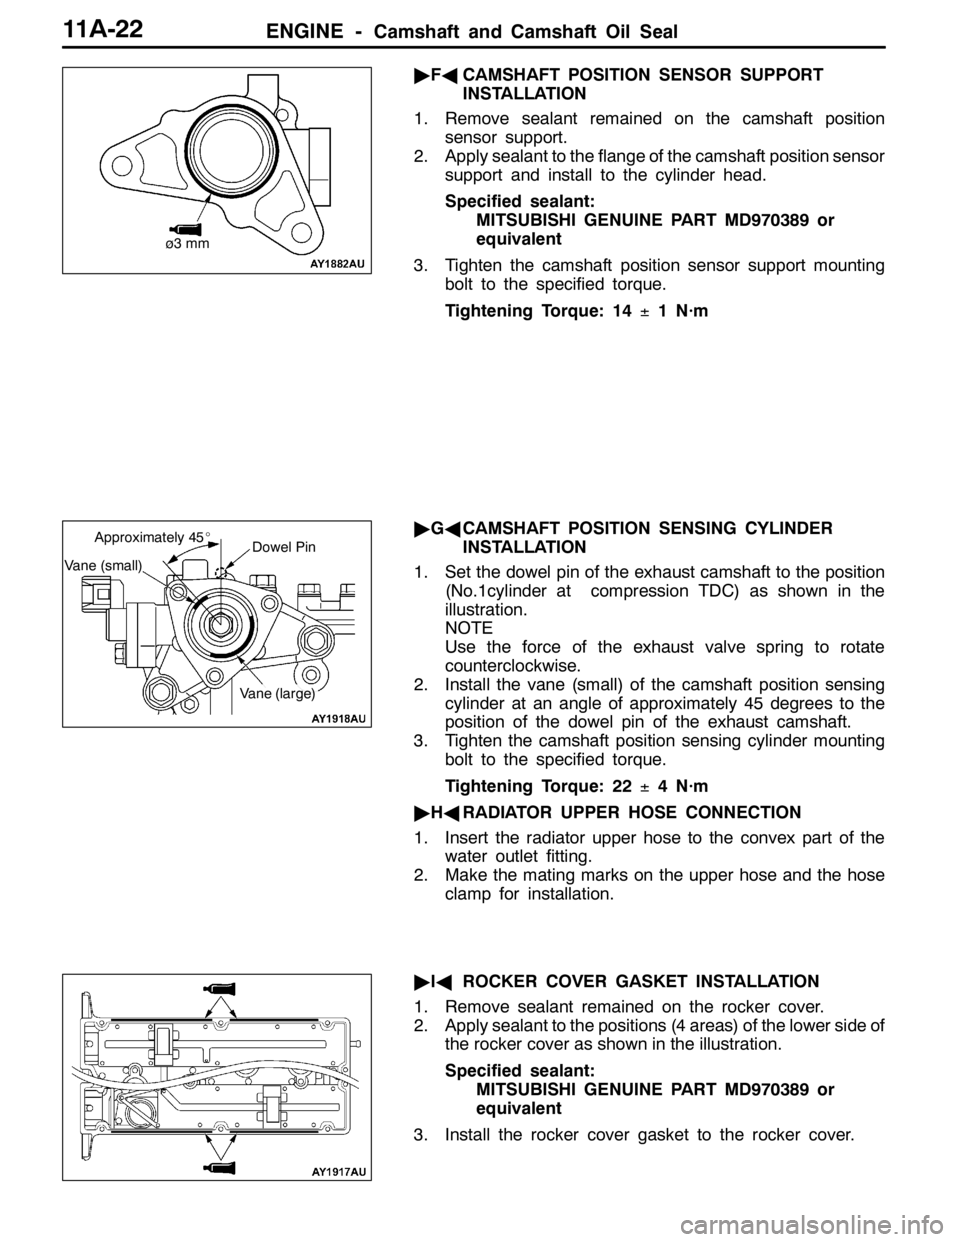
sensor support.
2. Apply sealant to the flange of the camshaft position sensor
support and install to the cylinder head.
Specified sealant:
MITSUBISHI GENUINE PART MD970389 or
equivalent
3. Tighten the camshaft position sensor support mounting
bolt to the specified torque.
Tightening Torque: 14±1 N·m
"GACAMSHAFT POSITION SENSING CYLINDER
INSTALLATION
1. Set the dowel pin of the exhaust camshaft to the position
(No.1cylinder at compression TDC) as shown in the
illustration.
NOTE
Use the force of the exhaust valve spring to rotate
counterclockwise.
2. Install the vane (small) of the camshaft position sensing
cylinder at an angle of approximately 45 degrees to the
position of the dowel pin of the exhaust camshaft.
3. Tighten the camshaft position sensing cylinder mounting
bolt to the specified torque.
Tightening Torque: 22±4 N·m
"HARADIATOR UPPER HOSE CONNECTION
1. Insert the radiator upper hose to the convex part of the
water outlet fitting.
2. Make the mating marks on the upper hose and the hose
clamp for installation.
"IAROCKER COVER GASKET INSTALLATION
1. Remove sealant remained on the rocker cover.
2. Apply sealant to the positions (4 areas) of the lower side of
the rocker cover as shown in the illustration.
Specified sealant:
MITSUBISHI GENUINE PART MD970389 or
equivalent
3. Install the rocker cover gasket to the rocker cover.
ø3 mm
Dowel Pin
Vane (small)
Approximately 45_
Vane (large)