MITSUBISHI PAJERO 1996 2.G Owners Manual
Manufacturer: MITSUBISHI, Model Year: 1996, Model line: PAJERO, Model: MITSUBISHI PAJERO 1996 2.GPages: 302, PDF Size: 48.23 MB
Page 231 of 302
Downloaded from www.Manualslib.com manuals search engine HATATOIMENPITEITA .... FOR EMERGENCIES
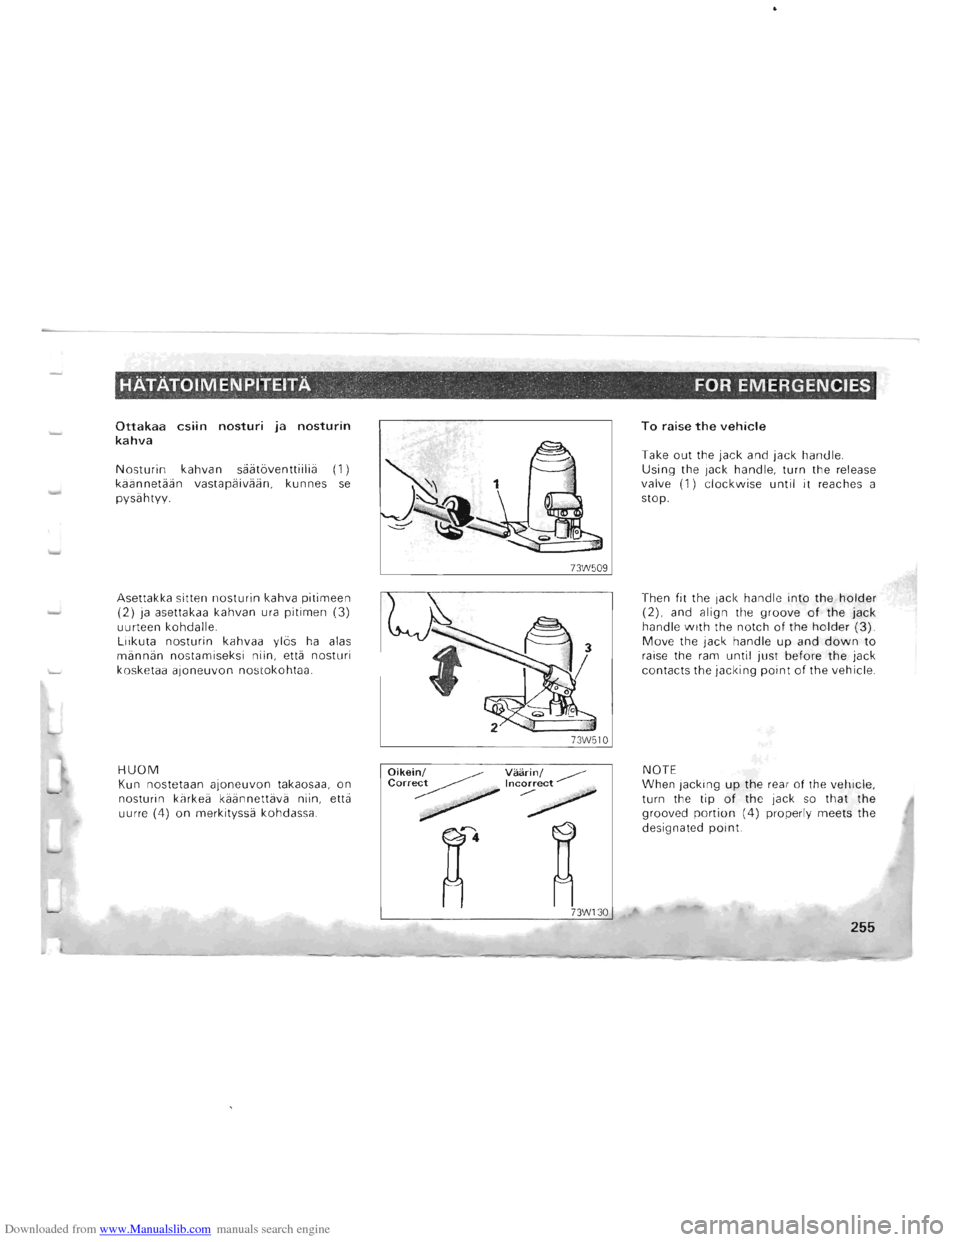
Ottakaa csiin nosturi ja nosturin kahva
Nosturin kahvan siiiitaventtiiliii (1) kiiiinnetiiiin vastapiiiviiiin , kunnes se pysiihtyy.
Asettakka sitten
nosturin kahva pitimeen (2) ja asettakaa kahvan ura pitimen (3)
uurteen kohdalle.
Liikuta nosturin kahvaa ylas ha alas miinniin nostamiseksi niin, etta nosturi
kosk etaa a
joneuvon nostokohtaa .
HUOM Kun nostetaan ajoneuvon takaosaa, on
nosturin kiirkeii kaannettiivii niin, ettii
uurr e (4)
on merkityssii kohdassa.
Oikei~/ Vaarin/ ~ Correct Incorrect
~ .. ~ . .......-~ ~ ~ ~.
~4 ~
73W130
To raise the vehicle
Take out the jack and jack handle .
Using the jack hand le, turn the release
valve (1) clockwise until it reaches a
stop.
Then
fit th e jack handle into the holder (2), and align the groove of the jack handle with the notch of the holder (3). Move the jack handle up and down to raise the ram until just before the jack
contacts the jacki ng point of the vehicle .
NOTE
When jacking
up the rear of the vehicle,
turn the tip of the jack so that the
grooved portion (4) properly meets the
designated
point.
255
Page 232 of 302
Downloaded from www.Manualslib.com manuals search engine HATATOIMENPITEITA " . "', '.... FOR'EMERGENCIES '
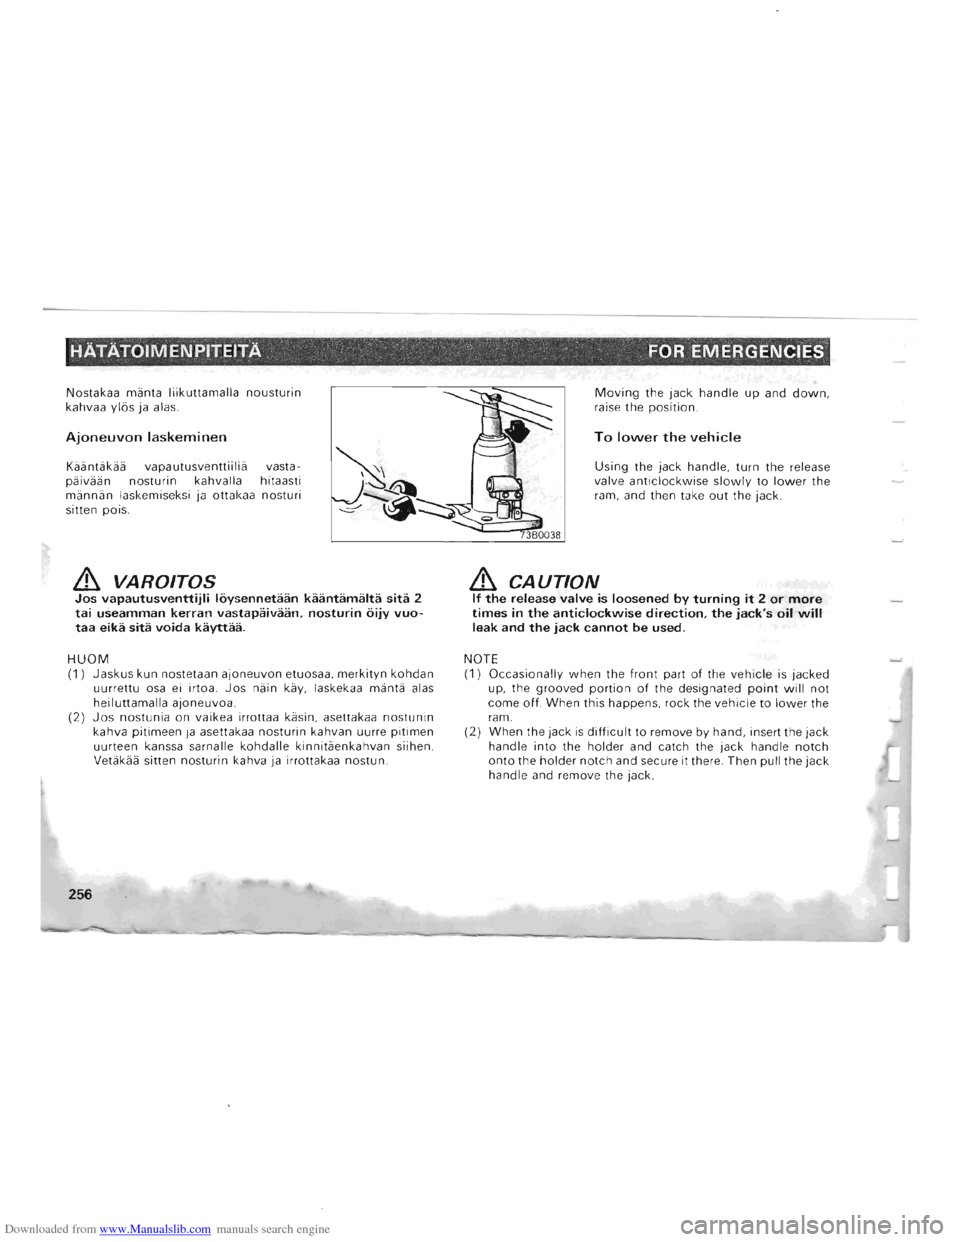
Nostakaa manta liikuttamalla nousturin kahvaa ylas ja alas.
Ajoneuvon laskeminen
Kaantakaa vapautusventtiilia vasta·
paivaan nosturin kahvalla hitaasti
mannan laskemiseksi ja ottakaa nosturi
sitten pois.
& VAROITOS Jos vapautusventtijli loysennetaan kaantamalta sita 2 tai useamman kerran vastapaivaan, nosturin oijy vuotaa eika sita voida kayttaa.
HUOM (1) Jaskus kun nostetaan ajoneuvon etuosaa, merkityn kohdan uurrettu osa ei irtoa. Jos nain kay, laskekaa manta alas
heiluttamalla ajoneuvoa.
(2)
Jos nostunia on vaikea irrottaa kasin, asettakaa nostunin kahva pitimeen ja asettakaa nosturin kahvan uurre pitimen
uurteen kanssa sarnalle kohdalle kinnitaenkahvan siihen.
Vetakaa sitten nosturin kahva ja irrottakaa nostun.
256
Moving the jack handle up and down,
raise the position .
To lower the vehicle
Using the jack handle , turn the release
valve anticlockwise slowly to lower the
ram , and then take out the jack .
& CAUTION If the release valve is loosened by turning it 2 or more times in the anticlockwise direction, the jack's oil will leak and the jack cannot be used .
NOTE (1) Occasionally when the front part of the vehicle is jacked
up, the grooved portion of the designated point will not
come off. When this happens, rock the vehicle to lower the ram. (2) When the jack is difficult to remove by hand, insert the jack handle into the holder and catch the jack handle notch onto the holder notch and secure it there. Then pull the jack handle and remove the jack.
Page 233 of 302
Downloaded from www.Manualslib.com manuals search engine HATATOIMEN PITEITA FOR EMERGENCIES
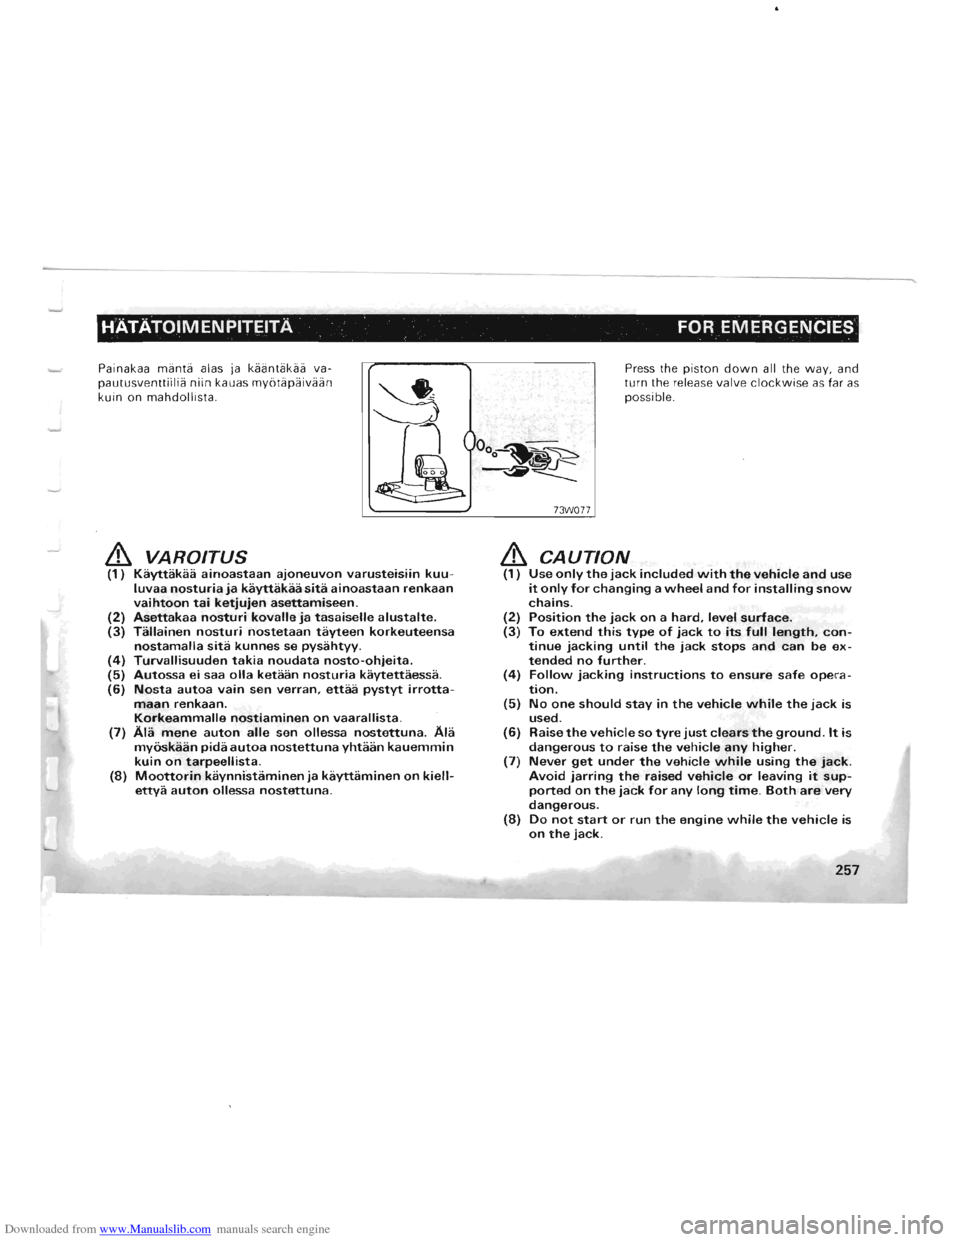
Painakaa manta alas ja kaijntakaa va
pautusventtiilia niin kauas mybtapaivaan
kuin on mahdollista .
& VAROITUS (1) Kayttakaa ainoastaan ajoneuvon varusteisiin kuuluvaa nosturia ja kayttakaa sita ainoastaan renkaan vaihtoon tai ketjujen asettamiseen. (2) Asettakaa nosturi kovalle ja tasaiselle alustalte. (3) Tallainen nosturi nostetaan tayteen korkeuteensa nostamalla sita kunnes se pysahtyy. (4) Turvallisuuden takia noudata nosto-ohjeita. (5) Autossa ei saa olla ketaan nosturia kaytettaessa. (6) Nosta autoa vain sen verran, ettaa pystyt irrotta-maan renkaan. Korkeammalle nostiaminen on vaarallista.
(7) Ala mene auton aile sen ollessa nostettuna. Ala myoskaan pida autoa nostettuna yhtaan kauemmin kuin on tarpeellista. (8) Moottorin kaynnistaminen ja kayttaminen on kiellettya auton ollessa nostettuna.
73W0 77
Press the piston down all the way, and
turn the release valve clockwise as far as
possible.
& CAUTION (1) Use only the jack included with the vehicle and use it only for changing a wheel and for installing snow chains. (2) Position the jack on a hard, level surface. (3) To extend this type of jack to its full length, continue jacking until the jack stops and can be extended no further. (4) Follow jacking instructions to ensure safe operation. (5) No one should stay in the vehicle while the jack is used. (6) Raise the vehicle so tyre just clears the ground. It is dangerous to raise the vehicle any higher. (7) Never get under the vehicle while using the jack. Avoid jarring the raised vehicle or leaving it supported on the jack for any long time. Both are very dangerous. (8) Do not start or run the engine while the vehicle is on the jack.
257
Page 234 of 302
Downloaded from www.Manualslib.com manuals search engine HATATOIMENPITEITA FOR EMERGENCIES
Varapyora HN23A-B
Koska on mahdotonta tietaa milloin kumi saattaa puhjeta, tarkastakaa varap
yoran ilmanpaine Iyhyin valiajoin var-
mistaaksenne etta se on aina
kayt-tovalmis hatatilanteissa. Va-
rapyoraa sailytetaan matkatavaratilan
lattialevyn alia; pyoran irrottamiseksi
loysatkaa ja irrottakaa sita
kiinnittava
siipimutteri .
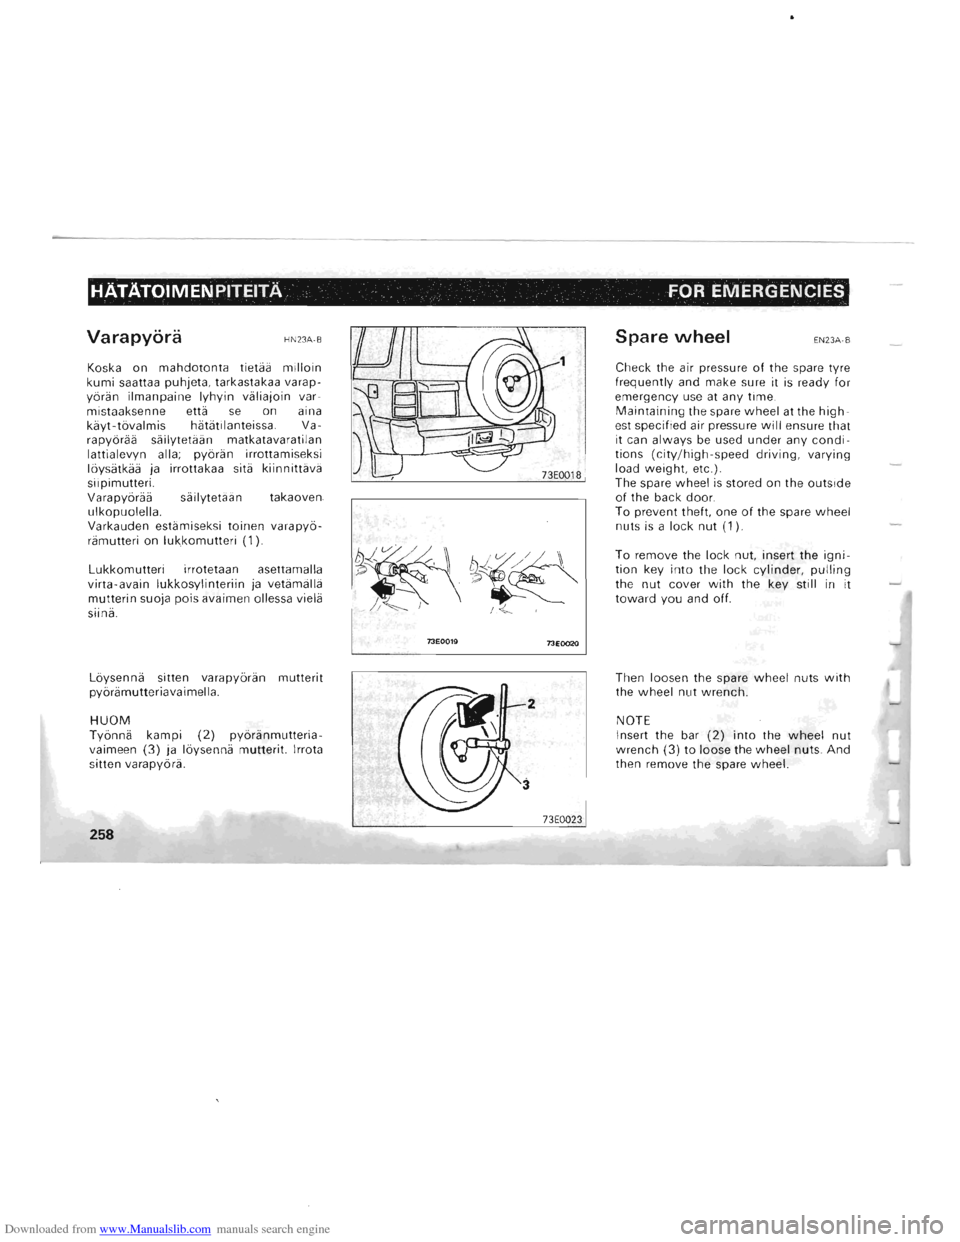
Varapyoraa sailytetaan takaoven.
ulkopuolella.
Varkauden estamiseksi
toinen varapyo
ramutteri on lukkomutteri (1).
Lukkomutteri irrotetaan asettamalla
virta-avain lukkosylinteriin ja vetamalla mutterin suoja pois avaimen ollessa viela
siina.
Loysenna sitten varapyoran
mutterit pyoramutteriavaimella .
HUOM Tyonna kampi (2) pyoranmutteria
vaimeen (3) ja loysenna mutterit. Irrota
sitten varapyora.
258
1
13Eoo19 13EOO2O
73E002 3
Spare wheel EN23A·B
Check the air pressure of the spare tyre
frequently and make sure it is ready for emergency use at any time. Maintaining the spare wheel at the high
est spe cified air pressure will ensure that it can always be used under any conditions (city/high-speed driving, varying
load weight. etc .) .
The spare wheel is stored on the outside of the back door.
To prevent theft. one of the spare wheel nuts is a lock nut (1).
To remove the lock nut. insert the ignition key into the lock cylinder, pulling
the nut cover with the key still in it toward you and off.
Then loosen the spare
wheel nuts with the wheel nut wrench.
NOTE Insert the bar (2) into the wheel nut wrench (3) to loose the wheel nuts. And then remove the spare wheel.
Page 235 of 302
Downloaded from www.Manualslib.com manuals search engine HATATOIMENPITEITA, -' " ' FOR EMERGENCIES , \, '
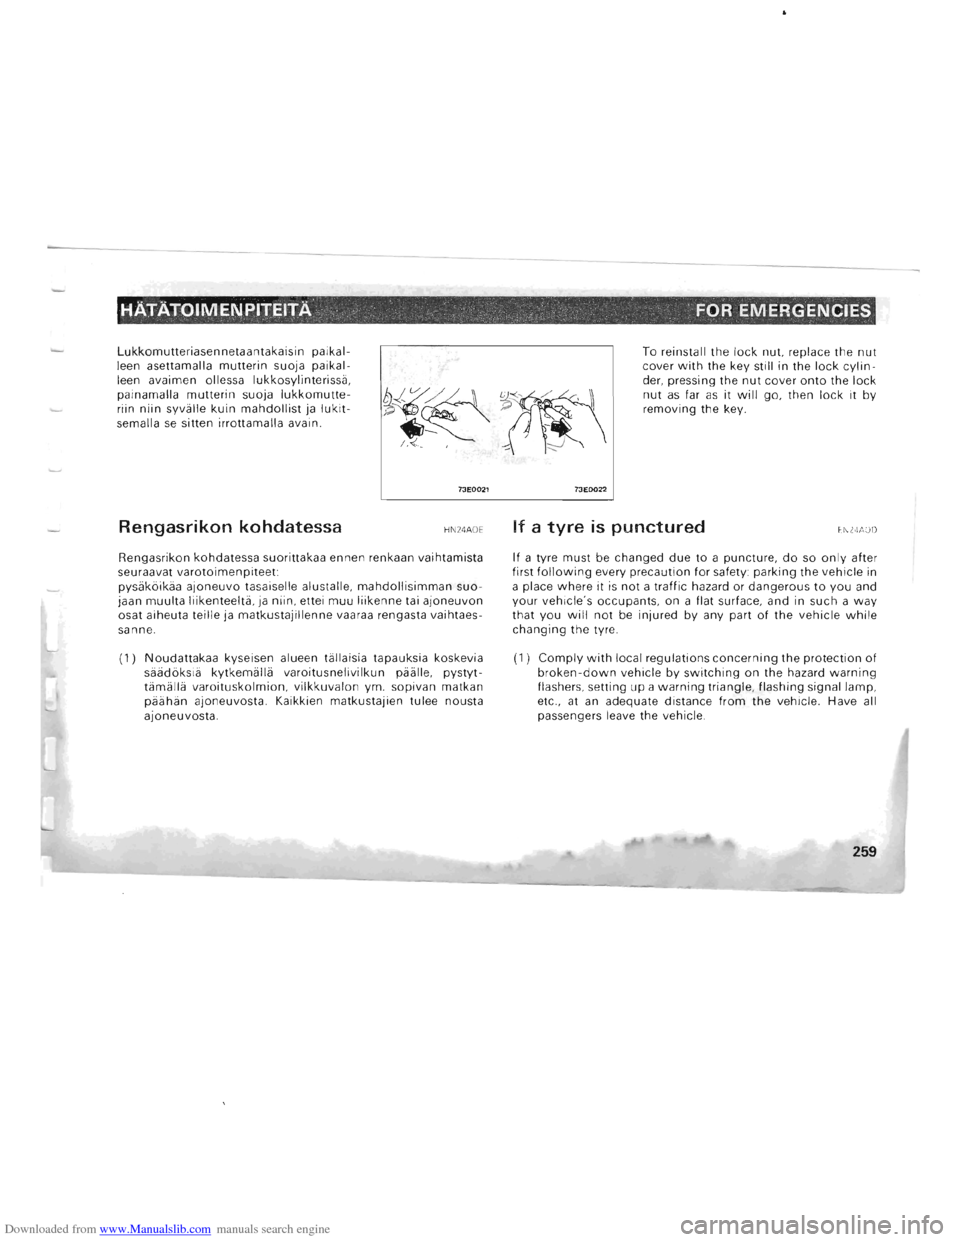
Lukkomutteriasennetaantakaisin paikal
leen asettamalla mutterin suoja paikal-
leen avaimen ollessa lukkosylinterissa ,
painamalla
mutterin suoja lukkomutteriin niin syvalle kuin mahdollist ja lukit
semalla se sitten irrottamalla avain.
Rengasrikon kohdatessa
73E0021
HN 24AOE
Rengasr ikon kohdatessa suorittakaa ennen renkaan vaihtamista
seuraavat varotoimenpiteet:
pysakbikaa aJoneuvo tasais
elle alustalle, mahdollisimman suo
jaan muulta liikenteelta , ja niin, ettei muu liikenne tai ajoneuvon
osat aiheuta teille ja matkustajillenne vaaraa rengasta vaihtaes
sanne.
(1) Noudattakaa kyseisen alueen tallaisia tapauksia koskevia
saadbksia kytkemalla varoitusnelivilkun paalle, pystyt
tamalla
varoituskolmion, vilkkuvalon ym. sopivan matkan
paahan ajoneuvosta. Kaikkien matkustajien tulee nousta
ajoneuvosta.
73EOO22
To reinstall the lock nut, replace the nut cover with the key still in the lock cylinder, pressing the nut cover onto the lock nut as far as it will go, then lock it by removing the key.
If a tyre is punctured EN24AOD
If a tyre must be changed due to a puncture , do so only after
first following every precaution for safety: parking the vehicle in
a place where it is not a traffic hazard or dangerous to you and
your vehicle's occupants, on a flat surface , and in such a way that you will not be injured by any part of the vehicle while changing the tyre.
(1) Comply with local regulations concerning the protection of broken-down vehicle by switching on the hazard warning flashers, setting up a warning triangle, flashing signal lamp,
etc., at an adequate distance from the vehicle. Have all
passengers leave the vehicle.
259
Page 236 of 302
Downloaded from www.Manualslib.com manuals search engine HATATOIMENPITEITA FOR EMERGENCIES
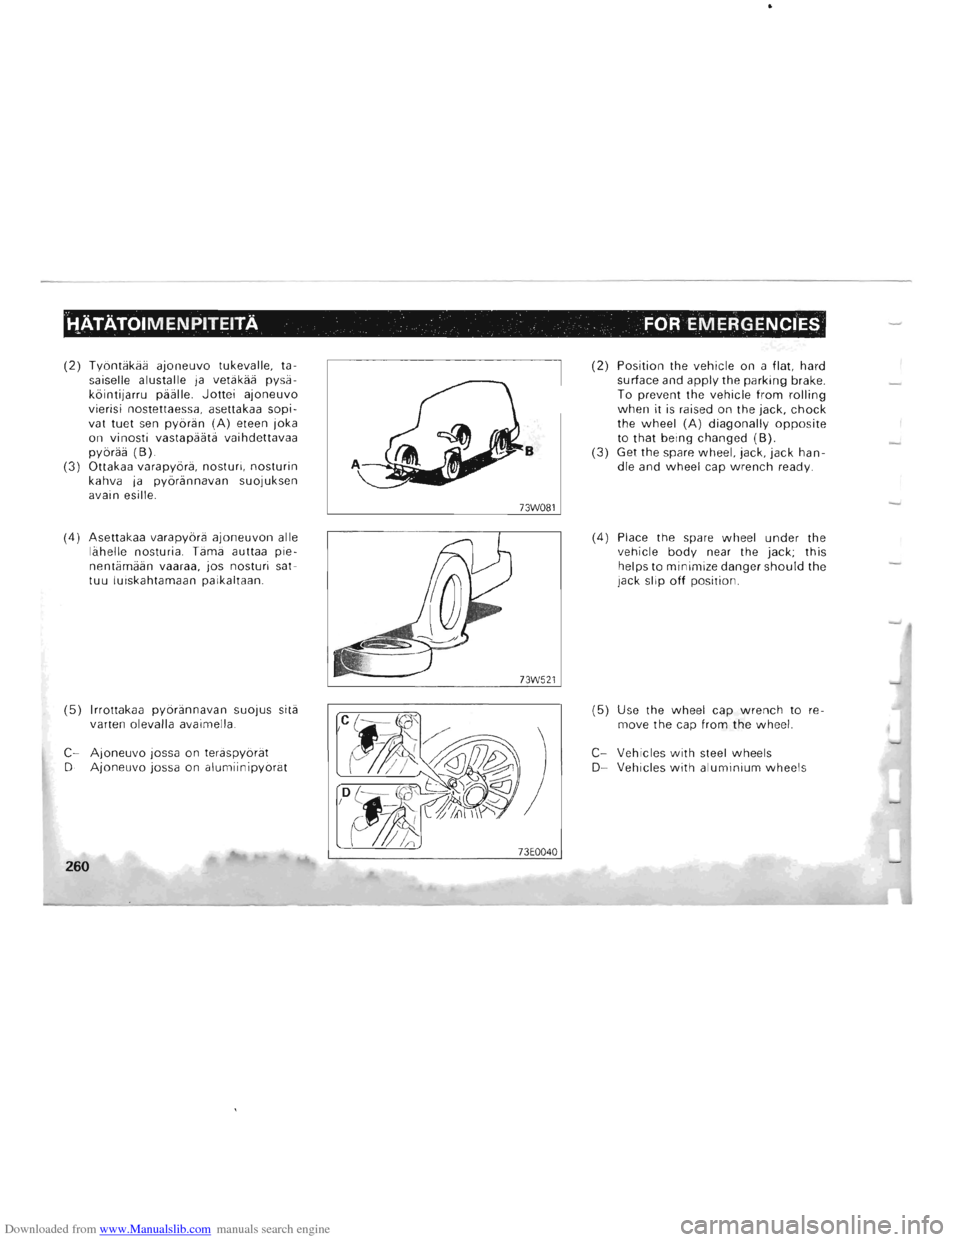
(2) Tybntiikiiii ajoneuvo tukevalle, ta
saiselle alustalle ja vetiikiiii pysii
kbintijarru piiiille.
Jottei ajoneuvo vierisi nostettaessa , asettakaa sopivat tuet sen pybriin (A) eteen joka on vinosti vastapiiiitii vaihdettavaa pybriiii (8). (3) Ottakaa varapybrii , nosturi , nosturin
kahva ja pybriinnavan suojuksen
avain esille.
(4) Asettakaa varapybrii ajoneuvon aile
Iii helle nosturia. Tiimii auttaa pienentiimiiiin vaaraa, jos nosturi sattuu luiskahtamaan paikaltaan.
(5) Irrottakaa pybriinnavan suojus sitii
varten olevalla avaimella .
c-Ajoneuvo jossa on teriispybriit 0-Ajoneuvo jossa on alumiinipybriit
260
B
73W081
73W521
(2) Position the vehicle on a flat, hard
surface and apply the parking brake.
To prevent the vehicle from rolling when it is raised on the jack, chock the wheel (A) diagonally opposite to that being changed (8). (3) Get the spare wheel, jack, jack handle and wheel cap wrench ready.
(4) Place the spare wheel under the
vehicle body near the jack; this
helps to minimize danger should the
jack slip off position .
(5) Use the wheel cap wrench to re
move the cap from the wheel.
c-Vehicles with steel wheels 0-Vehicles with aluminium wheels
Page 237 of 302
Downloaded from www.Manualslib.com manuals search engine HATATOIMENPITEITA ' FOR EMERGENCIES
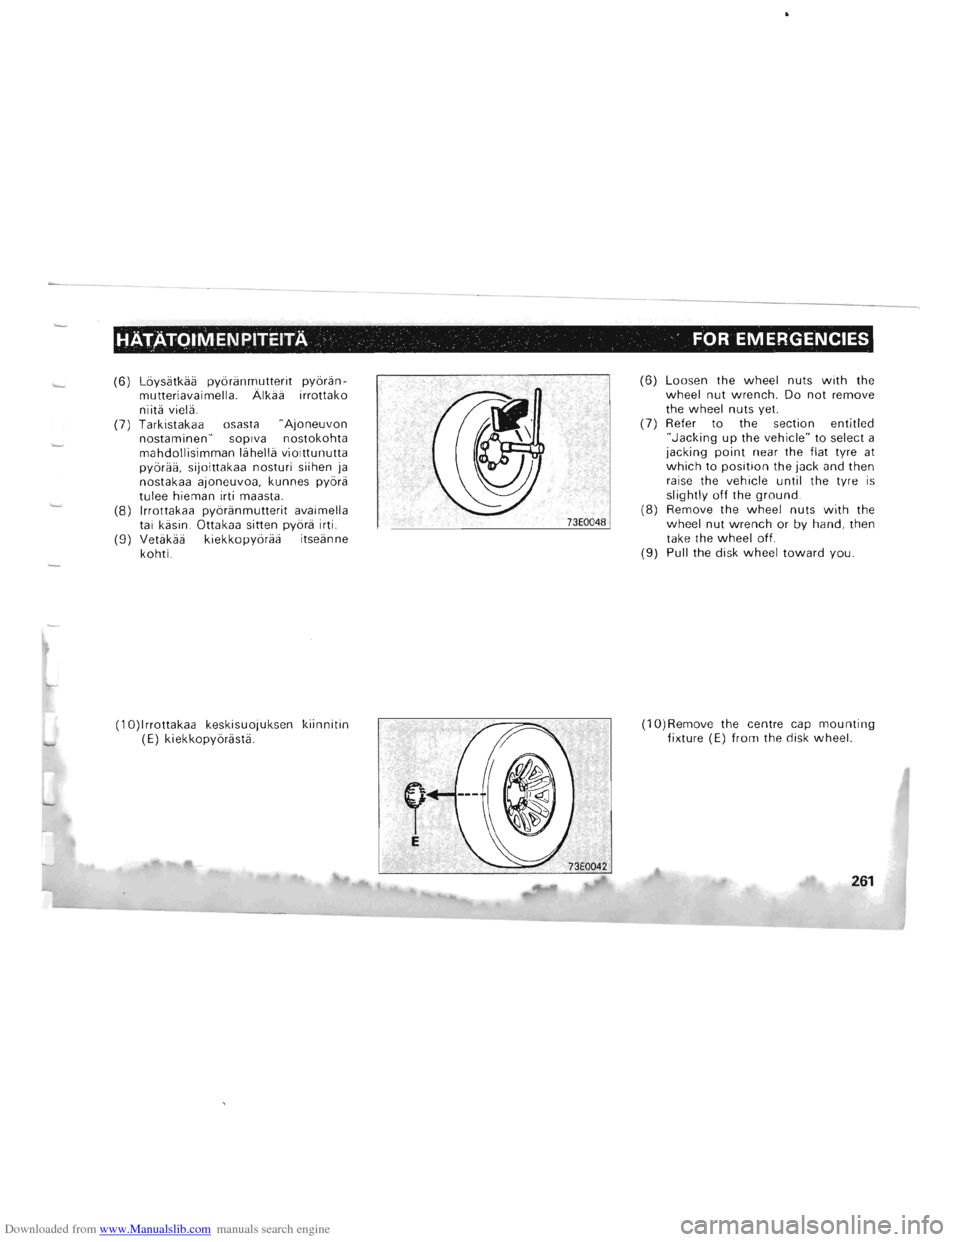
(6) Loysiitkiiii pyoriinmutterit pyoriinmutteriavaimella. Alkiiii irrottako
niitii vielii.
(7) Tarkistakaa osasta "Ajoneuvon nostaminen" sopiva nostokohta mahdollisimman liihellii vioittunutta pyoriiii. sijoittakaa nosturi siihen ja
nostakaa ajoneuvoa. kunnes pyorii tulee hieman irti maasta . (8) Irrottakaa pyoriinmutterit avaimella
tai kiisin . Ottakaa sitten pyorii irti.
(9) Vetiikiiii kiekkopyoriiii itseiinne
kohti.
(10)lrrottakaa keskisuojuksen kiinnitin (E) kiekkopyoriistii .
73E0048
(6) Loosen the wheel nuts with the
wheel nut wrench. Do not remove
the wheel nuts yet . (7) Refer to the section entitled "Jacking up the vehicle" to select a
jacking point near the flat tyre at which to position the jack and then raise the vehicle until the tyre is slightly off the ground.
(8) Remove the wheel nuts with the
wheel nut wrench or by hand. then
take the wheel off. (9) Pull the disk wheel toward you.
(10)Remove the centre ca p
mounting fixture (E) from the disk wheel.
261
Page 238 of 302
Downloaded from www.Manualslib.com manuals search engine HATATOIMENPITEITA FOR EMERGENCIES
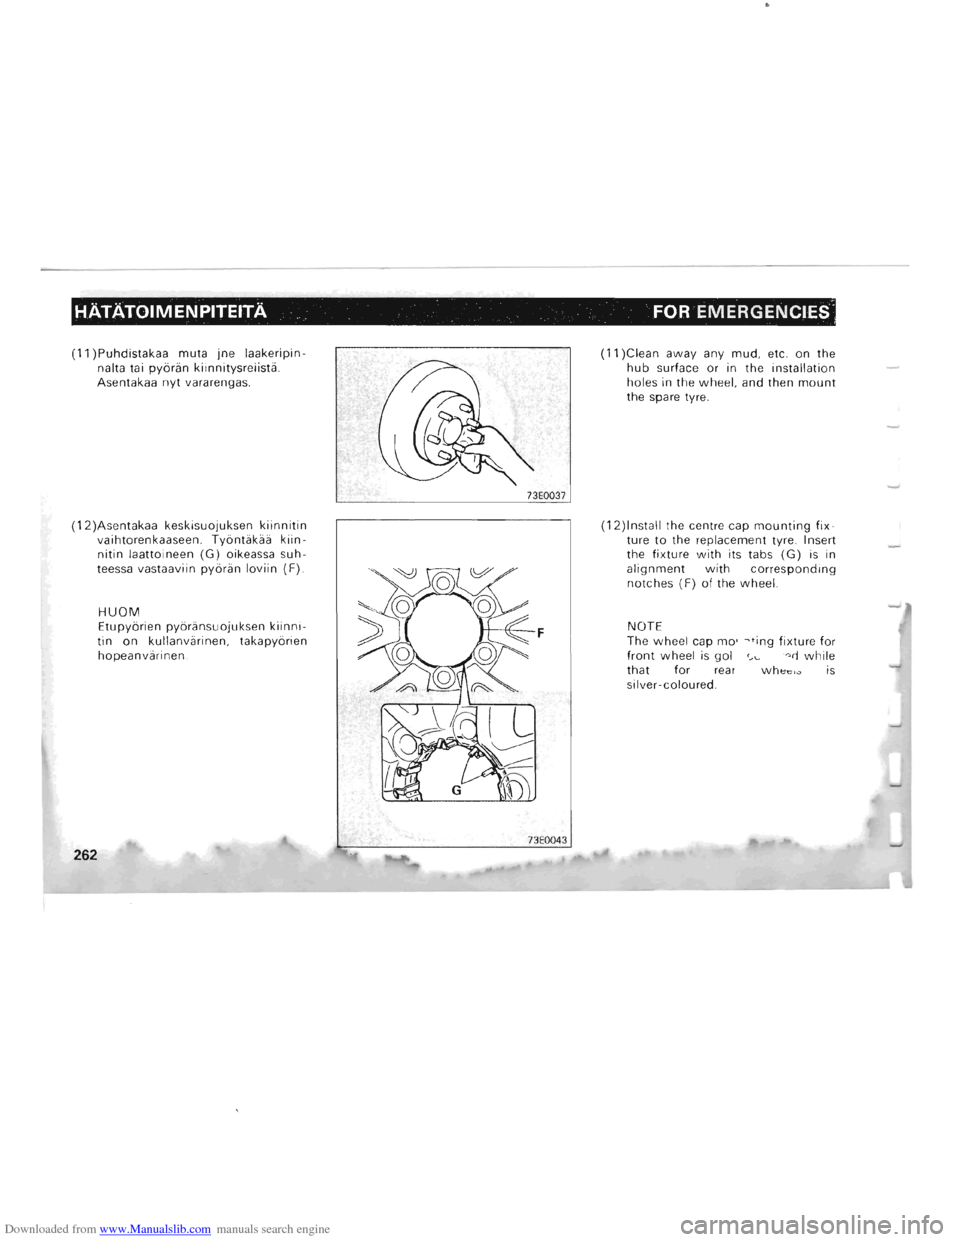
(11 )Puhdistakaa muta jne laakeripinnalta tai pybriin kiinnitysreiistii. Asentakaa nyt vararengas.
(12)Asentakaa keskisuojuksen kiinnitin vaihtorenkaaseen. Tybntiikiiii kiinnitin laattoineen (G) oikeassa suh
tees sa vastaaviin pybriin loviin (F).
262
HUOM Etupybrien pybriinsuojuksen ki innitin on kullanvarinen , takapybrien hopeanvarinen .
73E0037
73E0043
(11 )Clean away any mud, etc. on the hub surface or in the installation holes in the wheel, and then mount the spare tyre.
(12)lnstall the centre cap mounting fix
ture to the replacement tyre. Insert the fixture with its tabs (G) is in alignment with corresponding notches (F) of the wheel.
NOTE
The wheel cap mo' ~ting fixture for
front wheel is gol. c" '''ri while that for rear Whl::e,,, is silver-coloured.
Page 239 of 302
Downloaded from www.Manualslib.com manuals search engine HATATOIMENPITEITA FOR EMERGENCIES
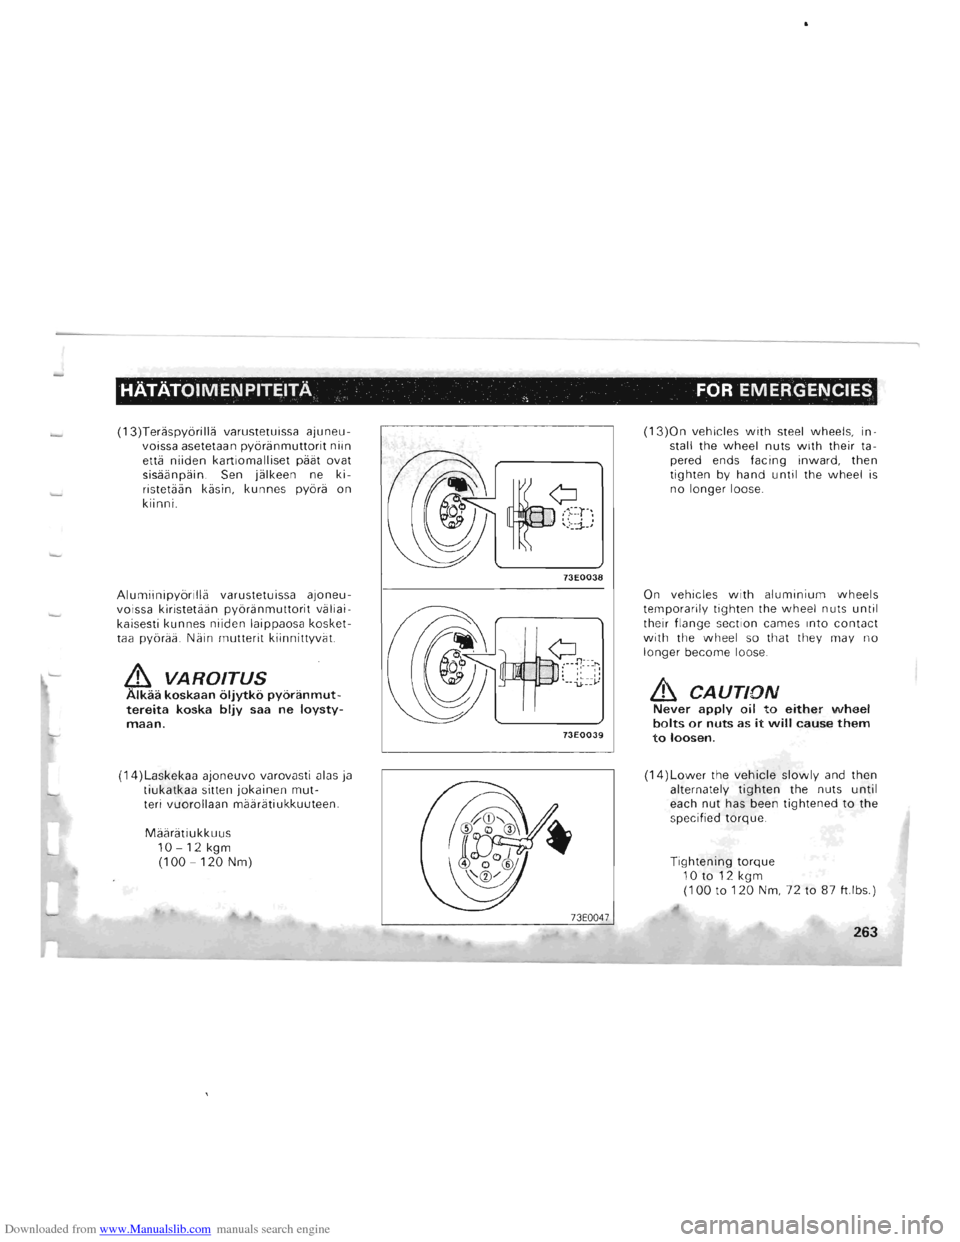
(13)Teriispyorillii varustetuissa ajuneuvoissa asetetaan pyoriinmuttorit niin ettii niiden kartiomalliset piiiit ovat
sisiiiinpiiin. Sen jiilkeen ne kiristetiiiin kiisin, kunnes pyorii on kiinni.
Alumiinipyorillii varustetuissa ajoneu
voissa kiristetiiiin pyoriinmuttorit viiliai
kaisesti kunnes niiden laippaosa kosket
taa pyoriiii . Niiin mutterit kiinnittyviit.
& VAROITUS Alkaa koskaan oljytko pyoranmuttereita koska bljy saa ne loystymaan.
(14 )Laskekaa ajoneuvo varovasti alas ja tiukatkaa sitten jokainen mut-teri vuorollaan miiiiriitiukkuuteen.
Miiiiriitiukkuus 10 -12 kgm (100 -120 Nm)
73E0038
73E0039
(13)On vehicles with steel wheels , install the wheel nuts with their tapered ends facing inward, then
tighten by hand until the wheel is no longer loose.
On vehicles
with aluminium wheels temporarily tighten the wheel nuts until their flange section cames into contact with the wheel so that they may no longer become loose.
& CAUTION Never apply oil to either wheel bolts or nuts as it will cause them to loosen.
(14)Lower the vehicle slowly and then
alternately tighten the nuts until each nut has been tightened to the
specified torque.
Tightening torque 10 to 12 kgm (100 to 120 Nm, 72 to 87 ft.lbs .)
263
Page 240 of 302
Downloaded from www.Manualslib.com manuals search engine HATATOIMENPITEITA FOR EMERGENCIES
& VAROITUS Ei saa koskaan yrittaa kiristaa muttereita jalalla tai Dutkella, koska silloin mutterit kiristyvat liikaa.
(15)Laske ka a nostu ri alas ja irro tta kaa se. Laittakaa nosturi ja tyhj ennyt re n gas siiiloon. Korj auttakaa rengas mahdolli
s im man nopeasti .
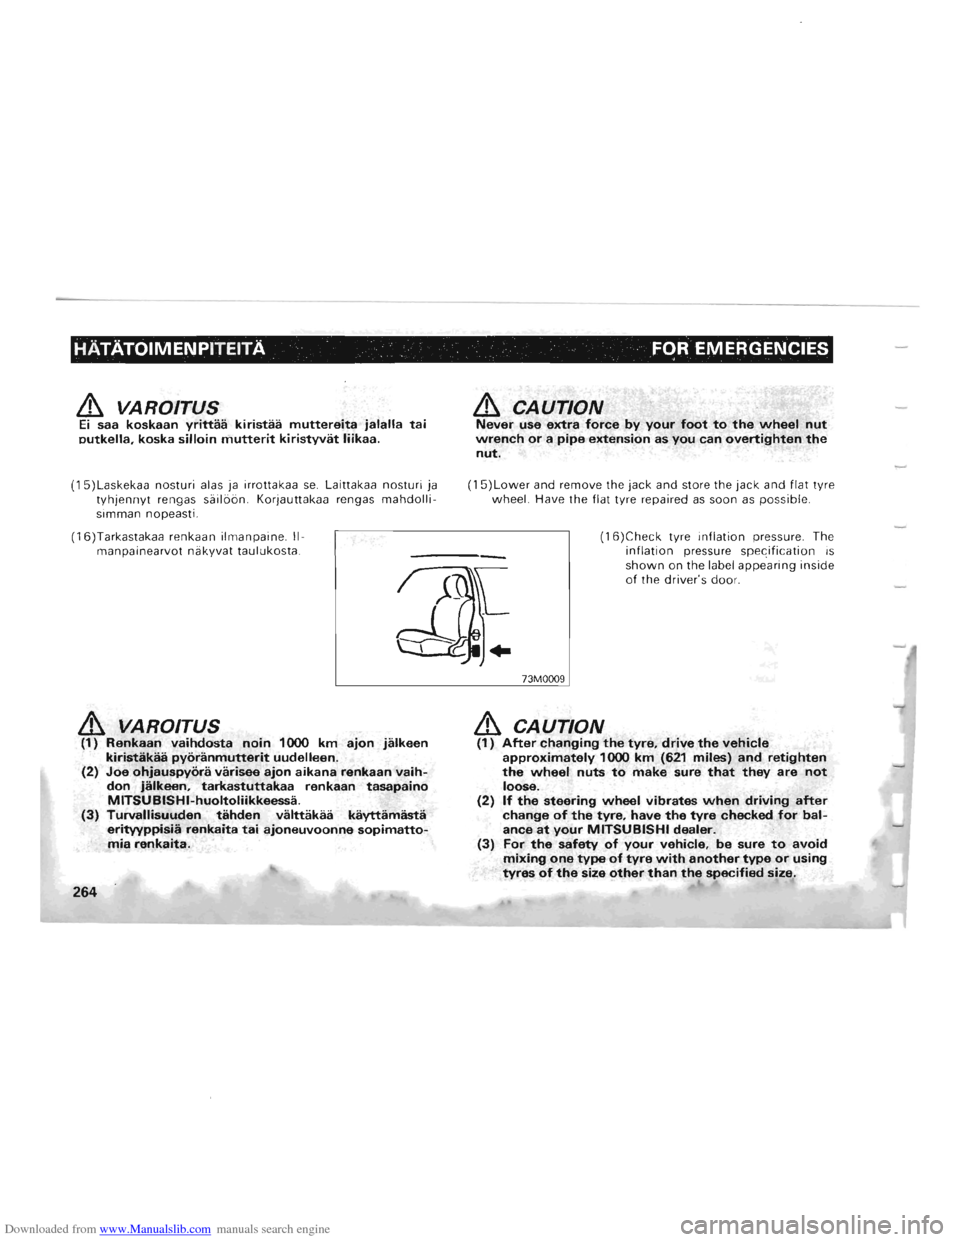
(16)Tarkastakaa re nkaa n ilm anpain e. 11-manpainearvot niikyvat taulukosta.
& VAROITUS (1) Renkaan vaihdosta noin 1000 km ajon jalkeen kiristakaa pyoranmutterit uudelleen. (2) Joe ohjauspyora varisee ajon aikana renkaan vaihdon jalkeen, tarkastuttakaa renkaan tasapaino MITSUBISHI-huoltoliikkeessa. (3) Turvallisuuden tahden valttakaa kayttamasta erityyppisia renkaita tai ajoneuvoonne sopimattomia renkaita.
264
& CAUTION Never use extra force by your foot to the wheel nut wrench or a pipe extension as you can overtighten the
nut.
(15)Lower and remove the jack and sto re th e jack an d flat ty re
wheel. Have the flat tyre re pair ed as soon as possibl e.
73MOOO9
(16)Check tyre infl ation pressure . Th e inflation pres sure specification is shown on the lab el app earing inside of the d river's d oor .
& CAUTION (1) After changing the tyre. drive the vehicle approximately 1000 km (621 miles) and retighten the wheel nuts to make sure that they are not loose. (2) If the steering wheel vibrates when driving after change of the tyre, have the tyre checked for balance at your MITSUBISHI dealer. (3) For the safety of your vehicle, be sure to avoid mixing one type of tyre with another type or using tyros of the size other than the specified size.