MITSUBISHI SPYDER 1990 Service Repair Manual
SPYDER 1990
MITSUBISHI
MITSUBISHI
https://www.carmanualsonline.info/img/19/57345/w960_57345-0.png
MITSUBISHI SPYDER 1990 Service Repair Manual
Trending: wheel alignment, warning lights, fuel filter location, steering wheel adjustment, MPG, high beam, key battery
Page 941 of 2103
MANUAL TRANSAXLE OVERHAUL
bear
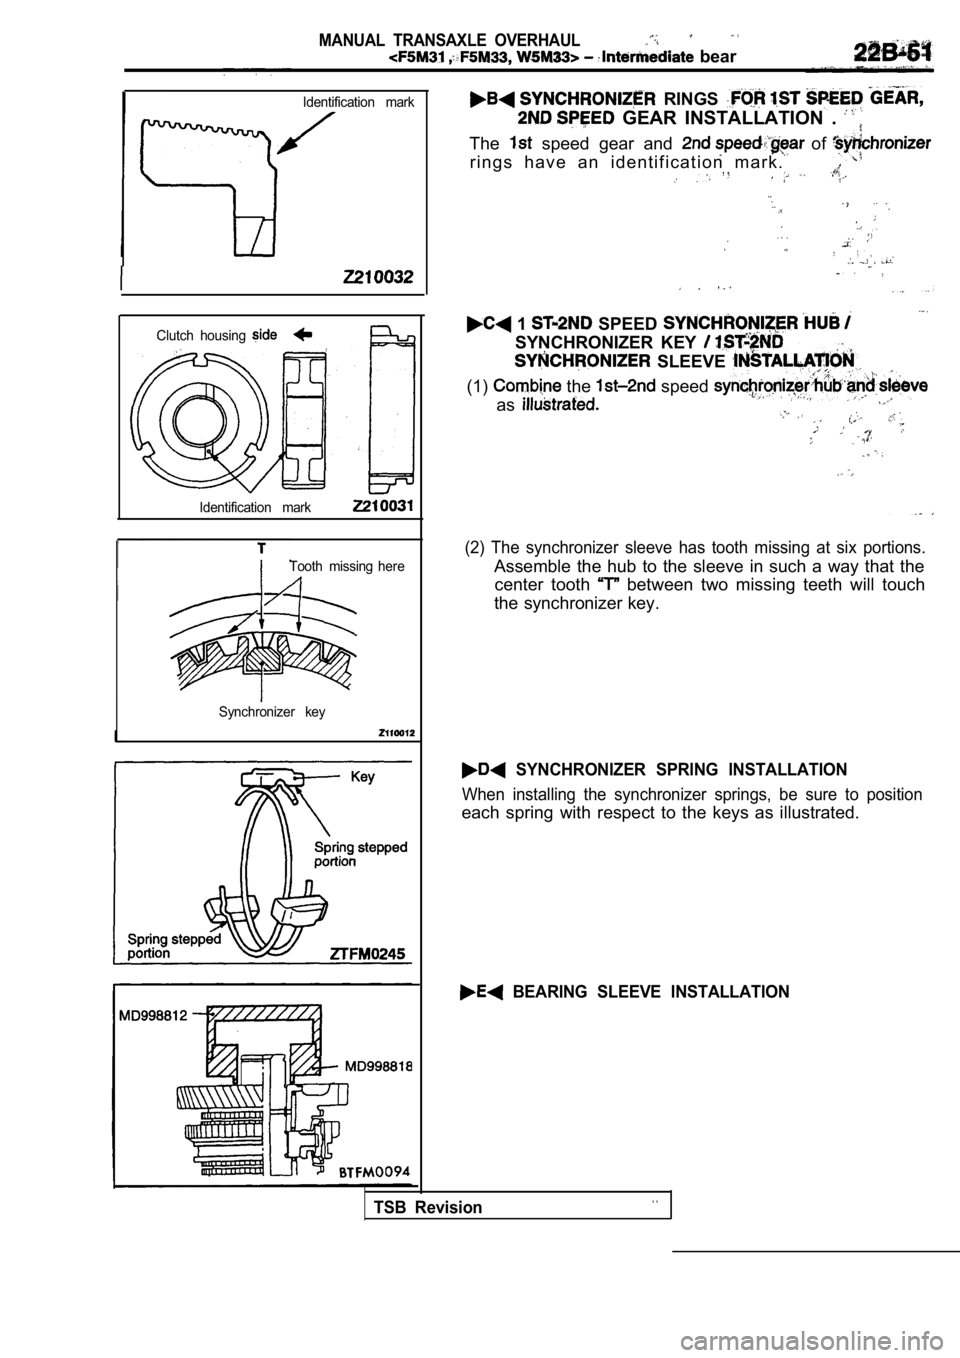
Identification mark RINGS
GEAR INSTALLATION .
The speed gear and of
r i n g s h a v e a n i d e n t i f i c a t i o n m a r k .
Clutch housing
Identification markTooth missing here
Synchronizer key
1 SPEED
SYNCHRONIZER KEY
SLEEVE
(1) the speed
as
(2) The synchronizer sleeve has tooth missing at si x portions.
Assemble the hub to the sleeve in such a way that t he
center tooth
between two missing teeth will touch
the synchronizer key.
SYNCHRONIZER SPRING INSTALLATION
When installing the synchronizer springs, be sure t o position
each spring with respect to the keys as illustrated.
BEARING SLEEVE INSTALLATION
TSB Revision
. .
Page 942 of 2103
MANUAL TRANSAXLE OVERHAUL
Intermediate Gear.
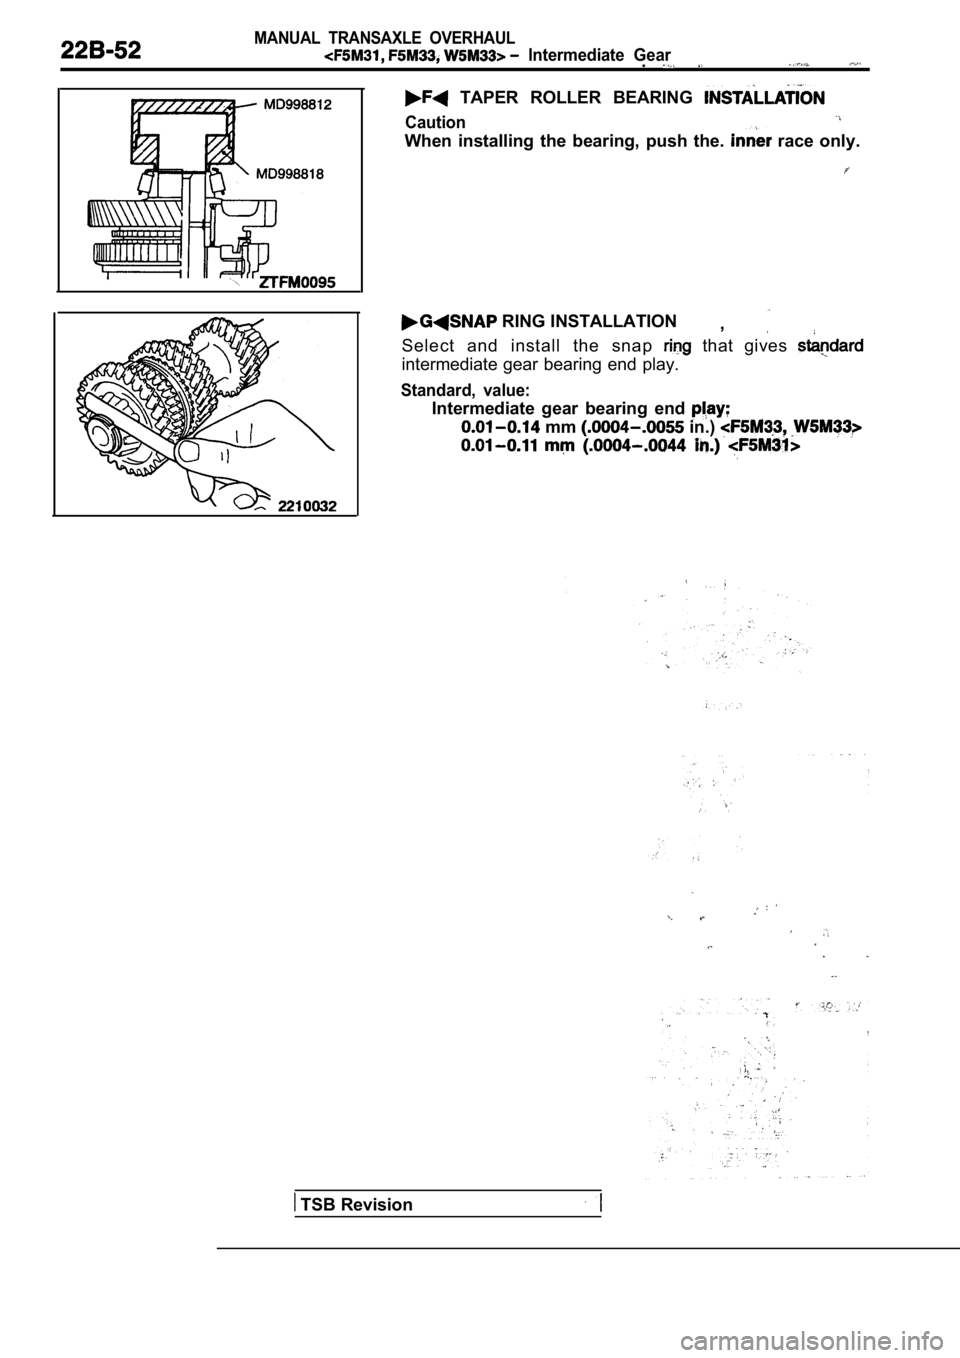
TAPER ROLLER BEARING
Caution
When installing the bearing, push the. race only.
RING INSTALLATION,
Select and install the snap that gives
intermediate gear bearing end play.
Standard, value:
Intermediate gear bearing end
mm in.)
TSB Revision
Page 943 of 2103
MANUAL TRANSAXLE OVERHAUL
Gear
ring
201051
Gear2110009
and wear
Scratches and damage
and wear
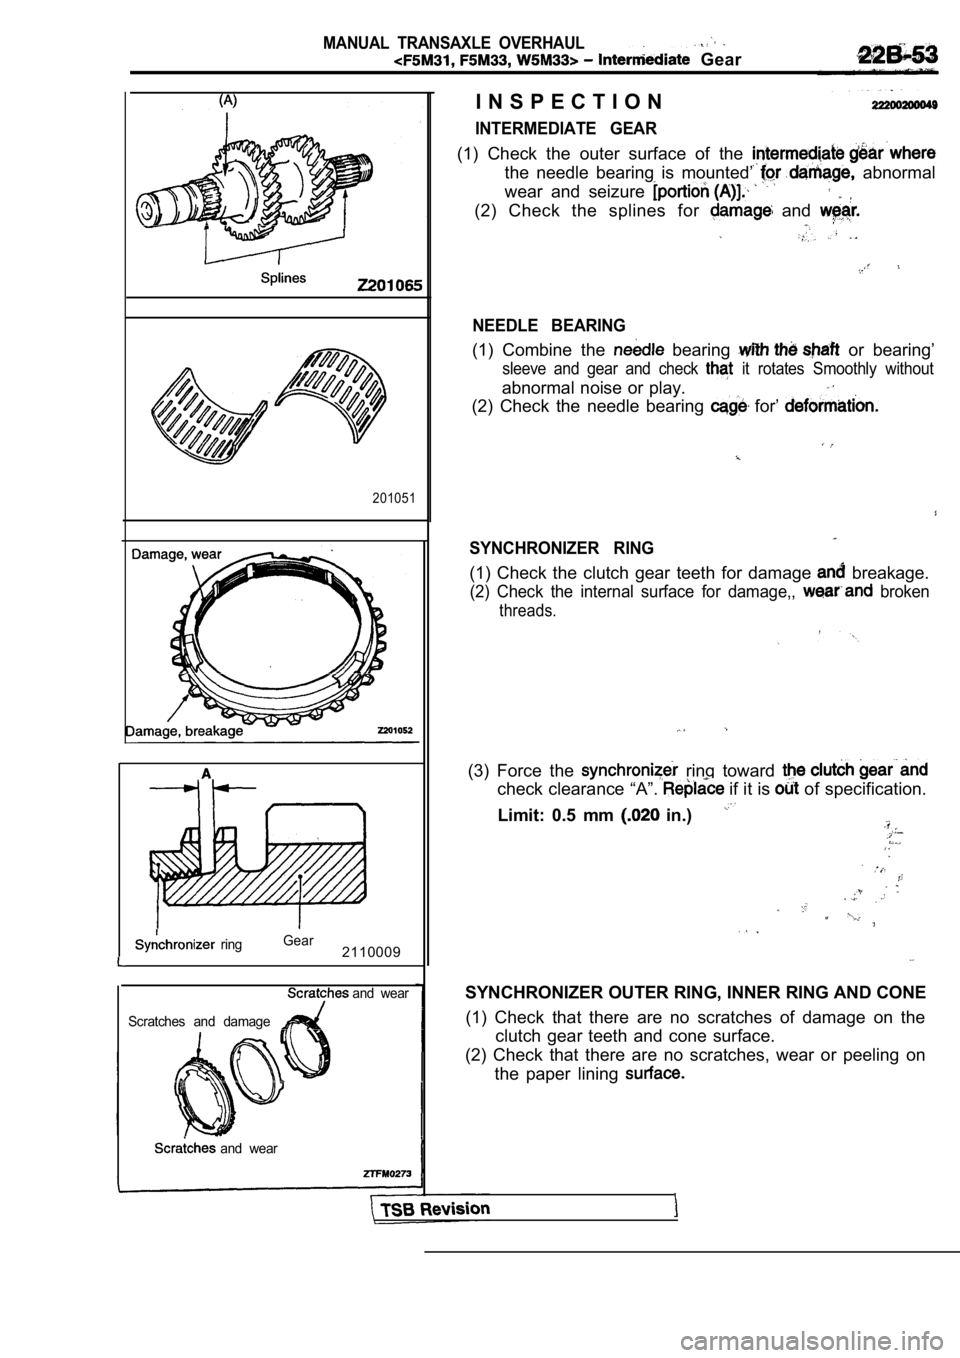
I N S P E C T I O N
INTERMEDIATE GEAR
(1) Check the outer surface of the
the needle bearing is mounted’ abnormal
wear and seizure
(2) Check the splines for and
NEEDLE BEARING
(1) Combine the bearing or bearing’
sleeve and gear and check it rotates Smoothly without
abnormal noise or play.
(2) Check the needle bearing for’
SYNCHRONIZER RING
(1) Check the clutch gear teeth for damage breakage.
(2) Check the internal surface for damage,, broken
threads.
(3) Force the ring toward
check clearance “A”. if it is of specification.
Limit: 0.5 mm
in.)
SYNCHRONIZER OUTER RING, INNER RING AND CONE (1) Check that there are no scratches of damage on the
clutch gear teeth and cone surface.
(2) Check that there are no scratches, wear or peel ing on
the paper lining
Page 944 of 2103
MANUAL TRANSAXLE OVERHAUL
Intermediate Gear
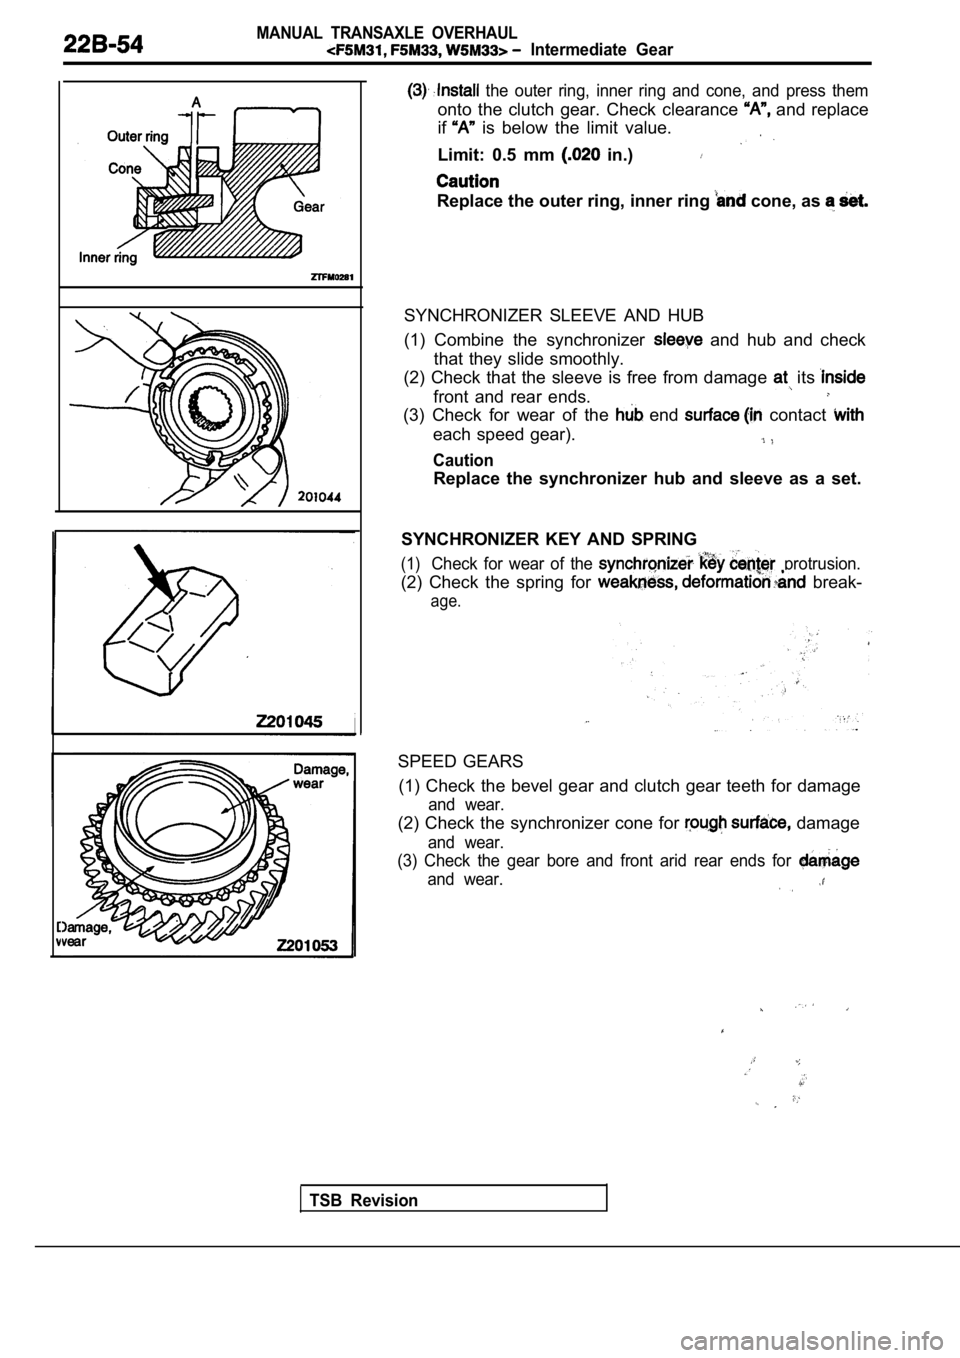
the outer ring, inner ring and cone, and press them
onto the clutch gear. Check clearance and replace
if
is below the limit value..
Limit: 0.5 mm in.)
Replace the outer ring, inner ring cone, as
TSB Revision
SYNCHRONIZER SLEEVE AND HUB
(1) Combine the synchronizer
and hub and check
that they slide smoothly.
(2) Check that the sleeve is free from damage
its
front and rear ends.
(3) Check for wear of the end contact
each speed gear).
Caution
Replace the synchronizer hub and sleeve as a set.
SYNCHRONIZER KEY AND SPRING
(1)Check for wear of the protrusion.
(2) Check the spring for break-
age.
SPEED GEARS (1) Check the bevel gear and clutch gear teeth for damage
and wear.
(2) Check the synchronizer cone for damage
and wear.
(3) Check the gear bore and front arid rear ends fo r
and wear.
Page 945 of 2103
MANUAL TRANSAXLE OVERHAUL
Output Shaft
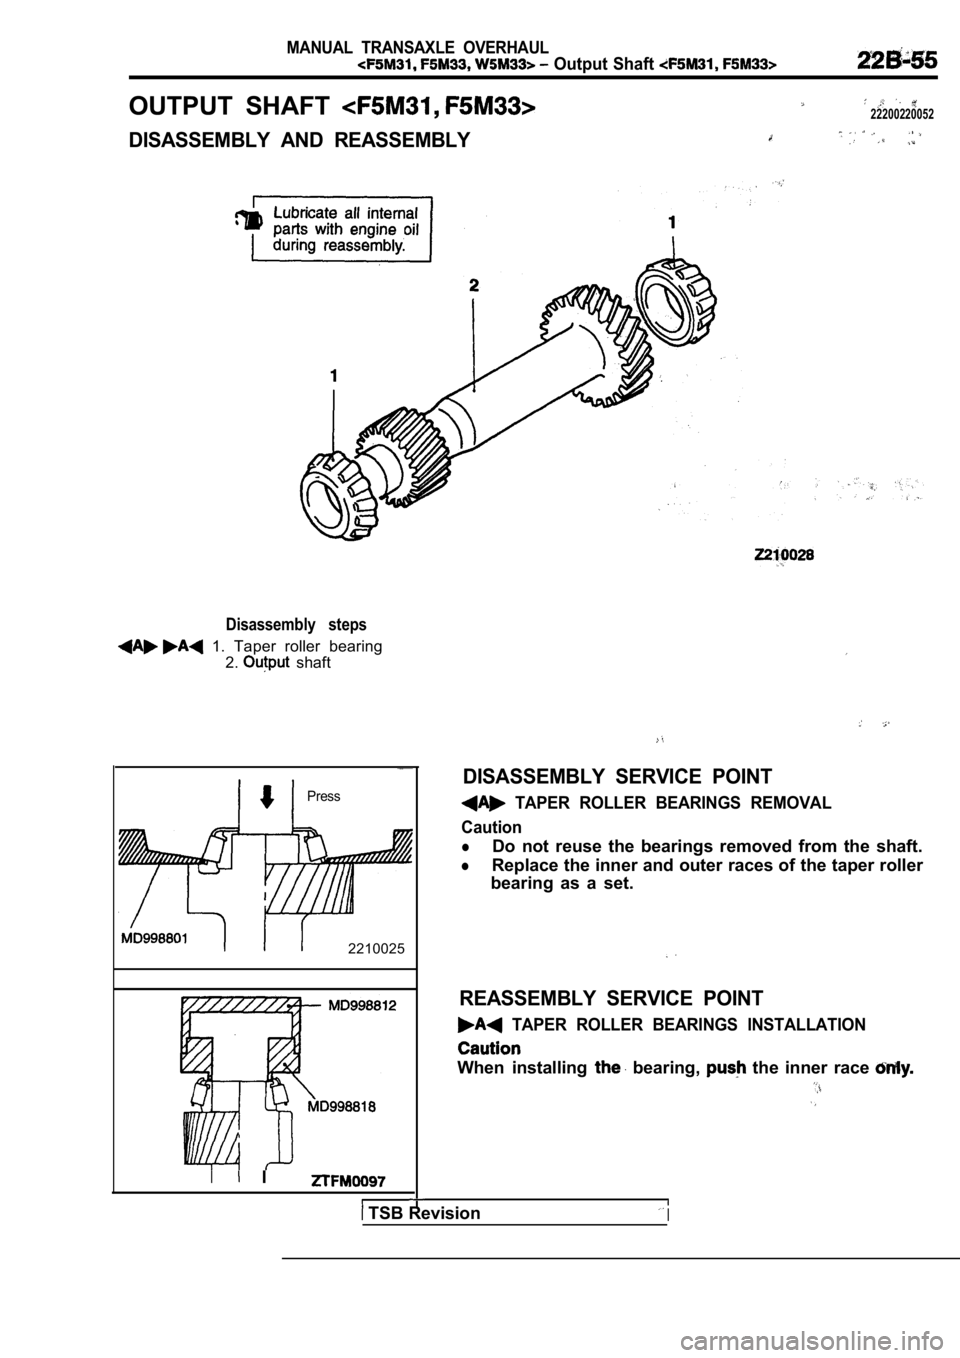
OUTPUT SHAFT 22200220052
DISASSEMBLY AND REASSEMBLY
Disassembly steps
1. Taper roller bearing2.
shaft
Press
2210025
I I
DISASSEMBLY SERVICE POINT
TAPER ROLLER BEARINGS REMOVAL
Caution
lDo not reuse the bearings removed from the shaft.
lReplace the inner and outer races of the taper roll er
bearing as a set.
REASSEMBLY SERVICE POINT
TAPER ROLLER BEARINGS INSTALLATION
When installing bearing, the inner race
TSB RevisionI
Page 946 of 2103
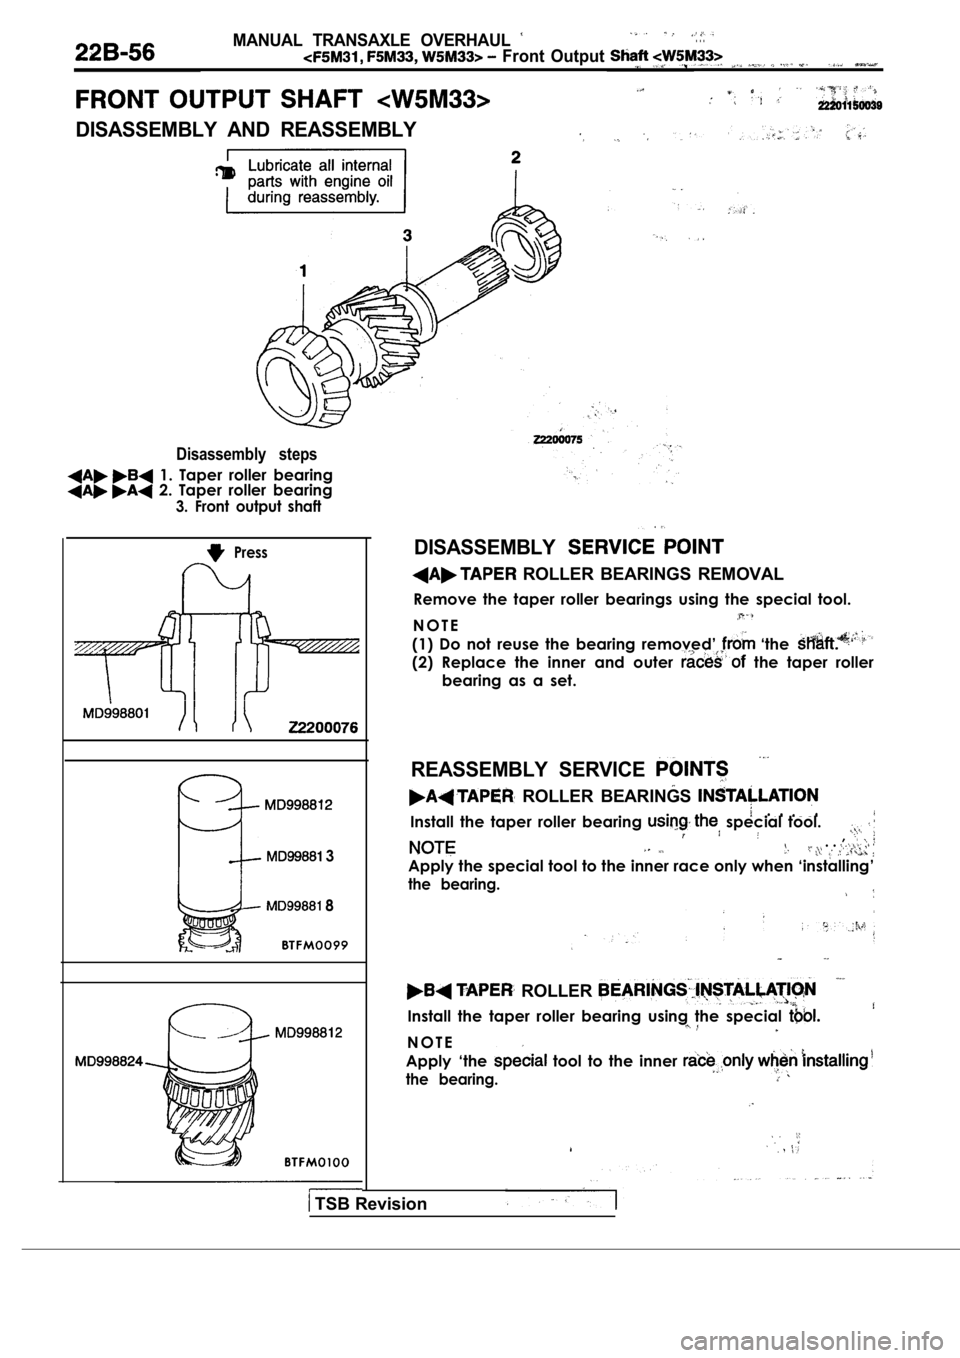
MANUAL TRANSAXLE OVERHAUL . . .
Front Output ,__
DISASSEMBLY AND REASSEMBLY
Disassembly steps
1. Taper roller bearing 2. Taper roller bearing
3. Front output shaft
Press
3
8
DISASSEMBLY
ROLLER BEARINGS REMOVAL
Remove the taper roller bearings using the special tool.
N O T E
(1) Do not reuse the bearing removed’ ‘the
(2) Replace the inner and outer the taper roller
bearing as a set.
REASSEMBLY SERVICE
ROLLER BEARINGS
Install the taper roller bearing special tool.,. .
Apply the special tool to the inner race only when ‘installing’
the bearing.
ROLLER
Install the taper roller bearing using the special
N O T E
Apply ‘the
tool to the inner
the bearing.
TSB Revision
Page 947 of 2103
MANUAL TRANSAXLE OVERHAUL
Differential
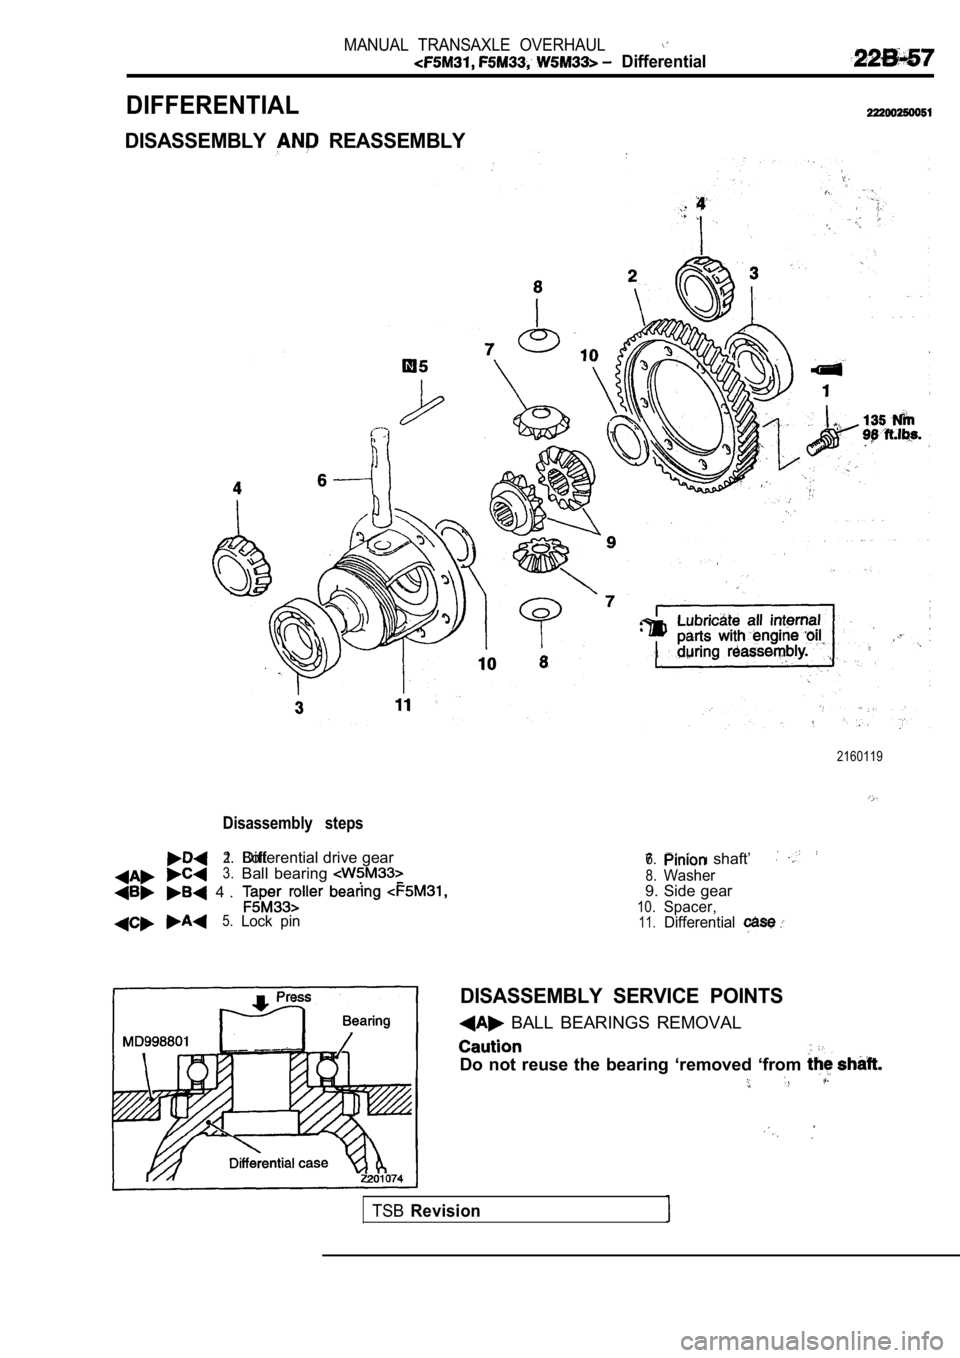
DIFFERENTIAL
DISASSEMBLY REASSEMBLY
2160119
Disassembly steps
1.Bolt2.Differential drive gear3.Ball bearing
4 .
5.Lock pin
6.Pinion shaft’7.
8.Washer9. Side gear10.Spacer,11.Differential
Do not reuse the bearing ‘removed ‘from
DISASSEMBLY SERVICE POINTS
BALL BEARINGS REMOVAL
TSBRevision
Page 948 of 2103
MANUAL TRANSAXLE OVERHAUL
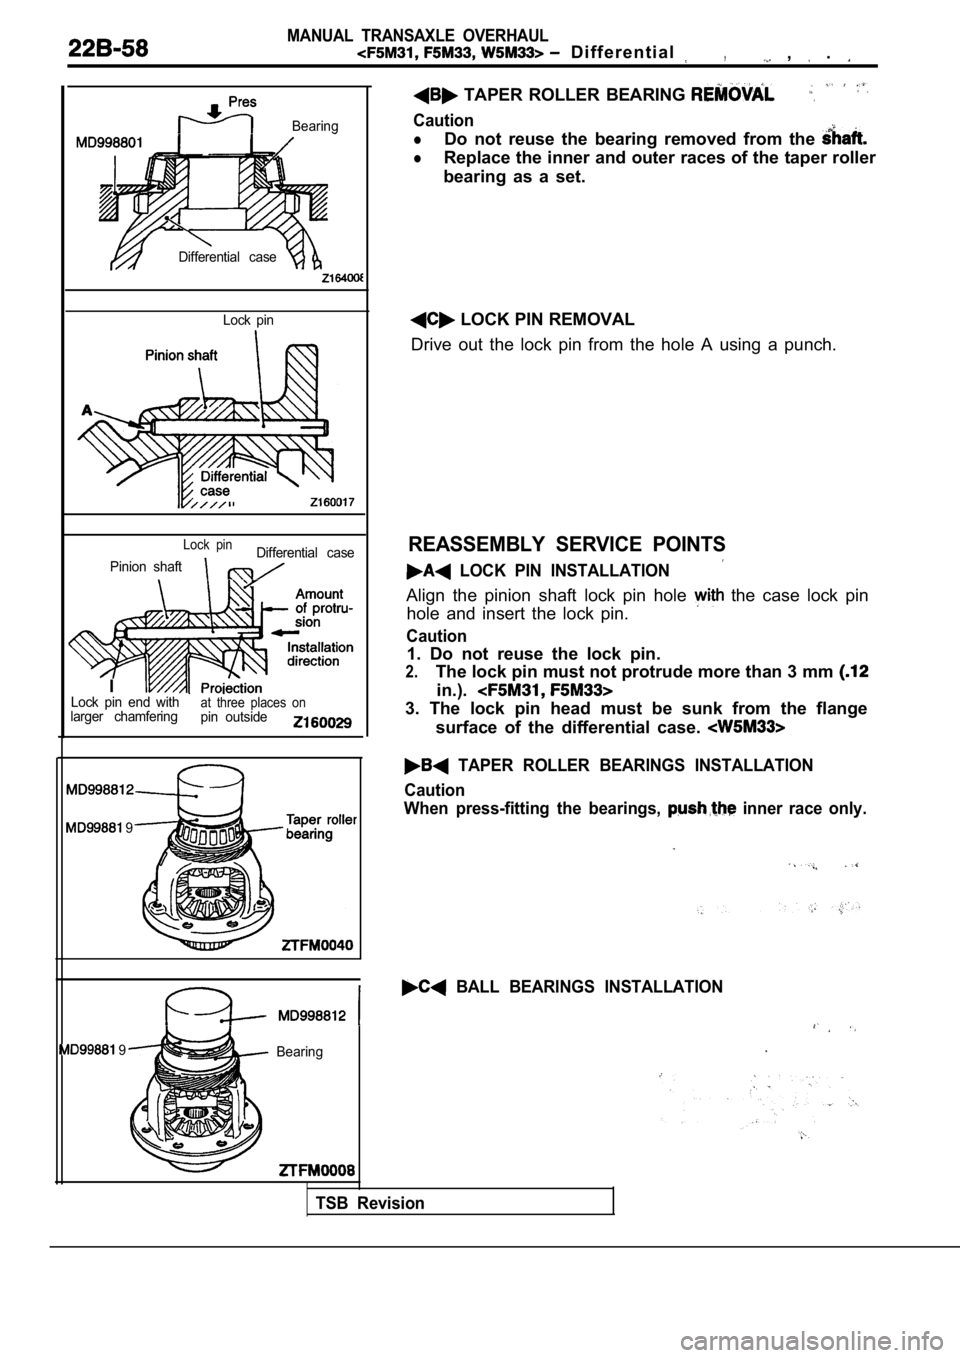
D i f f e r e n t i a l , , .
Bearing
Differential case Lock pin
Lock pinDifferential case
Pinion shaft
ILock pin end with
larger chamferingat three places onpin outside
9
9 Bearing
TAPER ROLLER BEARING
Caution
lDo not reuse the bearing removed from the
lReplace the inner and outer races of the taper roll er
bearing as a set.
LOCK PIN REMOVAL
Drive out the lock pin from the hole A using a punc h.
REASSEMBLY SERVICE POINTS
LOCK PIN INSTALLATION
Align the pinion shaft lock pin hole the case lock pin
hole and insert the lock pin.
Caution
1. Do not reuse the lock pin.
2.The lock pin must not protrude more than 3 mm
in.).
3. The lock pin head must be sunk from the flange
surface of the differential case.
TAPER ROLLER BEARINGS INSTALLATION
Caution
When press-fitting the bearings,
inner race only.
BALL BEARINGS INSTALLATION
TSB Revision
Page 949 of 2103
MANUAL TRANSAXLE OVERHAUL Differential
160030I
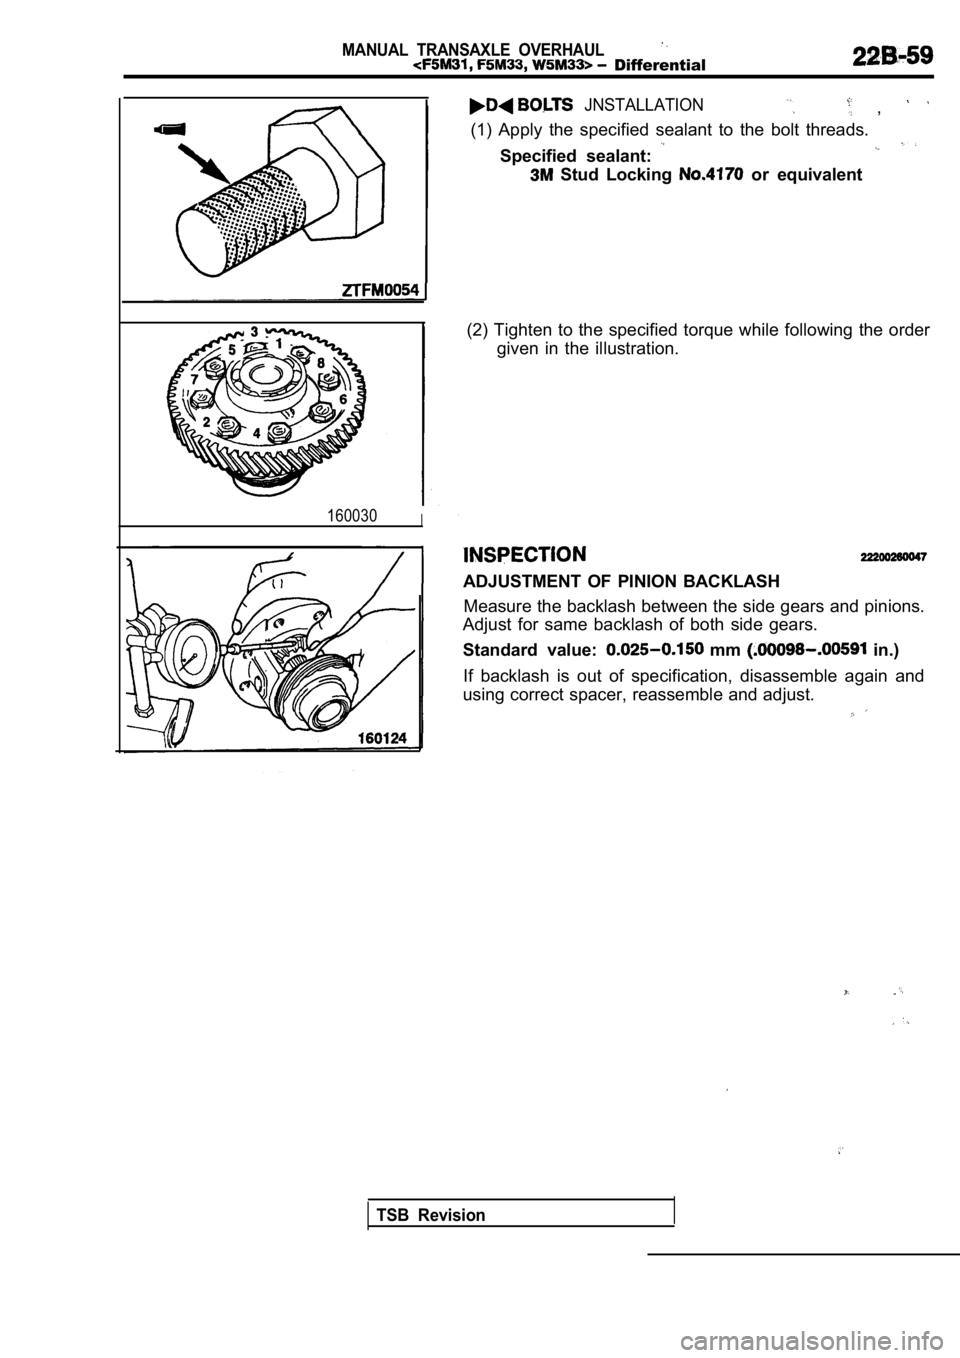
JNSTALLATION ,
(1) Apply the specified sealant to the bolt threads.
Specified sealant:
Stud Locking or equivalent
(2) Tighten to the specified torque while following the order
given in the illustration.
ADJUSTMENT OF PINION BACKLASH
Measure the backlash between the side gears and pin ions.
Adjust for same backlash of both side gears.
Standard value:
mm in.)
If backlash is out of specification, disassemble ag ain and
using correct spacer, reassemble and adjust.
TSB Revision
Page 950 of 2103
MANUAL TRANSAXLE OVERHAULCenter Differential ,
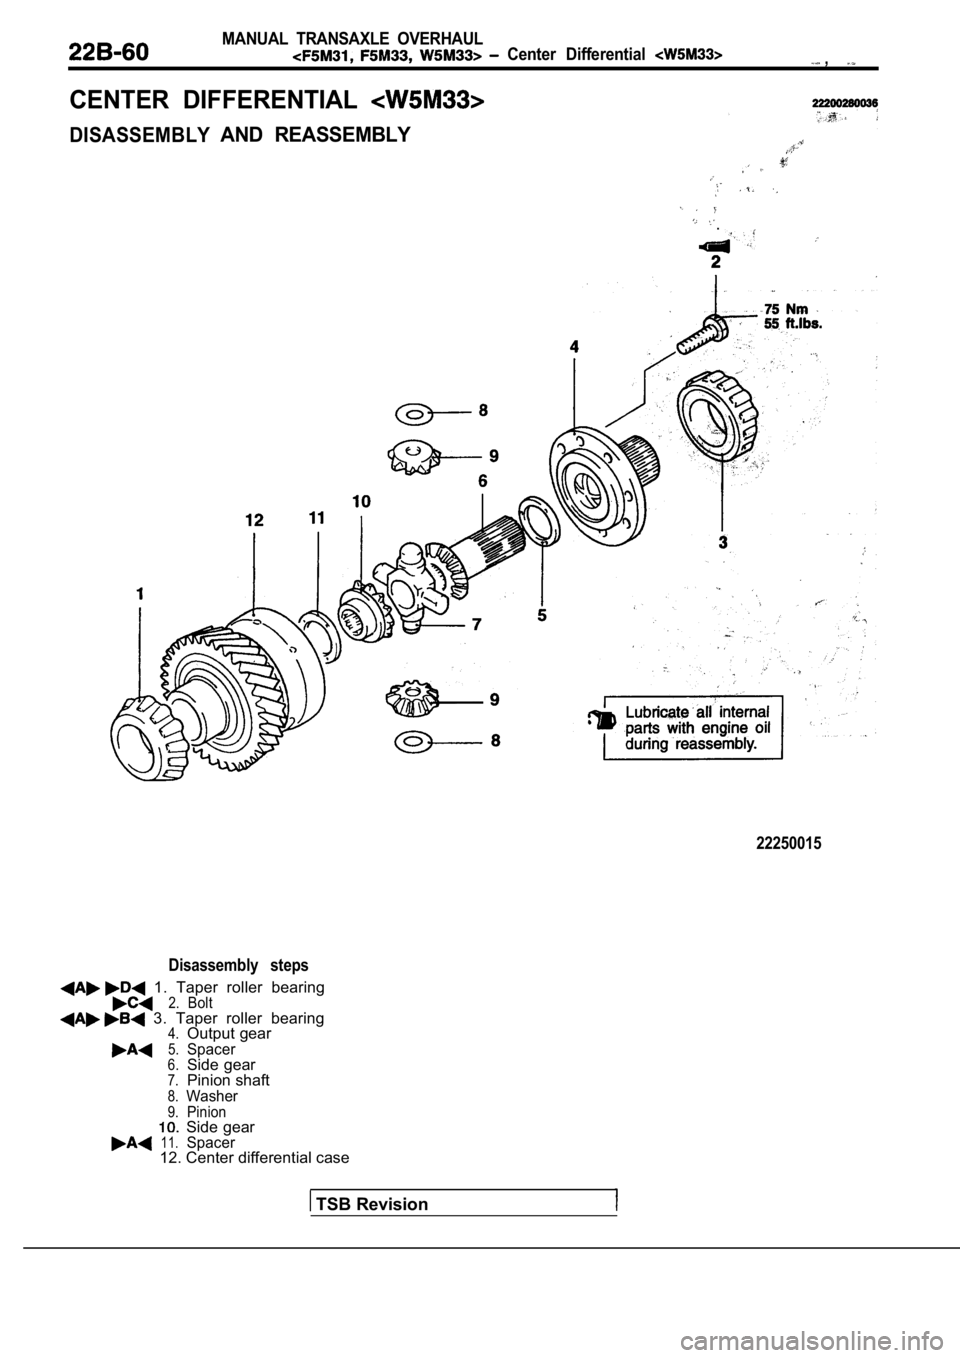
CENTER DIFFERENTIAL
DISASSEMBLYAND REASSEMBLY
,
22250015
Disassembly steps
1. Taper roller bearing2.Bolt 3. Taper roller bearing4.Output gear5.Spacer6.Side gear7.Pinion shaft8.Washer9.PinionSide gear11.Spacer12. Center differential case
TSB Revision
Trending: engine oil, compression ratio, seat memory, engine coolant, flat tire, maintenance schedule, gas type
