clutch NISSAN ALMERA 2001 Service Manual
[x] Cancel search | Manufacturer: NISSAN, Model Year: 2001, Model line: ALMERA, Model: NISSAN ALMERA 2001Pages: 2898, PDF Size: 60.76 MB
Page 416 of 2898

SAT140E
10. Remove D-rings and oil seals from forward clutch piston and
overrun clutch piston.
INSPECTIONNJAT0151Snap Rings and Spring RetainerNJAT0151S01+Check for deformation, fatigue or damage.
SAT138D
Forward Clutch and Overrun Clutch Return SpringsNJAT0151S02+Check for deformation or damage.
+Measure free length and outer diameter.
Inspection standard:
Refer to SDS, AT-477.
+Replace if deformed or fatigued.
SAT162D
Forward Clutch and Overrun Clutch Drive PlatesNJAT0151S03+Check facing for burns, cracks or damage.
+Measure thickness of facing.
Thickness of drive plate:
Forward clutch
Standard value: 1.8 mm (0.071 in)
Wear limit: 1.6 mm (0.063 in)
Overrun clutch
Standard value: 1.6 mm (0.063 in)
Wear limit: 1.4 mm (0.055 in)
+If not within wear limit, replace.
REPAIR FOR COMPONENT PARTS
Forward Clutch and Overrun Clutch (Cont'd)
AT-414
Page 417 of 2898

SAT163D
Forward Clutch and Overrun Clutch Dish PlatesNJAT0151S04+Check for deformation or damage.
+Measure thickness of dish plate.
Thickness of dish plate ªtº:
Forward clutch: 2.5 mm (0.098 in)
Overrun clutch: 2.15 mm (0.0846 in)
+If deformed or fatigued, replace.
SAT213D
Forward Clutch DrumNJAT0151S05+Make sure check balls are not fixed.
+Apply compressed air to check ball oil hole from outside of
forward clutch drum. Make sure air leaks past ball.
+Apply compressed air to oil hole from inside of forward clutch
drum. Make sure there is no air leakage.
SAT212D
Overrun Clutch PistonNJAT0151S06+Make sure check balls are not fixed.
+Apply compressed air to check ball oil hole opposite the return
spring. Make sure there is no air leakage.
+Apply compressed air to oil hole on return spring side. Make
sure air leaks past ball.
SAT208DA
ASSEMBLYNJAT01521. Install D-rings and oil seals on forward clutch piston and over-
run clutch piston.
+Take care with direction of oil seal.
+Apply ATF to both parts.
SAT215D
2. Install overrun clutch piston assembly on forward clutch piston
while turning it slowly.
+Apply ATF to inner surface of forward clutch piston.
REPAIR FOR COMPONENT PARTS
Forward Clutch and Overrun Clutch (Cont'd)
AT-415
Page 418 of 2898

SAT216D
3. Install forward clutch piston assembly on forward clutch drum
while turning it slowly.
+Apply ATF to inner surface of drum.
SAT217D
4. Align notch in forward clutch piston with groove in forward
clutch drum.
SAT218D
5. Install return spring on piston.
6. Install spring retainer on return springs.
For return spring, refer to AT-477.
SAT205D
7. Set Tool on spring retainer and install snap ring while com-
pressing return springs.
+Set Tool directly above return springs.
SAT220D
+Do not align snap ring gap with spring retainer stopper.
REPAIR FOR COMPONENT PARTS
Forward Clutch and Overrun Clutch (Cont'd)
AT-416
Page 419 of 2898

SAT204D
8. Install drive plates, driven plates, retaining plate and dish plate
for overrun clutch.
9. Install snap ring for overrun clutch.
SAT227D
10. Measure clearance between overrun clutch retaining plate and
snap ring.
If not within allowable limit, select proper retaining plate.
Specified clearance:
Standard: 1.0 - 1.4 mm (0.039 - 0.055 in)
Allowable limit: 2.0 mm (0.079 in)
Overrun clutch retaining plate:
Refer to SDS, AT-476.
SAT203D
11. Install drive plates, driven plates, retaining plate and dish plate
for forward clutch.
Take care with the order and direction of plates.
12. Install snap ring for forward clutch.
SAT228D
13. Measure clearance between forward clutch retaining plate and
snap ring.
If not within allowable limit, select proper retaining plate.
Specified clearance:
Standard: 0.45 - 0.85 mm (0.0177 - 0.0335 in)
Allowable limit: 1.85 mm (0.0728 in)
Forward clutch retaining plate:
Refer to SDS, AT-476.
SAT201D
14. Check operation of forward clutch.
Refer to ªForward Clutch and Overrun Clutchº, AT-412.
REPAIR FOR COMPONENT PARTS
Forward Clutch and Overrun Clutch (Cont'd)
AT-417
Page 420 of 2898

SAT202D
15. Check operation of overrun clutch.
Refer to ªForward Clutch and Overrun Clutchº, AT-412.
REPAIR FOR COMPONENT PARTS
Forward Clutch and Overrun Clutch (Cont'd)
AT-418
Page 423 of 2898
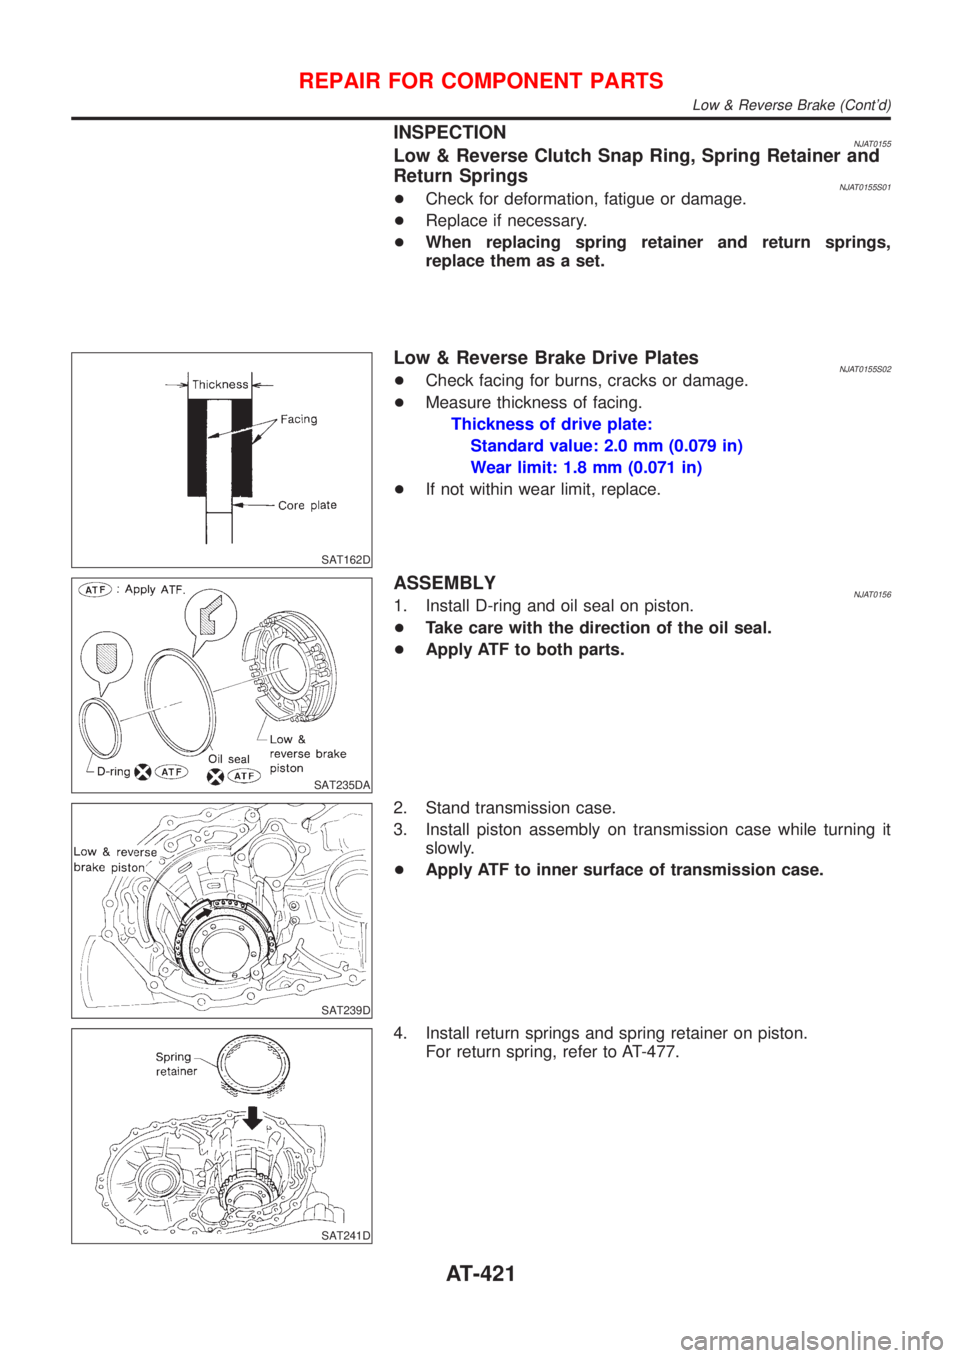
INSPECTIONNJAT0155Low & Reverse Clutch Snap Ring, Spring Retainer and
Return Springs
NJAT0155S01+Check for deformation, fatigue or damage.
+Replace if necessary.
+When replacing spring retainer and return springs,
replace them as a set.
SAT162D
Low & Reverse Brake Drive PlatesNJAT0155S02+Check facing for burns, cracks or damage.
+Measure thickness of facing.
Thickness of drive plate:
Standard value: 2.0 mm (0.079 in)
Wear limit: 1.8 mm (0.071 in)
+If not within wear limit, replace.
SAT235DA
ASSEMBLYNJAT01561. Install D-ring and oil seal on piston.
+Take care with the direction of the oil seal.
+Apply ATF to both parts.
SAT239D
2. Stand transmission case.
3. Install piston assembly on transmission case while turning it
slowly.
+Apply ATF to inner surface of transmission case.
SAT241D
4. Install return springs and spring retainer on piston.
For return spring, refer to AT-477.
REPAIR FOR COMPONENT PARTS
Low & Reverse Brake (Cont'd)
AT-421
Page 425 of 2898

Rear Internal Gear, Forward Clutch Hub and
Overrun Clutch Hub
COMPONENTSNJAT0157
SAT875J
SAT249D
DISASSEMBLYNJAT01581. Remove snap ring from overrun clutch hub.
2. Remove overrun clutch hub from forward clutch hub.
SAT250D
3. Remove thrust washer from forward clutch hub.
REPAIR FOR COMPONENT PARTS
Rear Internal Gear, Forward Clutch Hub and Overrun Clutch Hub
AT-423
Page 426 of 2898

SAT251D
4. Remove forward clutch hub from rear internal gear.
SAT252D
5. Remove end bearing from rear internal gear.
SAT253D
6. Remove thrust washer from rear internal gear.
SAT254D
7. Remove end bearing from forward one-way clutch.
SAT255D
8. Remove one-way clutch from forward clutch hub.
REPAIR FOR COMPONENT PARTS
Rear Internal Gear, Forward Clutch Hub and Overrun Clutch Hub (Cont'd)
AT-424
Page 427 of 2898

SAT256D
INSPECTIONNJAT0159Rear Internal Gear, Forward Clutch Hub and Overrun
Clutch Hub
NJAT0159S01+Check rubbing surfaces for wear or damage.
SAT257D
Snap Ring, End Bearings and Forward One-way ClutchNJAT0159S02+Check snap ring and end bearings for deformation and dam-
age.
+Check forward one-way clutch for wear and damage.
SAT976H
ASSEMBLYNJAT01601. Install forward one-way clutch on forward clutch.
+Take care with the direction of forward one-way clutch.
SAT259D
2. Install end bearing on forward one-way clutch.
+Apply petroleum jelly to end bearing.
SAT260D
3. Install thrust washer on rear internal gear.
+Apply petroleum jelly to thrust washer.
+Align pawls of thrust washer with holes of rear internal
gear.
REPAIR FOR COMPONENT PARTS
Rear Internal Gear, Forward Clutch Hub and Overrun Clutch Hub (Cont'd)
AT-425
Page 428 of 2898
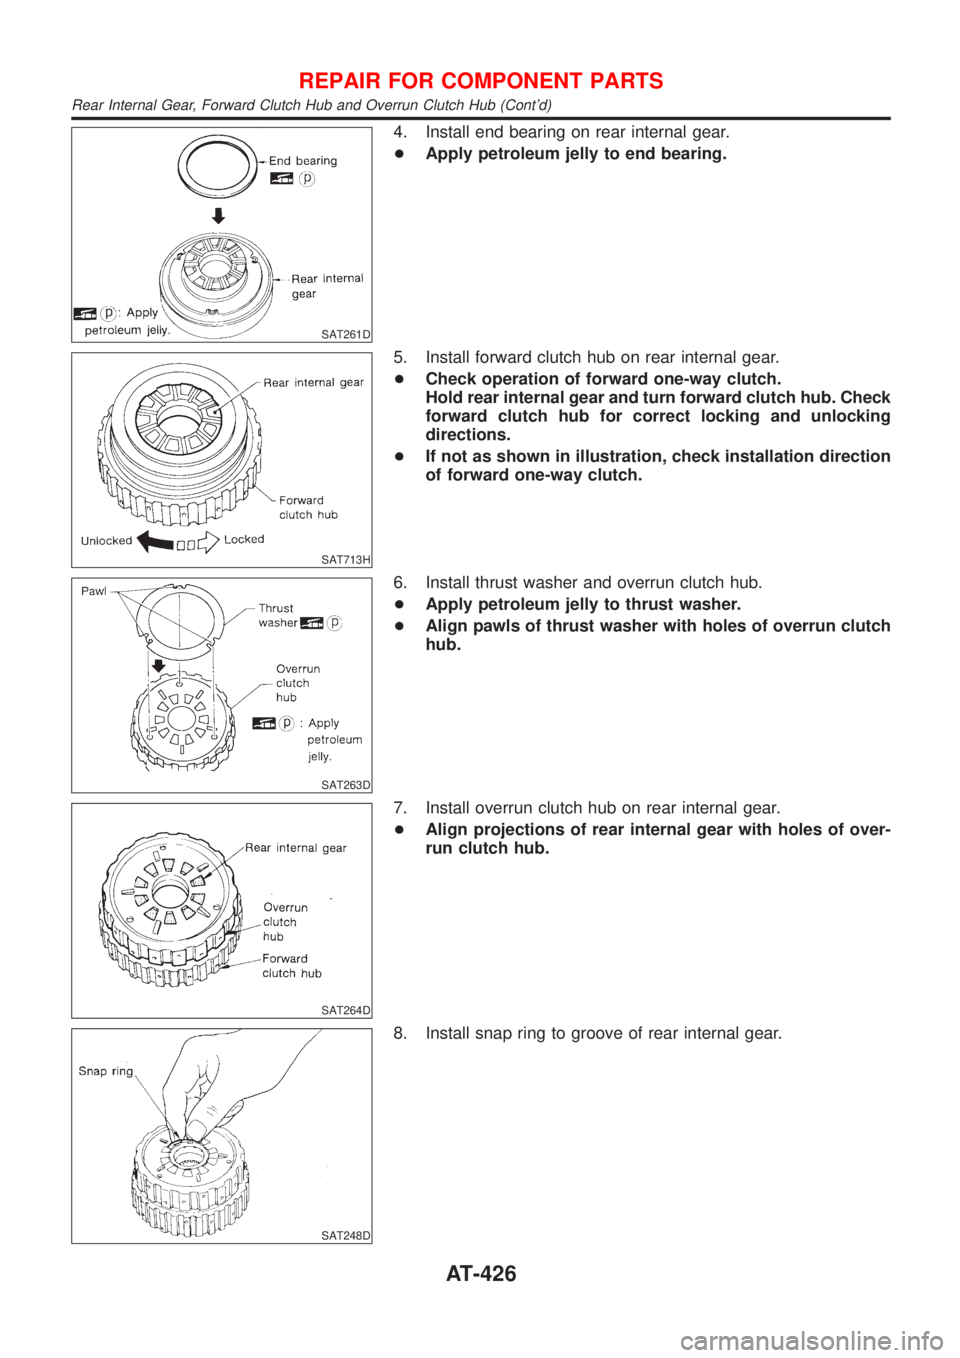
SAT261D
4. Install end bearing on rear internal gear.
+Apply petroleum jelly to end bearing.
SAT713H
5. Install forward clutch hub on rear internal gear.
+Check operation of forward one-way clutch.
Hold rear internal gear and turn forward clutch hub. Check
forward clutch hub for correct locking and unlocking
directions.
+If not as shown in illustration, check installation direction
of forward one-way clutch.
SAT263D
6. Install thrust washer and overrun clutch hub.
+Apply petroleum jelly to thrust washer.
+Align pawls of thrust washer with holes of overrun clutch
hub.
SAT264D
7. Install overrun clutch hub on rear internal gear.
+Align projections of rear internal gear with holes of over-
run clutch hub.
SAT248D
8. Install snap ring to groove of rear internal gear.
REPAIR FOR COMPONENT PARTS
Rear Internal Gear, Forward Clutch Hub and Overrun Clutch Hub (Cont'd)
AT-426