NISSAN ALMERA N15 1995 Service Manual
Manufacturer: NISSAN, Model Year: 1995, Model line: ALMERA N15, Model: NISSAN ALMERA N15 1995Pages: 1701, PDF Size: 82.27 MB
Page 691 of 1701
SFA113AASFA114A
FRONT
AXLE
Wheel HubandKnuckle (Conl'd)
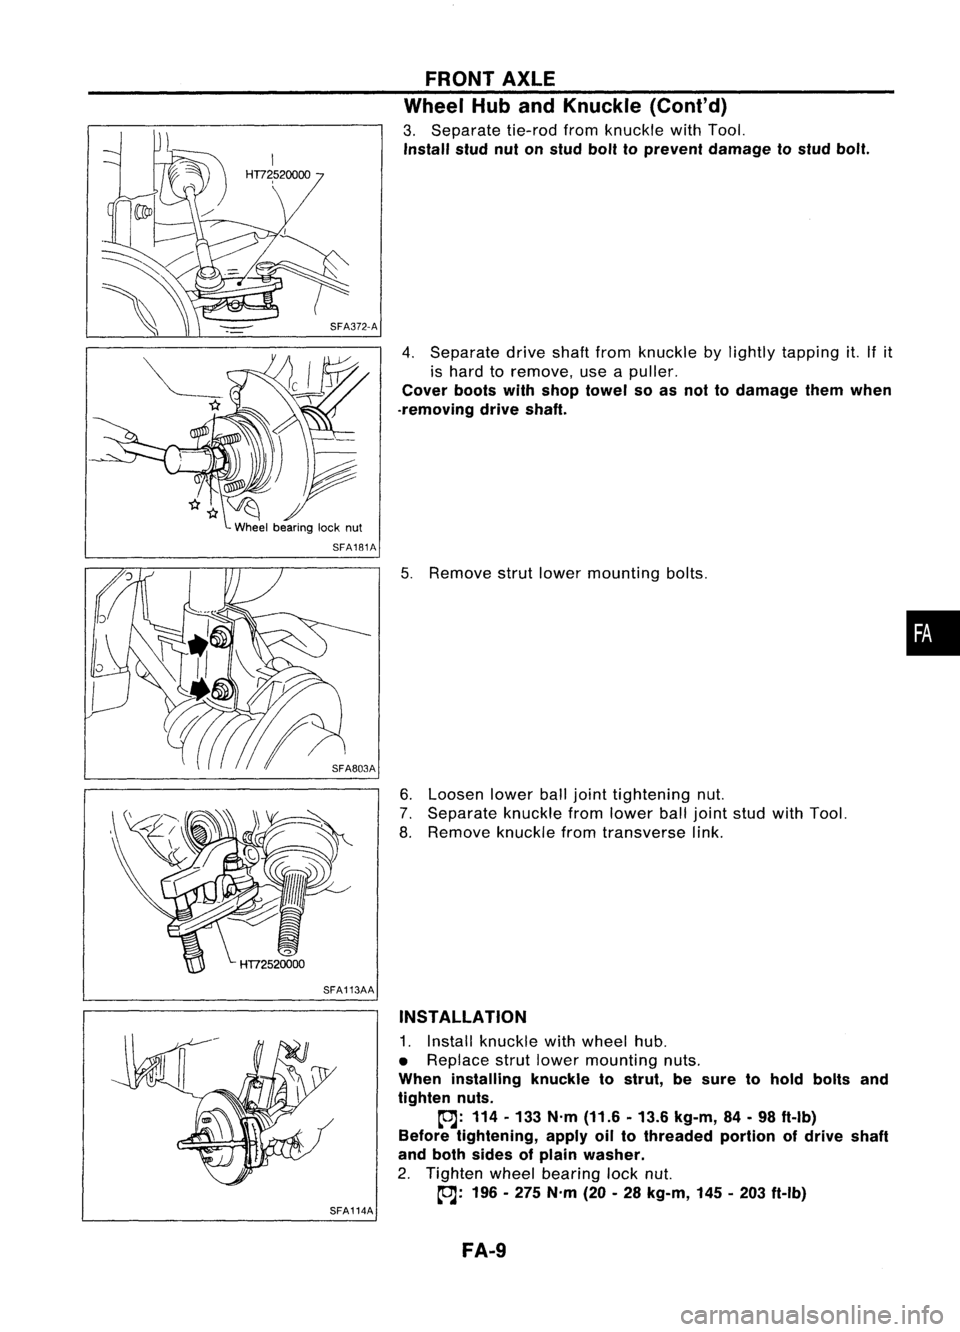
3. Separate tie-rodfromknuckle withTool.
Install studnutonstud bolttoprevent damage tostud bolt.
4. Separate driveshaftfrom knuckle bylightly tapping it.Ifit
is hard toremove, useapuller.
Cover bootswithshop towel soas not todamage themwhen
-removing driveshaft.
5. Remove strutlower mounting bolts.
6. Loosen lowerballjoint tightening nut.
7. Separate knucklefromlower balljoint studwithTool.
8. Remove knucklefromtransverse link.
INSTALLATION
1. Install knuckle withwheel hub.
• Replace strutlower mounting nuts.
When installing knuckletostrut, besure tohold bolts and
tighten nuts.
~: 114-133 N'm (11.6 •13.6 kg-m, 84.98 ft.lb)
Before tightening, applyoiltothreaded portionofdrive shaft
and both sides ofplain washer.
2. Tighten wheelbearing locknut.
~: 196-275 N'm (20•28 kg-m, 145-203 ft-Ib)
FA-9
•
Page 692 of 1701
SFA116A
SFA654A
FRONT
AXLE
Wheel HubandKnuckle (Cont'd)
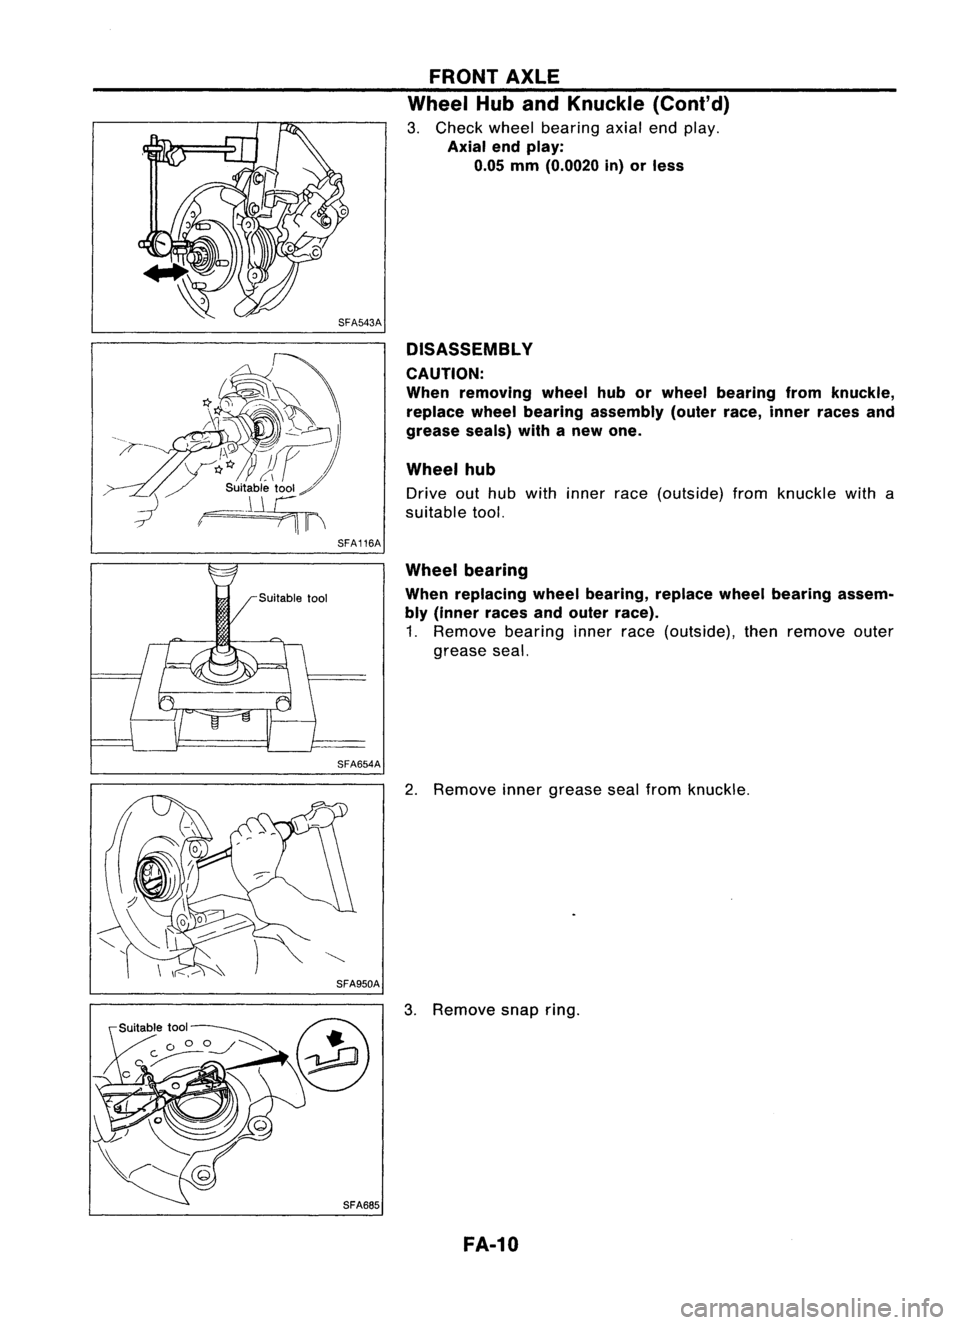
3. Check wheelbearing axialendplay.
Axial endplay:
0.05 mm(0.0020 in)orless
DISASSEMBL Y
CAUTION:
When removing wheelhuborwheel bearing fromknuckle,
replace wheelbearing assembly (outerrace,inner races and
grease seals)withanew one.
Wheel hub
Drive outhub with inner race(outside) fromknuckle witha
suitable tool.
Wheel bearing
When replacing wheelbearing, replacewheelbearing assem-
bly (inner racesandouter race).
1. Remove bearinginnerrace(outside), thenremove outer
grease seal.
2. Remove innergrease sealfrom knuckle.
3. Remove snapring.
FA-10
Page 693 of 1701
SFA496AFRONT
AXLE
Wheel HubandKnuckle (Cont'd)
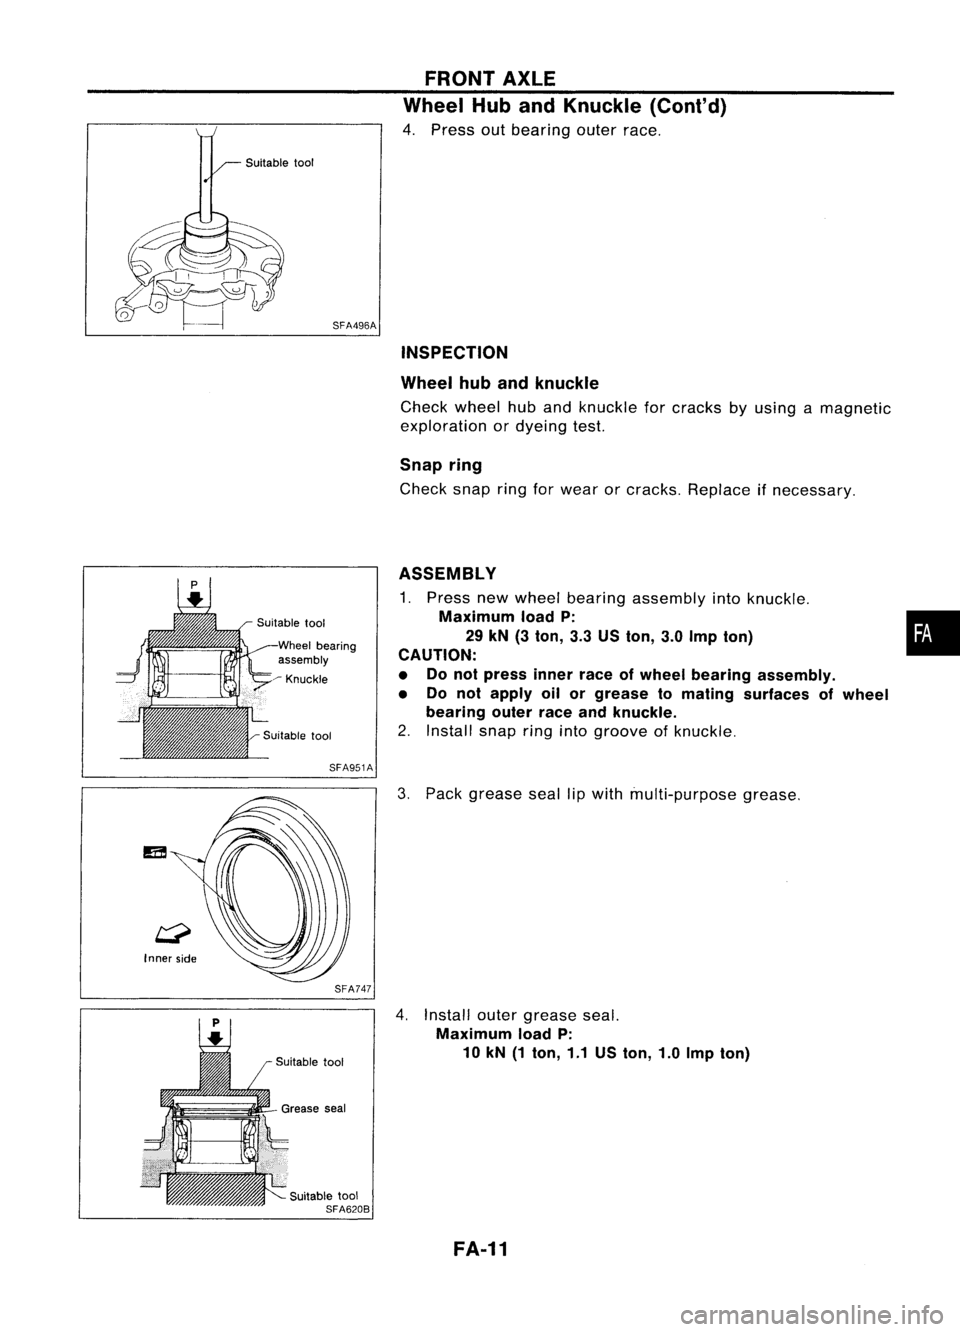
4. Press outbearing outerrace.
INSPECTION
Wheel hubandknuckle
Check wheel huband knuckle forcracks byusing amagnetic
exploration ordyeing test.
Snap ring
Check snapringforwear orcracks. Replace ifnecessary.
Wheel bearing
assembly
~ Knuckle
SFA951A
SFA747
Suitable tool
SFA620B ASSEMBLY
1. Press newwheel bearing assembly intoknuckle.
Maximum loadP: •
29 kN (3ton, 3.3USton, 3.0Imp ton)
i
CAUTION:
• Donot press innerraceofwheel bearing assembly.
• Do not apply oilorgrease tomating surfaces ofwheel
bearing outerraceandknuckle.
2. Install snapringintogroove ofknuckle.
3. Pack grease seallipwith multi-purpose grease.
4. Install outergrease seal.
Maximum loadP:
10 kN (1ton, 1.1USton, 1.0Imp ton)
FA-11
Page 694 of 1701
Wheelbearing
assembly SFA953A
SFA090A
FRONT
AXLE
Wheel HubandKnuckle (Cont'd)
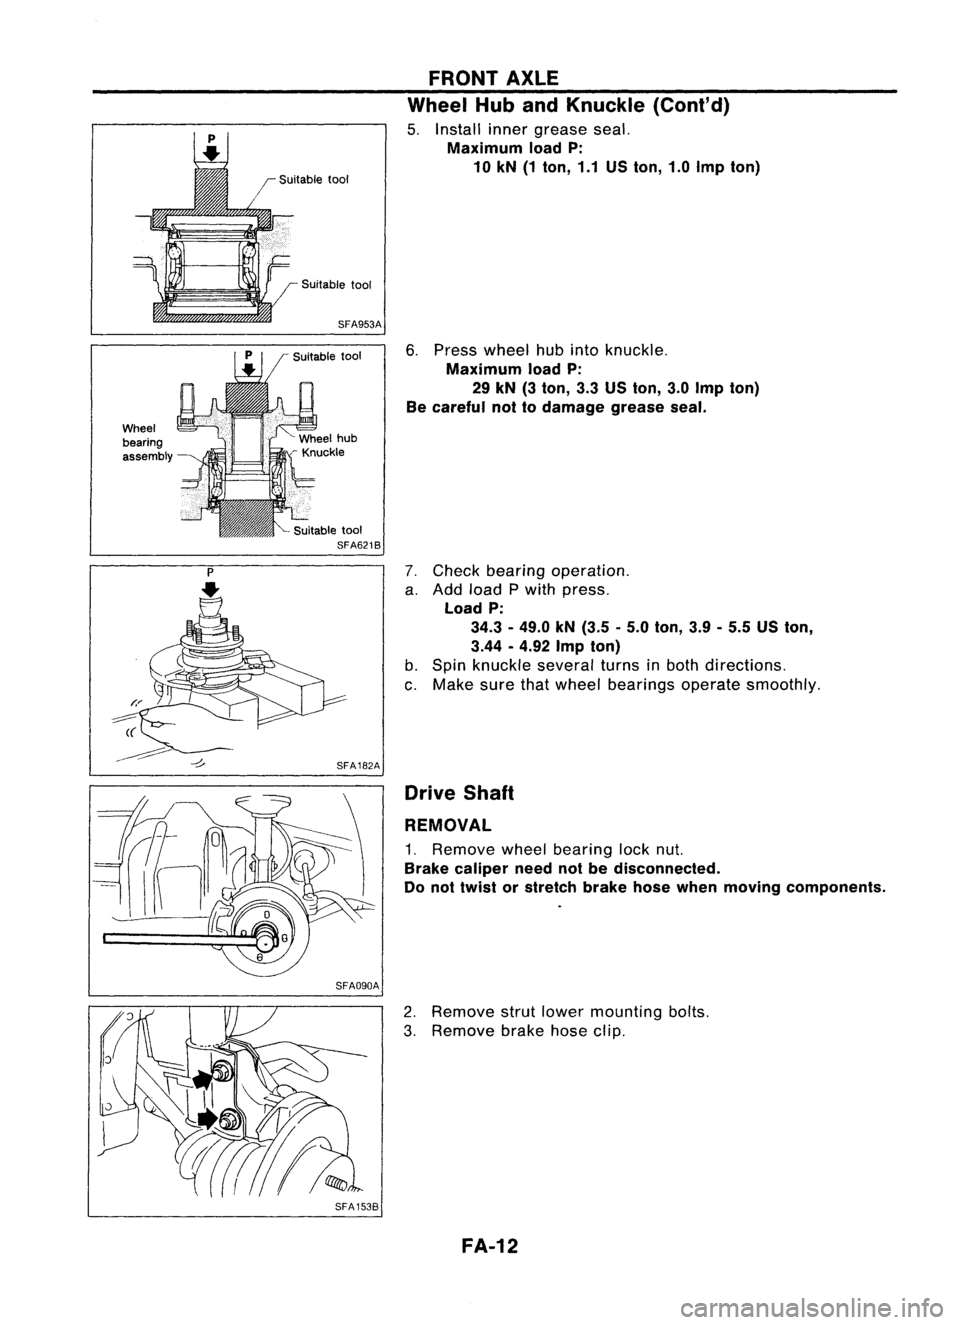
5. Install innergrease seal.
Maximum loadP:
10 kN (1ton, 1.1USton, 1.0Imp ton)
6. Press wheel hubinto knuckle.
Maximum loadP:
29 kN (3ton, 3.3USton, 3.0Imp ton)
Be careful nottodamage greaseseal.
7. Check bearing operation.
a. Add load Pwith press.
Load P:
34.3 -49.0 kN(3.5 -5.0 ton, 3.9-5.5 USton,
3.44 •4.92 Impton)
b. Spin knuckle severalturnsinboth directions.
c. Make surethatwheel bearings operatesmoothly.
Drive Shaft
REMOVAL
1. Remove wheelbearing locknut.
Brake caliper neednotbedisconnected.
Do not twist orstretch brakehosewhen moving components.
SFA1538
2.
Remove strutlower mounting bolts.
3. Remove brakehoseclip.
FA-12
Page 695 of 1701
AfTmodel
SFA730FRONT
AXLE
Drive Shaft(Coni' d)
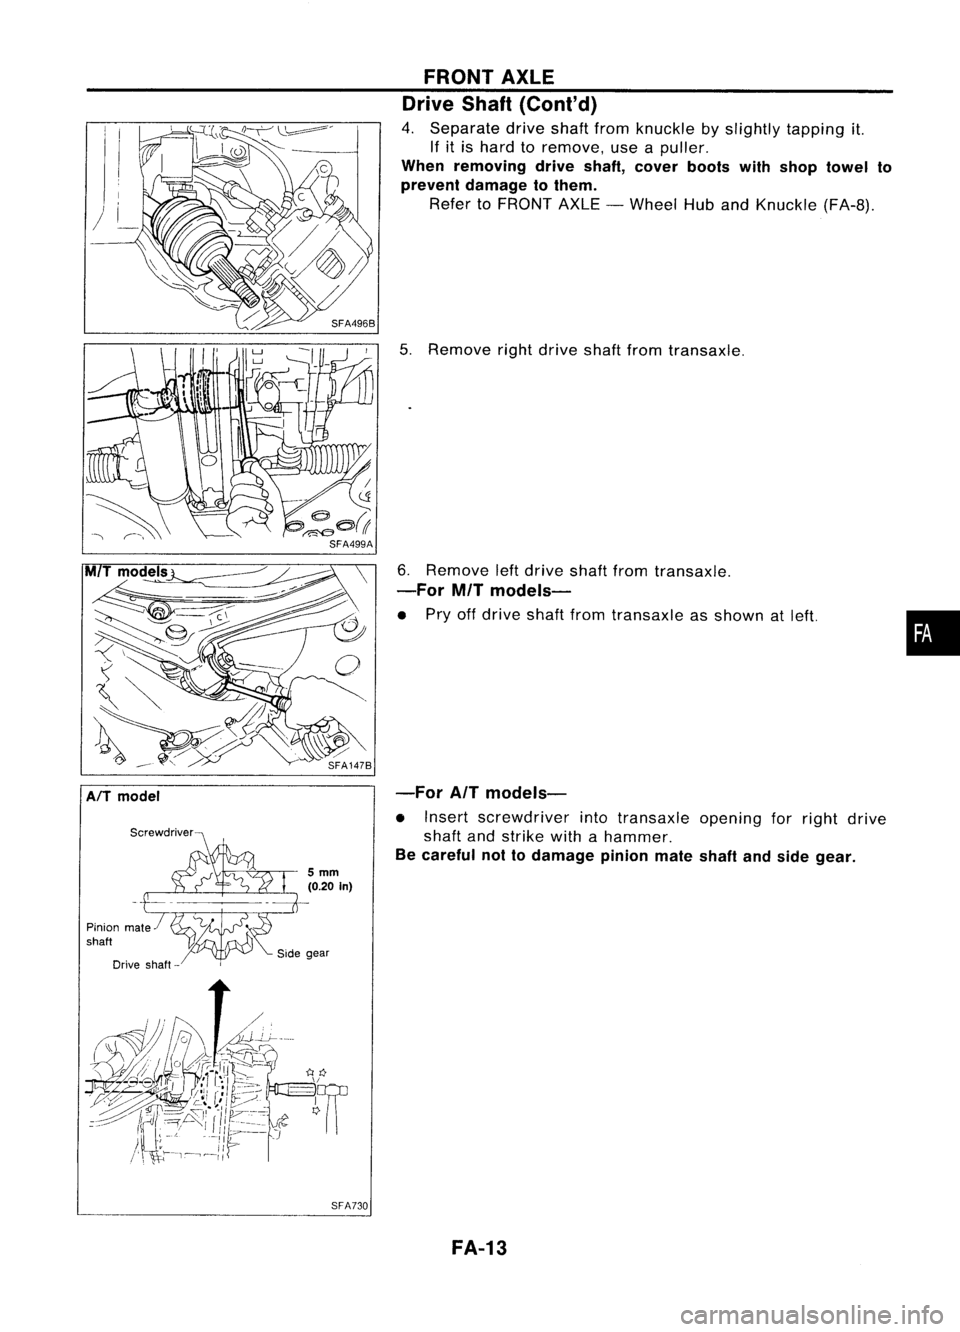
4. Separate driveshaftfromknuckle byslightly tapping it.
If it is hard toremove, useapuller.
When removing driveshaft, cover bootswithshop towel to
prevent damage tothem.
Refer toFRONT AXLE-Wheel HubandKnuckle (FA-8).
5. Remove rightdrive shaftfromtransaxle.
6. Remove leftdrive shaftfromtransaxle.
-For MITmodels-
• Pry offdrive shaftfromtransaxle asshown atleft.
-For AITmodels-
• Insert screwdriver intotransaxle openingforright drive
shaft andstrike withahammer.
Be careful nottodamage pinionmateshaftandside gear.
FA-13
•
Page 696 of 1701
RH
SFA394BB
FRONT
AXLE
Drive Shaft(Cont'd)
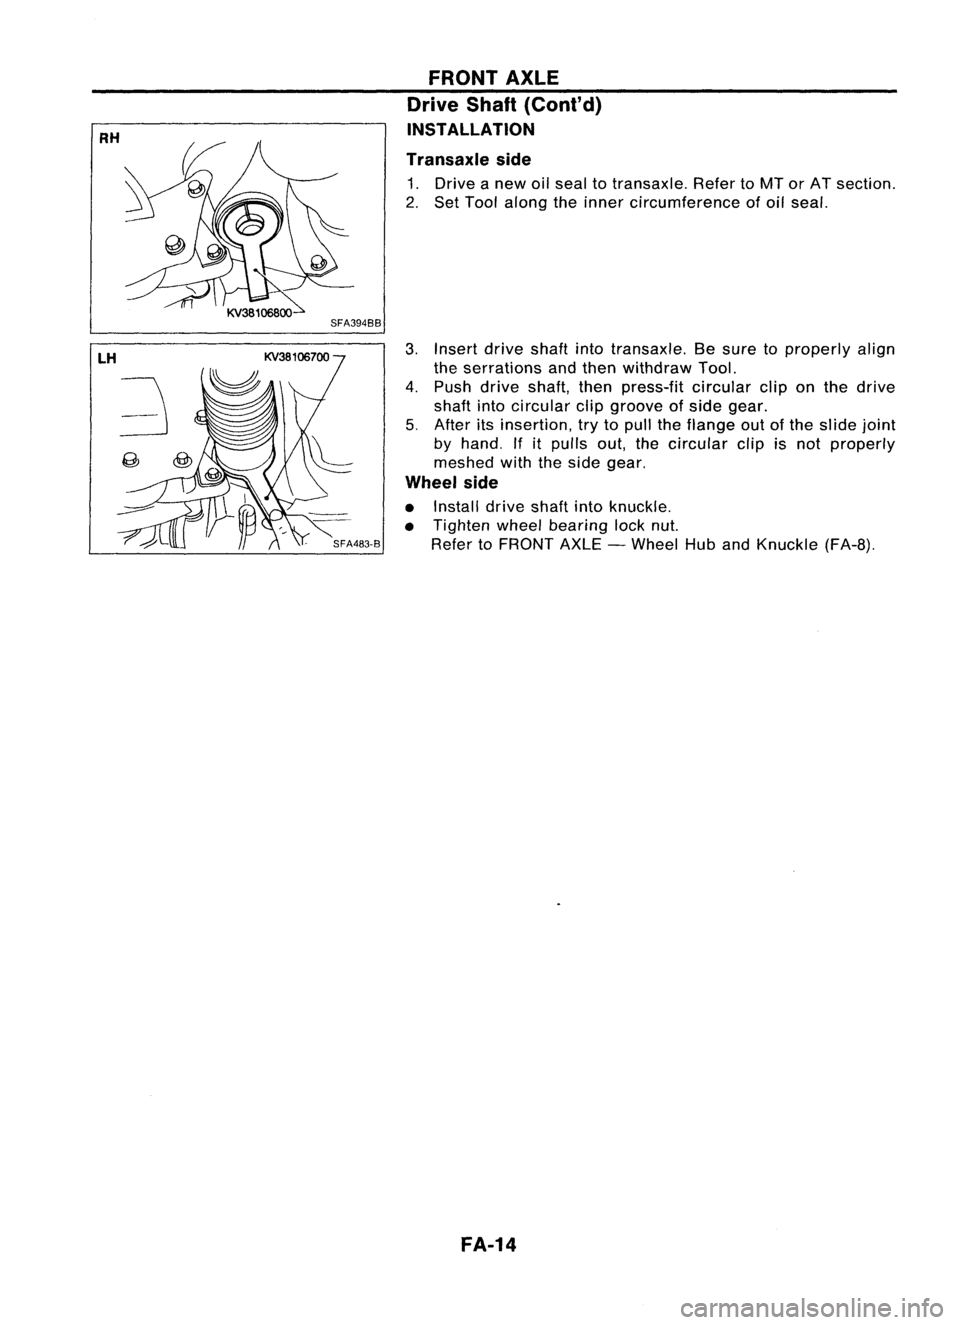
INSTALLATION
Transaxle side
1. Drive anew oilseal totransaxle. RefertoMT orAT section.
2. Set Tool along theinner circumference ofoil seal.
3. Insert driveshaft
into
transaxle. Besure toproperly align
the serrations andthen withdraw Tool.
4. Push drive shaft, thenpress-fit circularcliponthe drive
shaft intocircular clipgroove ofside gear.
5. After itsinsertion, trytopull theflange outofthe slide joint
by hand. Ifitpulls out,the
circular
clipisnot properly
meshed withtheside gear.
Wheel side
• Install driveshaftintoknuckle.
• Tighten wheelbearing locknut.
Refer toFRONT AXLE-Wheel HubandKnuckle (FA-B).
FA-14
Page 697 of 1701
FRONTAXLE
Drive Shaft(Cont'd)
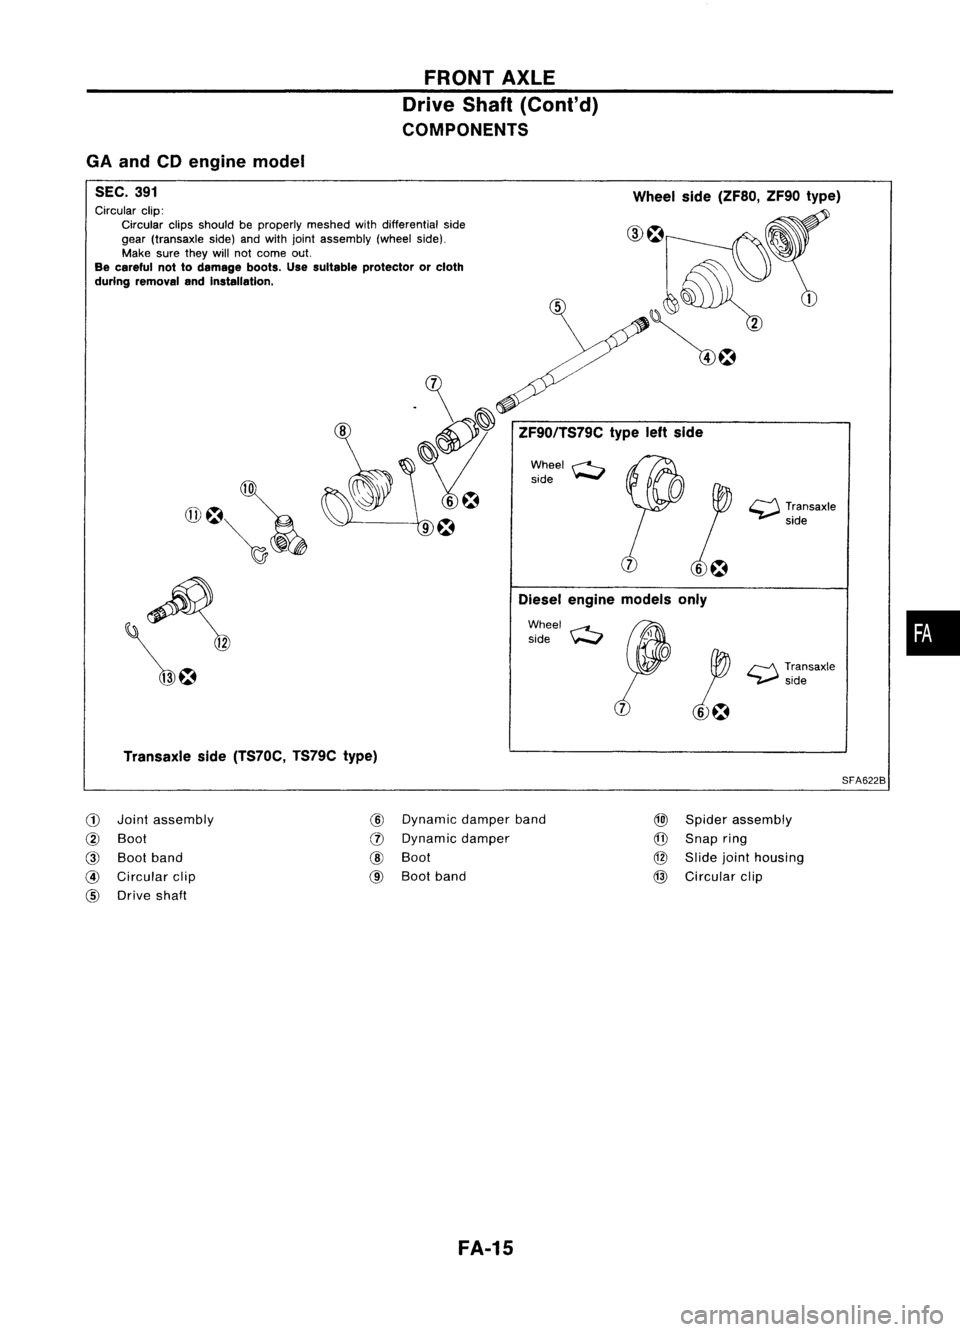
COMPONENTS
ZF90/TS79Ctypeleftside
Diesel engine models only
•
~
Transaxle
side
r-J\
Transaxle
~side
o
p
,~
Wheel
side(ZF80, ZF90type)
Wheel ~
side
Wheel side
8
.~
\~
Circular
clip:
Circular clipsshould beproperly meshedwithdifferential side
gear (transaxle side)andwith joint assembly (wheelside).
Make suretheywillnotcome out.
Be careful nottodamage boots.Usesuitable protector orcloth
during removal andinstallation.
GA
and CDengine model
SEC. 391
Transaxle side(TS70C, TS79Ctype)
SFA622B
CD
Joint
assembly
@
Dynamic damperband
@)
Spider assembly
@
Boot
(J)
Dynamic damper
@
Snap ring
@
Boot band
@
Boot
@
Slide jointhousing
@
Circular clip
@
Boot band
@
Circular clip
@
Drive shaft
FA-15
Page 698 of 1701
~RONTAXLE
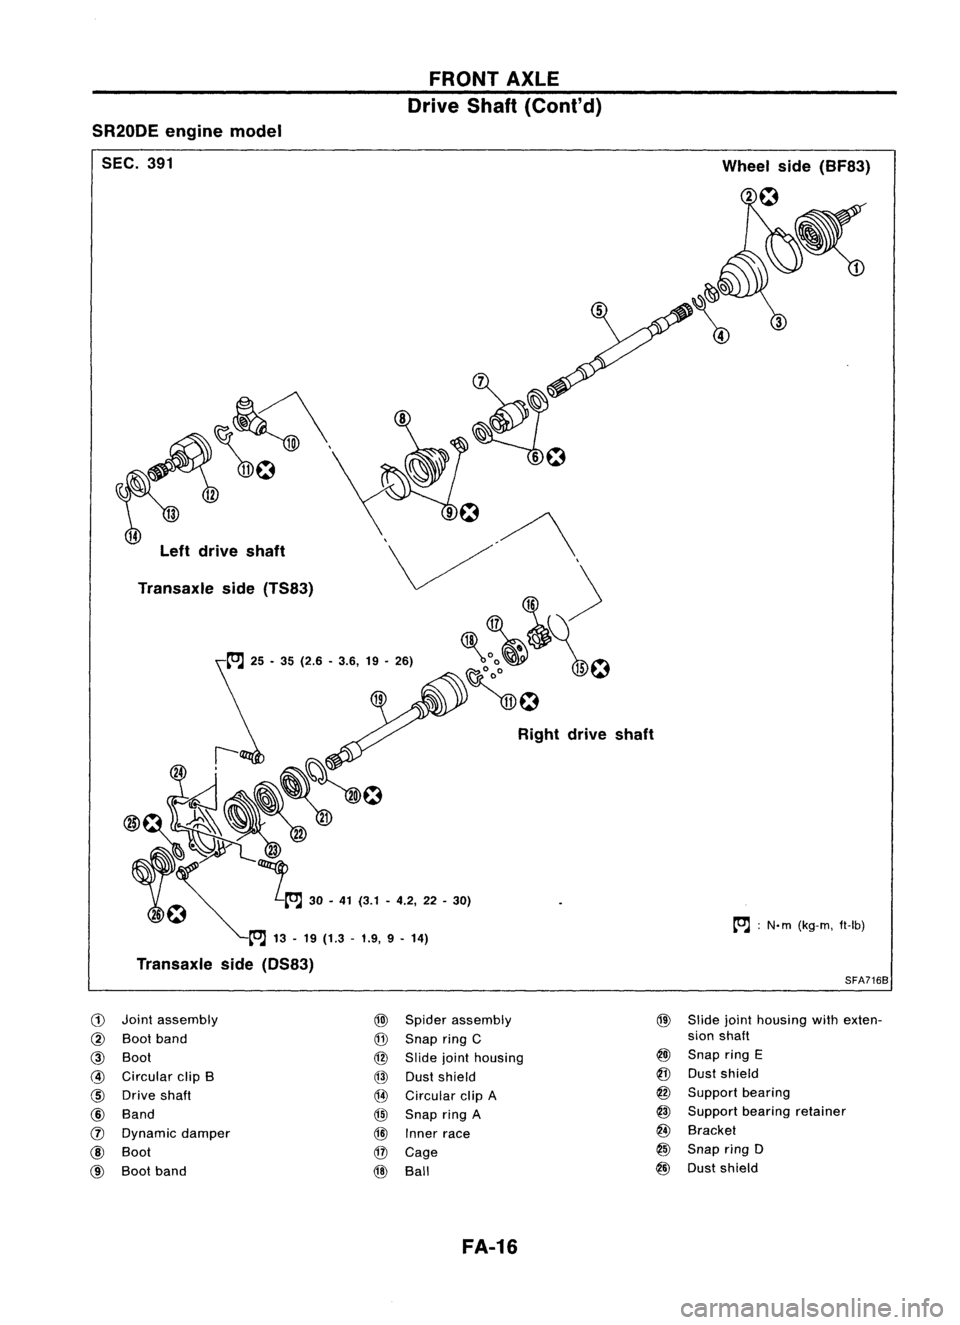
Drive Sh
f
a t(Cont'd)
Wheelside(BF83)
20
tOJ :
N-m (kg-m,
ft-Ib)
SFA716B
@
Slide jointh'
S'
ouslng,
Ion shaft withexten-
@J
Snap ringE
@
Dustshield
@
S
@
upport bearing
Support bearin
@
Bracket gretainer
@
Snap ring0
@
Dust shield
Right
driveshaft
@l
S'd
@
pierassembly
Snap ringC
@
Slide jointh.
13'
0 ouslng
\!'V
ustshield
@
Circular clipA
@
Snap ringA
@l
Inner race
@
Cage
@
Ball
@~ti~~o
f:~~ 2!~ ~
30.41
(3.1.4.2,22 -301
T ~
13-19 (13
ransaxle side(0 .-
1.9, 9•
14)
S83)
~'Vz~
r:~~
@O'
Left drive h
s aft
Transa I
x
e side (TS83)
tOJ
25.35 (26
.
•3.6,
19.26)
SR20DE
eng-
me model
SEC. 391
G)
Jo'
t
In
assembly
@
Boot band
@
Boot
@
Circular clipB
@
Drive shaft
@
Band
tJ)
Dynamic dam
@
Boot per
@
Boot band
FA-16
Page 699 of 1701
SFA963FRONT
AXLE
Drive Shaft(Cont'd)
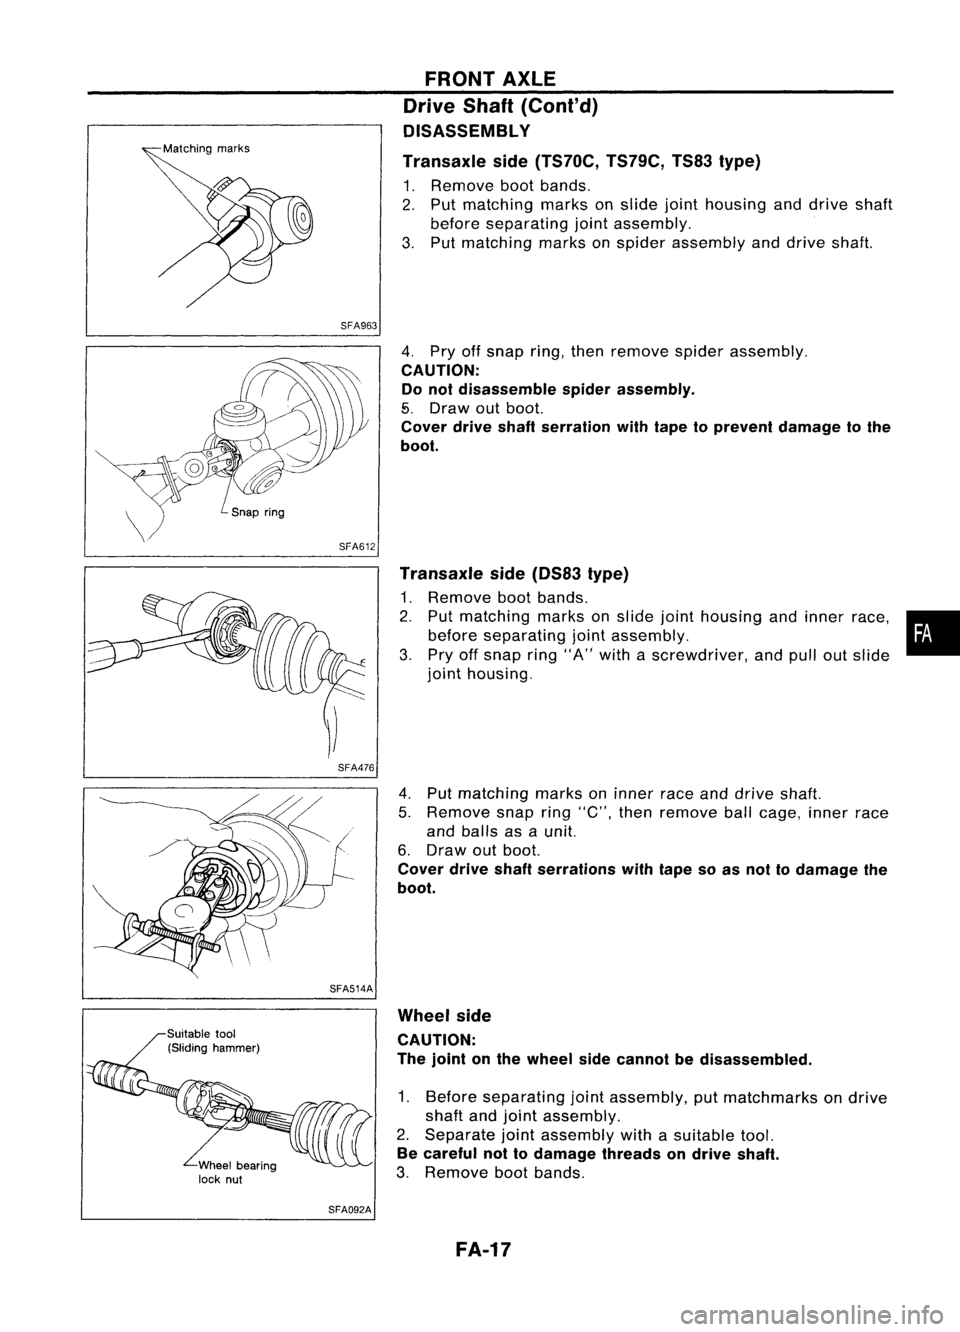
OISASSEMBL Y
Transaxle side(TS70C, TS79C,TS83type)
1. Remove bootbands.
2. Put matching marksonslide jointhousing anddrive shaft
before separating jointassembly.
3. Put matching marksonspider assembly anddrive shaft.
SFA476
SFA514A
SFA092A
4.
Pry offsnap ring,thenremove spiderassembly.
CAUTION: Do not disassemble spiderassembly.
5. Draw outboot.
Cover driveshaftserration withtape toprevent damage tothe
boot.
Transaxle side(OS83 type)
1. Remove bootbands.
2. Put matching marksonslide jointhousing andinner race, •
before separating jointassembly.
i
3. Pry offsnap ring"A"with ascrewdriver, andpulloutslide
joint housing.
4. Put matching marksoninner raceanddrive shaft.
5. Remove snapring"C", then remove ballcage, innerrace
and balls asaunit.
6. Draw outboot.
Cover driveshaftserrations withtape soas not todamage the
boot.
Wheel side
CAUTION:
The joint onthe wheel sidecannot bedisassembled.
1. Before separating jointassembly, putmatchmarks ondrive
shaft andjoint assembly.
2. Separate jointassembly withasuitable tool.
Be careful nottodamage threadsondrive shaft.
3. Remove bootbands.
FA-17
Page 700 of 1701
SFA692FRONT
AXLE
Drive Shaft(Cont'd)
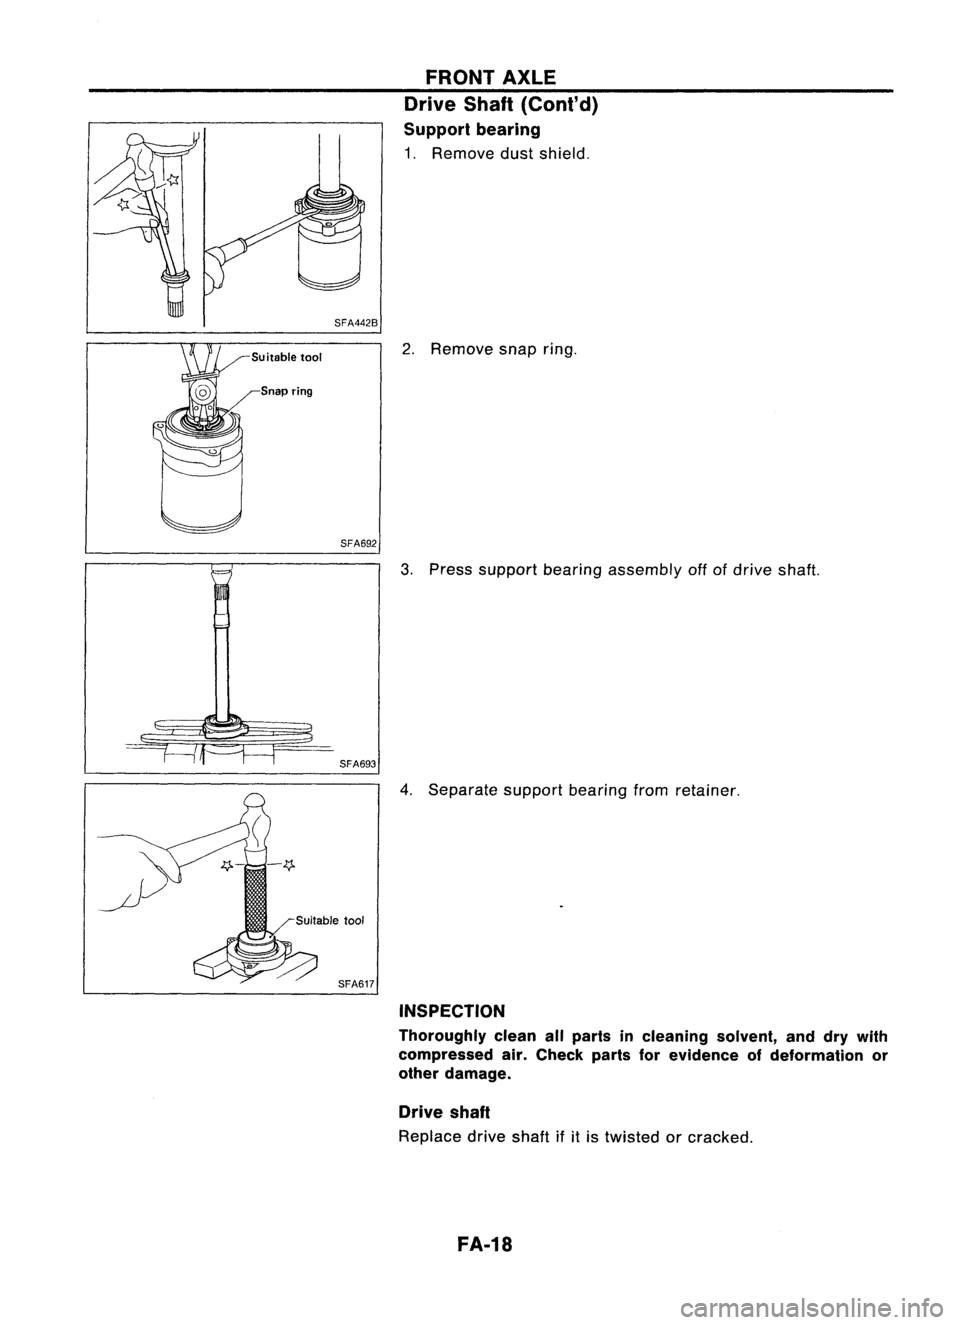
Support bearing
1. Remove dustshield.
2. Remove snapring.
3. Press support bearingassembly offofdrive shaft.
4. Separate supportbearingfromretainer.
INSPECTION
Thoroughly cleanallparts incleaning solvent,anddrywith
compressed air.Check partsforevidence ofdeformation or
other damage.
Drive shaft
Replace driveshaftifitis twisted orcracked.
FA-18