NISSAN LATIO 2009 Service Repair Manual
Manufacturer: NISSAN, Model Year: 2009, Model line: LATIO, Model: NISSAN LATIO 2009Pages: 4331, PDF Size: 58.04 MB
Page 3111 of 4331
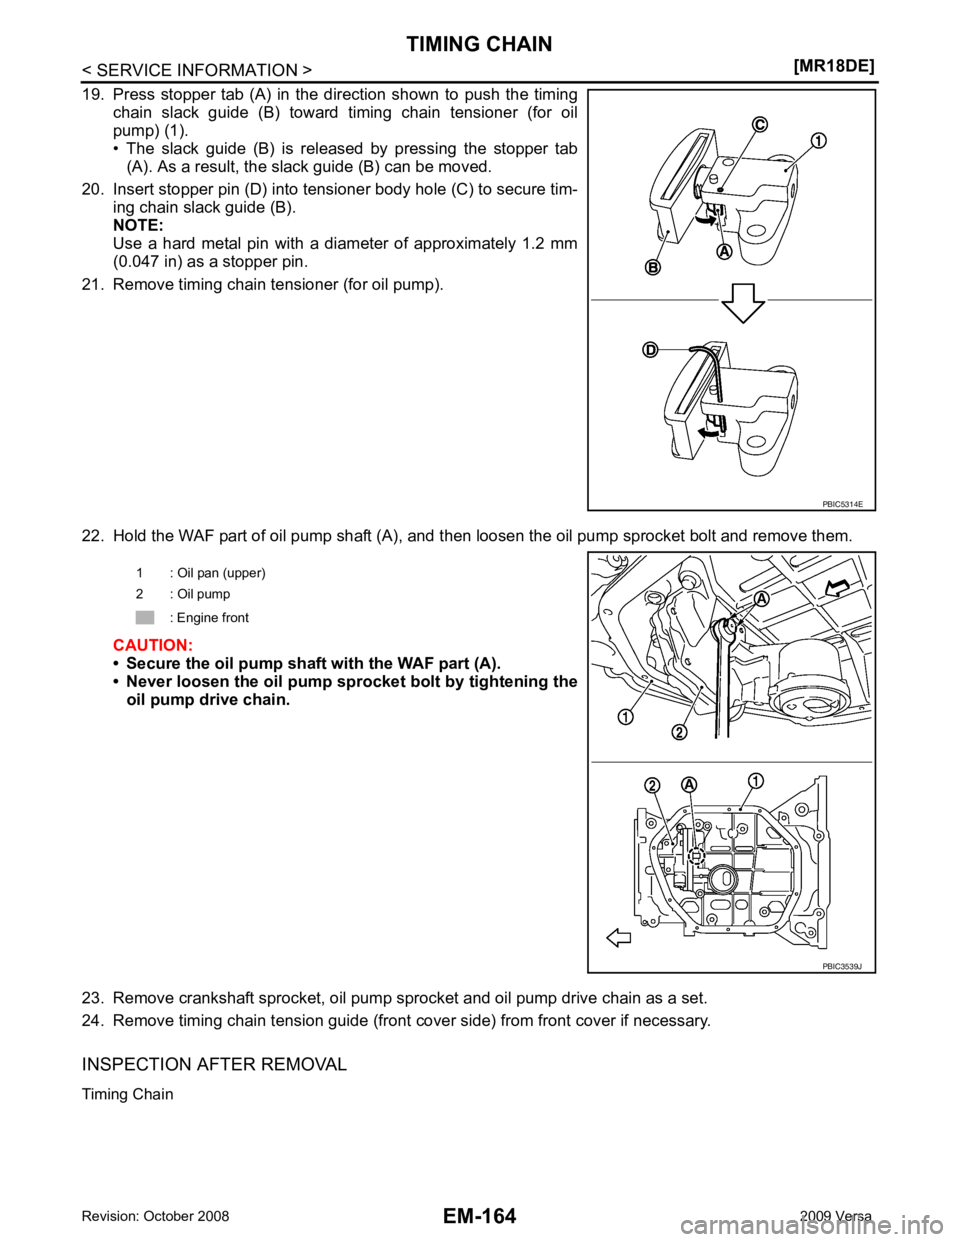
Page 3112 of 4331
EM
NP
O
• Check timing chain and oil pump drive chain for cracks (A) and any
excessive wear (B) at the roller links of timing chain.
• Replace timing chain and/or oil pump drive chain if necessary.
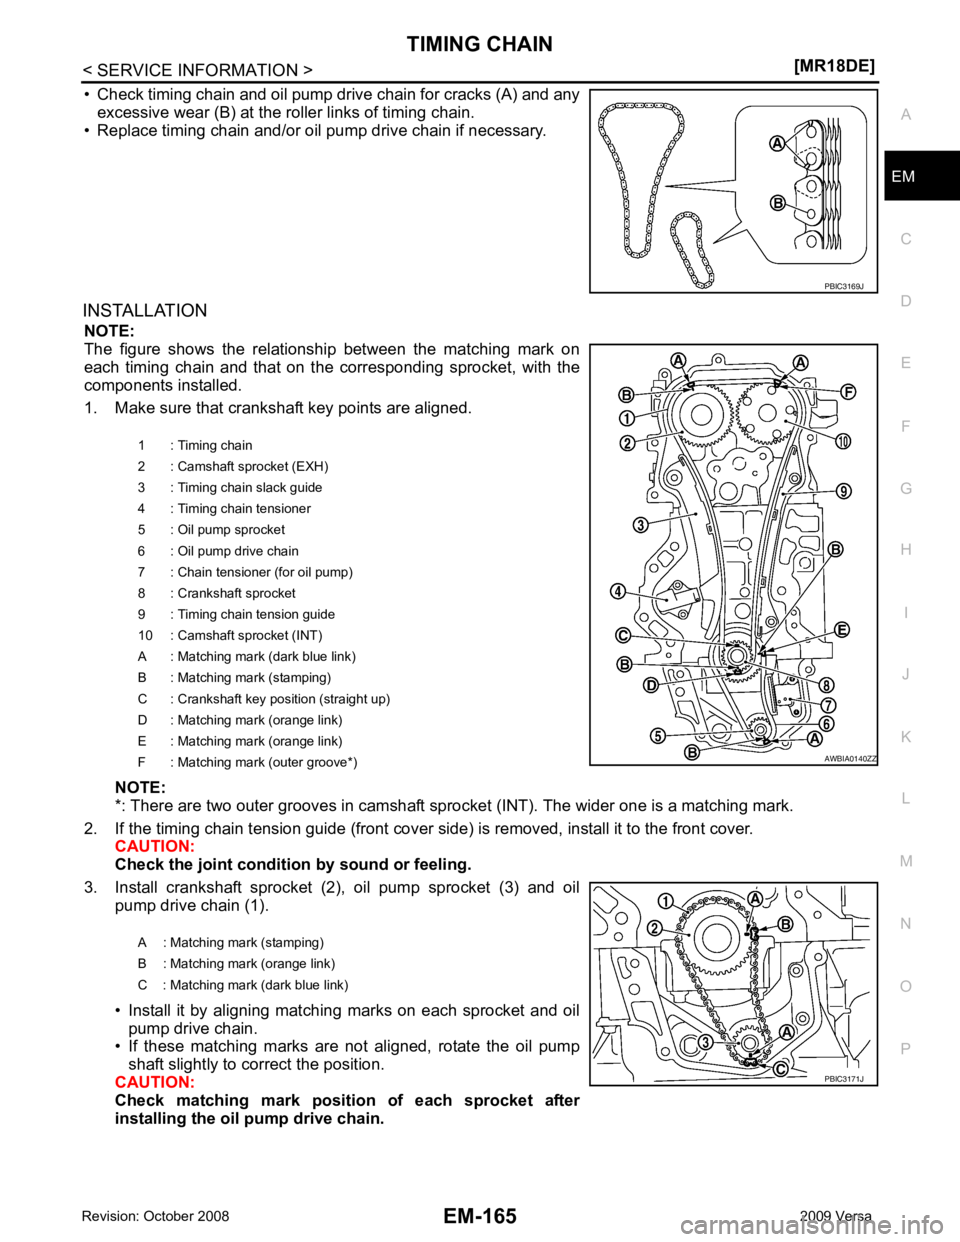
INSTALLATION NOTE:
The figure shows the relationship between the matching mark on
each timing chain and that on the corresponding sprocket, with the
components installed.
1. Make sure that crankshaft key points are aligned.
NOTE:
*: There are two outer grooves in camshaft spro cket (INT). The wider one is a matching mark.
2. If the timing chain tension guide (front cover si de) is removed, install it to the front cover.
CAUTION:
Check the joint condition by sound or feeling.
3. Install crankshaft sprocket (2), oil pump sprocket (3) and oil pump drive chain (1).
• Install it by aligning matching marks on each sprocket and oil pump drive chain.
• If these matching marks are not aligned, rotate the oil pump
shaft slightly to correct the position.
CAUTION:
Check matching mark position of each sprocket after
installing the oil pump drive chain. PBIC3171J
Page 3113 of 4331
![NISSAN LATIO 2009 Service Repair Manual EM-166< SERVICE INFORMATION >
[MR18DE]
TIMING CHAIN
4. Hold the WAF part of oil pump shaft (A), and then tighten the oil
pump sprocket bolt.
CAUTION:
• Secure the oil pump shaft with the WAF part ( NISSAN LATIO 2009 Service Repair Manual EM-166< SERVICE INFORMATION >
[MR18DE]
TIMING CHAIN
4. Hold the WAF part of oil pump shaft (A), and then tighten the oil
pump sprocket bolt.
CAUTION:
• Secure the oil pump shaft with the WAF part (](/img/5/57359/w960_57359-3112.png)
EM-166< SERVICE INFORMATION >
[MR18DE]
TIMING CHAIN
4. Hold the WAF part of oil pump shaft (A), and then tighten the oil
pump sprocket bolt.
CAUTION:
• Secure the oil pump shaft with the WAF part (A).
• Never loosen the oil pump sp rocket bolt by tightening the
oil pump drive chain.
5. Install chain tensioner (for oil pump) (1). 1. Fix the plunger at the most compressed position using a
stopper pin (A), and then install it.
2. Securely pull out ( ) the stopper pin after installing the chain tensioner (for oil pump).
3. Check matching mark position of oil pump drive chain and each sprocket again.
6. Align the matching marks of each sprocket with the matching marks of timing chain.
NOTE:
*: There are 2 outer grooves in camshaft sprocket (INT). The
wider one is a matching mark.
• If these matching marks are not aligned, rotate the camshaft slightly by holding the hexagonal portion to correct the posi-
tion.
CAUTION:
Check matching mark position of each sprocket and timing
chain again after instal ling the timing chain.
1 : Oil pan (upper)
2 : Oil pump
: Engine front PBIC3539J
AWBIA0139ZZ
1 : Camshaft sprocket (EXH)
2 : Camshaft sprocket (INT)
3 : Timing chain
A : Matching mark (dark blue link)
B : Matching mark (stamping)
C : Matching mark (outer groove*)
D : Matching mark (orange link)
E : Matching mark (stamping) PBIC3172J
Page 3114 of 4331
![NISSAN LATIO 2009 Service Repair Manual TIMING CHAIN
EM-167
< SERVICE INFORMATION >
[MR18DE] C
D E
F
G H
I
J
K L
M A EM
NP
O
7. Install the timing chain tension guide (3) and the timing chain
slack guide (2).
8. Install timing cha NISSAN LATIO 2009 Service Repair Manual TIMING CHAIN
EM-167
< SERVICE INFORMATION >
[MR18DE] C
D E
F
G H
I
J
K L
M A EM
NP
O
7. Install the timing chain tension guide (3) and the timing chain
slack guide (2).
8. Install timing cha](/img/5/57359/w960_57359-3113.png)
TIMING CHAIN
EM-167
< SERVICE INFORMATION >
[MR18DE] C
D E
F
G H
I
J
K L
M A EM
NP
O
7. Install the timing chain tension guide (3) and the timing chain
slack guide (2).
8. Install timing chain tensioner (1). 1. Fix the plunger at the most compressed position using a
stopper pin (A), and then install it.
2. Securely pull out the stopper pin after installing the timing chain tensioner.
9. Check matching mark position of timing chain and each sprocket again.
10. Apply new engine oil to new front oil seal joint surface.
11. Install front oil seal so that each seal lip is oriented as shown. 1 : Timing chain AWBIA0138ZZ
PBIC3165J
A : Dust seal lip
B : Oil seal lip
: Engine front
: Engine rear PBIC3485J
Page 3115 of 4331
![NISSAN LATIO 2009 Service Repair Manual EM-168< SERVICE INFORMATION >
[MR18DE]
TIMING CHAIN
• Install front oil seal (2) using a suitable tool with outer diameter 57 mm (2.24 in) and inner diameter 45 mm (1.77 in) (A) to the
dimension sho NISSAN LATIO 2009 Service Repair Manual EM-168< SERVICE INFORMATION >
[MR18DE]
TIMING CHAIN
• Install front oil seal (2) using a suitable tool with outer diameter 57 mm (2.24 in) and inner diameter 45 mm (1.77 in) (A) to the
dimension sho](/img/5/57359/w960_57359-3114.png)
EM-168< SERVICE INFORMATION >
[MR18DE]
TIMING CHAIN
• Install front oil seal (2) using a suitable tool with outer diameter 57 mm (2.24 in) and inner diameter 45 mm (1.77 in) (A) to the
dimension shown.
CAUTION:
• Be careful not to damage front cover and crankshaft.
• Press-fit oil seal straight to avoid causing burrs or tilting.
• Never touch grease applied onto oil seal lip.
12. Install new O-ring to cylinder block. CAUTION:
Be sure O-rings are aligned properly.
13. Apply the sealant without breaks to the specified location using Tool.
Use Genuine Silicone RTV Seal ant or equivalent. Refer to
GI-42, " Recommended Chemical
Product and Sealant " .
14. Make sure that matching marks of timing chain and each sprocket are still aligned. CAUTION:
• Make sure O-ring on cylinder block is correctly installed.
• Be careful not to damage front oil seal by interference with front end of crankshaft.
1 : Front cover
: Engine front
Within 0.3 mm (0.012 in) toward engine front
Within 0.5 mm (0.020 in) toward engine rear PBIC3729E
Tool number WS39930000 ( – )
A : Liquid gasket application area
B : Liquid gasket
: Engine outside PBIC3959E
Page 3116 of 4331
![NISSAN LATIO 2009 Service Repair Manual TIMING CHAIN
EM-169
< SERVICE INFORMATION >
[MR18DE] C
D E
F
G H
I
J
K L
M A EM
NP
O
15. Install front cover, and tighten bolts in two stages to specified
torque in numerical order as shown. NISSAN LATIO 2009 Service Repair Manual TIMING CHAIN
EM-169
< SERVICE INFORMATION >
[MR18DE] C
D E
F
G H
I
J
K L
M A EM
NP
O
15. Install front cover, and tighten bolts in two stages to specified
torque in numerical order as shown.](/img/5/57359/w960_57359-3115.png)
TIMING CHAIN
EM-169
< SERVICE INFORMATION >
[MR18DE] C
D E
F
G H
I
J
K L
M A EM
NP
O
15. Install front cover, and tighten bolts in two stages to specified
torque in numerical order as shown.
CAUTION:
• Attaching should be done wi thin 5 minutes after liquid
gasket application.
• Be sure to wipe off any excessive liquid gasket leaking.
NOTE:
Installation position of bolts is as shown.
16. Install crankshaft pulley using the following procedure.
a. Install crankshaft pulley. CAUTION:
• Never damage front oil seal lip section.
• If needed use a plastic hammer, tap on its cente r portion (not circumference) to seat crankshaft
pulley.
b. Apply new engine oil to thread and seat surfaces of crankshaft pulley bolt.
c. Secure crankshaft pulley (1) using Tool (A).
d. Tighten crankshaft pulley bolt in two steps.
• For angle tightening, put a paint mark (B) on crankshaft pulley(2), matching with any one of six easy to recognize angle
marks (A) on crankshaft pulley bolt flange (1).
• Turn 60 degrees clockwise (angle tightening).
• Check the tightening angle with movement of one angle mark.
e. Make sure that crankshaft rotates clockwise smoothly.
17. Installation of the remaining components is in the reverse order of removal. M6 bolts : No. 1
M10 bolts : No. 6, 7, 10, 11, 14
M12 bolts : No. 2, 4, 8, 12
M8 bolts : Except the above PBIC3164J
Tool Number : KV10109300 ( — )
Step 1 : 29.4 N·m (3.0 kg-m, 22 ft-lb)
Step 2 : 60 ° clockwise PBIC3961E
PBIC3963E
Page 3117 of 4331
Fuel Pressure Check " (Type 1) or
EC-1086, " Fuel Pressure
Check " (Type 2).
2. Disconnect negative battery terminal. Refer to SC-7, " Removal and Installation " .
3. Remove front RH wheel. Refer to WT-7 .
4. Remove front fender protector (RH). Refer to EI-24 .
5. Drain engine coolant. Refer to CO-35 .
NOTE:
Perform this step when engine is cold.
6. Remove the following parts. • Intake manifold; Refer to EM-141 .
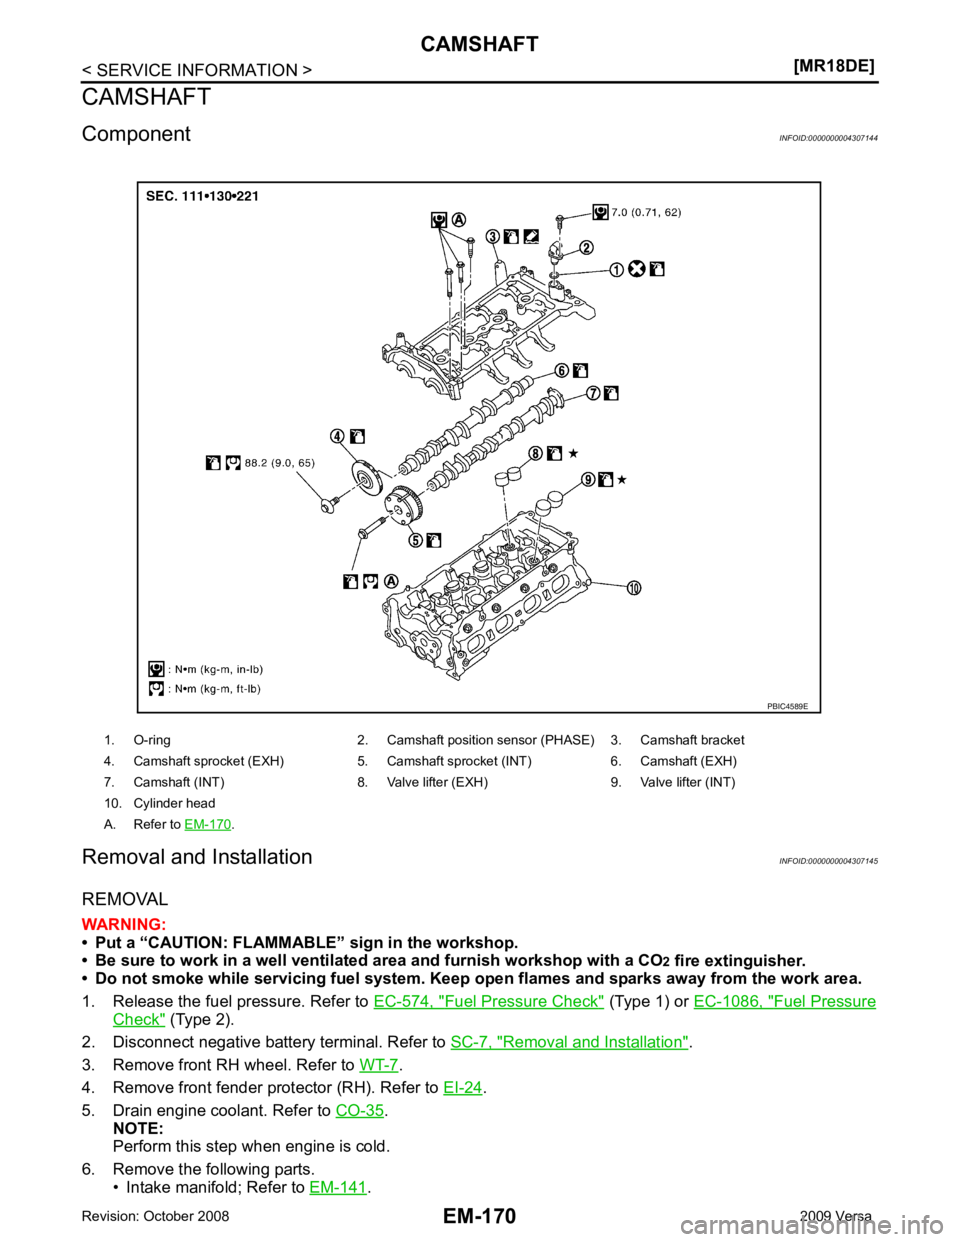
1. O-ring 2. Camshaft po
sition sensor (PHASE) 3. Camshaft bracket
4. Camshaft sprocket (EXH) 5. Camshaft sprocket (INT) 6. Camshaft (EXH)
7. Camshaft (INT) 8. Valve lifter (EXH) 9. Valve lifter (INT)
10. Cylinder head
A. Refer to EM-170 .
Page 3118 of 4331
EM
NP
O
• Rocker cover; Refer to
EM-153 .
• Fuel tube and fuel injector assembly; Refer to EM-156 .
• Front cover, timing chain and related parts; Refer to EM-160 .
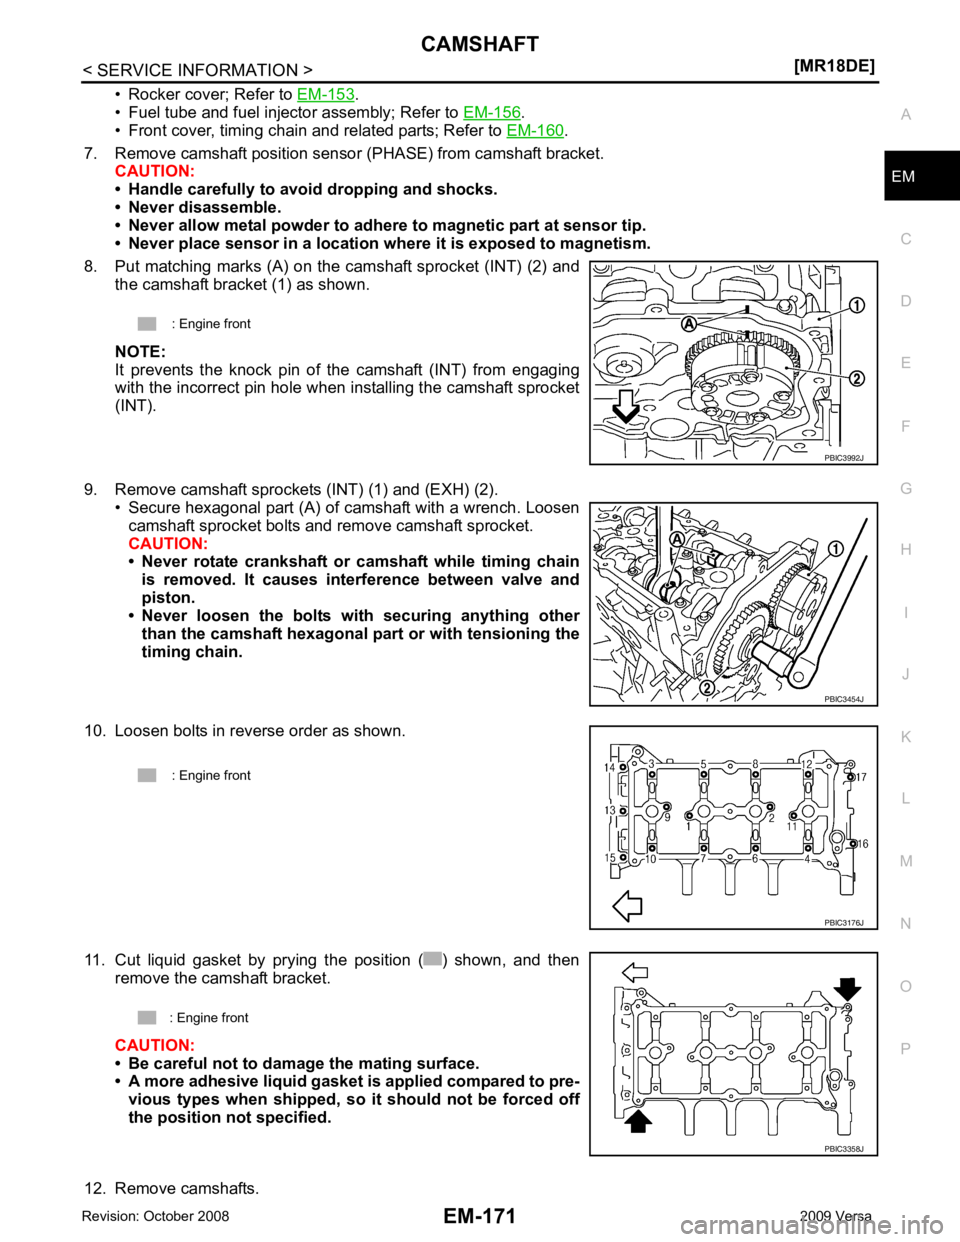
7. Remove camshaft position sensor (PHASE) from camshaft bracket. CAUTION:
• Handle carefully to avoid dropping and shocks.
• Never disassemble.
• Never allow metal powder to adhere to magnetic part at sensor tip.
• Never place sensor in a location wher e it is exposed to magnetism.
8. Put matching marks (A) on the camshaft sprocket (INT) (2) and the camshaft bracket (1) as shown.
NOTE:
It prevents the knock pin of the camshaft (INT) from engaging
with the incorrect pin hole when installing the camshaft sprocket
(INT).
9. Remove camshaft sprockets (INT) (1) and (EXH) (2). • Secure hexagonal part (A) of camshaft with a wrench. Loosen
camshaft sprocket bolts and remove camshaft sprocket.
CAUTION:
• Never rotate crankshaft or camshaft while timing chain
is removed. It causes interference between valve and
piston.
• Never loosen the bolts with securing anything other
than the camshaft hexagonal part or with tensioning the
timing chain.
10. Loosen bolts in reverse order as shown.
11. Cut liquid gasket by prying the position ( ) shown, and then remove the camshaft bracket.
CAUTION:
• Be careful not to damage the mating surface.
• A more adhesive liquid gasket is applied compared to pre-
vious types when shipped, so it should not be forced off
the position not specified.
12. Remove camshafts. : Engine front
PBIC3454J
Page 3119 of 4331
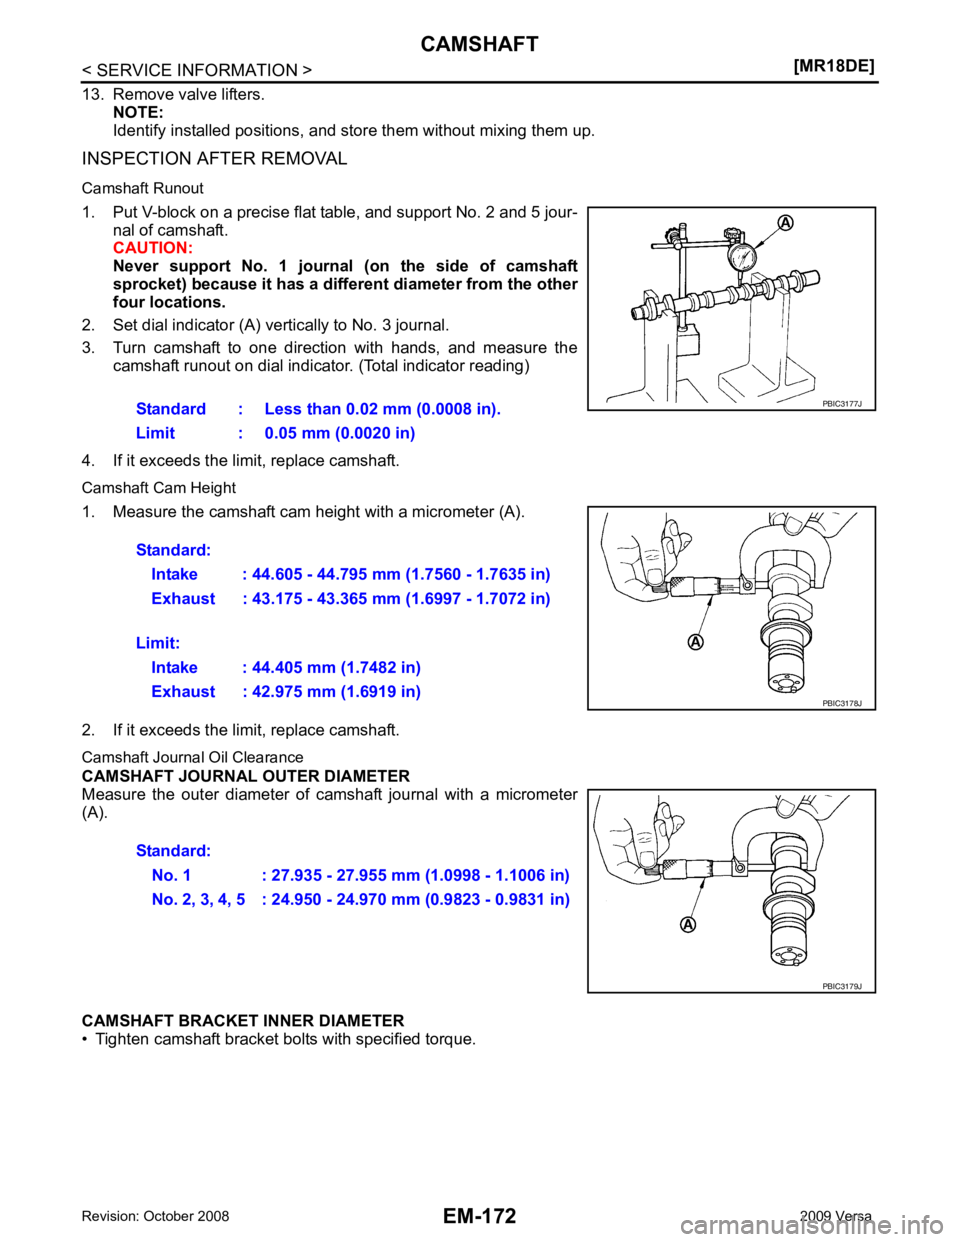
Page 3120 of 4331
![NISSAN LATIO 2009 Service Repair Manual CAMSHAFT
EM-173
< SERVICE INFORMATION >
[MR18DE] C
D E
F
G H
I
J
K L
M A EM
NP
O
• Measure the inner diameter of camshaft bracket with a bore gauge
(A).
CAMSHAFT JOURNAL OIL CLEARANCE
• (Oil clear NISSAN LATIO 2009 Service Repair Manual CAMSHAFT
EM-173
< SERVICE INFORMATION >
[MR18DE] C
D E
F
G H
I
J
K L
M A EM
NP
O
• Measure the inner diameter of camshaft bracket with a bore gauge
(A).
CAMSHAFT JOURNAL OIL CLEARANCE
• (Oil clear](/img/5/57359/w960_57359-3119.png)
CAMSHAFT
EM-173
< SERVICE INFORMATION >
[MR18DE] C
D E
F
G H
I
J
K L
M A EM
NP
O
• Measure the inner diameter of camshaft bracket with a bore gauge
(A).
CAMSHAFT JOURNAL OIL CLEARANCE
• (Oil clearance) = (Camshaft bracket inner diameter) – (Camshaft journal diameter)
• If it exceeds the limit, replace camshaft or cylinder head, or both. NOTE:
Camshaft bracket cannot be replaced as a single part , because it is machined together with cylinder head.
Replace whole cylinder head assembly.
Camshaft End Play 1. Install camshaft in cylinder head.
2. Install dial indicator in thrust direction on front end of camshaft. Read the end play of dial indicator (A) when camshaft is moved
forward/backward (in direction to axis).
• Measure the following parts if out of the standard.
- Dimension (A) for groove of cylinder head No. 1 journal
- Dimension (B) for camshaft flange
• Apply the standards above, and then replace camshaft and/or cylinder head, if necessary.
Camshaft Sprocket Runout 1. Put V-block on precise flat table, and support No. 2 and 5 journals of camshaft. CAUTION:
Never support No. 1 journal (on the side of cam shaft sprocket) because it has a different diameter
from the other four locations. B : Measuring direction of inner diameter
Standard: No. 1 : 28.000 - 28.021 mm (1.1024 - 1.1032 in)
No. 2, 3, 4, 5 : 25.000 - 25.021 mm (0.9843 - 0.9851 in) PBIC3180J
Standard:
No. 1 : 0.045 - 0.086 mm (0.0018 - 0.0034 in)
No. 2, 3, 4, 5 : 0.030 - 0.071 mm (0.0012 - 0.0028 in)
Limit:
: 0.15 mm (0.0059 in)
Standard : 0.075 - 0.153 mm (0.0030 - 0.0060 in)
Limit : 0.24 mm (0.0094 in) PBIC3181J
Standard : 4.000 - 4.030 mm (0.1575 - 0.1587 in)
Standard : 3.877 - 3.925 mm (0.1526 - 0.1545 in) PBIC3183J