NISSAN LATIO 2009 Service Repair Manual
Manufacturer: NISSAN, Model Year: 2009, Model line: LATIO, Model: NISSAN LATIO 2009Pages: 4331, PDF Size: 58.04 MB
Page 3151 of 4331
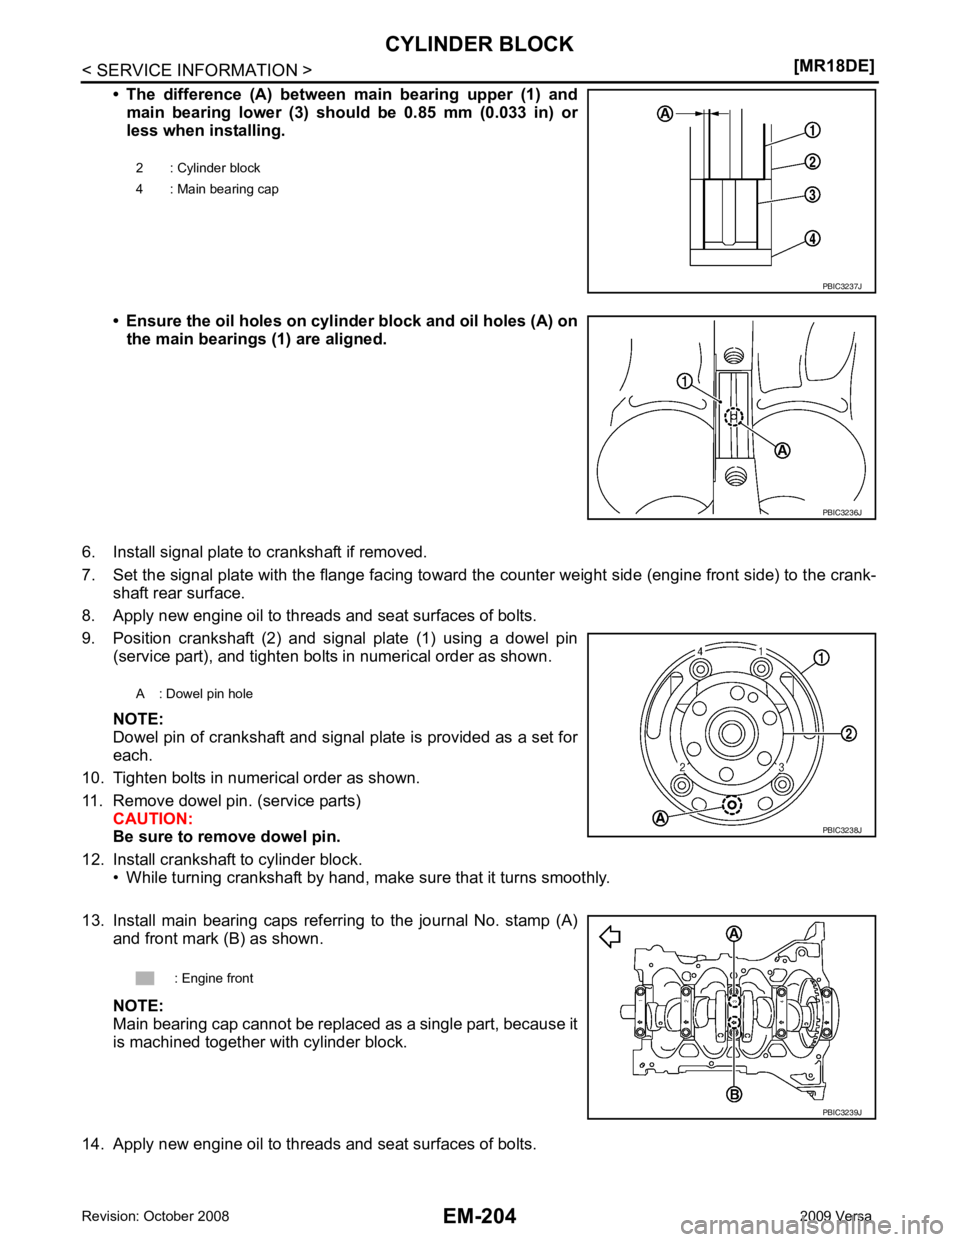
PBIC3236J
Page 3152 of 4331
EM
NP
O
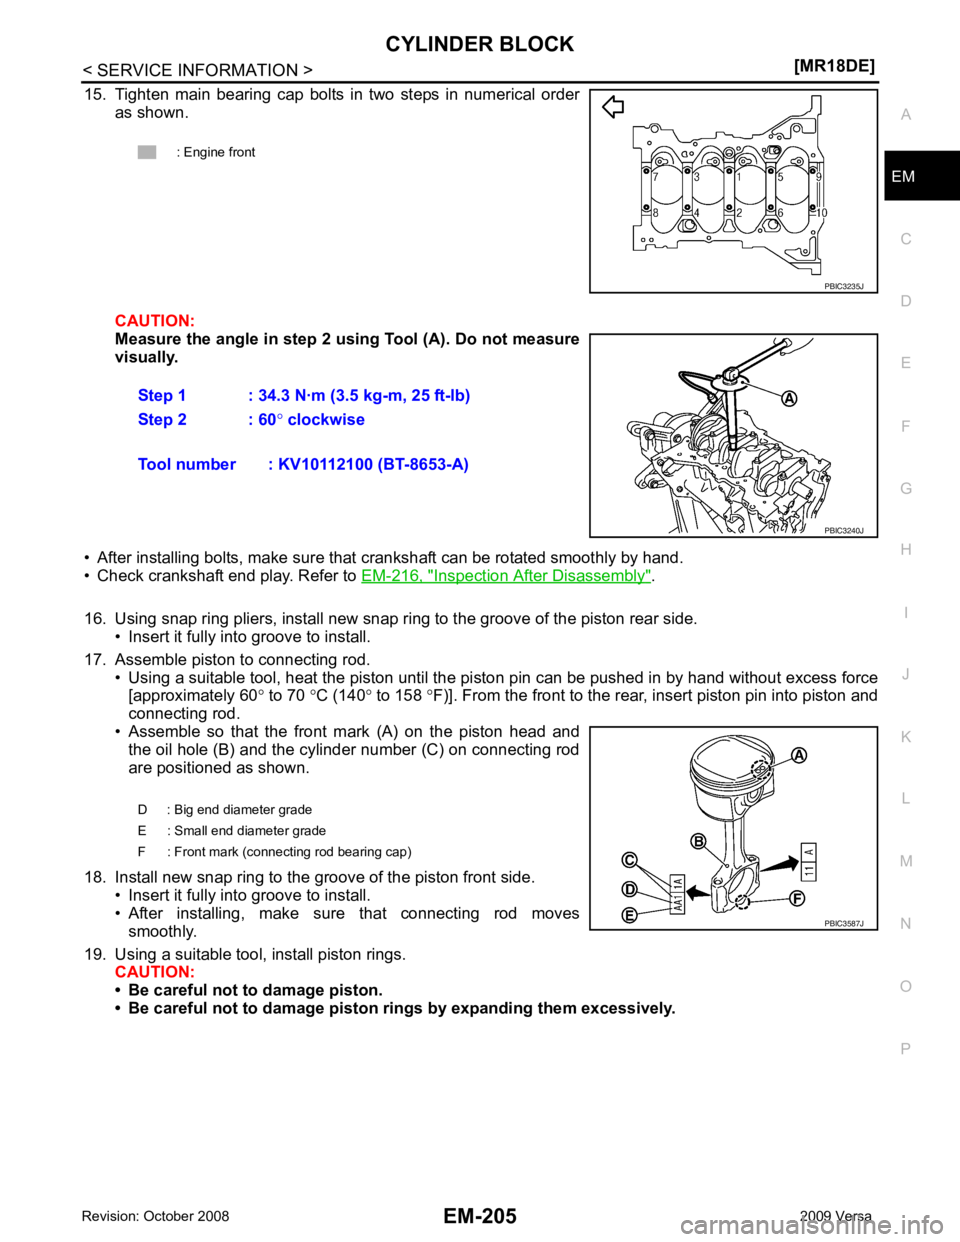
15. Tighten main bearing cap bolts in two steps in numerical order
as shown.
CAUTION:
Measure the angle in step 2 us ing Tool (A). Do not measure
visually.
• After installing bolts, make sure that crankshaft can be rotated smoothly by hand.
• Check crankshaft end play. Refer to EM-216, " Inspection After Disassembly " .
16. Using snap ring pliers, install new snap ring to the groove of the piston rear side. • Insert it fully into groove to install.
17. Assemble piston to connecting rod. • Using a suitable tool, heat the piston until the pi ston pin can be pushed in by hand without excess force
[approximately 60 ° to 70 °C (140 ° to 158 °F)]. From the front to the rear, insert piston pin into piston and
connecting rod.
• Assemble so that the front mark (A) on the piston head and the oil hole (B) and the cylinder number (C) on connecting rod
are positioned as shown.
18. Install new snap ring to the groove of the piston front side. • Insert it fully into groove to install.
• After installing, make sure that connecting rod moves smoothly.
19. Using a suitable tool, install piston rings. CAUTION:
• Be careful not to damage piston.
• Be careful not to damage piston rings by expanding them excessively.
: Engine front
Page 3153 of 4331
![NISSAN LATIO 2009 Service Repair Manual EM-206< SERVICE INFORMATION >
[MR18DE]
CYLINDER BLOCK
• Position each ring with the gap as shown referring to the pis- ton front mark.
CAUTION:
Never contact the rail end gap under NISSAN LATIO 2009 Service Repair Manual EM-206< SERVICE INFORMATION >
[MR18DE]
CYLINDER BLOCK
• Position each ring with the gap as shown referring to the pis- ton front mark.
CAUTION:
Never contact the rail end gap under](/img/5/57359/w960_57359-3152.png)
EM-206< SERVICE INFORMATION >
[MR18DE]
CYLINDER BLOCK
• Position each ring with the gap as shown referring to the pis- ton front mark.
CAUTION:
Never contact the rail end gap under the oil ring with the
oil drain cast groove of piston.
• Install second ring with the stamped surface facing upward.
20. Install connecting rod bearing upper (2) and lower (3) to con- necting rod (1) and connecting rod cap (4).
• Install the connecting rod in the dimension shown.
• Make sure that connecting rod bearing oil hole (A) is com- pletely in the inside of connecting rod oil hole chamfered area
(B).
• When installing connecting rod bearings, apply new engine oil to the bearing surface (inside). Do not apply new engine oil to
the back surface, but thoroughly clean it.
NOTE:
• There is no positioning tab.
• Install the connecting rod bearings in the center of connect-
ing rod and connecting rod bearing cap as shown. For ser-
vice operation, the center position can be checked, visually.
21. Install piston and connecting rod assembly to crankshaft. • Position crankshaft pin corresponding to connecting rod to be installed onto the bottom dead center.
• Apply new engine oil sufficiently to the cylinder bore, piston and crankshaft pin.
• Match the cylinder position with the cylinder number (C) on connecting rod to install.
• Install so that front mark (A) on the piston head faces the front of engine.A : Oil ring upper or lower rail gap
B : Front mark
C : Second ring and oil ring spacer gap
D : Top ring gap
E : Stamped mark PBIC3588J
C : Oil hole (connecting rod)
D : Arrow view
: Engine front PBIC4541E
B : Oil hole
D : Big end diameter grade
E : Small end diameter grade
F : Front mark (connecting rod bearing cap) PBIC3587J
Page 3154 of 4331
EM
NP
O
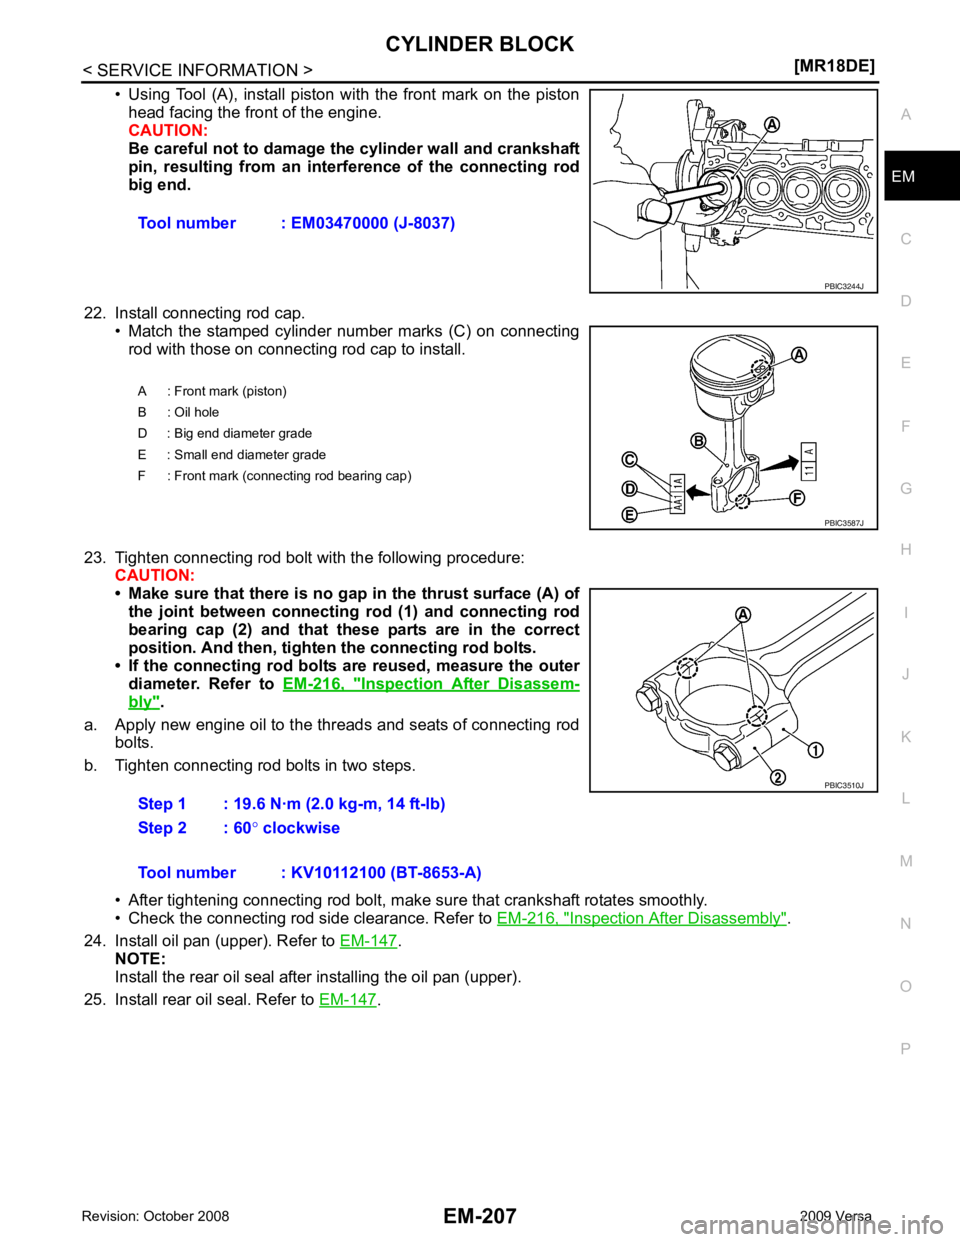
• Using Tool (A), install piston with the front mark on the piston
head facing the front of the engine.
CAUTION:
Be careful not to damage the cylinder wall and crankshaft
pin, resulting from an inte rference of the connecting rod
big end.
22. Install connecting rod cap. • Match the stamped cylinder number marks (C) on connectingrod with those on connecting rod cap to install.
23. Tighten connecting rod bolt with the following procedure: CAUTION:
• Make sure that there is no gap in the thrust surface (A) of
the joint between connecting rod (1) and connecting rod
bearing cap (2) and that these parts are in the correct
position. And then, tighten the connecting rod bolts.
• If the connecting rod bolts ar e reused, measure the outer
diameter. Refer to EM-216, " Inspection After Disassem-
bly " .
a. Apply new engine oil to the threads and seats of connecting rod bolts.
b. Tighten connecting rod bolts in two steps.
• After tightening connecting rod bolt, make sure that crankshaft rotates smoothly.
• Check the connecting rod side clearance. Refer to EM-216, " Inspection After Disassembly " .
24. Install oil pan (upper). Refer to EM-147 .
NOTE:
Install the rear oil seal after installing the oil pan (upper).
25. Install rear oil seal. Refer to EM-147 .
Tool number : EM03470000 (J-8037)
Page 3155 of 4331
PBIC3260J
Page 3156 of 4331
EM
NP
O
How to Select Piston and Bearing
INFOID:0000000004307160
DESCRIPTION
• The identification grade stamped on each part is the grade for the dimension measured in new condition.
This grade cannot apply to reused parts.
• For reused or repaired parts, measure the dimens ion accurately. Determine the grade by comparing the
measurement with the values of each selection table.
• For details of the measurement method of each part , the reuse standards and the selection method of the
selective fitting parts, follow the applicable procedures.
HOW TO SELECT PISTON
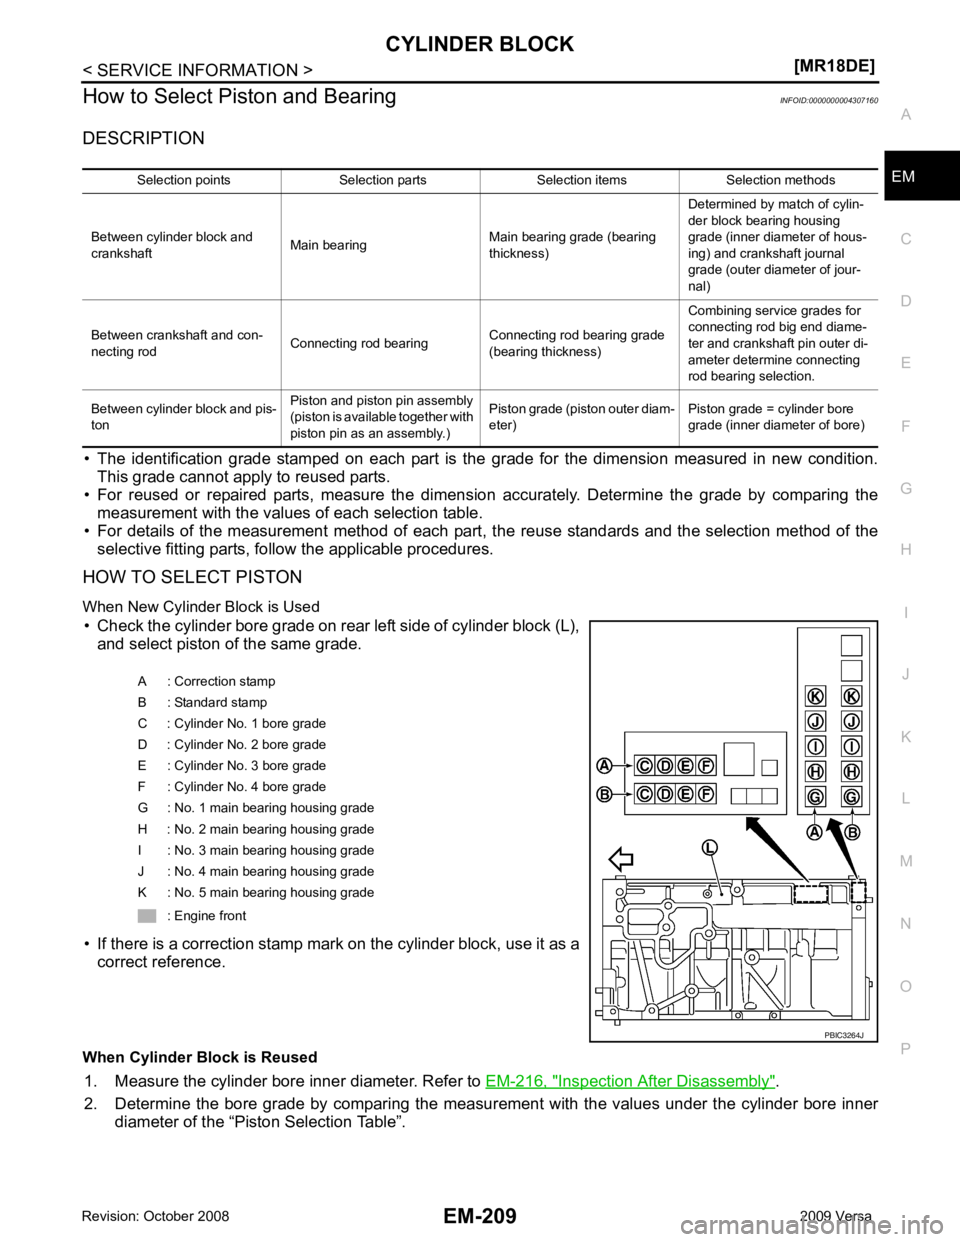
When New Cylinder Block is Used • Check the cylinder bore grade on rear left side of cylinder block (L), and select piston of the same grade.
• If there is a correction stamp mark on the cylinder block, use it as a correct reference.
When Cylinder Block is Reused 1. Measure the cylinder bore inner diameter. Refer to EM-216, " Inspection After Disassembly " .
2. Determine the bore grade by comparing the measur ement with the values under the cylinder bore inner
diameter of the “Piston Selection Table”. Selection points Selection parts Selection items Selection methods
Between cylinder block and
crankshaft Main bearing
Main bearing grade (bearing
thickness) Determined by match of cylin-
der block bearing housing
grade (inner diameter of hous-
ing) and crankshaft journal
grade (outer diameter of jour-
nal)
Between crankshaft and con-
necting rod Connecting rod bearing
Connecting rod bearing grade
(bearing thickness) Combining service grades for
connecting rod big end diame-
ter and crankshaft pin outer di-
ameter determine connecting
rod bearing selection.
Between cylinder block and pis-
ton Piston and piston pin assembly
(piston is available together with
piston pin as an assembly.) Piston grade (piston outer diam-
eter) Piston grade = cylinder bore
grade (inner diameter of bore) A : Correction stamp
B : Standard stamp
C : Cylinder No. 1 bore grade
D : Cylinder No. 2 bore grade
E : Cylinder No. 3 bore grade
F : Cylinder No. 4 bore grade
G : No. 1 main bearing housing grade
H : No. 2 main bearing housing grade
I : No. 3 main bearing housing grade
J : No. 4 main bearing housing grade
K : No. 5 main bearing housing grade
: Engine front
Page 3157 of 4331
Inspection After Disassembly " and
EM-216, " Inspection After Disassembly " .
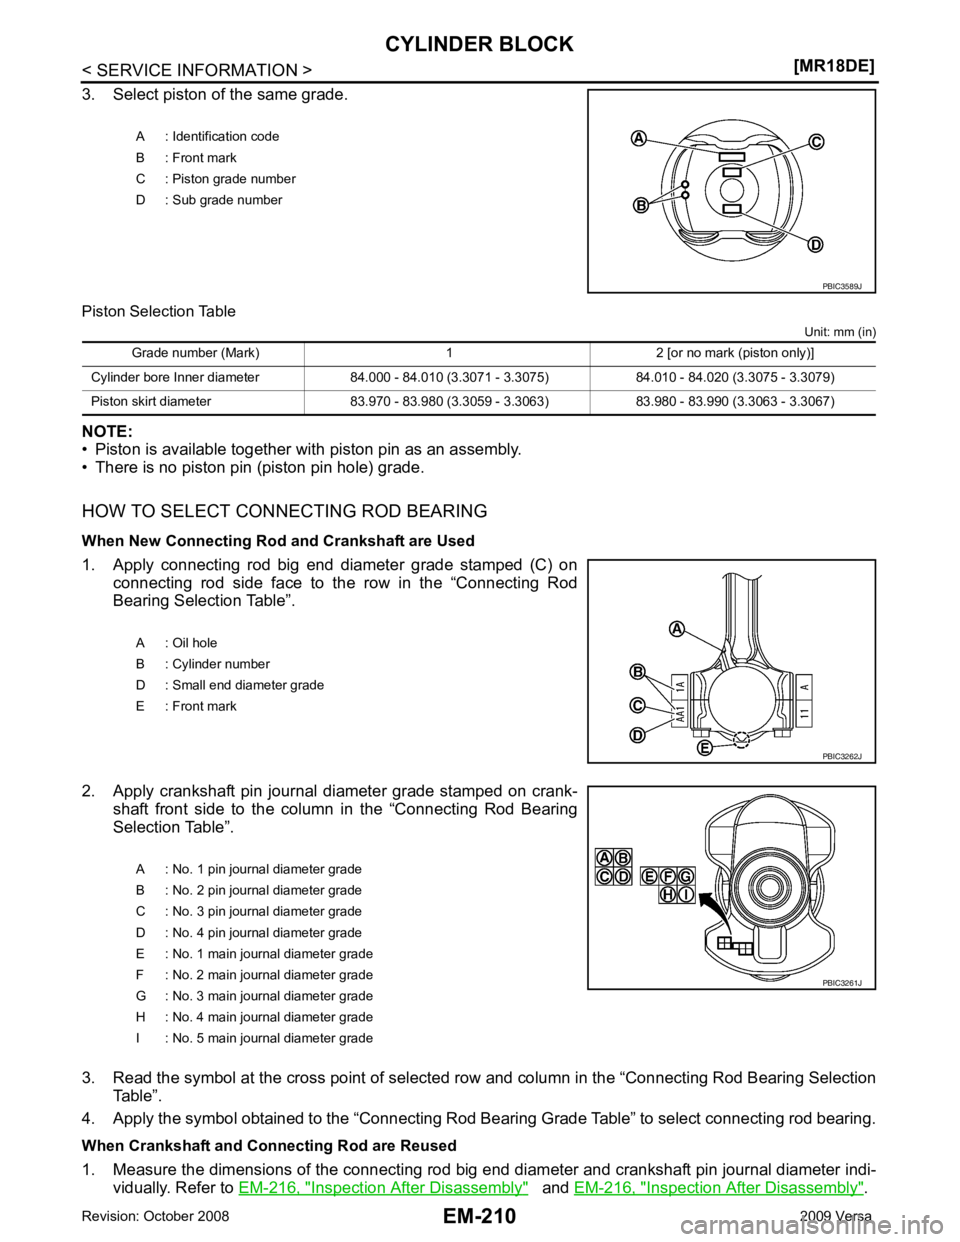
A : Identification code
B : Front mark
C : Piston grade number
D : Sub grade number A : Oil hole
B : Cylinder number
D : Small end diameter grade
E : Front mark
Page 3158 of 4331
EM
NP
O
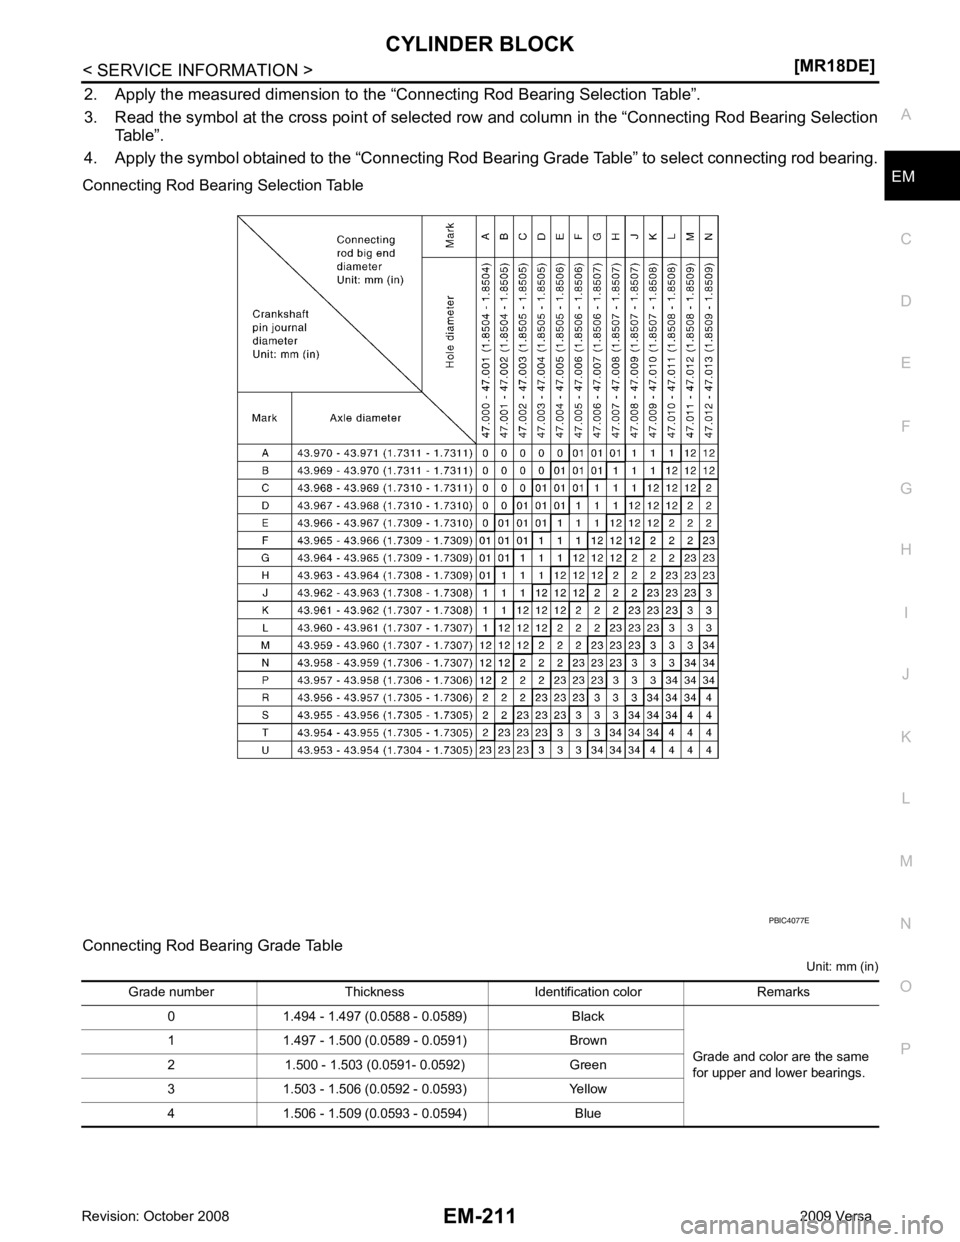
2. Apply the measured dimension to the
“Connecting Rod Bearing Selection Table”.
3. Read the symbol at the cross point of selected ro w and column in the “Connecting Rod Bearing Selection
Table”.
4. Apply the symbol obtained to the “Connecting Rod Bear ing Grade Table” to select connecting rod bearing.
Connecting Rod Bearing Selection Table
Connecting Rod Bearing Grade Table Unit: mm (in)
Page 3159 of 4331
![NISSAN LATIO 2009 Service Repair Manual EM-212< SERVICE INFORMATION >
[MR18DE]
CYLINDER BLOCK
Undersize Bearings Usage Guide
• When the specified connecting rod bearing oil clearance is not obtained with standard size connec NISSAN LATIO 2009 Service Repair Manual EM-212< SERVICE INFORMATION >
[MR18DE]
CYLINDER BLOCK
Undersize Bearings Usage Guide
• When the specified connecting rod bearing oil clearance is not obtained with standard size connec](/img/5/57359/w960_57359-3158.png)
EM-212< SERVICE INFORMATION >
[MR18DE]
CYLINDER BLOCK
Undersize Bearings Usage Guide
• When the specified connecting rod bearing oil clearance is not obtained with standard size connecting rod bearings, use undersize (US) bearings.
• When using undersize (US) bearing, measure the connecting rod bearing inner diameter with bearing
installed, and grind the crankshaft pin so that the connecting rod bearing oil clearance satisfies the standard.
CAUTION:
In grinding crankshaft pin to u se undersize bearings, keep the
fillet R [1.5 - 1.7 mm (0.059 - 0.067 in)] (A).
Bearing undersize table Unit: mm (in)
HOW TO SELECT MAIN BEARING
When New Cylinder Block and Crankshaft are Used 01
UPR 1.494 - 1.497 (0.0588 - 0.0589) Black
Grade and color are different
between upper and lower bear-
ings.
LWR 1.497 - 1.500 (0.0589 - 0.0591) Brown
12 UPR 1.497 - 1.500 (0.0589 - 0.0591) Brown
LWR 1.500 - 1.503 (0.0591 - 0.0592) Green
23 UPR 1.500 - 1.503 (0.0591 - 0.0592) Green
LWR 1.503 - 1.506 (0.0592 - 0.0593) Yellow
34 UPR 1.503 - 1.506 (0.0592 - 0.0593) Yellow
LWR 1.506 - 1.509 (0.0593 - 0.0594) Blue
Grade number Thickness Identification color Remarks PBIC3263J
Size Thickness
US 0.25 (0.0098) 1.623 - 1.631 (0.0639 - 0.0642)
Page 3160 of 4331
![NISSAN LATIO 2009 Service Repair Manual CYLINDER BLOCK
EM-213
< SERVICE INFORMATION >
[MR18DE] C
D E
F
G H
I
J
K L
M A EM
NP
O
1. “Main Bearing Selection Table” rows correspond to main bearing
housing grade on rear left side of cylinder NISSAN LATIO 2009 Service Repair Manual CYLINDER BLOCK
EM-213
< SERVICE INFORMATION >
[MR18DE] C
D E
F
G H
I
J
K L
M A EM
NP
O
1. “Main Bearing Selection Table” rows correspond to main bearing
housing grade on rear left side of cylinder](/img/5/57359/w960_57359-3159.png)
CYLINDER BLOCK
EM-213
< SERVICE INFORMATION >
[MR18DE] C
D E
F
G H
I
J
K L
M A EM
NP
O
1. “Main Bearing Selection Table” rows correspond to main bearing
housing grade on rear left side of cylinder block (L).
• If there is a correction stamp ma rk on cylinder block, use it as
a correct reference.
2. Apply main journal diameter grade stamped on crankshaft front side to column in the “Main Bearing Selection Table”.
3. Read the symbol at the cross point of selected row and column in the “Main Bearing Selection Table”.
CAUTION:
There are two main bearing selection tables. One is for No. 1, 4 and 5 journals and the other is for
No. 2 and 3 journals. Make certain to use the approp riate table. This is due to differences in the
specified clearances.
4. Apply the symbol obtained to the “Main B earing Grade Table” to select main bearing.
NOTE:
Service part is available as a set of both upper and lower.
When Cylinder Block and Crankshaft are Reused 1. Measure the dimensions of the cylinder block ma in bearing housing inner diameter and crankshaft main
journal diameter individually. Refer to EM-216, " Inspection After Disassembly " and
EM-216, " Inspection
After Disassembly " .
2. Apply the measured dimension to t he “Main Bearing Selection Table”.
3. Read the symbol at the cross point of selected row and column in the “Main Bearing Selection Table”.
CAUTION:
There are two main bearing selection tables. One is for No. 1, 4 and 5 journals and the other is for
No. 2 and 3 journals. Make certain to use the ap propriate table. This is due to differences in the
specified clearances.
4. Apply the symbol obtained to the “Main B earing Grade Table” to select main bearing.
NOTE: A : Correction stamp
B : Standard stamp
C : Cylinder No. 1 bore grade
D : Cylinder No. 2 bore grade
E : Cylinder No. 3 bore grade
F : Cylinder No. 4 bore grade
G : No. 1 main bearing housing grade
H : No. 2 main bearing housing grade
I : No. 3 main bearing housing grade
J : No. 4 main bearing housing grade
K : No. 5 main bearing housing grade
: Engine front PBIC3264J
A : No. 1 pin journal diameter grade
B : No. 2 pin journal diameter grade
C : No. 3 pin journal diameter grade
D : No. 4 pin journal diameter grade
E : No. 1 main journal diameter grade
F : No. 2 main journal diameter grade
G : No. 3 main journal diameter grade
H : No. 4 main journal diameter grade
I : No. 5 main journal diameter grade PBIC3261J