NISSAN LATIO 2011 Service Repair Manual
Manufacturer: NISSAN, Model Year: 2011, Model line: LATIO, Model: NISSAN LATIO 2011Pages: 3787, PDF Size: 78.35 MB
Page 2831 of 3787
IP-10
< SYMPTOM DIAGNOSIS >
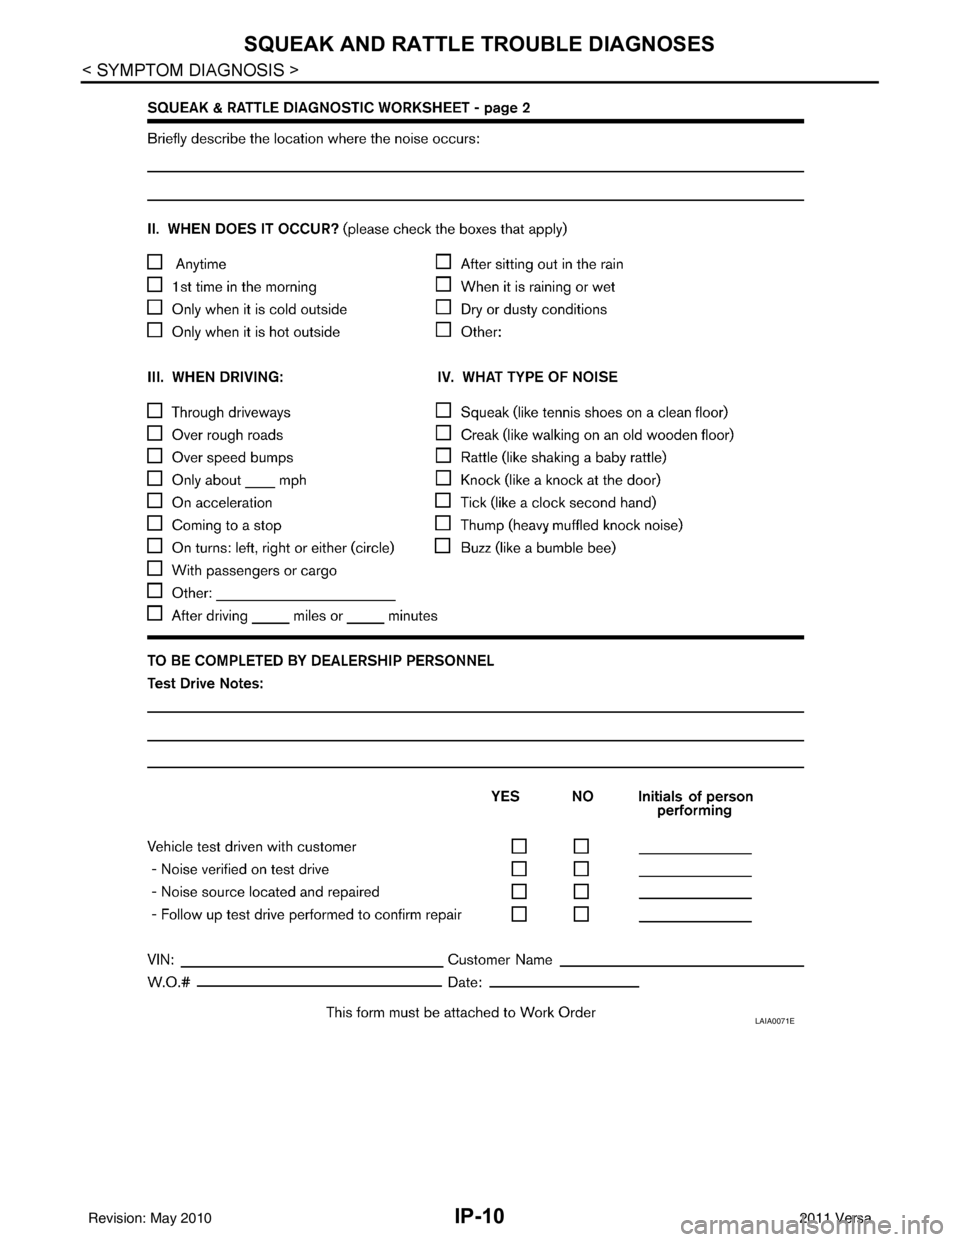
SQUEAK AND RATTLE TROUBLE DIAGNOSES
LAIA0071E
Revision: May 20102011 Versa
Page 2832 of 3787
INSTRUMENT PANEL ASSEMBLYIP-11
< ON-VEHICLE REPAIR >
C
DE
F
G H
J
K L
M A
B
IP
N
O P
ON-VEHICLE REPAIR
INSTRUMENT PANEL ASSEMBLY
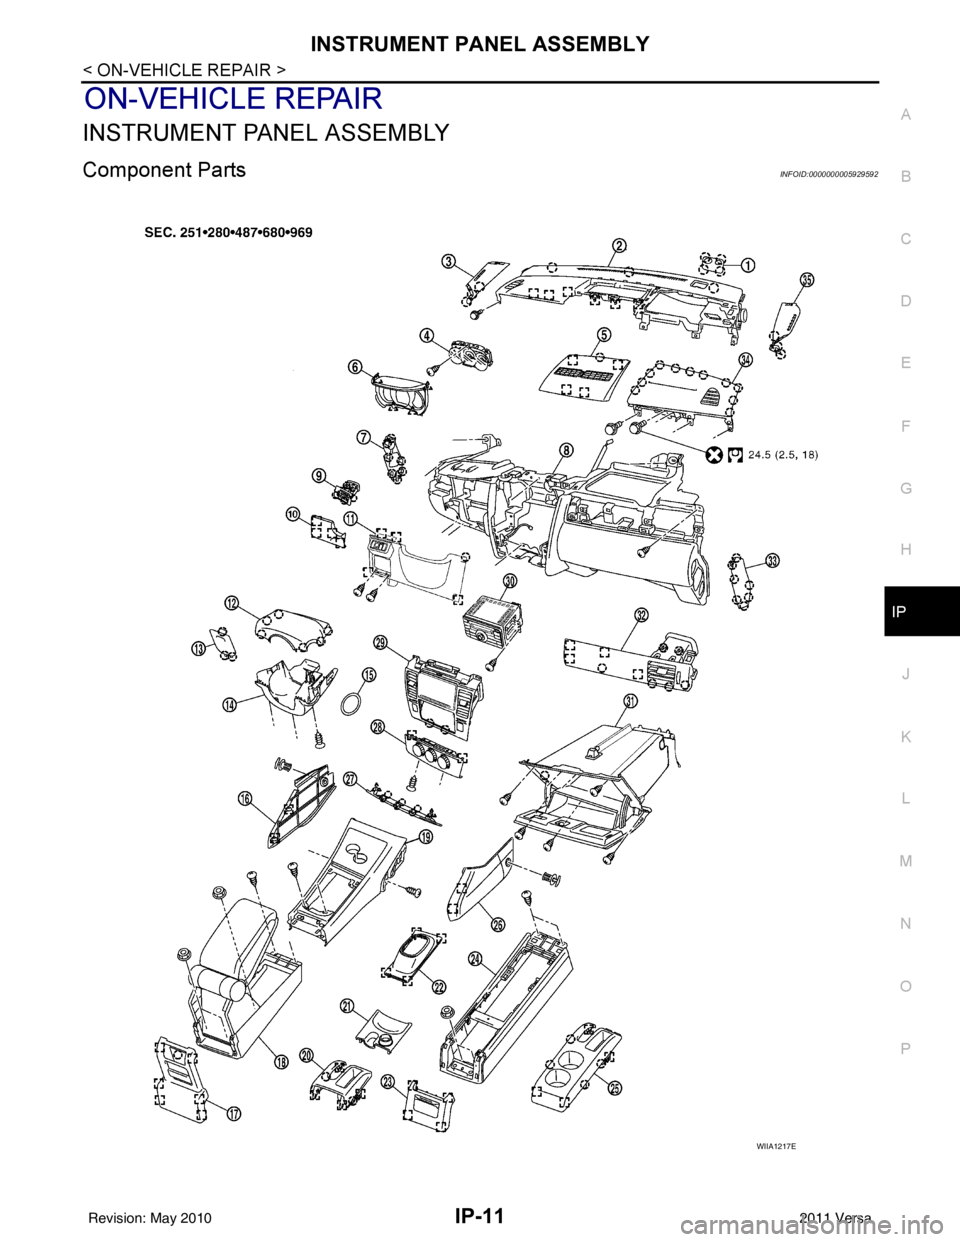
Component PartsINFOID:0000000005929592
WIIA1217E
Revision: May 2010 2011 Versa
Page 2833 of 3787
IP-12
< ON-VEHICLE REPAIR >
INSTRUMENT PANEL ASSEMBLY
Removal and Installation
INFOID:0000000005929593
CAUTION:
• Disconnect both the negative and positive battery terminals, then wait at least three minutes.
• Never tamper with or force air bag lid open, as this may adversely affect air bag performance.
• Be careful not to scratch pad and other parts.
INSTRUMENT PANEL ASSEMBLY
Removal
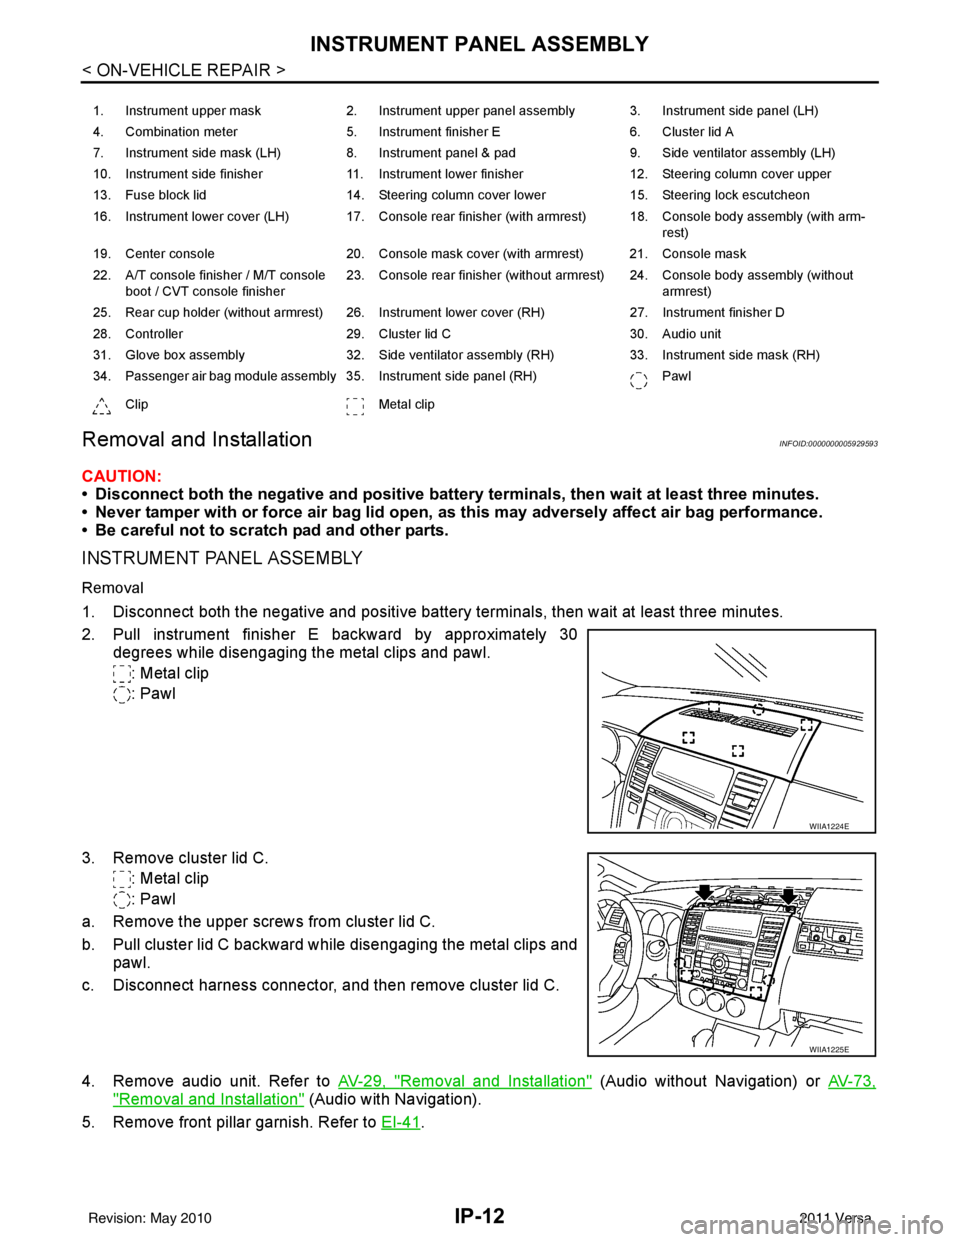
1. Disconnect both the negative and positive battery terminals, then wait at least three minutes.
2. Pull instrument finisher E backward by approximately 30
degrees while disengaging the metal clips and pawl.
: Metal clip
: Pawl
3. Remove cluster lid C. : Metal clip
: Pawl
a. Remove the upper screws from cluster lid C.
b. Pull cluster lid C backward while disengaging the metal clips and pawl.
c. Disconnect harness connector, and then remove cluster lid C.
4. Remove audio unit. Refer to AV-29, "
Removal and Installation" (Audio without Navigation) or AV-73,
"Removal and Installation" (Audio with Navigation).
5. Remove front pillar garnish. Refer to EI-41
.
1. Instrument upper mask 2. Instrument upper panel assembly 3. Instrument side panel (LH)
4. Combination meter 5. Instrument finisher E 6. Cluster lid A
7. Instrument side mask (LH) 8. Instrument panel & pad 9. Side ventilator assembly (LH)
10. Instrument side finisher 11. Instrument lower finisher 12. Steering column cover upper
13. Fuse block lid 14. Steering column cover lower 15. Steering lock escutcheon
16. Instrument lower cover (LH) 17. Console rear finisher (with armrest) 18. Console body assembly (with arm- rest)
19. Center console 20. Console mask cover (with armrest) 21. Console mask
22. A/T console finisher / M/T console boot / CVT console finisher 23. Console rear finisher (without armrest) 24. Console body assembly (without
armrest)
25. Rear cup holder (without armrest) 26. Instrument lower cover (RH) 27. Instrument finisher D
28. Controller 29. Cluster lid C 30. Audio unit
31. Glove box assembly 32. Side ventilator assembly (RH) 33. Instrument side mask (RH)
34. Passenger air bag module assembly 35. Instrument side panel (RH) Pawl
Clip Metal clip
WIIA1224E
WIIA1225E
Revision: May 2010 2011 Versa
Page 2834 of 3787
INSTRUMENT PANEL ASSEMBLYIP-13
< ON-VEHICLE REPAIR >
C
DE
F
G H
J
K L
M A
B
IP
N
O P
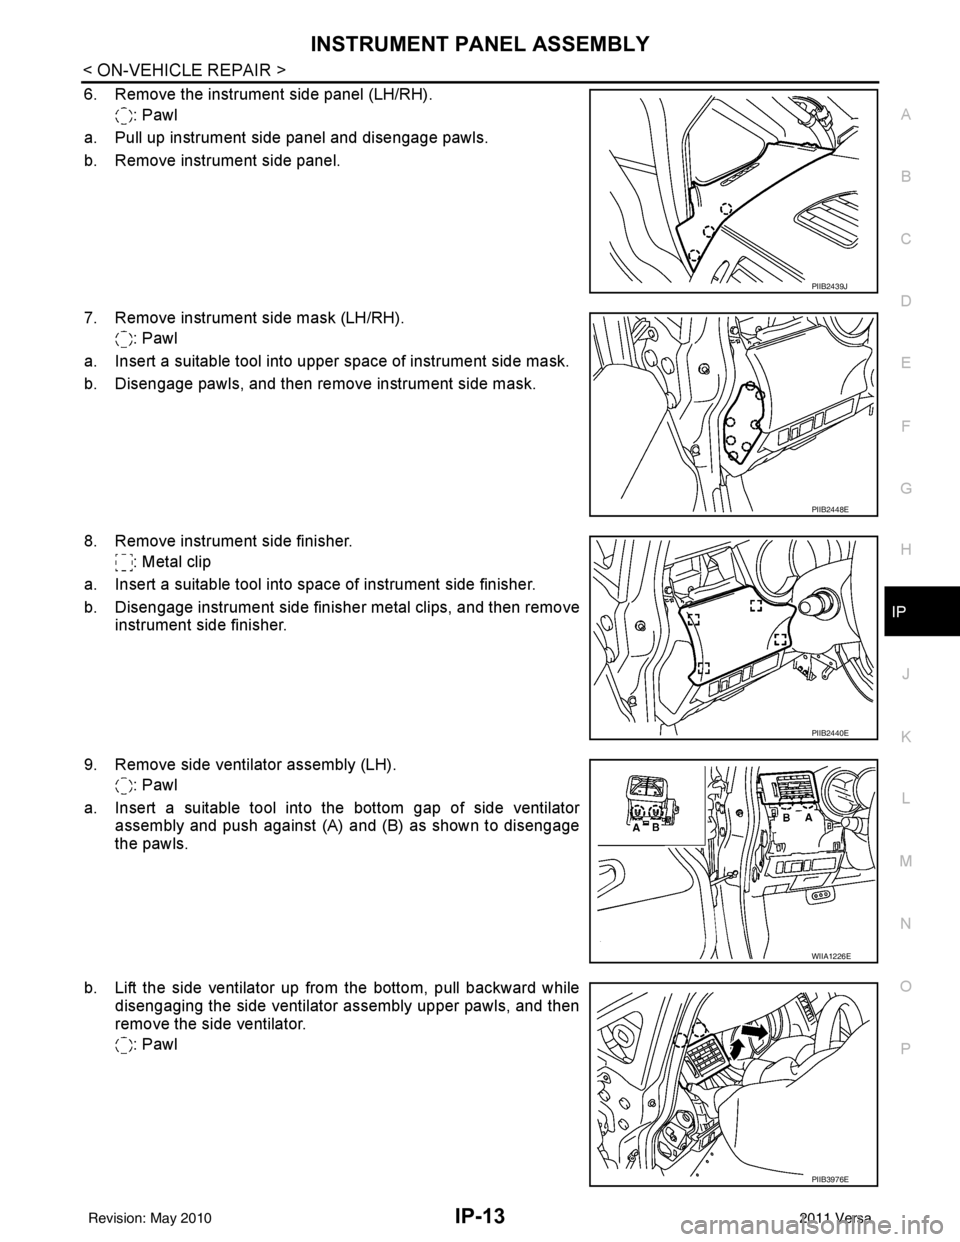
6. Remove the instrument side panel (LH/RH). : Pawl
a. Pull up instrument side panel and disengage pawls.
b. Remove instrument side panel.
7. Remove instrument side mask (LH/RH). : Pawl
a. Insert a suitable tool into upper space of instrument side mask.
b. Disengage pawls, and then remove instrument side mask.
8. Remove instrument side finisher. : Metal clip
a. Insert a suitable tool into space of instrument side finisher.
b. Disengage instrument side finisher metal clips, and then remove instrument side finisher.
9. Remove side ventilator assembly (LH). : Pawl
a. Insert a suitable tool into the bottom gap of side ventilator assembly and push against (A) and (B) as shown to disengage
the pawls.
b. Lift the side ventilator up from the bottom, pull backward while disengaging the side ventilator assembly upper pawls, and then
remove the side ventilator.
: Pawl
PIIB2439J
PIIB2448E
PIIB2440E
WIIA1226E
PIIB3976E
Revision: May 2010 2011 Versa
Page 2835 of 3787
IP-14
< ON-VEHICLE REPAIR >
INSTRUMENT PANEL ASSEMBLY
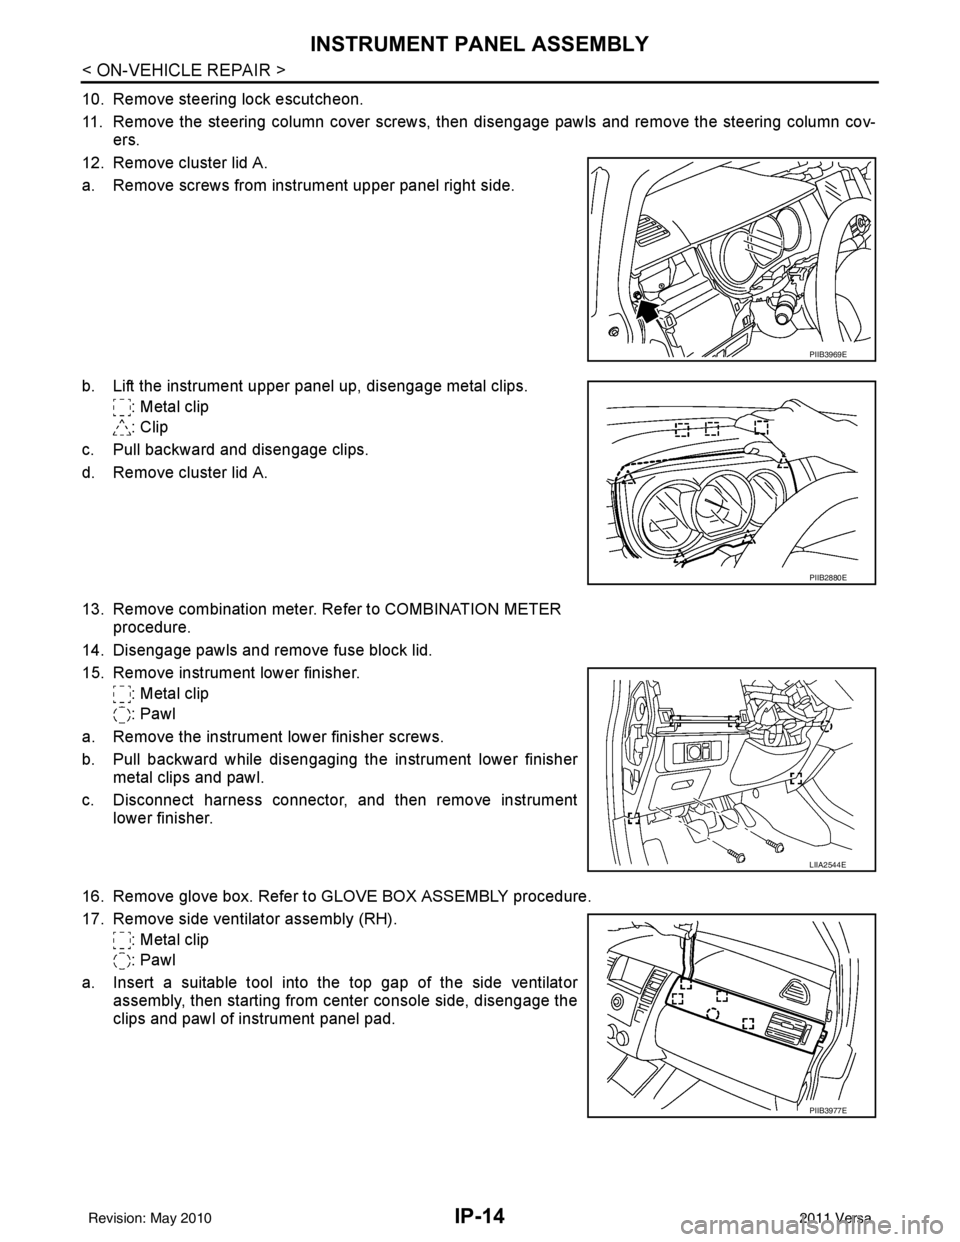
10. Remove steering lock escutcheon.
11. Remove the steering column cover screws, then disengage pawls and remove the steering column cov-
ers.
12. Remove cluster lid A.
a. Remove screws from instrument upper panel right side.
b. Lift the instrument upper panel up, disengage metal clips. : Metal clip
: Clip
c. Pull backward and disengage clips.
d. Remove cluster lid A.
13. Remove combination meter. Refer to COMBINATION METER procedure.
14. Disengage pawls and remove fuse block lid.
15. Remove instrument lower finisher. : Metal clip
: Pawl
a. Remove the instrument lower finisher screws.
b. Pull backward while disengaging the instrument lower finisher metal clips and pawl.
c. Disconnect harness connector, and then remove instrument lower finisher.
16. Remove glove box. Refer to GLOVE BOX ASSEMBLY procedure.
17. Remove side ventilator assembly (RH). : Metal clip
: Pawl
a. Insert a suitable tool into the top gap of the side ventilator assembly, then starting from center console side, disengage the
clips and pawl of instrument panel pad.
PIIB3969E
PIIB2880E
LIIA2544E
PIIB3977E
Revision: May 2010 2011 Versa
Page 2836 of 3787
INSTRUMENT PANEL ASSEMBLYIP-15
< ON-VEHICLE REPAIR >
C
DE
F
G H
J
K L
M A
B
IP
N
O P
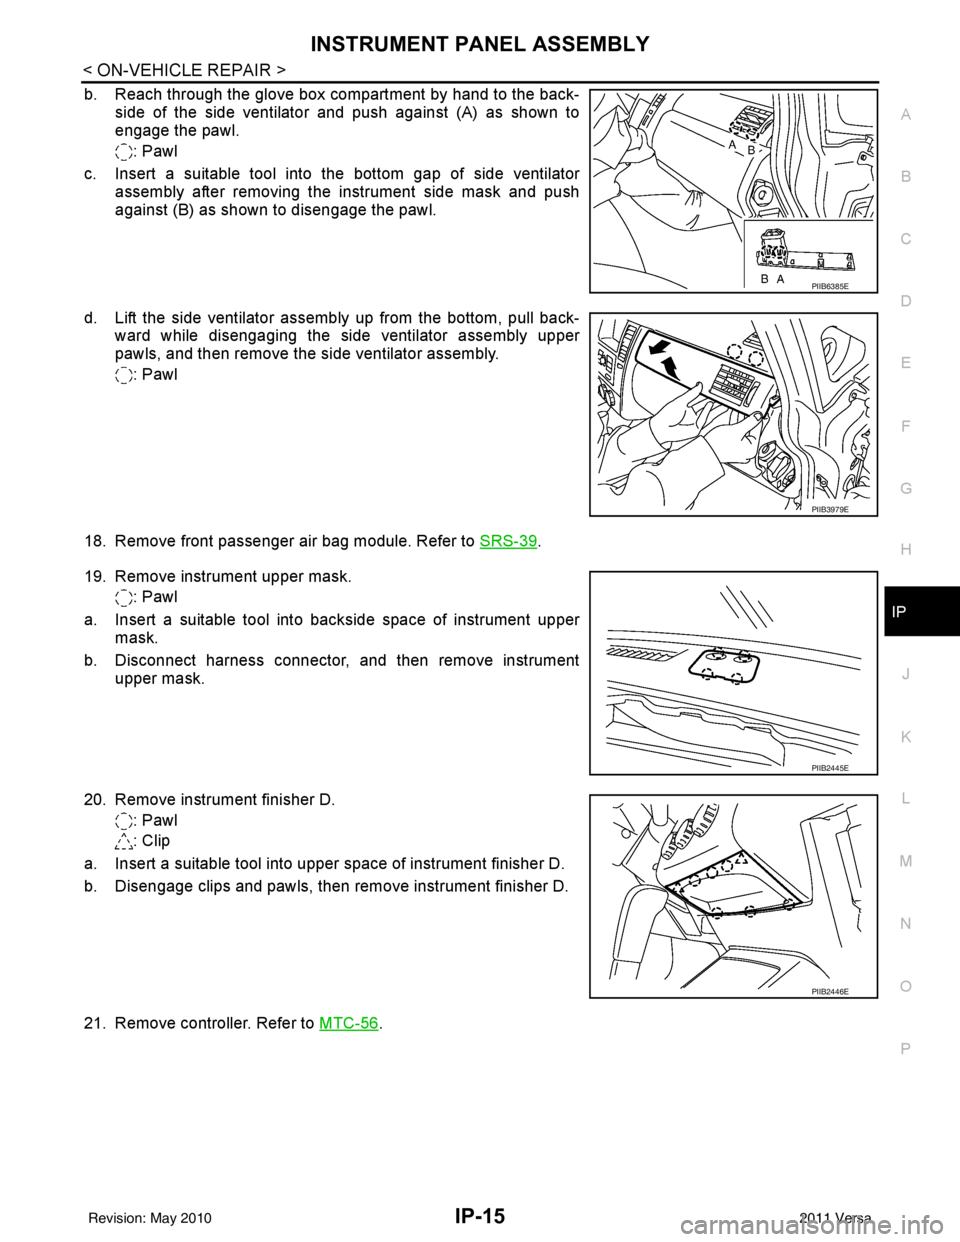
b. Reach through the glove box compartment by hand to the back- side of the side ventilator and push against (A) as shown to
engage the pawl.
: Pawl
c. Insert a suitable tool into the bottom gap of side ventilator assembly after removing the instrument side mask and push
against (B) as shown to disengage the pawl.
d. Lift the side ventilator assembly up from the bottom, pull back- ward while disengaging the side ventilator assembly upper
pawls, and then remove the side ventilator assembly.
: Pawl
18. Remove front passenger air bag module. Refer to SRS-39
.
19. Remove instrument upper mask. : Pawl
a. Insert a suitable tool into backside space of instrument upper mask.
b. Disconnect harness connector, and then remove instrument upper mask.
20. Remove instrument finisher D. : Pawl
: Clip
a. Insert a suitable tool into upper space of instrument finisher D.
b. Disengage clips and pawls, then remove instrument finisher D.
21. Remove controller. Refer to MTC-56
.
PIIB6385E
PIIB3979E
PIIB2445E
PIIB2446E
Revision: May 2010 2011 Versa
Page 2837 of 3787
IP-16
< ON-VEHICLE REPAIR >
INSTRUMENT PANEL ASSEMBLY
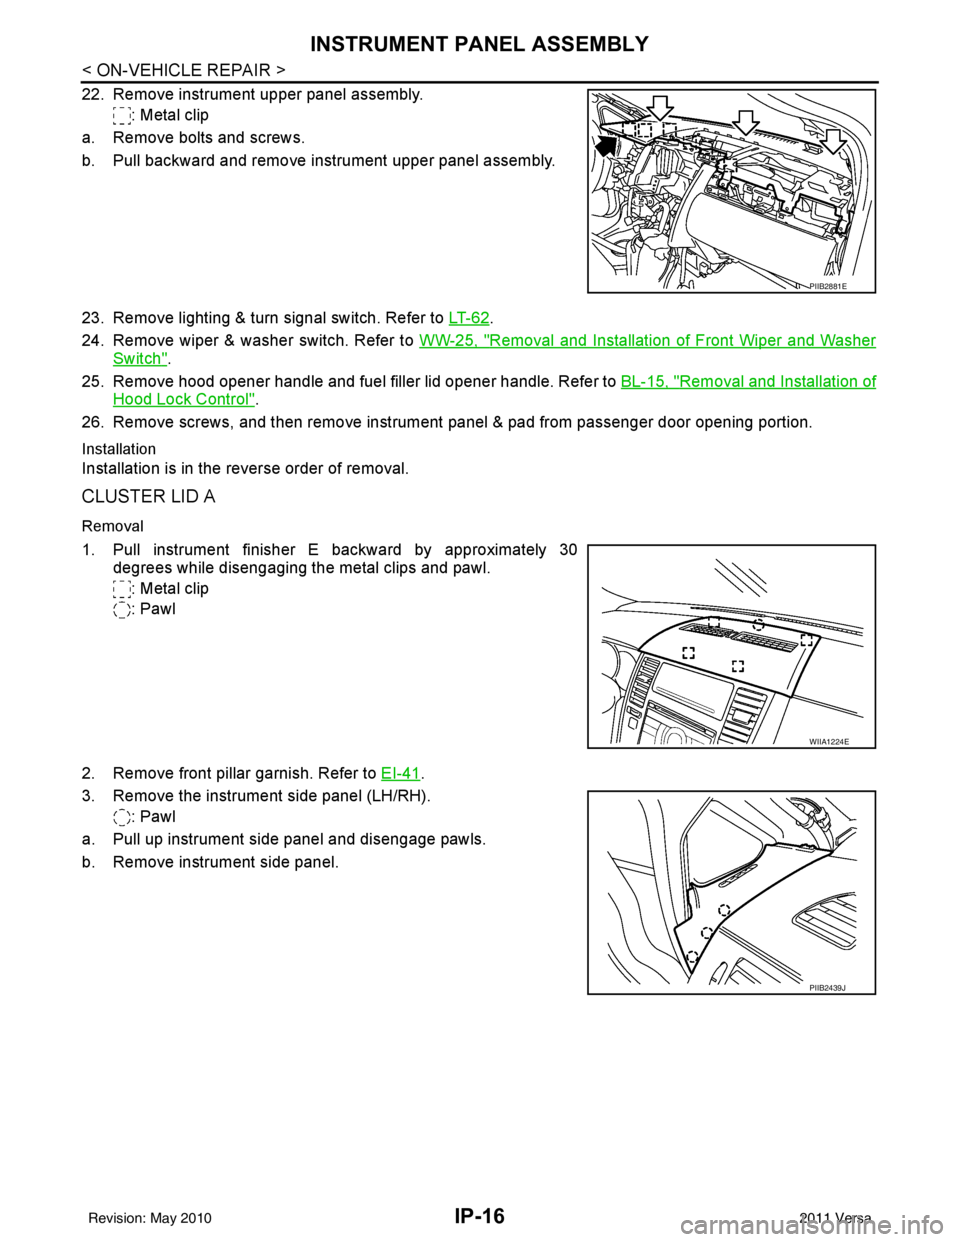
22. Remove instrument upper panel assembly.: Metal clip
a. Remove bolts and screws.
b. Pull backward and remove instrument upper panel assembly.
23. Remove lighting & turn signal switch. Refer to LT- 6 2
.
24. Remove wiper & washer switch. Refer to WW-25, "
Removal and Installation of Front Wiper and Washer
Switch".
25. Remove hood opener handle and fuel filler lid opener handle. Refer to BL-15, "
Removal and Installation of
Hood Lock Control".
26. Remove screws, and then remove instrument panel & pad from passenger door opening portion.
Installation
Installation is in the reverse order of removal.
CLUSTER LID A
Removal
1. Pull instrument finisher E backward by approximately 30
degrees while disengaging the metal clips and pawl.
: Metal clip
: Pawl
2. Remove front pillar garnish. Refer to EI-41
.
3. Remove the instrument side panel (LH/RH). : Pawl
a. Pull up instrument side panel and disengage pawls.
b. Remove instrument side panel.
PIIB2881E
WIIA1224E
PIIB2439J
Revision: May 2010 2011 Versa
Page 2838 of 3787
INSTRUMENT PANEL ASSEMBLYIP-17
< ON-VEHICLE REPAIR >
C
DE
F
G H
J
K L
M A
B
IP
N
O P
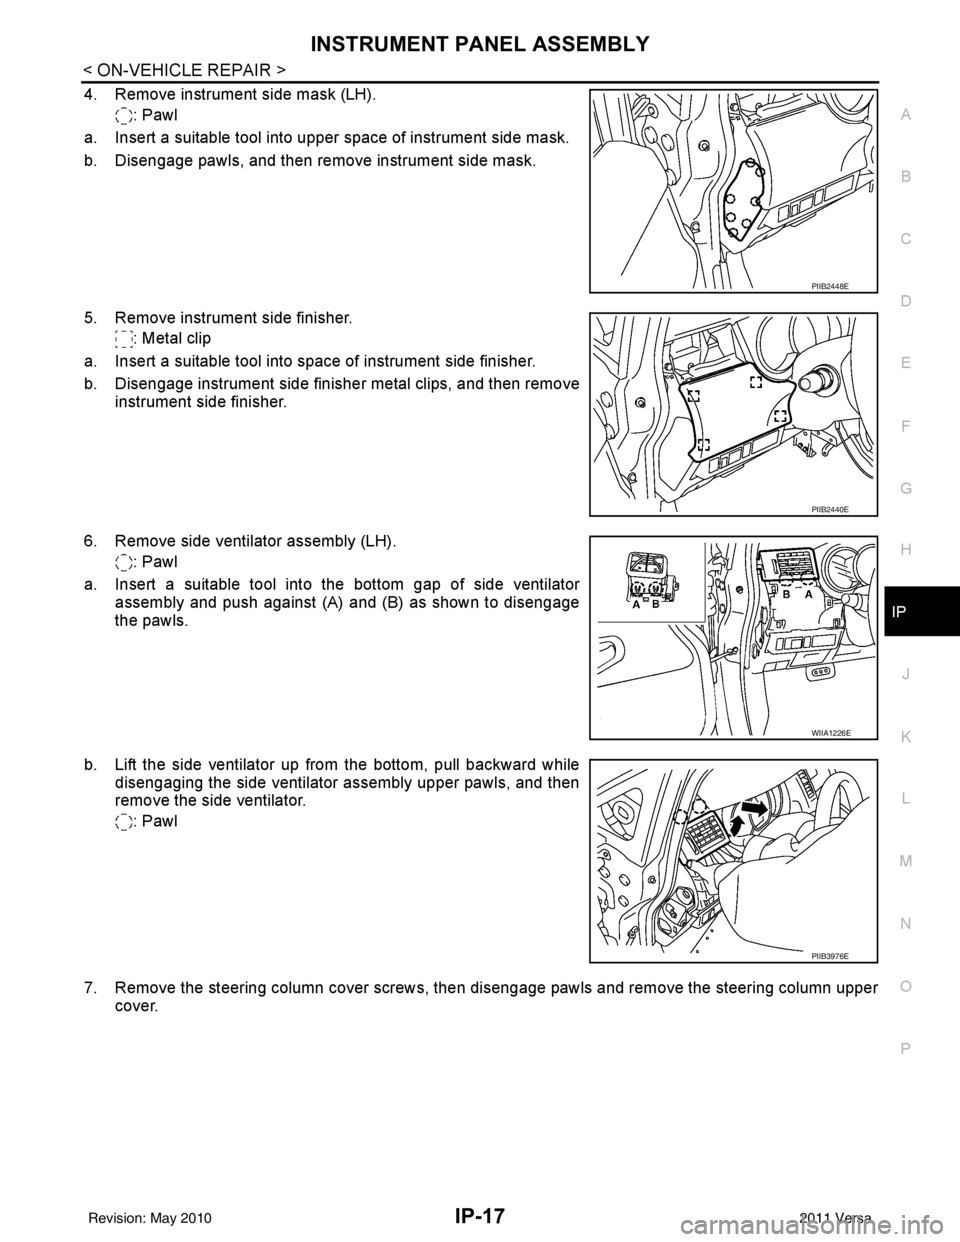
4. Remove instrument side mask (LH). : Pawl
a. Insert a suitable tool into upper space of instrument side mask.
b. Disengage pawls, and then remove instrument side mask.
5. Remove instrument side finisher. : Metal clip
a. Insert a suitable tool into space of instrument side finisher.
b. Disengage instrument side finisher metal clips, and then remove instrument side finisher.
6. Remove side ventilator assembly (LH). : Pawl
a. Insert a suitable tool into the bottom gap of side ventilator assembly and push against (A) and (B) as shown to disengage
the pawls.
b. Lift the side ventilator up from the bottom, pull backward while disengaging the side ventilator assembly upper pawls, and then
remove the side ventilator.
: Pawl
7. Remove the steering column cover screws, then disengage pawls and remove the steering column upper cover.
PIIB2448E
PIIB2440E
WIIA1226E
PIIB3976E
Revision: May 2010 2011 Versa
Page 2839 of 3787
IP-18
< ON-VEHICLE REPAIR >
INSTRUMENT PANEL ASSEMBLY
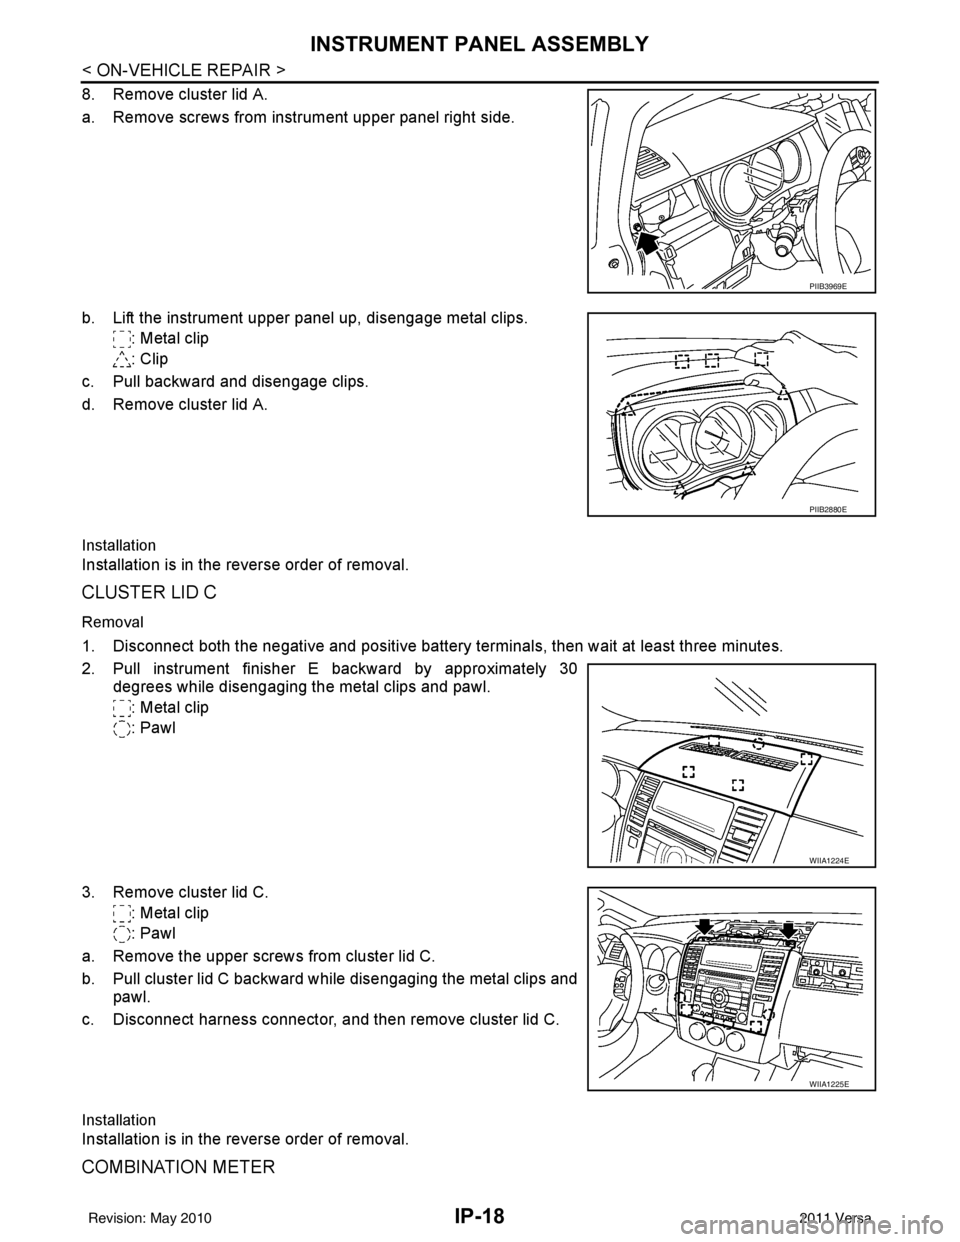
8. Remove cluster lid A.
a. Remove screws from instrument upper panel right side.
b. Lift the instrument upper panel up, disengage metal clips.: Metal clip
: Clip
c. Pull backward and disengage clips.
d. Remove cluster lid A.
Installation
Installation is in the reverse order of removal.
CLUSTER LID C
Removal
1. Disconnect both the negative and positive battery terminals, then wait at least three minutes.
2. Pull instrument finisher E backward by approximately 30 degrees while disengaging the metal clips and pawl.
: Metal clip
: Pawl
3. Remove cluster lid C. : Metal clip
: Pawl
a. Remove the upper screws from cluster lid C.
b. Pull cluster lid C backward while disengaging the metal clips and pawl.
c. Disconnect harness connector, and then remove cluster lid C.
Installation
Installation is in the reverse order of removal.
COMBINATION METER
PIIB3969E
PIIB2880E
WIIA1224E
WIIA1225E
Revision: May 2010 2011 Versa
Page 2840 of 3787
INSTRUMENT PANEL ASSEMBLYIP-19
< ON-VEHICLE REPAIR >
C
DE
F
G H
J
K L
M A
B
IP
N
O P
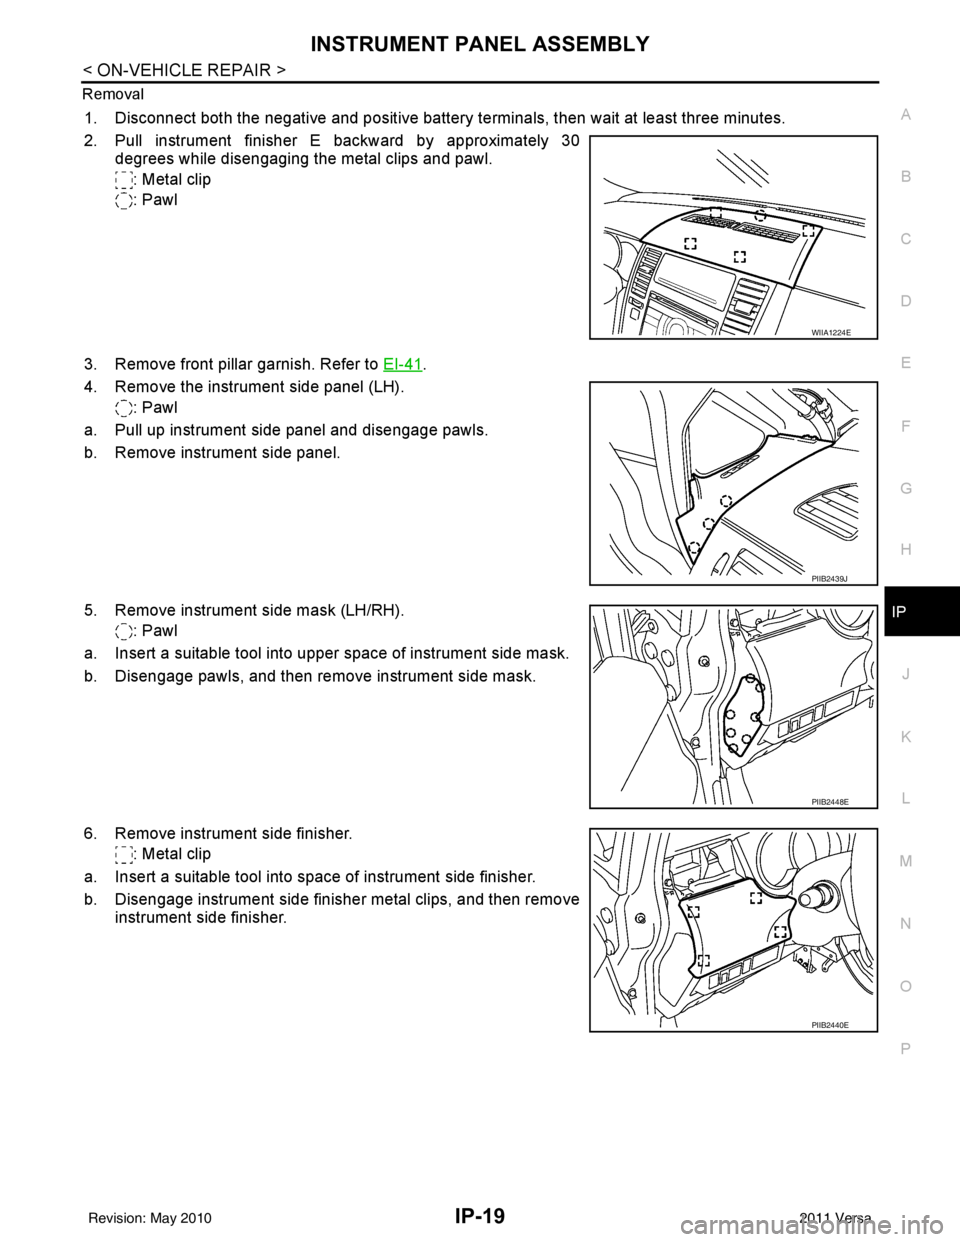
Removal
1. Disconnect both the negative and positive battery te
rminals, then wait at least three minutes.
2. Pull instrument finisher E backward by approximately 30 degrees while disengaging the metal clips and pawl.
: Metal clip
: Pawl
3. Remove front pillar garnish. Refer to EI-41
.
4. Remove the instrument side panel (LH). : Pawl
a. Pull up instrument side panel and disengage pawls.
b. Remove instrument side panel.
5. Remove instrument side mask (LH/RH). : Pawl
a. Insert a suitable tool into upper space of instrument side mask.
b. Disengage pawls, and then remove instrument side mask.
6. Remove instrument side finisher. : Metal clip
a. Insert a suitable tool into space of instrument side finisher.
b. Disengage instrument side finisher metal clips, and then remove instrument side finisher.
WIIA1224E
PIIB2439J
PIIB2448E
PIIB2440E
Revision: May 2010 2011 Versa