NISSAN LEAF 2013 1.G Navigation Manual
Manufacturer: NISSAN, Model Year: 2013, Model line: LEAF, Model: NISSAN LEAF 2013 1.GPages: 275, PDF Size: 6.66 MB
Page 151 of 275
Next/Previous Track and Fast For-
ward/Rewind
Push theTUNE SEEK CH button for more than
1.5 seconds while an iPod®is playing to fast
forward or rewind through the current track.
When the button is released, the iPod
®will
return to the normal play speed.
When the TUNE SEEK CH button is pushed for
less than 1.5 seconds while an iPod
®is playing,
the next track or the beginning of the current
track on the iPod
®will be played.
Select play mode
The play mode setting display will appear when
[Mode] is touched.
Select the preferred play mode from the
following items.
. Shuffle
Choose "Off", "Songs" or "Albums".
. Repeat
Choose "One" or "All".
iPod®settings
The following items can be chosen from the
menu list screen. For further information about
each item, see the iPod
®Owner’s Manual.
. Now Playing .
Playlists
. Artists
. Albums
. Songs
. Podcasts
. Genres
. Composers
PANDORA®OPERATION (if so
equipped)
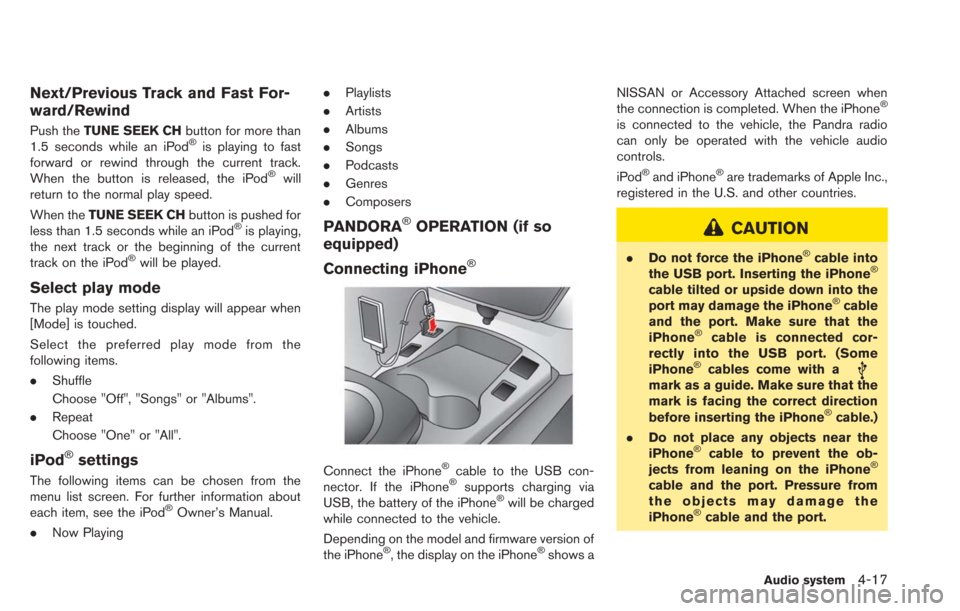
Connecting iPhone
®
Connect the iPhone®cable to the USB con-
nector. If the iPhone®supports charging via
USB, the battery of the iPhone®will be charged
while connected to the vehicle.
Depending on the model and firmware version of
the iPhone
®, the display on the iPhone®shows a NISSAN or Accessory Attached screen when
the connection is completed. When the iPhone
®
is connected to the vehicle, the Pandra radio
can only be operated with the vehicle audio
controls.
iPod
®and iPhone®are trademarks of Apple Inc.,
registered in the U.S. and other countries.
CAUTION
. Do not force the iPhone®cable into
the USB port. Inserting the iPhone®
cable tilted or upside down into the
port may damage the iPhone®cable
and the port. Make sure that the
iPhone
®cable is connected cor-
rectly into the USB port. (Some
iPhone
®cables come with amark as a guide. Make sure that the
mark is facing the correct direction
before inserting the iPhone
®cable.)
. Do not place any objects near the
iPhone
®cable to prevent the ob-
jects from leaning on the iPhone®
cable and the port. Pressure from
the objects may damage the
iPhone
®cable and the port.
Audio system4-17
Page 152 of 275
4-18Audio system
Compatibility:
The following models are available.
.iPhone
®3GS
. iPhone®4
. iPhone®4S
. iPod touch®4G
Playing Pandora®
Push the vehicle’s power switch to the "ACC" or
"ON" position. Then, push the CD·AUXbutton
repeatedly to switch to the Pandora
®mode. If
the system was turned off while the Pandora®
was playing, pushing thebutton will start the
Pandora®.
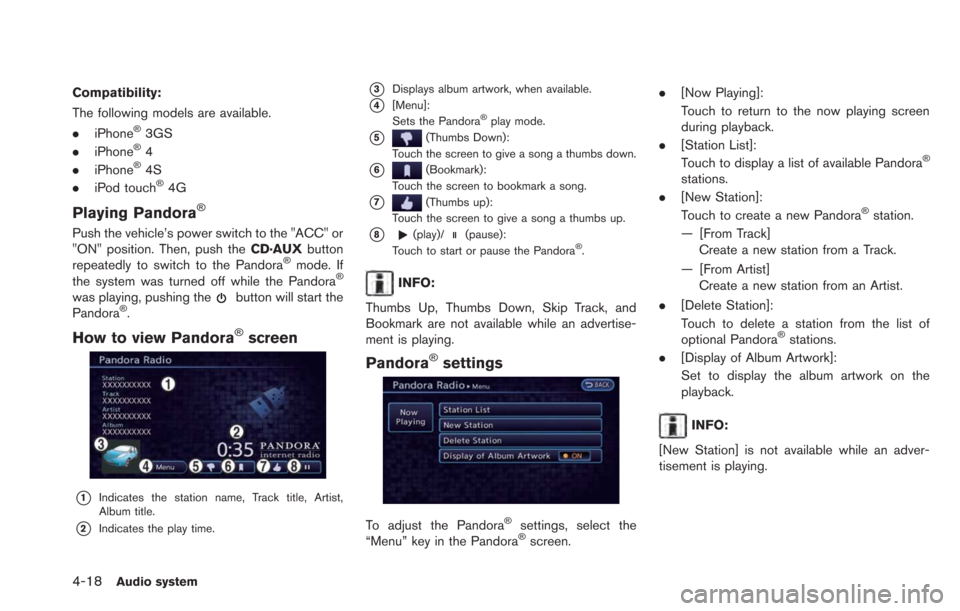
How to view Pandora®screen
*1Indicates the station name, Track title, Artist,
Album title.
*2Indicates the play time.
*3Displays album artwork, when available.
*4[Menu]:
Sets the Pandora®play mode.
*5(Thumbs Down):
Touch the screen to give a song a thumbs down.
*6(Bookmark):
Touch the screen to bookmark a song.
*7(Thumbs up):
Touch the screen to give a song a thumbs up.
*8(play)/(pause):
Touch to start or pause the Pandora®.
INFO:
Thumbs Up, Thumbs Down, Skip Track, and
Bookmark are not available while an advertise-
ment is playing.
Pandora®settings
To adjust the Pandora®settings, select the
“Menu” key in the Pandora®screen. .
[Now Playing]:
Touch to return to the now playing screen
during playback.
. [Station List]:
Touch to display a list of available Pandora
®
stations.
. [New Station]:
Touch to create a new Pandora
®station.
— [From Track] Create a new station from a Track.
— [From Artist] Create a new station from an Artist.
. [Delete Station]:
Touch to delete a station from the list of
optional Pandora
®stations.
. [Display of Album Artwork]:
Set to display the album artwork on the
playback.
INFO:
[New Station] is not available while an adver-
tisement is playing.
Page 153 of 275
USB MEMORY OPERATION
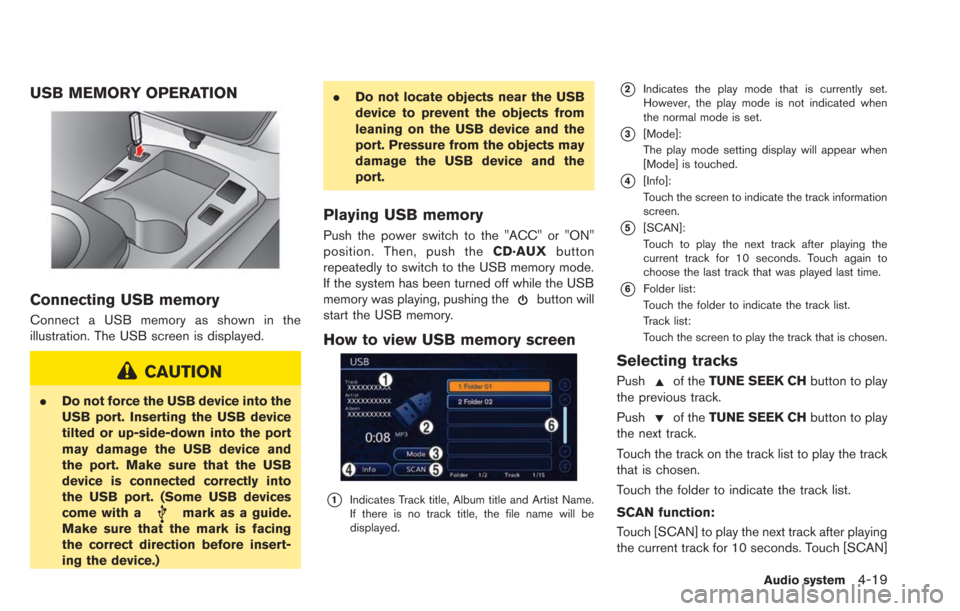
Connecting USB memory
Connect a USB memory as shown in the
illustration. The USB screen is displayed.
CAUTION
.Do not force the USB device into the
USB port. Inserting the USB device
tilted or up-side-down into the port
may damage the USB device and
the port. Make sure that the USB
device is connected correctly into
the USB port. (Some USB devices
come with a
mark as a guide.
Make sure that the mark is facing
the correct direction before insert-
ing the device.) .
Do not locate objects near the USB
device to prevent the objects from
leaning on the USB device and the
port. Pressure from the objects may
damage the USB device and the
port.
Playing USB memory
Push the power switch to the "ACC" or "ON"
position. Then, push the CD·AUXbutton
repeatedly to switch to the USB memory mode.
If the system has been turned off while the USB
memory was playing, pushing the
button will
start the USB memory.
How to view USB memory screen
*1Indicates Track title, Album title and Artist Name.
If there is no track title, the file name will be
displayed.
*2Indicates the play mode that is currently set.
However, the play mode is not indicated when
the normal mode is set.
*3[Mode]:
The play mode setting display will appear when
[Mode] is touched.
*4[Info]:
Touch the screen to indicate the track information
screen.
*5[SCAN]:
Touch to play the next track after playing the
current track for 10 seconds. Touch again to
choose the last track that was played last time.
*6Folder list:
Touch the folder to indicate the track list.
Track list:
Touch the screen to play the track that is chosen.
Selecting tracks
Pushof the TUNE SEEK CH button to play
the previous track.
Push
of the TUNE SEEK CH button to play
the next track.
Touch the track on the track list to play the track
that is chosen.
Touch the folder to indicate the track list.
SCAN function:
Touch [SCAN] to play the next track after playing
the current track for 10 seconds. Touch [SCAN]
Audio system4-19
Page 154 of 275
4-20Audio system
again to choose the last track that was played
last time.
Next/Previous File and Fast For-
ward/Rewind
Push theTUNE SEEK CH button for more than
1.5 seconds while a USB memory is being
played to fast forward or rewind though the
current track.
When the TUNE SEEK CH button is released,
the USB memory will return to normal play
speed.
When the TUNE SEEK CH button is pushed for
less than 1.5 seconds while a USB memory is
being played, the next track or the beginning of
the current track on the USB memory will be
played.
Select play mode
The play mode setting display will appear when
[Mode] is selected.
Select the preferred play mode from the
following items.
. Normal
. 1 Folder Repeat
. 1 Track Repeat
. All Random .
1 Folder Random
BLUETOOTH®STREAMING AUDIO
OPERATION
Your vehicle is equipped with Bluetooth®
Streaming Audio.
If you have a compatible Bluetooth®device with
streaming audio (A2DP profile) , you can set up a
wireless connection between your Bluetooth
®
device and the in-vehicle audio system. This
connection allows you to listen to the audio from
the Bluetooth
®device using your vehicle speak-
ers. It also may allow basic control of the device
for playing and skipping audio files using the
AVRCP Bluetooth
®profile. Not all Bluetooth®
devices have the same level of controls for
AVRCP. Please consult the manual for your
Bluetooth
®device for more details.
Wireless LAN (Wi-Fi) and the Bluetooth®
functions share the same frequency band (2.4
GHz) . Using the Bluetooth®and the wireless
LAN functions at the same time may slow down
or disconnect the communication and cause
undesired noise. It is recommended that you
turn off the wireless LAN (Wi-Fi) when using the
Bluetooth
®functions.
Regulatory information
FCC Regulatory information:
. CAUTION: To maintain compliance with
FCC’s RF exposure guidelines, use only
the supplied antenna. Unauthorized antenna,
modification, or attachments could damage
the transmitter and may violate FCC regula-
tions.
. Operation is subject to the following two
conditions:
— This device may not cause interference
and
— This device must accept any interfer- ence, including interference that may
cause undesired operation of the device
IC Regulatory information:
. Operation is subject to the following two
conditions:
— This device may not cause interference,
and
— This device must accept any interfer- ence, including interference that may
cause undesired operation of the device.
. This Class B digital apparatus meets all
requirements of the Canadian Interference-
Causing Equipment Regulations.
Page 155 of 275
![NISSAN LEAF 2013 1.G Navigation Manual Bluetooth®trademark:
Bluetooth®is a trademark owned
by Bluetooth®SIG, Inc., and
licensed to Clarion.
Connecting procedure
1. Push the MENUand touch [Settings].
2. Touch [Bluetooth].
3. Touch [Conne NISSAN LEAF 2013 1.G Navigation Manual Bluetooth®trademark:
Bluetooth®is a trademark owned
by Bluetooth®SIG, Inc., and
licensed to Clarion.
Connecting procedure
1. Push the MENUand touch [Settings].
2. Touch [Bluetooth].
3. Touch [Conne](/img/5/324/w960_324-154.png)
Bluetooth®trademark:
Bluetooth®is a trademark owned
by Bluetooth®SIG, Inc., and
licensed to Clarion.
Connecting procedure
1. Push the MENUand touch [Settings].
2. Touch [Bluetooth].
3. Touch [Connect Bluetooth]. A confirmation
message is displayed.
4. Confirm the contents of the message, thentouch [No].
INFO:
Selecting [Yes] will only connect the hands-
free phone portion of a Bluetooth
®device.
5. Choose a PIN code to use with the compatible Bluetooth®audio device using
the number input screen. The PIN code will
need to be entered into the Bluetooth
®
audio device after step 6.
6. Touch [OK]. The standby message screen will appear. Operate the compatible Blue-
tooth
®audio device. Please refer to the
device’s Owners Manual for the Bluetooth®
audio connection instructions for your spe-
cific device. When the connection is com-
pleted, the screen will return to the
Bluetooth
®setup display.
INFO:
It may not be possible to connect to a Blue-
tooth
®audio profile from the system. In this
case, perform connection operation from the
Bluetooth
®audio player, after connecting the
system and the Bluetooth®audio. For details of
how to perform connection, refer to the Owner’s
Manual of the Bluetooth
®audio player that is
being used.
Audio system4-21
Page 156 of 275
4-22Audio system
Playing Bluetooth®streaming audio
Push the power switch to the "ACC" or "ON"
position. Then, push theCD·AUXbutton
repeatedly to switch to the Bluetooth
®audio
mode. If the system has been turned off while
the Bluetooth
®audio device was playing, push-
ing thebutton will start the Bluetooth®audio
device.
The ability to pause, change tracks, fast forward,
rewind, randomize and repeat music may be
different between devices. Some or all of these
functions may not be supported on each device.
When the CD·AUXbutton is pushed with the
system off and the Bluetooth
®audio device
connected, the system will turn on.
If another audio source is playing and the
Bluetooth
®audio device is connected, push
the CD·AUX button repeatedly until the display
changes to the Bluetooth
®audio mode.
INFO:
. Depending on the Bluetooth
®audio device
that is connected, it may not be possible to
perform audio operations.
. Depending on the Bluetooth
®audio device
that is connected, a time lag may occur
before music is played back.
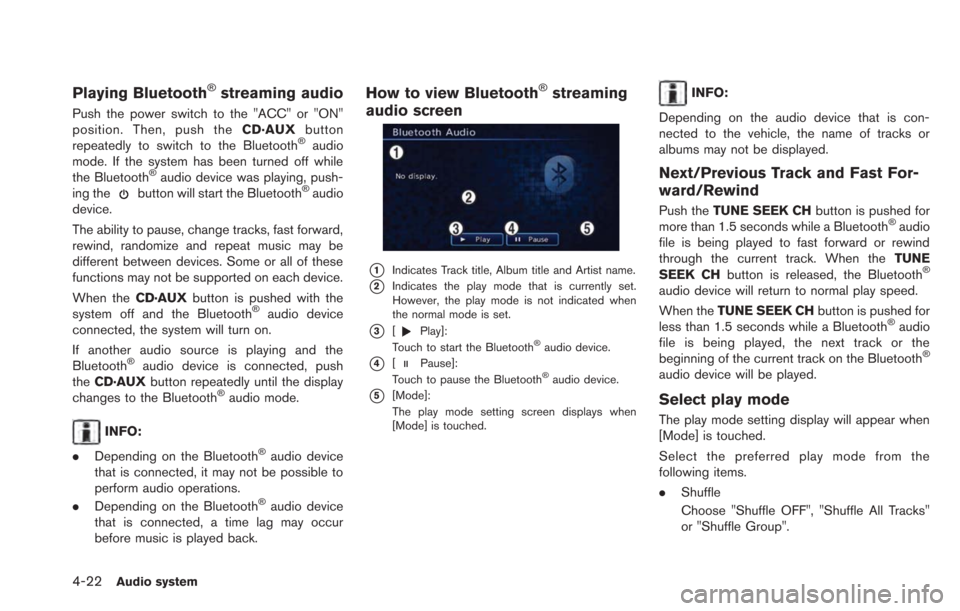
How to view Bluetooth®streaming
audio screen
*1Indicates Track title, Album title and Artist name.
*2Indicates the play mode that is currently set.
However, the play mode is not indicated when
the normal mode is set.
*3[Play]:
Touch to start the Bluetooth®audio device.
*4[Pause]:
Touch to pause the Bluetooth®audio device.
*5[Mode]:
The play mode setting screen displays when
[Mode] is touched.
INFO:
Depending on the audio device that is con-
nected to the vehicle, the name of tracks or
albums may not be displayed.
Next/Previous Track and Fast For-
ward/Rewind
Push the TUNE SEEK CH button is pushed for
more than 1.5 seconds while a Bluetooth®audio
file is being played to fast forward or rewind
through the current track. When the TUNE
SEEK CH button is released, the Bluetooth
®
audio device will return to normal play speed.
When theTUNE SEEK CH button is pushed for
less than 1.5 seconds while a Bluetooth
®audio
file is being played, the next track or the
beginning of the current track on the Bluetooth
®
audio device will be played.
Select play mode
The play mode setting display will appear when
[Mode] is touched.
Select the preferred play mode from the
following items.
. Shuffle
Choose "Shuffle OFF", "Shuffle All Tracks"
or "Shuffle Group".
Page 157 of 275
.Repeat
Choose "Repeat 1 Track", "Repeat All
Tracks" or "Repeat Group".
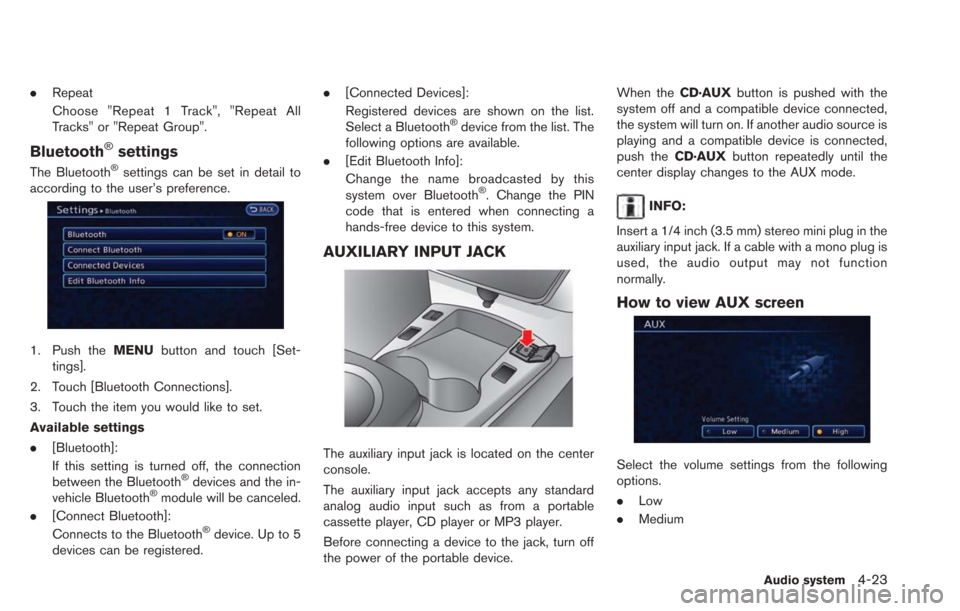
Bluetooth®settings
The Bluetooth®settings can be set in detail to
according to the user’s preference.
1. Push the MENUbutton and touch [Set-
tings].
2. Touch [Bluetooth Connections].
3. Touch the item you would like to set.
Available settings
. [Bluetooth]:
If this setting is turned off, the connection
between the Bluetooth
®devices and the in-
vehicle Bluetooth®module will be canceled.
. [Connect Bluetooth]:
Connects to the Bluetooth
®device. Up to 5
devices can be registered. .
[Connected Devices]:
Registered devices are shown on the list.
Select a Bluetooth
®device from the list. The
following options are available.
. [Edit Bluetooth Info]:
Change the name broadcasted by this
system over Bluetooth
®. Change the PIN
code that is entered when connecting a
hands-free device to this system.
AUXILIARY INPUT JACK
The auxiliary input jack is located on the center
console.
The auxiliary input jack accepts any standard
analog audio input such as from a portable
cassette player, CD player or MP3 player.
Before connecting a device to the jack, turn off
the power of the portable device. When the
CD·AUXbutton is pushed with the
system off and a compatible device connected,
the system will turn on. If another audio source is
playing and a compatible device is connected,
push the CD·AUXbutton repeatedly until the
center display changes to the AUX mode.
INFO:
Insert a 1/4 inch (3.5 mm) stereo mini plug in the
auxiliary input jack. If a cable with a mono plug is
used, the audio output may not function
normally.
How to view AUX screen
Select the volume settings from the following
options.
. Low
. Medium
Audio system4-23
Page 158 of 275
4-24Audio system
.High
STEERING WHEEL SWITCHES FOR
AUDIO CONTROL
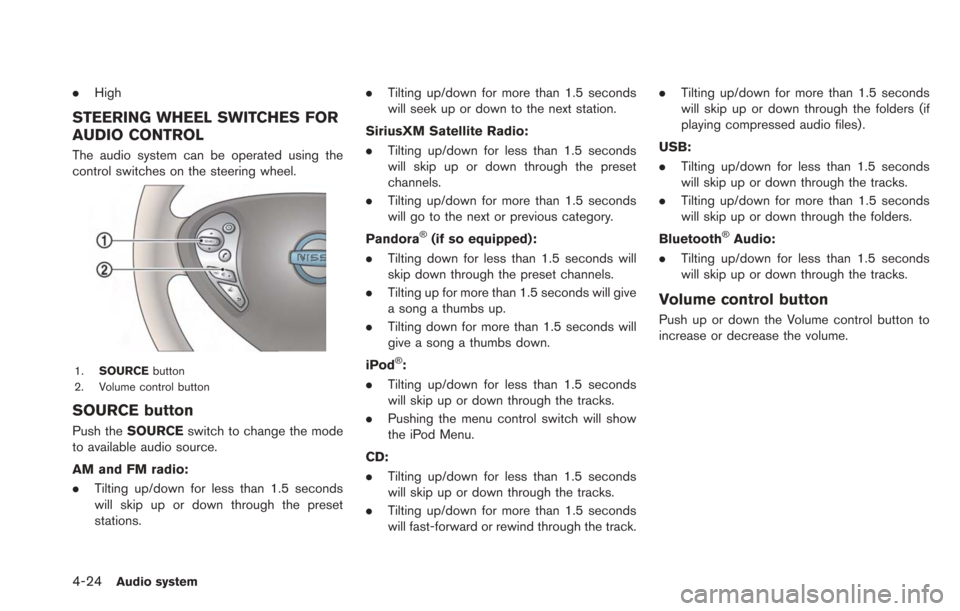
The audio system can be operated using the
control switches on the steering wheel.
1. SOURCE button
2. Volume control button
SOURCE button
Push the SOURCE switch to change the mode
to available audio source.
AM and FM radio:
. Tilting up/down for less than 1.5 seconds
will skip up or down through the preset
stations. .
Tilting up/down for more than 1.5 seconds
will seek up or down to the next station.
SiriusXM Satellite Radio:
. Tilting up/down for less than 1.5 seconds
will skip up or down through the preset
channels.
. Tilting up/down for more than 1.5 seconds
will go to the next or previous category.
Pandora
®(if so equipped):
. Tilting down for less than 1.5 seconds will
skip down through the preset channels.
. Tilting up for more than 1.5 seconds will give
a song a thumbs up.
. Tilting down for more than 1.5 seconds will
give a song a thumbs down.
iPod
®:
. Tilting up/down for less than 1.5 seconds
will skip up or down through the tracks.
. Pushing the menu control switch will show
the iPod Menu.
CD:
. Tilting up/down for less than 1.5 seconds
will skip up or down through the tracks.
. Tilting up/down for more than 1.5 seconds
will fast-forward or rewind through the track. .
Tilting up/down for more than 1.5 seconds
will skip up or down through the folders (if
playing compressed audio files) .
USB:
. Tilting up/down for less than 1.5 seconds
will skip up or down through the tracks.
. Tilting up/down for more than 1.5 seconds
will skip up or down through the folders.
Bluetooth
®Audio:
. Tilting up/down for less than 1.5 seconds
will skip up or down through the tracks.
Volume control button
Push up or down the Volume control button to
increase or decrease the volume.
Page 159 of 275

MEMO
Audio system4-25
Page 160 of 275

4-26Audio system
MEMO