NISSAN NAVARA 2005 Repair Workshop Manual
Manufacturer: NISSAN, Model Year: 2005, Model line: NAVARA, Model: NISSAN NAVARA 2005Pages: 3171, PDF Size: 49.59 MB
Page 2841 of 3171
SC-8
BATTERY
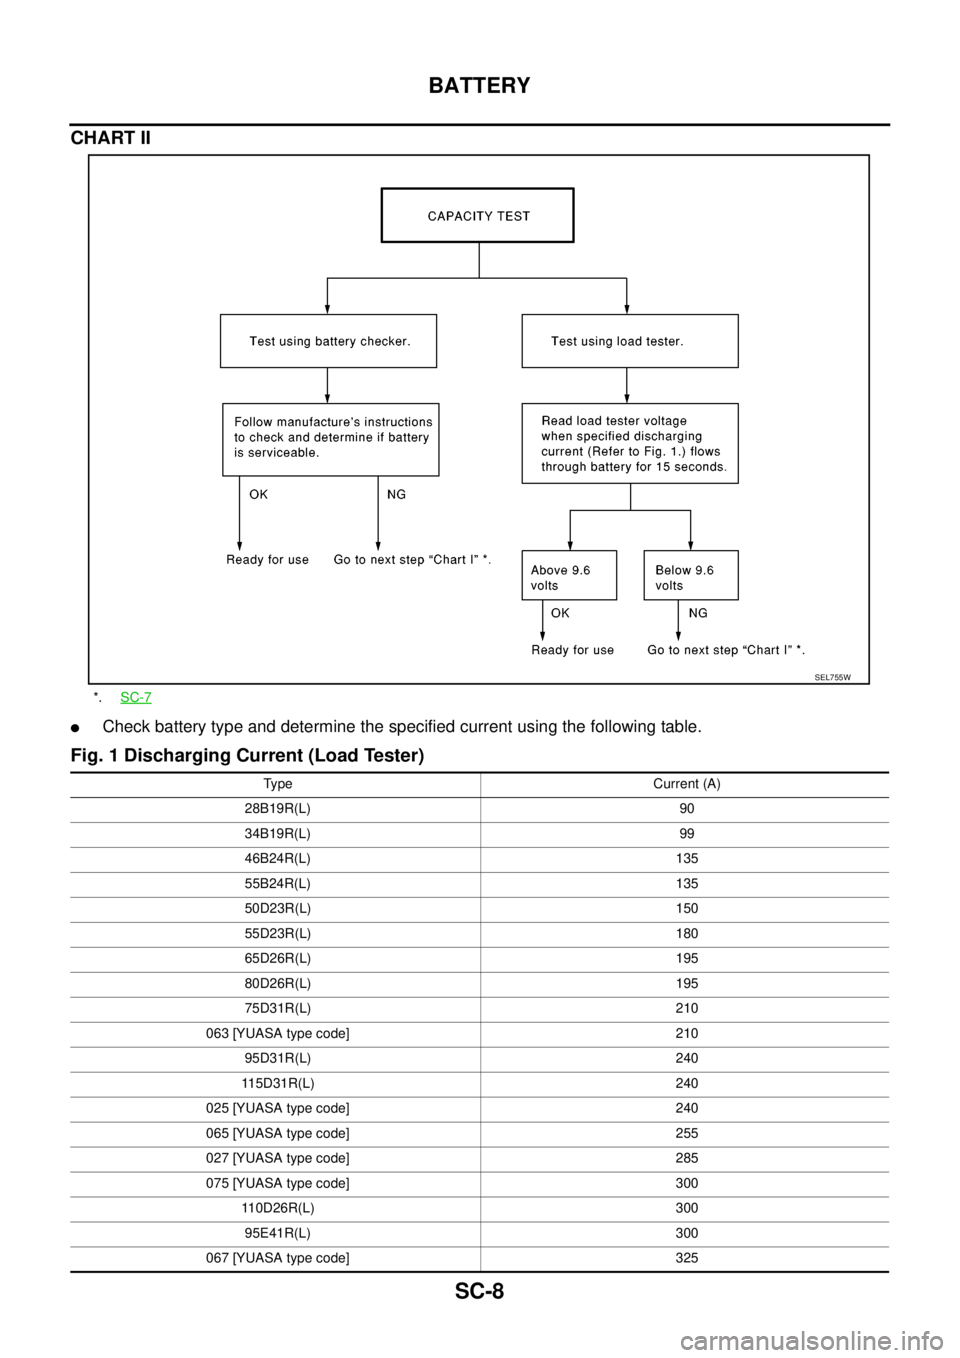
CHART II
lCheck battery type and determine the specified current using the following table.
Fig. 1 Discharging Current (Load Tester)
*.SC-7
SEL755W
Type Current (A)
28B19R(L) 90
34B19R(L) 99
46B24R(L) 135
55B24R(L) 135
50D23R(L) 150
55D23R(L) 180
65D26R(L) 195
80D26R(L) 195
75D31R(L) 210
063 [YUASA type code] 210
95D31R(L) 240
115D31R(L) 240
025 [YUASA type code] 240
065 [YUASA type code] 255
027 [YUASA type code] 285
075 [YUASA type code] 300
110D26R(L) 300
95E41R(L) 300
067 [YUASA type code] 325
Page 2842 of 3171
BATTERY
SC-9
C
D
E
F
G
H
I
J
L
MA
B
SC
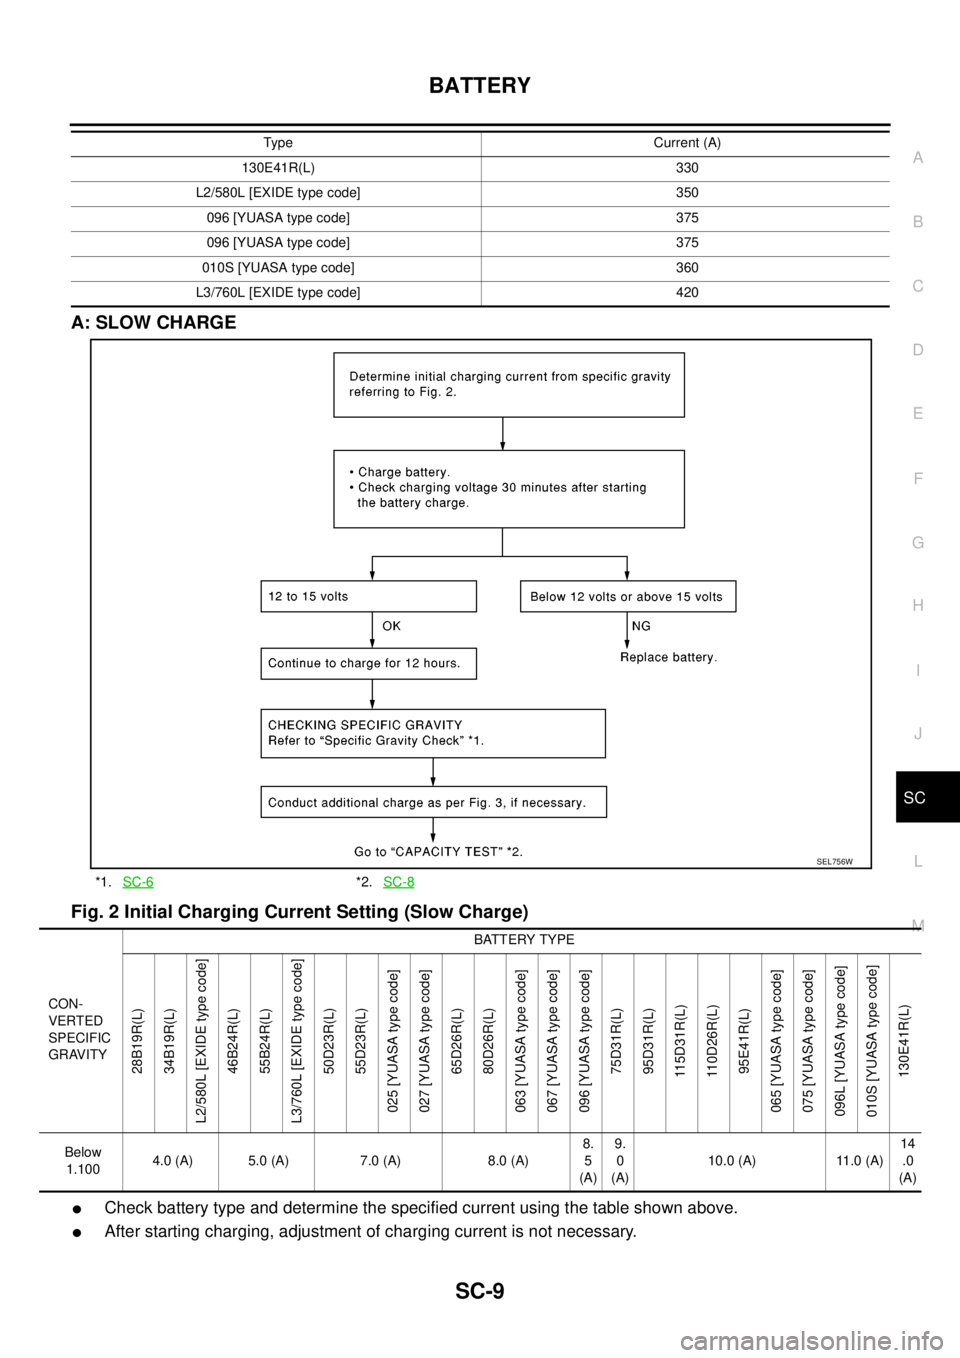
A: SLOW CHARGE
Fig. 2 Initial Charging Current Setting (Slow Charge)
lCheck battery type and determine the specified current using the table shown above.
lAfter starting charging, adjustment of charging current is not necessary.
130E41R(L) 330
L2/580L [EXIDE type code] 350
096 [YUASA type code] 375
096 [YUASA type code] 375
010S [YUASA type code] 360
L3/760L [EXIDE type code] 420Type Current (A)
*1.SC-6*2.SC-8
SEL756W
CON-
VERTED
SPECIFIC
GRAVITYBATTERY TYPE
28B19R(L)
34B19R(L)
L2/580L [EXIDE type code]
46B24R(L)
55B24R(L)
L3/760L [EXIDE type code]
50D23R(L)
55D23R(L)
025 [YUASA type code]
027 [YUASA type code]
65D26R(L)
80D26R(L)
063 [YUASA type code]
067 [YUASA type code]
096 [YUASA type code]
75D31R(L)
95D31R(L)
115D31R(L)
110D26R(L)
95E41R(L)
065 [YUASA type code]
075 [YUASA type code]
096L [YUASA type code]
010S [YUASA type code]
130E41R(L)
Below
1.1004.0(A) 5.0(A) 7.0(A) 8.0(A)8.
5
(A)9.
0
(A)10.0 (A) 11.0 (A)14
.0
(A)
Page 2843 of 3171
SC-10
BATTERY
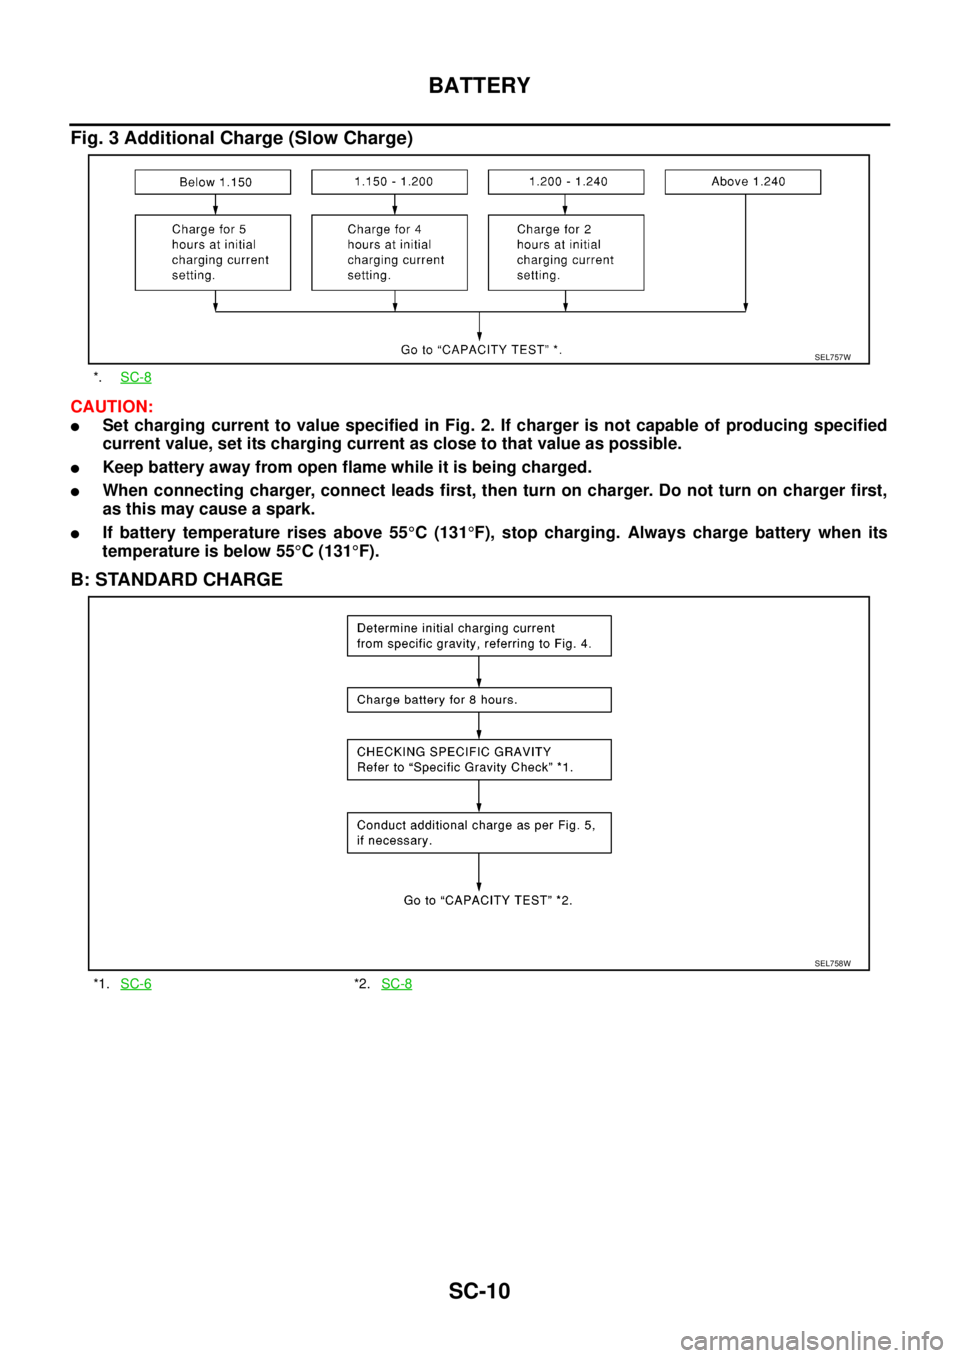
Fig. 3 Additional Charge (Slow Charge)
CAUTION:
lSet charging current to value specified in Fig. 2. If charger is not capable of producing specified
current value, set its charging current as close to that value as possible.
lKeep battery away from open flame while it is being charged.
lWhen connecting charger, connect leads first, then turn on charger. Do not turn on charger first,
as this may cause a spark.
lIf battery temperature rises above 55°C(131°F), stop charging. Always charge battery when its
temperature is below 55°C(131°F).
B: STANDARD CHARGE
*.SC-8
SEL757W
*1.SC-6*2.SC-8
SEL758W
Page 2844 of 3171
BATTERY
SC-11
C
D
E
F
G
H
I
J
L
MA
B
SC
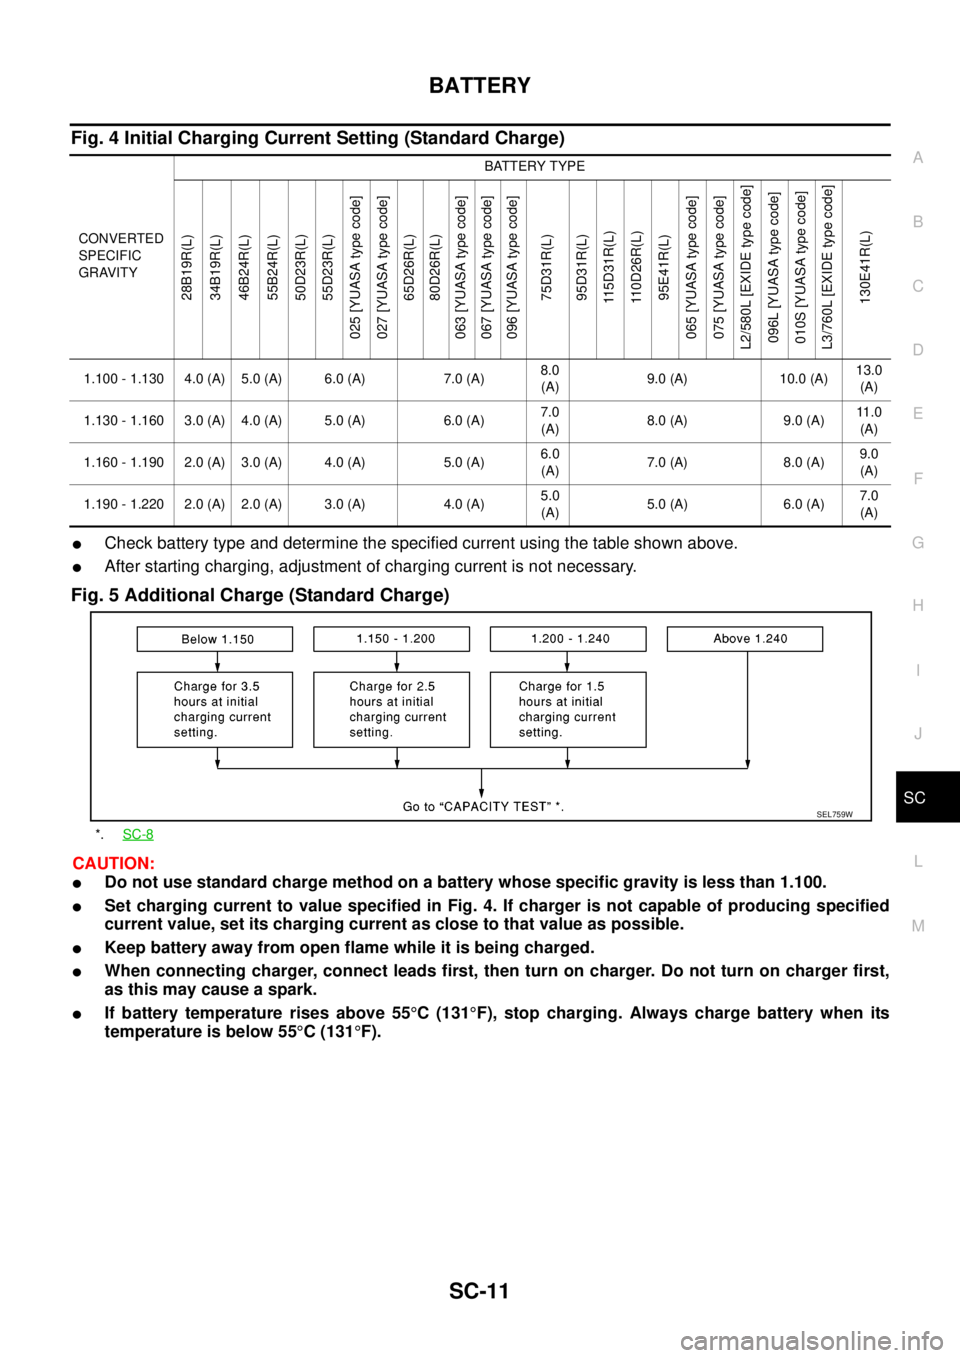
Fig. 4 Initial Charging Current Setting (Standard Charge)
lCheck battery type and determine the specified current using the table shown above.
lAfter starting charging, adjustment of charging current is not necessary.
Fig. 5 Additional Charge (Standard Charge)
CAUTION:
lDo not use standard charge method on a battery whose specific gravity is less than 1.100.
lSet charging current to value specified in Fig. 4. If charger is not capable of producing specified
current value, set its charging current as close to that value as possible.
lKeep battery away from open flame while it is being charged.
lWhen connecting charger, connect leads first, then turn on charger. Do not turn on charger first,
as this may cause a spark.
lIf battery temperature rises above 55°C(131°F), stop charging. Always charge battery when its
temperature is below 55°C(131°F).
CONVERTED
SPECIFIC
GRAVITYBATTERY TYPE
28B19R(L)
34B19R(L)
46B24R(L)
55B24R(L)
50D23R(L)
55D23R(L)
025 [YUASA type code]
027 [YUASA type code]
65D26R(L)
80D26R(L)
063 [YUASA type code]
067 [YUASA type code]
096 [YUASA type code]
75D31R(L)
95D31R(L)
115D31R(L)
110D26R(L)
95E41R(L)
065 [YUASA type code]
075 [YUASA type code]
L2/580L [EXIDE type code]
096L [YUASA type code]
010S [YUASA type code]
L3/760L [EXIDE type code]
130E41R(L)
1.100 - 1.130 4.0 (A) 5.0 (A) 6.0 (A) 7.0 (A)8.0
(A)9.0 (A) 10.0 (A)13.0
(A)
1.130 - 1.160 3.0 (A) 4.0 (A) 5.0 (A) 6.0 (A)7.0
(A)8.0(A) 9.0(A)11 . 0
(A)
1.160 - 1.190 2.0 (A) 3.0 (A) 4.0 (A) 5.0 (A)6.0
(A)7.0(A) 8.0(A)9.0
(A)
1.190 - 1.220 2.0 (A) 2.0 (A) 3.0 (A) 4.0 (A)5.0
(A)5.0(A) 6.0(A)7.0
(A)
*.SC-8
SEL759W
Page 2845 of 3171
SC-12
BATTERY
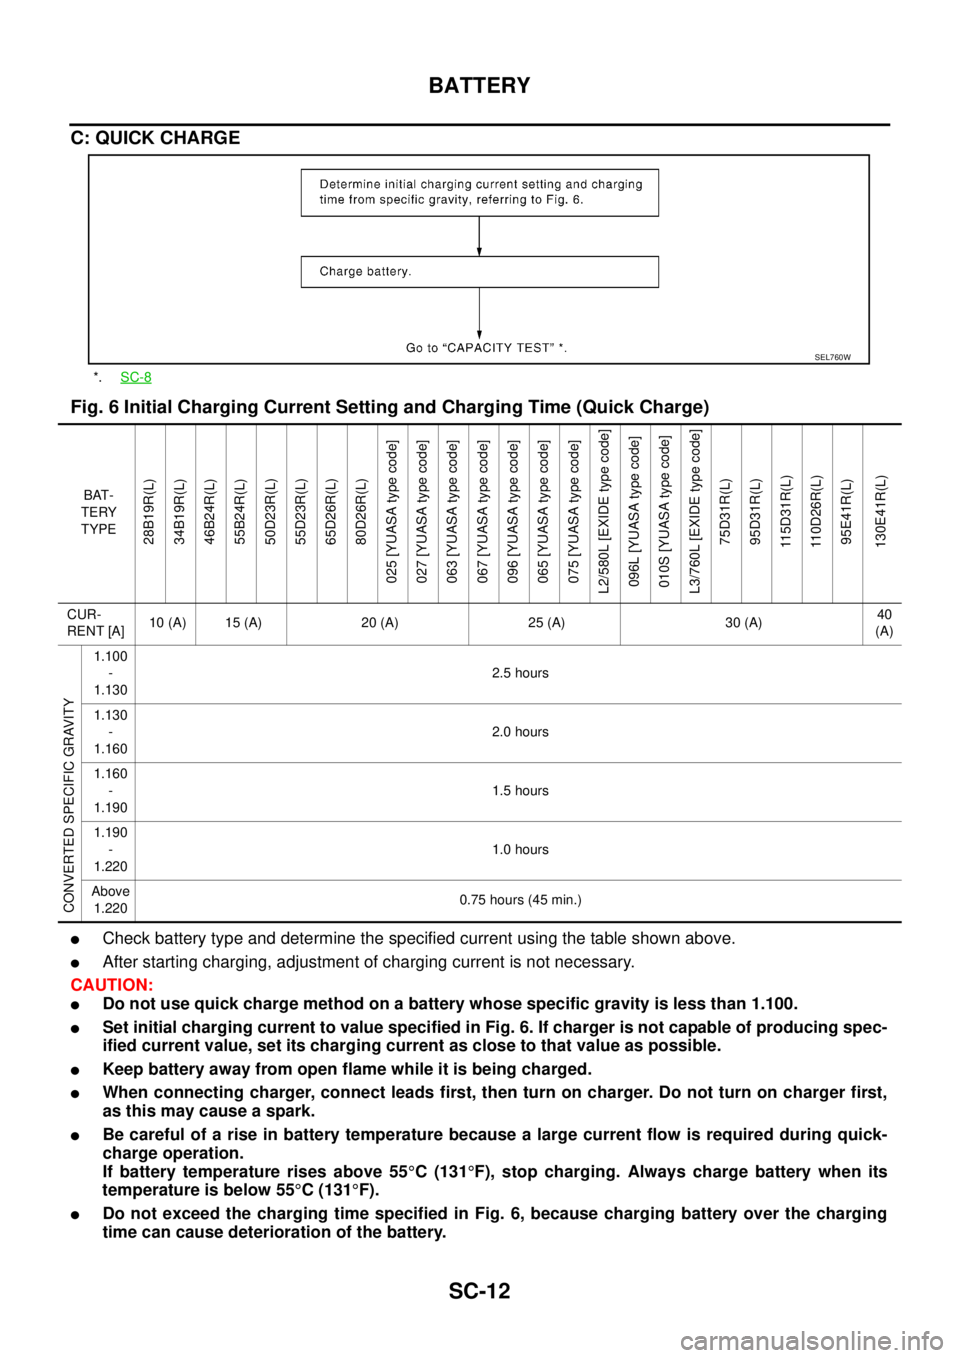
C: QUICK CHARGE
Fig. 6 Initial Charging Current Setting and Charging Time (Quick Charge)
lCheck battery type and determine the specified current using the table shown above.
lAfter starting charging, adjustment of charging current is not necessary.
CAUTION:
lDo not use quick charge method on a battery whose specific gravity is less than 1.100.
lSet initial charging current to value specified in Fig. 6. If charger is not capable of producing spec-
ified current value, set its charging current as close to that value as possible.
lKeep battery away from open flame while it is being charged.
lWhen connecting charger, connect leads first, then turn on charger. Do not turn on charger first,
as this may cause a spark.
lBe careful of a rise in battery temperature because a large current flow is required during quick-
charge operation.
If battery temperature rises above 55°C(131°F), stop charging. Always charge battery when its
temperature is below 55°C(131°F).
lDo not exceed the charging time specified in Fig. 6, because charging battery over the charging
time can cause deterioration of the battery.
*.SC-8
SEL760W
BAT-
TERY
TYPE
28B19R(L)
34B19R(L)
46B24R(L)
55B24R(L)
50D23R(L)
55D23R(L)
65D26R(L)
80D26R(L)
025 [YUASA type code]
027 [YUASA type code]
063 [YUASA type code]
067 [YUASA type code]
096 [YUASA type code]
065 [YUASA type code]
075 [YUASA type code]
L2/580L [EXIDE type code]
096L [YUASA type code]
010S [YUASA type code]
L3/760L [EXIDE type code]
75D31R(L)
95D31R(L)
115D31R(L)
110D26R(L)
95E41R(L)
130E41R(L)
CUR-
RENT [A]10 (A) 15 (A) 20 (A) 25 (A) 30 (A)40
(A)
CONVERTED SPECIFIC GRAVITY
1.100
-
1.1302.5 hours
1.130
-
1.1602.0 hours
1.160
-
1.1901.5 hours
1.190
-
1.2201.0 hours
Above
1.2200.75 hours (45 min.)
Page 2846 of 3171
BATTERY
SC-13
C
D
E
F
G
H
I
J
L
MA
B
SC
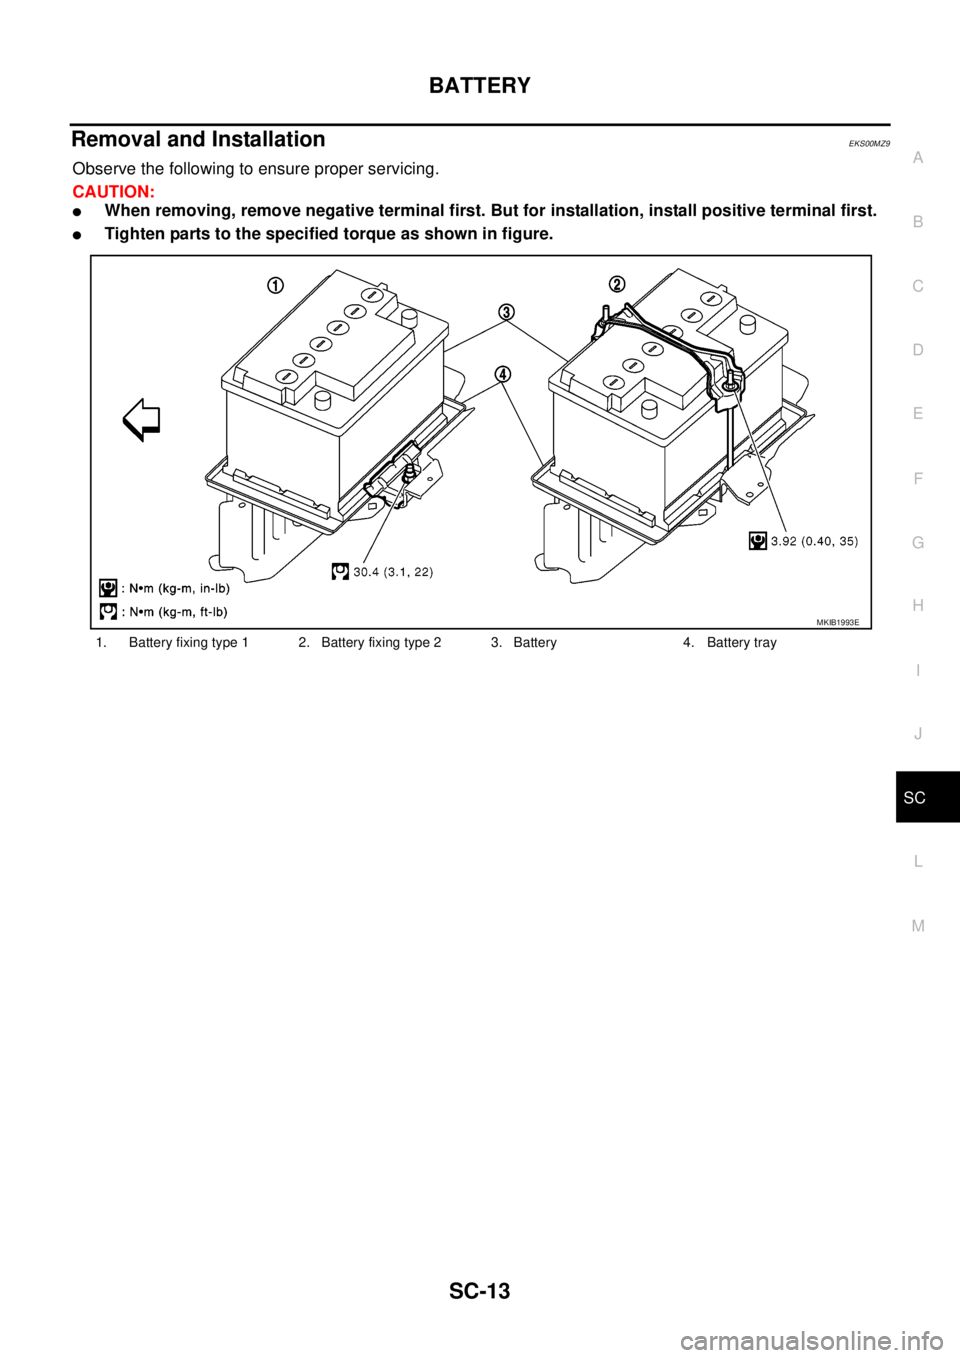
Removal and InstallationEKS00MZ9
Observethefollowingtoensureproperservicing.
CAUTION:
lWhen removing, remove negative terminal first. But for installation, install positive terminal first.
lTighten parts to the specified torque as shown in figure.
1. Battery fixing type 1 2. Battery fixing type 2 3. Battery 4. Battery tray
MKIB1993E
Page 2847 of 3171
SC-14
CHARGING SYSTEM
CHARGING SYSTEM
PFP:00011
System DescriptionEKS00MZA
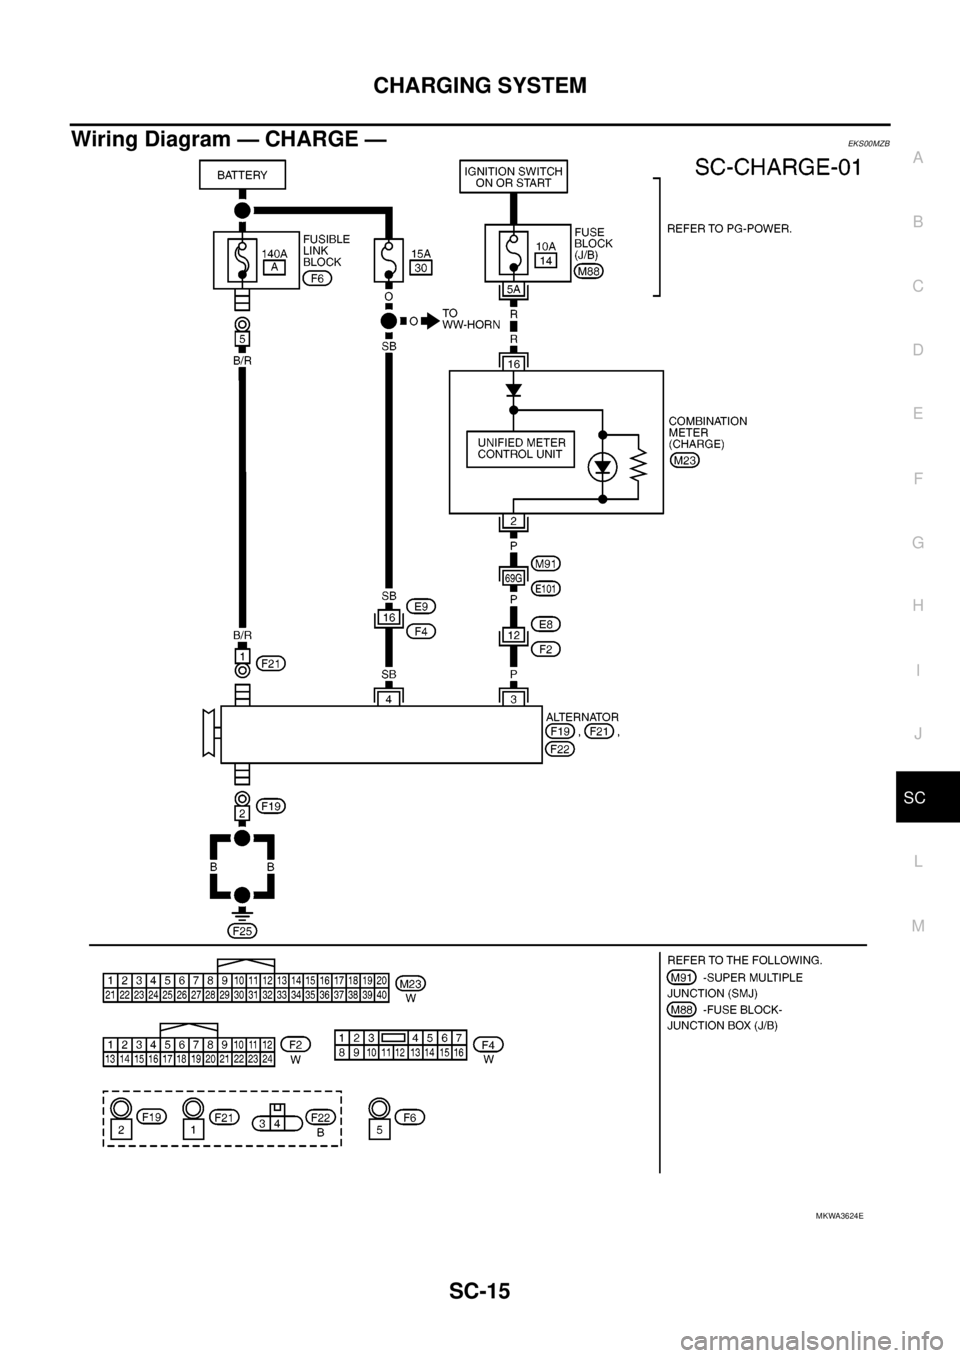
The alternator provides DC voltage to operate the vehicle's electrical system and to keep the battery charged.
The voltage output is controlled by the IC regulator.
Power is supplied at all times to alternator terminal 4 through:
l15A fuse (No. 30, located in the fuse and fusible link box).
Terminal 1 supplies power to charge the battery and operate the vehicle's electrical system. Output voltage is
controlled by the IC regulator at terminal 4 detecting the input voltage. The charging circuit is protected by the
140A fusible link (letter "A", located in the fuse and fusible link box) .
The alternator is grounded to the engine block.
With the ignition switch in the ON or START position, power is supplied
l10A fuse [No. 14, located in the fuse block (J/B)]
lto combination meter terminal 16 for the charge warning lamp.
Ground is supplied With power and ground supplied
lto terminal 2 of the combination meter
lthrough terminal 3 of the alternator.
If the charge warning lamp illuminates with the engine running, a fault is indicated.
The charge warning lamp will illuminate. When the alternator is providing sufficient voltage with the engine
running, the ground is opened and the charge warning lamp will go off.
Page 2848 of 3171
CHARGING SYSTEM
SC-15
C
D
E
F
G
H
I
J
L
MA
B
SC
Wiring Diagram — CHARGE —EKS00MZB
MKWA3624E
Page 2849 of 3171
SC-16
CHARGING SYSTEM
Trouble Diagnosis
EKS00MZD
DIAGNOSIS PROCEDURE
1. Check malfunction symptoms or customer's remarks.
2. Perform pre-diagnosis inspection. Refer toSC-16, "
PRE-DIAGNOSIS INSPECTION".
3. Perform trouble diagnosis for each trouble symptom. Refer toSC-16, "
DIAGNOSIS CHART BY SYMP-
TOM"
4. Repair or replace parts indicated inspection flow based on the charge warning lamp. Refer toSC-16,
"INSPECTION FLOW BY CHARGE WARNING LAMP".
5. End
PRE-DIAGNOSIS INSPECTION
1. Perform alternator belt inspection. Refer toEM-12, "DRIVE BELTS".
2. Inspect battery.
3. Check alternator terminal 1 for loose or improper connection.
4. Check alternator connector 4 and 3 terminals for loose connection, disconnection and bend.
5. Check connecting condition of harness for charging system harness (fusible link terminal and battery ter-
minal).
6. After performing 1 to 5 above, go to trouble diagnosis for symptoms. Refer toSC-16, "
DIAGNOSIS
CHART BY SYMPTOM".
DIAGNOSIS CHART BY SYMPTOM
INSPECTION FLOW BY CHARGE WARNING LAMP
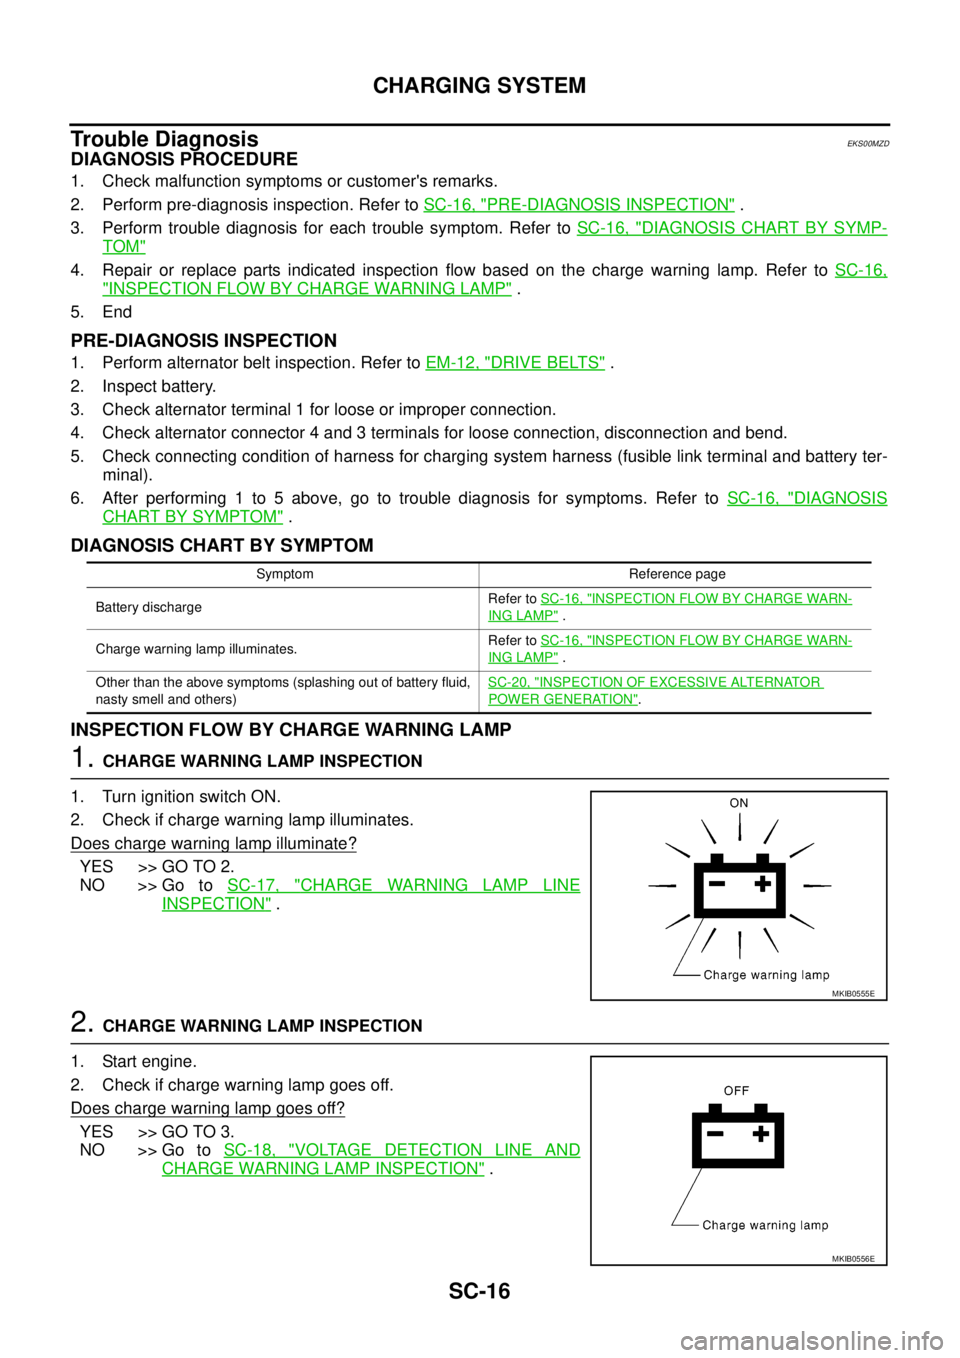
1.CHARGE WARNING LAMP INSPECTION
1. Turn ignition switch ON.
2. Check if charge warning lamp illuminates.
Does charge warning lamp illuminate?
YES >> GO TO 2.
NO >> Go toSC-17, "
CHARGE WARNING LAMP LINE
INSPECTION".
2.CHARGE WARNING LAMP INSPECTION
1. Start engine.
2. Check if charge warning lamp goes off.
Does charge warning lamp goes off?
YES >> GO TO 3.
NO >> Go toSC-18, "
VOLTAGE DETECTION LINE AND
CHARGE WARNING LAMP INSPECTION".
Symptom Reference page
Battery dischargeRefer toSC-16, "
INSPECTION FLOW BY CHARGE WARN-
ING LAMP".
Charge warning lamp illuminates.Refer toSC-16, "
INSPECTION FLOW BY CHARGE WARN-
ING LAMP".
Other than the above symptoms (splashing out of battery fluid,
nasty smell and others)SC-20, "
INSPECTION OF EXCESSIVE ALTERNATOR
POWER GENERATION".
MKIB0555E
MKIB0556E
Page 2850 of 3171
CHARGING SYSTEM
SC-17
C
D
E
F
G
H
I
J
L
MA
B
SC
3.CHARGE WARNING LAMP INSPECTION
1. Set engine speed at 2,500 rpm.
2. Check if charge warning lamp illuminates.
Does charge warning lamp illuminate?
YES >> Go toSC-20, "INSPECTION OF EXCESSIVE ALTER-
NATOR POWER GENERATION".
NO >> Go toSC-20, "
INSPECTION OF INSUFFICIENT
ALTERNATOR POWER GENERATION".
CHARGE WARNING LAMP LINE INSPECTION
CAUTION:
If open circuit is detected in alternator connector terminal 3, alternator cannot start generating.
INSPECTION PROCEDURE
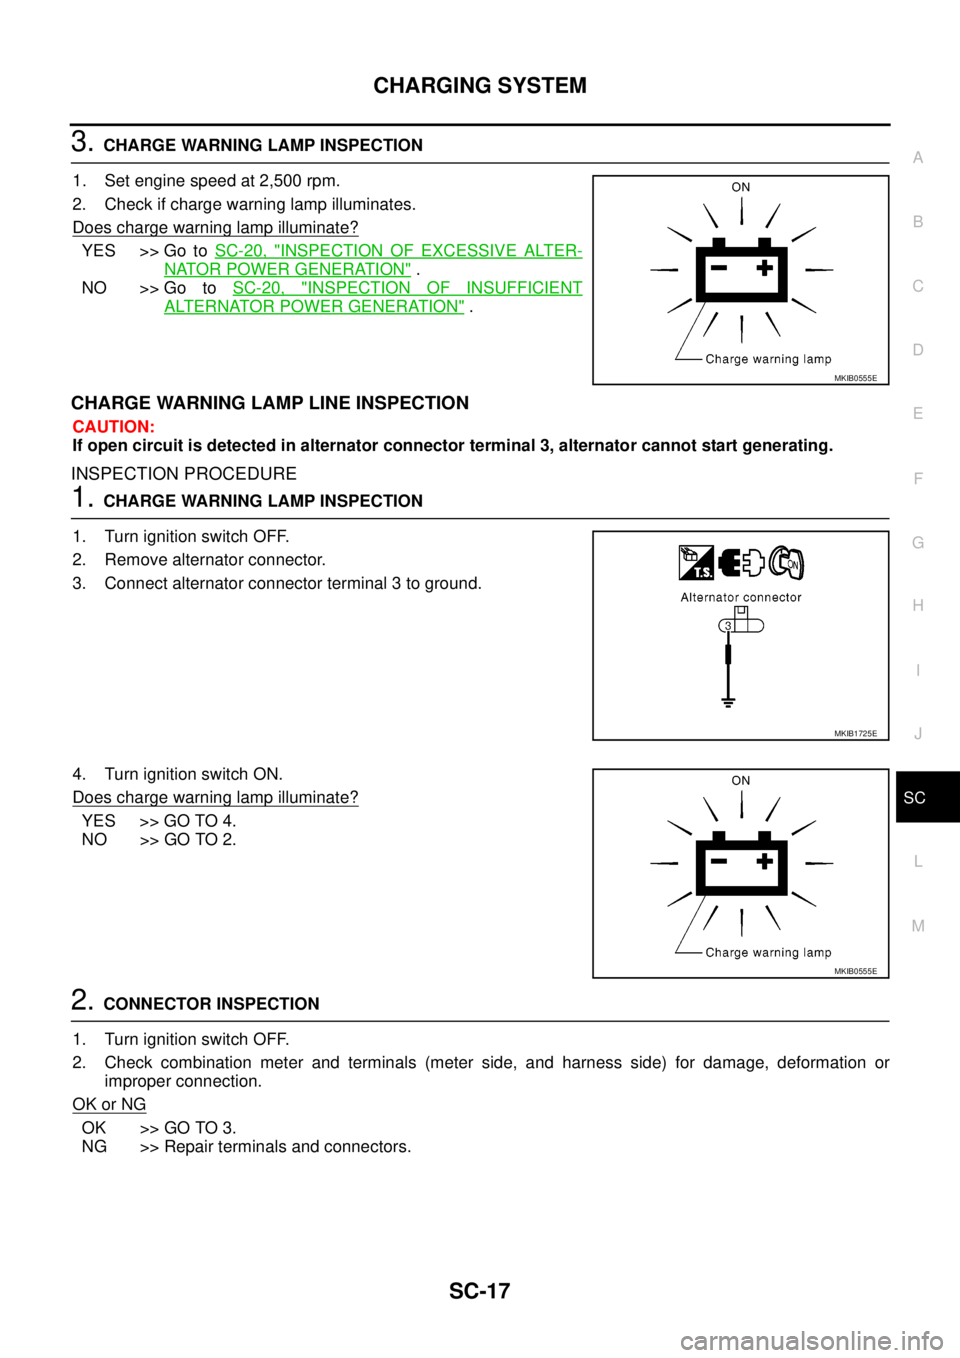
1.CHARGE WARNING LAMP INSPECTION
1. Turn ignition switch OFF.
2. Remove alternator connector.
3. Connect alternator connector terminal 3 to ground.
4. Turn ignition switch ON.
Does charge warning lamp illuminate?
YES >> GO TO 4.
NO >> GO TO 2.
2.CONNECTOR INSPECTION
1. Turn ignition switch OFF.
2. Check combination meter and terminals (meter side, and harness side) for damage, deformation or
improper connection.
OK or NG
OK >> GO TO 3.
NG >> Repair terminals and connectors.
MKIB0555E
MKIB1725E
MKIB0555E