NISSAN NAVARA 2005 Repair Workshop Manual
Manufacturer: NISSAN, Model Year: 2005, Model line: NAVARA, Model: NISSAN NAVARA 2005Pages: 3171, PDF Size: 49.59 MB
Page 3051 of 3171
TF-84
TROUBLE DIAGNOSIS FOR SYSTEM
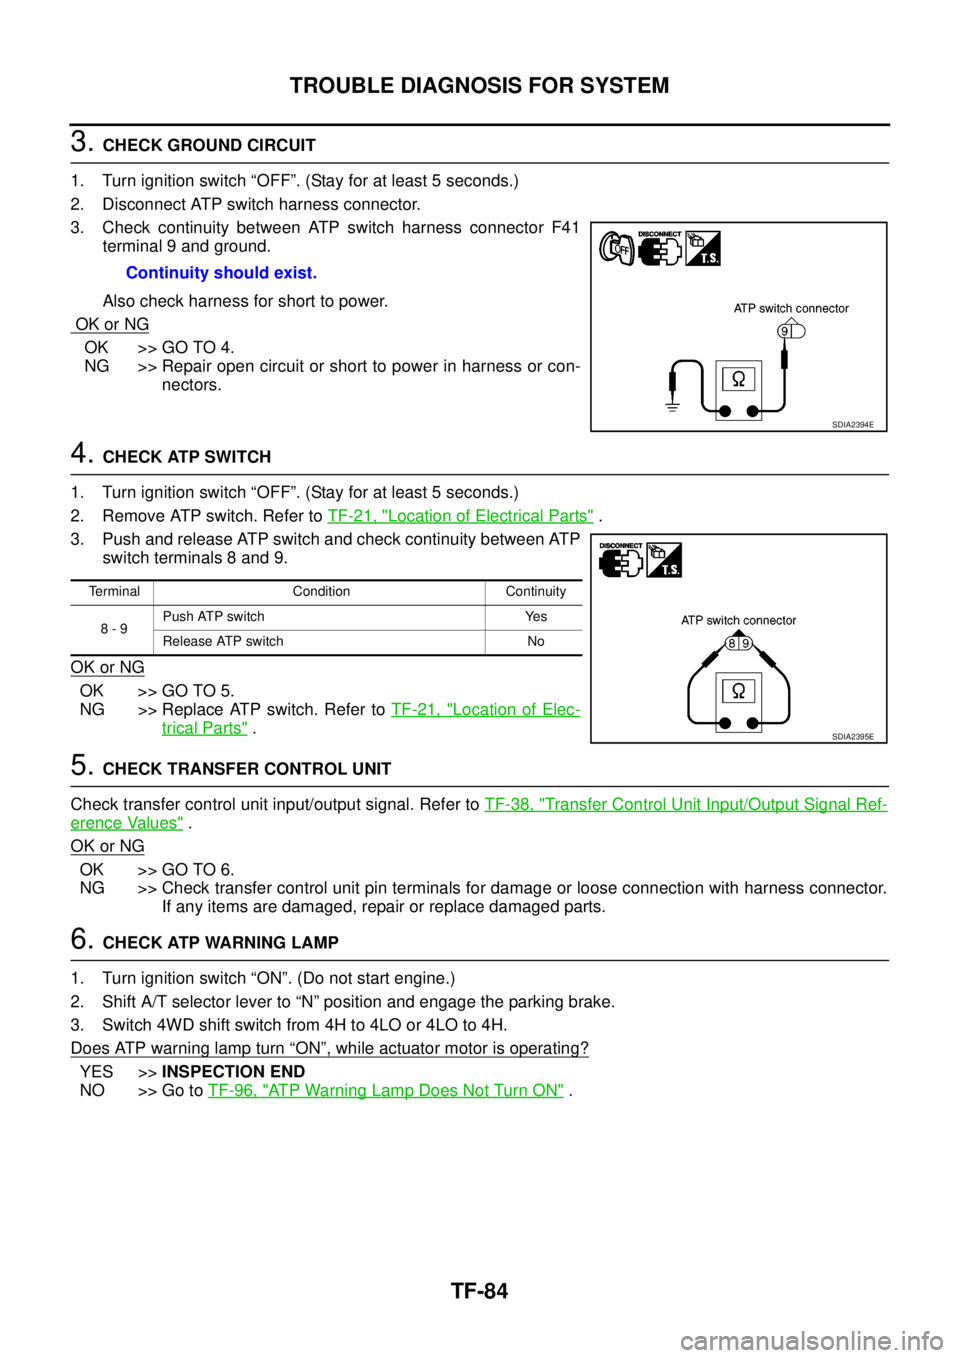
3.CHECK GROUND CIRCUIT
1. Turn ignition switch “OFF”. (Stay for at least 5 seconds.)
2. Disconnect ATP switch harness connector.
3. Check continuity between ATP switch harness connector F41
terminal 9 and ground.
Also check harness for short to power.
OK or NG
OK >> GO TO 4.
NG >> Repair open circuit or short to power in harness or con-
nectors.
4.CHECK ATP SWITCH
1. Turn ignition switch “OFF”. (Stay for at least 5 seconds.)
2. Remove ATP switch. Refer toTF-21, "
Location of Electrical Parts".
3. Push and release ATP switch and check continuity between ATP
switch terminals 8 and 9.
OK or NG
OK >> GO TO 5.
NG >> Replace ATP switch. Refer toTF-21, "
Location of Elec-
trical Parts".
5.CHECK TRANSFER CONTROL UNIT
Check transfer control unit input/output signal. Refer toTF-38, "
Transfer Control Unit Input/Output Signal Ref-
erence Values".
OK or NG
OK >> GO TO 6.
NG >> Check transfer control unit pin terminals for damage or loose connection with harness connector.
If any items are damaged, repair or replace damaged parts.
6.CHECK ATP WARNING LAMP
1. Turn ignition switch “ON”. (Do not start engine.)
2. Shift A/T selector lever to “N” position and engage the parking brake.
3. Switch 4WD shift switch from 4H to 4LO or 4LO to 4H.
Does ATP warning lamp turn
“ON”, while actuator motor is operating?
YES >>INSPECTION END
NO >> Go toTF-96, "
ATP Warning Lamp Does Not Turn ON". Continuity should exist.
SDIA2394E
Terminal Condition Continuity
8-9Push ATP switch Yes
Release ATP switch No
SDIA2395E
Page 3052 of 3171
TROUBLE DIAGNOSIS FOR SYSTEM
TF-85
C
E
F
G
H
I
J
K
L
MA
B
TF
COMPONENT INSPECTION
1. Turn ignition switch “OFF”. (Stay for at least 5 seconds.)
2. Disconnect ATP switch harness connector.
3. Remove ATP switch. Refer toTF-21, "
Location of Electrical Parts".
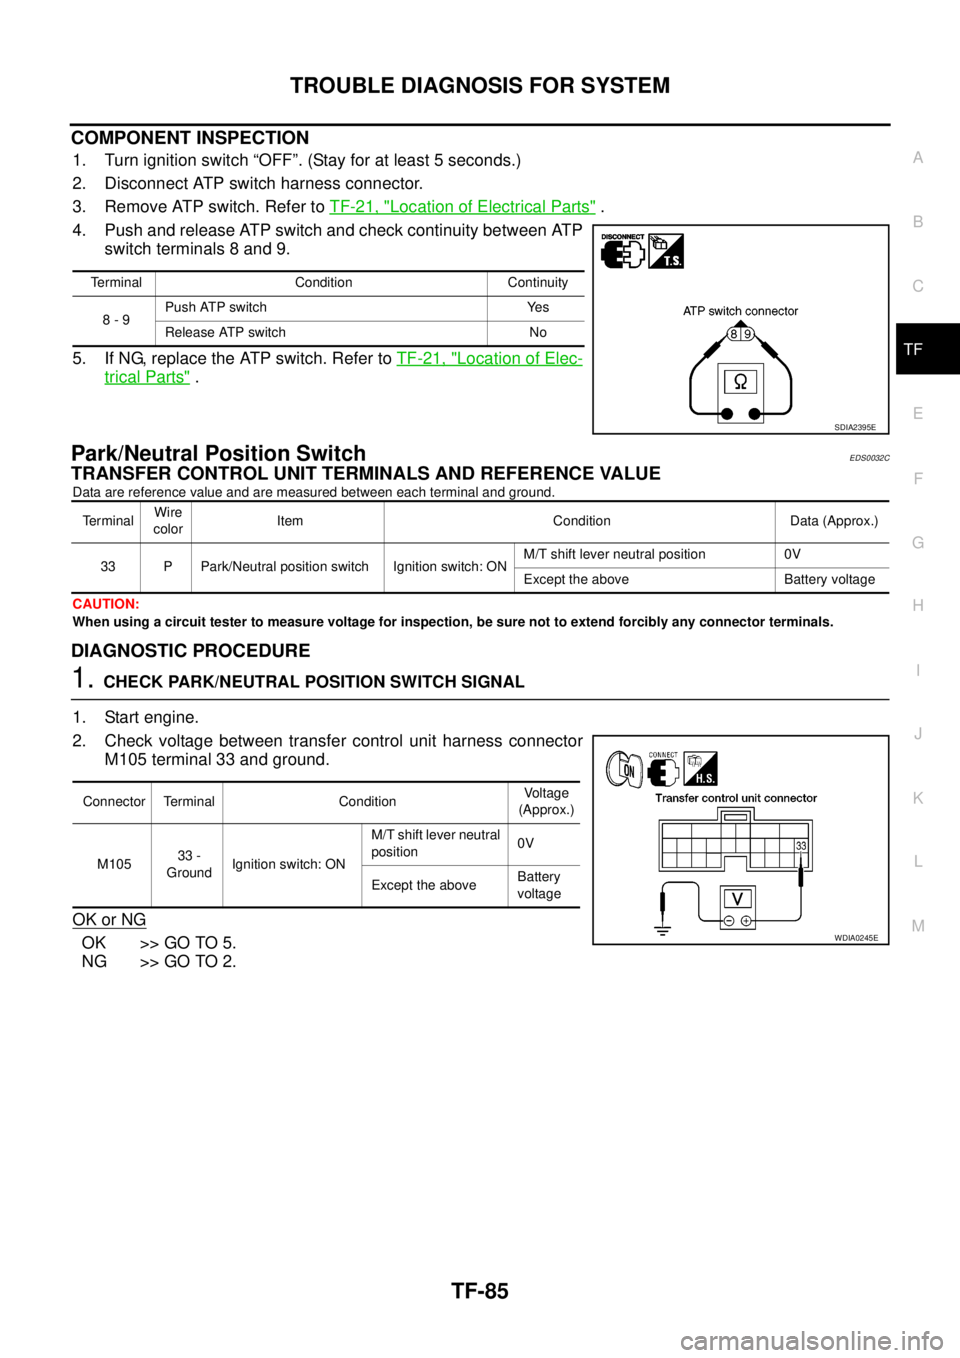
4. Push and release ATP switch and check continuity between ATP
switch terminals 8 and 9.
5. If NG, replace the ATP switch. Refer toTF-21, "
Location of Elec-
trical Parts".
Park/Neutral Position SwitchEDS0032C
TRANSFER CONTROL UNIT TERMINALS AND REFERENCE VALUE
Data are reference value and are measured between each terminal and ground.
CAUTION:
When using a circuit tester to measure voltage for inspection, be sure not to extend forcibly any connector terminals.
DIAGNOSTIC PROCEDURE
1.CHECK PARK/NEUTRAL POSITION SWITCH SIGNAL
1. Start engine.
2. Check voltage between transfer control unit harness connector
M105 terminal 33 and ground.
OK or NG
OK >> GO TO 5.
NG >> GO TO 2.
Terminal Condition Continuity
8-9Push ATP switch Yes
Release ATP switch No
SDIA2395E
TerminalWire
colorItem Condition Data (Approx.)
33 P Park/Neutral position switch Ignition switch: ONM/T shift lever neutral position 0V
Except the above Battery voltage
Connector Terminal ConditionVoltage
(Approx.)
M10533 -
GroundIgnition switch: ONM/T shift lever neutral
position0V
Except the aboveBattery
voltage
WDIA0245E
Page 3053 of 3171
TF-86
TROUBLE DIAGNOSIS FOR SYSTEM
2.CHECK HARNESS BETWEEN TRANSFER CONTROL UNIT AND PARK/NEUTRAL POSITION
SWITCH
1. Turn ignition switch “OFF”. (Stay for at least 5 seconds.)
2. Disconnect transfer control unit harness connector and the park/neutral position switch harness connec-
tor.
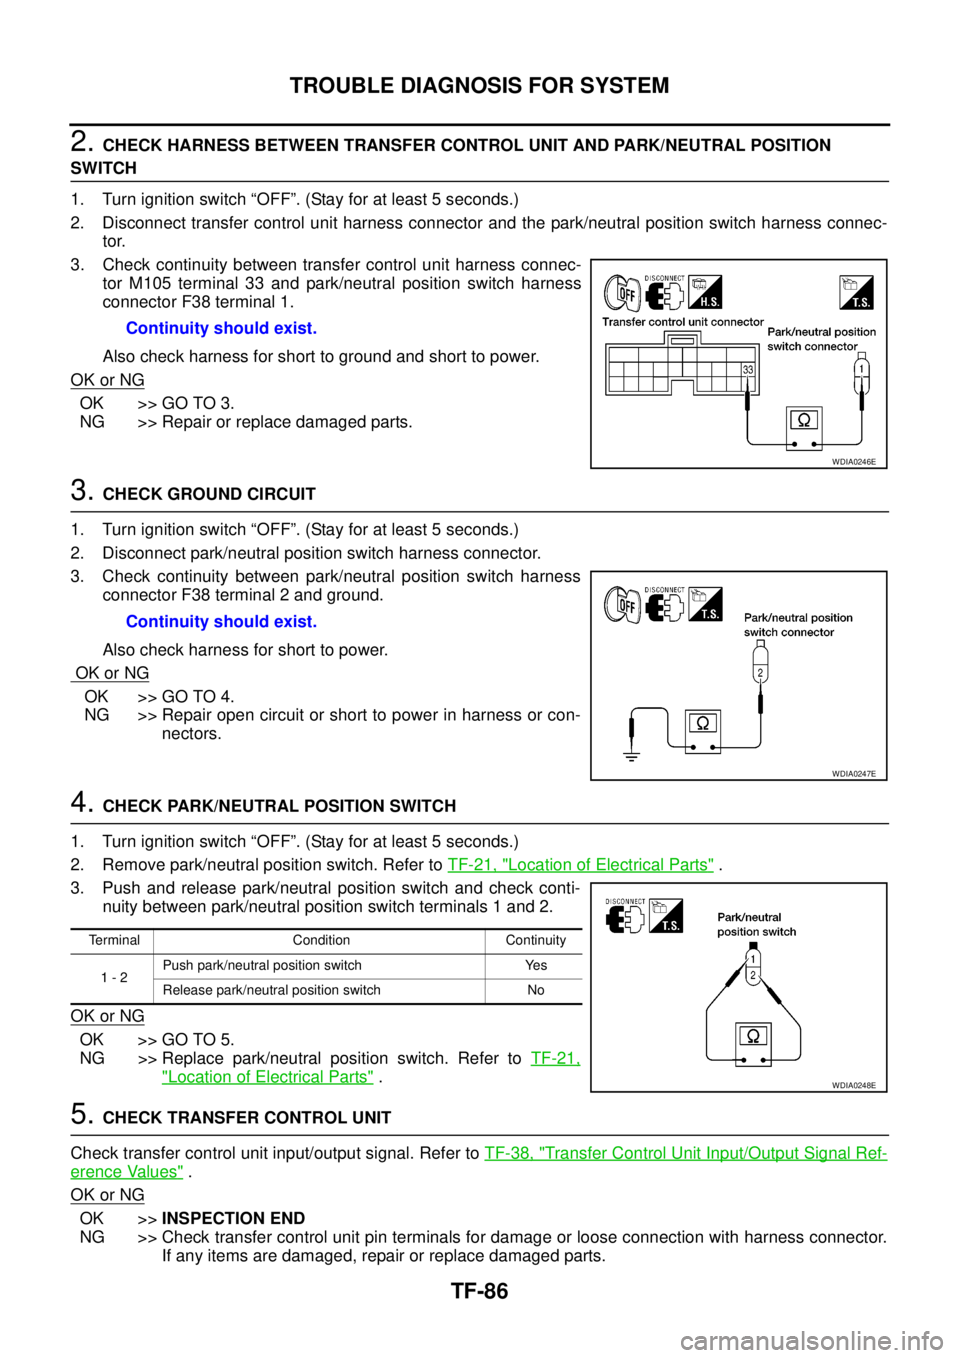
3. Check continuity between transfer control unit harness connec-
tor M105 terminal 33 and park/neutral position switch harness
connector F38 terminal 1.
Also check harness for short to ground and short to power.
OK or NG
OK >> GO TO 3.
NG >> Repair or replace damaged parts.
3.CHECK GROUND CIRCUIT
1. Turn ignition switch “OFF”. (Stay for at least 5 seconds.)
2. Disconnect park/neutral position switch harness connector.
3. Check continuity between park/neutral position switch harness
connector F38 terminal 2 and ground.
Also check harness for short to power.
OK or NG
OK >> GO TO 4.
NG >> Repair open circuit or short to power in harness or con-
nectors.
4.CHECK PARK/NEUTRAL POSITION SWITCH
1. Turn ignition switch “OFF”. (Stay for at least 5 seconds.)
2. Remove park/neutral position switch. Refer toTF-21, "
Location of Electrical Parts".
3. Push and release park/neutral position switch and check conti-
nuity between park/neutral position switch terminals 1 and 2.
OK or NG
OK >> GO TO 5.
NG >> Replace park/neutral position switch. Refer toTF-21,
"Location of Electrical Parts".
5.CHECK TRANSFER CONTROL UNIT
Check transfer control unit input/output signal. Refer toTF-38, "
Transfer Control Unit Input/Output Signal Ref-
erence Values".
OK or NG
OK >>INSPECTION END
NG >> Check transfer control unit pin terminals for damage or loose connection with harness connector.
If any items are damaged, repair or replace damaged parts. Continuity should exist.
WDIA0246E
Continuity should exist.
WDIA0247E
Terminal Condition Continuity
1-2Push park/neutral position switch Yes
Release park/neutral position switch No
WDIA0248E
Page 3054 of 3171
TROUBLE DIAGNOSIS FOR SYSTEM
TF-87
C
E
F
G
H
I
J
K
L
MA
B
TF
COMPONENT INSPECTION
1. Turn ignition switch “OFF”. (Stay for at least 5 seconds.)
2. Disconnect neutral position switch harness connector.
3. Remove neutral position switch. Refer toTF-21, "
Location of Electrical Parts".
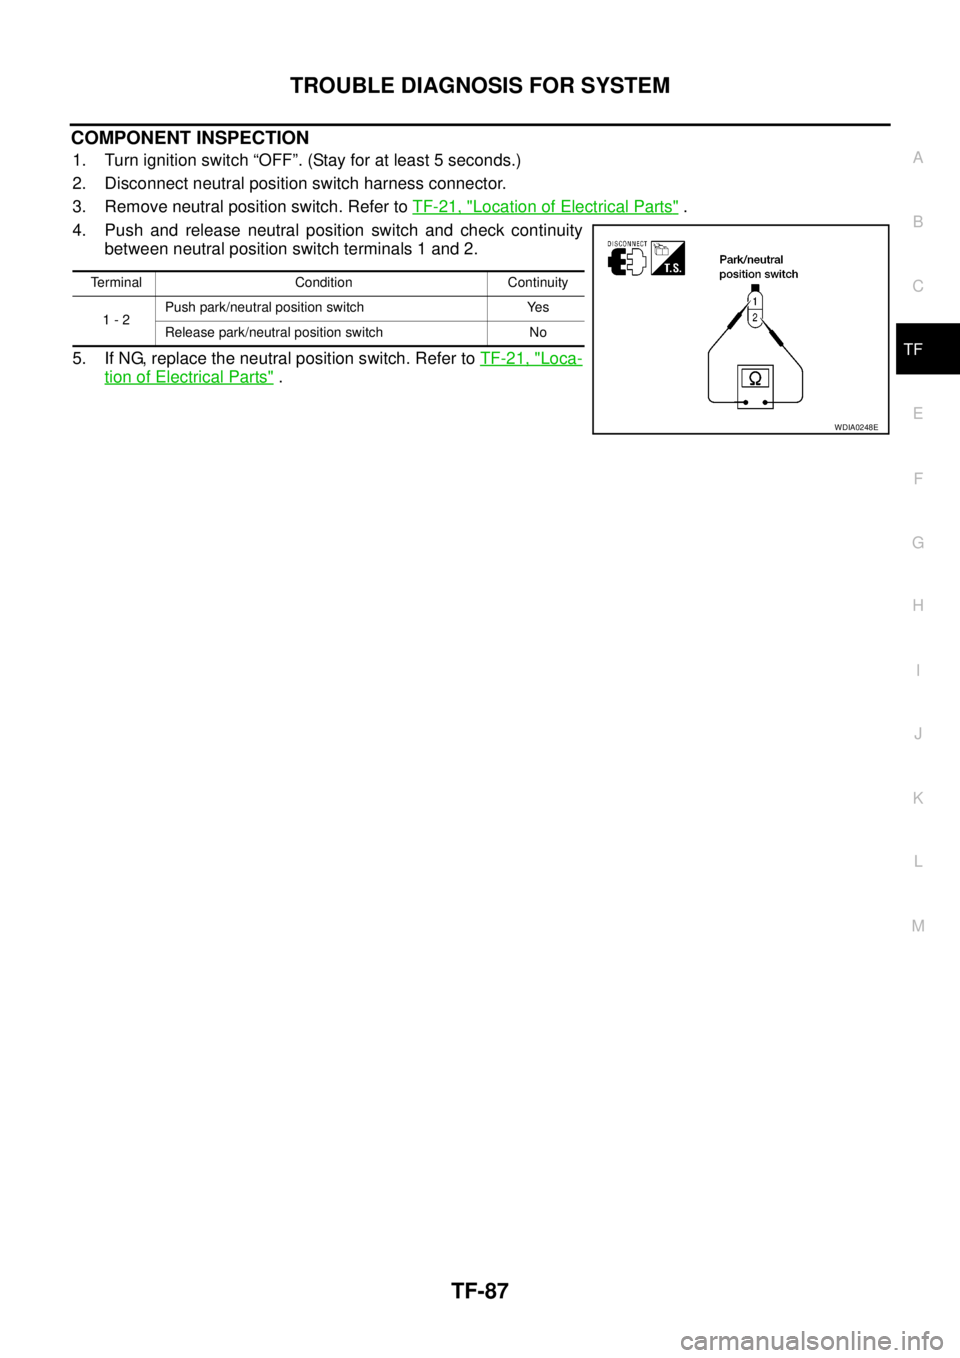
4. Push and release neutral position switch and check continuity
between neutral position switch terminals 1 and 2.
5. If NG, replace the neutral position switch. Refer toTF-21, "
Loca-
tion of Electrical Parts".
Terminal Condition Continuity
1-2Push park/neutral position switch Yes
Release park/neutral position switch No
WDIA0248E
Page 3055 of 3171

TF-88
TROUBLE DIAGNOSIS FOR SYMPTOMS
TROUBLE DIAGNOSIS FOR SYMPTOMS
PFP:00007
4WD Shift Indicator Lamp and 4LO Indicator Lamp Do Not Turn ONEDS0032D
SYMPTOM:
4WD shift indicator lamp and 4LO indicator lamp do not turn ON for approx. 1 second when turning
ignition switch to “ON”.
Page 3056 of 3171
TROUBLE DIAGNOSIS FOR SYMPTOMS
TF-89
C
E
F
G
H
I
J
K
L
MA
B
TF
DIAGNOSTIC PROCEDURE
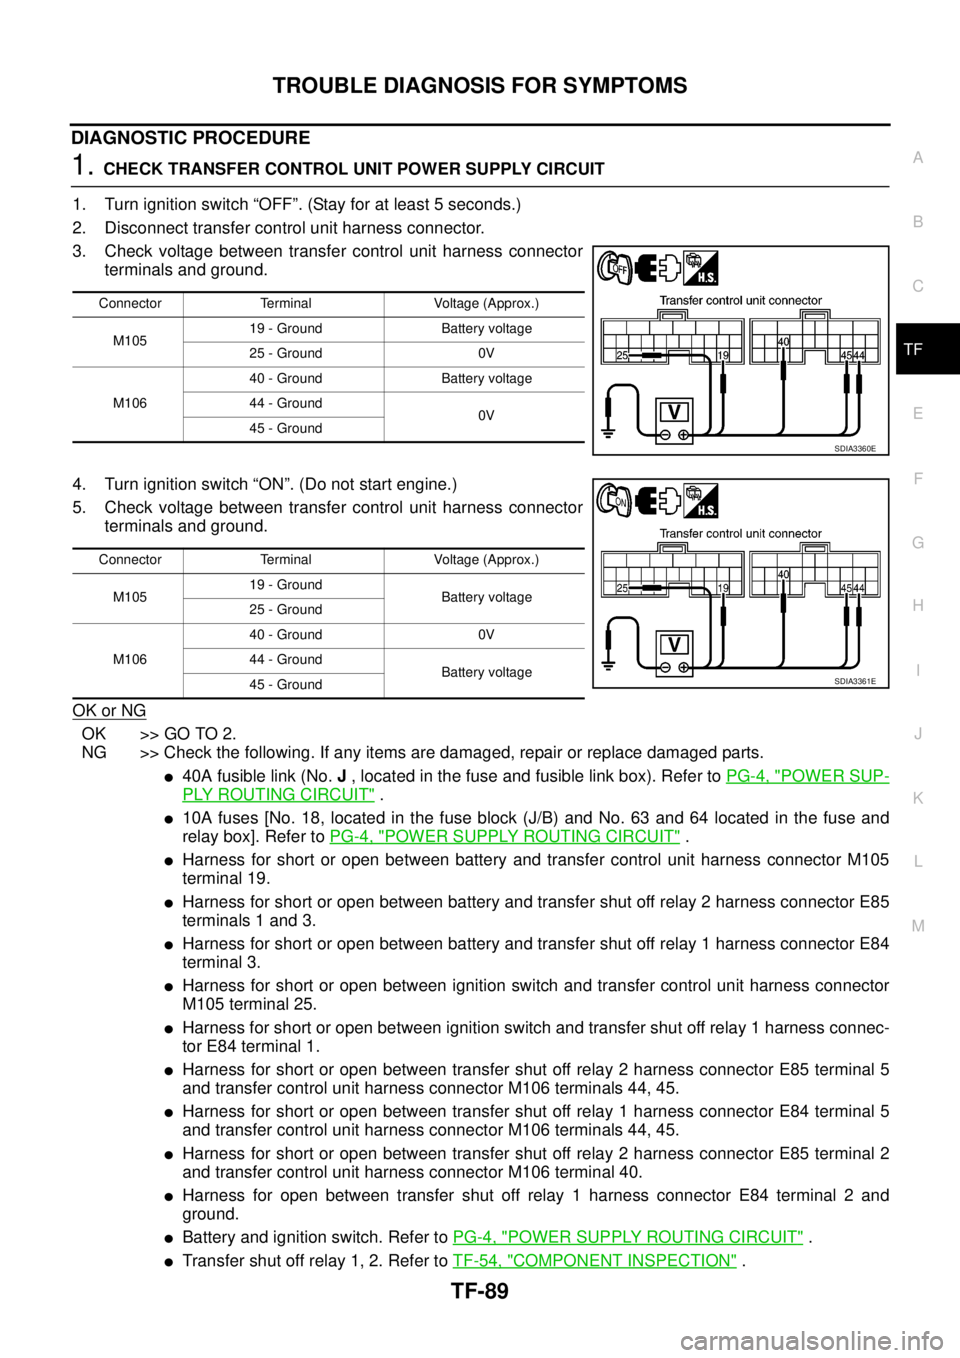
1.CHECK TRANSFER CONTROL UNIT POWER SUPPLY CIRCUIT
1. Turn ignition switch “OFF”. (Stay for at least 5 seconds.)
2. Disconnect transfer control unit harness connector.
3. Check voltage between transfer control unit harness connector
terminals and ground.
4. Turn ignition switch “ON”. (Do not start engine.)
5. Check voltage between transfer control unit harness connector
terminals and ground.
OK or NG
OK >> GO TO 2.
NG >> Check the following. If any items are damaged, repair or replace damaged parts.
l40A fusible link (No.J, located in the fuse and fusible link box). Refer toPG-4, "POWER SUP-
PLY ROUTING CIRCUIT".
l10A fuses [No. 18, located in the fuse block (J/B) and No. 63 and 64 located in the fuse and
relay box]. Refer toPG-4, "
POWER SUPPLY ROUTING CIRCUIT".
lHarness for short or open between battery and transfer control unit harness connector M105
terminal 19.
lHarness for short or open between battery and transfer shut off relay 2 harness connector E85
terminals 1 and 3.
lHarness for short or open between battery and transfer shut off relay 1 harness connector E84
terminal 3.
lHarness for short or open between ignition switch and transfer control unit harness connector
M105 terminal 25.
lHarness for short or open between ignition switch and transfer shut off relay 1 harness connec-
tor E84 terminal 1.
lHarness for short or open between transfer shut off relay 2 harness connector E85 terminal 5
and transfer control unit harness connector M106 terminals 44, 45.
lHarness for short or open between transfer shut off relay 1 harness connector E84 terminal 5
and transfer control unit harness connector M106 terminals 44, 45.
lHarness for short or open between transfer shut off relay 2 harness connector E85 terminal 2
and transfer control unit harness connector M106 terminal 40.
lHarness for open between transfer shut off relay 1 harness connector E84 terminal 2 and
ground.
lBattery and ignition switch. Refer toPG-4, "POWER SUPPLY ROUTING CIRCUIT".
lTransfer shut off relay 1, 2. Refer toTF-54, "COMPONENT INSPECTION".
Connector Terminal Voltage (Approx.)
M10519 - Ground Battery voltage
25 - Ground 0V
M10640 - Ground Battery voltage
44 - Ground
0V
45 - Ground
SDIA3360E
Connector Terminal Voltage (Approx.)
M10519 - Ground
Battery voltage
25 - Ground
M10640 - Ground 0V
44 - Ground
Battery voltage
45 - Ground
SDIA3361E
Page 3057 of 3171
TF-90
TROUBLE DIAGNOSIS FOR SYMPTOMS
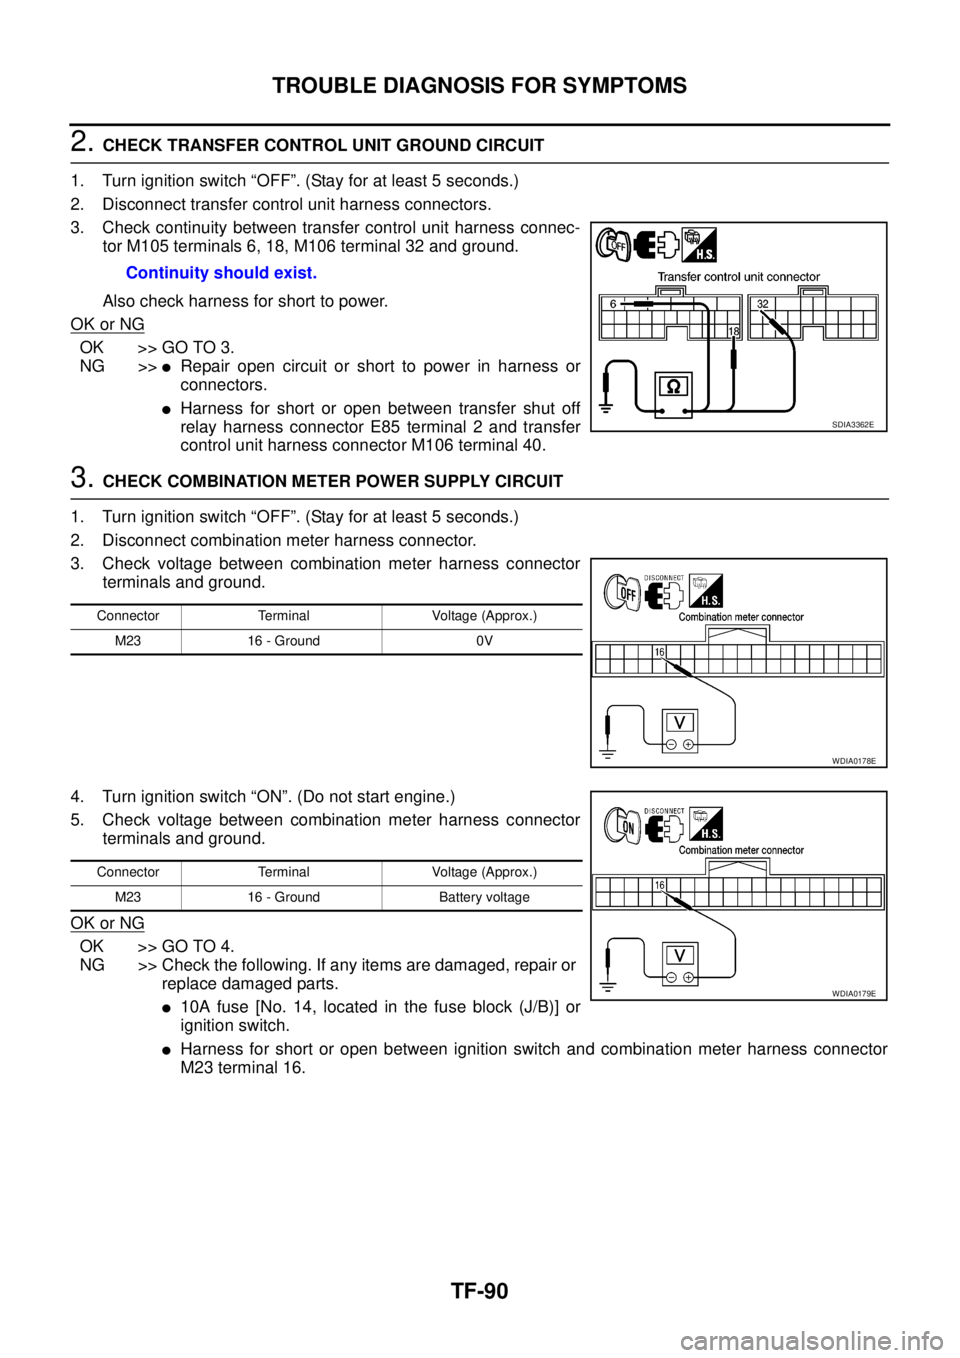
2.CHECK TRANSFER CONTROL UNIT GROUND CIRCUIT
1. Turn ignition switch “OFF”. (Stay for at least 5 seconds.)
2. Disconnect transfer control unit harness connectors.
3. Check continuity between transfer control unit harness connec-
tor M105 terminals 6, 18, M106 terminal 32 and ground.
Also check harness for short to power.
OK or NG
OK >> GO TO 3.
NG >>
lRepair open circuit or short to power in harness or
connectors.
lHarness for short or open between transfer shut off
relay harness connector E85 terminal 2 and transfer
control unit harness connector M106 terminal 40.
3.CHECK COMBINATION METER POWER SUPPLY CIRCUIT
1. Turn ignition switch “OFF”. (Stay for at least 5 seconds.)
2. Disconnect combination meter harness connector.
3. Check voltage between combination meter harness connector
terminals and ground.
4. Turn ignition switch “ON”. (Do not start engine.)
5. Check voltage between combination meter harness connector
terminals and ground.
OK or NG
OK >> GO TO 4.
NG >> Check the following. If any items are damaged, repair or
replace damaged parts.
l10A fuse [No. 14, located in the fuse block (J/B)] or
ignition switch.
lHarness for short or open between ignition switch and combination meter harness connector
M23 terminal 16. Continuity should exist.
SDIA3362E
Connector Terminal Voltage (Approx.)
M23 16 - Ground 0V
WDIA0178E
Connector Terminal Voltage (Approx.)
M23 16 - Ground Battery voltage
WDIA0179E
Page 3058 of 3171
TROUBLE DIAGNOSIS FOR SYMPTOMS
TF-91
C
E
F
G
H
I
J
K
L
MA
B
TF
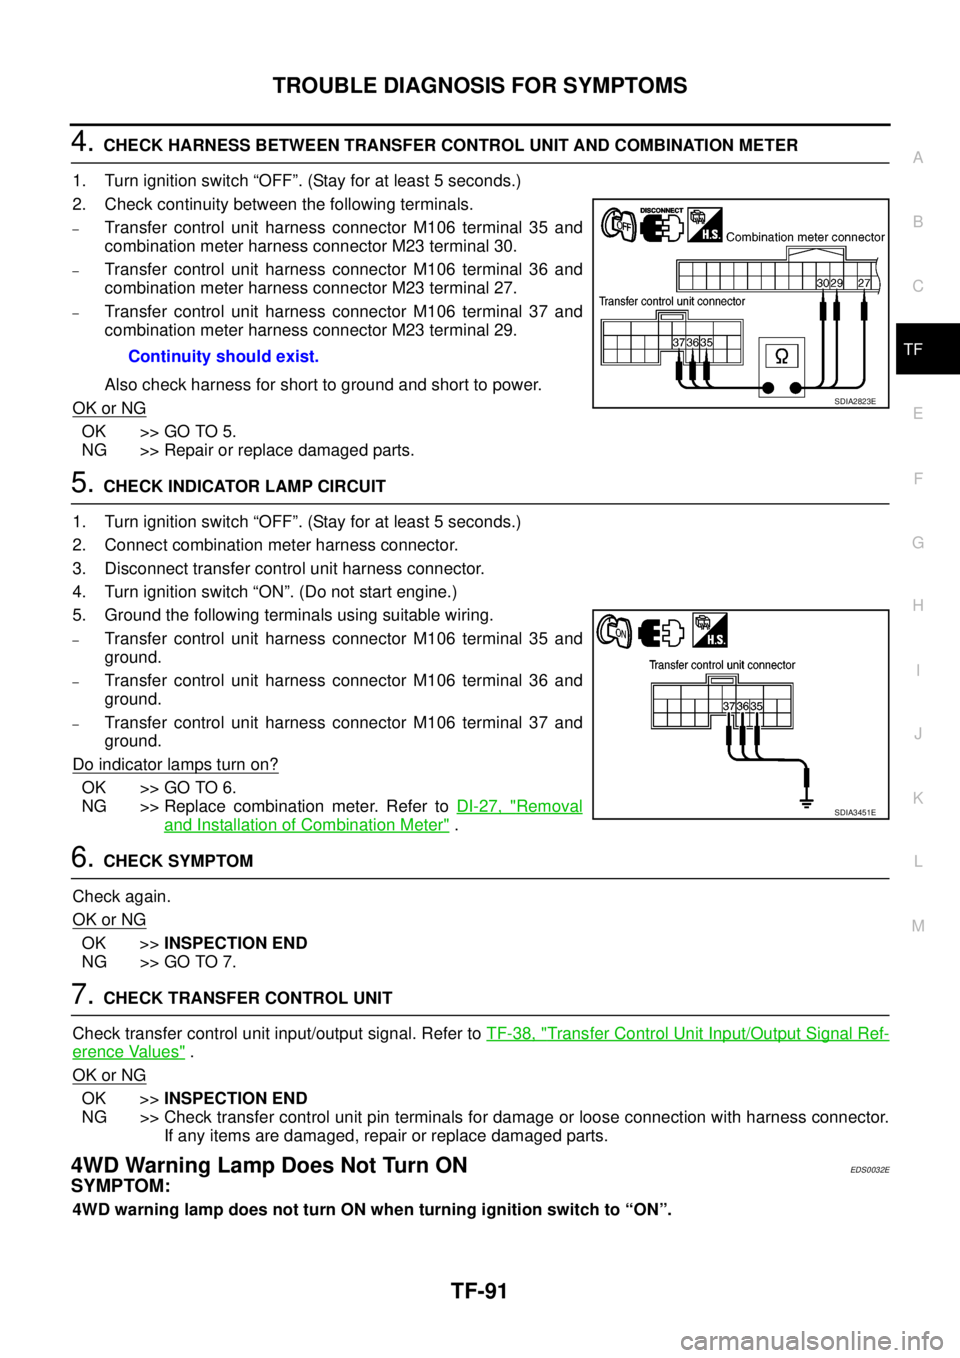
4.CHECK HARNESS BETWEEN TRANSFER CONTROL UNIT AND COMBINATION METER
1. Turn ignition switch “OFF”. (Stay for at least 5 seconds.)
2. Check continuity between the following terminals.
–Transfer control unit harness connector M106 terminal 35 and
combination meter harness connector M23 terminal 30.
–Transfer control unit harness connector M106 terminal 36 and
combination meter harness connector M23 terminal 27.
–Transfer control unit harness connector M106 terminal 37 and
combination meter harness connector M23 terminal 29.
Also check harness for short to ground and short to power.
OK or NG
OK >> GO TO 5.
NG >> Repair or replace damaged parts.
5.CHECK INDICATOR LAMP CIRCUIT
1. Turn ignition switch “OFF”. (Stay for at least 5 seconds.)
2. Connect combination meter harness connector.
3. Disconnect transfer control unit harness connector.
4. Turn ignition switch “ON”. (Do not start engine.)
5. Ground the following terminals using suitable wiring.
–Transfer control unit harness connector M106 terminal 35 and
ground.
–Transfer control unit harness connector M106 terminal 36 and
ground.
–Transfer control unit harness connector M106 terminal 37 and
ground.
Do indicator lamps turn on?
OK >> GO TO 6.
NG >> Replace combination meter. Refer toDI-27, "
Removal
and Installation of Combination Meter".
6.CHECK SYMPTOM
Check again.
OK or NG
OK >>INSPECTION END
NG >> GO TO 7.
7.CHECK TRANSFER CONTROL UNIT
Check transfer control unit input/output signal. Refer toTF-38, "
Transfer Control Unit Input/Output Signal Ref-
erence Values".
OK or NG
OK >>INSPECTION END
NG >> Check transfer control unit pin terminals for damage or loose connection with harness connector.
If any items are damaged, repair or replace damaged parts.
4WD Warning Lamp Does Not Turn ONEDS0032E
SYMPTOM:
4WD warning lamp does not turn ON when turning ignition switch to “ON”.Continuity should exist.
SDIA2823E
SDIA3451E
Page 3059 of 3171
TF-92
TROUBLE DIAGNOSIS FOR SYMPTOMS
DIAGNOSTIC PROCEDURE
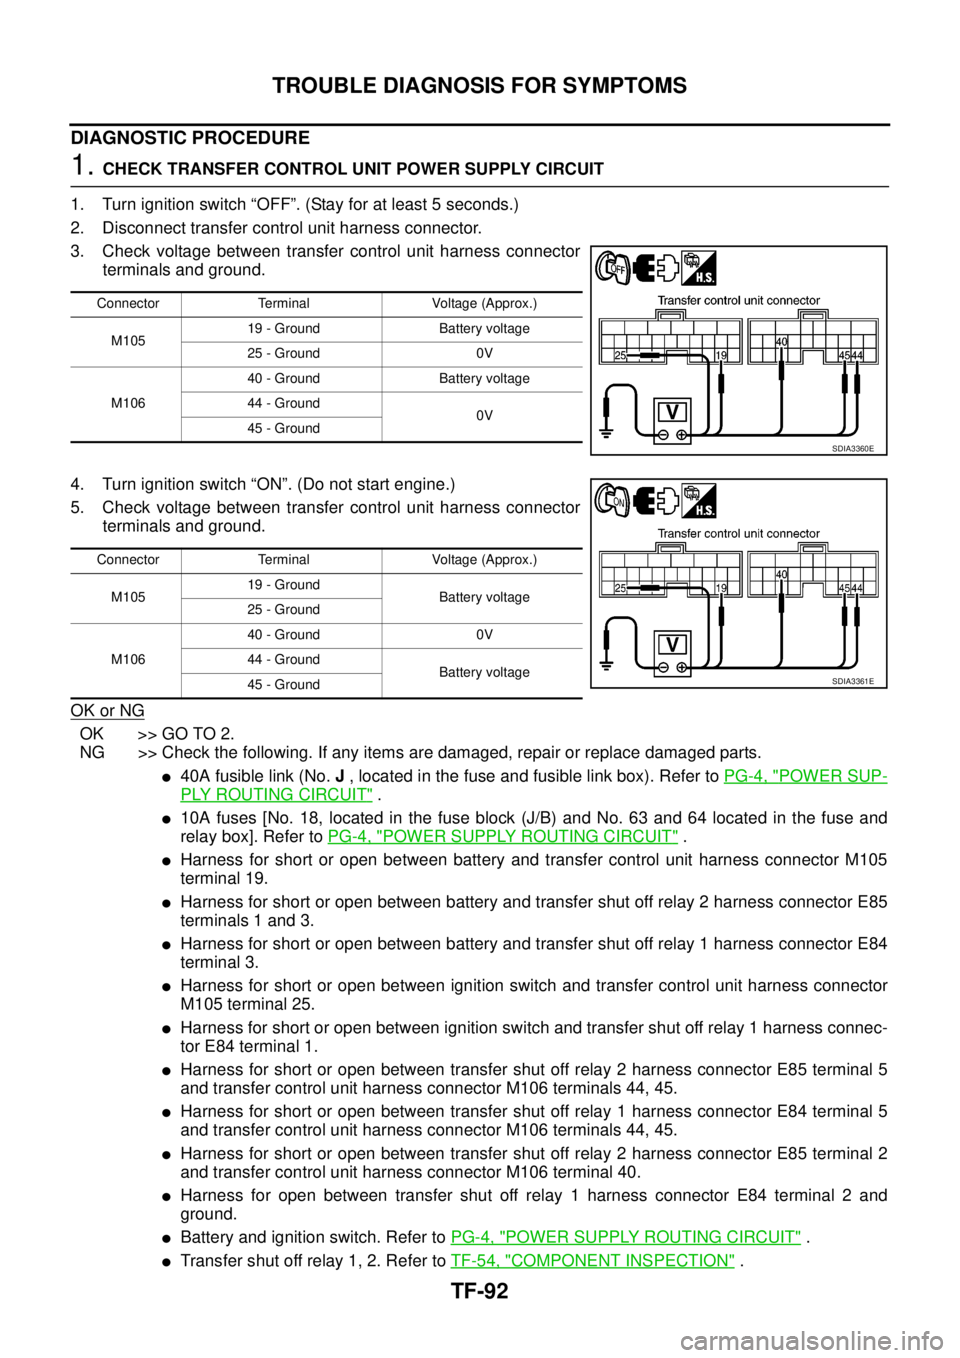
1.CHECK TRANSFER CONTROL UNIT POWER SUPPLY CIRCUIT
1. Turn ignition switch “OFF”. (Stay for at least 5 seconds.)
2. Disconnect transfer control unit harness connector.
3. Check voltage between transfer control unit harness connector
terminals and ground.
4. Turn ignition switch “ON”. (Do not start engine.)
5. Check voltage between transfer control unit harness connector
terminals and ground.
OK or NG
OK >> GO TO 2.
NG >> Check the following. If any items are damaged, repair or replace damaged parts.
l40A fusible link (No.J, located in the fuse and fusible link box). Refer toPG-4, "POWER SUP-
PLY ROUTING CIRCUIT".
l10A fuses [No. 18, located in the fuse block (J/B) and No. 63 and 64 located in the fuse and
relay box]. Refer toPG-4, "
POWER SUPPLY ROUTING CIRCUIT".
lHarness for short or open between battery and transfer control unit harness connector M105
terminal 19.
lHarness for short or open between battery and transfer shut off relay 2 harness connector E85
terminals 1 and 3.
lHarness for short or open between battery and transfer shut off relay 1 harness connector E84
terminal 3.
lHarness for short or open between ignition switch and transfer control unit harness connector
M105 terminal 25.
lHarness for short or open between ignition switch and transfer shut off relay 1 harness connec-
tor E84 terminal 1.
lHarness for short or open between transfer shut off relay 2 harness connector E85 terminal 5
and transfer control unit harness connector M106 terminals 44, 45.
lHarness for short or open between transfer shut off relay 1 harness connector E84 terminal 5
and transfer control unit harness connector M106 terminals 44, 45.
lHarness for short or open between transfer shut off relay 2 harness connector E85 terminal 2
and transfer control unit harness connector M106 terminal 40.
lHarness for open between transfer shut off relay 1 harness connector E84 terminal 2 and
ground.
lBattery and ignition switch. Refer toPG-4, "POWER SUPPLY ROUTING CIRCUIT".
lTransfer shut off relay 1, 2. Refer toTF-54, "COMPONENT INSPECTION".
Connector Terminal Voltage (Approx.)
M10519 - Ground Battery voltage
25 - Ground 0V
M10640 - Ground Battery voltage
44 - Ground
0V
45 - Ground
SDIA3360E
Connector Terminal Voltage (Approx.)
M10519 - Ground
Battery voltage
25 - Ground
M10640 - Ground 0V
44 - Ground
Battery voltage
45 - Ground
SDIA3361E
Page 3060 of 3171
TROUBLE DIAGNOSIS FOR SYMPTOMS
TF-93
C
E
F
G
H
I
J
K
L
MA
B
TF
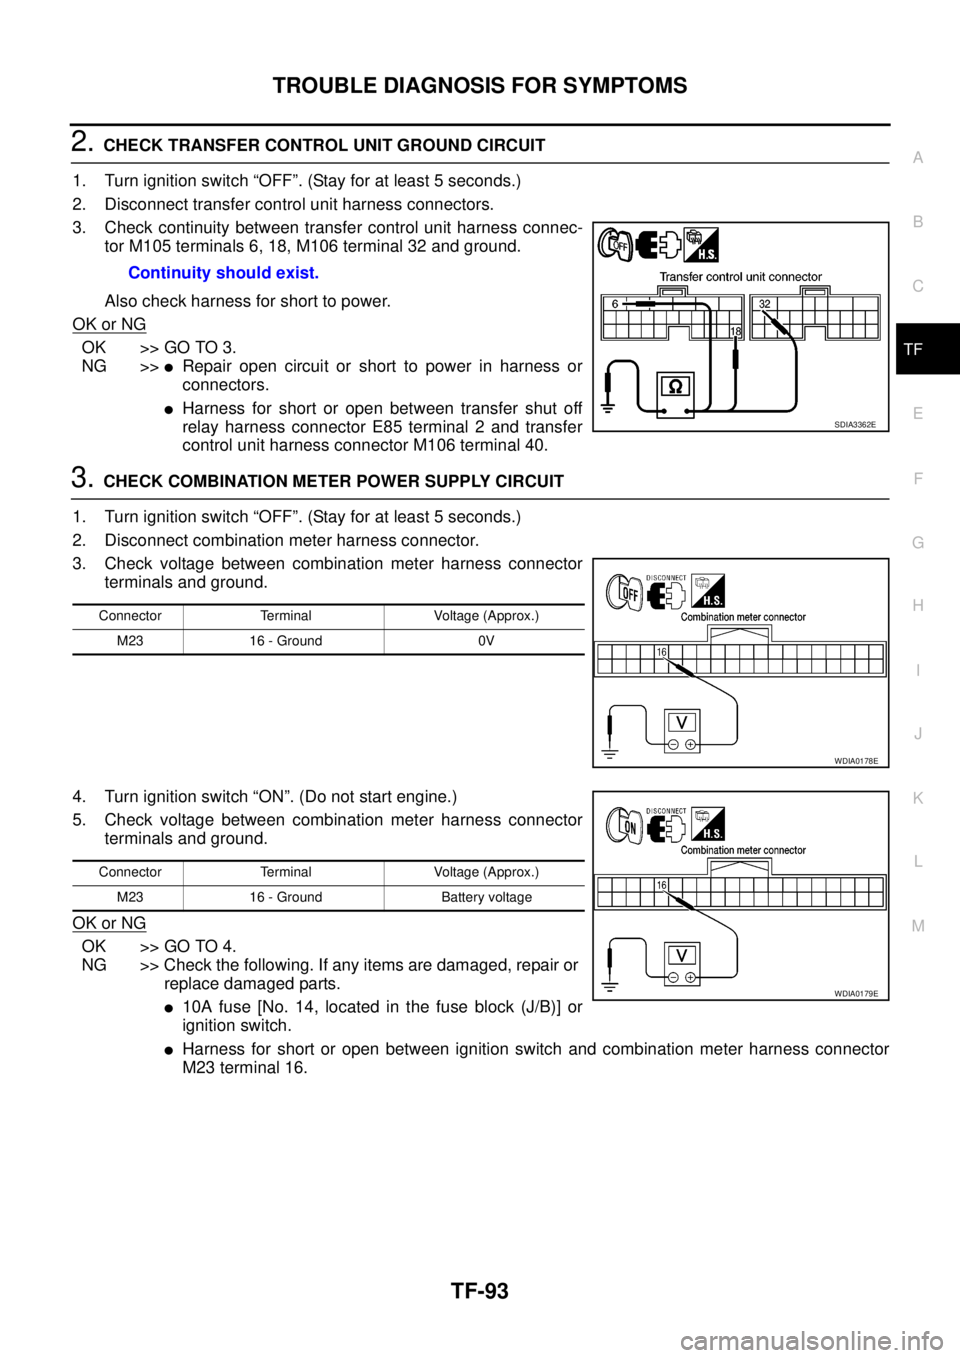
2.CHECK TRANSFER CONTROL UNIT GROUND CIRCUIT
1. Turn ignition switch “OFF”. (Stay for at least 5 seconds.)
2. Disconnect transfer control unit harness connectors.
3. Check continuity between transfer control unit harness connec-
tor M105 terminals 6, 18, M106 terminal 32 and ground.
Also check harness for short to power.
OK or NG
OK >> GO TO 3.
NG >>
lRepair open circuit or short to power in harness or
connectors.
lHarness for short or open between transfer shut off
relay harness connector E85 terminal 2 and transfer
control unit harness connector M106 terminal 40.
3.CHECK COMBINATION METER POWER SUPPLY CIRCUIT
1. Turn ignition switch “OFF”. (Stay for at least 5 seconds.)
2. Disconnect combination meter harness connector.
3. Check voltage between combination meter harness connector
terminals and ground.
4. Turn ignition switch “ON”. (Do not start engine.)
5. Check voltage between combination meter harness connector
terminals and ground.
OK or NG
OK >> GO TO 4.
NG >> Check the following. If any items are damaged, repair or
replace damaged parts.
l10A fuse [No. 14, located in the fuse block (J/B)] or
ignition switch.
lHarness for short or open between ignition switch and combination meter harness connector
M23 terminal 16. Continuity should exist.
SDIA3362E
Connector Terminal Voltage (Approx.)
M23 16 - Ground 0V
WDIA0178E
Connector Terminal Voltage (Approx.)
M23 16 - Ground Battery voltage
WDIA0179E