NISSAN PATHFINDER 2012 R52 / 4.G 06IT Navigation Manual
Manufacturer: NISSAN, Model Year: 2012, Model line: PATHFINDER, Model: NISSAN PATHFINDER 2012 R52 / 4.GPages: 235, PDF Size: 5.14 MB
Page 41 of 235

3 Map settings
Map types........................................................ 3-2
Plan View ..................................................... 3-2
Birdview
TM.................................................... 3-3
Building graphics ........................................... 3-3
Returning to the current vehicle location .................. 3-4
Operating with the touch operation .................... 3-5
Moving a map ................................................... 3-5
Plan View ..................................................... 3-5
Birdview
TM.................................................... 3-7
Changing the scale of a map ................................ 3-9
Operating with the buttons on the control panel .... 3-9
Operating with the center dial .........................3-10Operating with the touch operation
..................3-10
Map scale .................................................. 3-11
Other settings for the map screen ........................3-12
Switching the map view ................................. 3-12
Settings of heading/long range map view ...........3-14
Changing the Birdview
TMangle ....................... 3-16
Operation with split screen display ...................3-18
Looking at information on the map .......................3-19
Displaying landmark icons ..............................3-19
Map scrolling information ...............................3-20
Map symbols. .............................................. 3-22
Page 42 of 235
Two types of map views are available: Plan View
and BirdviewTM.
PLAN VIEW
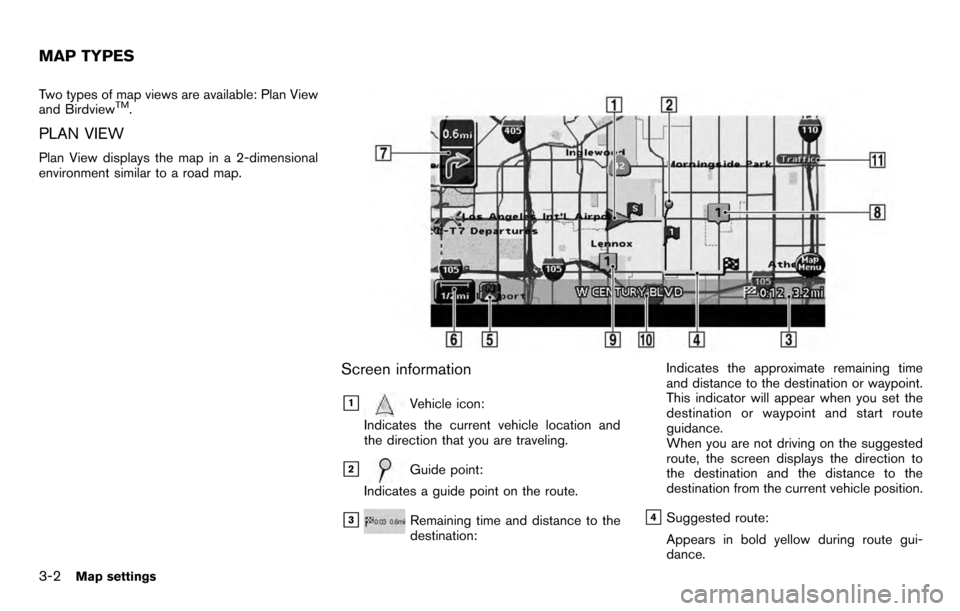
Plan View displays the map in a 2-dimensional
environment similar to a road map.
Screen information
&1Vehicle icon:
Indicates the current vehicle location and
the direction that you are traveling.
&2Guide point:
Indicates a guide point on the route.
&3Remaining time and distance to the
destination: Indicates the approximate remaining time
and distance to the destination or waypoint.
This indicator will appear when you set the
destination or waypoint and start route
guidance.
When you are not driving on the suggested
route, the screen displays the direction to
the destination and the distance to the
destination from the current vehicle position.&4Suggested route:
Appears in bold yellow during route gui-
dance.
MAP TYPES
3-2Map settings
Page 43 of 235
&5/Direction indicator:
Indicates the direction of the map.
Touch the icon to switch the direction of the
map.
&6Scale indicator:
Indicates the scale of the map.
Touch the icon to display the scale bar.
This allows the map scale to be adjusted.
&7Arrow:
Indicates the distance to the next guide
point and the turning direction at that guide
point.
&8Stored location (orange):
Displays the locations that are stored in the
Address Book. You can change the icons
according to your preferences.
&9Avoid Area (green):
Displays the areas to avoid that are stored in
the Address Book with green or blue icons.
During the route search, the route guidance
is performed by searching for a route that
avoids those areas.
&10Street name:
Displays the name of the street that you are
currently driving on.
&11Traffic indicator:
Displays the reception condition of traffic
information transmitted from the provider.
Green: Reception condition is good.
Gray: Reception condition is not good.
No mark: Subscription to XM NavTraffic
®
service is not detected.
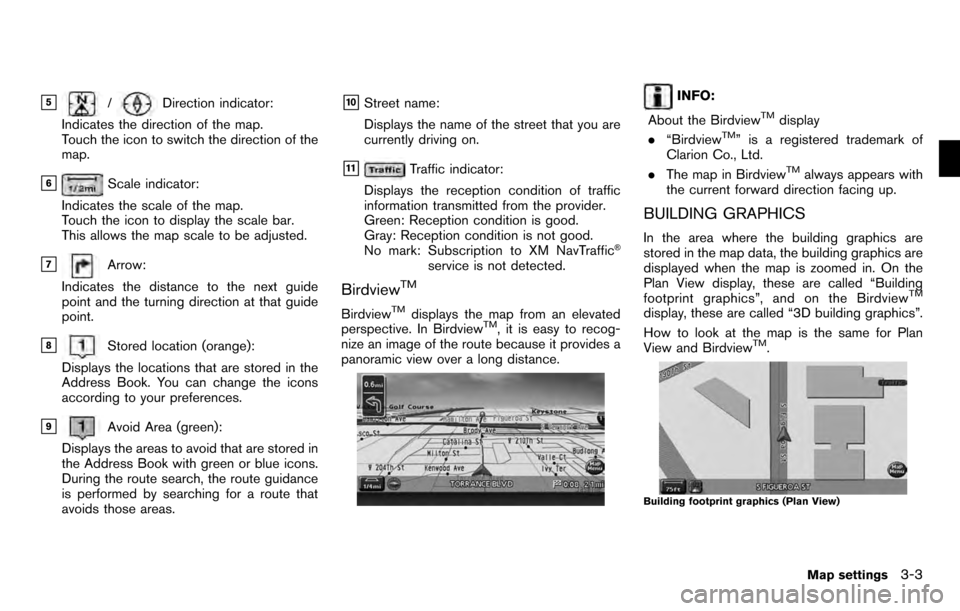
BirdviewTM
BirdviewTMdisplays the map from an elevated
perspective. In BirdviewTM, it is easy to recog-
nize an image of the route because it provides a
panoramic view over a long distance.
INFO:
About the Birdview
TMdisplay
. “BirdviewTM” is a registered trademark of
Clarion Co., Ltd.
. The map in Birdview
TMalways appears with
the current forward direction facing up.
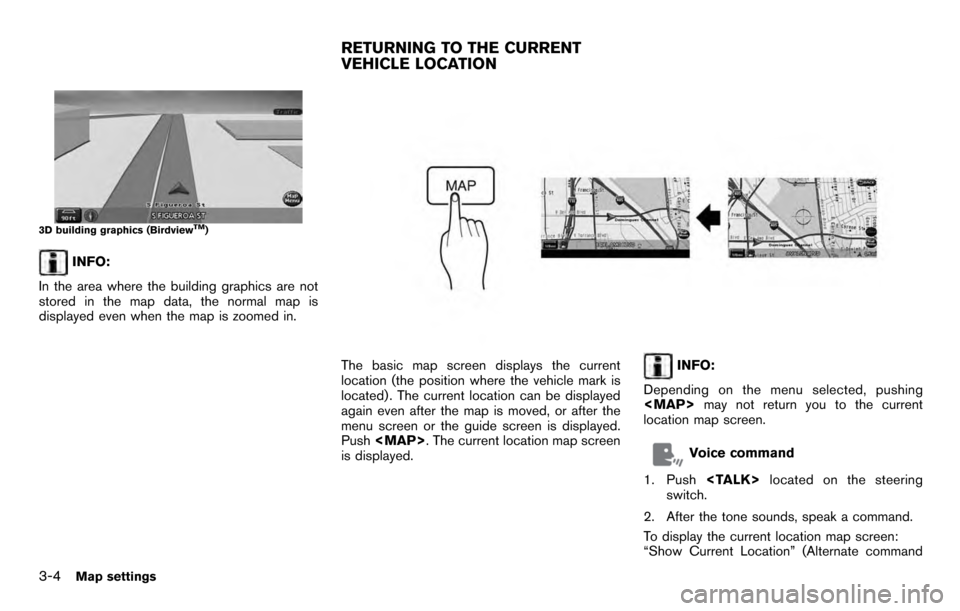
BUILDING GRAPHICS
In the area where the building graphics are
stored in the map data, the building graphics are
displayed when the map is zoomed in. On the
Plan View display, these are called “Building
footprint graphics”, and on the Birdview
TM
display, these are called “3D building graphics”.
How to look at the map is the same for Plan
View and Birdview
TM.
Building footprint graphics (Plan View)
Map settings3-3
Page 44 of 235
3D building graphics (BirdviewTM)
INFO:
In the area where the building graphics are not
stored in the map data, the normal map is
displayed even when the map is zoomed in.
The basic map screen displays the current
location (the position where the vehicle mark is
located) . The current location can be displayed
again even after the map is moved, or after the
menu screen or the guide screen is displayed.
Push
Page 45 of 235
![NISSAN PATHFINDER 2012 R52 / 4.G 06IT Navigation Manual mode)
OPERATING WITH THE TOUCH OP-
ERATION
Touch [BACK] on the map screen to display the
current location map screen.
The operations for moving across the map are
different between Plan View and Birdv NISSAN PATHFINDER 2012 R52 / 4.G 06IT Navigation Manual mode)
OPERATING WITH THE TOUCH OP-
ERATION
Touch [BACK] on the map screen to display the
current location map screen.
The operations for moving across the map are
different between Plan View and Birdv](/img/5/280/w960_280-44.png)
mode)
OPERATING WITH THE TOUCH OP-
ERATION
Touch [BACK] on the map screen to display the
current location map screen.
The operations for moving across the map are
different between Plan View and BirdviewTM.
PLAN VIEW
Operating with the multi-function con-
troller
Push one of the main directional buttons or
additional directional buttons corresponding to
the direction that you want to move across the
map. Hold down the button to continuously
move across the map in that direction.
Once you start moving across the map, thecross pointer appears.
If the map scale is set to 1/8 mile (200 m) or
less, the cross pointer will blink in pink when
positioned on a street, and the street name will
be displayed.
Screen information:&1Cross pointer
&2Distance from the current location to the
cross pointer
MOVING A MAP
Map settings3-5
Page 46 of 235
&3Street name
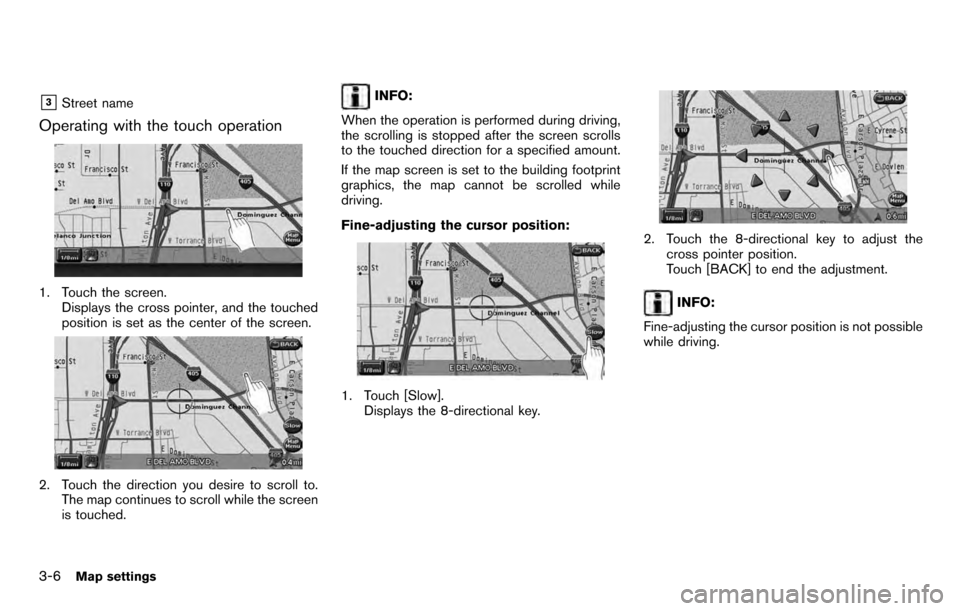
Operating with the touch operation
1. Touch the screen.Displays the cross pointer, and the touched
position is set as the center of the screen.
2. Touch the direction you desire to scroll to.The map continues to scroll while the screen
is touched.
INFO:
When the operation is performed during driving,
the scrolling is stopped after the screen scrolls
to the touched direction for a specified amount.
If the map screen is set to the building footprint
graphics, the map cannot be scrolled while
driving.
Fine-adjusting the cursor position:
1. Touch [Slow]. Displays the 8-directional key.
2. Touch the 8-directional key to adjust the
cross pointer position.
Touch [BACK] to end the adjustment.
INFO:
Fine-adjusting the cursor position is not possible
while driving.
3-6Map settings
Page 47 of 235
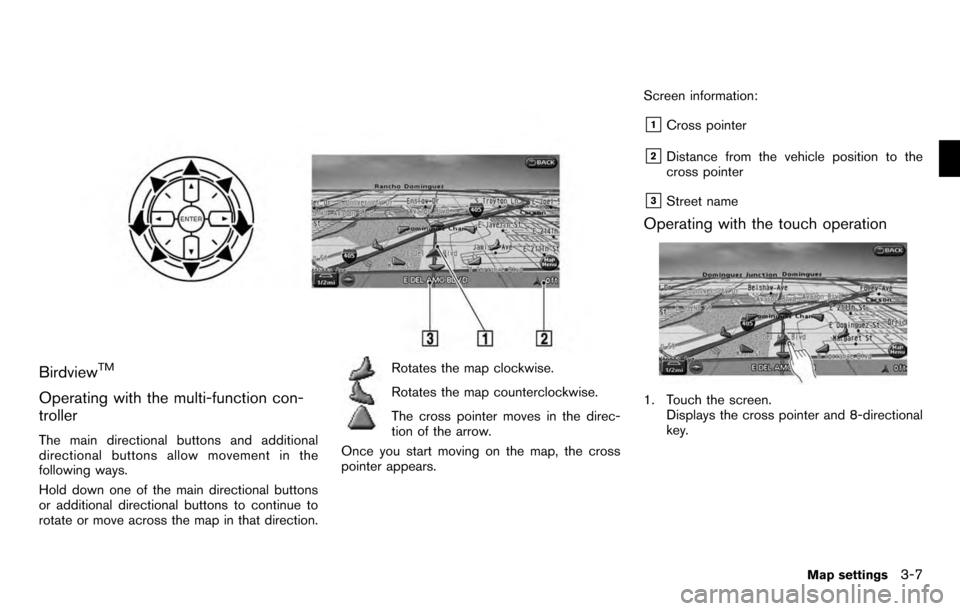
BirdviewTM
Operating with the multi-function con-
troller
The main directional buttons and additional
directional buttons allow movement in the
following ways.
Hold down one of the main directional buttons
or additional directional buttons to continue to
rotate or move across the map in that direction.
Rotates the map clockwise.
Rotates the map counterclockwise.
The cross pointer moves in the direc-
tion of the arrow.
Once you start moving on the map, the cross
pointer appears. Screen information:
&1Cross pointer
&2Distance from the vehicle position to the
cross pointer
&3Street name
Operating with the touch operation
1. Touch the screen.
Displays the cross pointer and 8-directional
key.
Map settings3-7
Page 48 of 235
![NISSAN PATHFINDER 2012 R52 / 4.G 06IT Navigation Manual 2. Touch the direction you desire to scroll to.The map continues to scroll while the screen
is touched.
3. Touch []or[] to change the
direction of the map.
: Rotates the map clockwise.
: Rotates the m NISSAN PATHFINDER 2012 R52 / 4.G 06IT Navigation Manual 2. Touch the direction you desire to scroll to.The map continues to scroll while the screen
is touched.
3. Touch []or[] to change the
direction of the map.
: Rotates the map clockwise.
: Rotates the m](/img/5/280/w960_280-47.png)
2. Touch the direction you desire to scroll to.The map continues to scroll while the screen
is touched.
3. Touch []or[] to change the
direction of the map.
: Rotates the map clockwise.
: Rotates the map counterclockwise.
INFO:
When the operation is performed during driving,
the scrolling is stopped after the screen scrolls
to the touched direction for a specified amount.
If the map scale is set to 180 ft (60 m) or less,
the map cannot be scrolled while driving.
3-8Map settings
Page 49 of 235
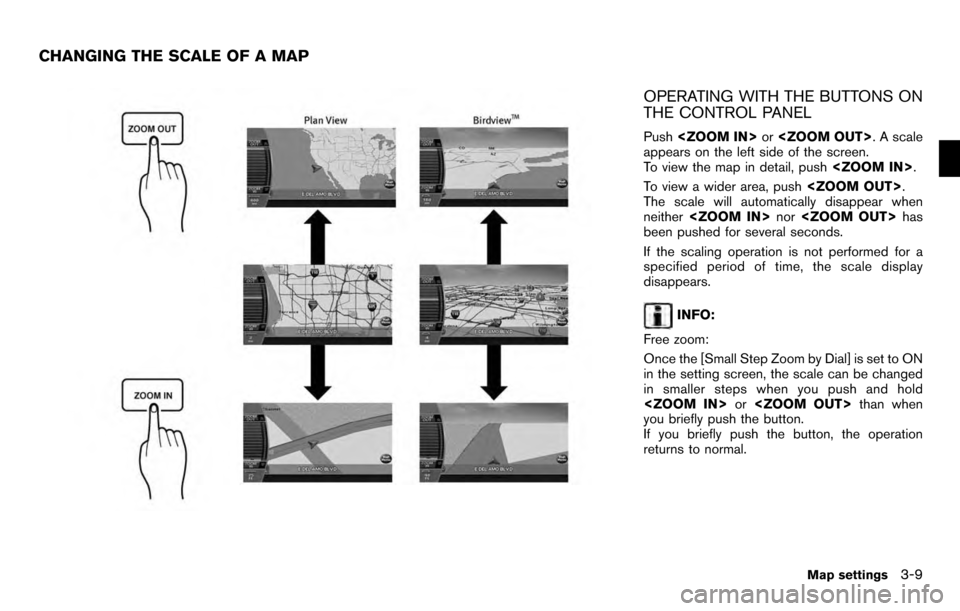
OPERATING WITH THE BUTTONS ON
THE CONTROL PANEL
Push
appears on the left side of the screen.
To view the map in detail, push
To view a wider area, push
The scale will automatically disappear when
neither
been pushed for several seconds.
If the scaling operation is not performed for a
specified period of time, the scale display
disappears.
INFO:
Free zoom:
Once the [Small Step Zoom by Dial] is set to ON
in the setting screen, the scale can be changed
in smaller steps when you push and hold
you briefly push the button.
If you briefly push the button, the operation
returns to normal.
CHANGING THE SCALE OF A MAP
Map settings3-9
Page 50 of 235
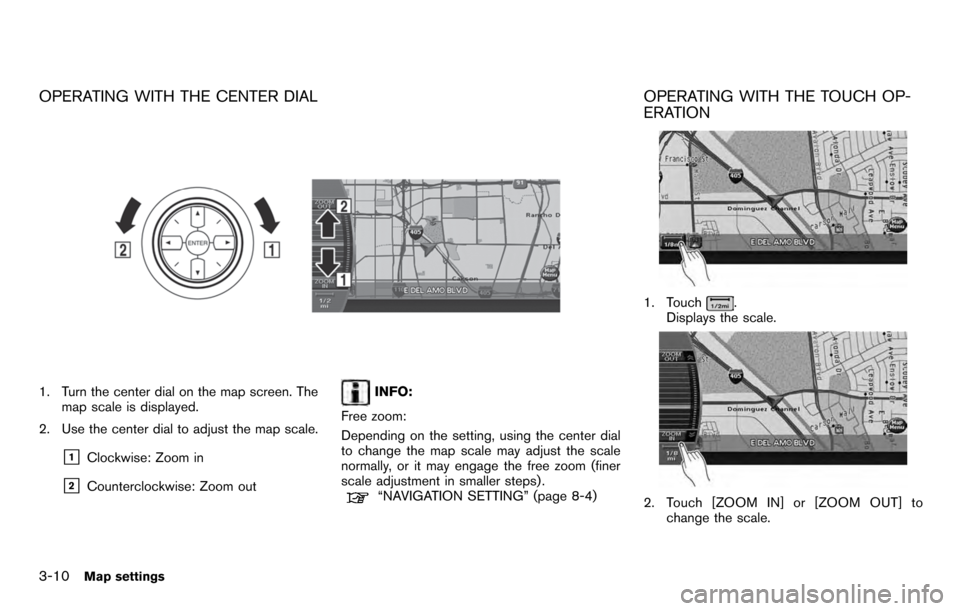
OPERATING WITH THE CENTER DIAL
1. Turn the center dial on the map screen. Themap scale is displayed.
2. Use the center dial to adjust the map scale.
&1Clockwise: Zoom in
&2Counterclockwise: Zoom out
INFO:
Free zoom:
Depending on the setting, using the center dial
to change the map scale may adjust the scale
normally, or it may engage the free zoom (finer
scale adjustment in smaller steps) .
“NAVIGATION SETTING” (page 8-4)
OPERATING WITH THE TOUCH OP-
ERATION
1. Touch.
Displays the scale.
2. Touch [ZOOM IN] or [ZOOM OUT] to
change the scale.
3-10Map settings