lock NISSAN PATROL 2006 Service Manual
[x] Cancel search | Manufacturer: NISSAN, Model Year: 2006, Model line: PATROL, Model: NISSAN PATROL 2006Pages: 1226, PDF Size: 37.18 MB
Page 719 of 1226
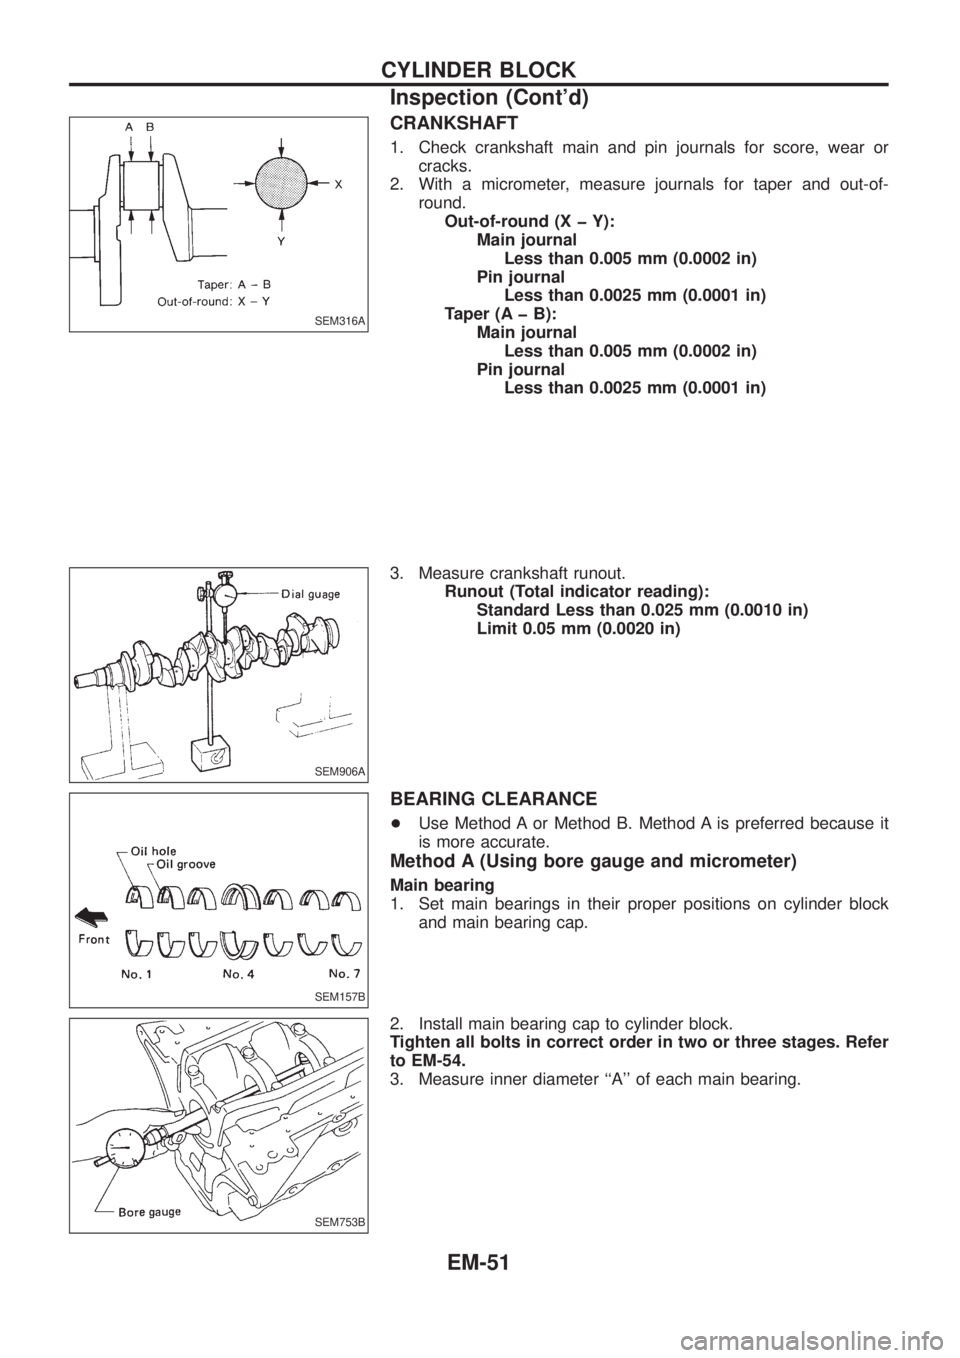
CRANKSHAFT
1. Check crankshaft main and pin journals for score, wear or
cracks.
2. With a micrometer, measure journals for taper and out-of-
round.
Out-of-round (X þ Y):
Main journal
Less than 0.005 mm (0.0002 in)
Pin journal
Less than 0.0025 mm (0.0001 in)
Taper (A þ B):
Main journal
Less than 0.005 mm (0.0002 in)
Pin journal
Less than 0.0025 mm (0.0001 in)
3. Measure crankshaft runout.
Runout (Total indicator reading):
Standard Less than 0.025 mm (0.0010 in)
Limit 0.05 mm (0.0020 in)
BEARING CLEARANCE
+Use Method A or Method B. Method A is preferred because it
is more accurate.
Method A (Using bore gauge and micrometer)
Main bearing
1. Set main bearings in their proper positions on cylinder block
and main bearing cap.
2. Install main bearing cap to cylinder block.
Tighten all bolts in correct order in two or three stages. Refer
to EM-54.
3. Measure inner diameter ``A'' of each main bearing.
SEM316A
SEM906A
SEM157B
SEM753B
CYLINDER BLOCK
Inspection (Cont'd)
EM-51
Page 720 of 1226
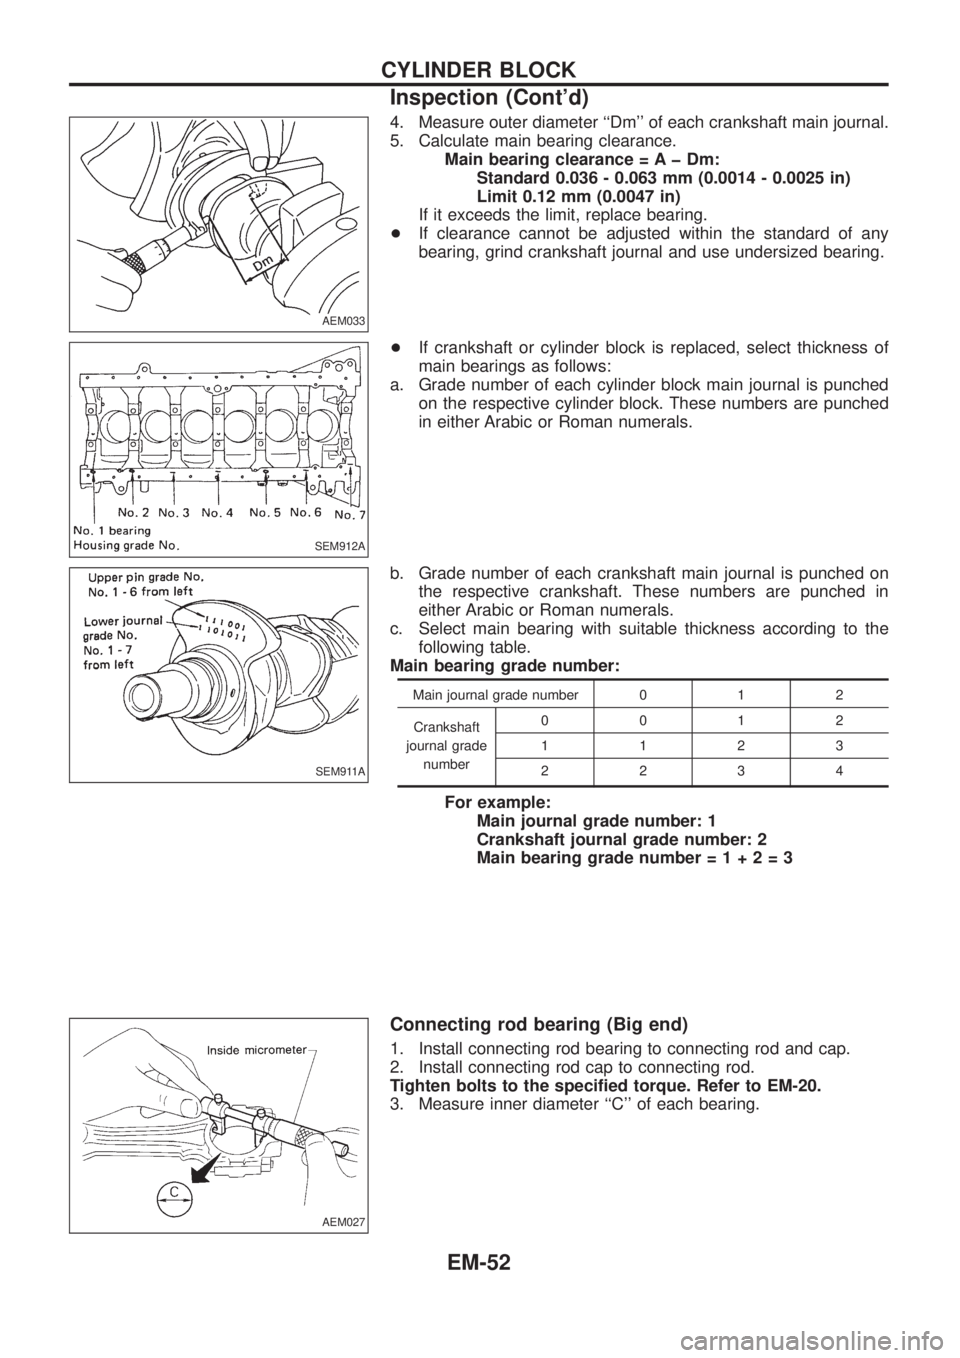
4. Measure outer diameter ``Dm'' of each crankshaft main journal.
5. Calculate main bearing clearance.
Main bearing clearance = A þ Dm:
Standard 0.036 - 0.063 mm (0.0014 - 0.0025 in)
Limit 0.12 mm (0.0047 in)
If it exceeds the limit, replace bearing.
+If clearance cannot be adjusted within the standard of any
bearing, grind crankshaft journal and use undersized bearing.
+If crankshaft or cylinder block is replaced, select thickness of
main bearings as follows:
a. Grade number of each cylinder block main journal is punched
on the respective cylinder block. These numbers are punched
in either Arabic or Roman numerals.
b. Grade number of each crankshaft main journal is punched on
the respective crankshaft. These numbers are punched in
either Arabic or Roman numerals.
c. Select main bearing with suitable thickness according to the
following table.
Main bearing grade number:
Main journal grade number 0 1 2
Crankshaft
journal grade
number0012
1123
2234
For example:
Main journal grade number: 1
Crankshaft journal grade number: 2
Main bearing grade number=1+2=3
Connecting rod bearing (Big end)
1. Install connecting rod bearing to connecting rod and cap.
2. Install connecting rod cap to connecting rod.
Tighten bolts to the speci®ed torque. Refer to EM-20.
3. Measure inner diameter ``C'' of each bearing.
AEM033
SEM912A
SEM911A
AEM027
CYLINDER BLOCK
Inspection (Cont'd)
EM-52
Page 721 of 1226
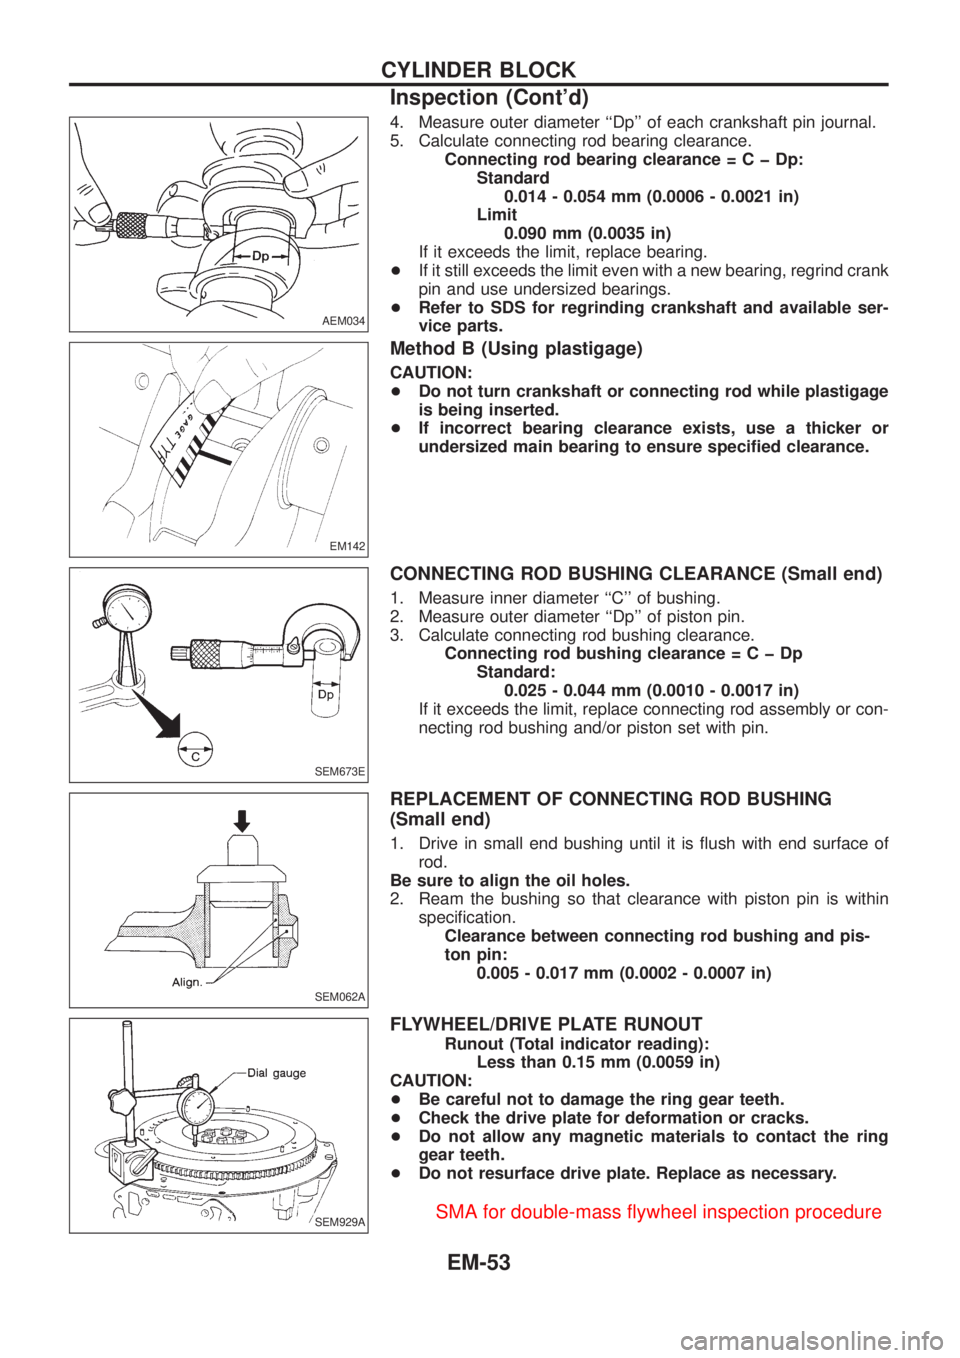
4. Measure outer diameter ``Dp'' of each crankshaft pin journal.
5. Calculate connecting rod bearing clearance.
Connecting rod bearing clearance=CþDp:
Standard
0.014 - 0.054 mm (0.0006 - 0.0021 in)
Limit
0.090 mm (0.0035 in)
If it exceeds the limit, replace bearing.
+If it still exceeds the limit even with a new bearing, regrind crank
pin and use undersized bearings.
+Refer to SDS for regrinding crankshaft and available ser-
vice parts.
Method B (Using plastigage)
CAUTION:
+Do not turn crankshaft or connecting rod while plastigage
is being inserted.
+If incorrect bearing clearance exists, use a thicker or
undersized main bearing to ensure speci®ed clearance.
CONNECTING ROD BUSHING CLEARANCE (Small end)
1. Measure inner diameter ``C'' of bushing.
2. Measure outer diameter ``Dp'' of piston pin.
3. Calculate connecting rod bushing clearance.
Connecting rod bushing clearance=CþDp
Standard:
0.025 - 0.044 mm (0.0010 - 0.0017 in)
If it exceeds the limit, replace connecting rod assembly or con-
necting rod bushing and/or piston set with pin.
REPLACEMENT OF CONNECTING ROD BUSHING
(Small end)
1. Drive in small end bushing until it is ¯ush with end surface of
rod.
Be sure to align the oil holes.
2. Ream the bushing so that clearance with piston pin is within
speci®cation.
Clearance between connecting rod bushing and pis-
ton pin:
0.005 - 0.017 mm (0.0002 - 0.0007 in)
FLYWHEEL/DRIVE PLATE RUNOUT
Runout (Total indicator reading):
Less than 0.15 mm (0.0059 in)
CAUTION:
+Be careful not to damage the ring gear teeth.
+Check the drive plate for deformation or cracks.
+Do not allow any magnetic materials to contact the ring
gear teeth.
+Do not resurface drive plate. Replace as necessary.
AEM034
EM142
SEM673E
SEM062A
SEM929A
CYLINDER BLOCK
Inspection (Cont'd)
EM-53
Page 722 of 1226
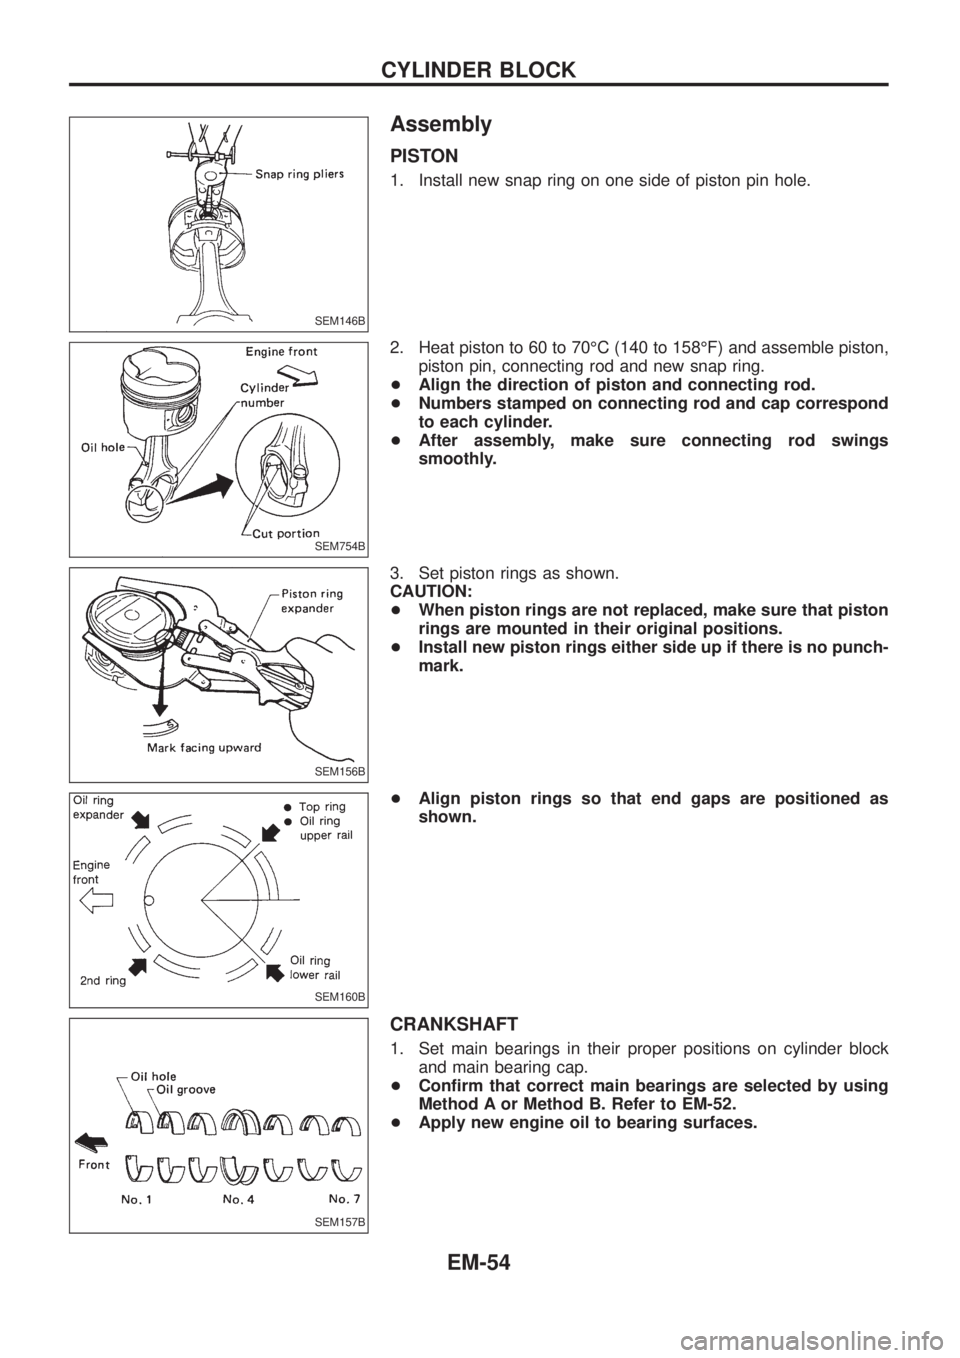
Assembly
PISTON
1. Install new snap ring on one side of piston pin hole.
2. Heat piston to 60 to 70ÉC (140 to 158ÉF) and assemble piston,
piston pin, connecting rod and new snap ring.
+Align the direction of piston and connecting rod.
+Numbers stamped on connecting rod and cap correspond
to each cylinder.
+After assembly, make sure connecting rod swings
smoothly.
3. Set piston rings as shown.
CAUTION:
+When piston rings are not replaced, make sure that piston
rings are mounted in their original positions.
+Install new piston rings either side up if there is no punch-
mark.
+Align piston rings so that end gaps are positioned as
shown.
CRANKSHAFT
1. Set main bearings in their proper positions on cylinder block
and main bearing cap.
+Con®rm that correct main bearings are selected by using
Method A or Method B. Refer to EM-52.
+Apply new engine oil to bearing surfaces.
SEM146B
SEM754B
SEM156B
SEM160B
SEM157B
CYLINDER BLOCK
EM-54
Page 723 of 1226
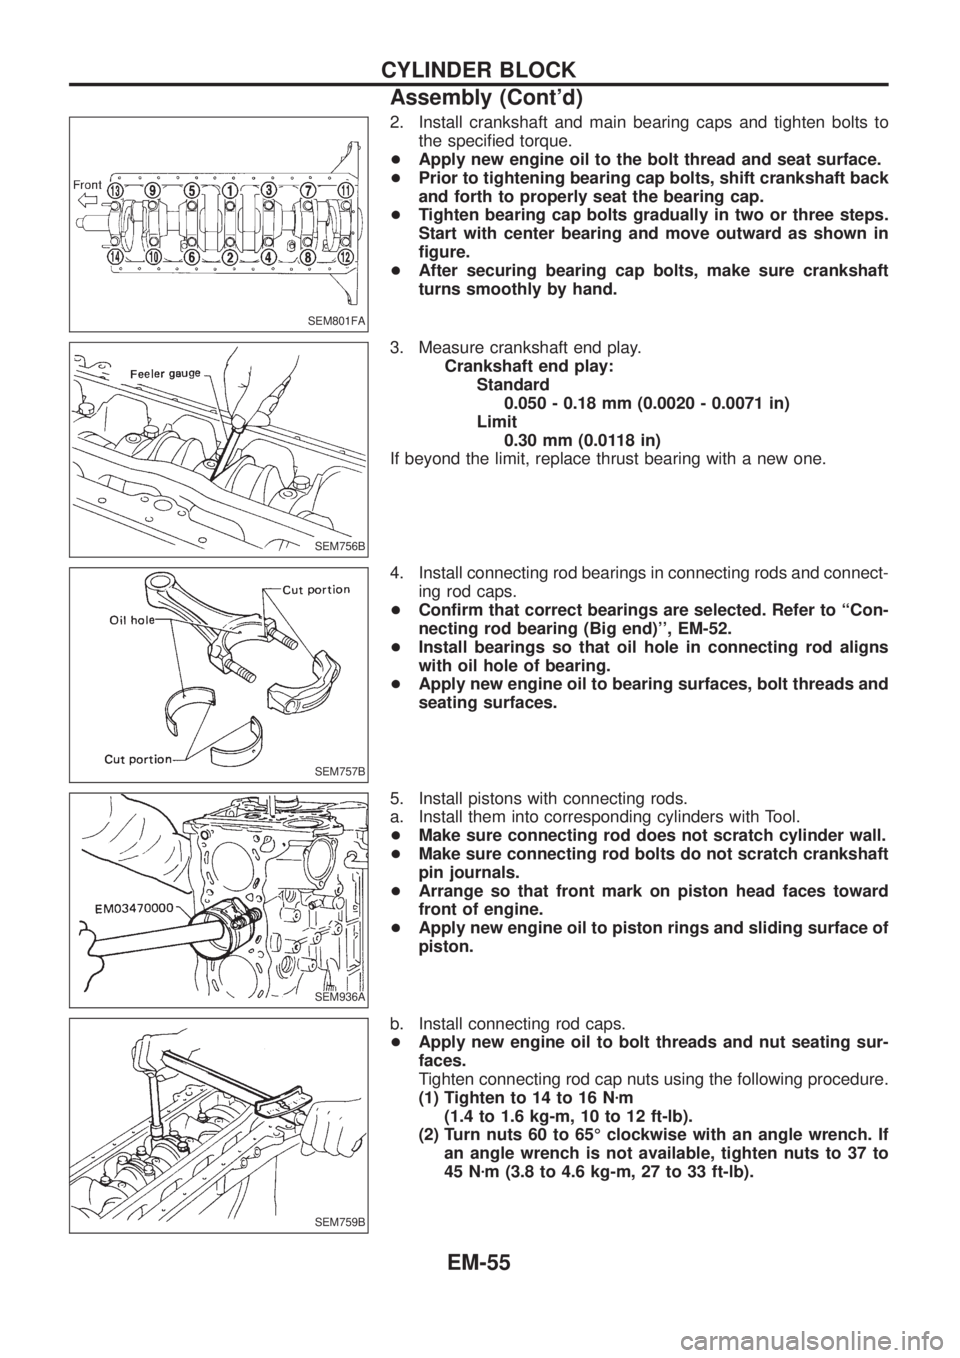
2. Install crankshaft and main bearing caps and tighten bolts to
the speci®ed torque.
+Apply new engine oil to the bolt thread and seat surface.
+Prior to tightening bearing cap bolts, shift crankshaft back
and forth to properly seat the bearing cap.
+Tighten bearing cap bolts gradually in two or three steps.
Start with center bearing and move outward as shown in
®gure.
+After securing bearing cap bolts, make sure crankshaft
turns smoothly by hand.
3. Measure crankshaft end play.
Crankshaft end play:
Standard
0.050 - 0.18 mm (0.0020 - 0.0071 in)
Limit
0.30 mm (0.0118 in)
If beyond the limit, replace thrust bearing with a new one.
4. Install connecting rod bearings in connecting rods and connect-
ing rod caps.
+Con®rm that correct bearings are selected. Refer to ``Con-
necting rod bearing (Big end)'', EM-52.
+Install bearings so that oil hole in connecting rod aligns
with oil hole of bearing.
+Apply new engine oil to bearing surfaces, bolt threads and
seating surfaces.
5. Install pistons with connecting rods.
a. Install them into corresponding cylinders with Tool.
+Make sure connecting rod does not scratch cylinder wall.
+Make sure connecting rod bolts do not scratch crankshaft
pin journals.
+Arrange so that front mark on piston head faces toward
front of engine.
+Apply new engine oil to piston rings and sliding surface of
piston.
b. Install connecting rod caps.
+Apply new engine oil to bolt threads and nut seating sur-
faces.
Tighten connecting rod cap nuts using the following procedure.
(1) Tighten to 14 to 16 Nzm
(1.4 to 1.6 kg-m, 10 to 12 ft-lb).
(2) Turn nuts 60 to 65É clockwise with an angle wrench. If
an angle wrench is not available, tighten nuts to 37 to
45 Nzm (3.8 to 4.6 kg-m, 27 to 33 ft-lb).
SEM801FA
SEM756B
SEM757B
SEM936A
SEM759B
CYLINDER BLOCK
Assembly (Cont'd)
EM-55
Page 724 of 1226
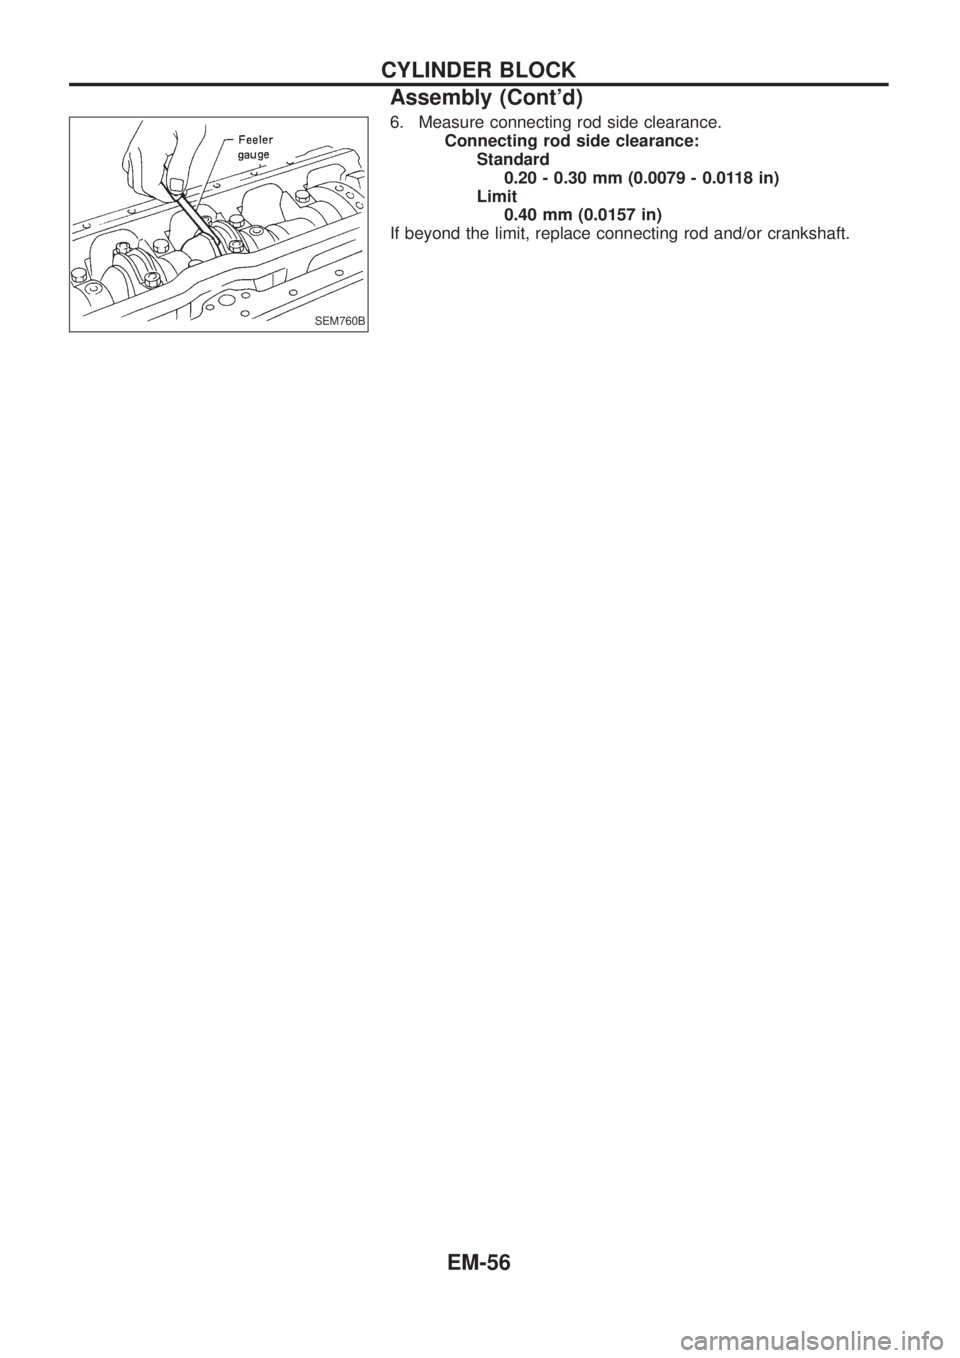
6. Measure connecting rod side clearance.
Connecting rod side clearance:
Standard
0.20 - 0.30 mm (0.0079 - 0.0118 in)
Limit
0.40 mm (0.0157 in)
If beyond the limit, replace connecting rod and/or crankshaft.
SEM760B
CYLINDER BLOCK
Assembly (Cont'd)
EM-56
Page 729 of 1226
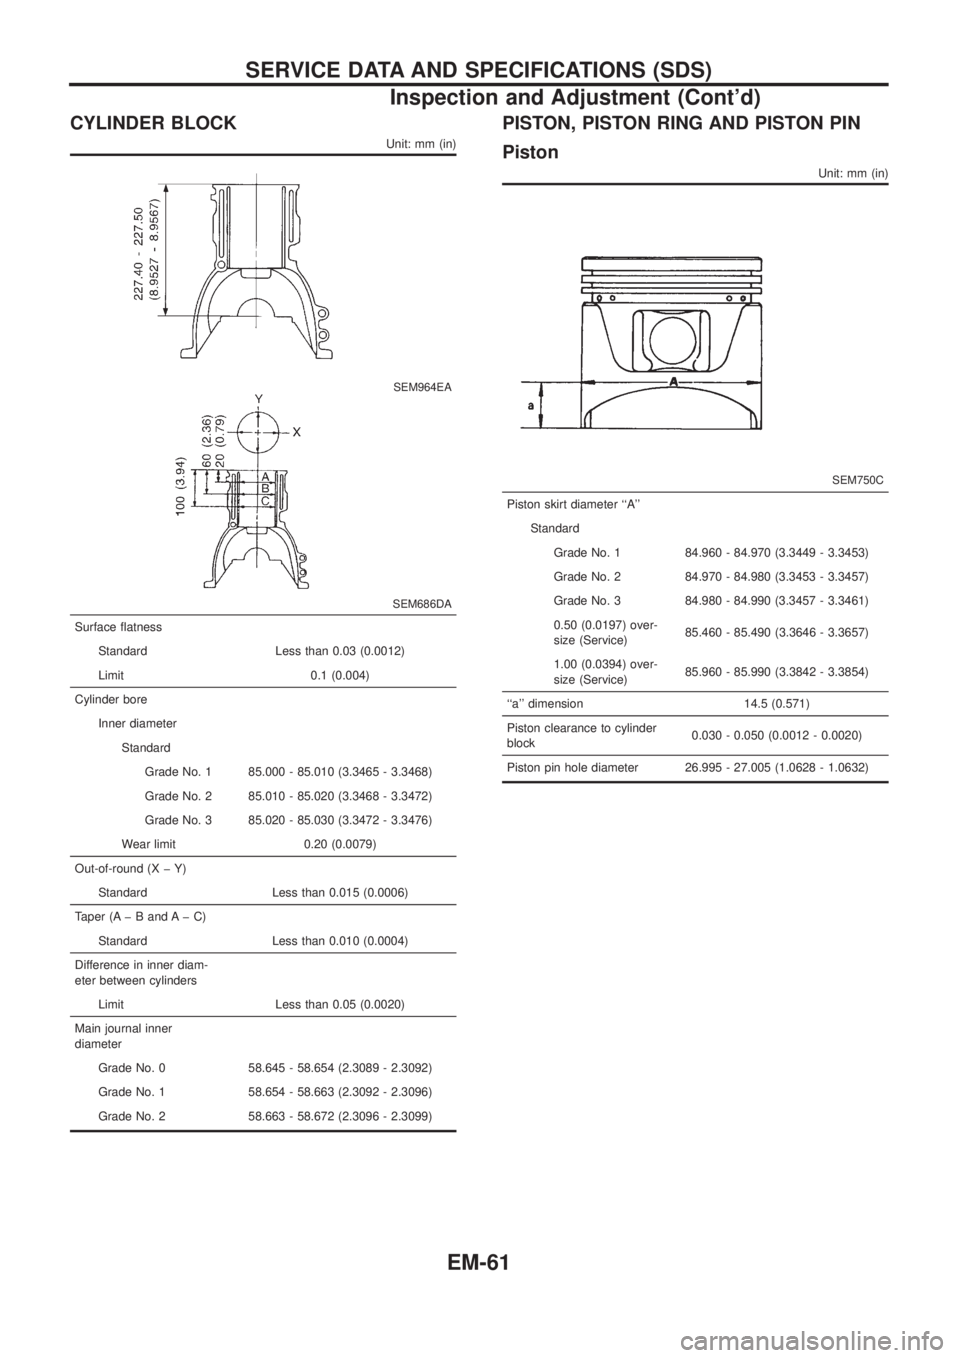
CYLINDER BLOCK
Unit: mm (in)
SEM964EA
SEM686DA
Surface ¯atness
Standard Less than 0.03 (0.0012)
Limit 0.1 (0.004)
Cylinder bore
Inner diameter
Standard
Grade No. 1 85.000 - 85.010 (3.3465 - 3.3468)
Grade No. 2 85.010 - 85.020 (3.3468 - 3.3472)
Grade No. 3 85.020 - 85.030 (3.3472 - 3.3476)
Wear limit 0.20 (0.0079)
Out-of-round (X þ Y)
Standard Less than 0.015 (0.0006)
Taper (A þ B and A þ C)
Standard Less than 0.010 (0.0004)
Difference in inner diam-
eter between cylinders
Limit Less than 0.05 (0.0020)
Main journal inner
diameter
Grade No. 0 58.645 - 58.654 (2.3089 - 2.3092)
Grade No. 1 58.654 - 58.663 (2.3092 - 2.3096)
Grade No. 2 58.663 - 58.672 (2.3096 - 2.3099)
PISTON, PISTON RING AND PISTON PIN
Piston
Unit: mm (in)
SEM750C
Piston skirt diameter ``A''
Standard
Grade No. 1 84.960 - 84.970 (3.3449 - 3.3453)
Grade No. 2 84.970 - 84.980 (3.3453 - 3.3457)
Grade No. 3 84.980 - 84.990 (3.3457 - 3.3461)
0.50 (0.0197) over-
size (Service)85.460 - 85.490 (3.3646 - 3.3657)
1.00 (0.0394) over-
size (Service)85.960 - 85.990 (3.3842 - 3.3854)
``a'' dimension 14.5 (0.571)
Piston clearance to cylinder
block0.030 - 0.050 (0.0012 - 0.0020)
Piston pin hole diameter 26.995 - 27.005 (1.0628 - 1.0632)
SERVICE DATA AND SPECIFICATIONS (SDS)
Inspection and Adjustment (Cont'd)
EM-61
Page 733 of 1226
FRONT AXLE &
FRONT SUSPENSION
SECTION
FA
CONTENTS
PRECAUTIONS AND PREPARATION............................1
Precautions ..................................................................1
Special Service Tools ..................................................1
Commercial Service Tools ...........................................2
NOISE, VIBRATION AND HARSHNESS (NVH)
TROUBLESHOOTING.....................................................3
NVH Troubleshooting Chart.........................................3
FRONT AXLE AND FRONT SUSPENSION...................4
ON-VEHICLE SERVICE..................................................5
Front Axle and Front Suspension Parts ......................5
Front Wheel Bearing....................................................5
Front Wheel Alignment ................................................8
FRONT AXLE Ð Drive ¯ange and Free-running
Hub.................................................................................10
FRONT AXLE Ð Manual-lock Free-running Hub...... 11
Removal ..................................................................... 11
Installation ..................................................................12
Inspection...................................................................12
FRONT AXLE Ð Auto-lock Free-running Hub..........13
Removal .....................................................................13
Installation ..................................................................13FRONT AXLE Ð Wheel Hub and Rotor Disc............14
Removal and Installation ...........................................14
Inspection...................................................................15
Assembly ...................................................................15
FRONT AXLE Ð Knuckle Flange................................17
Removal .....................................................................17
Inspection...................................................................19
Installation ..................................................................19
Knuckle Flange Grease Seal.....................................21
FRONT AXLE Ð Drive Shaft.......................................23
Inspection...................................................................23
Installation ..................................................................23
FRONT SUSPENSION..................................................24
Shock Absorber .........................................................25
Stabilizer Bar .............................................................25
Coil Spring .................................................................25
Leading Arm...............................................................26
Panhard Rod..............................................................26
SERVICE DATA AND SPECIFICATIONS (SDS)..........27
General Speci®cations ...............................................27
Inspection and Adjustment ........................................27
FA
Page 734 of 1226
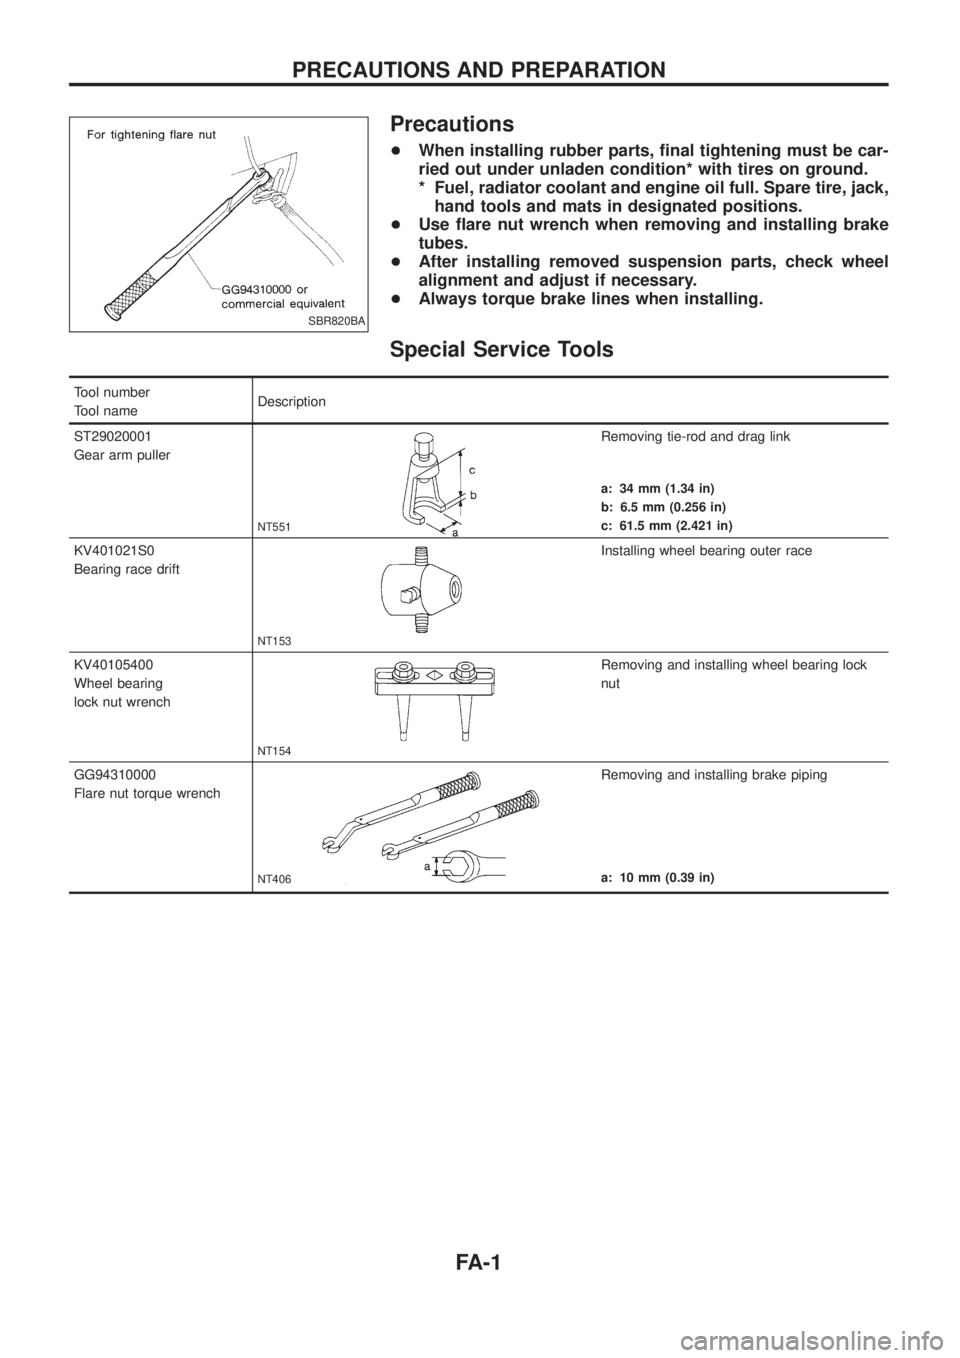
Precautions
+When installing rubber parts, ®nal tightening must be car-
ried out under unladen condition* with tires on ground.
* Fuel, radiator coolant and engine oil full. Spare tire, jack,
hand tools and mats in designated positions.
+Use ¯are nut wrench when removing and installing brake
tubes.
+After installing removed suspension parts, check wheel
alignment and adjust if necessary.
+Always torque brake lines when installing.
Special Service Tools
Tool number
Tool nameDescription
ST29020001
Gear arm puller
NT551
Removing tie-rod and drag link
a: 34 mm (1.34 in)
b: 6.5 mm (0.256 in)
c: 61.5 mm (2.421 in)
KV401021S0
Bearing race drift
NT153
Installing wheel bearing outer race
KV40105400
Wheel bearing
lock nut wrench
NT154
Removing and installing wheel bearing lock
nut
GG94310000
Flare nut torque wrench
NT406
Removing and installing brake piping
a: 10 mm (0.39 in)
SBR820BA
PRECAUTIONS AND PREPARATION
FA-1
Page 739 of 1226
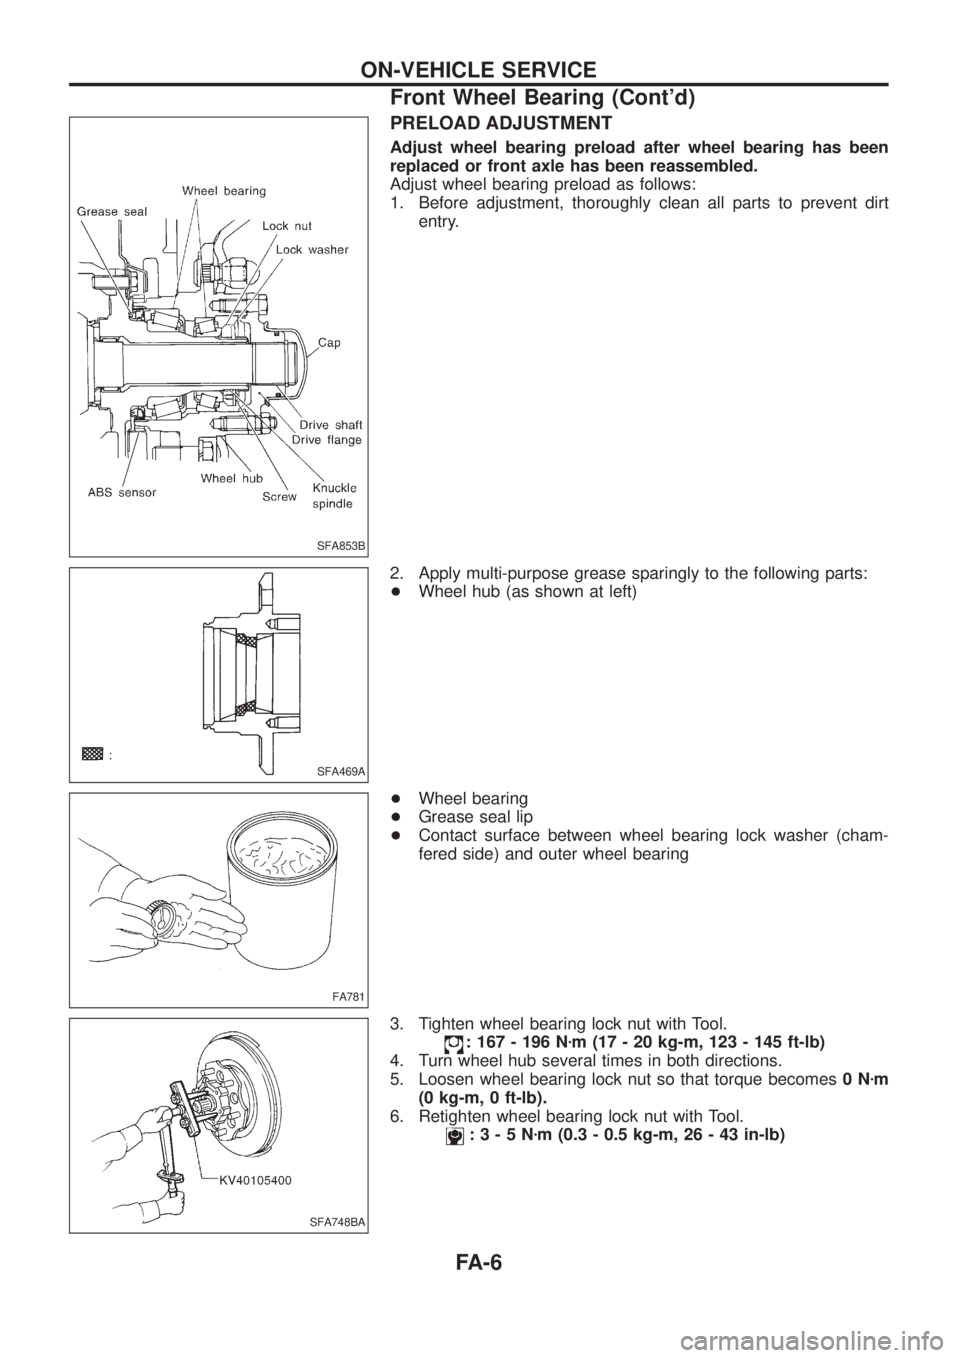
PRELOAD ADJUSTMENT
Adjust wheel bearing preload after wheel bearing has been
replaced or front axle has been reassembled.
Adjust wheel bearing preload as follows:
1. Before adjustment, thoroughly clean all parts to prevent dirt
entry.
2. Apply multi-purpose grease sparingly to the following parts:
+Wheel hub (as shown at left)
+Wheel bearing
+Grease seal lip
+Contact surface between wheel bearing lock washer (cham-
fered side) and outer wheel bearing
3. Tighten wheel bearing lock nut with Tool.
: 167 - 196 Nzm (17 - 20 kg-m, 123 - 145 ft-lb)
4. Turn wheel hub several times in both directions.
5. Loosen wheel bearing lock nut so that torque becomes0Nzm
(0 kg-m, 0 ft-lb).
6. Retighten wheel bearing lock nut with Tool.
:3-5Nzm (0.3 - 0.5 kg-m, 26 - 43 in-lb)
SFA853B
SFA469A
FA781
SFA748BA
ON-VEHICLE SERVICE
Front Wheel Bearing (Cont'd)
FA-6