NISSAN PICK-UP 1999 Repair Manual
PICK-UP 1999
NISSAN
NISSAN
https://www.carmanualsonline.info/img/5/57373/w960_57373-0.png
NISSAN PICK-UP 1999 Repair Manual
Trending: steering wheel adjustment, transmission, battery, coolant reservoir, brakes, wheel bolt torque, NATS TROUBLE
Page 431 of 666
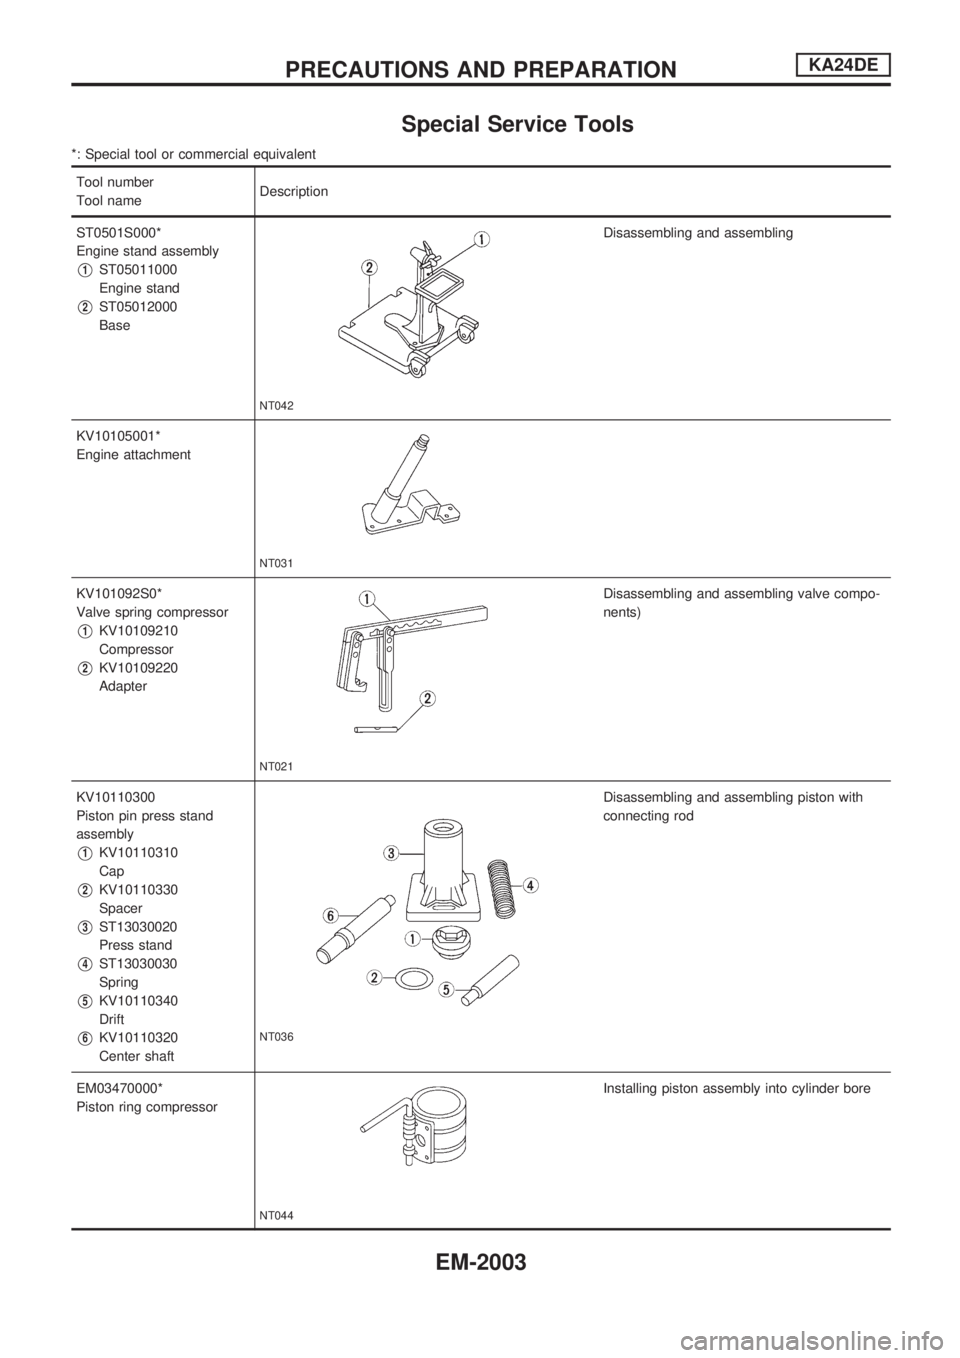
Special Service Tools
*: Special tool or commercial equivalent
Tool number
Tool nameDescription
ST0501S000*
Engine stand assembly
V1ST05011000
Engine stand
V2ST05012000
Base
NT042
Disassembling and assembling
KV10105001*
Engine attachment
NT031
KV101092S0*
Valve spring compressor
V1KV10109210
Compressor
V2KV10109220
Adapter
NT021
Disassembling and assembling valve compo-
nents)
KV10110300
Piston pin press stand
assembly
V1KV10110310
Cap
V2KV10110330
Spacer
V3ST13030020
Press stand
V4ST13030030
Spring
V5KV10110340
Drift
V6KV10110320
Center shaftNT036
Disassembling and assembling piston with
connecting rod
EM03470000*
Piston ring compressor
NT044
Installing piston assembly into cylinder bore
PRECAUTIONS AND PREPARATIONKA24DE
EM-2003
Page 432 of 666
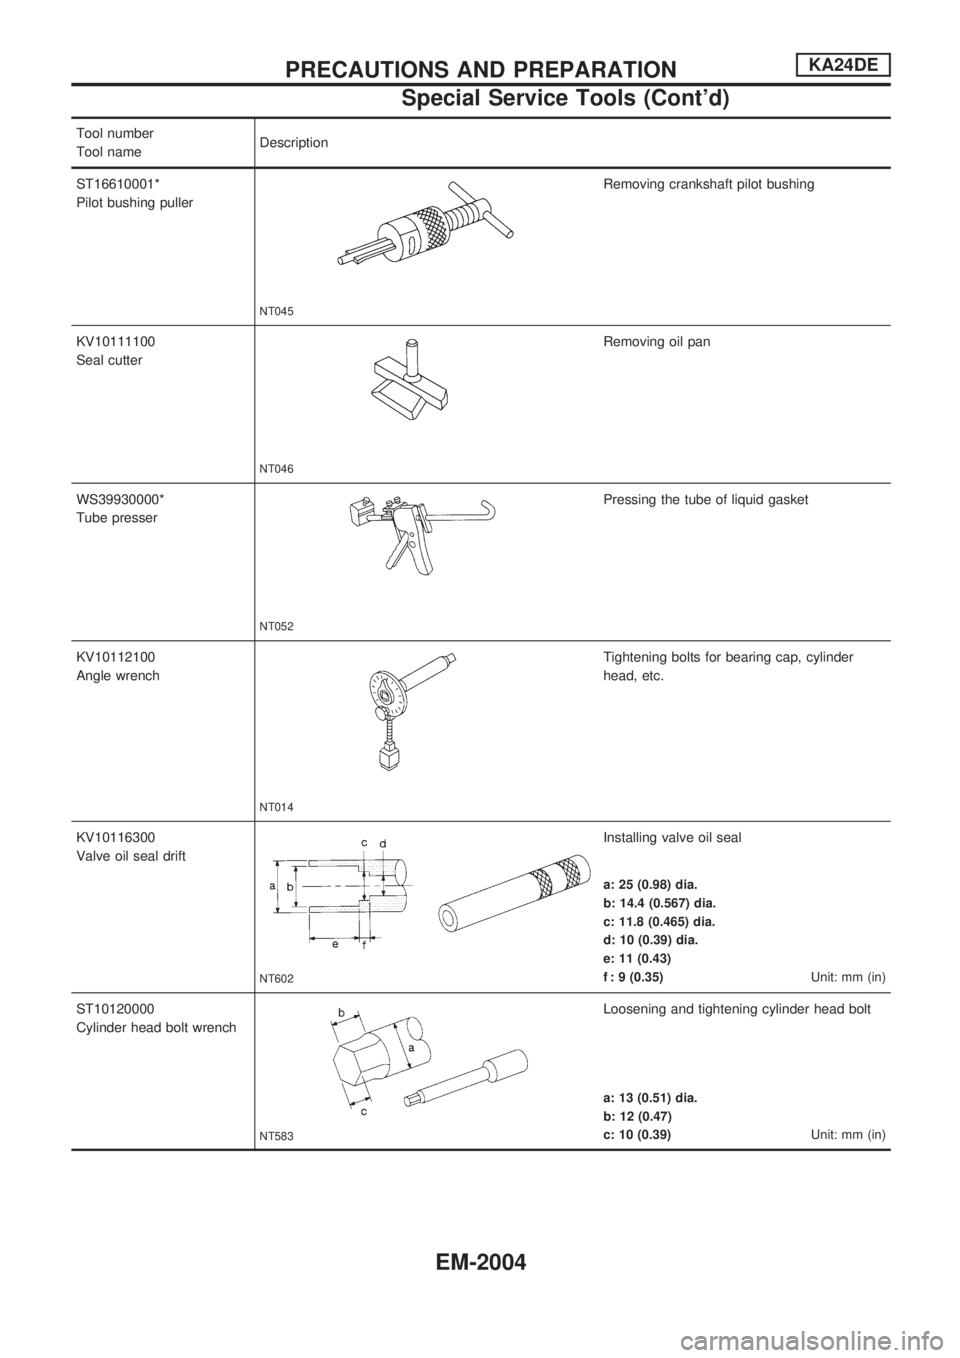
Tool number
Tool nameDescription
ST16610001*
Pilot bushing puller
NT045
Removing crankshaft pilot bushing
KV10111100
Seal cutter
NT046
Removing oil pan
WS39930000*
Tube presser
NT052
Pressing the tube of liquid gasket
KV10112100
Angle wrench
NT014
Tightening bolts for bearing cap, cylinder
head, etc.
KV10116300
Valve oil seal drift
NT602
Installing valve oil seal
a: 25 (0.98) dia.
b: 14.4 (0.567) dia.
c: 11.8 (0.465) dia.
d: 10 (0.39) dia.
e: 11 (0.43)
f : 9 (0.35)Unit: mm (in)
ST10120000
Cylinder head bolt wrench
NT583
Loosening and tightening cylinder head bolt
a: 13 (0.51) dia.
b: 12 (0.47)
c: 10 (0.39)Unit: mm (in)
PRECAUTIONS AND PREPARATIONKA24DE
Special Service Tools (Cont'd)
EM-2004
Page 433 of 666
Tool number
Tool nameDescription
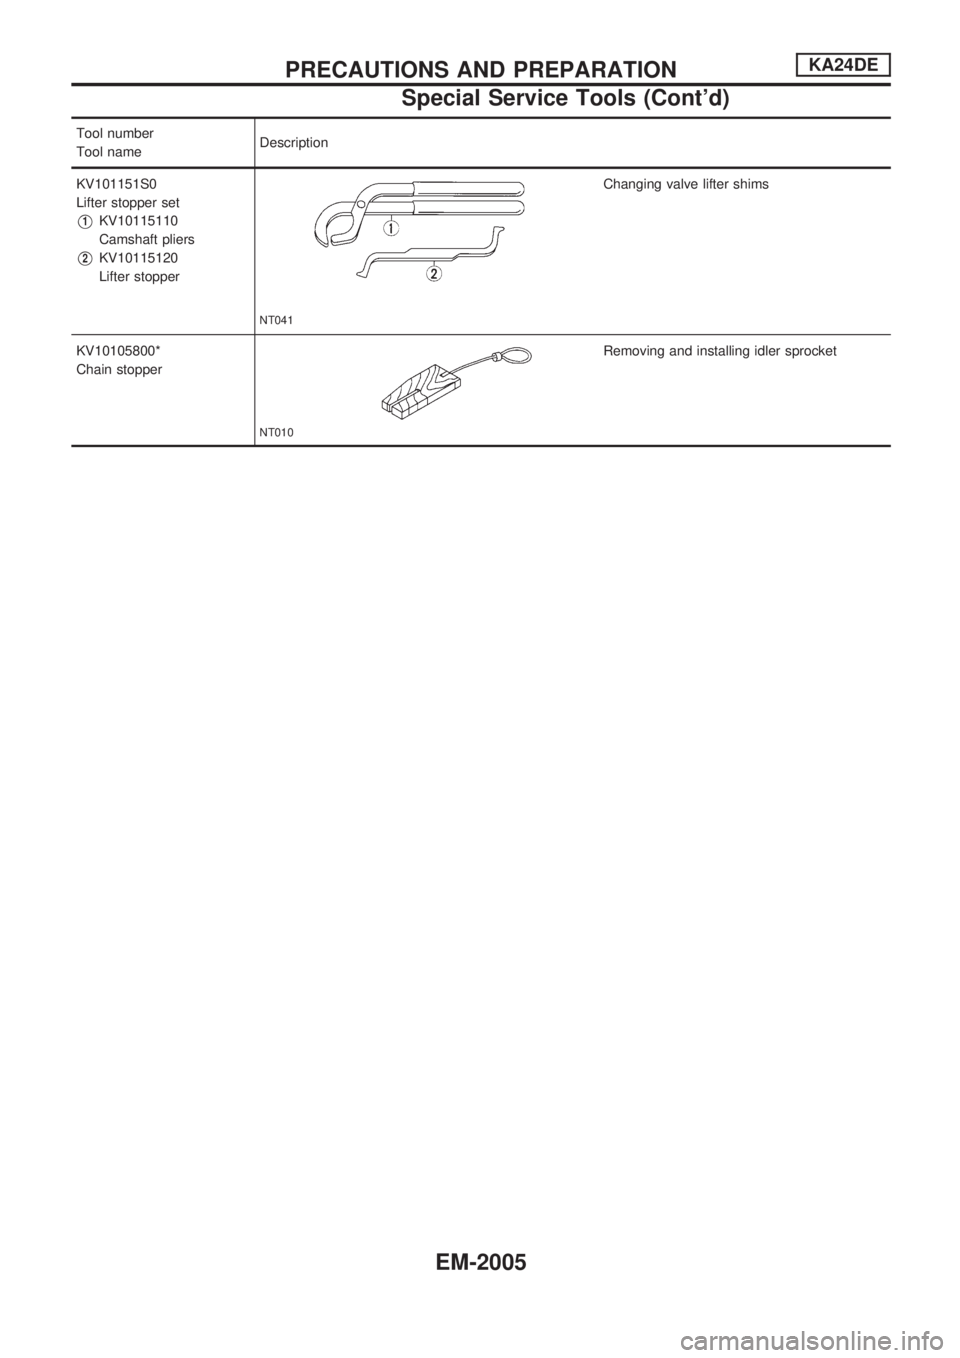
KV101151S0
Lifter stopper set
V1KV10115110
Camshaft pliers
V2KV10115120
Lifter stopper
NT041
Changing valve lifter shims
KV10105800*
Chain stopper
NT010
Removing and installing idler sprocket
PRECAUTIONS AND PREPARATIONKA24DE
Special Service Tools (Cont'd)
EM-2005
Page 434 of 666
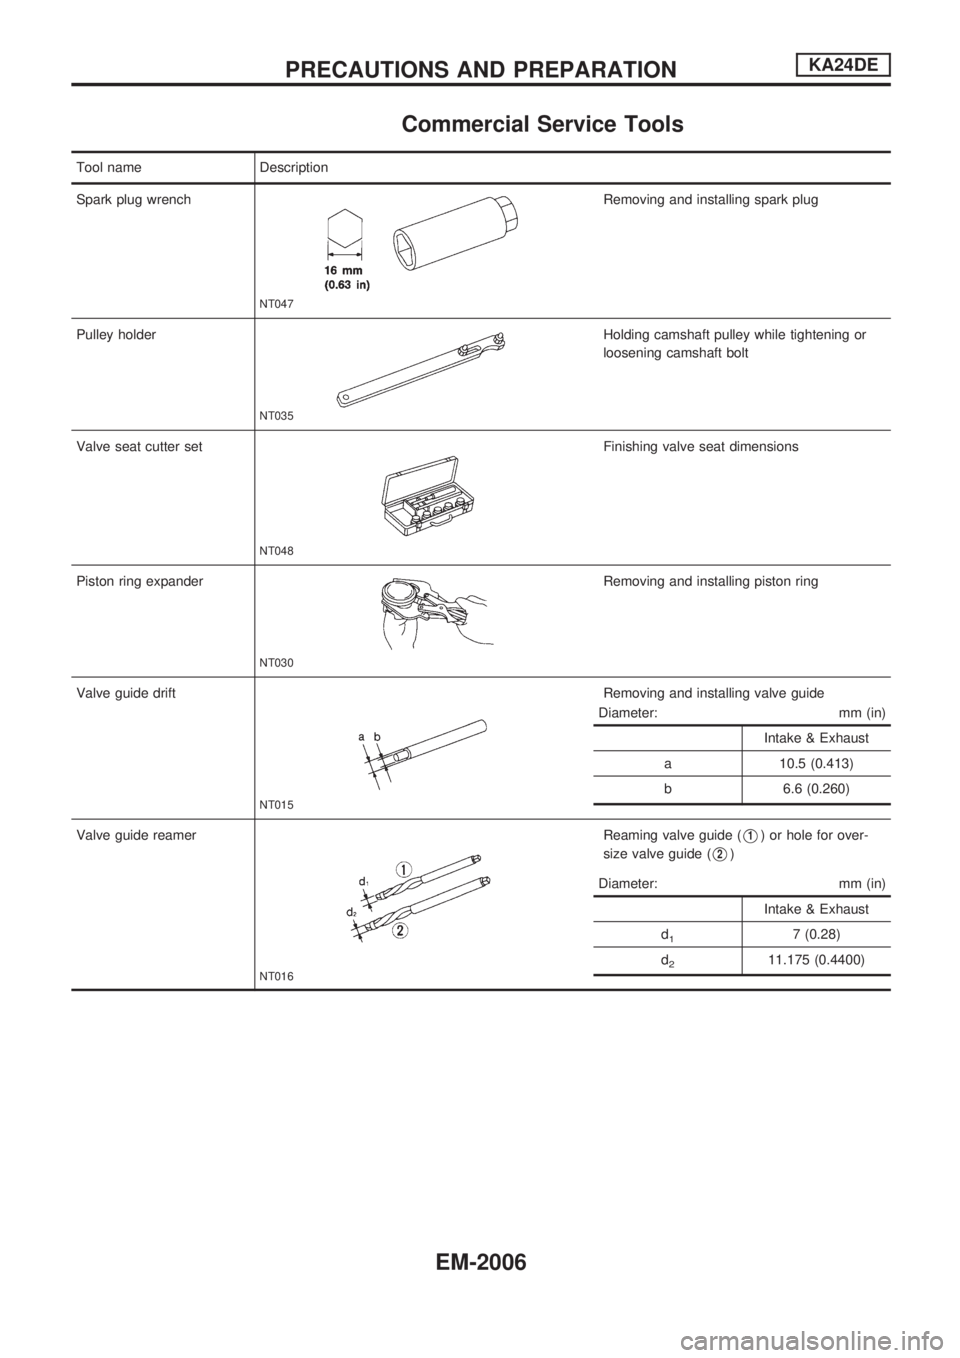
Commercial Service Tools
Tool name Description
Spark plug wrench
NT047
Removing and installing spark plug
Pulley holder
NT035
Holding camshaft pulley while tightening or
loosening camshaft bolt
Valve seat cutter set
NT048
Finishing valve seat dimensions
Piston ring expander
NT030
Removing and installing piston ring
Valve guide drift
NT015
Removing and installing valve guide
Valve guide reamer
NT016
Reaming valve guide (V1) or hole for over-
size valve guide (
V2)
Diameter: mm (in)
Intake & Exhaust
a 10.5 (0.413)
b 6.6 (0.260)
Diameter: mm (in)
Intake & Exhaust
d
17 (0.28)
d
211.175 (0.4400)
PRECAUTIONS AND PREPARATIONKA24DE
EM-2006
Page 435 of 666
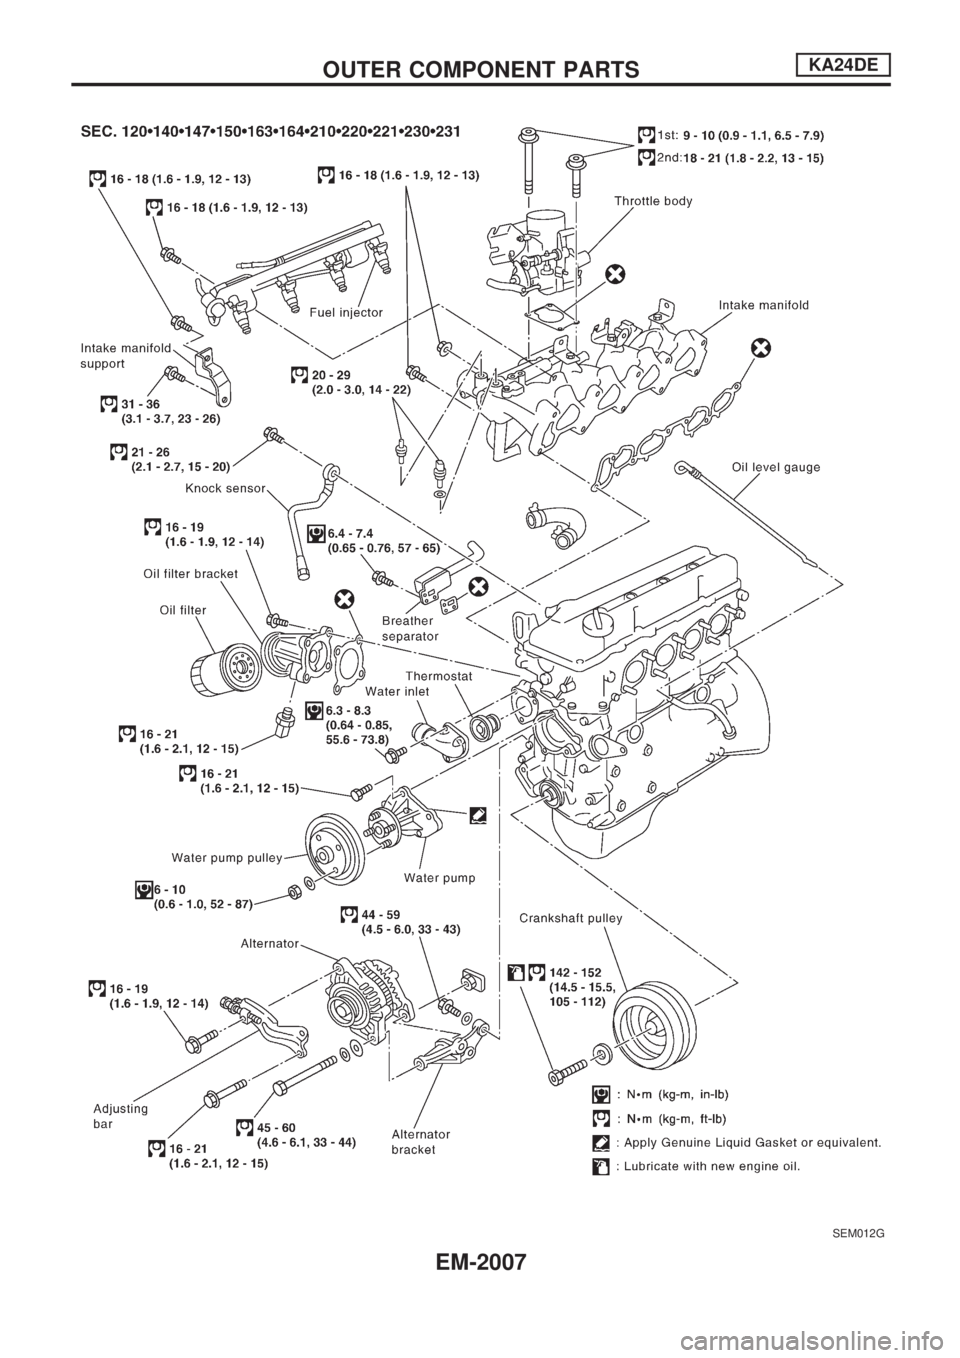
SEM012G
OUTER COMPONENT PARTSKA24DE
EM-2007
Page 436 of 666
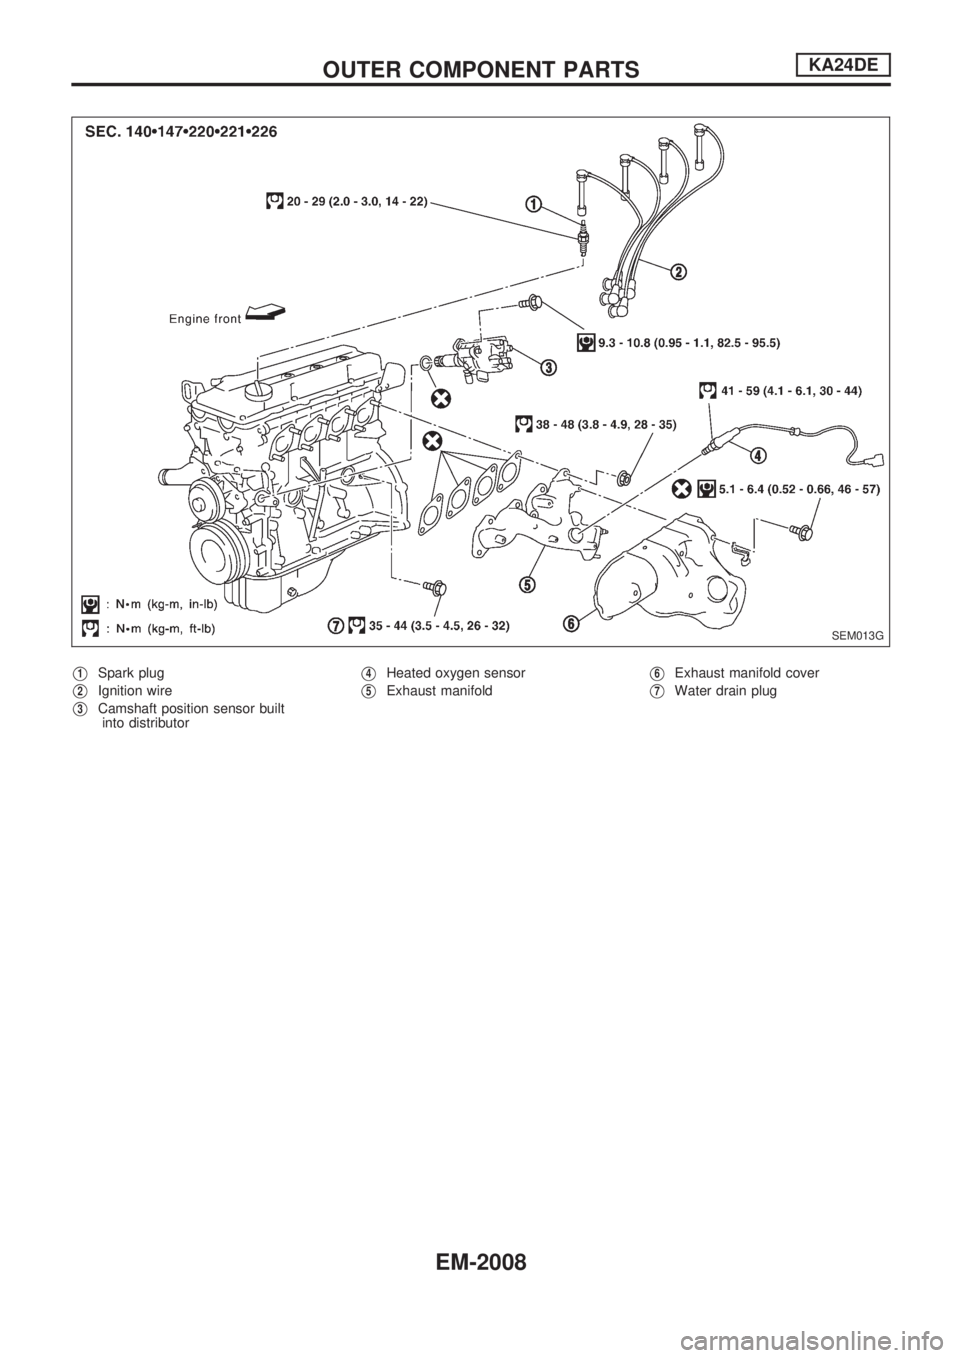
V1Spark plug
V2Ignition wire
V3Camshaft position sensor built
into distributor
V4Heated oxygen sensor
V5Exhaust manifoldV6Exhaust manifold cover
V7Water drain plug
SEM013G
OUTER COMPONENT PARTSKA24DE
EM-2008
Page 437 of 666
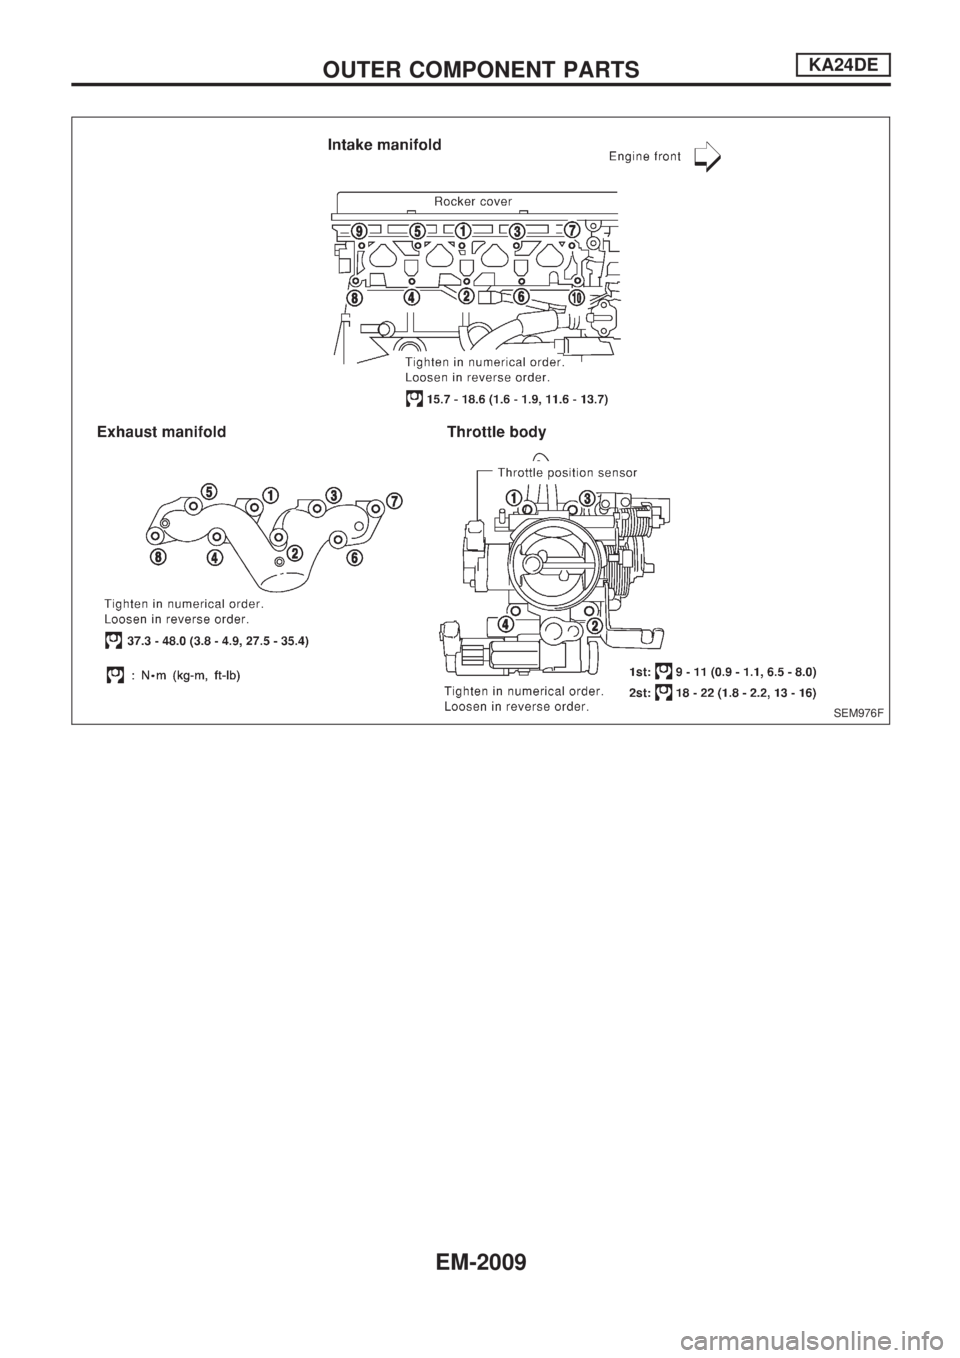
SEM976F
OUTER COMPONENT PARTSKA24DE
EM-2009
Page 438 of 666
Measurement of Compression Pressure
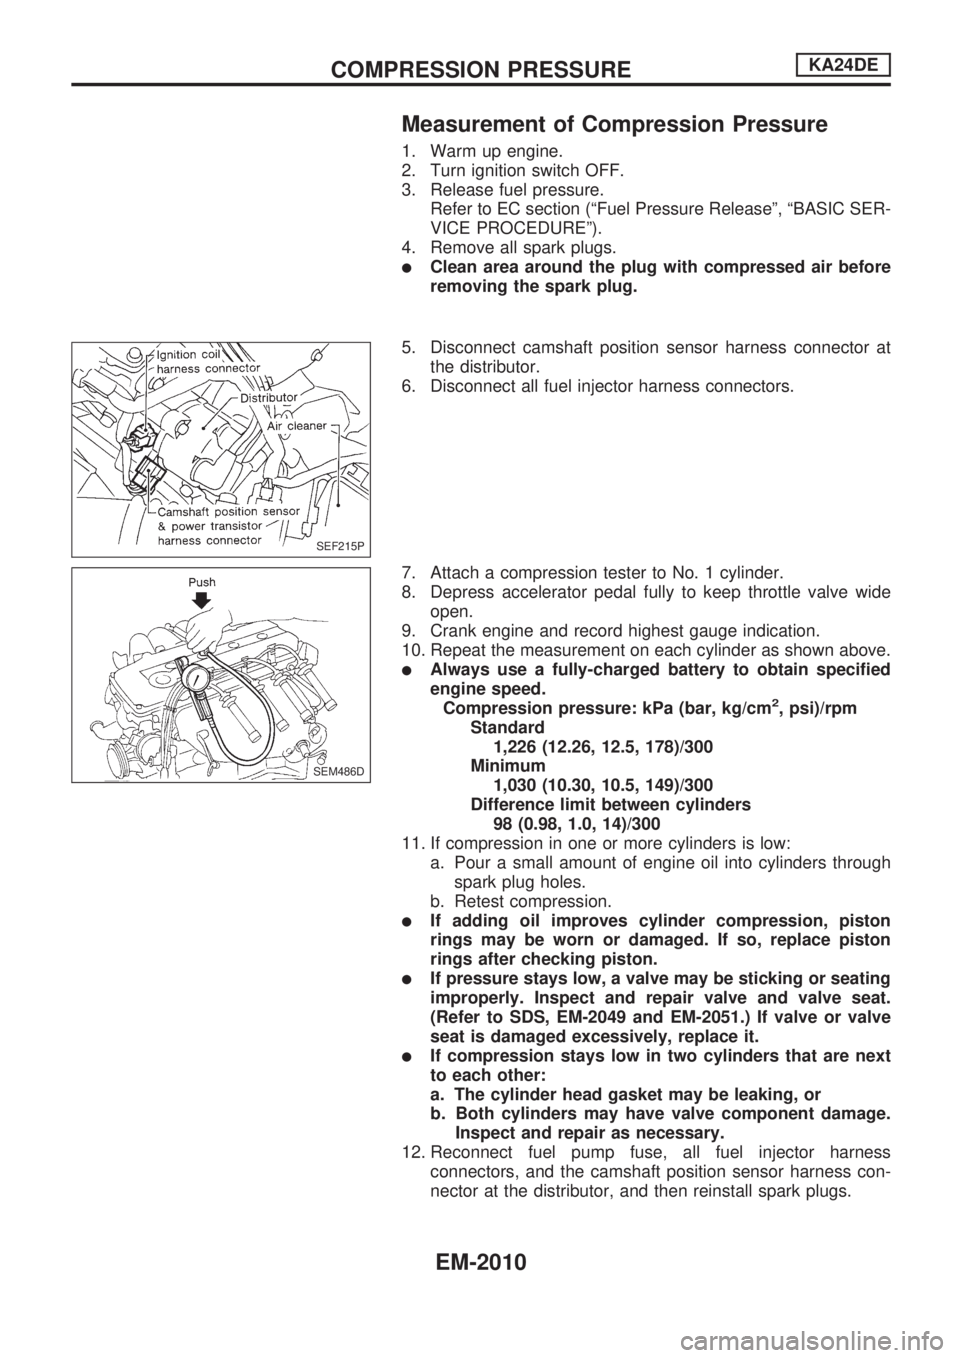
1. Warm up engine.
2. Turn ignition switch OFF.
3. Release fuel pressure.
Refer to EC section (ªFuel Pressure Releaseº, ªBASIC SER-
VICE PROCEDUREº).
4. Remove all spark plugs.
lClean area around the plug with compressed air before
removing the spark plug.
5. Disconnect camshaft position sensor harness connector at
the distributor.
6. Disconnect all fuel injector harness connectors.
7. Attach a compression tester to No. 1 cylinder.
8. Depress accelerator pedal fully to keep throttle valve wide
open.
9. Crank engine and record highest gauge indication.
10. Repeat the measurement on each cylinder as shown above.
lAlways use a fully-charged battery to obtain specified
engine speed.
Compression pressure: kPa (bar, kg/cm
2, psi)/rpm
Standard
1,226 (12.26, 12.5, 178)/300
Minimum
1,030 (10.30, 10.5, 149)/300
Difference limit between cylinders
98 (0.98, 1.0, 14)/300
11. If compression in one or more cylinders is low:
a. Pour a small amount of engine oil into cylinders through
spark plug holes.
b. Retest compression.
lIf adding oil improves cylinder compression, piston
rings may be worn or damaged. If so, replace piston
rings after checking piston.
lIf pressure stays low, a valve may be sticking or seating
improperly. Inspect and repair valve and valve seat.
(Refer to SDS, EM-2049 and EM-2051.) If valve or valve
seat is damaged excessively, replace it.
lIf compression stays low in two cylinders that are next
to each other:
a. The cylinder head gasket may be leaking, or
b. Both cylinders may have valve component damage.
Inspect and repair as necessary.
12. Reconnect fuel pump fuse, all fuel injector harness
connectors, and the camshaft position sensor harness con-
nector at the distributor, and then reinstall spark plugs.
SEF215P
SEM486D
COMPRESSION PRESSUREKA24DE
EM-2010
Page 439 of 666
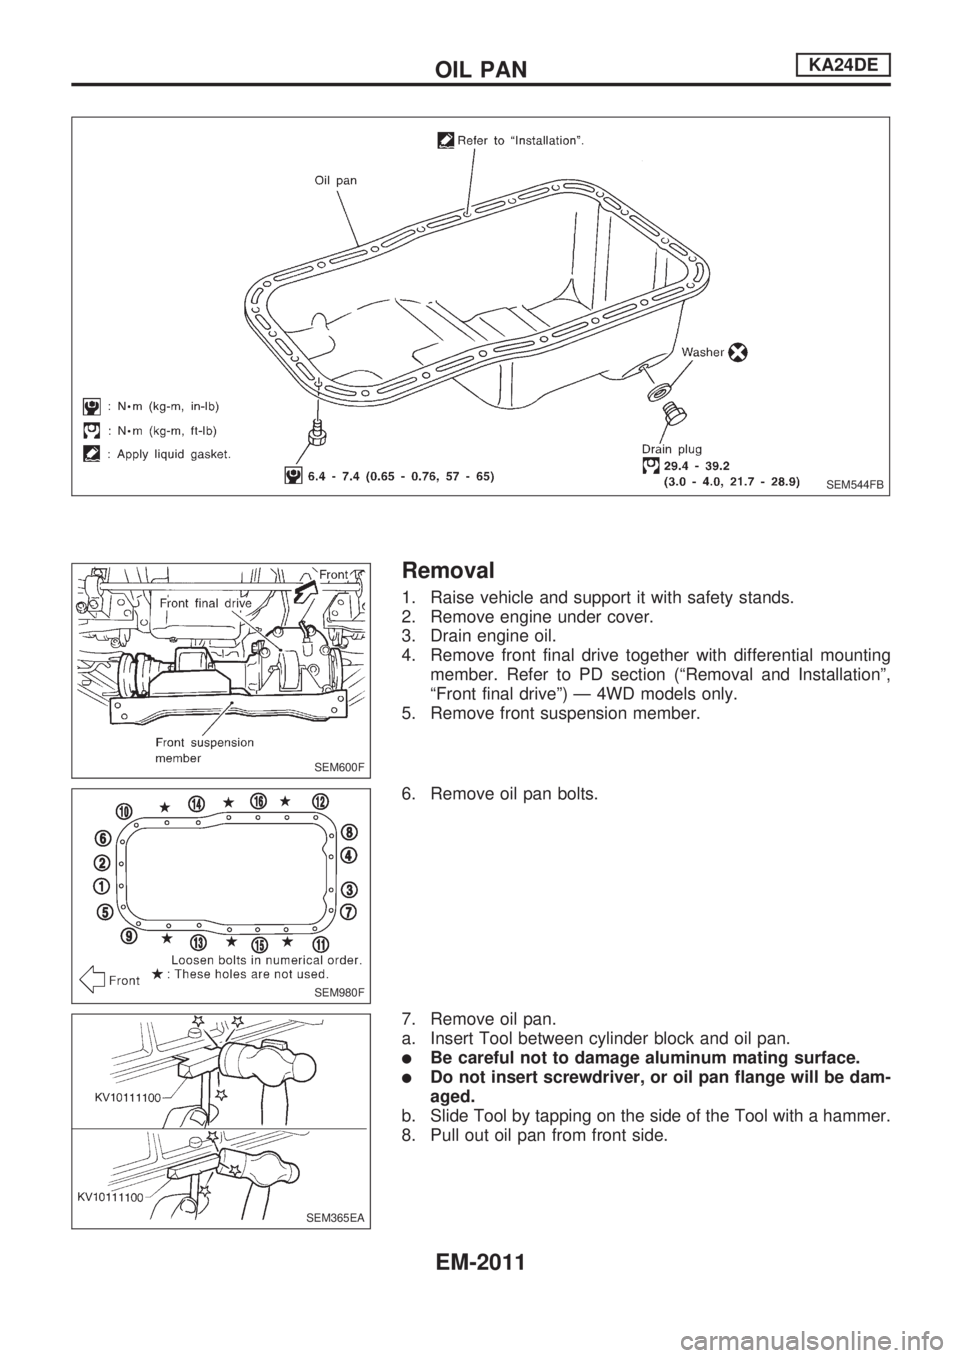
Removal
1. Raise vehicle and support it with safety stands.
2. Remove engine under cover.
3. Drain engine oil.
4. Remove front final drive together with differential mounting
member. Refer to PD section (ªRemoval and Installationº,
ªFront final driveº) Ð 4WD models only.
5. Remove front suspension member.
6. Remove oil pan bolts.
7. Remove oil pan.
a. Insert Tool between cylinder block and oil pan.
lBe careful not to damage aluminum mating surface.
lDo not insert screwdriver, or oil pan flange will be dam-
aged.
b. Slide Tool by tapping on the side of the Tool with a hammer.
8. Pull out oil pan from front side.
SEM544FB
SEM600F
SEM980F
SEM365EA
OIL PANKA24DE
EM-2011
Page 440 of 666
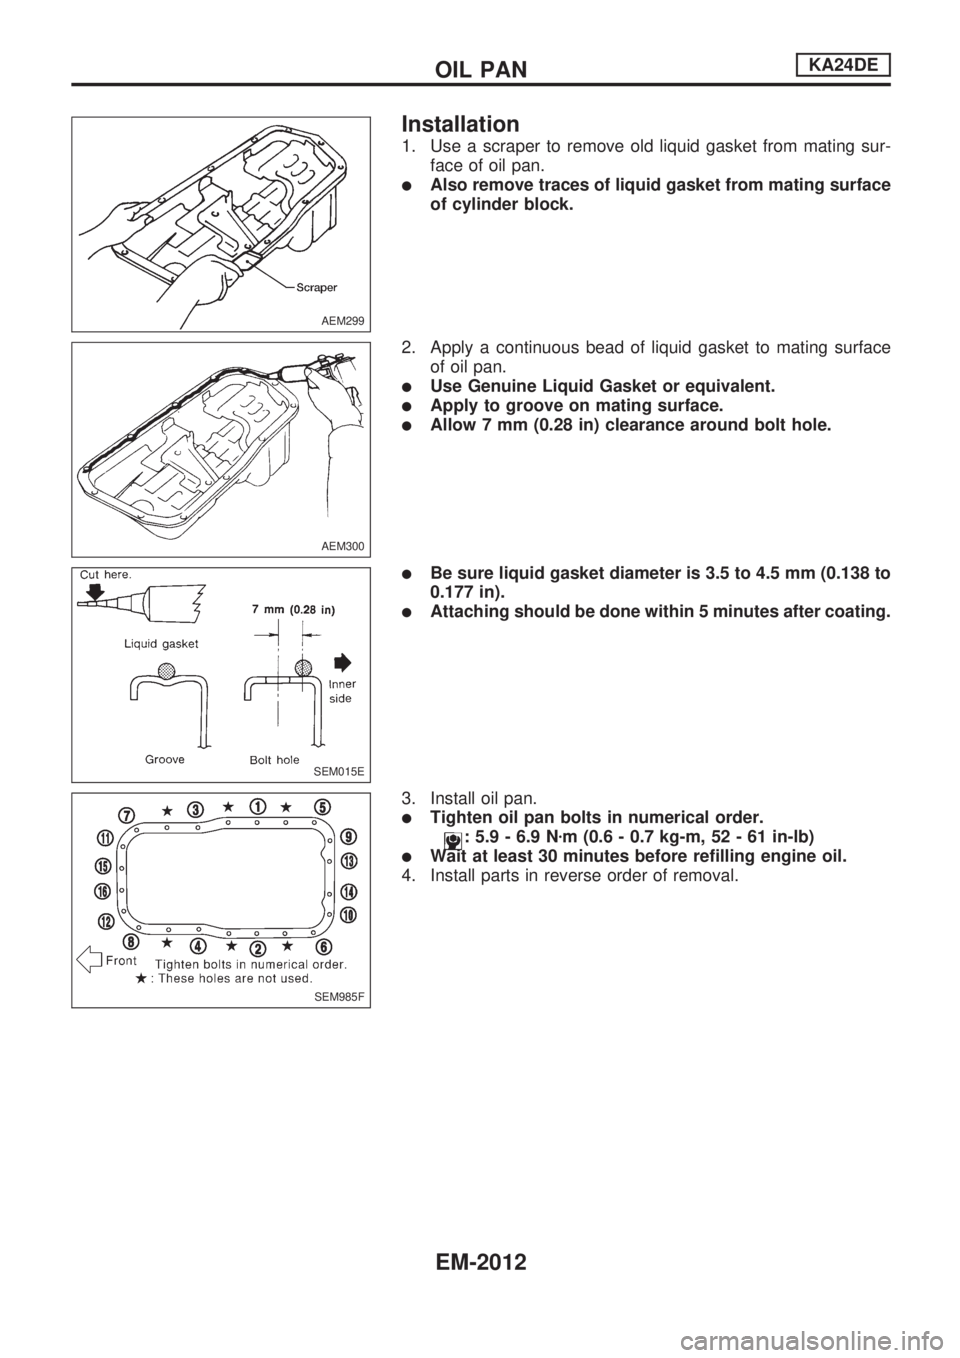
Installation
1. Use a scraper to remove old liquid gasket from mating sur-
face of oil pan.
lAlso remove traces of liquid gasket from mating surface
of cylinder block.
2. Apply a continuous bead of liquid gasket to mating surface
of oil pan.
lUse Genuine Liquid Gasket or equivalent.
lApply to groove on mating surface.
lAllow 7 mm (0.28 in) clearance around bolt hole.
lBe sure liquid gasket diameter is 3.5 to 4.5 mm (0.138 to
0.177 in).
lAttaching should be done within 5 minutes after coating.
3. Install oil pan.
lTighten oil pan bolts in numerical order.
: 5.9 - 6.9 Nzm (0.6 - 0.7 kg-m, 52 - 61 in-lb)
lWait at least 30 minutes before refilling engine oil.
4. Install parts in reverse order of removal.
AEM299
AEM300
SEM015E
SEM985F
OIL PANKA24DE
EM-2012
Trending: height, fuse, diagram, relay, air suspension, air condition, EC-2004
