NISSAN PRIMERA 1999 Electronic Repair Manual
Manufacturer: NISSAN, Model Year: 1999, Model line: PRIMERA, Model: NISSAN PRIMERA 1999Pages: 2267, PDF Size: 35.74 MB
Page 311 of 2267
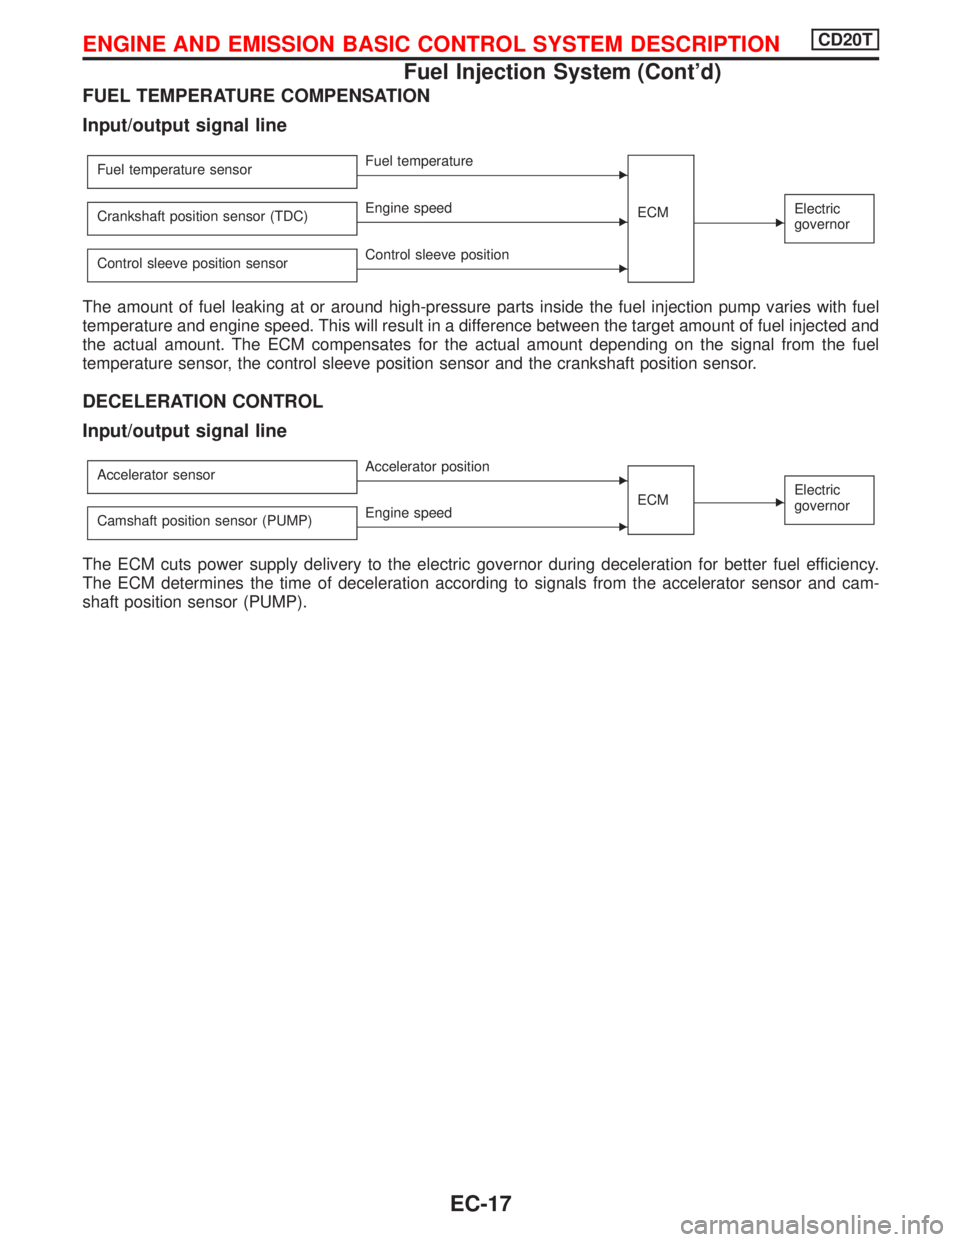
FUEL TEMPERATURE COMPENSATION
Input/output signal line
Fuel temperature sensorEFuel temperature
ECM
EElectric
governorCrankshaft position sensor (TDC)EEngine speed
Control sleeve position sensor
EControl sleeve position
The amount of fuel leaking at or around high-pressure parts inside the fuel injection pump varies with fuel
temperature and engine speed. This will result in a difference between the target amount of fuel injected and
the actual amount. The ECM compensates for the actual amount depending on the signal from the fuel
temperature sensor, the control sleeve position sensor and the crankshaft position sensor.
DECELERATION CONTROL
Input/output signal line
Accelerator sensorEAccelerator position
ECM
EElectric
governor
Camshaft position sensor (PUMP)EEngine speed
The ECM cuts power supply delivery to the electric governor during deceleration for better fuel efficiency.
The ECM determines the time of deceleration according to signals from the accelerator sensor and cam-
shaft position sensor (PUMP).
ENGINE AND EMISSION BASIC CONTROL SYSTEM DESCRIPTIONCD20T
Fuel Injection System (Cont'd)
EC-17
Page 312 of 2267
Fuel Injection Timing System
SYSTEM DESCRIPTION
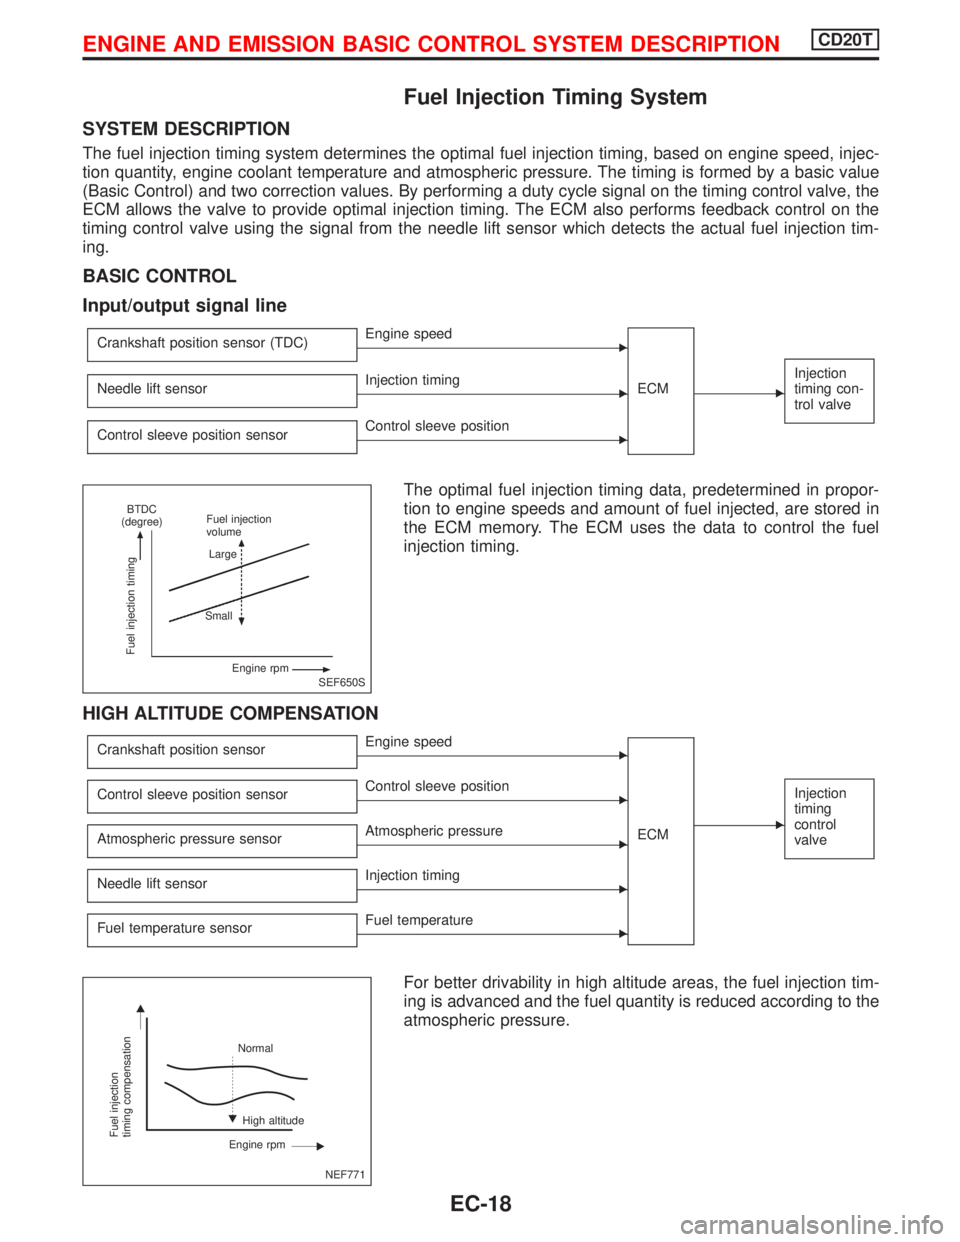
The fuel injection timing system determines the optimal fuel injection timing, based on engine speed, injec-
tion quantity, engine coolant temperature and atmospheric pressure. The timing is formed by a basic value
(Basic Control) and two correction values. By performing a duty cycle signal on the timing control valve, the
ECM allows the valve to provide optimal injection timing. The ECM also performs feedback control on the
timing control valve using the signal from the needle lift sensor which detects the actual fuel injection tim-
ing.
BASIC CONTROL
Input/output signal line
Crankshaft position sensor (TDC)EEngine speed
ECM
E
Injection
timing con-
trol valveNeedle lift sensorEInjection timing
Control sleeve position sensor
EControl sleeve position
The optimal fuel injection timing data, predetermined in propor-
tion to engine speeds and amount of fuel injected, are stored in
the ECM memory. The ECM uses the data to control the fuel
injection timing.
HIGH ALTITUDE COMPENSATION
Crankshaft position sensorEEngine speed
ECM
E
Injection
timing
control
valveControl sleeve position sensorEControl sleeve position
Atmospheric pressure sensor
EAtmospheric pressure
Needle lift sensor
EInjection timing
Fuel temperature sensor
EFuel temperature
For better drivability in high altitude areas, the fuel injection tim-
ing is advanced and the fuel quantity is reduced according to the
atmospheric pressure.
SEF650S
Fuel injection timing
BTDC
(degree)Fuel injection
volume
Large
Small
Engine rpm
NEF771
Fuel injection
timing compensation
Normal
High altitude
Engine rpm
ENGINE AND EMISSION BASIC CONTROL SYSTEM DESCRIPTIONCD20T
EC-18
Page 313 of 2267
ENGINE COOLANT TEMPERATURE COMPENSATION (During driving)
Input/output signal line
Crankshaft position sensor (TDC)EEngine speed
ECM
E
Injection
timing con-
trol valveEngine coolant temperature sensorEEngine coolant temperature
Needle lift sensor
EInjection timing
Control sleeve position sensor
EControl sleeve position
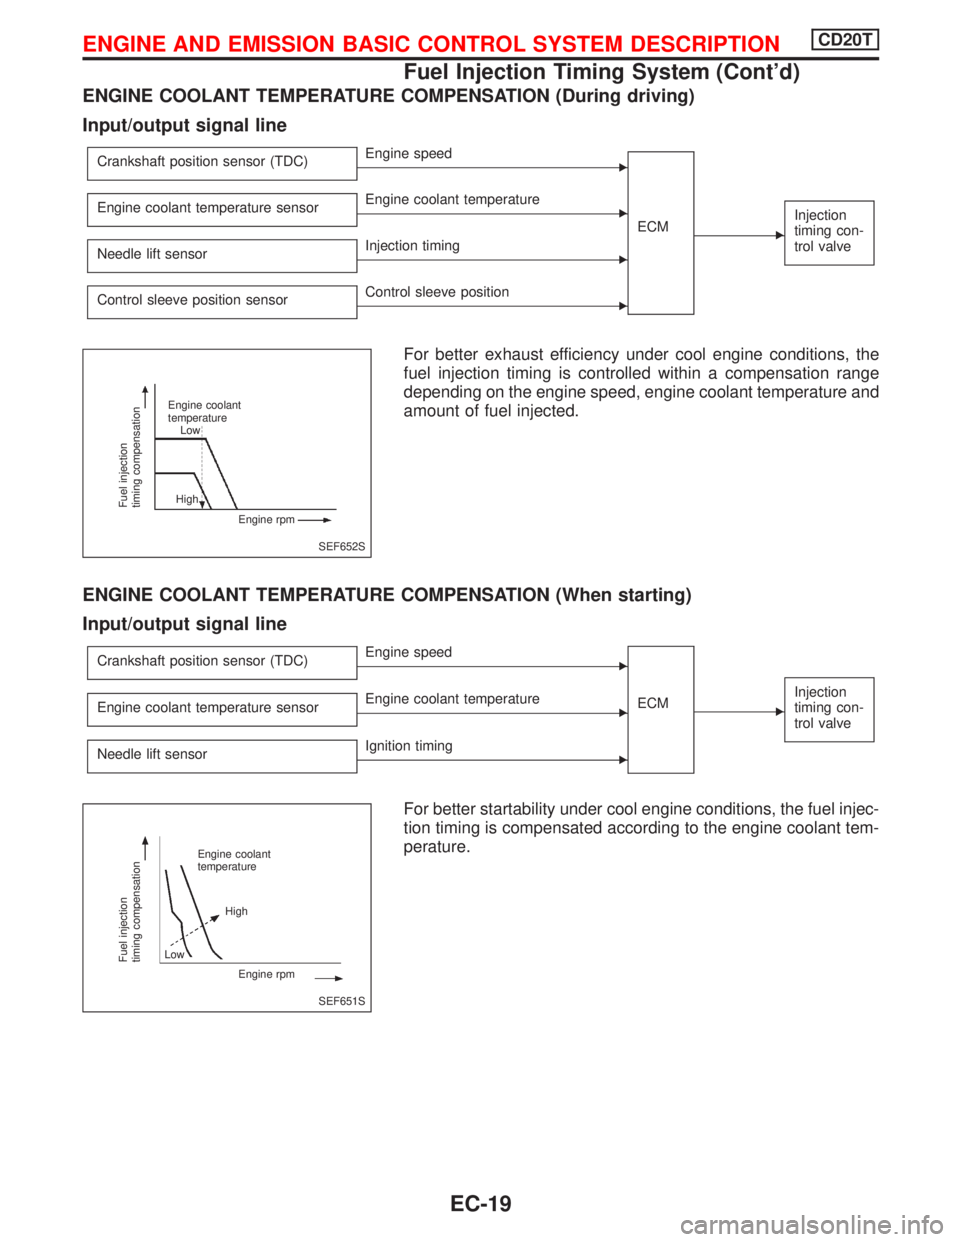
For better exhaust efficiency under cool engine conditions, the
fuel injection timing is controlled within a compensation range
depending on the engine speed, engine coolant temperature and
amount of fuel injected.
ENGINE COOLANT TEMPERATURE COMPENSATION (When starting)
Input/output signal line
Crankshaft position sensor (TDC)EEngine speed
ECM
E
Injection
timing con-
trol valveEngine coolant temperature sensorEEngine coolant temperature
Needle lift sensor
EIgnition timing
For better startability under cool engine conditions, the fuel injec-
tion timing is compensated according to the engine coolant tem-
perature.
SEF652S
Fuel injection
timing compensation
Engine coolant
temperature
Low
High
Engine rpm
SEF651S
Fuel injection
timing compensation
Engine coolant
temperature
High
Engine rpm Low
ENGINE AND EMISSION BASIC CONTROL SYSTEM DESCRIPTIONCD20T
Fuel Injection Timing System (Cont'd)
EC-19
Page 314 of 2267
Air Conditioning Cut Control
INPUT/OUTPUT SIGNAL LINE
Air conditioner switch or ABS actuator
and electric unit (control unit)EAir conditioner ªONº signal
ECM
EAir
conditioner
relayAccelerator position sensorEAccelerator valve opening angle
Vehicle speed sensor
EVehicle speed
Engine coolant temperature sensor
EEngine coolant temperature
SYSTEM DESCRIPTION
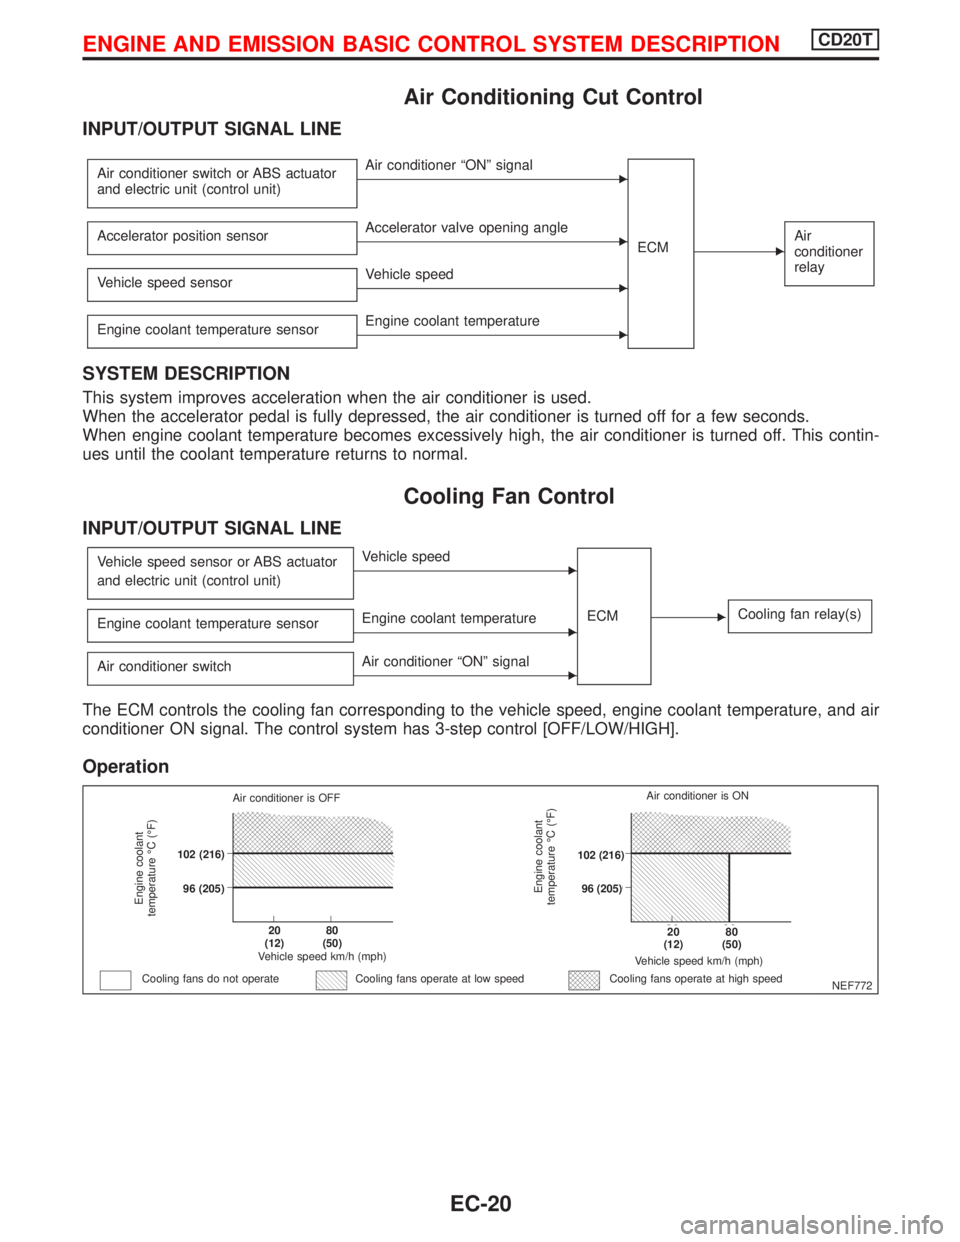
This system improves acceleration when the air conditioner is used.
When the accelerator pedal is fully depressed, the air conditioner is turned off for a few seconds.
When engine coolant temperature becomes excessively high, the air conditioner is turned off. This contin-
ues until the coolant temperature returns to normal.
Cooling Fan Control
INPUT/OUTPUT SIGNAL LINE
Vehicle speed sensor or ABS actuator
and electric unit (control unit)EVehicle speed
ECM
ECooling fan relay(s)Engine coolant temperature sensorEEngine coolant temperature
Air conditioner switch
EAir conditioner ªONº signal
The ECM controls the cooling fan corresponding to the vehicle speed, engine coolant temperature, and air
conditioner ON signal. The control system has 3-step control [OFF/LOW/HIGH].
Operation
NEF772
Engine coolant
temperature ÉC (ÉF)
Air conditioner is OFF
.102 (216)
.96 (205)
.20
(12).80
(50)
Vehicle speed km/h (mph)
Cooling fans do not operateCooling fans operate at high speed
Engine coolant
temperature ÉC (ÉF)
Vehicle speed km/h (mph)
.20
(12).80
(50)
.102 (216)
.96 (205)Air conditioner is ON
Cooling fans operate at low speed
ENGINE AND EMISSION BASIC CONTROL SYSTEM DESCRIPTIONCD20T
EC-20
Page 315 of 2267
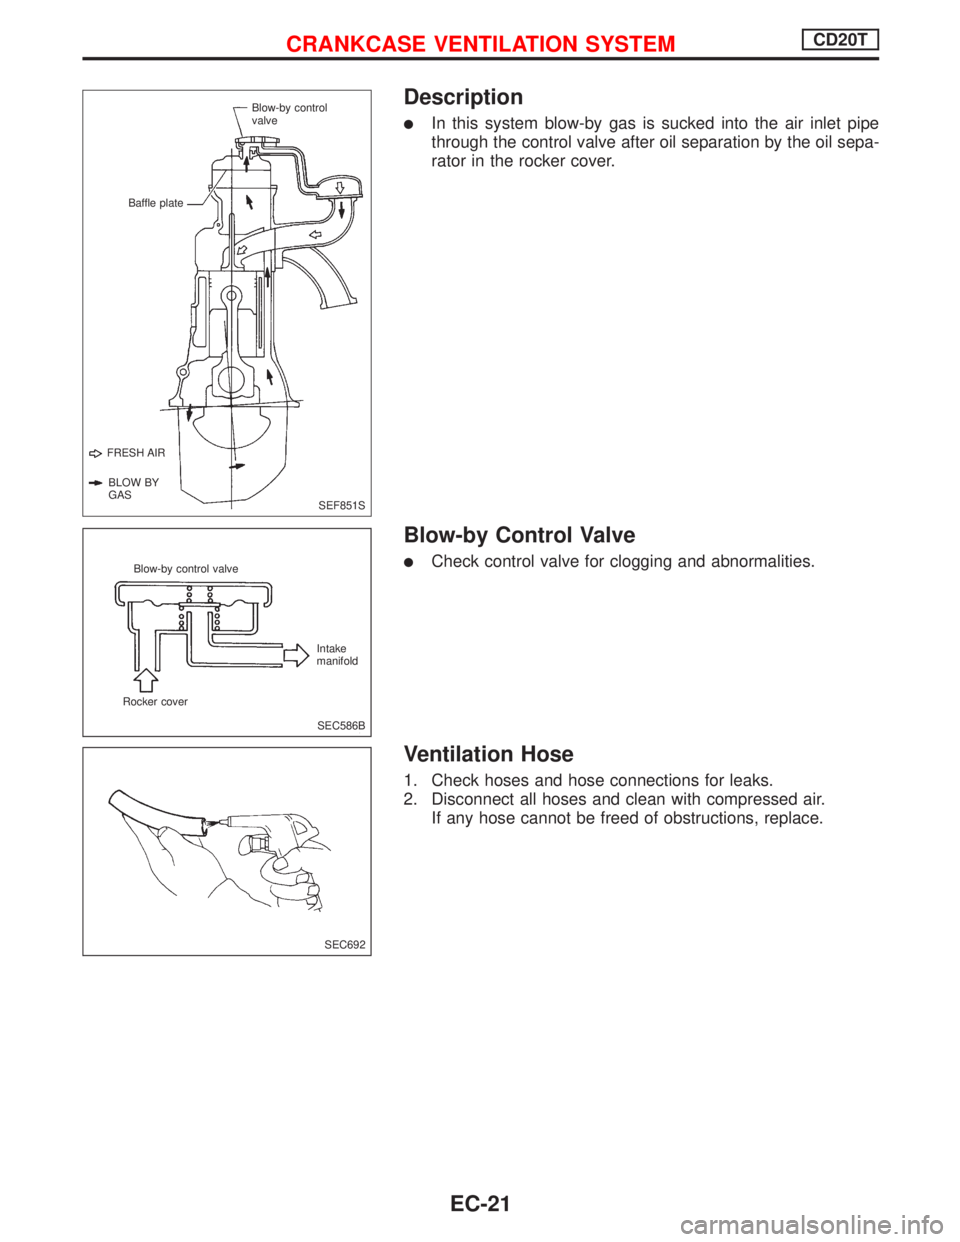
Description
lIn this system blow-by gas is sucked into the air inlet pipe
through the control valve after oil separation by the oil sepa-
rator in the rocker cover.
Blow-by Control Valve
lCheck control valve for clogging and abnormalities.
Ventilation Hose
1. Check hoses and hose connections for leaks.
2. Disconnect all hoses and clean with compressed air.
If any hose cannot be freed of obstructions, replace.
SEF851S
Blow-by control
valve
FRESH AIR
BLOW BY
GASBaffle plate
SEC586B Blow-by control valve
Rocker coverIntake
manifold
SEC692
CRANKCASE VENTILATION SYSTEMCD20T
EC-21
Page 316 of 2267
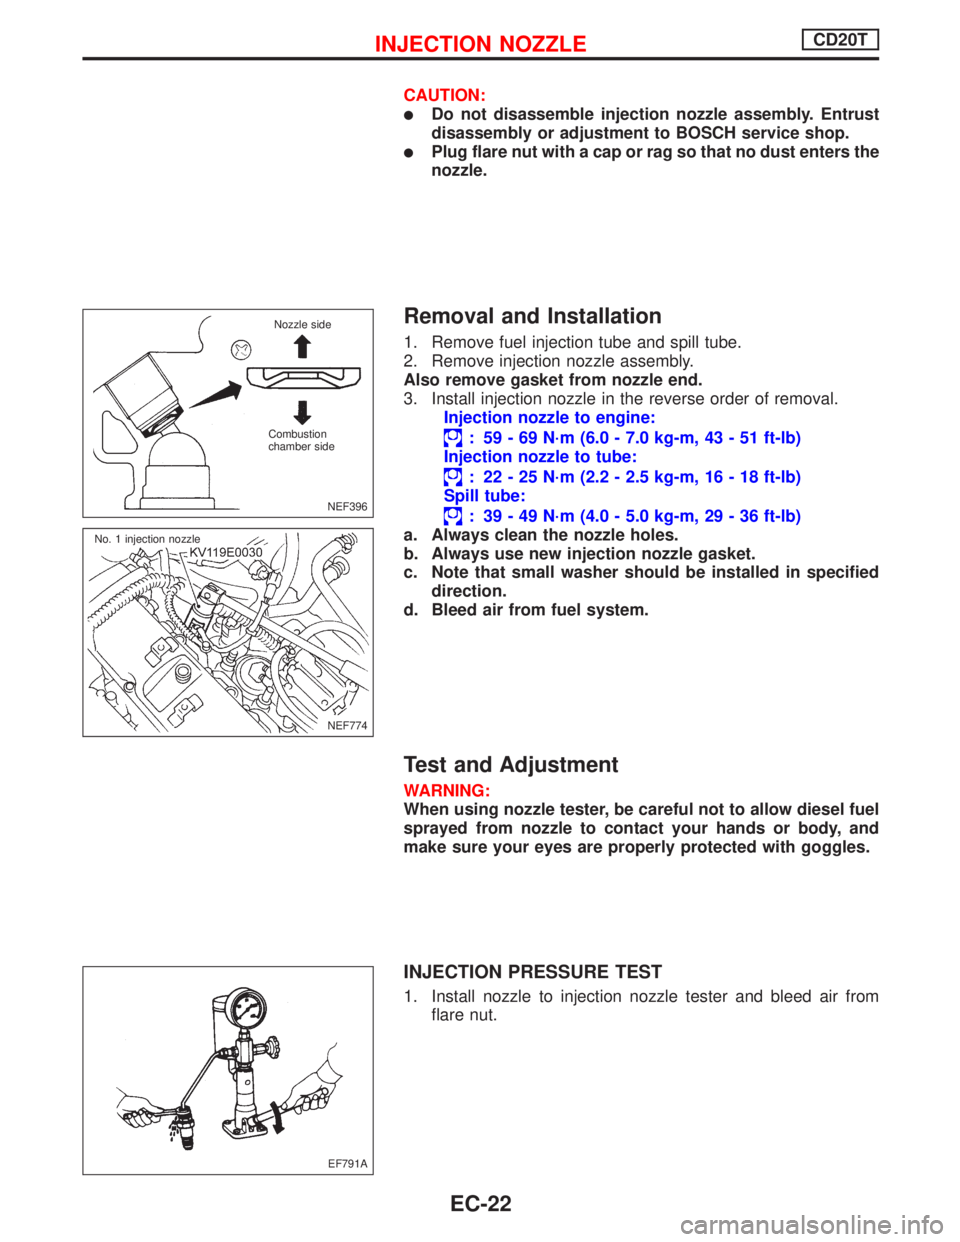
CAUTION:
lDo not disassemble injection nozzle assembly. Entrust
disassembly or adjustment to BOSCH service shop.
lPlug flare nut with a cap or rag so that no dust enters the
nozzle.
Removal and Installation
1. Remove fuel injection tube and spill tube.
2. Remove injection nozzle assembly.
Also remove gasket from nozzle end.
3. Install injection nozzle in the reverse order of removal.
Injection nozzle to engine:
: 59 - 69 N´m (6.0 - 7.0 kg-m, 43 - 51 ft-lb)
Injection nozzle to tube:
: 22 - 25 N´m (2.2 - 2.5 kg-m, 16 - 18 ft-lb)
Spill tube:
: 39 - 49 N´m (4.0 - 5.0 kg-m, 29 - 36 ft-lb)
a. Always clean the nozzle holes.
b. Always use new injection nozzle gasket.
c. Note that small washer should be installed in specified
direction.
d. Bleed air from fuel system.
Test and Adjustment
WARNING:
When using nozzle tester, be careful not to allow diesel fuel
sprayed from nozzle to contact your hands or body, and
make sure your eyes are properly protected with goggles.
INJECTION PRESSURE TEST
1. Install nozzle to injection nozzle tester and bleed air from
flare nut.
NEF396
Nozzle side
Combustion
chamber side
NEF774 No. 1 injection nozzle
EF791A
INJECTION NOZZLECD20T
EC-22
Page 317 of 2267
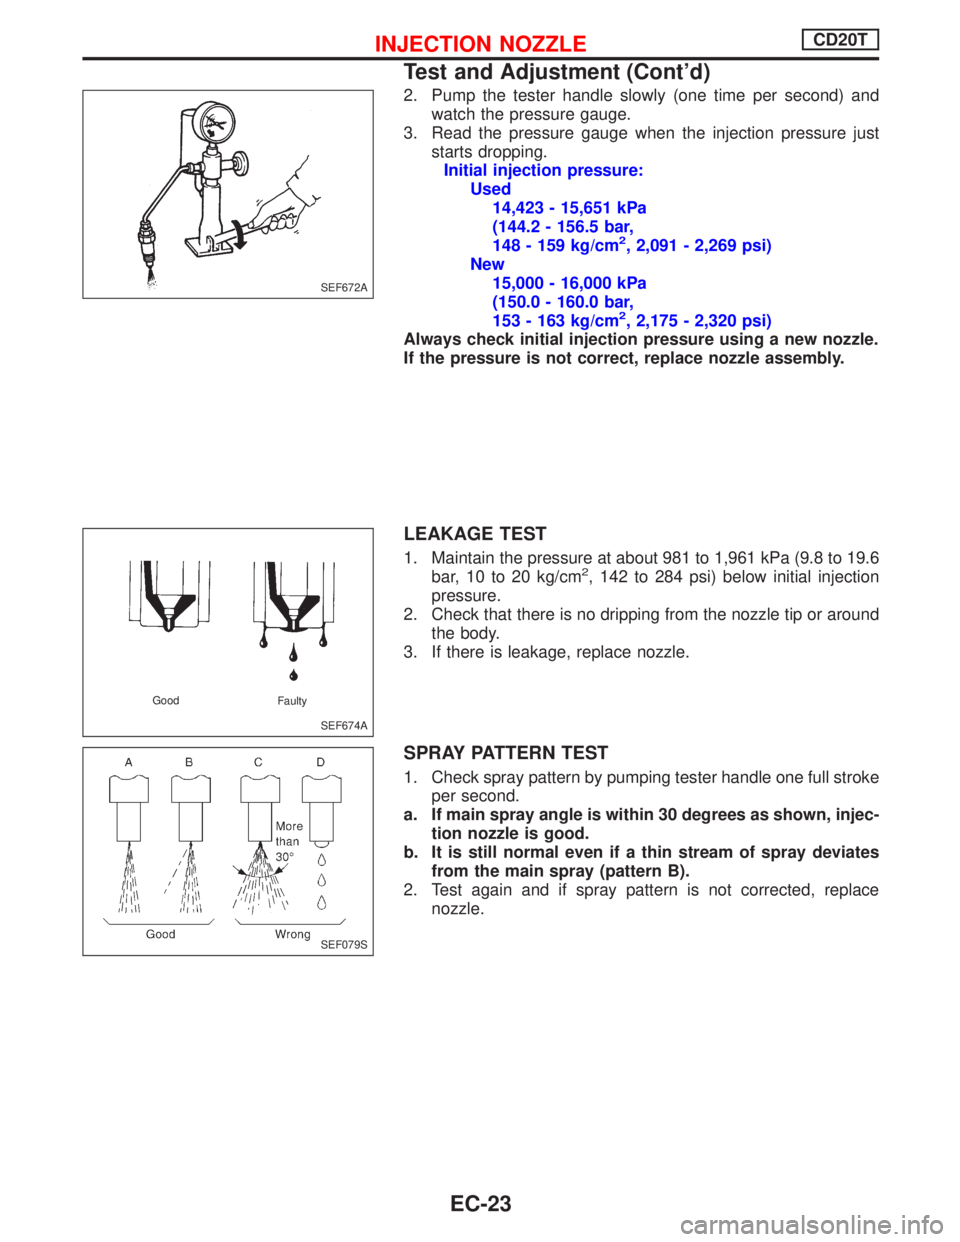
2. Pump the tester handle slowly (one time per second) and
watch the pressure gauge.
3. Read the pressure gauge when the injection pressure just
starts dropping.
Initial injection pressure:
Used
14,423 - 15,651 kPa
(144.2 - 156.5 bar,
148 - 159 kg/cm
2, 2,091 - 2,269 psi)
New
15,000 - 16,000 kPa
(150.0 - 160.0 bar,
153 - 163 kg/cm
2, 2,175 - 2,320 psi)
Always check initial injection pressure using a new nozzle.
If the pressure is not correct, replace nozzle assembly.
LEAKAGE TEST
1. Maintain the pressure at about 981 to 1,961 kPa (9.8 to 19.6
bar, 10 to 20 kg/cm2, 142 to 284 psi) below initial injection
pressure.
2. Check that there is no dripping from the nozzle tip or around
the body.
3. If there is leakage, replace nozzle.
SPRAY PATTERN TEST
1. Check spray pattern by pumping tester handle one full stroke
per second.
a. If main spray angle is within 30 degrees as shown, injec-
tion nozzle is good.
b. It is still normal even if a thin stream of spray deviates
from the main spray (pattern B).
2. Test again and if spray pattern is not corrected, replace
nozzle.
SEF672A
SEF674A Good
Faulty
SEF079S
INJECTION NOZZLECD20T
Test and Adjustment (Cont'd)
EC-23
Page 318 of 2267
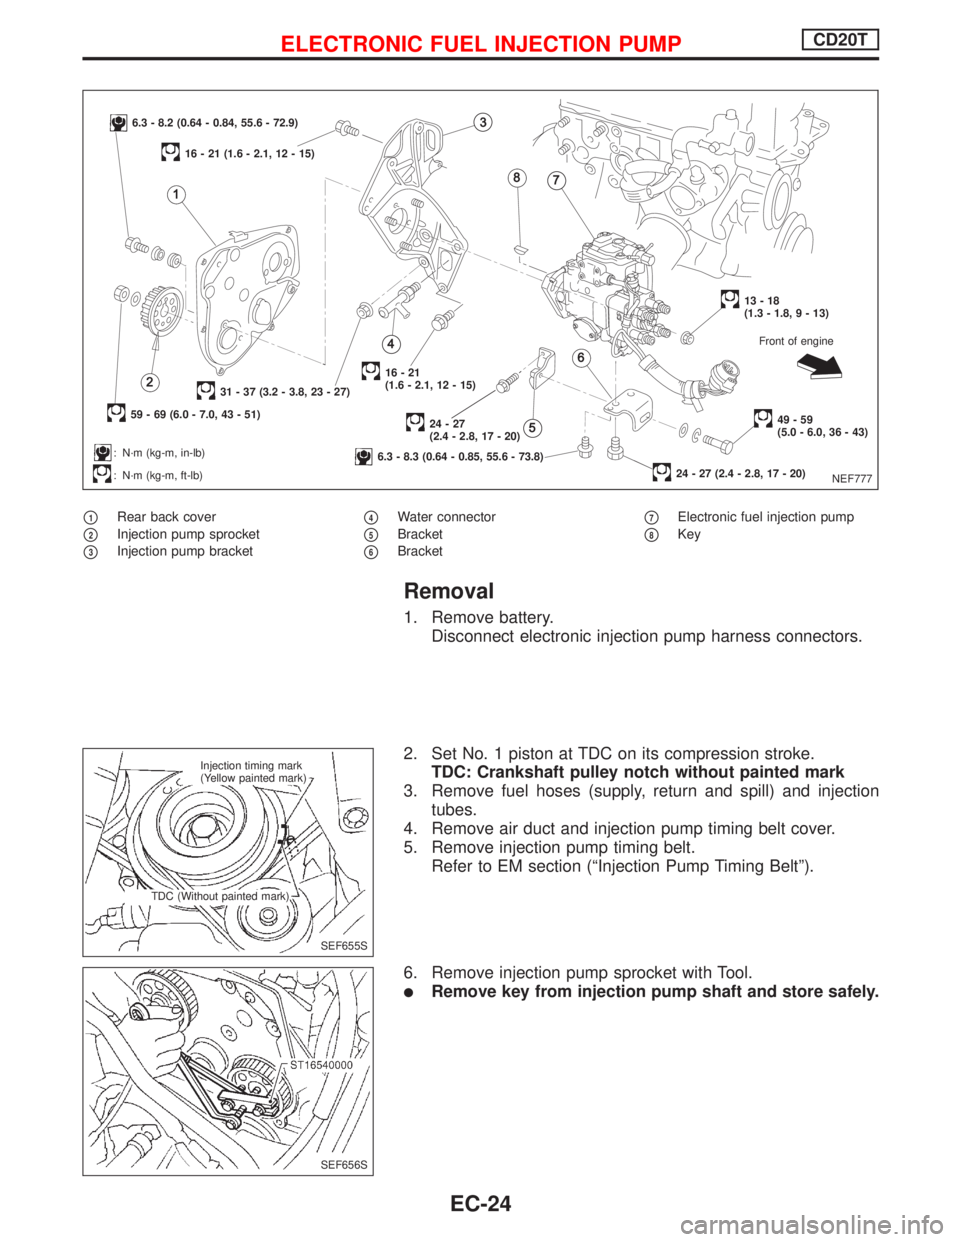
p1Rear back cover
p2Injection pump sprocket
p3Injection pump bracket
p4Water connector
p5Bracket
p6Bracket
p7Electronic fuel injection pump
p8Key
Removal
1. Remove battery.
Disconnect electronic injection pump harness connectors.
2. Set No. 1 piston at TDC on its compression stroke.
TDC: Crankshaft pulley notch without painted mark
3. Remove fuel hoses (supply, return and spill) and injection
tubes.
4. Remove air duct and injection pump timing belt cover.
5. Remove injection pump timing belt.
Refer to EM section (ªInjection Pump Timing Beltº).
6. Remove injection pump sprocket with Tool.
lRemove key from injection pump shaft and store safely.
NEF777
6.3 - 8.2 (0.64 - 0.84, 55.6 - 72.9)
59 - 69 (6.0 - 7.0, 43 - 51)
31 - 37 (3.2 - 3.8, 23 - 27)
: N´m (kg-m, in-lb)
: N´m (kg-m, ft-lb)
16 - 21 (1.6 - 2.1, 12 - 15)
16-21
(1.6 - 2.1, 12 - 15)
24-27
(2.4 - 2.8, 17 - 20)
6.3 - 8.3 (0.64 - 0.85, 55.6 - 73.8)
13-18
(1.3 - 1.8, 9 - 13)
49-59
(5.0 - 6.0, 36 - 43)
24 - 27 (2.4 - 2.8, 17 - 20)Front of engine
SEF655S Injection timing mark
(Yellow painted mark)
TDC (Without painted mark)
SEF656S
ELECTRONIC FUEL INJECTION PUMPCD20T
EC-24
Page 319 of 2267
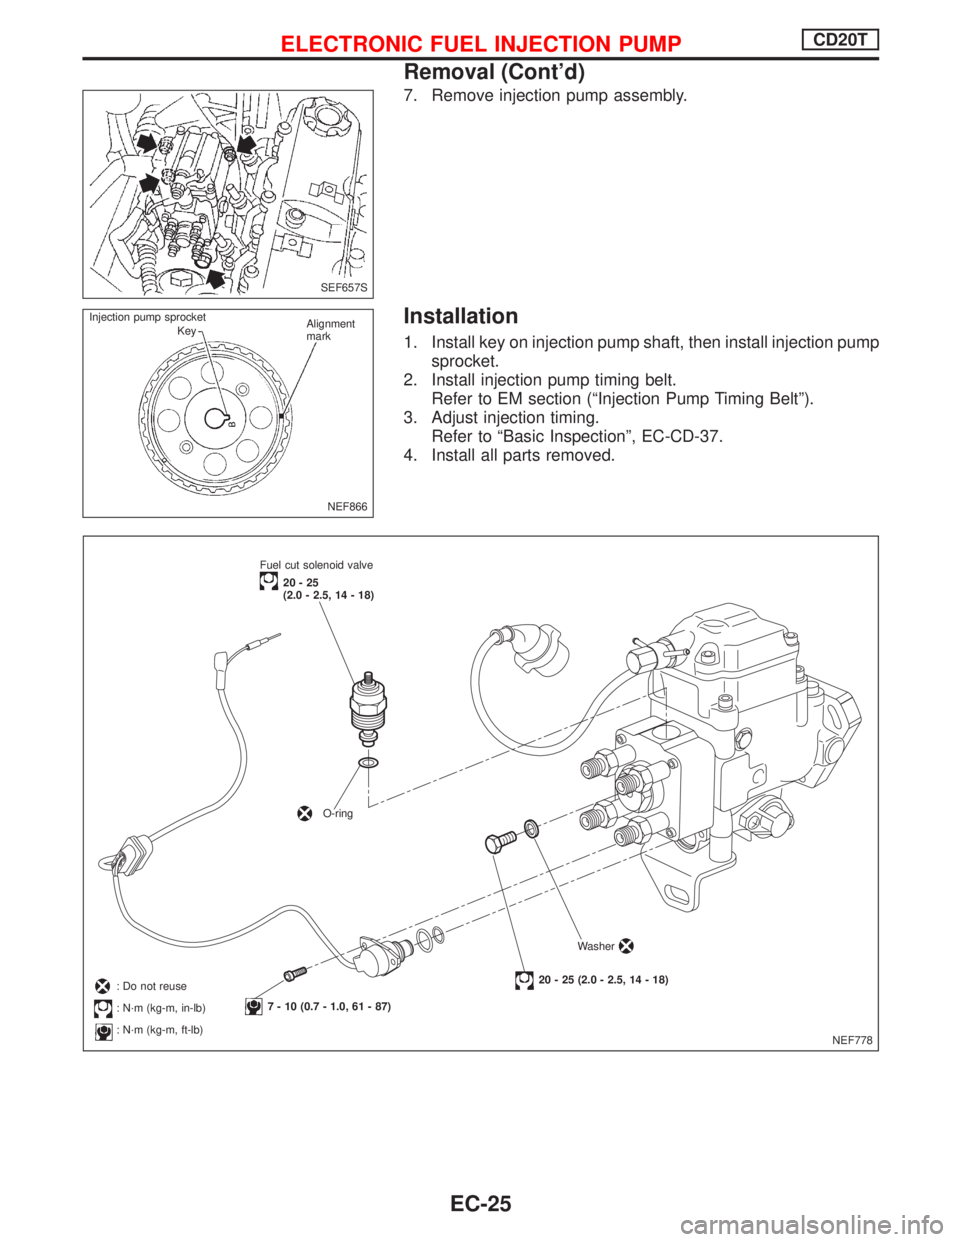
7. Remove injection pump assembly.
Installation
1. Install key on injection pump shaft, then install injection pump
sprocket.
2. Install injection pump timing belt.
Refer to EM section (ªInjection Pump Timing Beltº).
3. Adjust injection timing.
Refer to ªBasic Inspectionº, EC-CD-37.
4. Install all parts removed.
SEF657S
NEF866 Injection pump sprocket
KeyAlignment
mark
NEF778 Fuel cut solenoid valve
20-25
(2.0 - 2.5, 14 - 18)
O-ring
7 - 10 (0.7 - 1.0, 61 - 87)
20 - 25 (2.0 - 2.5, 14 - 18)Washer: Do not reuse
: N´m (kg-m, in-lb)
: N´m (kg-m, ft-lb)
ELECTRONIC FUEL INJECTION PUMPCD20T
Removal (Cont'd)
EC-25
Page 320 of 2267
Disassembly and Assembly
CAUTION:
lDo not disassemble the parts not shown in the illustra-
tion above.
lBefore installing injection timing control valve, apply a
coat of diesel fuel to O-ring and its mating area. Insert
injection timing control valve straight into bore in fuel
pump body. After properly positioning injection timing
control valve, visually check for fuel leaks.
lAfter assembling the parts, erase Diagnostic Trouble
Code (DTC), and perform DTC CONFIRMATION PROCE-
DURE (or OVERALL FUNCTION CHECK).
ELECTRONIC FUEL INJECTION PUMPCD20T
EC-26