NISSAN PRIMERA 1999 Electronic Repair Manual
Manufacturer: NISSAN, Model Year: 1999, Model line: PRIMERA, Model: NISSAN PRIMERA 1999Pages: 2267, PDF Size: 35.74 MB
Page 281 of 2267
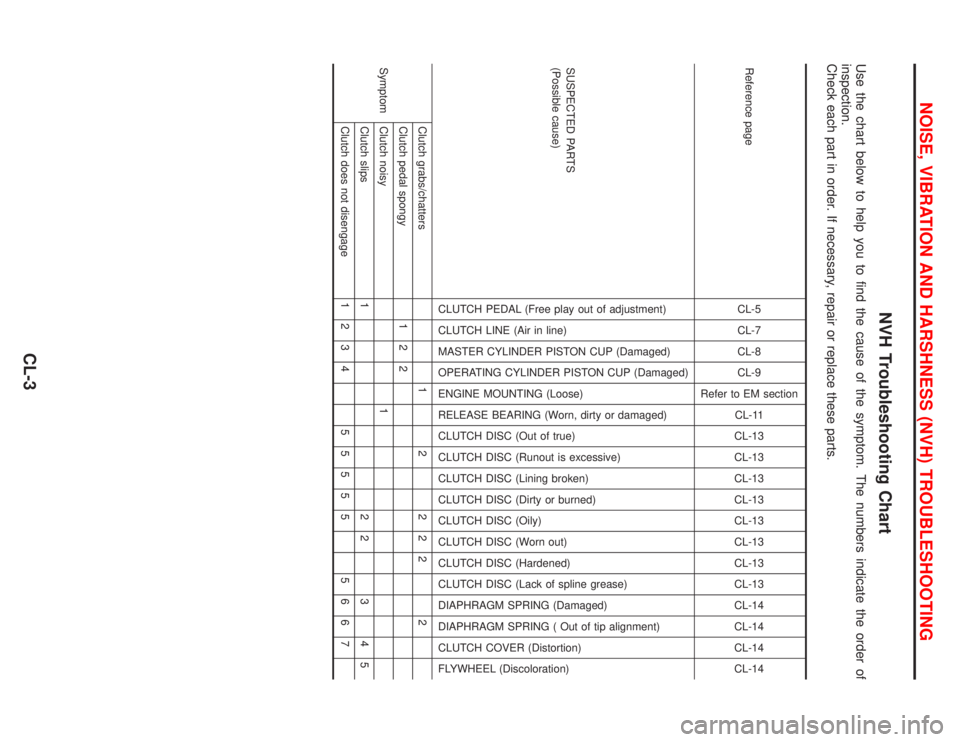
NVH Troubleshooting Chart
Use the chart below to help you to find the cause of the symptom. The numbers indicate the order of
inspection.
Check each part in order. If necessary, repair or replace these parts.
Reference pageCL-5
CL-7
CL-8
CL-9
Refer to EM section
CL-11
CL-13
CL-13
CL-13
CL-13
CL-13
CL-13
CL-13
CL-13
CL-14
CL-14
CL-14
CL-14
SUSPECTED PARTS
(Possible cause)
CLUTCH PEDAL (Free play out of adjustment)
CLUTCH LINE (Air in line)
MASTER CYLINDER PISTON CUP (Damaged)
OPERATING CYLINDER PISTON CUP (Damaged)
ENGINE MOUNTING (Loose)
RELEASE BEARING (Worn, dirty or damaged)
CLUTCH DISC (Out of true)
CLUTCH DISC (Runout is excessive)
CLUTCH DISC (Lining broken)
CLUTCH DISC (Dirty or burned)
CLUTCH DISC (Oily)
CLUTCH DISC (Worn out)
CLUTCH DISC (Hardened)
CLUTCH DISC (Lack of spline grease)
DIAPHRAGM SPRING (Damaged)
DIAPHRAGM SPRING ( Out of tip alignment)
CLUTCH COVER (Distortion)
FLYWHEEL (Discoloration)
SymptomClutch grabs/chatters 1 2 2 2 2 2
Clutch pedal spongy 1 2 2
Clutch noisy 1
Clutch slips 1 2 2 3 4 5
Clutch does not disengage 1 2 3 4 5 5 5 5 5 5 6 6 7
NOISE, VIBRATION AND HARSHNESS (NVH) TROUBLESHOOTING
CL-3
Page 282 of 2267

YCL007
CLUTCH SYSTEM
CL-4
Page 283 of 2267
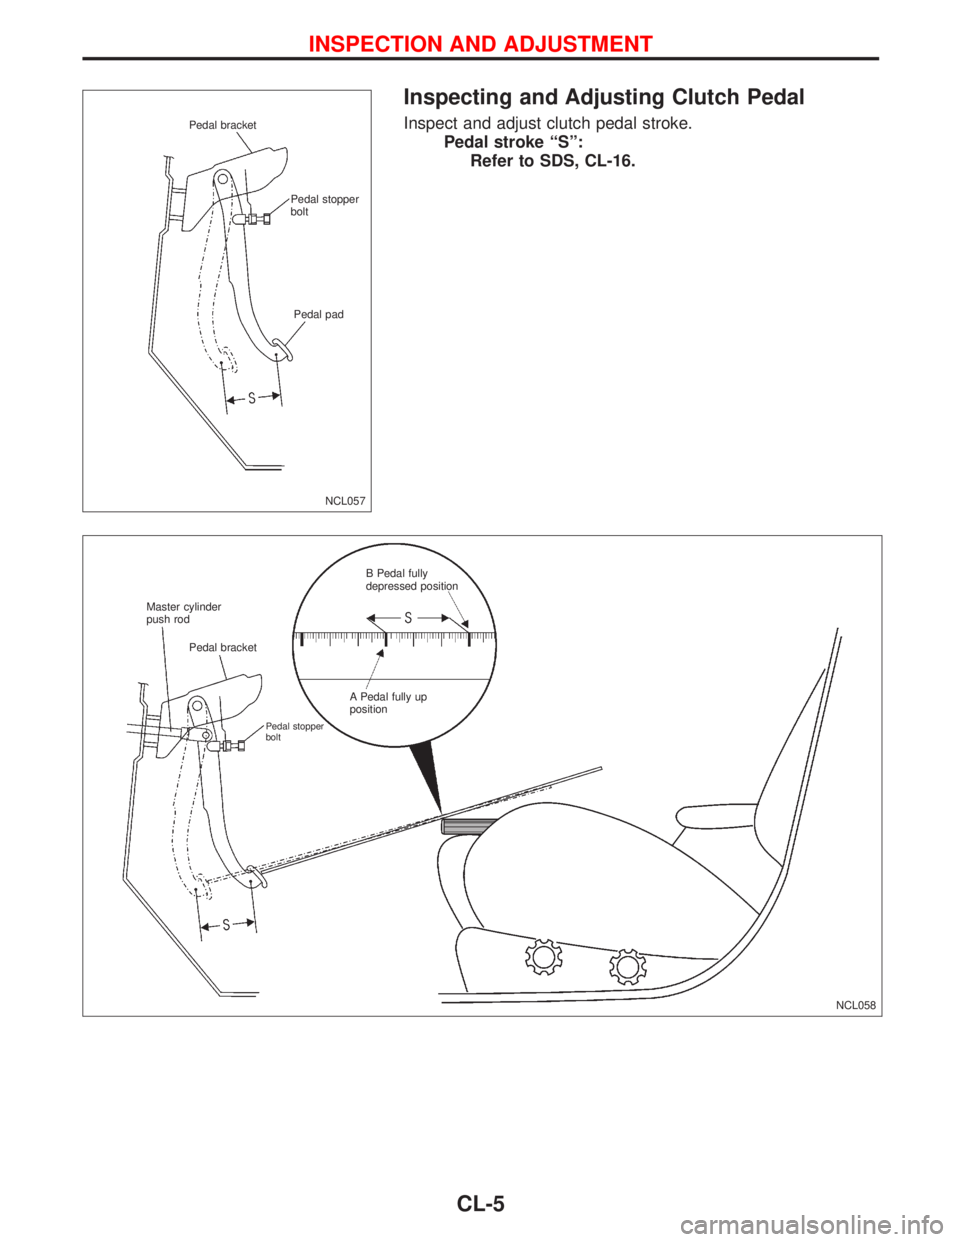
Inspecting and Adjusting Clutch Pedal
Inspect and adjust clutch pedal stroke.
Pedal stroke ªSº:
Refer to SDS, CL-16.
NCL057
Pedal bracket
Pedal stopper
bolt
Pedal pad
NCL058 Master cylinder
push rod
Pedal bracket
Pedal stopper
bolt
B Pedal fully
depressed position
A Pedal fully up
position
INSPECTION AND ADJUSTMENT
CL-5
Page 284 of 2267
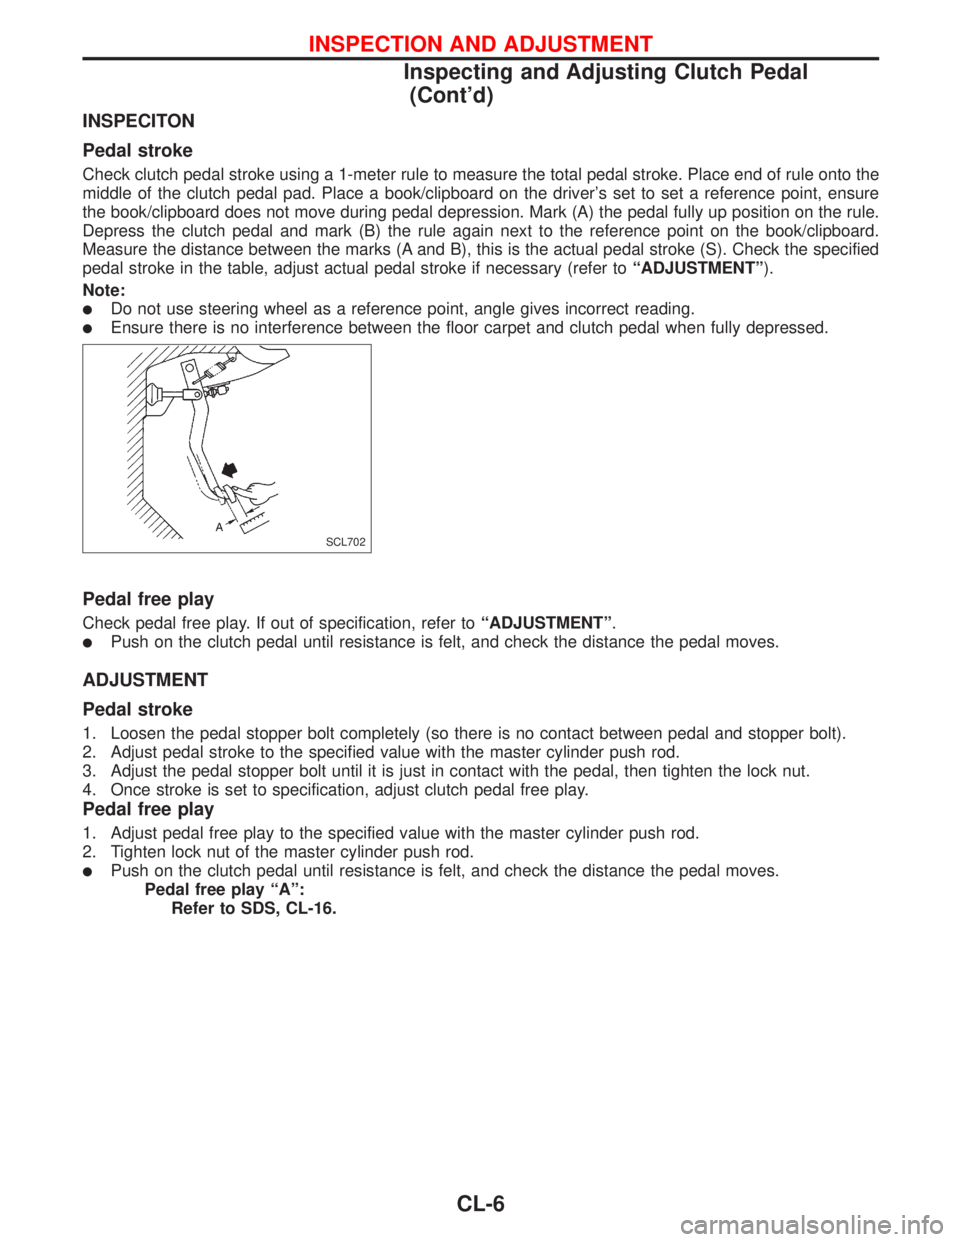
INSPECITON
Pedal stroke
Check clutch pedal stroke using a 1-meter rule to measure the total pedal stroke. Place end of rule onto the
middle of the clutch pedal pad. Place a book/clipboard on the driver's set to set a reference point, ensure
the book/clipboard does not move during pedal depression. Mark (A) the pedal fully up position on the rule.
Depress the clutch pedal and mark (B) the rule again next to the reference point on the book/clipboard.
Measure the distance between the marks (A and B), this is the actual pedal stroke (S). Check the specified
pedal stroke in the table, adjust actual pedal stroke if necessary (refer toªADJUSTMENTº).
Note:
lDo not use steering wheel as a reference point, angle gives incorrect reading.
lEnsure there is no interference between the floor carpet and clutch pedal when fully depressed.
Pedal free play
Check pedal free play. If out of specification, refer toªADJUSTMENTº.
lPush on the clutch pedal until resistance is felt, and check the distance the pedal moves.
ADJUSTMENT
Pedal stroke
1. Loosen the pedal stopper bolt completely (so there is no contact between pedal and stopper bolt).
2. Adjust pedal stroke to the specified value with the master cylinder push rod.
3. Adjust the pedal stopper bolt until it is just in contact with the pedal, then tighten the lock nut.
4. Once stroke is set to specification, adjust clutch pedal free play.
Pedal free play
1. Adjust pedal free play to the specified value with the master cylinder push rod.
2. Tighten lock nut of the master cylinder push rod.
lPush on the clutch pedal until resistance is felt, and check the distance the pedal moves.
Pedal free play ªAº:
Refer to SDS, CL-16.
SCL702
INSPECTION AND ADJUSTMENT
Inspecting and Adjusting Clutch Pedal
(Cont'd)
CL-6
Page 285 of 2267
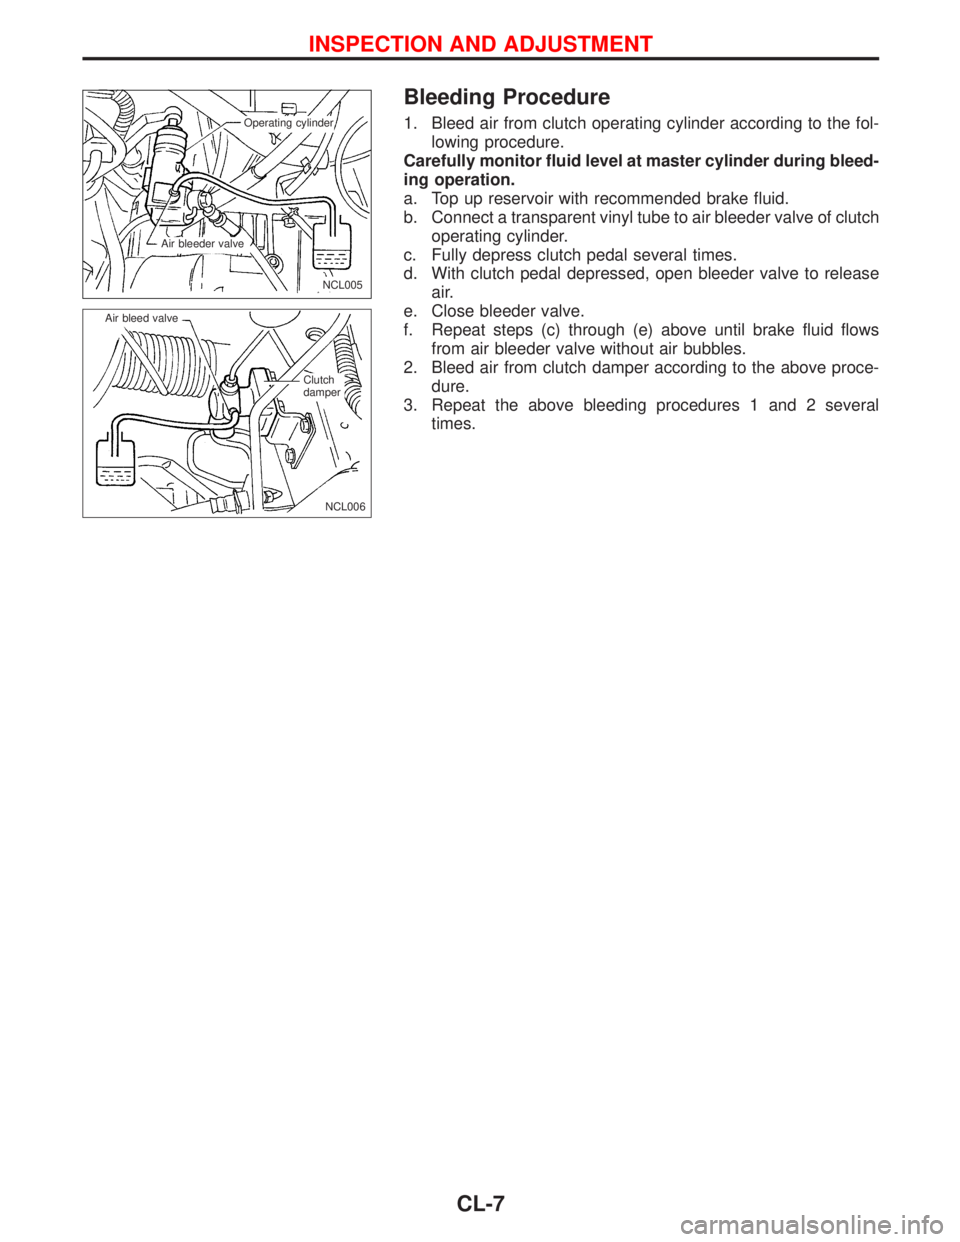
Bleeding Procedure
1. Bleed air from clutch operating cylinder according to the fol-
lowing procedure.
Carefully monitor fluid level at master cylinder during bleed-
ing operation.
a. Top up reservoir with recommended brake fluid.
b. Connect a transparent vinyl tube to air bleeder valve of clutch
operating cylinder.
c. Fully depress clutch pedal several times.
d. With clutch pedal depressed, open bleeder valve to release
air.
e. Close bleeder valve.
f. Repeat steps (c) through (e) above until brake fluid flows
from air bleeder valve without air bubbles.
2. Bleed air from clutch damper according to the above proce-
dure.
3. Repeat the above bleeding procedures 1 and 2 several
times.
.NCL005
.Operating cylinder
.Air bleeder valve
NCL006 Air bleed valve
.Clutch
damper
INSPECTION AND ADJUSTMENT
CL-7
Page 286 of 2267
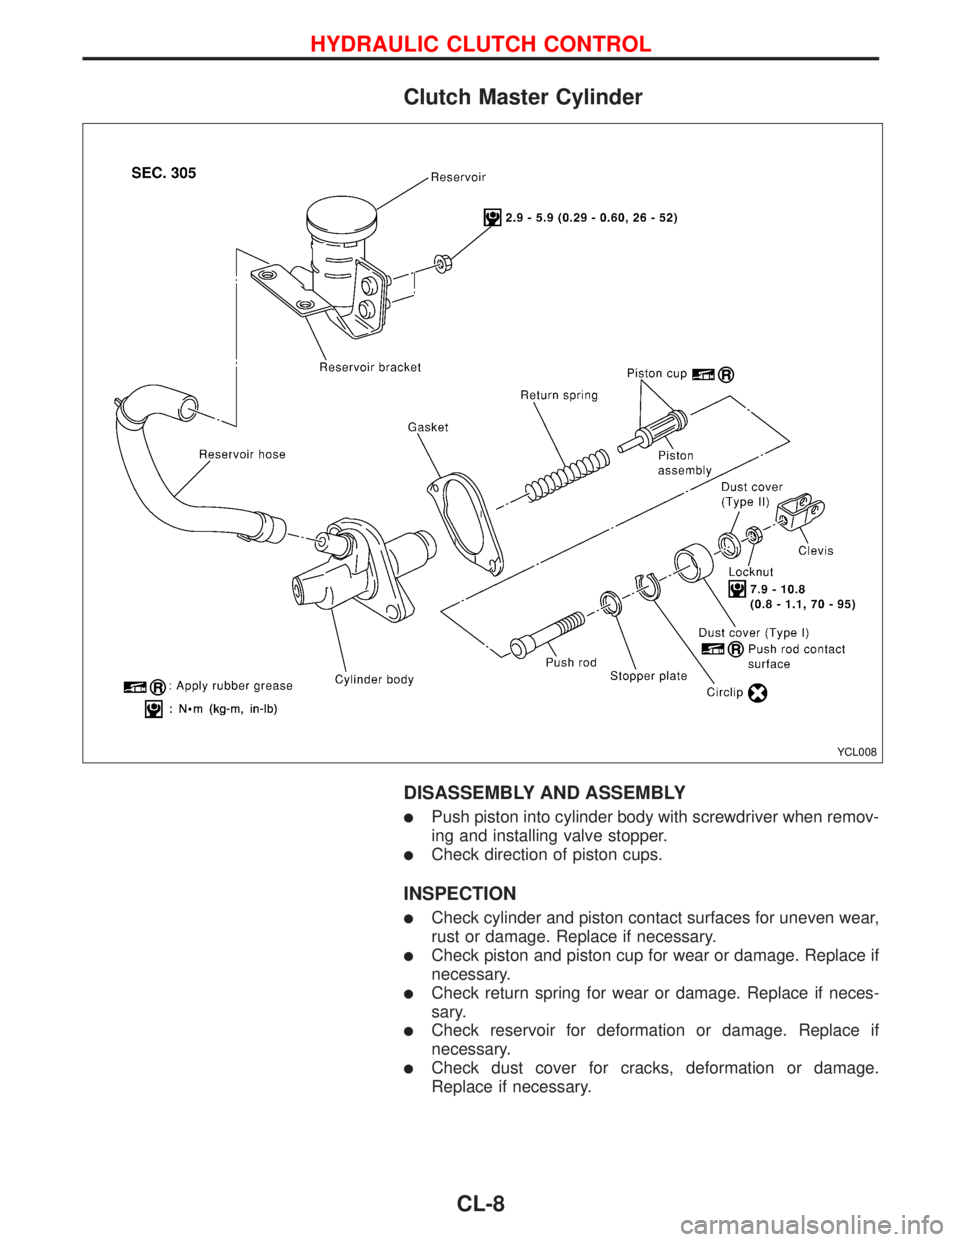
Clutch Master Cylinder
DISASSEMBLY AND ASSEMBLY
lPush piston into cylinder body with screwdriver when remov-
ing and installing valve stopper.
lCheck direction of piston cups.
INSPECTION
lCheck cylinder and piston contact surfaces for uneven wear,
rust or damage. Replace if necessary.
lCheck piston and piston cup for wear or damage. Replace if
necessary.
lCheck return spring for wear or damage. Replace if neces-
sary.
lCheck reservoir for deformation or damage. Replace if
necessary.
lCheck dust cover for cracks, deformation or damage.
Replace if necessary.
YCL008
HYDRAULIC CLUTCH CONTROL
CL-8
Page 287 of 2267
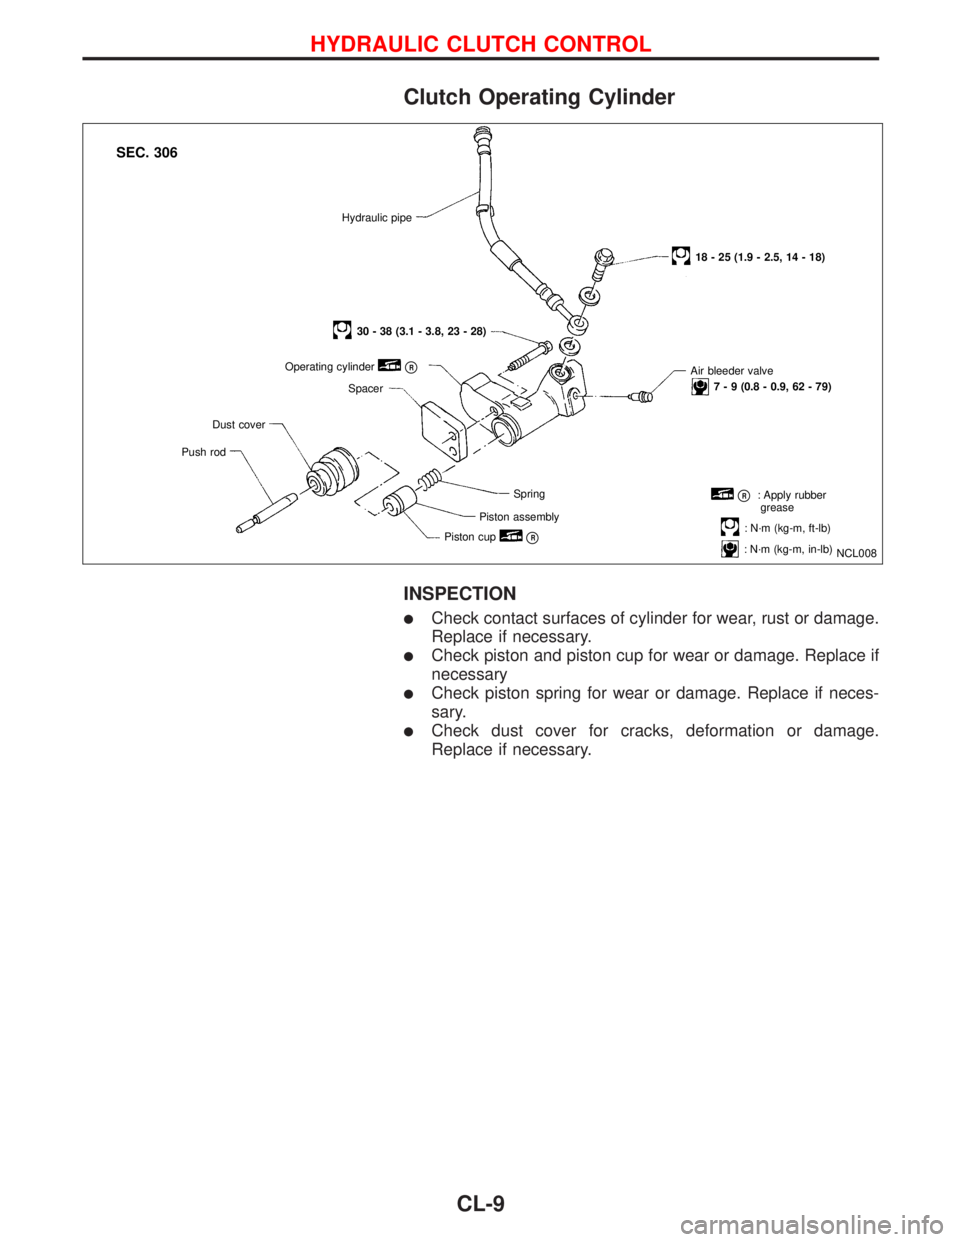
Clutch Operating Cylinder
INSPECTION
lCheck contact surfaces of cylinder for wear, rust or damage.
Replace if necessary.
lCheck piston and piston cup for wear or damage. Replace if
necessary
lCheck piston spring for wear or damage. Replace if neces-
sary.
lCheck dust cover for cracks, deformation or damage.
Replace if necessary.
NCL008
18 - 25 (1.9 - 2.5, 14 - 18) Hydraulic pipe
Air bleeder valve
7 - 9 (0.8 - 0.9, 62 - 79)
30 - 38 (3.1 - 3.8, 23 - 28)
Operating cylinder
pR
Spacer
Dust cover
Push rod
Spring
Piston assembly
Piston cup
pR
pR: Apply rubber
grease
: N´m (kg-m, ft-lb)
: N´m (kg-m, in-lb)
SEC. 306
HYDRAULIC CLUTCH CONTROL
CL-9
Page 288 of 2267
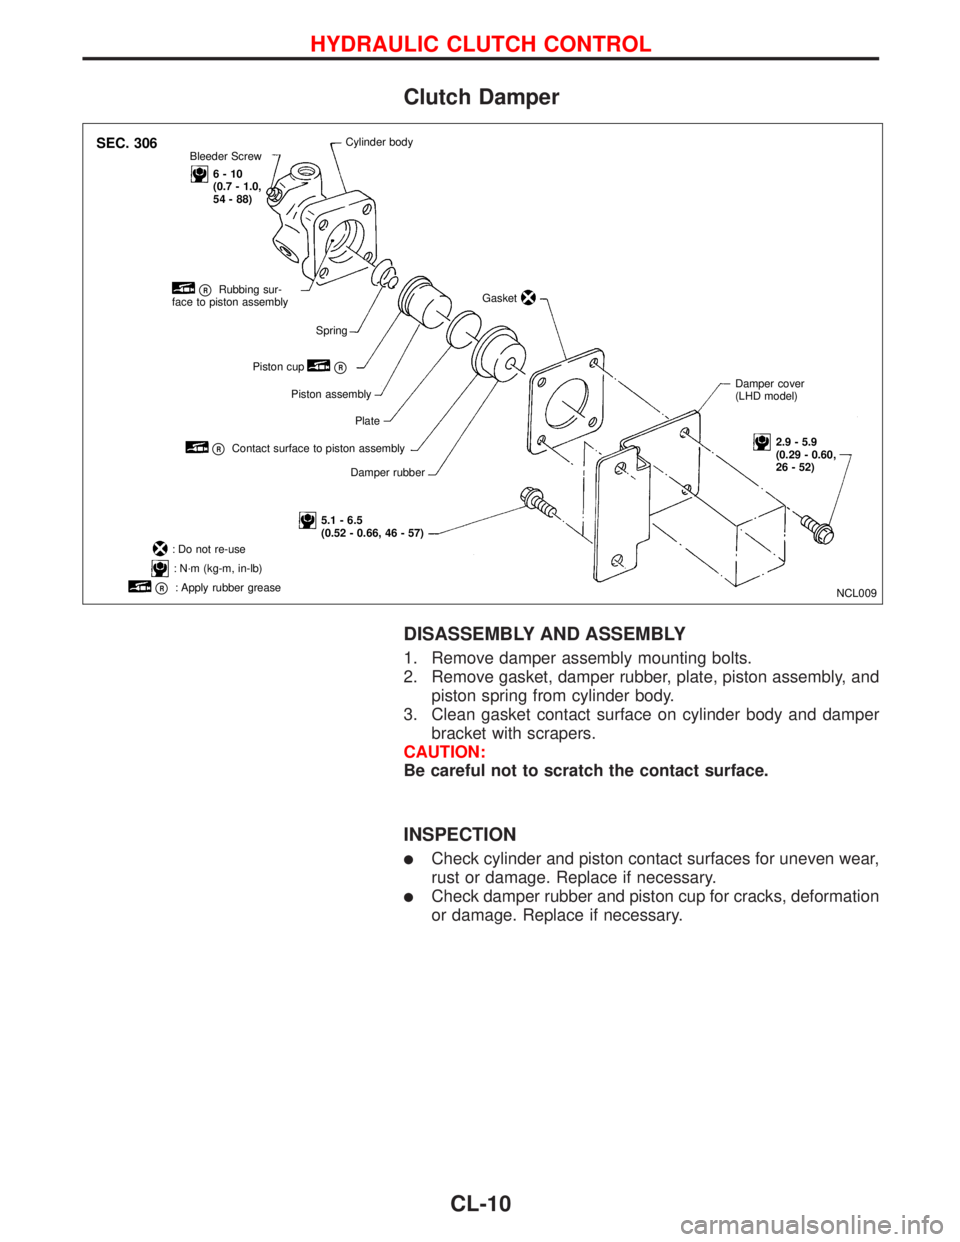
Clutch Damper
DISASSEMBLY AND ASSEMBLY
1. Remove damper assembly mounting bolts.
2. Remove gasket, damper rubber, plate, piston assembly, and
piston spring from cylinder body.
3. Clean gasket contact surface on cylinder body and damper
bracket with scrapers.
CAUTION:
Be careful not to scratch the contact surface.
INSPECTION
lCheck cylinder and piston contact surfaces for uneven wear,
rust or damage. Replace if necessary.
lCheck damper rubber and piston cup for cracks, deformation
or damage. Replace if necessary.
NCL009 Bleeder Screw
6-10
(0.7 - 1.0,
54 - 88)Cylinder body
Gasket
Damper cover
(LHD model)
2.9 - 5.9
(0.29 - 0.60,
26 - 52)
5.1 - 6.5
(0.52 - 0.66, 46 - 57)Damper rubber
pRContact surface to piston assemblyPlate Piston assembly Piston cup
pR
pRRubbing sur-
face to piston assembly
Spring
: Do not re-use
: N´m (kg-m, in-lb)
pR: Apply rubber grease
SEC. 306
HYDRAULIC CLUTCH CONTROL
CL-10
Page 289 of 2267
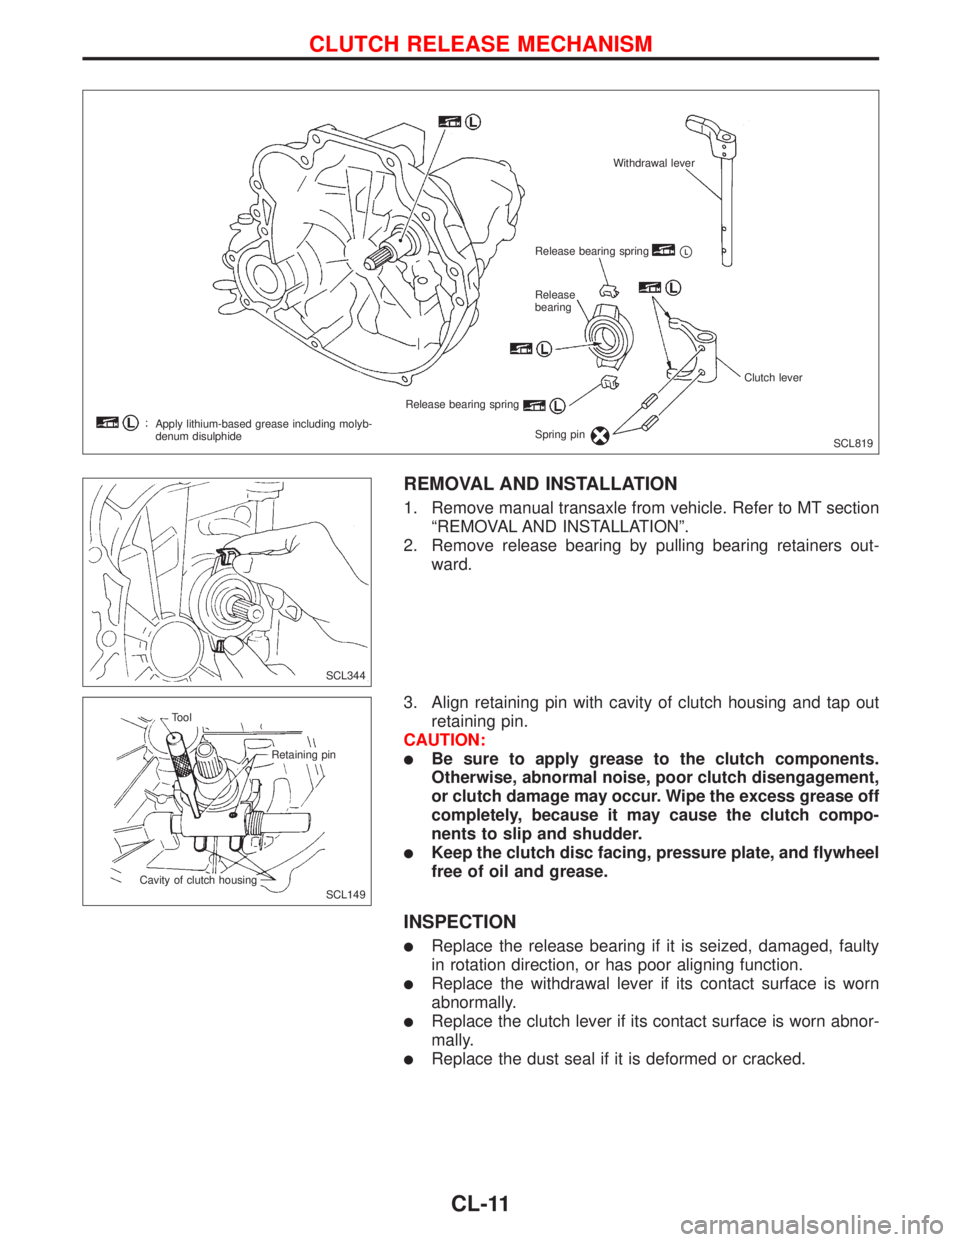
REMOVAL AND INSTALLATION
1. Remove manual transaxle from vehicle. Refer to MT section
ªREMOVAL AND INSTALLATIONº.
2. Remove release bearing by pulling bearing retainers out-
ward.
3. Align retaining pin with cavity of clutch housing and tap out
retaining pin.
CAUTION:
lBe sure to apply grease to the clutch components.
Otherwise, abnormal noise, poor clutch disengagement,
or clutch damage may occur. Wipe the excess grease off
completely, because it may cause the clutch compo-
nents to slip and shudder.
lKeep the clutch disc facing, pressure plate, and flywheel
free of oil and grease.
INSPECTION
lReplace the release bearing if it is seized, damaged, faulty
in rotation direction, or has poor aligning function.
lReplace the withdrawal lever if its contact surface is worn
abnormally.
lReplace the clutch lever if its contact surface is worn abnor-
mally.
lReplace the dust seal if it is deformed or cracked.
SCL819 Withdrawal lever
Release bearing spring
pL
Release
bearing
Release bearing spring
Spring pinClutch lever
Apply lithium-based grease including molyb-
denum disulphide
SCL344
SCL149 Tool
Retaining pin
Cavity of clutch housing
CLUTCH RELEASE MECHANISM
CL-11
Page 290 of 2267
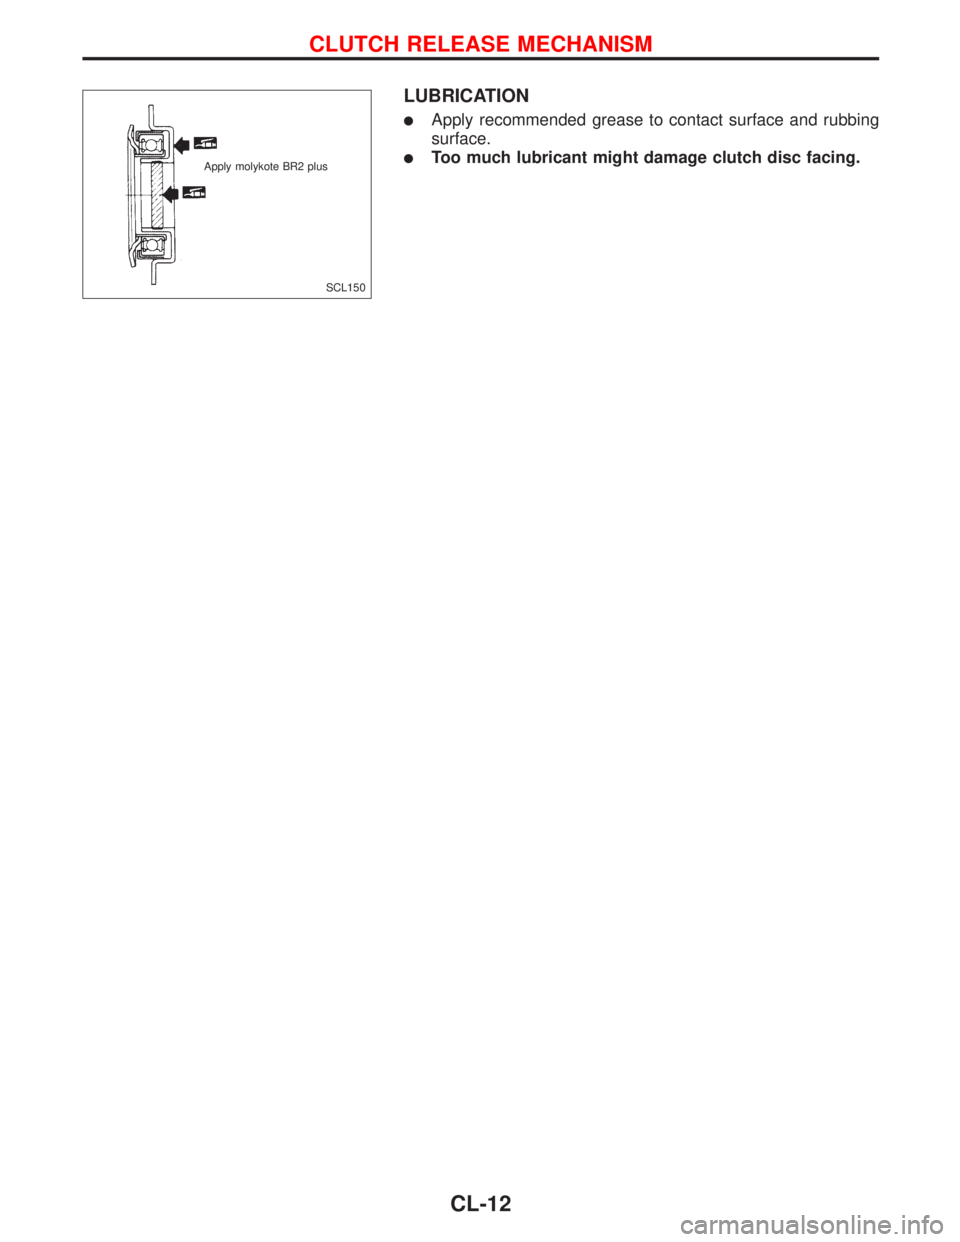
LUBRICATION
lApply recommended grease to contact surface and rubbing
surface.
lToo much lubricant might damage clutch disc facing.
SCL150 Apply molykote BR2 plus
CLUTCH RELEASE MECHANISM
CL-12