ESP NISSAN ROGUE 2021 Owner´s Manual
[x] Cancel search | Manufacturer: NISSAN, Model Year: 2021, Model line: ROGUE, Model: NISSAN ROGUE 2021Pages: 556, PDF Size: 2.7 MB
Page 169 of 556
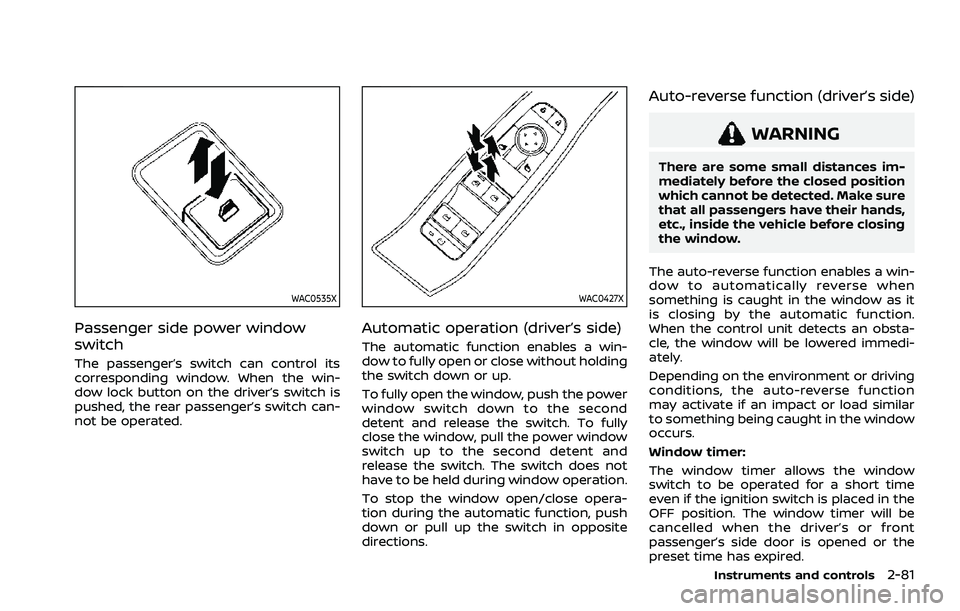
WAC0535X
Passenger side power window
switch
The passenger’s switch can control its
corresponding window. When the win-
dow lock button on the driver’s switch is
pushed, the rear passenger’s switch can-
not be operated.
WAC0427X
Automatic operation (driver’s side)
The automatic function enables a win-
dow to fully open or close without holding
the switch down or up.
To fully open the window, push the power
window switch down to the second
detent and release the switch. To fully
close the window, pull the power window
switch up to the second detent and
release the switch. The switch does not
have to be held during window operation.
To stop the window open/close opera-
tion during the automatic function, push
down or pull up the switch in opposite
directions.
Auto-reverse function (driver’s side)
WARNING
There are some small distances im-
mediately before the closed position
which cannot be detected. Make sure
that all passengers have their hands,
etc., inside the vehicle before closing
the window.
The auto-reverse function enables a win-
dow to automatically reverse when
something is caught in the window as it
is closing by the automatic function.
When the control unit detects an obsta-
cle, the window will be lowered immedi-
ately.
Depending on the environment or driving
conditions, the auto-reverse function
may activate if an impact or load similar
to something being caught in the window
occurs.
Window timer:
The window timer allows the window
switch to be operated for a short time
even if the ignition switch is placed in the
OFF position. The window timer will be
cancelled when the driver’s or front
passenger’s side door is opened or the
preset time has expired.
Instruments and controls2-81
Page 172 of 556
2-84Instruments and controls
Auto-reverse function
WARNING
There are some small distances just
before the closed position which
cannot be detected. Make sure that
all passengers have their hands, etc.
inside the vehicle before closing the
moonroof and sunshade.
The auto-reverse function enables the
moonroof and sunshade to automatically
reverse when something is caught in the
moonroof and sunshade as it is closing.
When the control unit detects an obsta-
cle, the moonroof and sunshade will open
immediately.
Depending on the environment or driving
conditions, the auto-reverse function
may activate if an impact or load similar
to something being caught in the moon-
roof and sunshade occurs.
If the auto-reverse function activates
consecutively or the battery is dis-
charged, the moonroof and sunshade
may not close properly. In this case, push
and hold the switch to the CLOSE position
to close the moonroof.
If the moonroof does not operate
If the moonroof and sunshade do not
operate properly, perform the following
procedure to initialize the operation sys-
tem.
1. If the moonroof and sunshade are open, close them fully by repeatedly
pushing the moonroof switch to the
CLOSE
andposition.
2. Push and hold the moonroof switch to the CLOSE
position for 10 seconds.
3. After the moonroof and sunshade move slightly to the closed position
and then move back a little, release
the moonroof switch.
4. Push and hold the moonroof switch to the CLOSE
position, and the glass
and shade will move.
5. Release the moonroof switch. Then the moonroof and sunshade will fully
open and then fully close.
6. Check if the moonroof switch oper- ates normally.
WARNING
The driver is always responsible for
operating the moonroof properly,
including the operation by all pas-
sengers. Failure to follow the warn- ings and instructions for proper use
of the moonroof could result in
serious injury or death.
.
Do not allow children to operate
the moonroof. Improper opera-
tion by children may cause an
accident. If children or others get
caught in the moonroof, it could
cause serious injury.
. To help avoid risk of injury or
death through unintended opera-
tion of the moonroof, place the
ignition switch in the OFF position
when leaving the vehicle, and do
not leave children and the Intelli-
gent Key inside the vehicle.
. Do not activate the auto-reverse
function intentionally. If hands or
face, etc. get caught in the moon-
roof, it could cause serious injury.
CAUTION
.Do not place objects (such as
newspapers, handkerchiefs, etc.)
on the sunshade when it is ex-
tending or retracting causing im-
proper operation or damage to
the sunshade.
Page 183 of 556
AUTOMATIC DOOR LOCKS
.All doors lock automatically when the
vehicle speed reaches 15 MPH (24
km/h).
. All doors unlock automatically when
the ignition switch is placed in the OFF
position or when the shift position is
placed in the P (Park) position, if
selected.
NOTE:
The Automatic door unlock feature can
be changed using the "Vehicle Settings"
menu on the vehicle information dis-
play. (See “Vehicle Settings” (P.2-27).)
WAD0021X
CHILD SAFETY REAR DOOR LOCK
Child safety rear door locks help prevent
the rear doors from being opened acci-
dentally, especially when small children
are in the vehicle.
When the levers are in the lock position
, the rear doors can be opened only
from the outside.
To disengage, move the levers to the
unlock position
.
WARNING
. Radio waves could adversely af-
fect electric medical equipment.
Those who use a pacemaker
should contact the electric med-
ical equipment manufacturer for
the possible influences before
use.
. The Intelligent Key transmits
radio waves when the buttons
are pushed. The FAA advises that
the radio waves may affect air-
craft navigation and communica-
tion systems. Do not operate the
Intelligent Key while on an air-
plane. Make sure the buttons are
not operated unintentionally
when the unit is stored during a
flight.
The Intelligent Key system can operate all
the door locks using the remote control-
ler function or pushing the request switch
(if so equipped) on the vehicle without
taking the key out from a pocket or purse.
The operating environment and/or con-
ditions may affect the Intelligent Key
system operation.
Be sure to read the following before using
the Intelligent Key system.
Pre-driving checks and adjustments3-7
INTELLIGENT KEY SYSTEM
Page 188 of 556
3-12Pre-driving checks and adjustments
the vehicle.
. The request switch is operational
only when the Intelligent Key has
been detected by the Intelligent
Key system.
Unlocking doors
1. Push the door handle request switchor the liftgate request switchwhile carrying the Intelligent Key with
you.
2. The hazard indicator flashes once and outside chime sounds once. The cor-
responding door or the liftgate will
unlock.
3. Push the request switch again within 1 minute.
4. The hazard indicator flashes once and outside chime sounds once again. All
the doors and the liftgate will unlock.
All doors will be locked automatically
unless one of the following operations is
performed within 1 minute after pushing
the request switch while the doors are
locked.
. Opening any door.
. Pushing the ignition switch.
During this 1-minute time period, if the
UNLOCK
button on the Intelligent Key
is pushed, all doors will be locked auto- matically after another 1 minute.
NOTE:
The unlocking operation can be chan-
ged in selective unlock in the Vehicle
Settings of the vehicle information dis-
play. For additional information, see
“Vehicle Settings” (P.2-27).
Opening liftgate
1. Carry the Intelligent Key.
2. Push the liftgate opener switch
.
3. The liftgate will unlock and then open.
BATTERY SAVER SYSTEM
When all the following conditions are met
for a period of time, the battery saver
system will cut off the power supply to
prevent battery discharge.
. The ignition switch is in the ON posi-
tion. (See “Push-button ignition switch
positions” (P.5-16).)
WARNING LIGHTS AND AUDIBLE RE-
MINDERS
To help prevent the vehicle from moving
unexpectedly by erroneous operation of
the Intelligent Key listed on the following
chart or to help prevent the vehicle from
being stolen, chime or beep sounds inside
and outside the vehicle and the warning
display appears on the vehicle informa-
tion display. When a chime or beep sounds or the
warning display appears, be sure to check
the vehicle and Intelligent Key.
See “Troubleshooting guide” (P.3-13) and
“Vehicle information display” (P.2-22).
Page 189 of 556
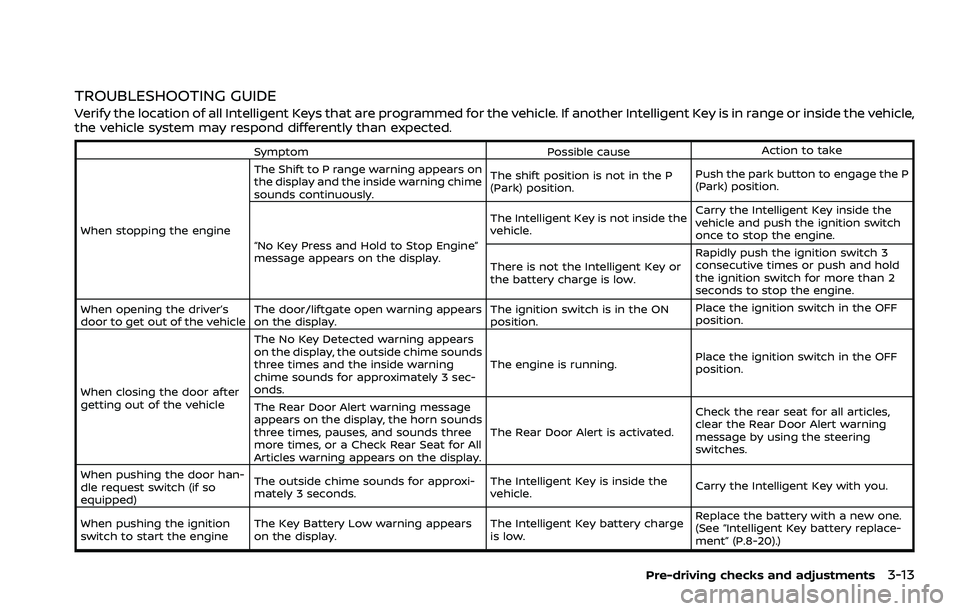
TROUBLESHOOTING GUIDE
Verify the location of all Intelligent Keys that are programmed for the vehicle. If another Intelligent Key is in range or inside the vehicle,
the vehicle system may respond differently than expected.
SymptomPossible causeAction to take
When stopping the engine The Shift to P range warning appears on
the display and the inside warning chime
sounds continuously.
The shift position is not in the P
(Park) position.
Push the park button to engage the P
(Park) position.
“No Key Press and Hold to Stop Engine”
message appears on the display. The Intelligent Key is not inside the
vehicle.
Carry the Intelligent Key inside the
vehicle and push the ignition switch
once to stop the engine.
There is not the Intelligent Key or
the battery charge is low. Rapidly push the ignition switch 3
consecutive times or push and hold
the ignition switch for more than 2
seconds to stop the engine.
When opening the driver’s
door to get out of the vehicle The door/liftgate open warning appears
on the display. The ignition switch is in the ON
position.Place the ignition switch in the OFF
position.
When closing the door after
getting out of the vehicle The No Key Detected warning appears
on the display, the outside chime sounds
three times and the inside warning
chime sounds for approximately 3 sec-
onds.
The engine is running.
Place the ignition switch in the OFF
position.
The Rear Door Alert warning message
appears on the display, the horn sounds
three times, pauses, and sounds three
more times, or a Check Rear Seat for All
Articles warning appears on the display. The Rear Door Alert is activated.
Check the rear seat for all articles,
clear the Rear Door Alert warning
message by using the steering
switches.
When pushing the door han-
dle request switch (if so
equipped) The outside chime sounds for approxi-
mately 3 seconds.
The Intelligent Key is inside the
vehicle.
Carry the Intelligent Key with you.
When pushing the ignition
switch to start the engine The Key Battery Low warning appears
on the display. The Intelligent Key battery charge
is low.Replace the battery with a new one.
(See “Intelligent Key battery replace-
ment” (P.8-20).)
Pre-driving checks and adjustments3-13
Page 213 of 556
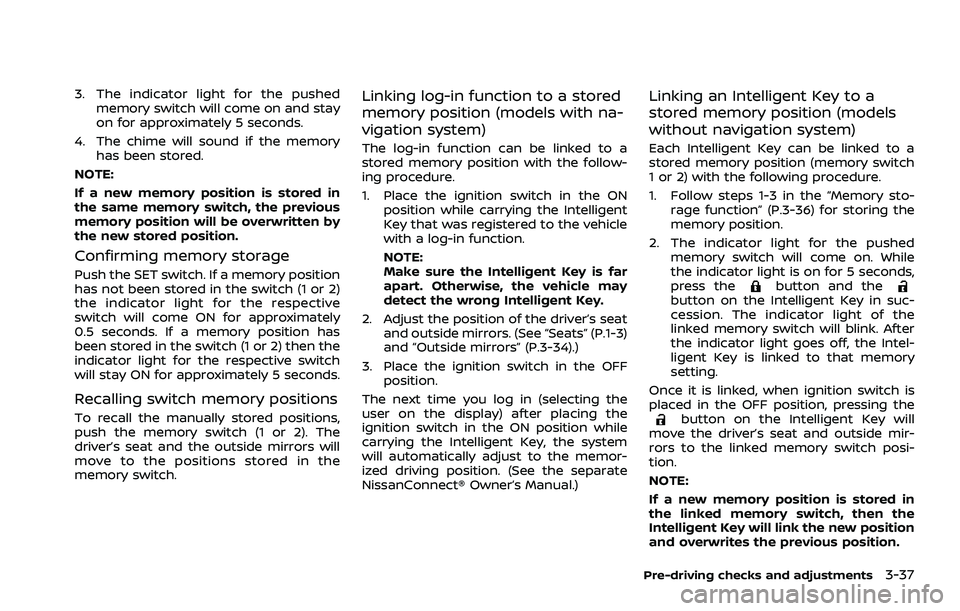
3. The indicator light for the pushedmemory switch will come on and stay
on for approximately 5 seconds.
4. The chime will sound if the memory has been stored.
NOTE:
If a new memory position is stored in
the same memory switch, the previous
memory position will be overwritten by
the new stored position.
Confirming memory storage
Push the SET switch. If a memory position
has not been stored in the switch (1 or 2)
the indicator light for the respective
switch will come ON for approximately
0.5 seconds. If a memory position has
been stored in the switch (1 or 2) then the
indicator light for the respective switch
will stay ON for approximately 5 seconds.
Recalling switch memory positions
To recall the manually stored positions,
push the memory switch (1 or 2). The
driver’s seat and the outside mirrors will
move to the positions stored in the
memory switch.
Linking log-in function to a stored
memory position (models with na-
vigation system)
The log-in function can be linked to a
stored memory position with the follow-
ing procedure.
1. Place the ignition switch in the ON position while carrying the Intelligent
Key that was registered to the vehicle
with a log-in function.
NOTE:
Make sure the Intelligent Key is far
apart. Otherwise, the vehicle may
detect the wrong Intelligent Key.
2. Adjust the position of the driver’s seat and outside mirrors. (See “Seats” (P.1-3)
and “Outside mirrors” (P.3-34).)
3. Place the ignition switch in the OFF position.
The next time you log in (selecting the
user on the display) after placing the
ignition switch in the ON position while
carrying the Intelligent Key, the system
will automatically adjust to the memor-
ized driving position. (See the separate
NissanConnect® Owner’s Manual.)
Linking an Intelligent Key to a
stored memory position (models
without navigation system)
Each Intelligent Key can be linked to a
stored memory position (memory switch
1 or 2) with the following procedure.
1. Follow steps 1-3 in the “Memory sto- rage function” (P.3-36) for storing the
memory position.
2. The indicator light for the pushed memory switch will come on. While
the indicator light is on for 5 seconds,
press the
button and thebutton on the Intelligent Key in suc-
cession. The indicator light of the
linked memory switch will blink. After
the indicator light goes off, the Intel-
ligent Key is linked to that memory
setting.
Once it is linked, when ignition switch is
placed in the OFF position, pressing the
button on the Intelligent Key will
move the driver’s seat and outside mir-
rors to the linked memory switch posi-
tion.
NOTE:
If a new memory position is stored in
the linked memory switch, then the
Intelligent Key will link the new position
and overwrites the previous position.
Pre-driving checks and adjustments3-37
Page 221 of 556
5. When the vehicle is parked in thespace completely, place the shift posi-
tion to the P (Park) position and apply
the parking brake.
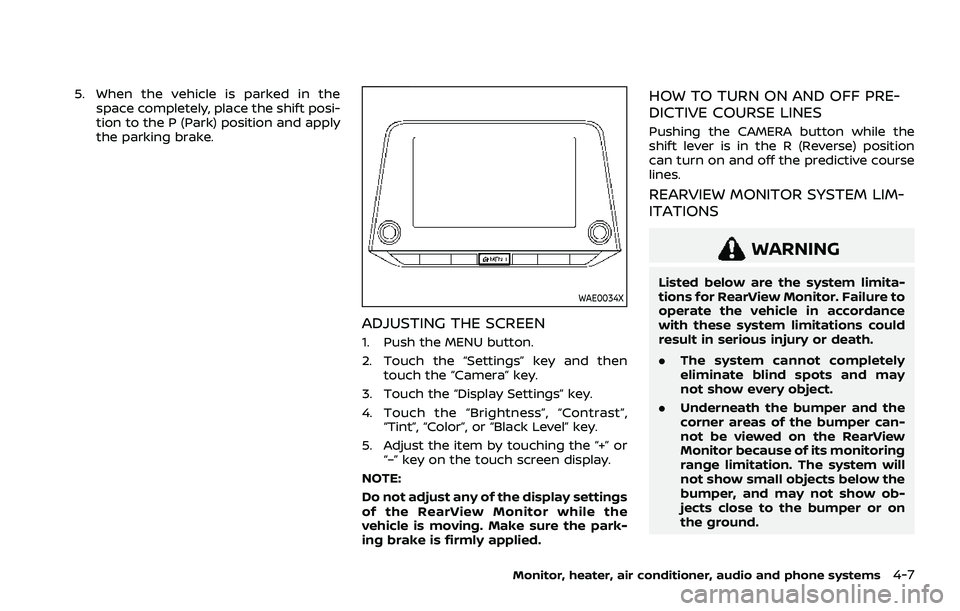
WAE0034X
ADJUSTING THE SCREEN
1. Push the MENU button.
2. Touch the “Settings” key and thentouch the “Camera” key.
3. Touch the “Display Settings” key.
4. Touch the “Brightness”, “Contrast”, “Tint”, “Color”, or “Black Level” key.
5. Adjust the item by touching the “+” or “–” key on the touch screen display.
NOTE:
Do not adjust any of the display settings
of the RearView Monitor while the
vehicle is moving. Make sure the park-
ing brake is firmly applied.
HOW TO TURN ON AND OFF PRE-
DICTIVE COURSE LINES
Pushing the CAMERA button while the
shift lever is in the R (Reverse) position
can turn on and off the predictive course
lines.
REARVIEW MONITOR SYSTEM LIM-
ITATIONS
WARNING
Listed below are the system limita-
tions for RearView Monitor. Failure to
operate the vehicle in accordance
with these system limitations could
result in serious injury or death.
. The system cannot completely
eliminate blind spots and may
not show every object.
. Underneath the bumper and the
corner areas of the bumper can-
not be viewed on the RearView
Monitor because of its monitoring
range limitation. The system will
not show small objects below the
bumper, and may not show ob-
jects close to the bumper or on
the ground.
Monitor, heater, air conditioner, audio and phone systems4-7
Page 224 of 556
4-10Monitor, heater, air conditioner, audio and phone systems
viewed. The four corners of the
vehicle in particular, are areas
where objects do not always ap-
pear in the bird’s-eye, front, or
rear views. Always check your
surroundings to be sure that it is
safe to move before operating
the vehicle. Always operate the
vehicle slowly.
. The driver is always responsible
for safety during parking and
other maneuvers.
CAUTION
Do not scratch the lens when clean-
ing dirt or snow from the front of the
camera.
The Intelligent Around View® Monitor
system is designed as an aid to the driver
in situations such as slot parking or
parallel parking.
The monitor displays various views of the
position of the vehicle in a split screen
format. Not all views are available at all
times. Available views:
.
Front view
A view of the front of the vehicle
. Rear view
A view of the rear of the vehicle
. Bird’s-eye view
The surrounding view of the vehicle
from above
. Front-side view
The view around and ahead of the
front passenger’s side wheel
. Front-wide view
A wider area view of the front view
. Rear-wide view
A wider area view of the rear view
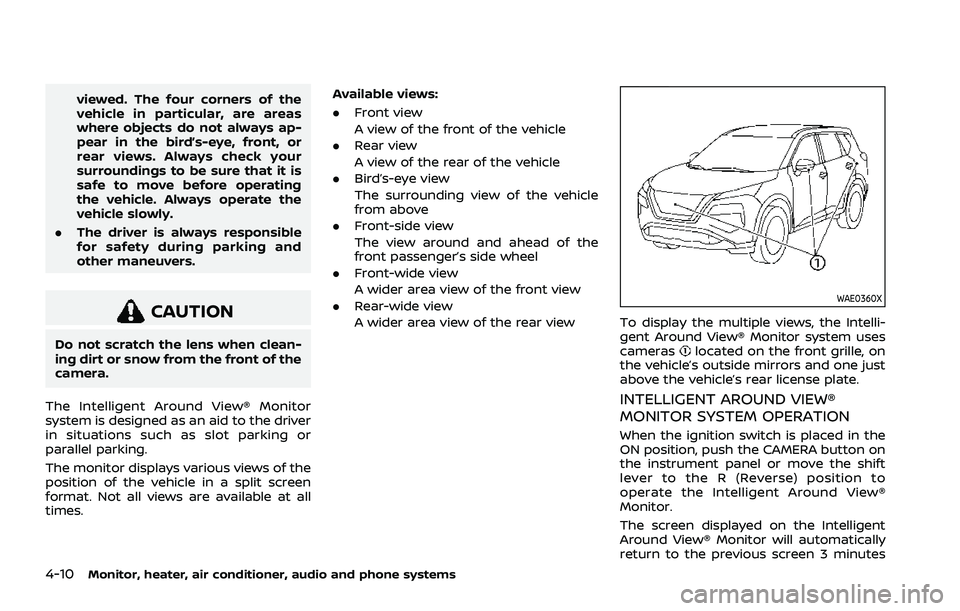
WAE0360X
To display the multiple views, the Intelli-
gent Around View® Monitor system uses
cameras
located on the front grille, on
the vehicle’s outside mirrors and one just
above the vehicle’s rear license plate.
INTELLIGENT AROUND VIEW®
MONITOR SYSTEM OPERATION
When the ignition switch is placed in the
ON position, push the CAMERA button on
the instrument panel or move the shift
lever to the R (Reverse) position to
operate the Intelligent Around View®
Monitor.
The screen displayed on the Intelligent
Around View® Monitor will automatically
return to the previous screen 3 minutes
Page 247 of 556
2. Turn the temperature control dial onthe corresponding side to set the
desired temperature.
.You can individually set tempera-tures for the driver’s side and front
passenger’s side when the indica-
tor light on the SYNC button is not
illuminated.
A visible mist may be seen coming from
the ventilators in hot, humid conditions as
the air is cooled rapidly. This does not
indicate a malfunction.
Heating (A/C OFF):
The air conditioner does not activate in
this mode. Use this mode when you only
need to heat.
1. Push the AUTO button on. (The in- dicator light on the button will illumi-
nate.)
2. Push the A/C button. (The indicator light will turn off.)
3. Turn the temperature control dial on the corresponding side to set the
desired temperature.
.You can individually set tempera-
tures for the driver’s side and front
passenger’s side when the indica-
tor light on the SYNC button is not
illuminated.
.The temperature of the passengercompartment will be maintained
automatically. Air flow distribution
and fan speed are also controlled
automatically.
NOTE:
. Do not set the temperature lower
than the outside air temperature or
the system may not work properly.
. Not recommended if windows fog
up.
Dehumidified defrosting or defogging:
1. Push the
button. (The indicator
light on the button will turn on.)
2. Turn the temperature control dial on the corresponding side to set the
desired temperature.
.To quickly remove ice from theoutside of the windows, use the
button to set the fan speed to
maximum.
.As soon as possible after the wind- shield is clean, push the AUTO
button to return to the automatic
mode.
.When thebutton is pushed, the
air conditioner will automatically be
turned on at outside temperatures
more than slightly above freezing.
The air recirculation mode auto-
matically turns off, allowing outside air to be drawn into the passenger
compartment to further improve
the defogging performance.
Manual operation
Fan speed control:
Push the
buttons to manually control
the fan speed.
Air intake control:
The air intake control mode will change
each time the
button is pushed.
. When the indicator light is turned on,
the air recirculates inside the vehicle.
. When the indicator light is turned off,
the air flow is drawn from outside the
vehicle.
. To switch to automatic control mode,
push and hold the
button for
about 2 seconds. The indicator light
will blink, and then the air intake will
be controlled automatically.
Air flow control:
Pushing the
button manually con-
trols air flow and selects the air outlet:
Monitor, heater, air conditioner, audio and phone systems4-33
Page 249 of 556
WAE0354X
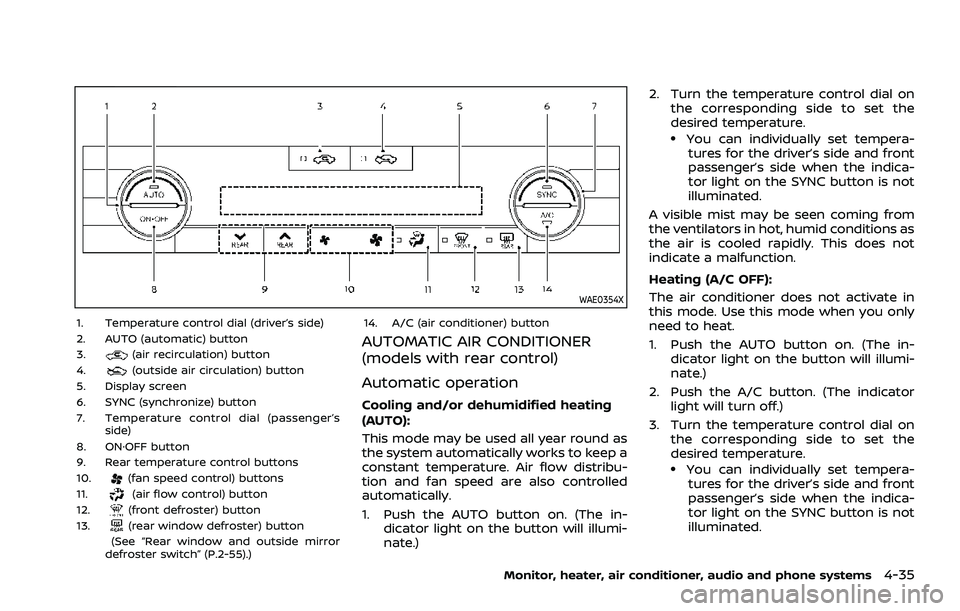
1. Temperature control dial (driver’s side)
2. AUTO (automatic) button
3.
(air recirculation) button
4.(outside air circulation) button
5. Display screen
6. SYNC (synchronize) button
7. Temperature control dial (passenger’s side)
8. ON·OFF button
9. Rear temperature control buttons
10.
(fan speed control) buttons
11.(air flow control) button
12.(front defroster) button
13.(rear window defroster) button
(See “Rear window and outside mirror
defroster switch” (P.2-55).) 14. A/C (air conditioner) button
AUTOMATIC AIR CONDITIONER
(models with rear control)
Automatic operation
Cooling and/or dehumidified heating
(AUTO):
This mode may be used all year round as
the system automatically works to keep a
constant temperature. Air flow distribu-
tion and fan speed are also controlled
automatically.
1. Push the AUTO button on. (The in-
dicator light on the button will illumi-
nate.) 2. Turn the temperature control dial on
the corresponding side to set the
desired temperature.
.You can individually set tempera-tures for the driver’s side and front
passenger’s side when the indica-
tor light on the SYNC button is not
illuminated.
A visible mist may be seen coming from
the ventilators in hot, humid conditions as
the air is cooled rapidly. This does not
indicate a malfunction.
Heating (A/C OFF):
The air conditioner does not activate in
this mode. Use this mode when you only
need to heat.
1. Push the AUTO button on. (The in- dicator light on the button will illumi-
nate.)
2. Push the A/C button. (The indicator light will turn off.)
3. Turn the temperature control dial on the corresponding side to set the
desired temperature.
.You can individually set tempera-
tures for the driver’s side and front
passenger’s side when the indica-
tor light on the SYNC button is not
illuminated.
Monitor, heater, air conditioner, audio and phone systems4-35