change NISSAN SENTRA 2006 B15 / 5.G Navigation Manual
[x] Cancel search | Manufacturer: NISSAN, Model Year: 2006, Model line: SENTRA, Model: NISSAN SENTRA 2006 B15 / 5.GPages: 272, PDF Size: 5.53 MB
Page 87 of 272
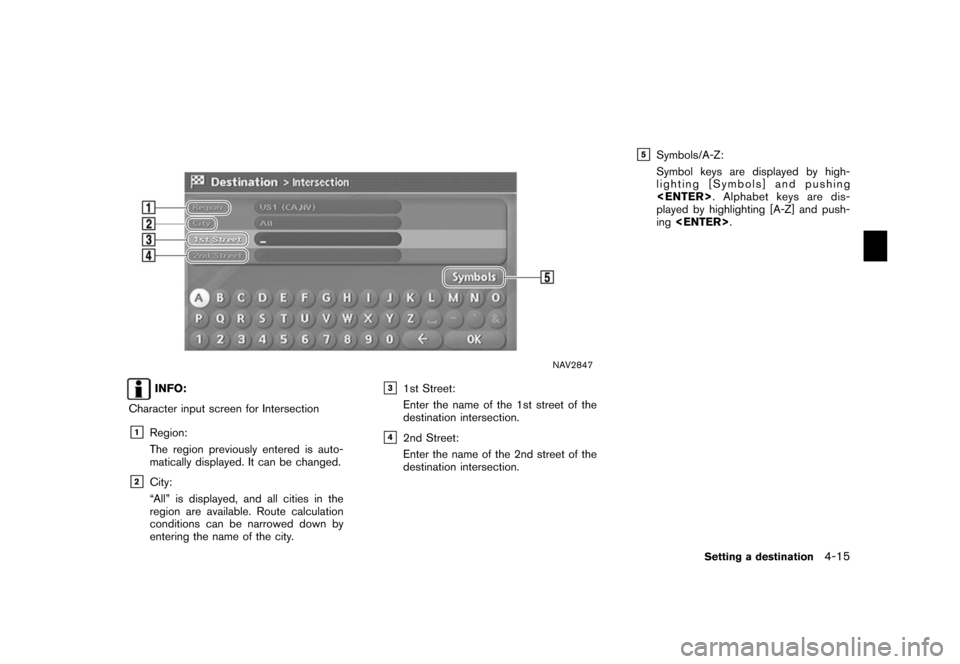
NAV2847
INFO:
Character input screen for Intersection
&1
Region:
The region previously entered is auto-
matically displayed. It can be changed.
&2
City:
“All” is displayed, and all cities in the
region are available. Route calculation
conditions can be narrowed down by
entering the name of the city.
&3
1st Street:
Enter the name of the 1st street of the
destination intersection.
&4
2nd Street:
Enter the name of the 2nd street of the
destination intersection.
&5
Symbols/A-Z:
Symbol keys are displayed by high-
lighting [Symbols] and pushing
played by highlighting [A-Z] and push-
ing
Setting a destination
4-15
Page 90 of 272
![NISSAN SENTRA 2006 B15 / 5.G Navigation Manual
NAV2854
Changing the region1. Highlight [Region] and push<ENTER>
to
change the region.
NAV2855
2. Highlight the preferred region and push
<ENTER> .
A character input screen is displayed.
NAV2856
Spec](/img/5/699/w960_699-89.png "NISSAN SENTRA 2006 B15 / 5.G Navigation Manual
NAV2854
Changing the region1. Highlight [Region] and push<ENTER>
to
change the region.
NAV2855
2. Highlight the preferred region and push
<ENTER> .
A character input screen is displayed.
NAV2856
Spec")
NAV2854
Changing the region1. Highlight [Region] and push
to
change the region.
NAV2855
2. Highlight the preferred region and push
A character input screen is displayed.
NAV2856
Specifying a city1. Highlight [City] and push
to
narrow down the route calculation condi-
tions by entering the name of the city.
4-18
Setting a destination
Page 107 of 272
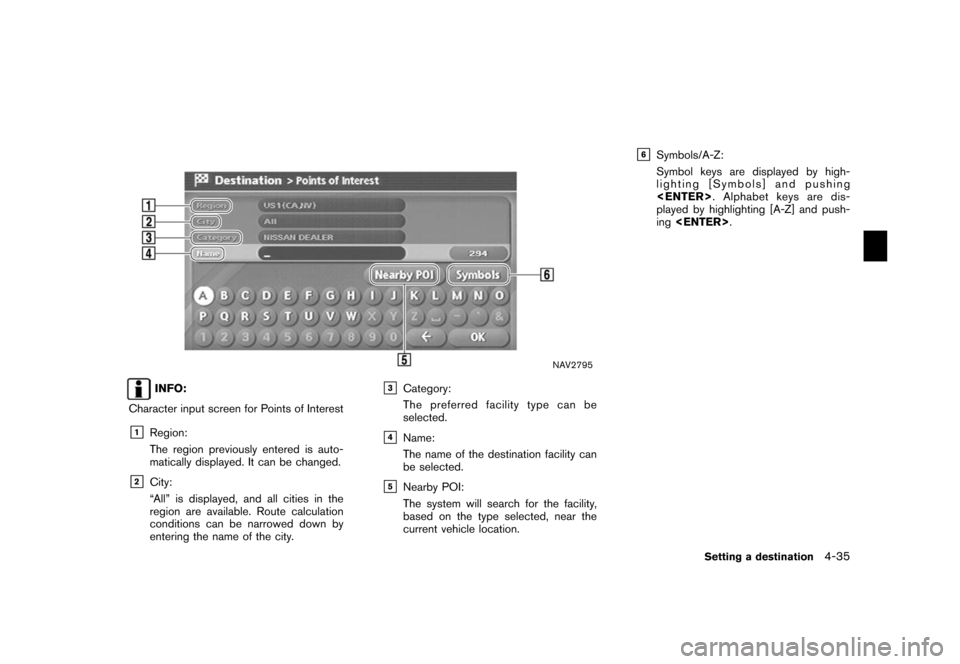
NAV2795
INFO:
Character input screen for Points of Interest
&1
Region:
The region previously entered is auto-
matically displayed. It can be changed.
&2
City:
“All” is displayed, and all cities in the
region are available. Route calculation
conditions can be narrowed down by
entering the name of the city.
&3
Category:
The preferred facility type can be
selected.
&4
Name:
The name of the destination facility can
be selected.
&5
Nearby POI:
The system will search for the facility,
based on the type selected, near the
current vehicle location.
&6
Symbols/A-Z:
Symbol keys are displayed by high-
lighting [Symbols] and pushing
played by highlighting [A-Z] and push-
ing
Setting a destination
4-35
Page 110 of 272
![NISSAN SENTRA 2006 B15 / 5.G Navigation Manual
NAV2802
Changing the region1. Highlight [Region] and push<ENTER>
to
change the region.
NAV2803
2. Highlight the preferred region and push
<ENTER> .
A character input screen is displayed.
NAV2804
Spec](/img/5/699/w960_699-109.png "NISSAN SENTRA 2006 B15 / 5.G Navigation Manual
NAV2802
Changing the region1. Highlight [Region] and push<ENTER>
to
change the region.
NAV2803
2. Highlight the preferred region and push
<ENTER> .
A character input screen is displayed.
NAV2804
Spec")
NAV2802
Changing the region1. Highlight [Region] and push
to
change the region.
NAV2803
2. Highlight the preferred region and push
A character input screen is displayed.
NAV2804
Specifying a city1. Highlight [City] and push
to
narrow down the route calculation condi-
tions by entering the name of the city.
4-38
Setting a destination
Page 127 of 272
5 Route guidanceProcedures after setting a destination..................... 5-2
Available items after setting a destination ............. 5-2
Starting route guidance ................................... 5-3
Selecting a route ........................................... 5-3
Confirming a route .......................................... 5-4
Adding a destination or waypoint ....................... 5-5
About route guidance .......................................... 5-7
Voice guidance during route guidance. ................ 5-7
Guidance screens and preview mode ................. 5-8
Route setting .................................................. 5-10
Basic operation ........................................... 5-10
Setting conditions for the route calculation ............. 5-12
Route priority settings ................................... 5-12
Detailed route priorities .................................. 5-13
Change/edit route ............................................ 5-15
Basic operation ........................................... 5-15 Setting a detour route
................................... 5-17
Recalculate route ......................................... 5-18
Editing a route ............................................. 5-19
Confirming a route ............................................ 5-26
Basic operation ........................................... 5-26
Using turn list .............................................. 5-27
Using route preview ...................................... 5-27
Confirming by simulation ................................ 5-28
Route guidance settings .................................... 5-29
Basic operation ........................................... 5-29
Visual guidance settings ................................ 5-31
Voice guidance settings ................................. 5-32
Set average speeds ...................................... 5-33
Deleting/reactivating a route ............................... 5-35
Deleting a route ........................................... 5-35
Reactivating a route ...................................... 5-36
Page 134 of 272
GUIDANCE SCREENS AND PREVIEW
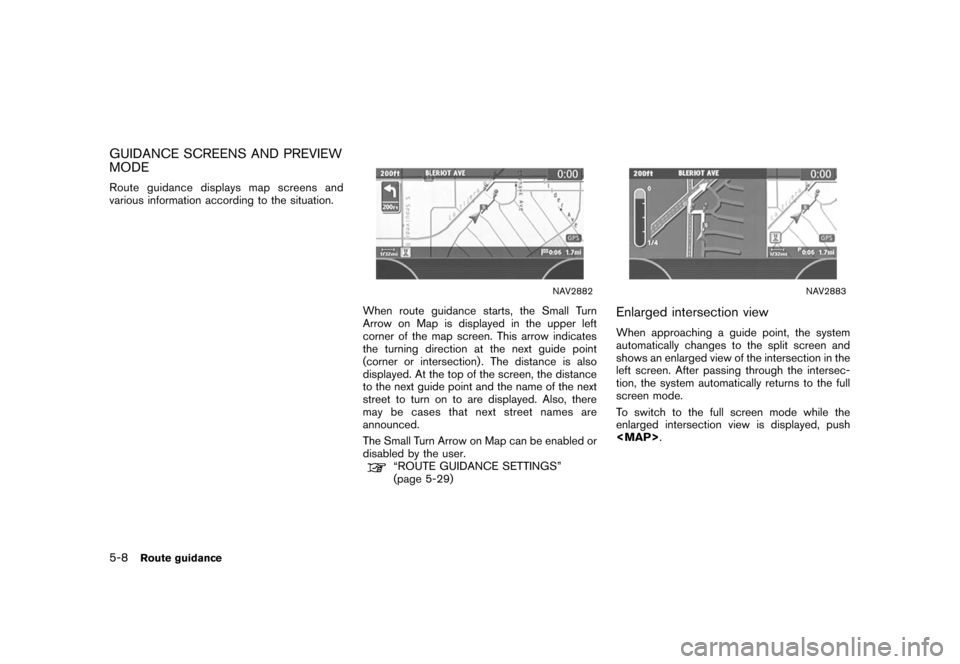
MODERoute guidance displays map screens and
various information according to the situation.
NAV2882
When route guidance starts, the Small Turn
Arrow on Map is displayed in the upper left
corner of the map screen. This arrow indicates
the turning direction at the next guide point
(corner or intersection) . The distance is also
displayed. At the top of the screen, the distance
to the next guide point and the name of the next
street to turn on to are displayed. Also, there
may be cases that next street names are
announced.
The Small Turn Arrow on Map can be enabled or
disabled by the user.
“ROUTE GUIDANCE SETTINGS”
(page 5-29)
NAV2883
Enlarged intersection viewWhen approaching a guide point, the system
automatically changes to the split screen and
shows an enlarged view of the intersection in the
left screen. After passing through the intersec-
tion, the system automatically returns to the full
screen mode.
To switch to the full screen mode while the
enlarged intersection view is displayed, push
Page 136 of 272
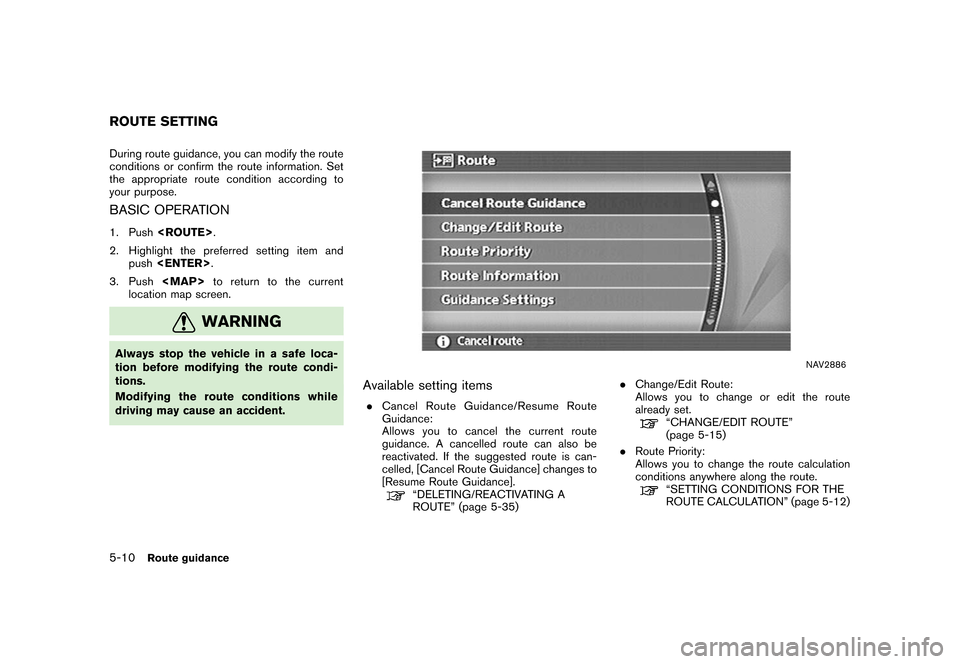
During route guidance, you can modify the route
conditions or confirm the route information. Set
the appropriate route condition according to
your purpose.BASIC OPERATION1. Push
2. Highlight the preferred setting item and push
3. Push
Page 141 of 272
![NISSAN SENTRA 2006 B15 / 5.G Navigation Manual
You can calculate a detour for a section of the
route, edit the route or store the route.BASIC OPERATION1. Push<ROUTE> .
2. Highlight [Change/Edit Route] and push <ENTER> .
3. Highlight the preferred](/img/5/699/w960_699-140.png "NISSAN SENTRA 2006 B15 / 5.G Navigation Manual
You can calculate a detour for a section of the
route, edit the route or store the route.BASIC OPERATION1. Push<ROUTE> .
2. Highlight [Change/Edit Route] and push <ENTER> .
3. Highlight the preferred")
You can calculate a detour for a section of the
route, edit the route or store the route.BASIC OPERATION1. Push
2. Highlight [Change/Edit Route] and push
3. Highlight the preferred setting item and push
4. Push
Page 145 of 272
![NISSAN SENTRA 2006 B15 / 5.G Navigation Manual
NAV2895
EDITING A ROUTE1. Highlight [Edit Route] and push<ENTER>
.
2. Highlight the preferred condition and push <ENTER> .
3. Push <BACK>/
<PREV> to return to the
previous screen. Push <MAP>
to retur](/img/5/699/w960_699-144.png "NISSAN SENTRA 2006 B15 / 5.G Navigation Manual
NAV2895
EDITING A ROUTE1. Highlight [Edit Route] and push<ENTER>
.
2. Highlight the preferred condition and push <ENTER> .
3. Push <BACK>/
<PREV> to return to the
previous screen. Push <MAP>
to retur")
NAV2895
EDITING A ROUTE1. Highlight [Edit Route] and push
.
2. Highlight the preferred condition and push
3. Push
previous screen. Push
Page 146 of 272
“Changing route calculation conditions”
(page 5-24)
&5Allows you to add a destination.“Setting a destination or waypoint”
(page 5-20)
&6Allows you to add a waypoint.“Setting a destination or waypoint”
(page 5-20)
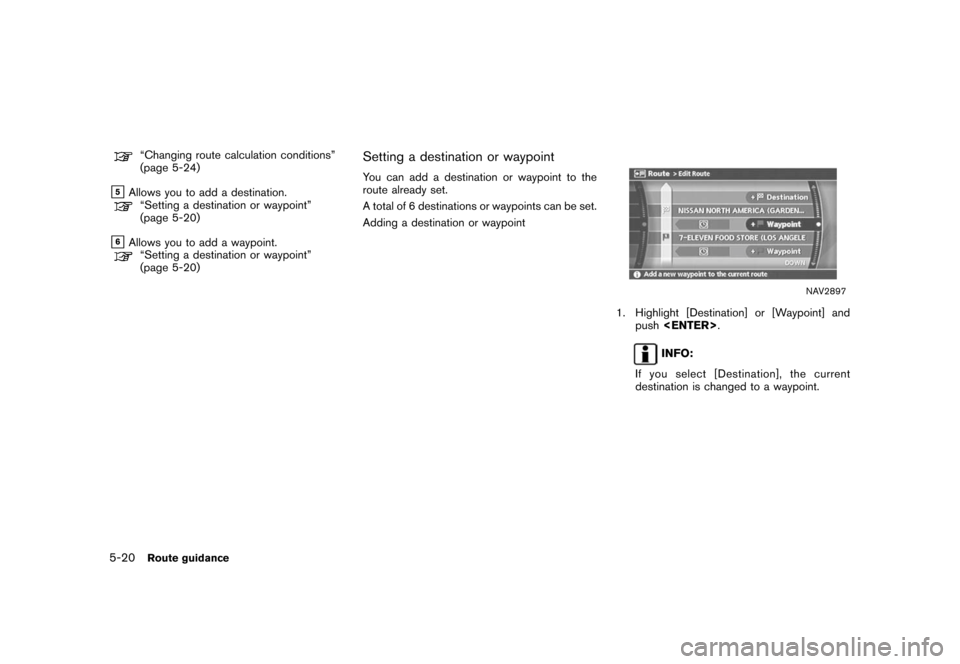
Setting a destination or waypointYou can add a destination or waypoint to the
route already set.
A total of 6 destinations or waypoints can be set.
Adding a destination or waypoint
NAV2897
1. Highlight [Destination] or [Waypoint] andpush
INFO:
If you select [Destination], the current
destination is changed to a waypoint.
5-20
Route guidance