NISSAN SENTRA 2006 B15 / 5.G Navigation Manual
SENTRA 2006 B15 / 5.G
NISSAN
NISSAN
https://www.carmanualsonline.info/img/5/699/w960_699-0.png
NISSAN SENTRA 2006 B15 / 5.G Navigation Manual
Page 58 of 272
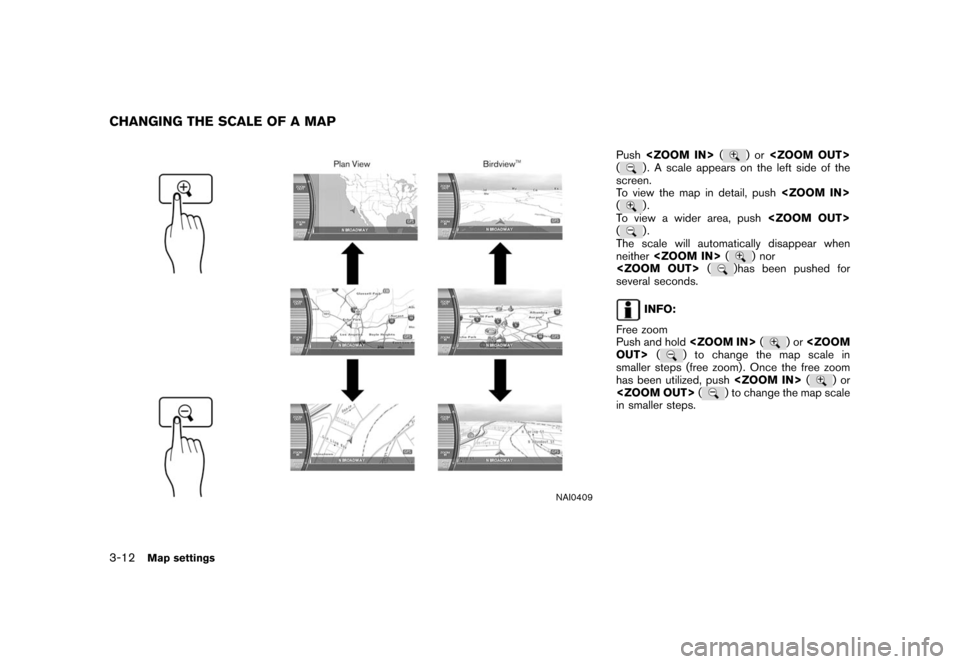
NAI0409
Push (
)or
(
) . A scale appears on the left side of the
screen.
To view the map in detail, push
().
To view a wider area, push
().
The scale will automatically disappear when
neither (
) nor
(
)has been pushed for
several seconds.
INFO:
Free zoom
Push and hold (
)or
OUT> (
) to change the map scale in
smaller steps (free zoom) . Once the free zoom
has been utilized, push (
)or
(
) to change the map scale
in smaller steps.
CHANGING THE SCALE OF A MAP3-12
Map settings
Page 61 of 272
Other settings are also available for the map
screen, such as changing the map direction,
splitting the screen, etc.SETTINGS OF HEADING/LONG
RANGE MAP VIEWYou can change the map direction (orientation)
in Plan View or change the position of the
vehicle icon to view a wider area in the traveling
direction.
These settings are available only in the Plan
View or Split (Plan View) mode.
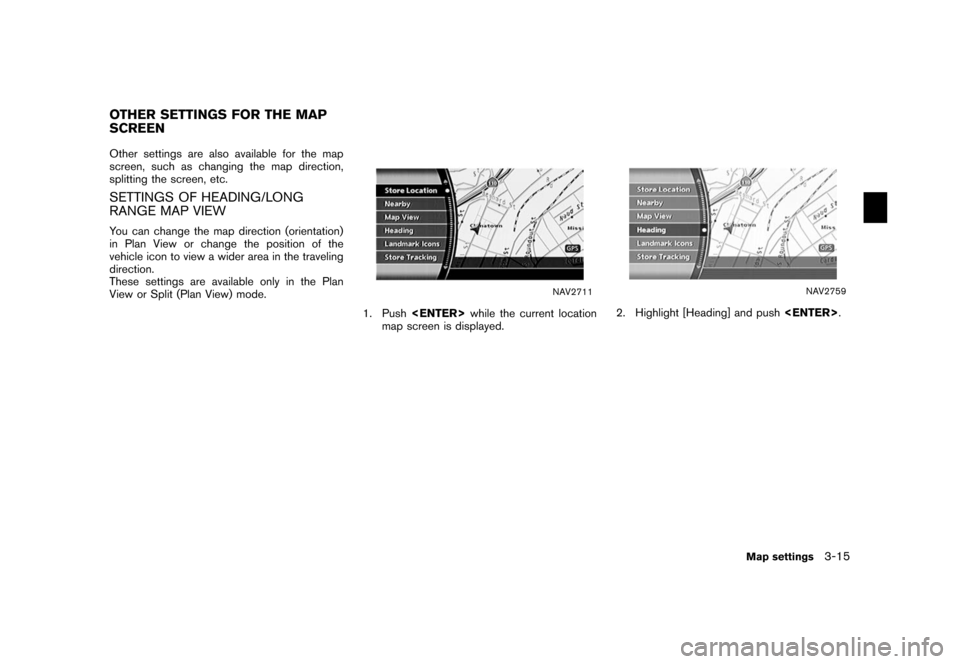
NAV2711
1. Push while the current location
map screen is displayed.
NAV2759
2. Highlight [Heading] and push
.
OTHER SETTINGS FOR THE MAP
SCREEN
Map settings
3-15
Page 62 of 272
NAV2760
3. Highlight the preferred map orientation andpush . The indicator of the
selected map orientation illuminates.
INFO:
[Long Range Map View] is displayed only
when you select [Heading Up].
4. Push
Page 63 of 272
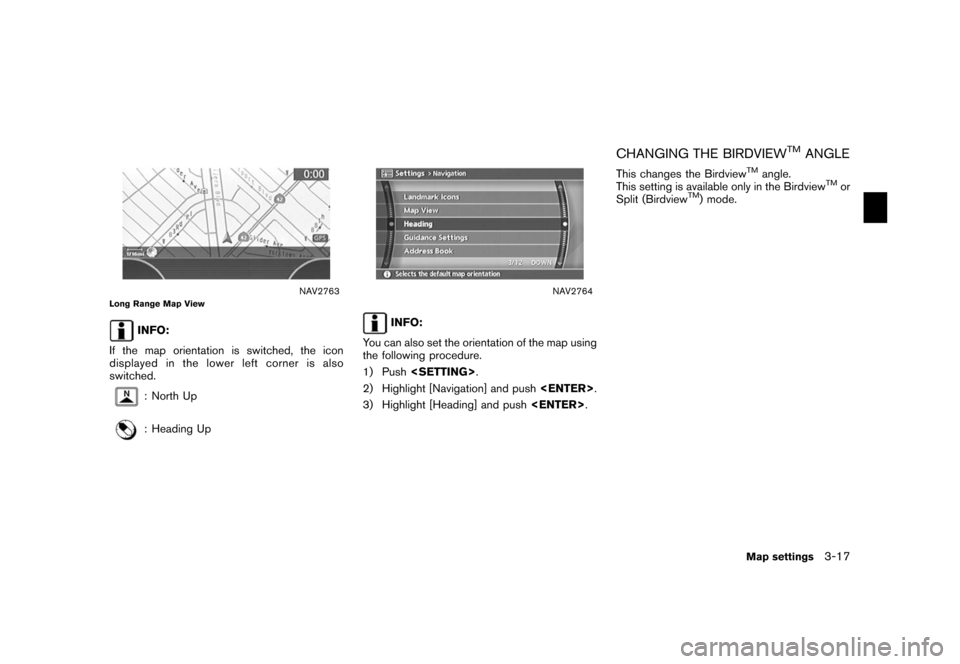
NAV2763
Long Range Map View
INFO:
If the map orientation is switched, the icon
displayed in the lower left corner is also
switched.: North Up: Heading Up
NAV2764
INFO:
You can also set the orientation of the map using
the following procedure.
1) Push .
2) Highlight [Navigation] and push
.
3) Highlight [Heading] and push .
CHANGING THE BIRDVIEW
TM
ANGLE
This changes the Birdview
TM
angle.
This setting is available only in the Birdview
TM
or
Split (Birdview
TM) mode.
Map settings
3-17
Page 66 of 272
CHANGING THE SCALE OF THE LEFT
SCREENWhen the split screen is displayed, you can
change the scale of the left screen.
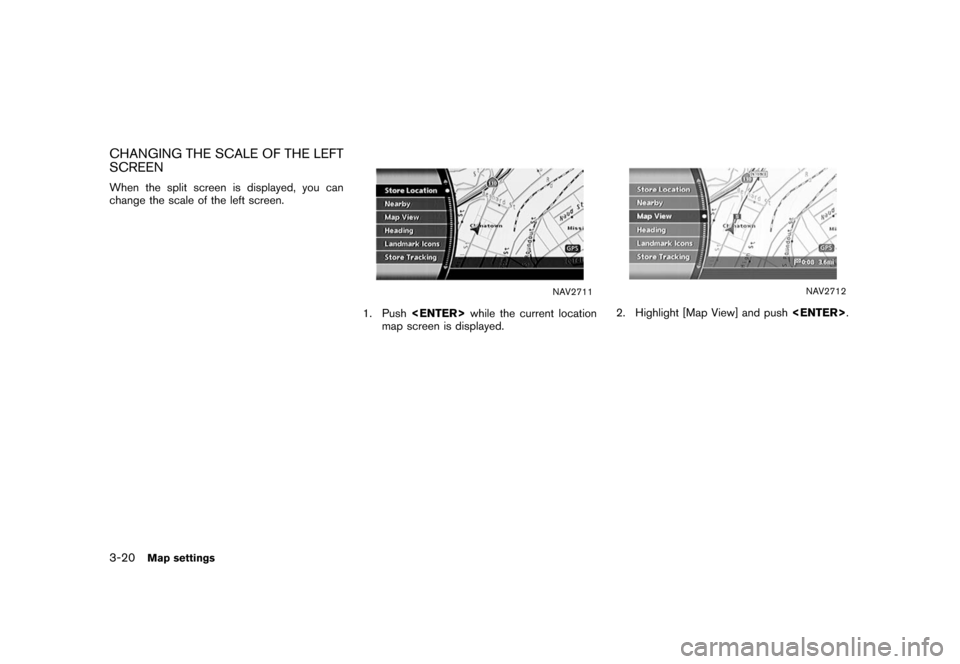
NAV2711
1. Push while the current location
map screen is displayed.
NAV2712
2. Highlight [Map View] and push
.
3-20
Map settings
Page 67 of 272
NAV2767
3. Highlight [Change Map Scale for Left] andpush .
INFO:
[Change Map Scale for Left] is displayed
only when the map view is in the Split (Plan
View) or Split (Birdview
TM) mode.
NAV2768
4. Highlight [Map Scale] and push
.
Adjust the map scale by moving the cursor
in the direction of [+] or [ ].
Use the joystick to adjust the scale of the
map.
After finishing the setup, push
or
/
to apply the scale
setting.
5. Push
Page 77 of 272
NAV2825
SETTING A STREET ADDRESS1. Highlight [Street Address] and push .
A character input screen is displayed.
NAV2826
INFO:
Character input screen for Street Address
&1
Region:
The region previously entered is auto-
matically displayed. It can be changed.
&2
City:
“All” is displayed, and all cities in the
region are available. Route calculation
conditions can be narrowed down by
entering the name of the city.
&3
Street:
Enter the name of a street.
&4
House No.:
A house number can be entered.
&5
Symbols/A-Z:
Symbol keys are displayed by high-
lighting [Symbols] and pushing
. Alphabet keys are dis-
played by highlighting [A-Z] and push-
ing .
Setting a destination
4-5
Page 79 of 272
NAV2830
5. The selected destination is displayed at thecenter of the map. Highlight [OK] after
confirming the location of the displayed
destination, and push .
The system sets the destination to the
selected location and starts calculating a
route.
NAV2831
INFO:
Even after setting a destination, you can
adjust the location of the destination, store
the route, etc.“OPERATIONS AFTER SETTING A
DESTINATION” (page 4-50)
NAV2832
Changing the region1. Highlight [Region] and push
to
change the region.
Setting a destination
4-7
Page 82 of 272
NAV2787
SETTING A CITY CENTER1. Highlight [Others] and push.
NAV2837
2. Highlight [City Center] and push
.
A character input screen is displayed.
NAV2838
INFO:
Character input screen for City Center
&1
Region:
The region previously entered is auto-
matically displayed. It can be changed.
&2
City:
“All” is displayed, and all cities in the
region are available. Route calculation
conditions can be narrowed down by
entering the name of the city.
4-10
Setting a destination
Page 85 of 272
NAV2844
Changing the region1. Highlight [Region] and push
to
change the region.
NAV2845
2. Highlight the preferred region and push
.
A character input screen is displayed.
Setting a destination
4-13
![NISSAN SENTRA 2006 B15 / 5.G Navigation Manual
NAV2760
3. Highlight the preferred map orientation andpush <ENTER> . The indicator of the
selected map orientation illuminates.
INFO:
[Long Range Map View] is displayed only
when you select [Heading](/img/5/699/w960_699-61.png "NISSAN SENTRA 2006 B15 / 5.G Navigation Manual
NAV2760
3. Highlight the preferred map orientation andpush <ENTER> . The indicator of the
selected map orientation illuminates.
INFO:
[Long Range Map View] is displayed only
when you select [Heading")
![NISSAN SENTRA 2006 B15 / 5.G Navigation Manual
NAV2767
3. Highlight [Change Map Scale for Left] andpush <ENTER> .
INFO:
[Change Map Scale for Left] is displayed
only when the map view is in the Split (Plan
View) or Split (Birdview
TM) mode.
NAV27](/img/5/699/w960_699-66.png "NISSAN SENTRA 2006 B15 / 5.G Navigation Manual
NAV2767
3. Highlight [Change Map Scale for Left] andpush <ENTER> .
INFO:
[Change Map Scale for Left] is displayed
only when the map view is in the Split (Plan
View) or Split (Birdview
TM) mode.
NAV27")
![NISSAN SENTRA 2006 B15 / 5.G Navigation Manual
NAV2825
SETTING A STREET ADDRESS1. Highlight [Street Address] and push<ENTER> .
A character input screen is displayed.
NAV2826
INFO:
Character input screen for Street Address
&1
Region:
The region pr](/img/5/699/w960_699-76.png "NISSAN SENTRA 2006 B15 / 5.G Navigation Manual
NAV2825
SETTING A STREET ADDRESS1. Highlight [Street Address] and push<ENTER> .
A character input screen is displayed.
NAV2826
INFO:
Character input screen for Street Address
&1
Region:
The region pr")
![NISSAN SENTRA 2006 B15 / 5.G Navigation Manual
NAV2830
5. The selected destination is displayed at thecenter of the map. Highlight [OK] after
confirming the location of the displayed
destination, and push <ENTER>.
The system sets the destination](/img/5/699/w960_699-78.png "NISSAN SENTRA 2006 B15 / 5.G Navigation Manual
NAV2830
5. The selected destination is displayed at thecenter of the map. Highlight [OK] after
confirming the location of the displayed
destination, and push <ENTER>.
The system sets the destination")
![NISSAN SENTRA 2006 B15 / 5.G Navigation Manual
NAV2787
SETTING A CITY CENTER1. Highlight [Others] and push<ENTER>.
NAV2837
2. Highlight [City Center] and push
<ENTER> .
A character input screen is displayed.
NAV2838
INFO:
Character input screen f](/img/5/699/w960_699-81.png "NISSAN SENTRA 2006 B15 / 5.G Navigation Manual
NAV2787
SETTING A CITY CENTER1. Highlight [Others] and push<ENTER>.
NAV2837
2. Highlight [City Center] and push
<ENTER> .
A character input screen is displayed.
NAV2838
INFO:
Character input screen f")
![NISSAN SENTRA 2006 B15 / 5.G Navigation Manual
NAV2844
Changing the region1. Highlight [Region] and push<ENTER>
to
change the region.
NAV2845
2. Highlight the preferred region and push
<ENTER> .
A character input screen is displayed.
Setting a de](/img/5/699/w960_699-84.png "NISSAN SENTRA 2006 B15 / 5.G Navigation Manual
NAV2844
Changing the region1. Highlight [Region] and push<ENTER>
to
change the region.
NAV2845
2. Highlight the preferred region and push
<ENTER> .
A character input screen is displayed.
Setting a de")