NISSAN TEANA 2014 Service Manual
Manufacturer: NISSAN, Model Year: 2014, Model line: TEANA, Model: NISSAN TEANA 2014Pages: 4801, PDF Size: 51.2 MB
Page 371 of 4801

CHG-26
< DTC/CIRCUIT DIAGNOSIS >
B TERMINAL CIRCUIT
B TERMINAL CIRCUIT
DescriptionINFOID:0000000009460661
“B” terminal circuit supplies power to charge the battery and to operate the vehicles electrical system.
Diagnosis ProcedureINFOID:0000000009460662
Regarding Wiring Diagram information. Refer to CHG-12, "Wiring Diagram".
1.CHECK “B” TERMINAL CONNECTION
1. Turn ignition switch OFF.
2. Check if “B” terminal is clean and tight.
Is the inspection result normal?
YES >> GO TO 2.
NO >> Repair terminal “B” connection. Confirm repa ir by performing complete Charging system test
using the EXP-800 NI or GR8-1200 NI (if availabl e). Refer to applicable Instruction Manual for
proper testing procedures.
2.CHECK “B” TERMINAL CIRCUIT
Check voltage between generator “B” terminal and ground.
Is the inspection result normal?
YES >> GO TO 3.
NO >> Check harness for open between generator and fusible link.
3.CHECK “B” TERMINAL CONNECT ION (VOLTAGE DROP TEST)
1. Start engine, then engine running at idle and warm.
2. Check voltage between battery positive te rminal and generator connector “B” terminal.
Is the inspection result normal?
YES >> “B” terminal circuit is normal. Refer to CHG-17, "Work Flow (With EXP-800 NI or GR8-1200 NI)"
or CHG-20, "Work Flow (Without EXP-800 NI or GR8-1200 NI)".
NO >> Check harness between battery and generator for continuity.
(+)
(-)Voltage
(Approx.)
Generator
Connector Terminal F6 1 Ground Battery voltage
(+) (-)Voltage
(Approx.)
Generator
Connector Terminal F6 1 Battery positive terminal Less than 0.2V
Revision: November 20132014 Altima NAMRevision: November 20132014 Altima NAM
Page 372 of 4801
CHG
L TERMINAL CIRCUIT (OPEN)CHG-27
< DTC/CIRCUIT DIAGNOSIS >
C
D E
F
G H
I
J
K L
B
A
O P
N
L TERMINAL CIRCUIT (OPEN)
DescriptionINFOID:0000000009460663
The “L” terminal circuit controls the charge warning
lamp. The charge warning lamp turns ON when the igni-
tion switch is set to ON or START. When the generator is providing sufficient voltage with the engine running,
the charge warning lamp turns OFF. If the charge warn ing lamp illuminates with the engine running, a malfunc-
tion is indicated.
Diagnosis ProcedureINFOID:0000000009460664
Regarding Wiring Diagram information. Refer to CHG-12, "Wiring Diagram".
1.CHECK “L” TERMINAL CONNECTION
1. Turn ignition switch OFF.
2. Check if “L” terminal is clean and tight.
Is the inspection result normal?
YES >> GO TO 2.
NO >> Repair “L” terminal connection. Confirm repair by performing complete Charging system test
using EXP-800 NI or GR8-1200 NI (if available). Refer to applicable Instruction Manual for proper
testing procedures.
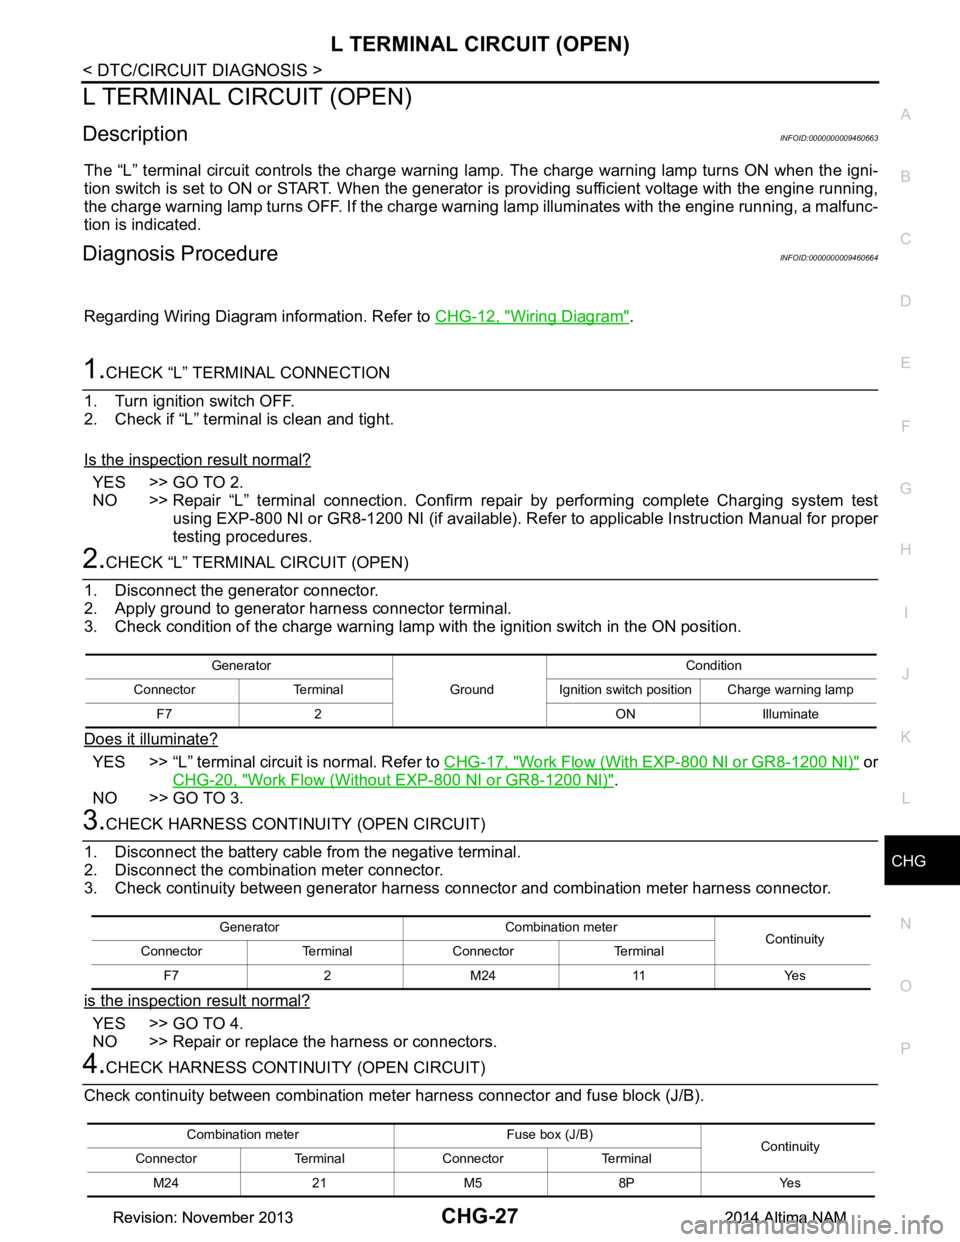
2.CHECK “L” TERMINAL CIRCUIT (OPEN)
1. Disconnect the generator connector.
2. Apply ground to generator harness connector terminal.
3. Check condition of the charge warning lamp with the ignition switch in the ON position.
Does it illuminate?
YES >> “L” terminal circuit is normal. Refer to CHG-17, "Work Flow (With EXP-800 NI or GR8-1200 NI)" or
CHG-20, "Work Flow (Without EXP-800 NI or GR8-1200 NI)"
.
NO >> GO TO 3.
3.CHECK HARNESS CONTI NUITY (OPEN CIRCUIT)
1. Disconnect the battery cabl e from the negative terminal.
2. Disconnect the combination meter connector.
3. Check continuity between generator harness connector and combination meter harness connector.
is the inspection result normal?
YES >> GO TO 4.
NO >> Repair or replace the harness or connectors.
4.CHECK HARNESS CONTI NUITY (OPEN CIRCUIT)
Check continuity between combination me ter harness connector and fuse block (J/B).
Generator
GroundCondition
Connector Terminal Ignition switch position Charge warning lamp F7 2 ON Illuminate
Generator Combination meter Continuity
Connector Terminal Connector Terminal
F7 2 M24 11 Yes
Combination meter Fuse box (J/B) Continuity
Connector Terminal Connector Terminal
M24 21 M5 8P Yes
Revision: November 20132014 Altima NAMRevision: November 20132014 Altima NAM
Page 373 of 4801

CHG-28
< DTC/CIRCUIT DIAGNOSIS >
L TERMINAL CIRCUIT (OPEN)
Is the inspection result normal?
YES >> GO TO 5.
NO >> Repair or replace the harness or connectors.
5.CHECK POWER SUPPLY CIRCUIT
1. Connect the battery cable to the negative terminal.
2. Check voltage between combination meter harness connector and ground.
Is the inspection result normal?
YES >> Replace the combination meter. Refer to MWI-82, "Removal and Installation".
NO >> Repair or replace the harness or connectors.
(+)
(-) Condition Voltage
(Approx.)
Combination meter
Connector Terminal
M24 21 Ground When the ignition
switch is in ON position Battery voltage
Revision: November 20132014 Altima NAMRevision: November 20132014 Altima NAM
Page 374 of 4801
CHG
L TERMINAL CIRCUIT (SHORT)CHG-29
< DTC/CIRCUIT DIAGNOSIS >
C
D E
F
G H
I
J
K L
B
A
O P
N
L TERMINAL CIRCUIT (SHORT)
DescriptionINFOID:0000000009460665
The terminal “L” circuit controls the charge warning
lamp. The charge warning lamp turns ON when the igni-
tion switch is set to ON or START. When the generator is providing sufficient voltage with the engine running,
the charge warning lamp turns off. If the charge warn ing lamp illuminates with the engine running, a malfunc-
tion is indicated.
Diagnosis ProcedureINFOID:0000000009460666
Regarding Wiring Diagram information, refer to CHG-12, "Wiring Diagram".
1.CHECK “L” TERMINAL CIRCUIT (SHORT)
1. Turn ignition switch OFF.
2. Disconnect generator connector.
3. Turn ignition switch ON.
Does charge warning lamp illuminate?
YES >> GO TO 2.
NO >> Refer to CHG-17, "Work Flow (With EXP-800 NI or GR8-1200 NI)"
or CHG-20, "Work Flow (With-
out EXP-800 NI or GR8-1200 NI)".
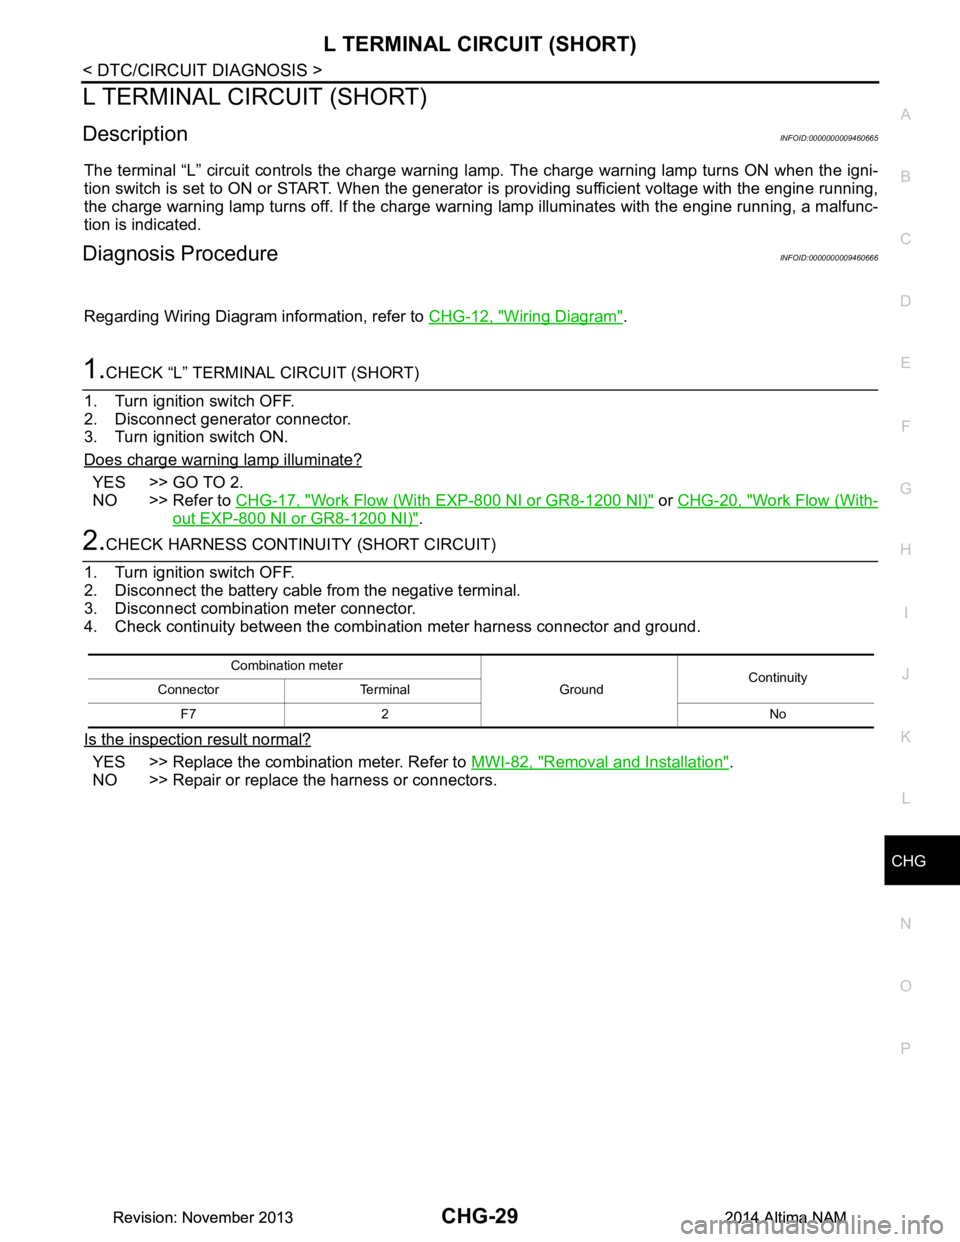
2.CHECK HARNESS CONTINUI TY (SHORT CIRCUIT)
1. Turn ignition switch OFF.
2. Disconnect the battery cabl e from the negative terminal.
3. Disconnect combination meter connector.
4. Check continuity between the comb ination meter harness connector and ground.
Is the inspection result normal?
YES >> Replace the combination meter. Refer to MWI-82, "Removal and Installation".
NO >> Repair or replace the harness or connectors.
Combination meter
GroundContinuity
Connector Terminal
F7 2 No
Revision: November 20132014 Altima NAMRevision: November 20132014 Altima NAM
Page 375 of 4801

CHG-30
< DTC/CIRCUIT DIAGNOSIS >
S TERMINAL CIRCUIT
S TERMINAL CIRCUIT
DescriptionINFOID:0000000009460667
The output voltage of the generator is controlled by the IC regulator at terminal “S” detecting the input voltage
from battery.
The “S” terminal circuit detects the battery voltage to adjust the generator output voltage with the IC voltage
regulator.
Diagnosis ProcedureINFOID:0000000009460668
Regarding Wiring Diagram information. Refer to CHG-12, "Wiring Diagram".
1.CHECK “S” TERMINAL CONNECTION
1. Turn ignition switch OFF.
2. Check if “S” terminal is clean and tight.
Is the inspection result normal?
YES >> GO TO 2.
NO >> Repair “S” terminal connection. Confirm repa ir by performing complete Charging system test
using EXP-800 NI or GR8-1200 NI (if available). Refer to the applicable Instruction Manual for
proper testing procedures.
2.CHECK “S” TERMINAL CIRCUIT
Check voltage between generator harness connector and ground.
Is the inspection result normal?
YES >> Refer to CHG-17, "Work Flow (With EXP-800 NI or GR8-1200 NI)" or CHG-20, "Work Flow (With-
out EXP-800 NI or GR8-1200 NI)".
NO >> Check harness for open between generator and fuse.
(+)
(-)Voltage
(Approx.)
Generator
Connector Terminal F7 3 Ground Battery voltage
Revision: November 20132014 Altima NAMRevision: November 20132014 Altima NAM
Page 376 of 4801
CHG
CHARGING SYSTEMCHG-31
< SYMPTOM DIAGNOSIS >
C
D E
F
G H
I
J
K L
B
A
O P
N
SYMPTOM DIAGNOSIS
CHARGING SYSTEM
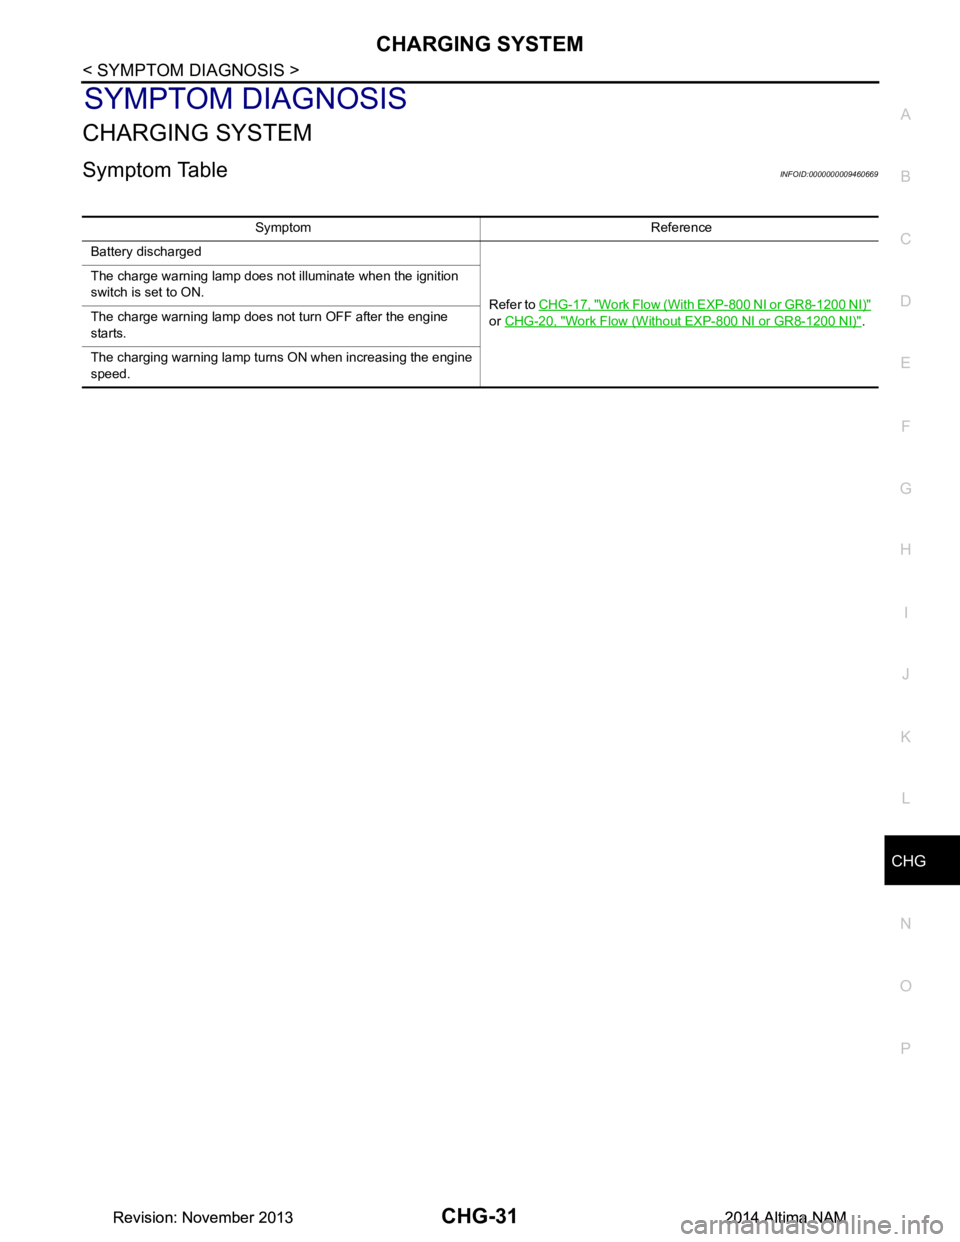
Symptom TableINFOID:0000000009460669
Symptom Reference
Battery discharged
Refer to CHG-17, "Work Flow (With EXP-800 NI or GR8-1200 NI)"
or CHG-20, "Work Flow (Without EXP-800 NI or GR8-1200 NI)"
.
The charge warning lamp does not illuminate when the ignition
switch is set to ON.
The charge warning lamp does not turn OFF after the engine
starts.
The charging warning lamp turns ON when increasing the engine
speed.
Revision: November 20132014 Altima NAMRevision: November 20132014 Altima NAM
Page 377 of 4801
CHG-32
< REMOVAL AND INSTALLATION >
GENERATOR
REMOVAL AND INSTALLATION
GENERATOR
Removal and InstallationINFOID:0000000009460670
QR25DE
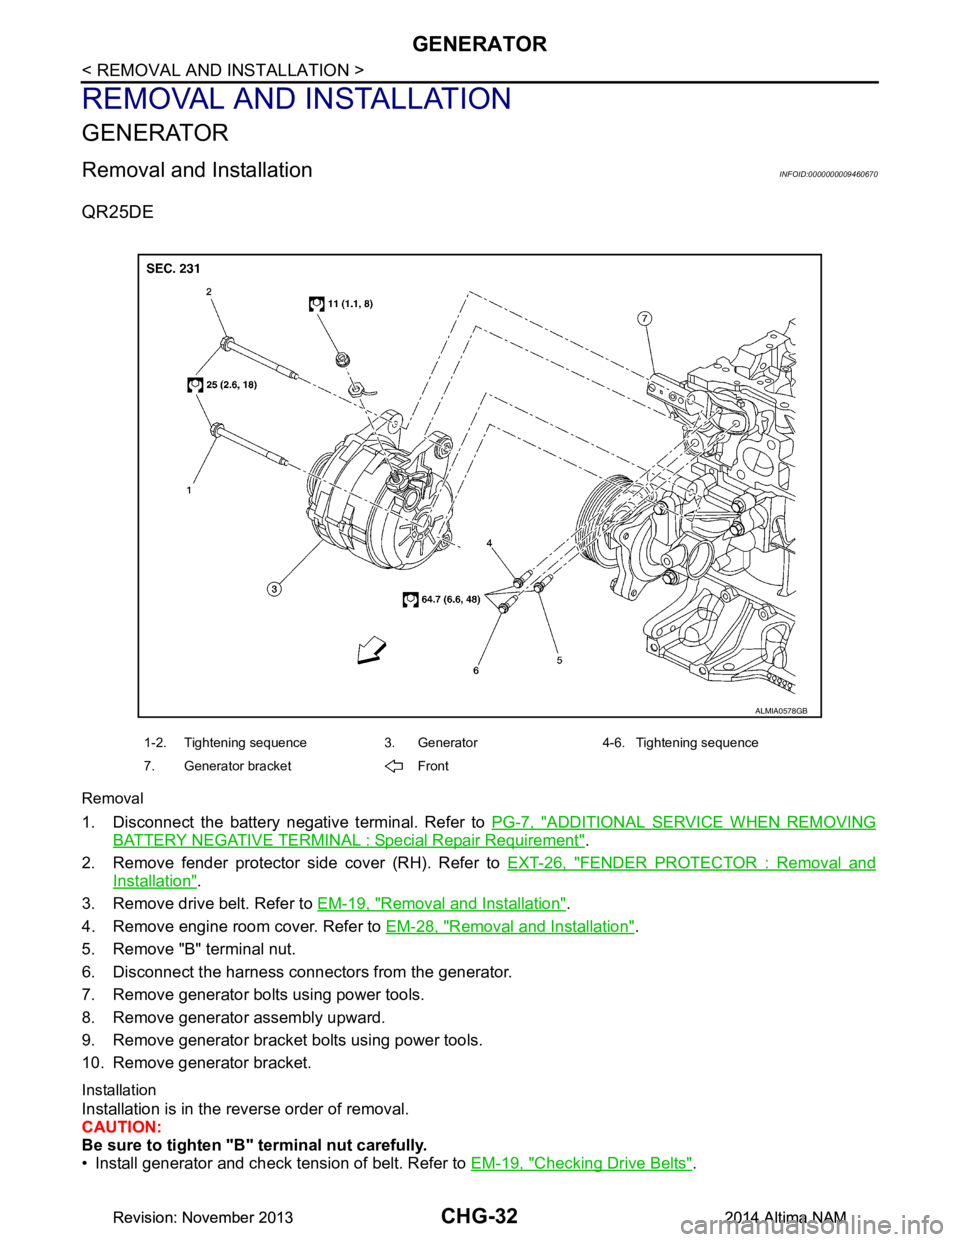
Removal
1. Disconnect the battery negative terminal. Refer to PG-7, "ADDITIONAL SERVICE WHEN REMOVING
BATTERY NEGATIVE TERMINAL : Special Repair Requirement".
2. Remove fender protector side cover (RH). Refer to EXT-26, "FENDER PROTECTOR : Removal and
Installation".
3. Remove drive belt. Refer to EM-19, "Removal and Installation"
.
4. Remove engine room cover. Refer to EM-28, "Removal and Installation"
.
5. Remove "B" terminal nut.
6. Disconnect the harness connectors from the generator.
7. Remove generator bolts using power tools.
8. Remove generator assembly upward.
9. Remove generator bracket bolts using power tools.
10. Remove generator bracket.
Installation
Installation is in the reverse order of removal.
CAUTION:
Be sure to tighten "B" terminal nut carefully.
• Install generator and check tension of belt. Refer to EM-19, "Checking Drive Belts"
.
ALMIA0578GB
1-2. Tightening sequence 3. Generator 4-6. Tightening sequence
7. Generator bracket Front
Revision: November 20132014 Altima NAMRevision: November 20132014 Altima NAM
Page 378 of 4801
CHG
GENERATORCHG-33
< REMOVAL AND INSTALLATION >
C
D E
F
G H
I
J
K L
B
A
O P
N
• This model is equipped with a power generation voltage
variable control system. Therefore, perform an
inspection of the power generation voltage variable c ontrol system operation after replacing the generator.
Refer to CHG-10, "System Description"
.
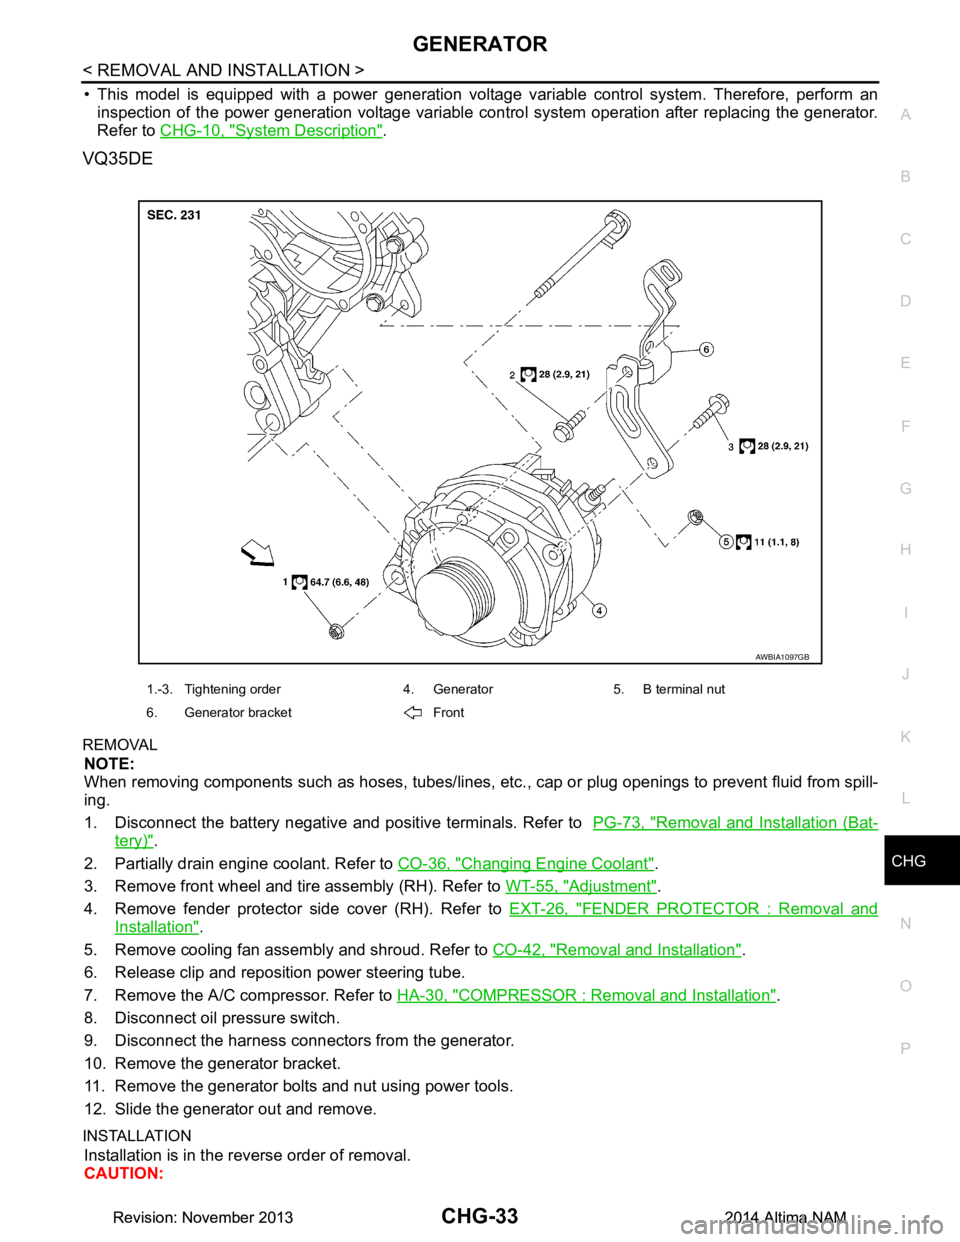
VQ35DE
REMOVAL
NOTE:
When removing components such as hoses, tubes/lines, etc. , cap or plug openings to prevent fluid from spill-
ing.
1. Disconnect the battery negative and positive terminals. Refer to PG-73, "Removal and Installation (Bat-
tery)".
2. Partially drain engine coolant. Refer to CO-36, "Changing Engine Coolant"
.
3. Remove front wheel and tire assembly (RH). Refer to WT-55, "Adjustment"
.
4. Remove fender protector side cover (RH). Refer to EXT-26, "FENDER PROTECTOR : Removal and
Installation".
5. Remove cooling fan assembly and shroud. Refer to CO-42, "Removal and Installation"
.
6. Release clip and reposition power steering tube.
7. Remove the A/C compressor. Refer to HA-30, "COMPRESSOR : Removal and Installation"
.
8. Disconnect oil pressure switch.
9. Disconnect the harness connectors from the generator.
10. Remove the generator bracket.
11. Remove the generator bolts and nut using power tools.
12. Slide the generator out and remove.
INSTALLATION
Installation is in the reverse order of removal.
CAUTION:
AWBIA1097GB
1.-3. Tightening order 4. Generator 5. B terminal nut
6. Generator bracket Front
Revision: November 20132014 Altima NAMRevision: November 20132014 Altima NAM
Page 379 of 4801

CHG-34
< REMOVAL AND INSTALLATION >
GENERATOR
Be sure to tighten "B" terminal nut carefully.
• Install generator and check tension of belt. Refer to EM-134, "Checking Drive Belts"
.
• This model is equipped with a power generation voltage variable control system. Therefore, perform an
inspection of the power generation voltage variable cont rol system operation after replacing the generator.
Refer to CHG-10, "System Description"
.
Revision: November 20132014 Altima NAMRevision: November 20132014 Altima NAM
Page 380 of 4801

CHG
SERVICE DATA AND SPECIFICATIONS (SDS)CHG-35
< SERVICE DATA AND SPECIFICATIONS (SDS)
C
D E
F
G H
I
J
K L
B
A
O P
N
SERVICE DATA AND SPECIFICATIONS (SDS)
SERVICE DATA AND SPECIFICATIONS (SDS)
GeneratorINFOID:0000000009460671
*: Always check with the Parts Department for the latest parts information. Application QR25DE VQ35DE
Manufacturer Mitsubishi Melco
Part number* A002TJ1891ZC A003TJ3691ZC
Nominal rating 12V-110A 12V-130A
Ground polarity Negative
Minimum revolution 1,000 rpm 1,000 rpm
Hot output current (When 13.5 volts is applied) More than 27A/1,300 rpm
More than 95A/2,500 rpm
More than 116A/5,000 rpm More than 66A/1,500 rpm
More than 108A/2,500 rpm
More than 124A/5,000 rpm
Regulated output voltage @ 20 °C 14.1 - 14.7 14.1 - 14.7V
Adjustment range of power generation variable
voltage control 11.7 - 15.3V 11.7 - 15.3V
Revision: November 20132014 Altima NAMRevision: November 20132014 Altima NAM