NISSAN TERRANO 2004 Service Repair Manual
TERRANO 2004
NISSAN
NISSAN
https://www.carmanualsonline.info/img/5/57394/w960_57394-0.png
NISSAN TERRANO 2004 Service Repair Manual
Trending: boot, ad blue, alternator belt, Ignition wiring, coolant, Air conditioning, engine oil
Page 941 of 1833
Disassembly
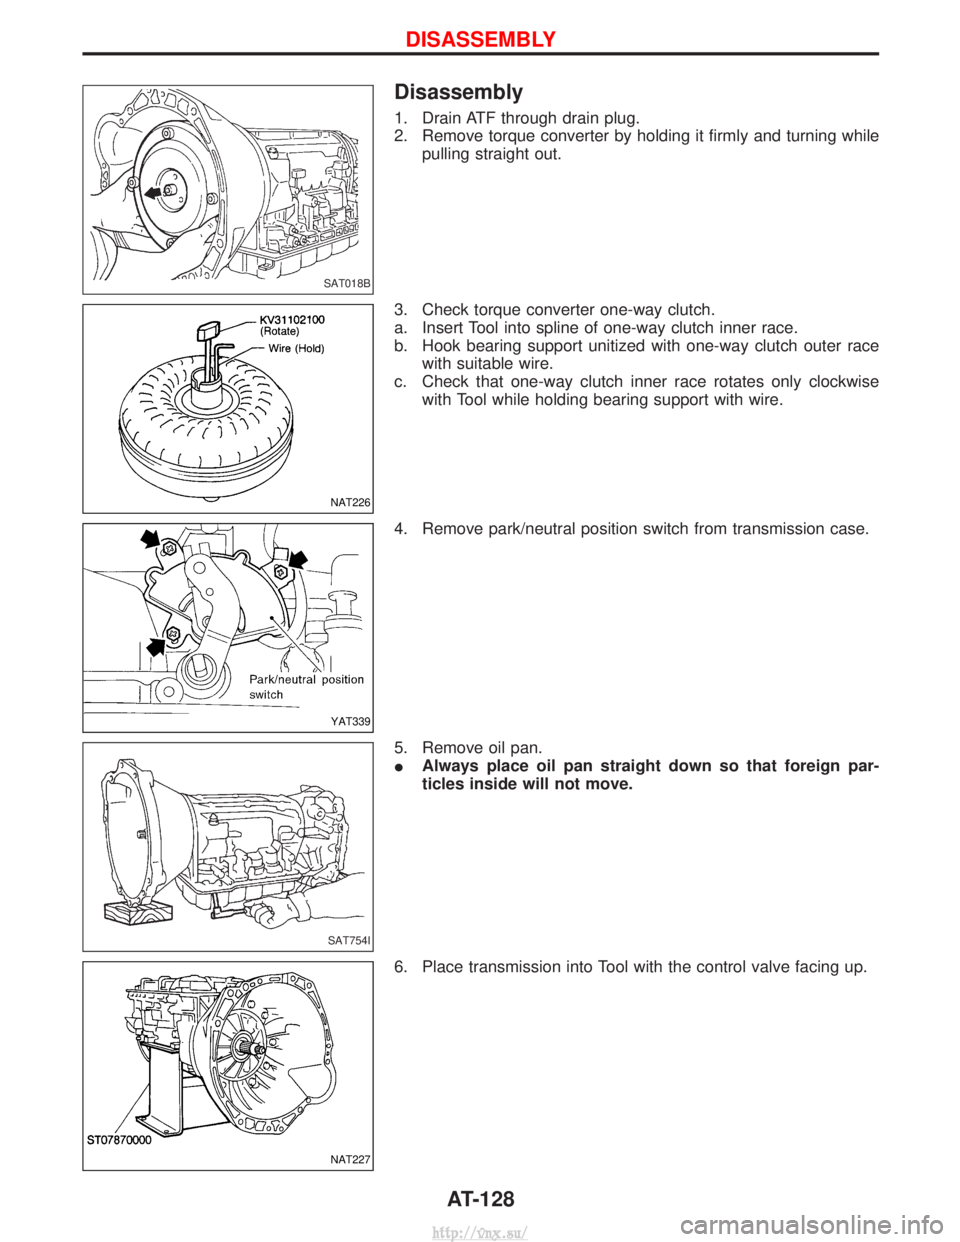
1. Drain ATF through drain plug.
2. Remove torque converter by holding it firmly and turning whilepulling straight out.
3. Check torque converter one-way clutch.
a. Insert Tool into spline of one-way clutch inner race.
b. Hook bearing support unitized with one-way clutch outer race with suitable wire.
c. Check that one-way clutch inner race rotates only clockwise with Tool while holding bearing support with wire.
4. Remove park/neutral position switch from transmission case.
5. Remove oil pan.
I Always place oil pan straight down so that foreign par-
ticles inside will not move.
6. Place transmission into Tool with the control valve facing up.
SAT018B
NAT226
YAT339
SAT754I
NAT227
DISASSEMBLY
AT-128
http://vnx.su/
Page 942 of 1833
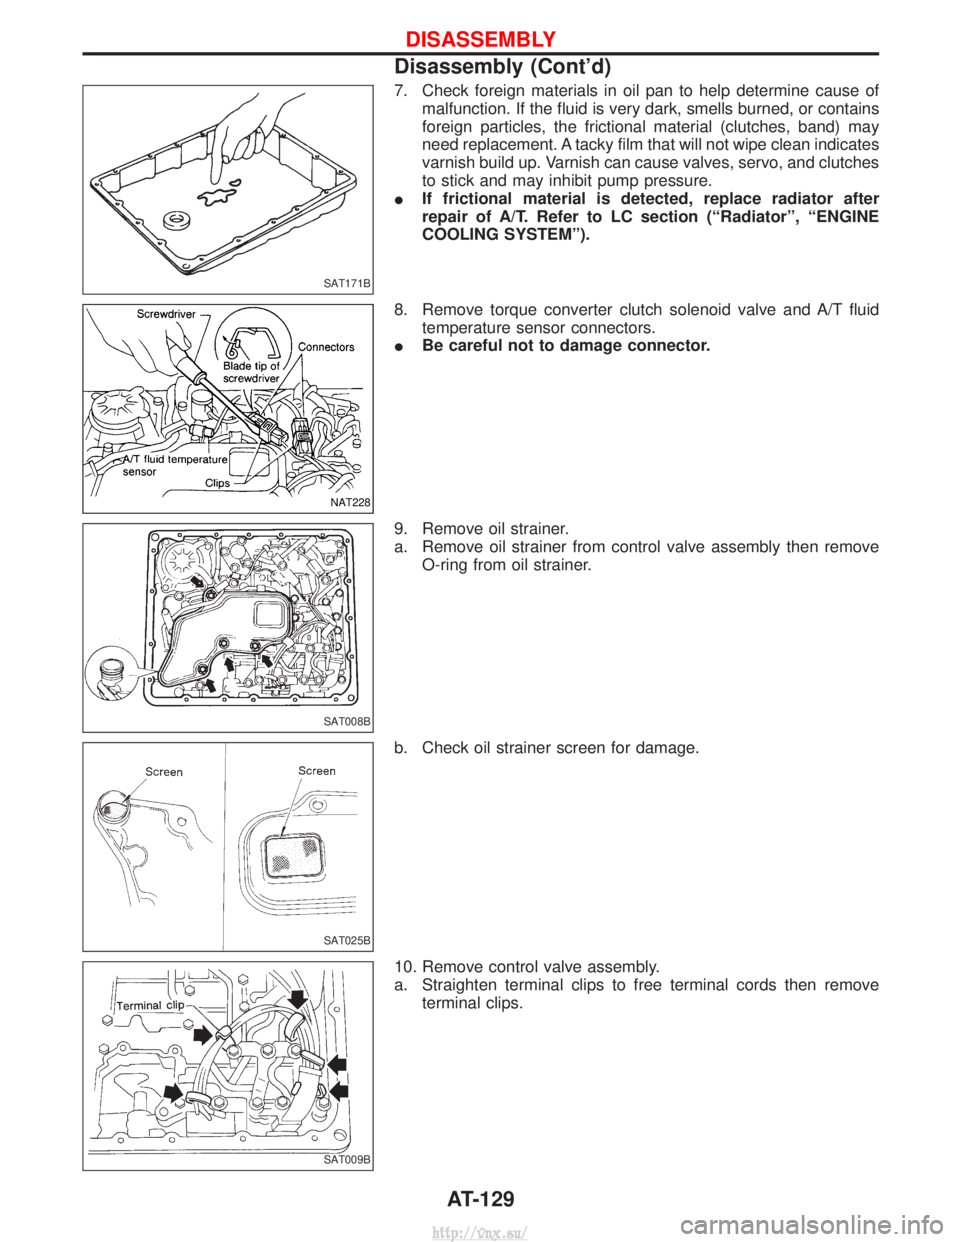
7. Check foreign materials in oil pan to help determine cause ofmalfunction. If the fluid is very dark, smells burned, or contains
foreign particles, the frictional material (clutches, band) may
need replacement. A tacky film that will not wipe clean indicates
varnish build up. Varnish can cause valves, servo, and clutches
to stick and may inhibit pump pressure.
I If frictional material is detected, replace radiator after
repair of A/T. Refer to LC section (ªRadiatorº, ªENGINE
COOLING SYSTEMº).
8. Remove torque converter clutch solenoid valve and A/T fluid temperature sensor connectors.
I Be careful not to damage connector.
9. Remove oil strainer.
a. Remove oil strainer from control valve assembly then remove O-ring from oil strainer.
b. Check oil strainer screen for damage.
10. Remove control valve assembly.
a. Straighten terminal clips to free terminal cords then remove terminal clips.
SAT171B
NAT228
SAT008B
SAT025B
SAT009B
DISASSEMBLY
Disassembly (Cont'd)
AT-129
http://vnx.su/
Page 943 of 1833
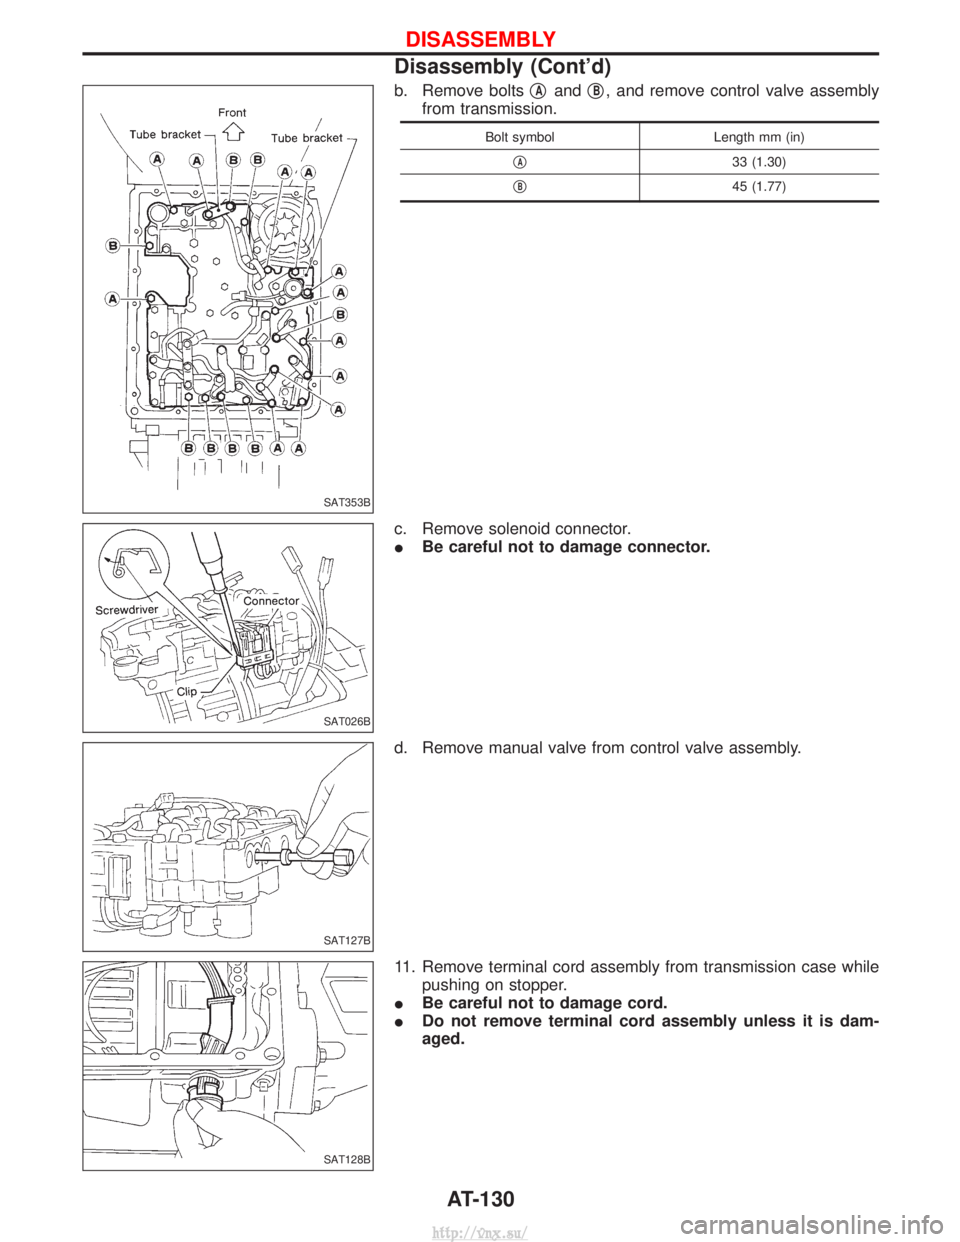
b. Remove boltsqAandqB, and remove control valve assembly
from transmission.
Bolt symbol Length mm (in)
q
A33 (1.30)
q
B45 (1.77)
c. Remove solenoid connector.
I Be careful not to damage connector.
d. Remove manual valve from control valve assembly.
11. Remove terminal cord assembly from transmission case while pushing on stopper.
I Be careful not to damage cord.
I Do not remove terminal cord assembly unless it is dam-
aged.
SAT353B
SAT026B
SAT127B
SAT128B
DISASSEMBLY
Disassembly (Cont'd)
AT-130
http://vnx.su/
Page 944 of 1833
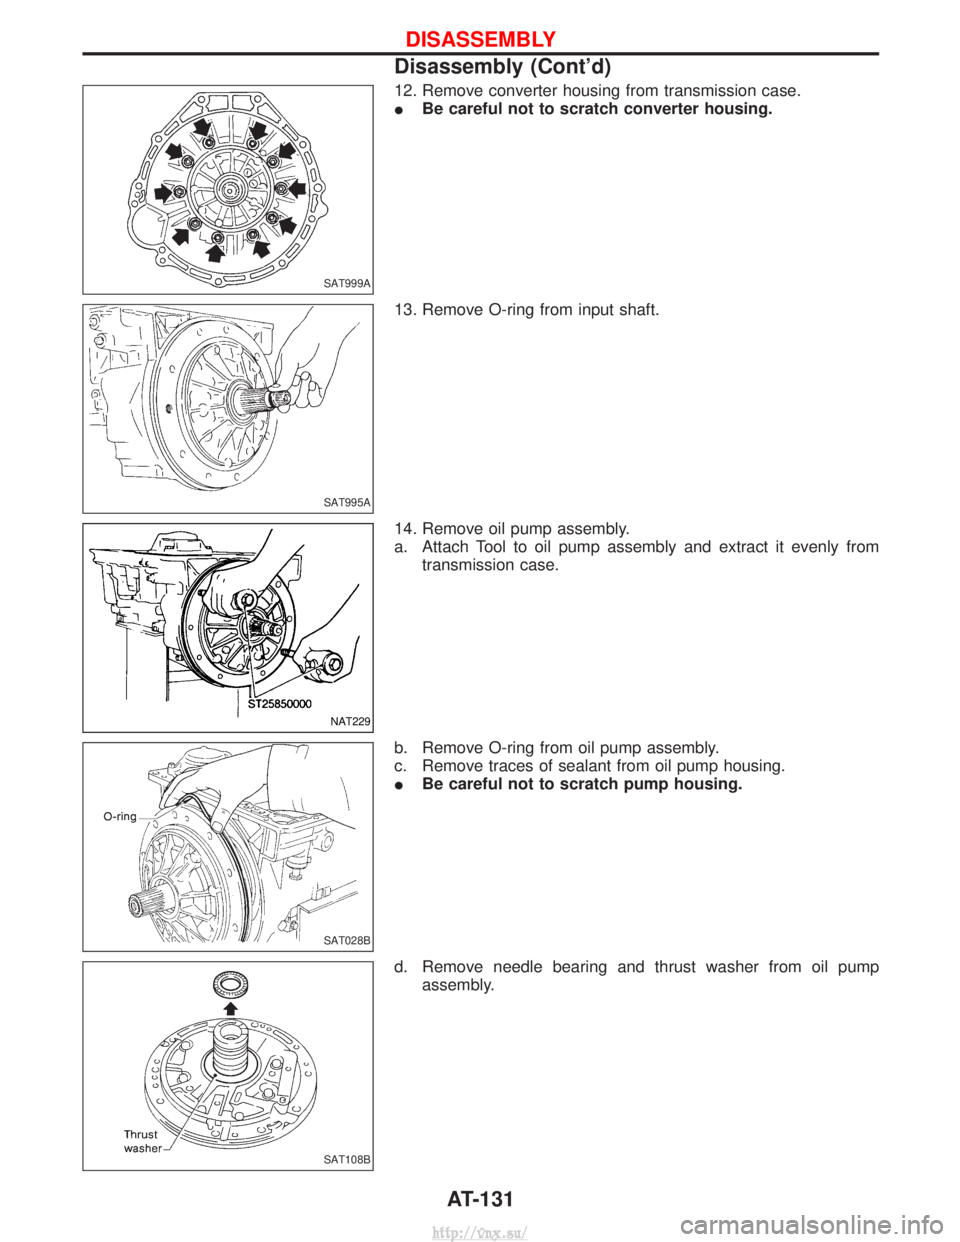
12. Remove converter housing from transmission case.
IBe careful not to scratch converter housing.
13. Remove O-ring from input shaft.
14. Remove oil pump assembly.
a. Attach Tool to oil pump assembly and extract it evenly from transmission case.
b. Remove O-ring from oil pump assembly.
c. Remove traces of sealant from oil pump housing.
I Be careful not to scratch pump housing.
d. Remove needle bearing and thrust washer from oil pump assembly.
SAT999A
SAT995A
NAT229
SAT028B
SAT108B
DISASSEMBLY
Disassembly (Cont'd)
AT-131
http://vnx.su/
Page 945 of 1833
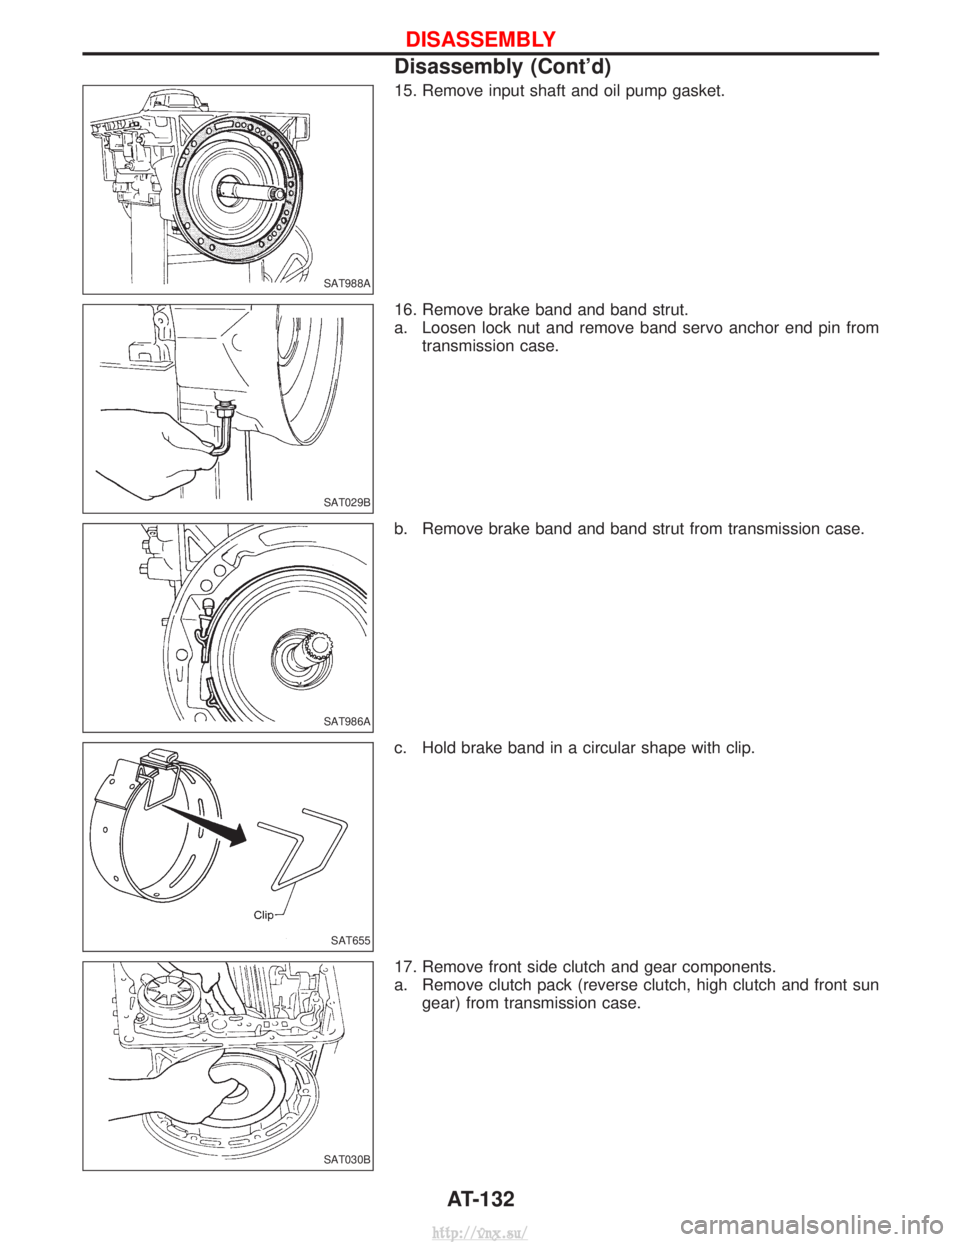
15. Remove input shaft and oil pump gasket.
16. Remove brake band and band strut.
a. Loosen lock nut and remove band servo anchor end pin fromtransmission case.
b. Remove brake band and band strut from transmission case.
c. Hold brake band in a circular shape with clip.
17. Remove front side clutch and gear components.
a. Remove clutch pack (reverse clutch, high clutch and front sun gear) from transmission case.
SAT988A
SAT029B
SAT986A
SAT655
SAT030B
DISASSEMBLY
Disassembly (Cont'd)
AT-132
http://vnx.su/
Page 946 of 1833
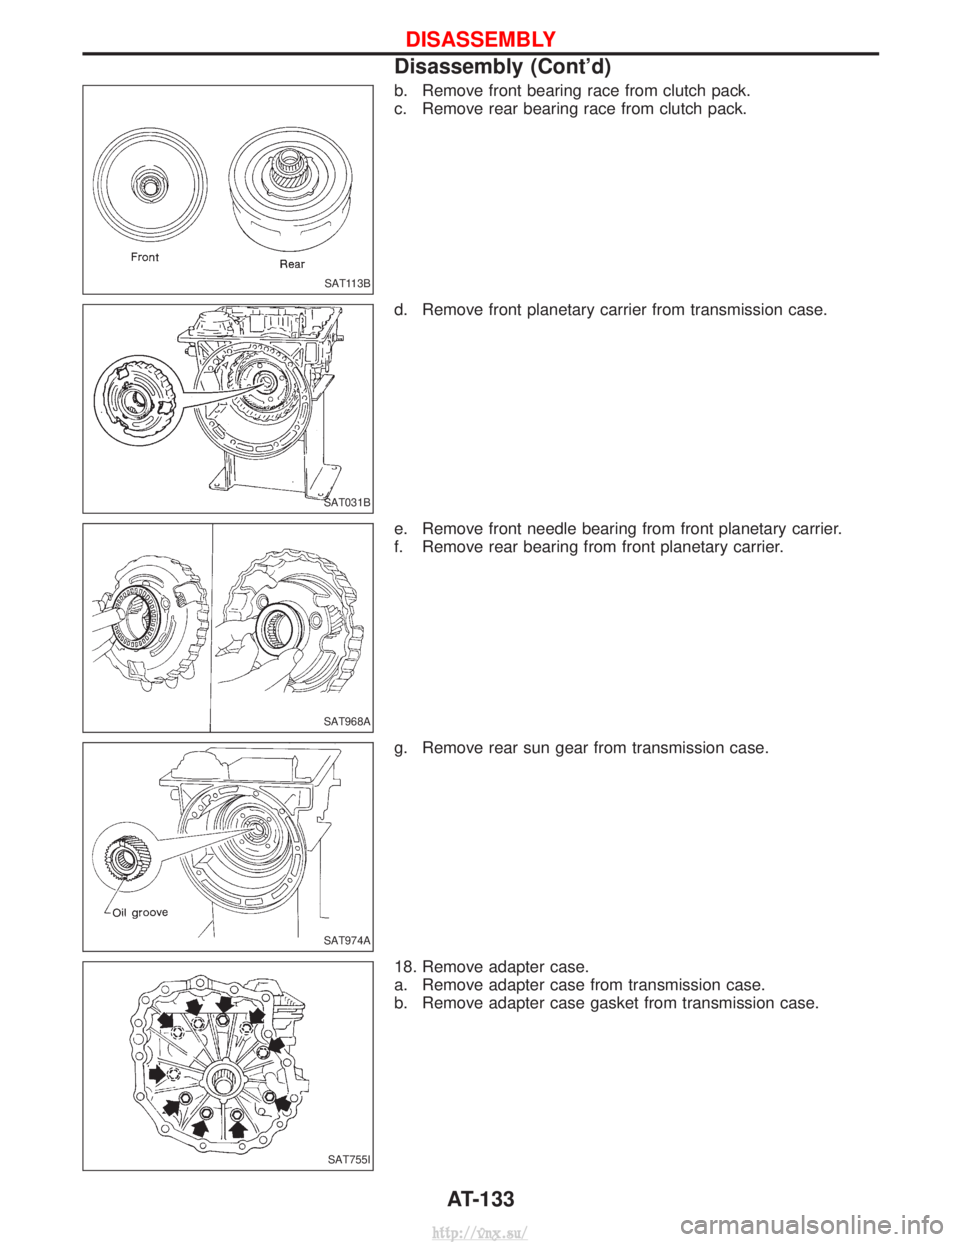
b. Remove front bearing race from clutch pack.
c. Remove rear bearing race from clutch pack.
d. Remove front planetary carrier from transmission case.
e. Remove front needle bearing from front planetary carrier.
f. Remove rear bearing from front planetary carrier.
g. Remove rear sun gear from transmission case.
18. Remove adapter case.
a. Remove adapter case from transmission case.
b. Remove adapter case gasket from transmission case.
SAT113B
SAT031B
SAT968A
SAT974A
SAT755I
DISASSEMBLY
Disassembly (Cont'd)AT-133
http://vnx.su/
Page 947 of 1833
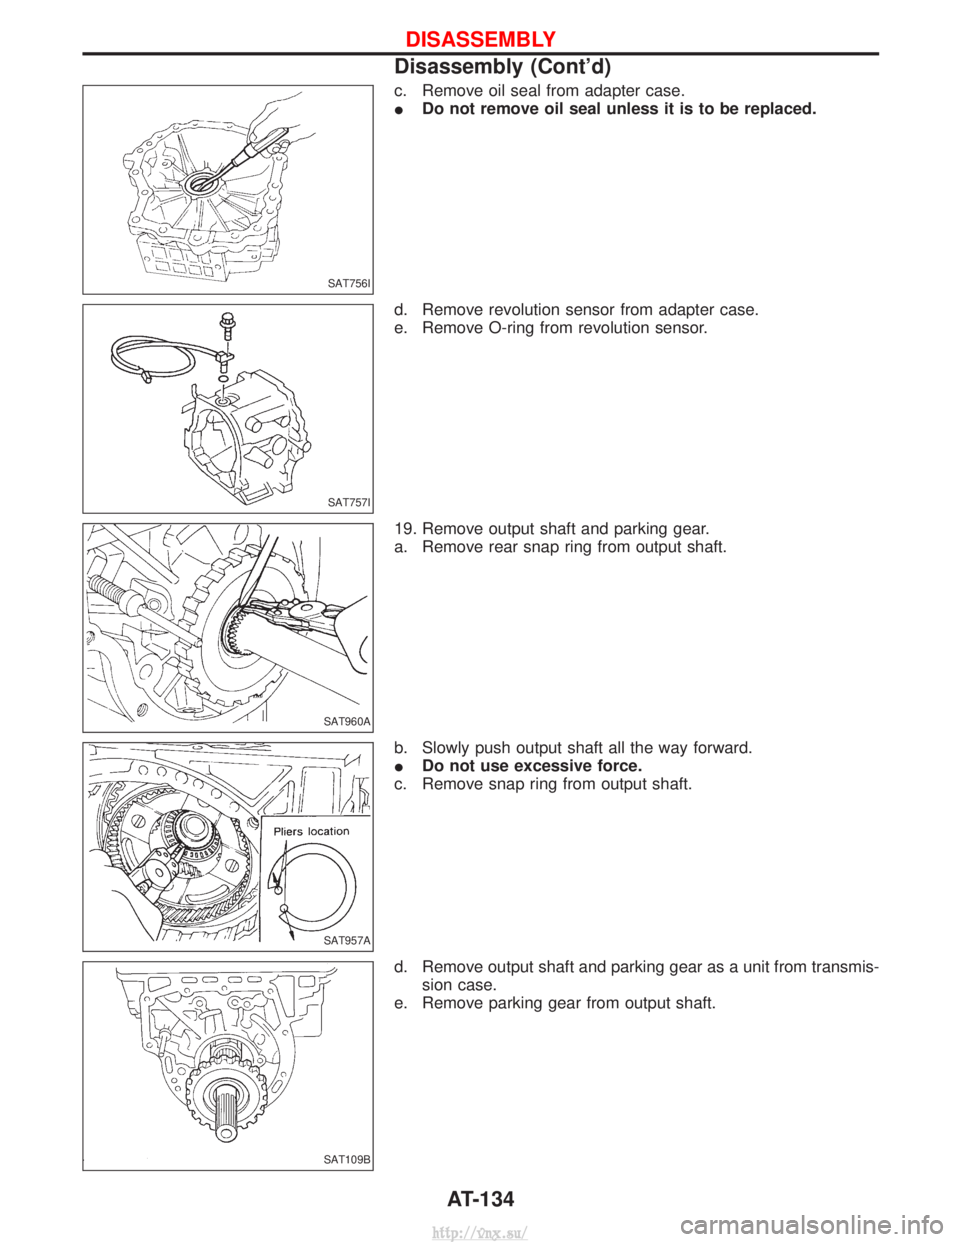
c. Remove oil seal from adapter case.
IDo not remove oil seal unless it is to be replaced.
d. Remove revolution sensor from adapter case.
e. Remove O-ring from revolution sensor.
19. Remove output shaft and parking gear.
a. Remove rear snap ring from output shaft.
b. Slowly push output shaft all the way forward.
I Do not use excessive force.
c. Remove snap ring from output shaft.
d. Remove output shaft and parking gear as a unit from transmis- sion case.
e. Remove parking gear from output shaft.
SAT756I
SAT757I
SAT960A
SAT957A
SAT109B
DISASSEMBLY
Disassembly (Cont'd)
AT-134
http://vnx.su/
Page 948 of 1833
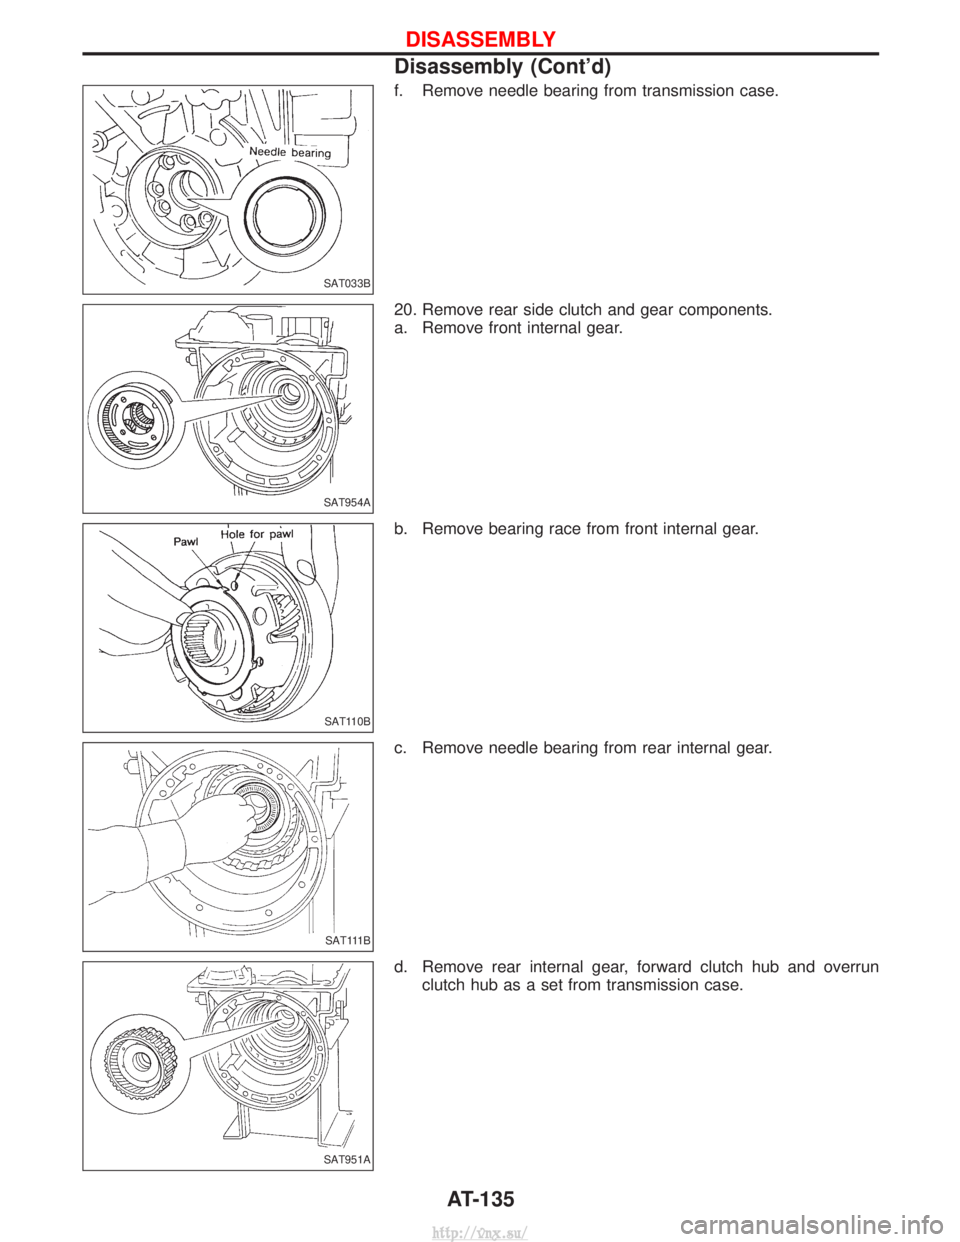
f. Remove needle bearing from transmission case.
20. Remove rear side clutch and gear components.
a. Remove front internal gear.
b. Remove bearing race from front internal gear.
c. Remove needle bearing from rear internal gear.
d. Remove rear internal gear, forward clutch hub and overrunclutch hub as a set from transmission case.
SAT033B
SAT954A
SAT110B
SAT111B
SAT951A
DISASSEMBLY
Disassembly (Cont'd)
AT-135
http://vnx.su/
Page 949 of 1833
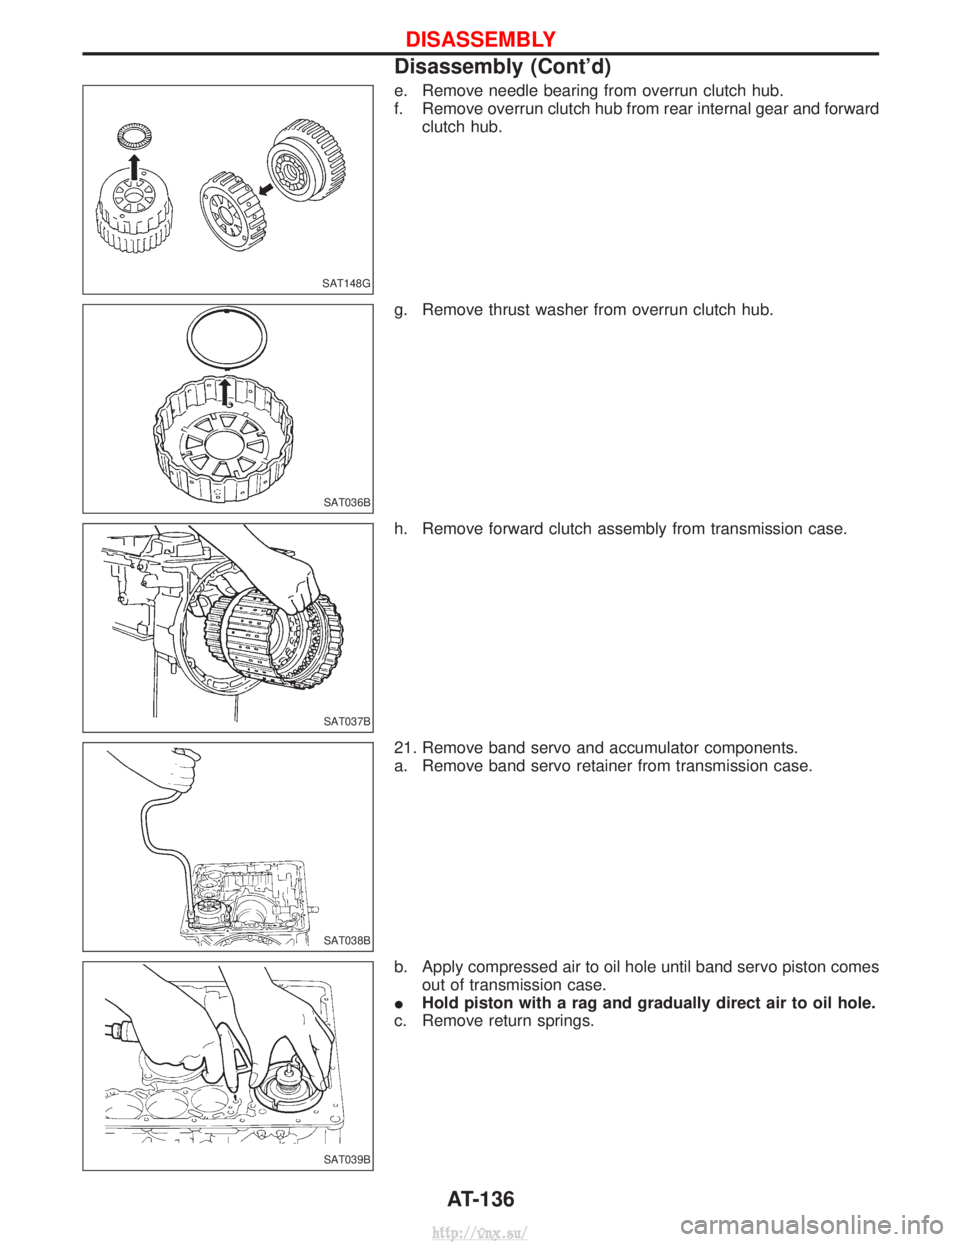
e. Remove needle bearing from overrun clutch hub.
f. Remove overrun clutch hub from rear internal gear and forwardclutch hub.
g. Remove thrust washer from overrun clutch hub.
h. Remove forward clutch assembly from transmission case.
21. Remove band servo and accumulator components.
a. Remove band servo retainer from transmission case.
b. Apply compressed air to oil hole until band servo piston comes out of transmission case.
I Hold piston with a rag and gradually direct air to oil hole.
c. Remove return springs.
SAT148G
SAT036B
SAT037B
SAT038B
SAT039B
DISASSEMBLY
Disassembly (Cont'd)
AT-136
http://vnx.su/
Page 950 of 1833
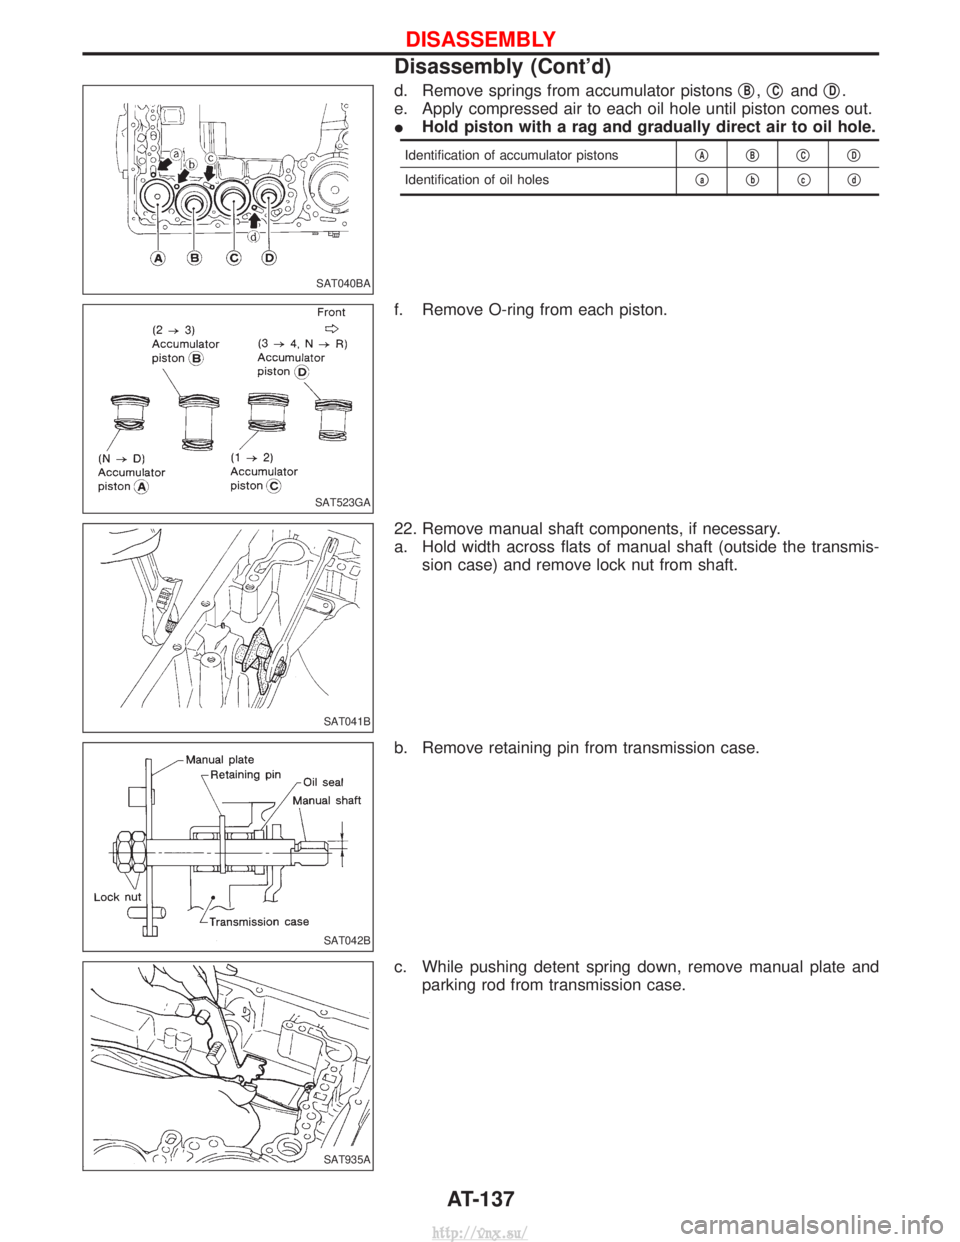
d. Remove springs from accumulator pistonsqB,qCand qD.
e. Apply compressed air to each oil hole until piston comes out.
I Hold piston with a rag and gradually direct air to oil hole.
Identification of accumulator pistons qAqBqCqD
Identification of oil holes qaqbqcqd
f. Remove O-ring from each piston.
22. Remove manual shaft components, if necessary.
a. Hold width across flats of manual shaft (outside the transmis-
sion case) and remove lock nut from shaft.
b. Remove retaining pin from transmission case.
c. While pushing detent spring down, remove manual plate and parking rod from transmission case.
SAT040BA
SAT523GA
SAT041B
SAT042B
SAT935A
DISASSEMBLY
Disassembly (Cont'd)
AT-137
http://vnx.su/
Trending: brakes, headrest, mileage, wheel, remove seats, fuse, bulb
