checking oil NISSAN X-TRAIL 2001 Service Service Manual
[x] Cancel search | Manufacturer: NISSAN, Model Year: 2001, Model line: X-TRAIL, Model: NISSAN X-TRAIL 2001Pages: 3833, PDF Size: 39.49 MB
Page 3804 of 3833

MA-24
ENGINE MAINTENANCE (QR20DE·QR25DE)
4. Apply engine oil to the oil seal circumference of the new oil filter.
5. Screw the oil filter manually until it touches the installation sur-
face, then tighten it by 2/3 turn.
6. After warming up the engine, check for engine oil leakage.
7. Check engine oil level and add engine oil. Refer to LU-7, "
ENGINE OIL" .
Checking and Changing Spark PlugsELS000K1
REMOVAL
1. Remove ignition coil. Refer to EM-29, "IGNITION COIL" .
2. Remove spark plug with suitable spark plug wrench.
CAUTION:
Do not drop or shock it.
INSPECTION AFTER REMOVAL
●Use standard type spark plug for normal condition.
●The hot type spark plug is suitable when fouling occurs with the standard type spark plug under conditions
such as.
–frequent engine starts.
–low ambient temperatures.
●The cold type spark plug is suitable when spark knock occurs with the standard type spark plug under
conditions such as.
–extended highway driving.
–frequent high engine revolution.
SMA010
Oil filter:
: 14.7 - 20.5 N·m (1.5 - 2.1 Kg-m, 11 - 15 ft-lb)
SMA229B
SEM294A
MakeNGK
Standard typeLFR5A-11
Hot typeLFR4A-11
Cold typeLFR6A-11
Page 3806 of 3833
MA-26
ENGINE MAINTENANCE (YD22DDTI)
ENGINE MAINTENANCE (YD22DDTI)
PFP:00100
Checking Drive BeltsELS000CC
●Before inspecting the engine, make sure the engine has cooled
down; wait approximately 30 minutes after the engine has been
stopped.
●Visually inspect all belts for wear, damage or cracks on contact-
ing surfaces and edge areas.
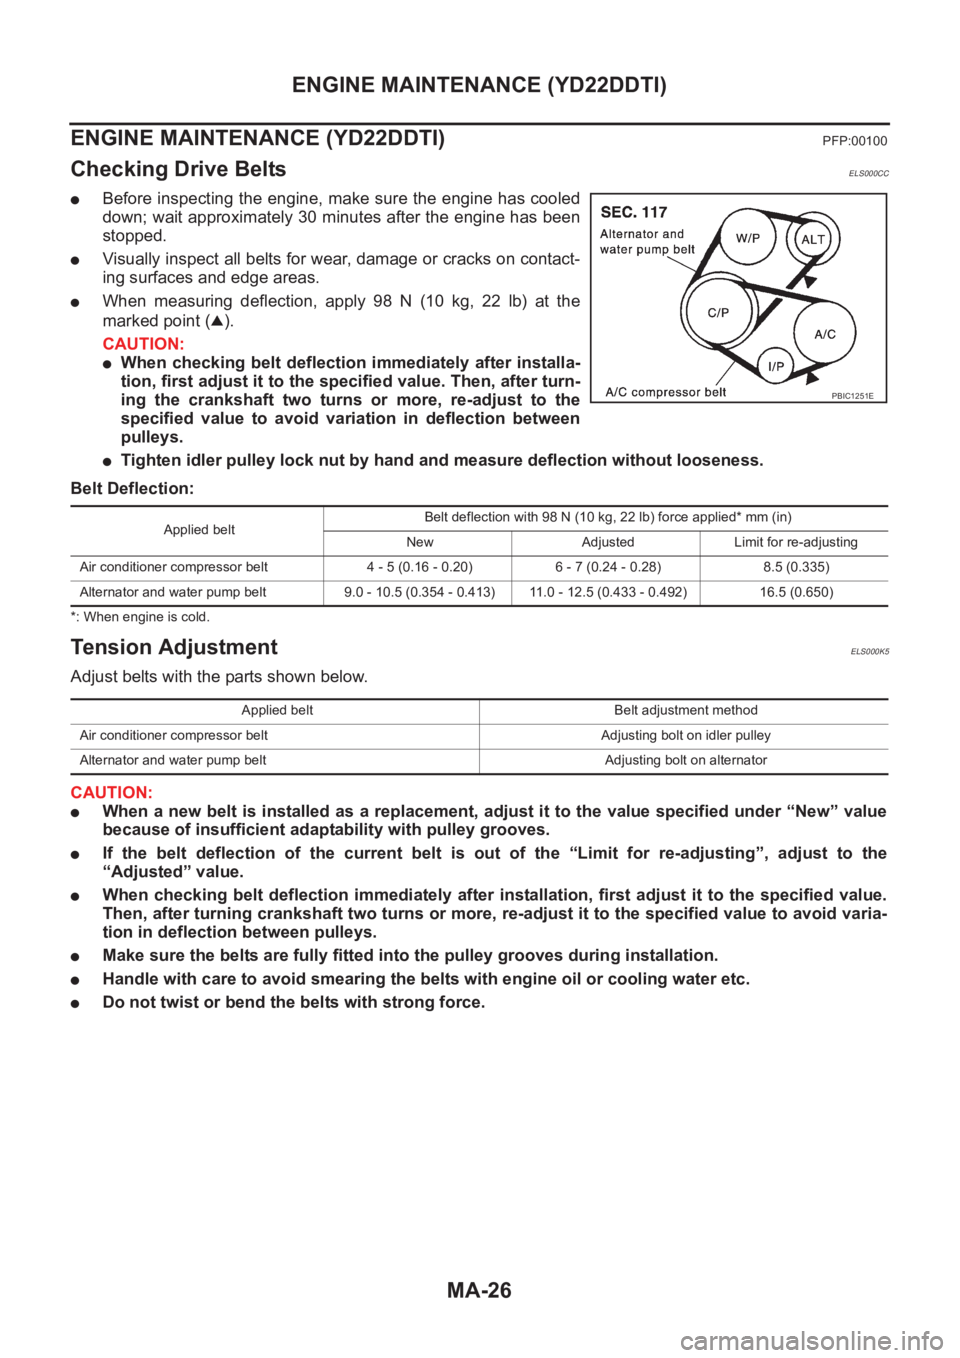
●When measuring deflection, apply 98 N (10 kg, 22 lb) at the
marked point ( ).
CAUTION:
●When checking belt deflection immediately after installa-
tion, first adjust it to the specified value. Then, after turn-
ing the crankshaft two turns or more, re-adjust to the
specified value to avoid variation in deflection between
pulleys.
●Tighten idler pulley lock nut by hand and measure deflection without looseness.
Belt Deflection:
*: When engine is cold.
Tension AdjustmentELS000K5
Adjust belts with the parts shown below.
CAUTION:
●When a new belt is installed as a replacement, adjust it to the value specified under “New” value
because of insufficient adaptability with pulley grooves.
●If the belt deflection of the current belt is out of the “Limit for re-adjusting”, adjust to the
“Adjusted” value.
●When checking belt deflection immediately after installation, first adjust it to the specified value.
Then, after turning crankshaft two turns or more, re-adjust it to the specified value to avoid varia-
tion in deflection between pulleys.
●Make sure the belts are fully fitted into the pulley grooves during installation.
●Handle with care to avoid smearing the belts with engine oil or cooling water etc.
●Do not twist or bend the belts with strong force.
PBIC1251E
Applied beltBelt deflection with 98 N (10 kg, 22 lb) force applied* mm (in)
New Adjusted Limit for re-adjusting
Air conditioner compressor belt 4 - 5 (0.16 - 0.20) 6 - 7 (0.24 - 0.28) 8.5 (0.335)
Alternator and water pump belt 9.0 - 10.5 (0.354 - 0.413) 11.0 - 12.5 (0.433 - 0.492) 16.5 (0.650)
Applied belt Belt adjustment method
Air conditioner compressor belt Adjusting bolt on idler pulley
Alternator and water pump belt Adjusting bolt on alternator
Page 3815 of 3833
CHASSIS AND BODY MAINTENANCE
MA-35
C
D
E
F
G
H
I
J
K
MA
B
MA
CHASSIS AND BODY MAINTENANCEPFP:00100
Checking Exhaust SystemELS000B9
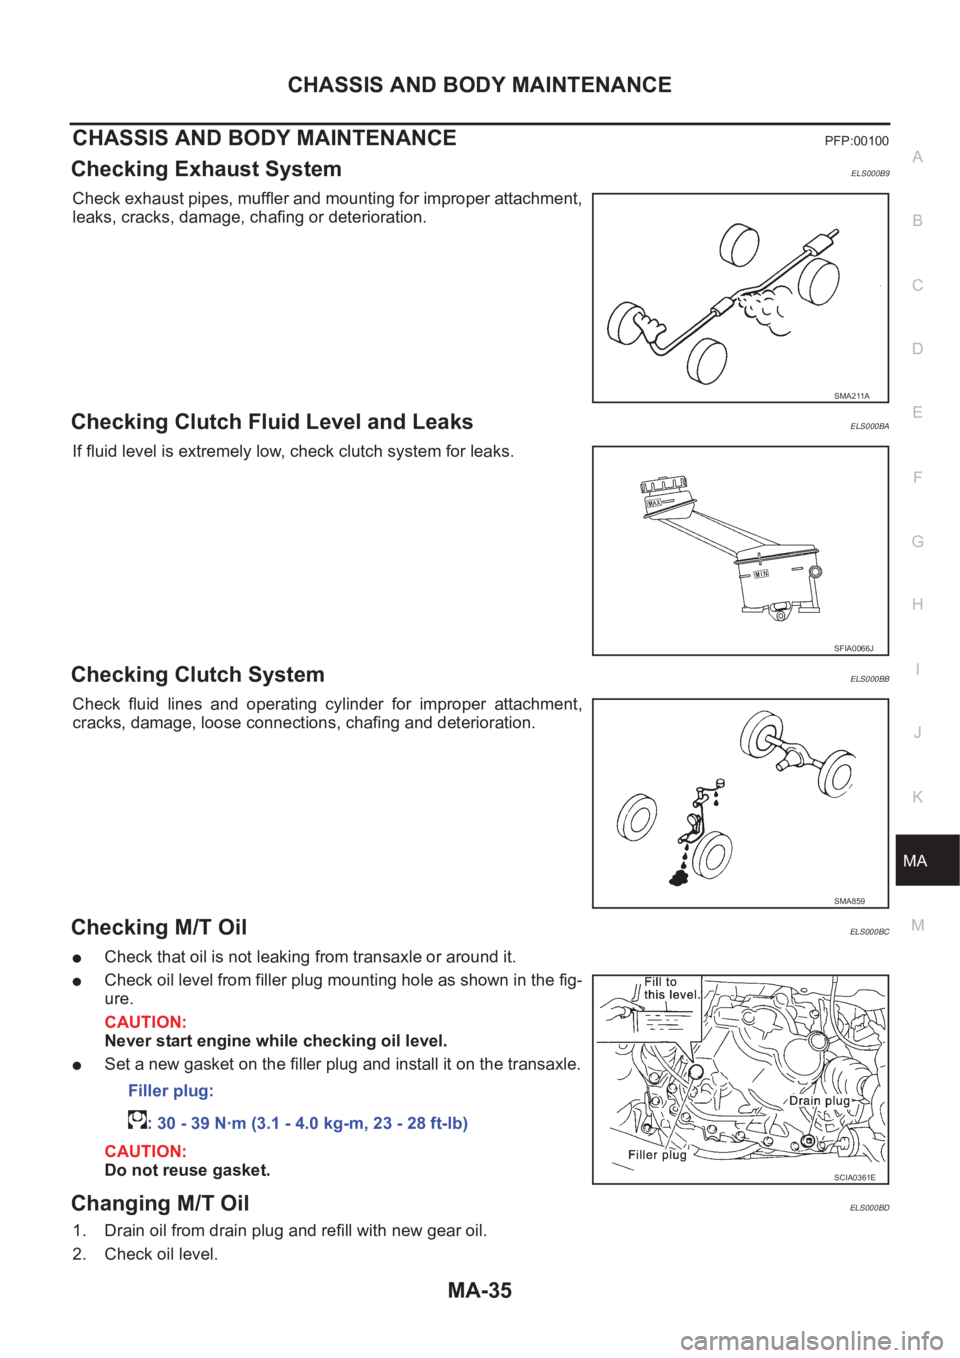
Check exhaust pipes, muffler and mounting for improper attachment,
leaks, cracks, damage, chafing or deterioration.
Checking Clutch Fluid Level and LeaksELS000BA
If fluid level is extremely low, check clutch system for leaks.
Checking Clutch SystemELS000BB
Check fluid lines and operating cylinder for improper attachment,
cracks, damage, loose connections, chafing and deterioration.
Checking M/T OilELS000BC
●Check that oil is not leaking from transaxle or around it.
●Check oil level from filler plug mounting hole as shown in the fig-
ure.
CAUTION:
Never start engine while checking oil level.
●Set a new gasket on the filler plug and install it on the transaxle.
CAUTION:
Do not reuse gasket.
Changing M/T OilELS000BD
1. Drain oil from drain plug and refill with new gear oil.
2. Check oil level.
SMA211A
SFIA0066J
SMA859
Filler plug:
: 30 - 39 N·m (3.1 - 4.0 kg-m, 23 - 28 ft-lb)
SCIA0361E
Page 3816 of 3833
MA-36
CHASSIS AND BODY MAINTENANCE
CAUTION:
Do not reuse gasket.
Checking A/T FluidELS000BV
1. Warm up engine.
2. Check for fluid leakage.
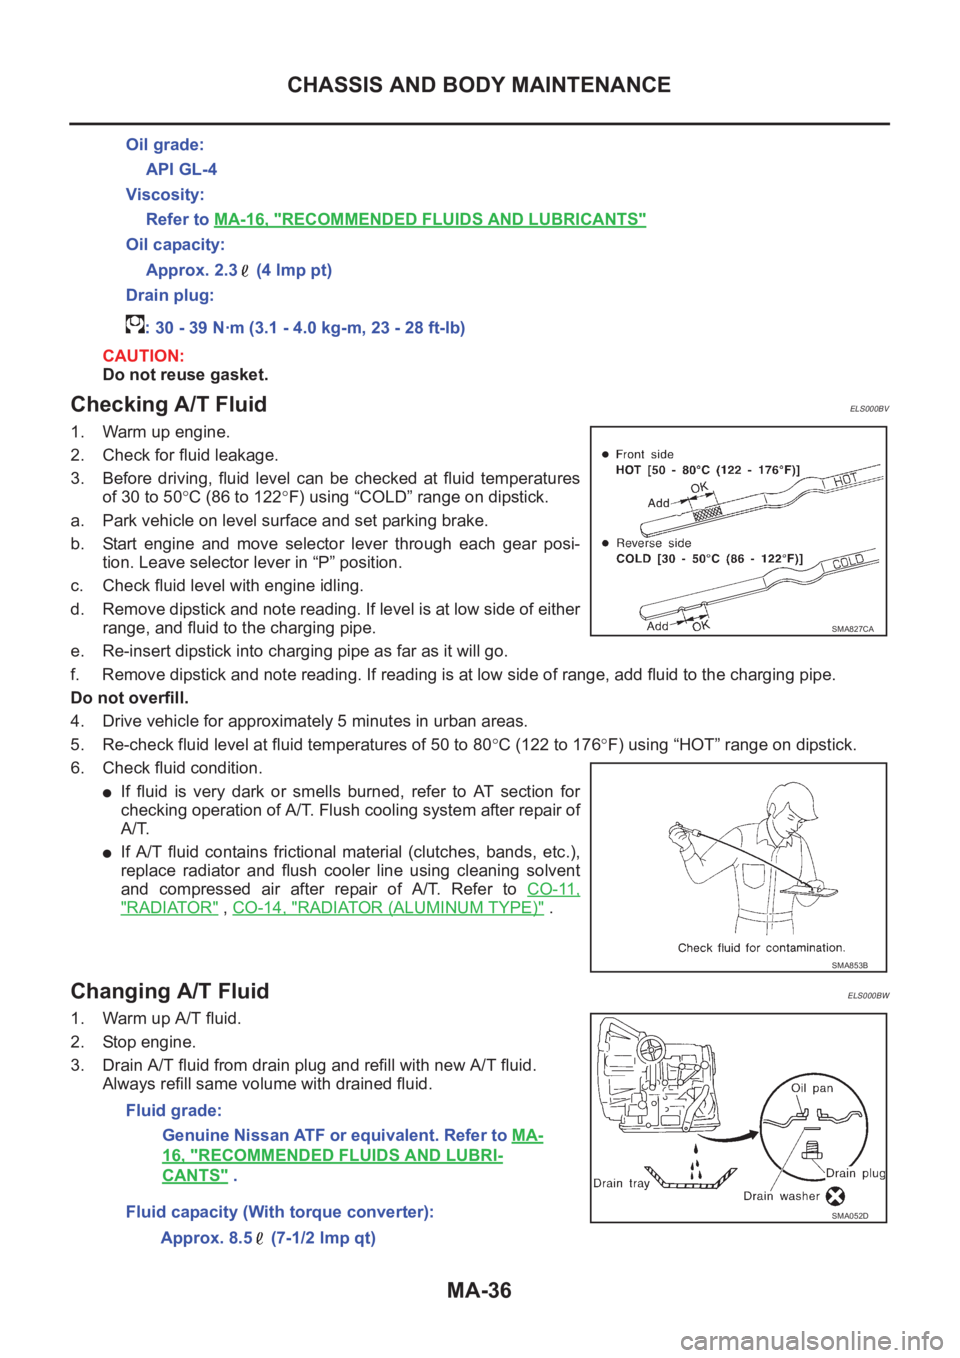
3. Before driving, fluid level can be checked at fluid temperatures
of 30 to 50°C (86 to 122°F) using “COLD” range on dipstick.
a. Park vehicle on level surface and set parking brake.
b. Start engine and move selector lever through each gear posi-
tion. Leave selector lever in “P” position.
c. Check fluid level with engine idling.
d. Remove dipstick and note reading. If level is at low side of either
range, and fluid to the charging pipe.
e. Re-insert dipstick into charging pipe as far as it will go.
f. Remove dipstick and note reading. If reading is at low side of range, add fluid to the charging pipe.
Do not overfill.
4. Drive vehicle for approximately 5 minutes in urban areas.
5. Re-check fluid level at fluid temperatures of 50 to 80°C (122 to 176°F) using “HOT” range on dipstick.
6. Check fluid condition.
●If fluid is very dark or smells burned, refer to AT section for
checking operation of A/T. Flush cooling system after repair of
A/T.
●If A/T fluid contains frictional material (clutches, bands, etc.),
replace radiator and flush cooler line using cleaning solvent
and compressed air after repair of A/T. Refer to CO-11,
"RADIATOR" , CO-14, "RADIATOR (ALUMINUM TYPE)" .
Changing A/T FluidELS000BW
1. Warm up A/T fluid.
2. Stop engine.
3. Drain A/T fluid from drain plug and refill with new A/T fluid.
Always refill same volume with drained fluid.Oil grade:
API GL-4
Viscosity:
Refer to MA-16, "
RECOMMENDED FLUIDS AND LUBRICANTS"
Oil capacity:
Approx. 2.3 (4 lmp pt)
Drain plug:
: 30 - 39 N·m (3.1 - 4.0 kg-m, 23 - 28 ft-lb)
SMA827CA
SMA853B
Fluid grade:
Genuine Nissan ATF or equivalent. Refer to MA-
16, "RECOMMENDED FLUIDS AND LUBRI-
CANTS" .
Fluid capacity (With torque converter):
Approx. 8.5 (7-1/2 lmp qt)
SMA052D
Page 3817 of 3833
CHASSIS AND BODY MAINTENANCE
MA-37
C
D
E
F
G
H
I
J
K
MA
B
MA
4. Run engine at idle speed for five minutes.
5. Check fluid level and condition. Refer to MA-36, "
Checking A/T Fluid" . If fluid is still dirty, repeat steps 2
through 5.
Checking Transfer OilELS000BT
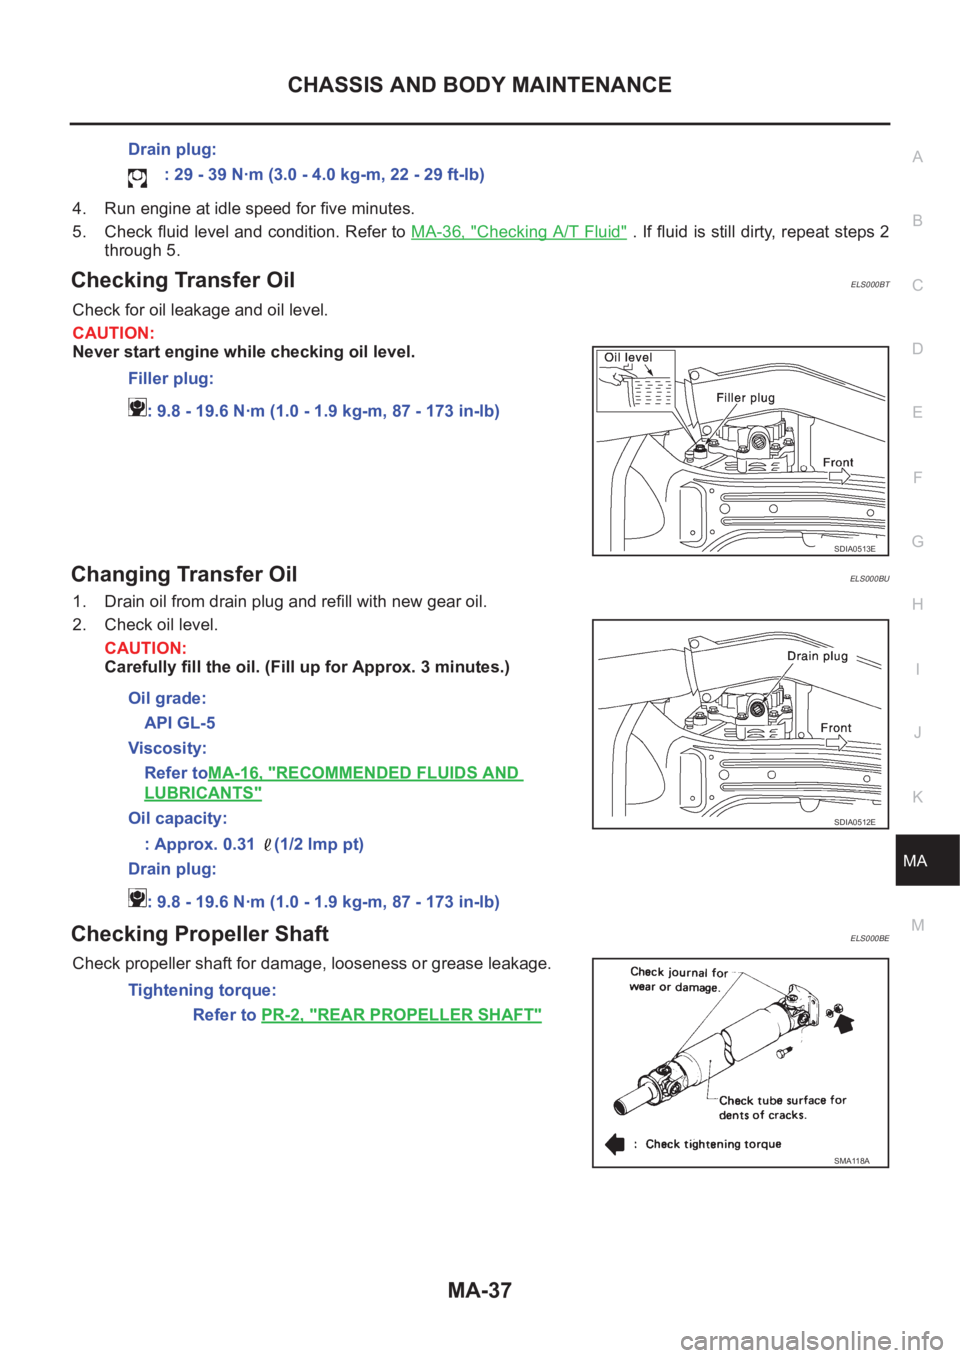
Check for oil leakage and oil level.
CAUTION:
Never start engine while checking oil level.
Changing Transfer OilELS000BU
1. Drain oil from drain plug and refill with new gear oil.
2. Check oil level.
CAUTION:
Carefully fill the oil. (Fill up for Approx. 3 minutes.)
Checking Propeller ShaftELS000BE
Check propeller shaft for damage, looseness or grease leakage.Drain plug:
: 29 - 39 N·m (3.0 - 4.0 kg-m, 22 - 29 ft-lb)
Filler plug:
: 9.8 - 19.6 N·m (1.0 - 1.9 kg-m, 87 - 173 in-lb)
SDIA0513E
Oil grade:
API GL-5
Viscosity:
Refer toMA-16, "
RECOMMENDED FLUIDS AND
LUBRICANTS"
Oil capacity:
: Approx. 0.31 (1/2 lmp pt)
Drain plug:
: 9.8 - 19.6 N·m (1.0 - 1.9 kg-m, 87 - 173 in-lb)SDIA0512E
Tightening torque:
Refer to PR-2, "
REAR PROPELLER SHAFT"
SMA118A
Page 3818 of 3833
MA-38
CHASSIS AND BODY MAINTENANCE
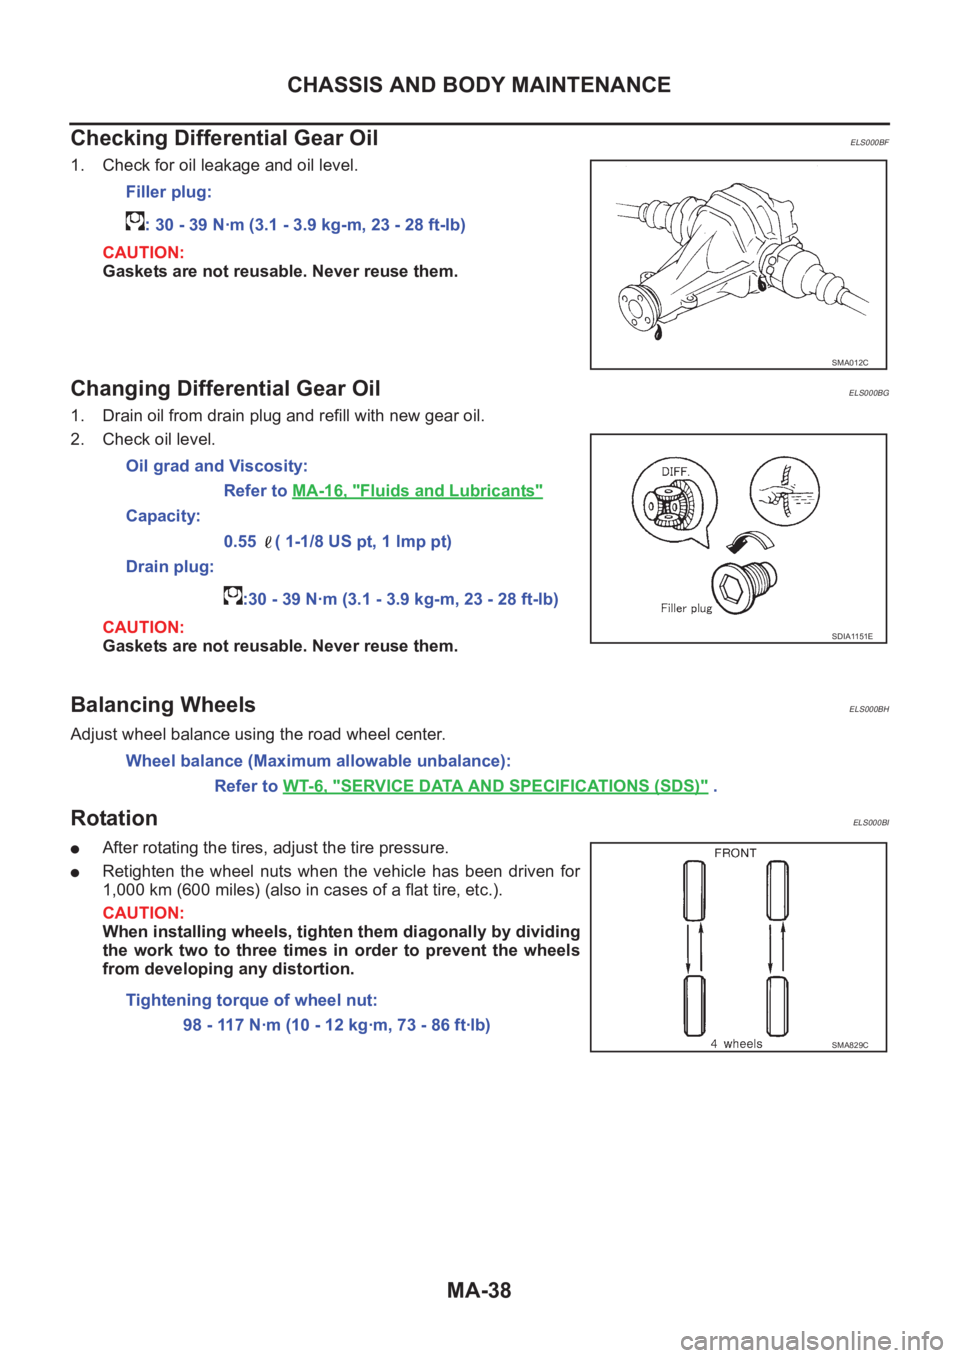
Checking Differential Gear Oil
ELS000BF
1. Check for oil leakage and oil level.
CAUTION:
Gaskets are not reusable. Never reuse them.
Changing Differential Gear OilELS000BG
1. Drain oil from drain plug and refill with new gear oil.
2. Check oil level.
CAUTION:
Gaskets are not reusable. Never reuse them.
Balancing WheelsELS000BH
Adjust wheel balance using the road wheel center.
RotationELS000BI
●After rotating the tires, adjust the tire pressure.
●Retighten the wheel nuts when the vehicle has been driven for
1,000 km (600 miles) (also in cases of a flat tire, etc.).
CAUTION:
When installing wheels, tighten them diagonally by dividing
the work two to three times in order to prevent the wheels
from developing any distortion.Filler plug:
: 30 - 39 N·m (3.1 - 3.9 kg-m, 23 - 28 ft-lb)
SMA012C
Oil grad and Viscosity:
Refer to MA-16, "
Fluids and Lubricants"
Capacity:
0.55 ( 1-1/8 US pt, 1 lmp pt)
Drain plug:
:30 - 39 N·m (3.1 - 3.9 kg-m, 23 - 28 ft-lb)
SDIA1151E
Wheel balance (Maximum allowable unbalance):
Refer to WT-6, "
SERVICE DATA AND SPECIFICATIONS (SDS)" .
Tightening torque of wheel nut:
98 - 117 N·m (10 - 12 kg·m, 73 - 86 ft·lb)
SMA829C
Page 3826 of 3833

IDX-2
ALPHABETICAL INDEX
Numerics
4WD mode switch ................................... TF-54
,TF-57
4WD shift indicator lamp .................................... TF-55
4WD solenoid valve ................................ TF-49,TF-52
4WD warning lamp TF-40,TF-55,TF-56,TF-57,TF-58
A
A/C air flow ......................................... ATC-31
,MTC-5
A/C component layout ..................................... ATC-23
A/C compressor clutch removal and installation ...........
ATC-135
A/C compressor precaution ............................... ATC-9
A/C compressor special service tool ................ ATC-14
A/C diagnostic work flow (auto A/C) ................ ATC-33
A/C HFC134a (R134a) system precaution ........ ATC-4
A/C HFC134a (R134a) system service procedure .......
ATC-129
A/C HFC134a (R134a) system service tools ... ATC-15
A/C HFC134a system service equipment precaution ...
ATC-10
A/C lubricant (R134a) ...................................... ATC-24
A/C operational check ......................... ATC-54,MTC-7
A/C performance test diagnoses ..................... ATC-88
A/C reray .......................................................... ATC-84
A/C self-diagnoses (auto A/C) ......................... ATC-46
A/C system description (auto A/C) ................... ATC-27
A/C trouble diagnoses (auto A/C) ....... ATC-33,MTC-3
A/C, A - Wiring diagram ................................... ATC-38
A/CCUT - Wiring diagram .............................. EC-1572
A/T - Wiring diagram - AT - FTS ...................... AT-118
A/T - Wiring diagram - AT - MAIN .................... AT-350
A/T - Wiring diagram - AT - PNP/SW ............... AT-112
A/T - Wiring diagram - AT - VSS A/T . AT-124,AT-355
A/T fluid checking .................................. AT-13,MA-36
A/T fluid replacement ............................. AT-13,MA-36
A/T fluid temperature sensor ........................... AT-121
A/T IND - Wiring diagram .................................... DI-57
A/T indicator ........................................................ DI-57
A/T shift lock system ........................................ AT-406
A/T shift lock system - Wiring diagram ............ AT-407
A/T trouble diagnoses .......................... AT-56,AT-258
A/T Wiring diagram - AT - ENG SS ... AT-128,AT-393
A/T Wiring diagram AT - 1ST ........................... AT-134
A/T Wiring diagram AT - 2ND .......................... AT-140
A/T Wiring diagram AT - 3RD .......................... AT-146
A/T Wiring diagram AT - 4TH .......................... AT-152
A/T Wiring diagram AT - BA/FTS ....... AT-195,AT-388
A/T Wiring diagram AT - CAN ............ AT-191,AT-404
A/T Wiring diagram AT - LPSV .......... AT-165,AT-398
A/T Wiring diagram AT - OVRCSV .... AT-187,AT-378
A/T Wiring diagram AT - SSV/A ......... AT-172,AT-369
A/T Wiring diagram AT - SSV/B ......... AT-177,AT-374
A/T Wiring diagram AT - TCV ............ AT-160,AT-383
A/T Wiring diagram AT - TPS ............ AT-182,AT-364
A/T Wiring diagrawm AT - VSSMTR .. AT-201,AT-360
ABS - Wiring diagram ..................................... BRC-12
Absolute pressure sensor .............................. EC-1494
Accelerator control system ............................... ACC-2
Accelerator pedal position (APP) sensor ........ EC-355,
EC-361
,EC-373,EC-631,EC-637,EC-651,EC-893,
EC-1222
,EC-1460
Accelerator pedal released position learning . EC-1404
Accelerator pedal released position switch .... EC-1531
Actuator relay ..................................................... TF-52
Aiming adjustment ............................................... LT-4
Air bag .............................................................. SRS-3
Air bag disposal .............................................. SRS-41
Air bleeding (hydraulic clutch) .............................. CL-8
Air bleeding for brake system ............................ BR-10
Air cleaner and air duct(QR20DE•QR25DE) .... EM-14
Air cleaner and air duct(YD22DDTi) ............... EM-120
Air cleaner filter replacement(QR20DE•QR25DE) ........
MA-22
Air cleaner filter replacement(YD22DDTi) ......... MA-32
Air cleaner filter(QR20DE•QR25DE) ................ EM-14
Air cleaner filter(YD22DDTi) ........................... EM-120
Air conditioner cut control .... EC-36,EC-446,EC-768,
EC-1132
,EC-1401
Air flow meter - See Mass air flow sensor ....... EC-138,
EC-516
,EC-870,EC-999,EC-1202
Air mix door control linkage adjustment ......... ATC-66,
ATC-125
,MTC-10,MTC-28
Air mix. door motor ......................... ATC-64,ATC-125
Air spoiler, rear ................................................... EI-21
Alternator ........................................................... SC-12
Ambient sensor ............. ATC-100,ATC-102,ATC-112
Angular tightening application(QR20DE•QR25DE) ......
EM-5
Angular tightening application(YD22DDTi) ..... EM-110
Antenna - See Power antenna ........................... AV-16
APPS - Wiring diagram ... EC-895,EC-1225,EC-1462
APPS1 - Wiring diagram ................... EC-357,EC-633
APPS2 - Wiring diagram ................... EC-363,EC-640
APPS3 - Wiring diagram ................... EC-375,EC-653
APRSW - Wiring diagram .............................. EC-1533
Audio .................................................................... AV-3
Auto air conditioner - Wiring diagram ............. ATC-38
Automatic amplifier ........................... ATC-44,ATC-57
Automatic transmission fluid replacement ....... MA-35,
MA-37
Axle ................................................................... MA-41
B
Back door ........................................................... BL-71
Back door trim ..................................................... EI-25
Back door window .............................................. GW-8
Back window ...................................................... GW-8
BACK/L - Wiring diagram ................................... LT-28
Back-up lamp .......................................... LT-28,LT-42
Back-up lamp switch (M/T) ............................... MT-12
Basic inspection ... EC-73,EC-465,EC-805,EC-1152,
EC-1412
Battery ................................................................. SC-3
Baulk ring (M/T) .................................... MT-18,MT-23
Blower motor ..... ATC-70,ATC-77,ATC-118,MTC-14,