NISSAN XTERRA 2006 N50 / 2.G Navigation Manual
XTERRA 2006 N50 / 2.G
NISSAN
NISSAN
https://www.carmanualsonline.info/img/5/699/w960_699-0.png
NISSAN XTERRA 2006 N50 / 2.G Navigation Manual
Page 68 of 272
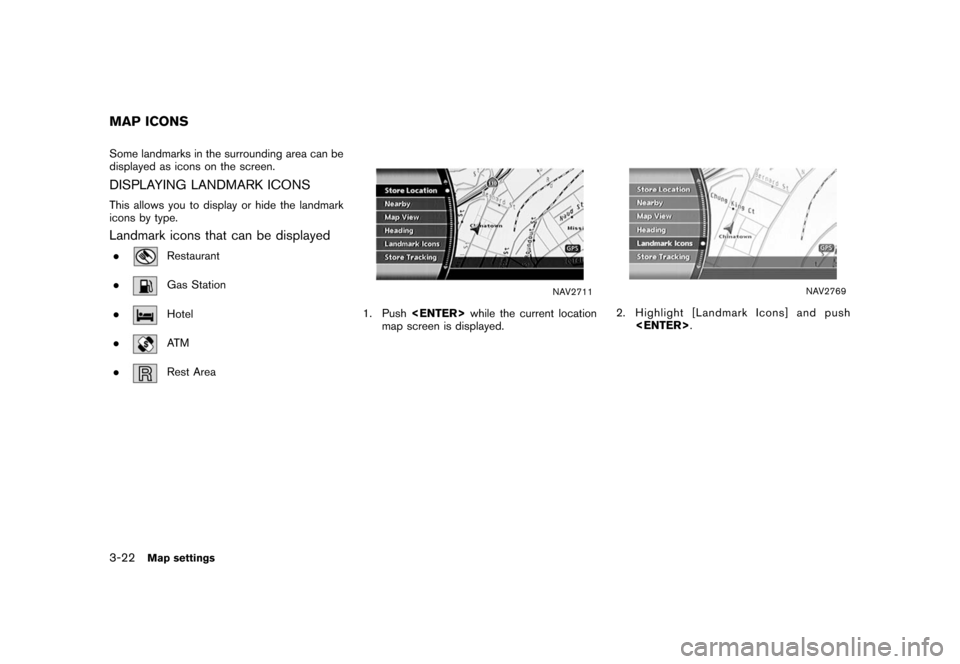
Some landmarks in the surrounding area can be
displayed as icons on the screen.DISPLAYING LANDMARK ICONSThis allows you to display or hide the landmark
icons by type.Landmark icons that can be displayed.
Restaurant
.Gas Station
.Hotel
.AT M
.Rest Area
NAV2711
1. Push while the current location
map screen is displayed.
NAV2769
2. Highlight [Landmark Icons] and push
.
MAP ICONS3-22
Map settings
Page 69 of 272
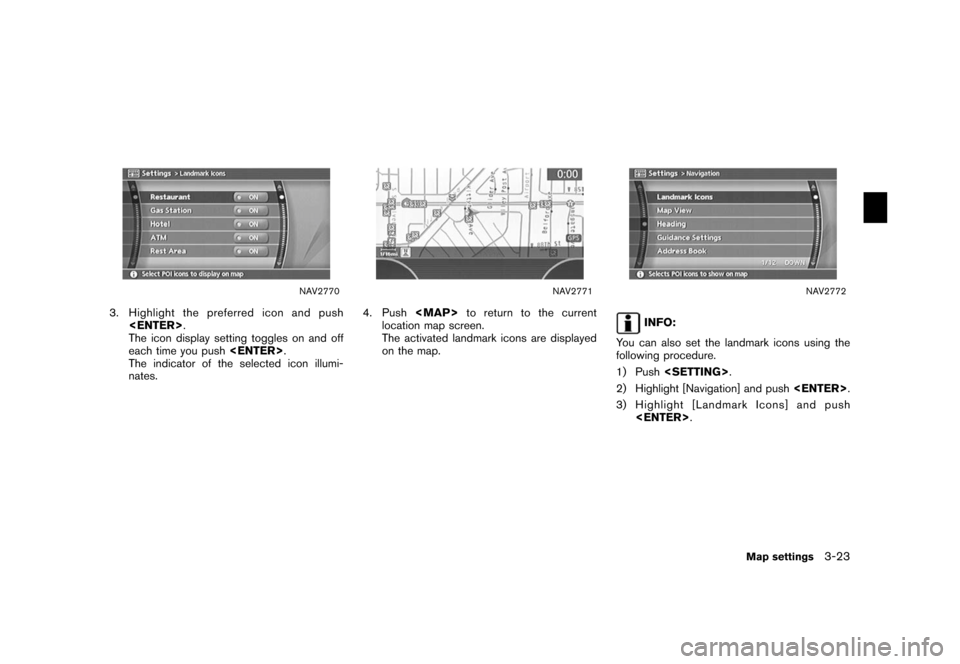
NAV2770
3. Highlight the preferred icon and push .
The icon display setting toggles on and off
each time you push .
The indicator of the selected icon illumi-
nates.
NAV2771
4. Push
Page 70 of 272
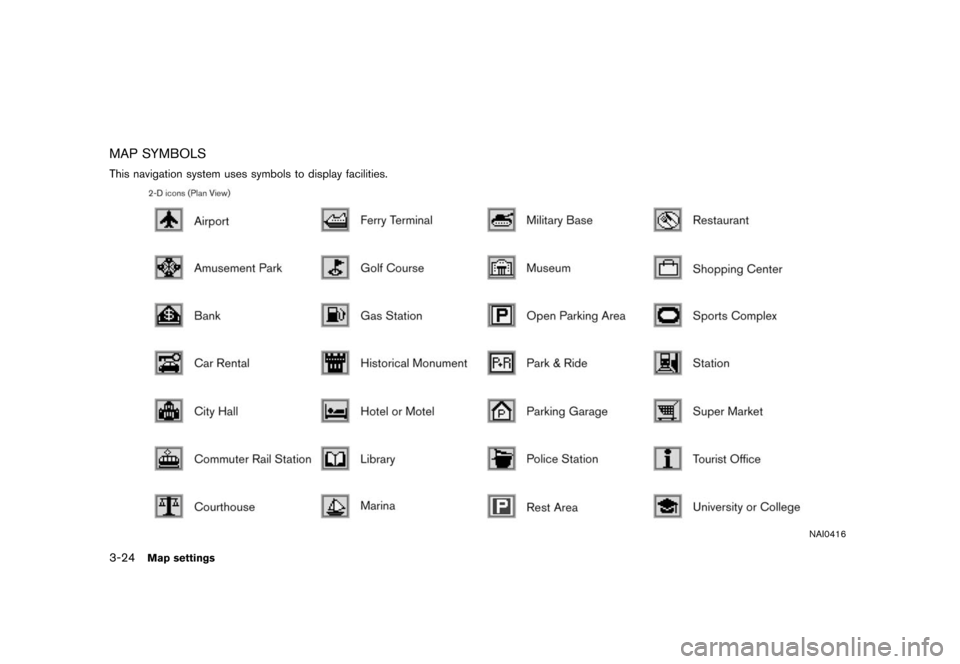
MAP SYMBOLSThis navigation system uses symbols to display facilities.
NAI0416
3-24
Map settings
Page 77 of 272
NAV2825
SETTING A STREET ADDRESS1. Highlight [Street Address] and push .
A character input screen is displayed.
NAV2826
INFO:
Character input screen for Street Address
&1
Region:
The region previously entered is auto-
matically displayed. It can be changed.
&2
City:
“All” is displayed, and all cities in the
region are available. Route calculation
conditions can be narrowed down by
entering the name of the city.
&3
Street:
Enter the name of a street.
&4
House No.:
A house number can be entered.
&5
Symbols/A-Z:
Symbol keys are displayed by high-
lighting [Symbols] and pushing
. Alphabet keys are dis-
played by highlighting [A-Z] and push-
ing .
Setting a destination
4-5
Page 78 of 272
NAV2827
2. Enter the house number, highlight [OK] andpush .
If you do not know the house number,
highlight [OK] or [Skip] and push
.
NAV2828
3. Enter the name of the street. After finishing
the entry, highlight [OK] and push
. A list of cities is displayed.
NAV2829
4. Highlight the correct city of the destination
from the list and push .
4-6
Setting a destination
Page 79 of 272
NAV2830
5. The selected destination is displayed at thecenter of the map. Highlight [OK] after
confirming the location of the displayed
destination, and push .
The system sets the destination to the
selected location and starts calculating a
route.
NAV2831
INFO:
Even after setting a destination, you can
adjust the location of the destination, store
the route, etc.“OPERATIONS AFTER SETTING A
DESTINATION” (page 4-50)
NAV2832
Changing the region1. Highlight [Region] and push
to
change the region.
Setting a destination
4-7
Page 80 of 272
NAV2833
2. Highlight the preferred region and push .
A character input screen is displayed.
NAV2834
Specifying a city1. Highlight [City] and push
to
narrow down the route calculation condi-
tions by entering the name of the city.
NAV2835
2. Enter the name of the city, highlight [OK] and
push .
A list screen is displayed.
INFO:
.
Highlight [All Cities] and push
to include all cities in the
region as the route calculation condition.
.
Highlight [Last 5 Cities] and push
to display 5 cities recently
set as destinations.
4-8
Setting a destination
Page 82 of 272
NAV2787
SETTING A CITY CENTER1. Highlight [Others] and push.
NAV2837
2. Highlight [City Center] and push
.
A character input screen is displayed.
NAV2838
INFO:
Character input screen for City Center
&1
Region:
The region previously entered is auto-
matically displayed. It can be changed.
&2
City:
“All” is displayed, and all cities in the
region are available. Route calculation
conditions can be narrowed down by
entering the name of the city.
4-10
Setting a destination
Page 83 of 272
&3
Symbols/A-Z:
Symbol keys are displayed by high-
lighting [Symbols] and pushing
. Alphabet keys are dis-
played by highlighting [A-Z] and push-
ing .
NAV2839
3. Highlight [City] and push
to
narrow down the route calculation condi-
tions by entering the name of the city.
Enter the name of the city, highlight [OK] and
push .
A list screen is displayed.
INFO:
Highlight [Last 5 Cities] and push
to display 5 cities recently set
as destinations.
NAV2840
4. Highlight the preferred destination from the list and push .
The position of the selected location is
displayed in the preview on the right side
of the screen.
Setting a destination
4-11
Page 84 of 272
NAV2841
INFO:
By selecting [By Distance], you can sort the
list by the nearest distance.
NAV2842
5. The selected destination is displayed at the center of the map. Highlight [OK] after
confirming the location of the displayed
destination, and push .
The system sets the destination to the
selected location and starts calculating a
route.
NAV2843
INFO:
Even after setting a destination, you can
adjust the location of the destination, store
the route, etc.“OPERATIONS AFTER SETTING A
DESTINATION” (page 4-50)
4-12
Setting a destination


![NISSAN XTERRA 2006 N50 / 2.G Navigation Manual
NAV2825
SETTING A STREET ADDRESS1. Highlight [Street Address] and push<ENTER> .
A character input screen is displayed.
NAV2826
INFO:
Character input screen for Street Address
&1
Region:
The region pr NISSAN XTERRA 2006 N50 / 2.G Navigation Manual
NAV2825
SETTING A STREET ADDRESS1. Highlight [Street Address] and push<ENTER> .
A character input screen is displayed.
NAV2826
INFO:
Character input screen for Street Address
&1
Region:
The region pr](/img/5/699/w960_699-76.png)
![NISSAN XTERRA 2006 N50 / 2.G Navigation Manual
NAV2827
2. Enter the house number, highlight [OK] andpush <ENTER> .
If you do not know the house number,
highlight [OK] or [Skip] and push
<ENTER> .
NAV2828
3. Enter the name of the street. After fin NISSAN XTERRA 2006 N50 / 2.G Navigation Manual
NAV2827
2. Enter the house number, highlight [OK] andpush <ENTER> .
If you do not know the house number,
highlight [OK] or [Skip] and push
<ENTER> .
NAV2828
3. Enter the name of the street. After fin](/img/5/699/w960_699-77.png)
![NISSAN XTERRA 2006 N50 / 2.G Navigation Manual
NAV2830
5. The selected destination is displayed at thecenter of the map. Highlight [OK] after
confirming the location of the displayed
destination, and push <ENTER>.
The system sets the destination NISSAN XTERRA 2006 N50 / 2.G Navigation Manual
NAV2830
5. The selected destination is displayed at thecenter of the map. Highlight [OK] after
confirming the location of the displayed
destination, and push <ENTER>.
The system sets the destination](/img/5/699/w960_699-78.png)
![NISSAN XTERRA 2006 N50 / 2.G Navigation Manual
NAV2833
2. Highlight the preferred region and push<ENTER> .
A character input screen is displayed.
NAV2834
Specifying a city1. Highlight [City] and push <ENTER>
to
narrow down the route calculation c NISSAN XTERRA 2006 N50 / 2.G Navigation Manual
NAV2833
2. Highlight the preferred region and push<ENTER> .
A character input screen is displayed.
NAV2834
Specifying a city1. Highlight [City] and push <ENTER>
to
narrow down the route calculation c](/img/5/699/w960_699-79.png)
![NISSAN XTERRA 2006 N50 / 2.G Navigation Manual
NAV2787
SETTING A CITY CENTER1. Highlight [Others] and push<ENTER>.
NAV2837
2. Highlight [City Center] and push
<ENTER> .
A character input screen is displayed.
NAV2838
INFO:
Character input screen f NISSAN XTERRA 2006 N50 / 2.G Navigation Manual
NAV2787
SETTING A CITY CENTER1. Highlight [Others] and push<ENTER>.
NAV2837
2. Highlight [City Center] and push
<ENTER> .
A character input screen is displayed.
NAV2838
INFO:
Character input screen f](/img/5/699/w960_699-81.png)
![NISSAN XTERRA 2006 N50 / 2.G Navigation Manual
&3
Symbols/A-Z:
Symbol keys are displayed by high-
lighting [Symbols] and pushing
<ENTER>. Alphabet keys are dis-
played by highlighting [A-Z] and push-
ing <ENTER>.
NAV2839
3. Highlight [City] and p NISSAN XTERRA 2006 N50 / 2.G Navigation Manual
&3
Symbols/A-Z:
Symbol keys are displayed by high-
lighting [Symbols] and pushing
<ENTER>. Alphabet keys are dis-
played by highlighting [A-Z] and push-
ing <ENTER>.
NAV2839
3. Highlight [City] and p](/img/5/699/w960_699-82.png)
![NISSAN XTERRA 2006 N50 / 2.G Navigation Manual
NAV2841
INFO:
By selecting [By Distance], you can sort the
list by the nearest distance.
NAV2842
5. The selected destination is displayed at the center of the map. Highlight [OK] after
confirming the NISSAN XTERRA 2006 N50 / 2.G Navigation Manual
NAV2841
INFO:
By selecting [By Distance], you can sort the
list by the nearest distance.
NAV2842
5. The selected destination is displayed at the center of the map. Highlight [OK] after
confirming the](/img/5/699/w960_699-83.png)