NISSAN XTERRA 2006 N50 / 2.G Navigation Manual
XTERRA 2006 N50 / 2.G
NISSAN
NISSAN
https://www.carmanualsonline.info/img/5/699/w960_699-0.png
NISSAN XTERRA 2006 N50 / 2.G Navigation Manual
Page 97 of 272
NAV2774
SETTING FROM ADDRESS BOOK1. Highlight [Address Book] and push .
A list screen is displayed.
NAV2778
2. Highlight the preferred location from the list and push .
NAV2779
INFO:
Selecting [Sort List] displays a list of various
sort functions.
To use the sort functions, stored locations
must be set in advance.“EDITING THE STORED HOME AND
LOCATION” (page 6-16)
Setting a destination
4-25
Page 98 of 272
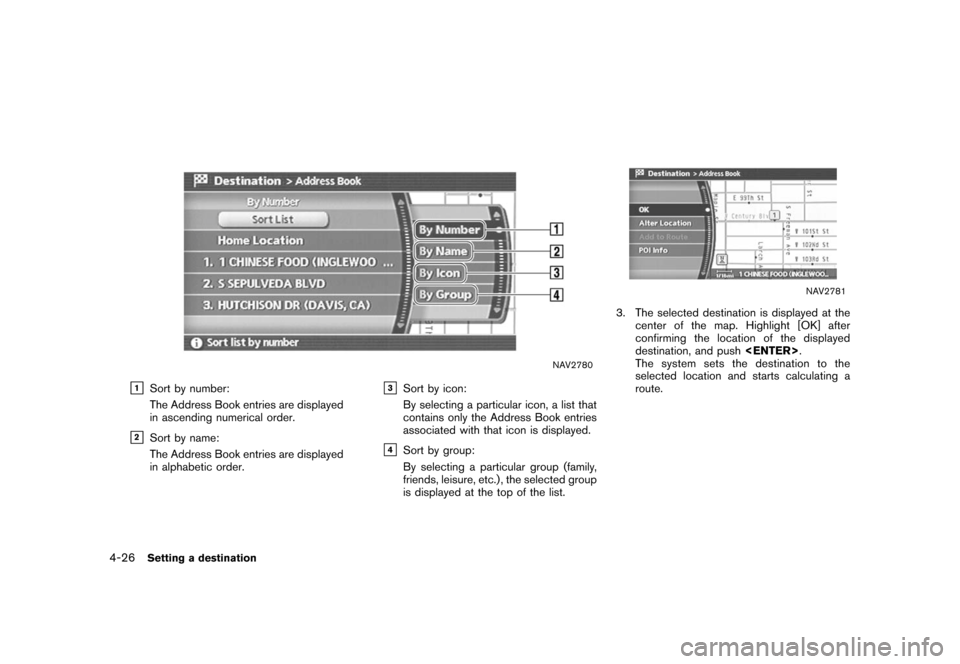
NAV2780
&1
Sort by number:
The Address Book entries are displayed
in ascending numerical order.
&2
Sort by name:
The Address Book entries are displayed
in alphabetic order.
&3
Sort by icon:
By selecting a particular icon, a list that
contains only the Address Book entries
associated with that icon is displayed.
&4
Sort by group:
By selecting a particular group (family,
friends, leisure, etc.) , the selected group
is displayed at the top of the list.
NAV2781
3. The selected destination is displayed at thecenter of the map. Highlight [OK] after
confirming the location of the displayed
destination, and push .
The system sets the destination to the
selected location and starts calculating a
route.
4-26
Setting a destination
Page 100 of 272
NAV2783
SETTING A PREVIOUS DESTINATION1. Highlight [Previous Destinations] and push .
NAV2784
2. Highlight the preferred destination from the
list and push .
NAV2785
3. The selected destination is displayed at the
center of the map. Highlight [OK] after
confirming the location of the displayed
destination, and push .
The system sets the destination to the
selected location and starts calculating a
route.
4-28
Setting a destination
Page 102 of 272
NAV2787
SETTING THE PREVIOUS STARTING
POINT1. Highlight [Others] and push.
NAV2788
2. Highlight [Previous Starting Point] and push
.
NAV2789
3. The starting point of the route of the
previous route guidance is displayed at the
center of the map. Highlight [OK] after
confirming the location of the displayed
destination, and push .
The system sets the destination to the
selected location and starts calculating a
route.
4-30
Setting a destination
Page 104 of 272
NAV2787
SETTING FROM STORED ROUTES1. Highlight [Others] and push.
NAV2791
2. Highlight[StoredRoutes]andpush
.
A list screen is displayed.
NAV2792
3. Highlight the preferred route from the list
and push .
The route to the destination is set.
INFO:
The stored route includes only locations
(destination and waypoints) and route cal-
culation conditions, not the route itself.
Therefore, when the destination is set using
a stored route, a different route may be
suggested if the current vehicle location is
different from the one when the route was
stored.
4-32
Setting a destination
Page 106 of 272
NAV2728
SETTING A POINT OF INTEREST1. Highlight [Points of Interest] and push .
NAV2793
2. Highlightthemaincategoryandpush
.
INFO:
Highlight [By Name] and push to
include all categories in the route calculation
conditions.
NAV2794
3. Highlight the subcategory and push .
A character input screen is displayed.
4-34
Setting a destination
Page 107 of 272
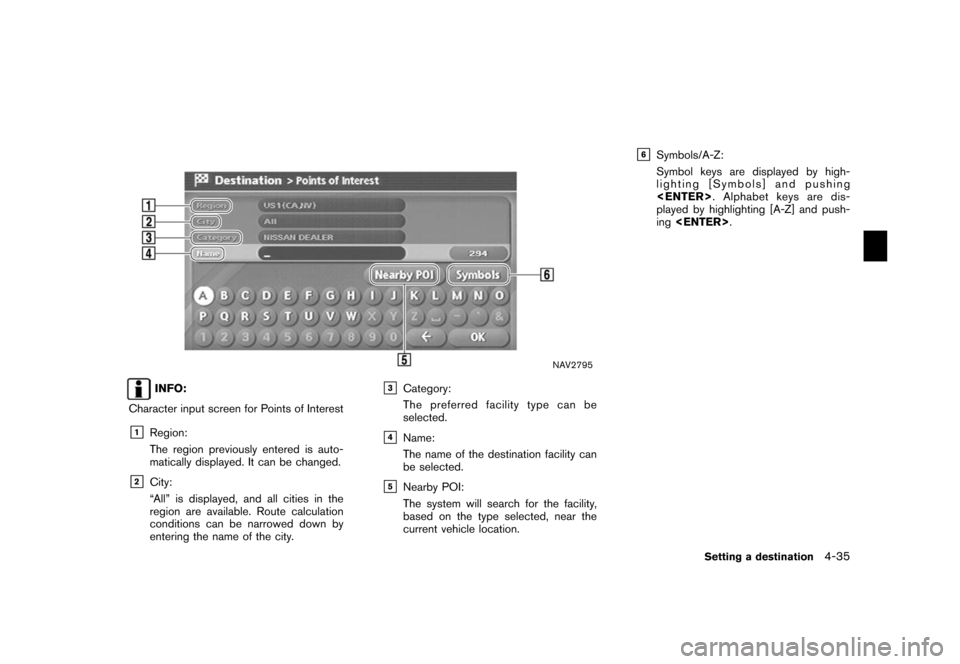
NAV2795
INFO:
Character input screen for Points of Interest
&1
Region:
The region previously entered is auto-
matically displayed. It can be changed.
&2
City:
“All” is displayed, and all cities in the
region are available. Route calculation
conditions can be narrowed down by
entering the name of the city.
&3
Category:
The preferred facility type can be
selected.
&4
Name:
The name of the destination facility can
be selected.
&5
Nearby POI:
The system will search for the facility,
based on the type selected, near the
current vehicle location.
&6
Symbols/A-Z:
Symbol keys are displayed by high-
lighting [Symbols] and pushing
. Alphabet keys are dis-
played by highlighting [A-Z] and push-
ing .
Setting a destination
4-35
Page 108 of 272
NAV2796
4. Highlight [Name] and push.
Enter the name of the destination facility.
NAV2797
5. After finishing the entry, highlight [OK] and push .
A list screen is displayed.
NAV2798
6. Highlight the preferred destination facility
from the list and push .
4-36
Setting a destination
Page 109 of 272
NAV2799
INFO:
By selecting [By Distance], you can sort the
list by the nearest distance.
The position of the selected location is
displayed in the preview on the right side
of the screen.
NAV2800
7. The selected destination is displayed at the center of the map. Highlight [OK] after
confirming the location of the displayed
destination, and push .
The system sets the destination to the
selected location and starts calculating a
route.
NAV2801
INFO:
Even after setting a destination, you can
adjust the location of the destination, store
the location, etc.“OPERATIONS AFTER SETTING A
DESTINATION” (page 4-50)
Setting a destination
4-37
Page 110 of 272
NAV2802
Changing the region1. Highlight [Region] and push
to
change the region.
NAV2803
2. Highlight the preferred region and push
.
A character input screen is displayed.
NAV2804
Specifying a city1. Highlight [City] and push
to
narrow down the route calculation condi-
tions by entering the name of the city.
4-38
Setting a destination
![NISSAN XTERRA 2006 N50 / 2.G Navigation Manual
NAV2774
SETTING FROM ADDRESS BOOK1. Highlight [Address Book] and push<ENTER> .
A list screen is displayed.
NAV2778
2. Highlight the preferred location from the list and push <ENTER> .
NAV2779
INFO:
S NISSAN XTERRA 2006 N50 / 2.G Navigation Manual
NAV2774
SETTING FROM ADDRESS BOOK1. Highlight [Address Book] and push<ENTER> .
A list screen is displayed.
NAV2778
2. Highlight the preferred location from the list and push <ENTER> .
NAV2779
INFO:
S](/img/5/699/w960_699-96.png)

![NISSAN XTERRA 2006 N50 / 2.G Navigation Manual
NAV2783
SETTING A PREVIOUS DESTINATION1. Highlight [Previous Destinations] and push<ENTER> .
NAV2784
2. Highlight the preferred destination from the
list and push <ENTER>.
NAV2785
3. The selected des NISSAN XTERRA 2006 N50 / 2.G Navigation Manual
NAV2783
SETTING A PREVIOUS DESTINATION1. Highlight [Previous Destinations] and push<ENTER> .
NAV2784
2. Highlight the preferred destination from the
list and push <ENTER>.
NAV2785
3. The selected des](/img/5/699/w960_699-99.png)
![NISSAN XTERRA 2006 N50 / 2.G Navigation Manual
NAV2787
SETTING THE PREVIOUS STARTING
POINT1. Highlight [Others] and push<ENTER>.
NAV2788
2. Highlight [Previous Starting Point] and push
<ENTER> .
NAV2789
3. The starting point of the route of the
p NISSAN XTERRA 2006 N50 / 2.G Navigation Manual
NAV2787
SETTING THE PREVIOUS STARTING
POINT1. Highlight [Others] and push<ENTER>.
NAV2788
2. Highlight [Previous Starting Point] and push
<ENTER> .
NAV2789
3. The starting point of the route of the
p](/img/5/699/w960_699-101.png)
![NISSAN XTERRA 2006 N50 / 2.G Navigation Manual
NAV2787
SETTING FROM STORED ROUTES1. Highlight [Others] and push<ENTER>.
NAV2791
2. Highlight[StoredRoutes]andpush
<ENTER> .
A list screen is displayed.
NAV2792
3. Highlight the preferred route from NISSAN XTERRA 2006 N50 / 2.G Navigation Manual
NAV2787
SETTING FROM STORED ROUTES1. Highlight [Others] and push<ENTER>.
NAV2791
2. Highlight[StoredRoutes]andpush
<ENTER> .
A list screen is displayed.
NAV2792
3. Highlight the preferred route from](/img/5/699/w960_699-103.png)
![NISSAN XTERRA 2006 N50 / 2.G Navigation Manual
NAV2728
SETTING A POINT OF INTEREST1. Highlight [Points of Interest] and push<ENTER> .
NAV2793
2. Highlightthemaincategoryandpush
<ENTER> .
INFO:
Highlight [By Name] and push <ENTER>to
include all ca NISSAN XTERRA 2006 N50 / 2.G Navigation Manual
NAV2728
SETTING A POINT OF INTEREST1. Highlight [Points of Interest] and push<ENTER> .
NAV2793
2. Highlightthemaincategoryandpush
<ENTER> .
INFO:
Highlight [By Name] and push <ENTER>to
include all ca](/img/5/699/w960_699-105.png)

![NISSAN XTERRA 2006 N50 / 2.G Navigation Manual
NAV2796
4. Highlight [Name] and push<ENTER>.
Enter the name of the destination facility.
NAV2797
5. After finishing the entry, highlight [OK] and push <ENTER> .
A list screen is displayed.
NAV2798
6. NISSAN XTERRA 2006 N50 / 2.G Navigation Manual
NAV2796
4. Highlight [Name] and push<ENTER>.
Enter the name of the destination facility.
NAV2797
5. After finishing the entry, highlight [OK] and push <ENTER> .
A list screen is displayed.
NAV2798
6.](/img/5/699/w960_699-107.png)
![NISSAN XTERRA 2006 N50 / 2.G Navigation Manual
NAV2799
INFO:
By selecting [By Distance], you can sort the
list by the nearest distance.
The position of the selected location is
displayed in the preview on the right side
of the screen.
NAV2800
7. NISSAN XTERRA 2006 N50 / 2.G Navigation Manual
NAV2799
INFO:
By selecting [By Distance], you can sort the
list by the nearest distance.
The position of the selected location is
displayed in the preview on the right side
of the screen.
NAV2800
7.](/img/5/699/w960_699-108.png)
![NISSAN XTERRA 2006 N50 / 2.G Navigation Manual
NAV2802
Changing the region1. Highlight [Region] and push<ENTER>
to
change the region.
NAV2803
2. Highlight the preferred region and push
<ENTER> .
A character input screen is displayed.
NAV2804
Spec NISSAN XTERRA 2006 N50 / 2.G Navigation Manual
NAV2802
Changing the region1. Highlight [Region] and push<ENTER>
to
change the region.
NAV2803
2. Highlight the preferred region and push
<ENTER> .
A character input screen is displayed.
NAV2804
Spec](/img/5/699/w960_699-109.png)