OPEL ANTARA 2009 Owners Manual
Manufacturer: OPEL, Model Year: 2009, Model line: ANTARA, Model: OPEL ANTARA 2009Pages: 234, PDF Size: 3.01 MB
Page 161 of 234
Driving and operation161
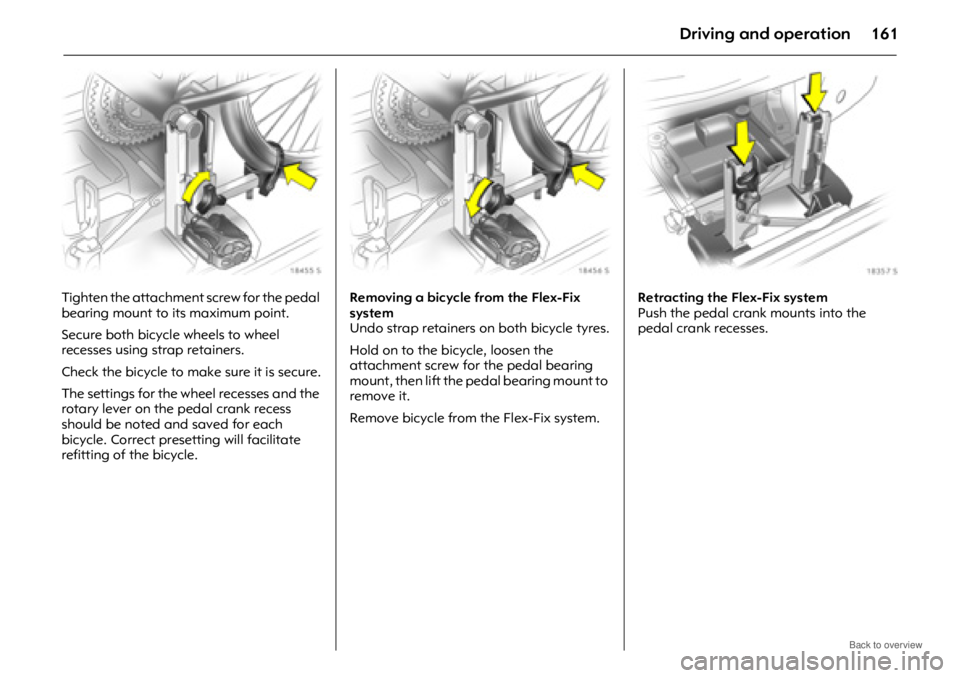
Tighten the attachment screw for the pedal
bearing mount to its maximum point.
Secure both bicycle wheels to wheel
recesses using strap retainers.
Check the bicycle to make sure it is secure.
The settings for the wheel recesses and the
rotary lever on the pedal crank recess
should be noted and saved for each
bicycle. Correct presetting will facilitate
refitting of the bicycle. Removing a bicycle from the Flex-Fix
system
Undo strap retainers on both bicycle tyres.
Hold on to the bicycle, loosen the
attachment screw for the pedal bearing
mount, then lift the pedal bearing mount to
remove it.
Remove bicycle from the Flex-Fix system.
Retracting the Flex-Fix system
Push the pedal crank mounts into the
pedal crank recesses.
Page 162 of 234
Driving and operation162
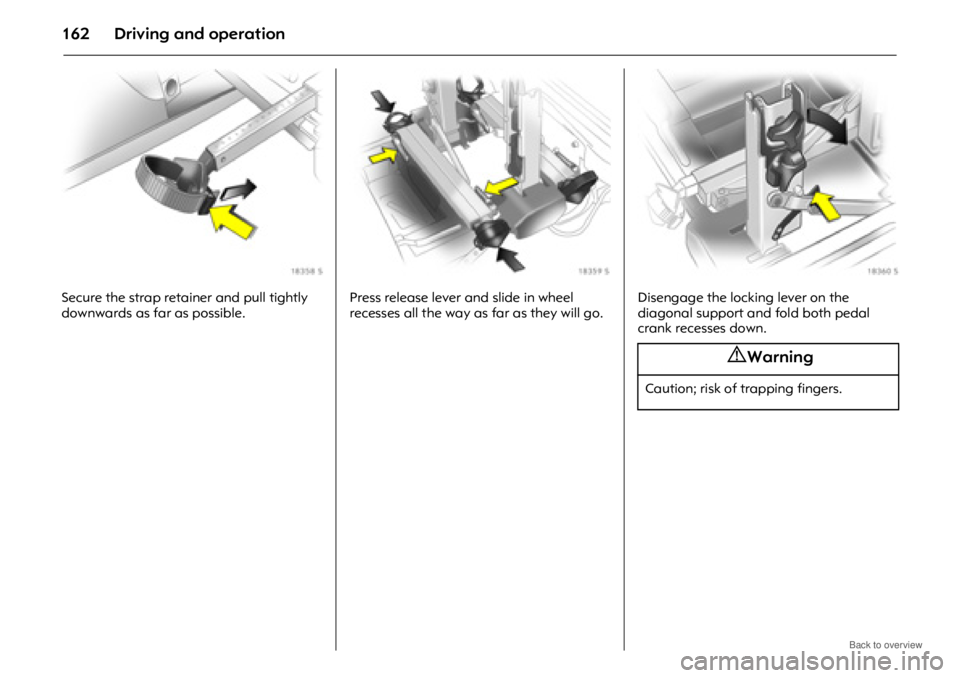
Secure the strap retainer and pull tightly
downwards as far as possible.Press release lever and slide in wheel
recesses all the way as far as they will go.Disengage the locking lever on the
diagonal support and fold both pedal
crank recesses down.
9 Warning
Caution; risk of trapping fingers.
Page 163 of 234
Driving and operation163
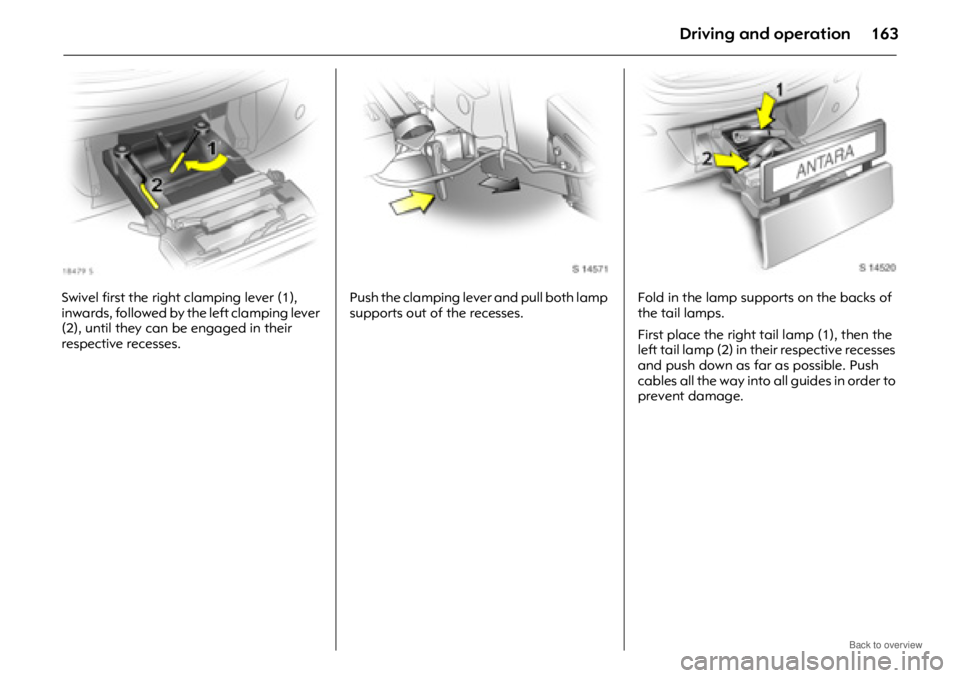
Swivel first the right clamping lever (1),
inwards, followed by the left clamping lever
(2), until they can be engaged in their
respective recesses.Push the clamping lever and pull both lamp
supports out of the recesses.
Fold in the lamp supports on the backs of
the tail lamps.
First place the right tail lamp (1), then the
left tail lamp (2) in their respective recesses
and push down as far as possible. Push
cables all the way into all guides in order to
prevent damage.
Page 164 of 234
Driving and operation164
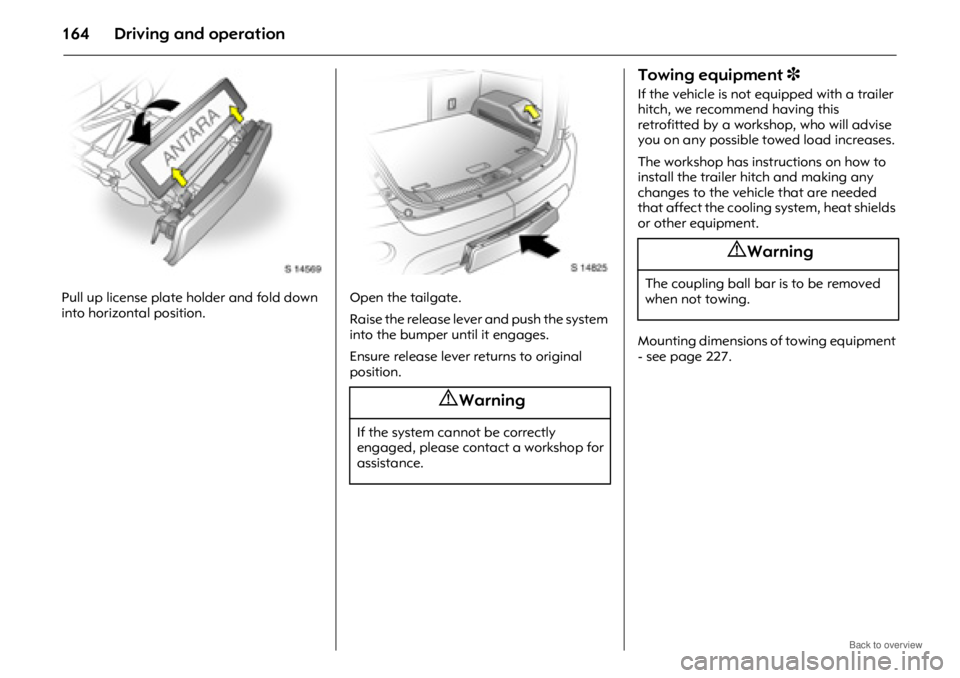
Pull up license plate holder and fold down
into horizontal position.Open the tailgate.
Raise the release lever
and push the system
into the bumper until it engages.
Ensure release lever returns to original
position.
Towing equipment 3
If the vehicle is not equipped with a trailer
hitch, we recommend having this
retrofitted by a workshop, who will advise
you on any possible towed load increases.
The workshop has instructions on how to
install the trailer hitch and making any
changes to the vehicle that are needed
that affect the coolin g system, heat shields
or other equipment.
Mounting dimensions of towing equipment
- see page 227.
9 Warning
If the system cannot be correctly
engaged, please contact a workshop for
assistance.
9 Warning
The coupling ball bar is to be removed
when not towing.
Page 165 of 234
Driving and operation165
Towing equipment with detachable
coupling ball bar 3
Stowage of coupling ball bar
The coupling ball bar is kept in a bag,
fastened with a strap and is stowed below
the floor cover in the luggage
compartment.
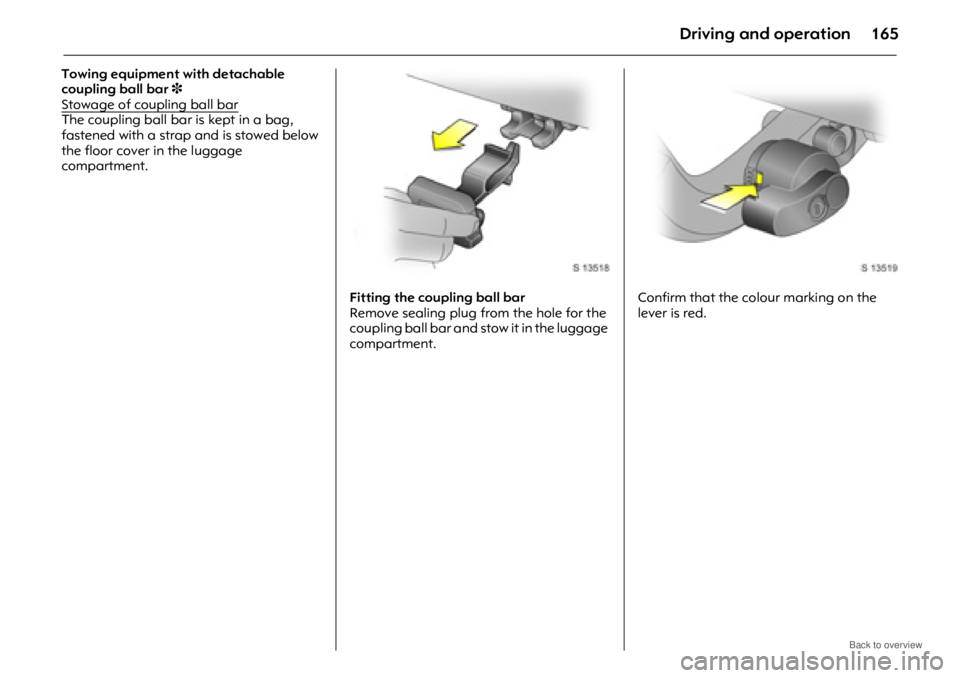
Fitting the coupling ball bar
Remove sealing plug from the hole for the
coupling ball bar and stow it in the luggage
compartment. Confirm that the colour marking on the
lever is red.
Page 166 of 234
Driving and operation166
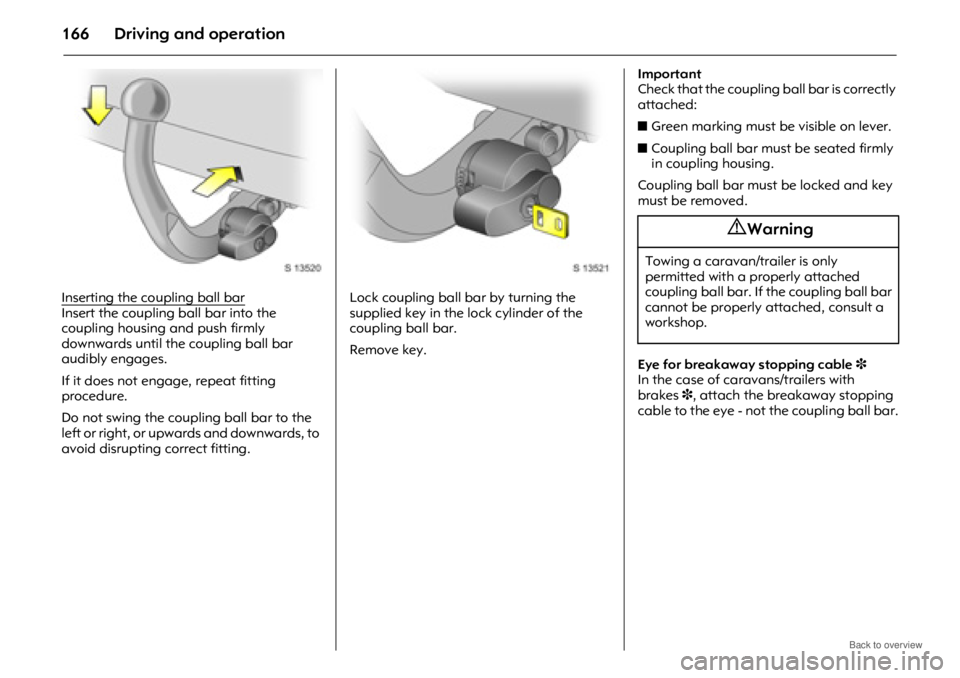
Inserting the coupling ball barInsert the coupling ball bar into the
coupling housing and push firmly
downwards until the coupling ball bar
audibly engages.
If it does not engage, repeat fitting
procedure.
Do not swing the coupling ball bar to the
left or right, or upwards and downwards, to
avoid disrupting correct fitting. Lock coupling ball bar by turning the
supplied key in the lock cylinder of the
coupling ball bar.
Remove key.Important
Check that the coupling ball bar is correctly
attached:
z
Green marking must be visible on lever.
z Coupling ball bar must be seated firmly
in coupling housing.
Coupling ball bar must be locked and key
must be removed.
Eye for breakaway stopping cable 3
In the case of caravans/trailers with
brakes 3, attach the breakaway stopping
cable to the eye - not the coupling ball bar.
9 Warning
Towing a caravan/trailer is only
permitted with a properly attached
coupling ball bar. If the coupling ball bar
cannot be properly attached, consult a
workshop.
Page 167 of 234

Driving and operation167
Dismounting the coupling ball bar
Unlock coupling ball bar and remove key.
Push lever to the left, towards the coupling
ball bar and turn it downwards. Pull
coupling ball bar out of coupling housing.
Remove any rust or dirt from area around
the coupling housing and coupling ball bar
connection before inserting sealing plug in
the hole.
Place the coupling ball bar in the bag
supplied, fasten it wi th the strap and stow
it below the floor cover in the luggage
compartment.
Do not use steam-jet cleaners or other
high-pressure cleaners to clean the
coupling ball bar.
Towing
Caravan/trailer loads1)
The permissible caravan/trailer loads are
vehicle-dependent and engine-dependent
maximum values which must not be
exceeded.
The actual caravan/trailer load is the
difference between the actual gross weight
of the caravan/trailer and the actual
coupling socket load with the caravan/
trailer coupled.
When the caravan/trailer load is being
checked, therefore, on ly the caravan/trailer
wheels - and not the jockey wheel - must be
standing on the weighing apparatus.
The permissible caravan/trailer loads for
your vehicle are given in the vehicle papers.
Unless otherwise stated , they are valid for
gradients up to max. 12%.
The permissible caravan/trailer load should
be fully utilized only by drivers who are
adequately experienced in towing large
caravans/trailers.
The permitted caravan/trailer load applies
up to the specified incline and up to an
altitude of 1000 metres above sea level. Since engine power decreases as altitude
increases because of the air becoming
thinner, therefore reducing climbing ability,
it may not be possible for permissible trailer
loads to be fully utilized in mountainous
territory.
The permitted towing weight decreases by
10% for every 1000 metres of additional
altitude.
The towing weight does not have to be
reduced when driving on roads with slight
inclines (less than 8%, e.g. on motorways).
The actual caravan/trailer load plus the
actual Gross Vehicle Weight must not
exceed the maximum permitted towing
weight. For example, if the permitted Gross
Vehicle Weight is utilised, the caravan/
trailer load must only
be used until the
maximum permitted towing weight is
reached.
The maximum permitted towing weight is
shown on the vehicle id entification plate -
see page 215.
1)Observe national regulations.
Page 168 of 234

Driving and operation168
Coupling socket load
The coupling socket load is the load
exerted by the caravan/trailer on the
coupling ball. It can be varied by changing
the weight distribution when loading the
caravan/trailer.
The maximum permissible coupling socket
load for the towing vehicle (80 kg) is stated
on the towing equipment identification
plate and should always be aimed for,
particularly in the case of heavy caravans/
trailers. The coupling socket load should
never be below 25 kg.
When measuring the coupling socket load,
make sure that the drawbar of the loaded
caravan/trailer is at the same height as it
will be when the carava n/trailer is coupled
with the towing vehicle loaded. This is
particularly important for caravans/trailers
with tandem axle. Rear axle load during towing
When the caravan/trailer is coupled and
the towing vehicle fully
loaded (including
all occupants), the permissible rear axle
load must not be exceeded.
National regulations regarding maximum
speeds for vehicles towing a caravan/
trailer must be observed.
Tyre pressure
Increase the tyre pressure on the towing
vehicle to the value specified for full load
(see page 224). Also check the pressure of
the caravan/trailer tyres.
Page 169 of 234

Driving and operation169
Driving characteristics, towing tips
In the case of caravans/trailers with
brakes3, attach the breakaway stopping
cable to the eye 3 or loop around coupling
ball bar if no eye is available.
Ensure cable is crossed under the coupling
socket to ensure the caravan/trailer nose
cannot drop to the ground if it becomes
separated from the trailer hitch.
Do not allow the cable to drag along the
ground and always allow enough slack to
permit full turning. Fo llow the instructions
supplied with the towing equipment.
Before coupling the caravan/trailer,
lubricate the ball of the caravan/trailer
towing device. However, do not do so if a
stabilizer which acts on the coupling ball is
being used to damp rolling motions.
Handling is greatly influenced by the
loading of the caravan/trailer. Loads
should therefore be secured so that they
cannot slip and should be placed in the
centre of the caravan/trailer if possible,
i.e. above the axle.
Opel genuine parts an d accessories which
can be subsequently fitted aid trailer
operation, e.g. larg e mirrors for wide
caravans/trailers. In the case of caravans/trailers with low
directional stability, it is advisable to use a
friction-type stabilizer to damp rolling
motions.
Do not drive faster than 80 km/h (50 mph),
even in countries where higher speeds are
permitted.
When driving uphill, do not drive faster
than 30 km/h (20 mph) in 1st gear, or
50 km/h (30 mph) in 2nd gear.
Make sure that you have enough room
when cornering and avoid sudden
manoeuvres.
If the caravan/trailer starts to sway, drive
more slowly, do not attempt to correct the
steering and brake sharply if necessary.
If it is necessary to apply the brakes fully,
depress the brake pedal as hard as
possible.
The cooling fan is electrically operated.
The fan cooling capacity is not, therefore,
dependent on engine speed. It is not
necessary, when drivin
g uphill, to shift
down into a lower gear if the vehicle can
climb in a higher gear. When coupled to a caravan/trailer, the
vehicle requires more
braking effort when
driving down long grad ients, so select the
same gear as you would when driving
uphill and drive at roughly the same speed.
Automatic transmission in automatic mode
will select the drivin g program with the
optimum engine braking effect.
Remember that brak ing distances for
vehicles towing carava ns/trailers with and
without brakes is always greater than for
vehicles not towing a caravan/trailer. For
caravans/trailers with brakes, follow the
instructions carefully. Do not make any
modifications to the brake system.
Always check lamps on caravans/trailers
before towing. Ensure national regulations
are observed.
The fog tail lamp on the vehicle is
deactivated when towing a caravan/
trailer.
When reversing, if possible, have someone
provide assistance.
Drive slowly and shift down into a lower
gear when descending steep gradients
rather than holding the foot brake
depressed, to avoid overheating and
reduced brake efficiency.
Page 170 of 234
Driving and operation170
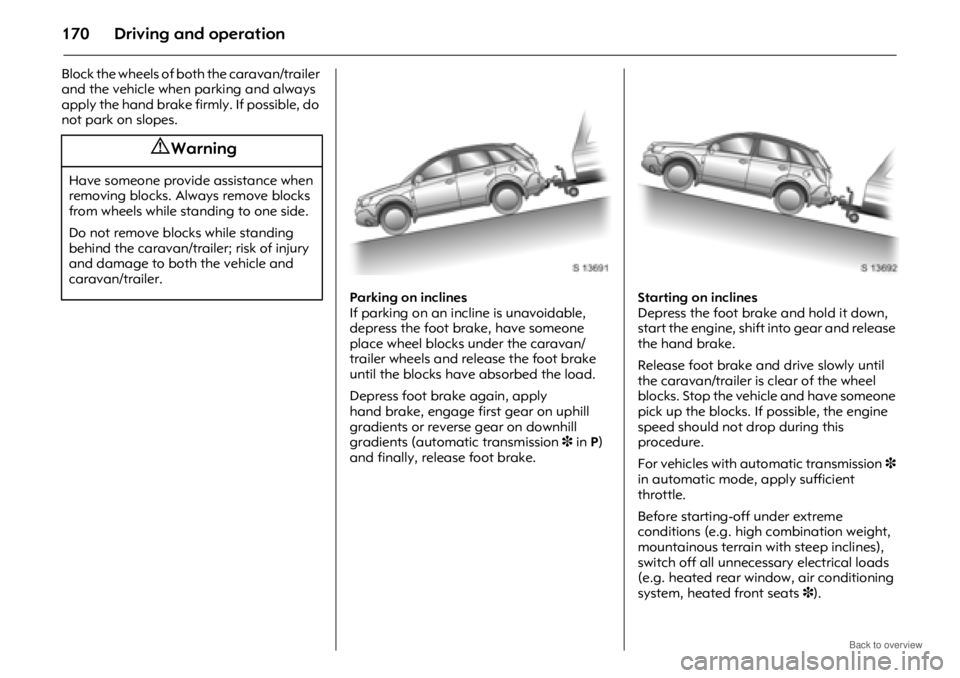
Block the wheels of both the caravan/trailer
and the vehicle when parking and always
apply the hand brake firmly. If possible, do
not park on slopes. Parking on inclines
If parking on an incline is unavoidable,
depress the foot brake, have someone
place wheel blocks under the caravan/
trailer wheels and release the foot brake
until the blocks have absorbed the load.
Depress foot brake again, apply
hand brake, engage first gear on uphill
gradients or reverse gear on downhill
gradients (automatic transmission 3 in P)
and finally, release foot brake. Starting on inclines
Depress the foot brake and hold it down,
start the engine, shift into gear and release
the hand brake.
Release foot brake and drive slowly until
the caravan/trailer is clear of the wheel
blocks. Stop the vehicle and have someone
pick up the blocks. If possible, the engine
speed should not drop during this
procedure.
For vehicles with automatic transmission
3
in automatic mode, apply sufficient
throttle.
Before starting-off under extreme
conditions (e.g. high combination weight,
mountainous terrain with steep inclines),
switch off all unnecessary electrical loads
(e.g. heated rear window, air conditioning
system, heated front seats 3).
9 Warning
Have someone provide assistance when
removing blocks. Always remove blocks
from wheels while standing to one side.
Do not remove blocks while standing
behind the caravan/trailer; risk of injury
and damage to both the vehicle and
caravan/trailer.