OPEL ANTARA 2009 Owners Manual
Manufacturer: OPEL, Model Year: 2009, Model line: ANTARA, Model: OPEL ANTARA 2009Pages: 234, PDF Size: 3.01 MB
Page 181 of 234

Self-help, vehicle care181
Electrical system
Fuses
There are two fuse boxes in the vehicle:
the instrument panel fu se box is located on
the left-hand side of the front passenger’s
footwell, the engine compartment fuse box
is located next to the coolant reservoir.
It is advisable to carry a full set of fuses.
Spare fuses are kept in the engine
compartment fuse box.
7. Change the wheel.
Notes on spare wheel - see page 178.
8. Screw on wheel nuts and tighten slightly by hand until wheel is held
against the hub.
9. Rotate wrench anti-clockwise and lower vehicle to the ground.
10. Tighten wheel nuts in a cross wise sequence, putting the wrench on as far
as possible.
11. Stow replaced wheel in luggage compartment.
12. Stow the jacking equipment and warning triangle 3 - see pages 176,
177.
13. Check the tyre pressure of the newly fitted wheel - see page 224. Adjust as
necessary.
14. Have the new wheel balanced on the vehicle and have the tightening torque
of the wheel nuts checked as soon as
possible, and if necessary, corrected.
Tightening torque - see page 223.
15. Replace defective tyre on the wheel that was removed.
16. Replace temporary spare wheel with a full specification wheel without delay.
9 Warning
Electronic ignition systems generate very
high voltages. Do not touch the ignition
system; high voltage can be fatal.
Page 182 of 234
Self-help, vehicle care182
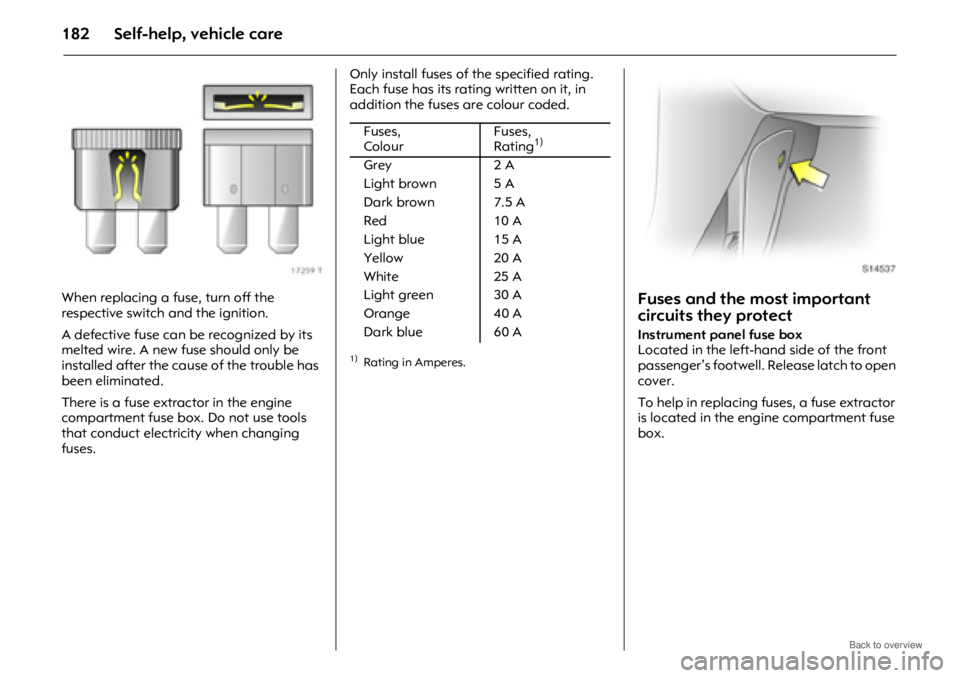
When replacing a fuse, turn off the
respective switch and the ignition.
A defective fuse can be recognized by its
melted wire. A new fuse should only be
installed after the cause of the trouble has
been eliminated.
There is a fuse extractor in the engine
compartment fuse box. Do not use tools
that conduct electricity when changing
fuses.Only install fuses of the specified rating.
Each fuse has its rating written on it, in
addition the fuses are colour coded.Fuses and the most important
circuits they protect
Instrument panel fuse box
Located in the left-hand side of the front
passenger’s footwell. Release latch to open
cover.
To help in replacing fu
ses, a fuse extractor
is located in the engine compartment fuse
box.
Fuses,
Colour Fuses,
Rating1)
1)Rating in Amperes.
Grey
2 A
Light brown 5 A
Dark brown 7.5 A
Red 10 A
Light blue 15 A
Yellow 20 A
White 25 A
Light green 30 A
Orange 40 A
Dark blue 60 A
Page 183 of 234
Self-help, vehicle care 183
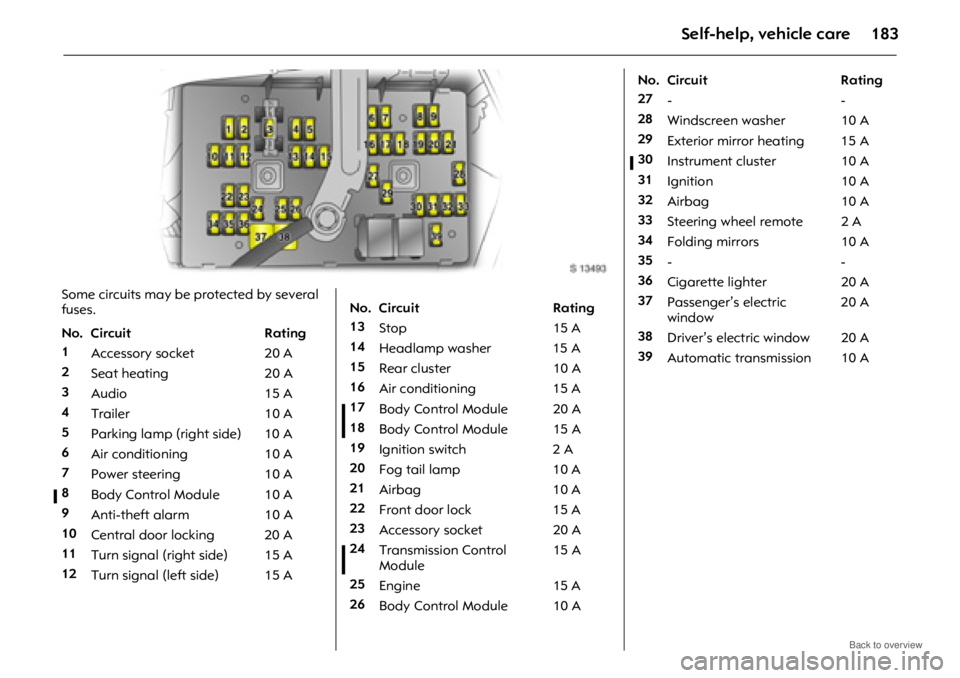
Some circuits may be protected by several
fuses.
No. Circuit Rating
1Accessory socket 20 A
2 Seat heating 20 A
3 Audio 15 A
4 Trailer 10 A
5 Parking lamp (right side) 10 A
6 Air conditioning 10 A
7 Power steering 10 A
8 Body Control Module 10 A
9 Anti-theft alarm 10 A
10 Central door locking 20 A
11 Turn signal (right side) 15 A
12 Turn signal (left side) 15 ANo. Circuit Rating
13 Stop 15 A
14 Headlamp washer 15 A
15 Rear cluster 10 A
16 Air conditioning 15 A
17 Body Control Module 20 A
18 Body Control Module 15 A
19 Ignition switch 2 A
20 Fog tail lamp 10 A
21 Airbag 10 A
22 Front door lock 15 A
23 Accessory socket 20 A
24 Transmission Control
Module 15 A
25 Engine 15 A
26 Body Control Module 10 A
No. Circuit Rating
27 --
28 Windscreen washer 10 A
29 Exterior mirror heating 15 A
30 Instrument cluster 10 A
31 Ignition 10 A
32 Airbag 10 A
33 Steering wheel remote 2 A
34 Folding mirrors 10 A
35 --
36 Cigarette lighter 20 A
37 Passenger’s electric
window 20 A
38 Driver’s electric window 20 A
39 Automatic transmission 10 A
Page 184 of 234
184 Self-help, vehicle care
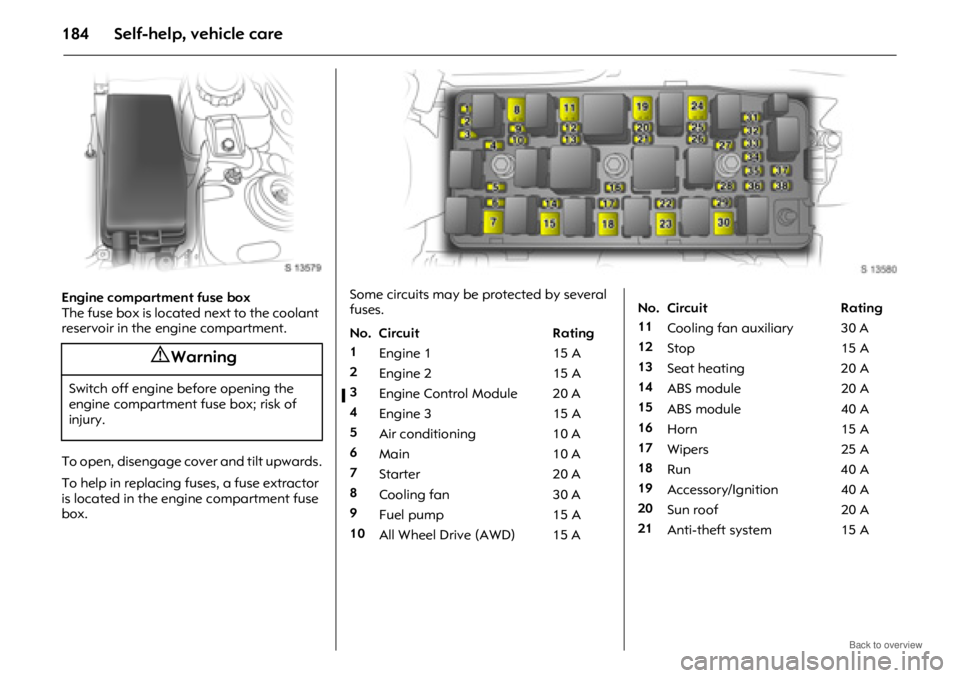
Engine compartment fuse box
The fuse box is located next to the coolant
reservoir in the engine compartment.
To open, disengage cover and tilt upwards.
To help in replacing fuses, a fuse extractor
is located in the engine compartment fuse
box.
9 Warning
Switch off engine before opening the
engine compartment fuse box; risk of
injury.
Some circuits may be protected by several
fuses.
No. Circuit Rating
1 Engine 1 15 A
2 Engine 2 15 A
3 Engine Control Module 20 A
4 Engine 3 15 A
5 Air conditioning 10 A
6 Main 10 A
7 Starter 20 A
8 Cooling fan 30 A
9 Fuel pump 15 A
10 All Wheel Drive (AWD) 15 ANo. Circuit Rating
11 Cooling fan auxiliary 30 A
12 Stop 15 A
13 Seat heating 20 A
14 ABS module 20 A
15 ABS module 40 A
16 Horn 15 A
17 Wipers 25 A
18 Run 40 A
19 Accessory/Ignition 40 A
20 Sun roof 20 A
21 Anti-theft system 15 A
Page 185 of 234
Self-help, vehicle care185
Bulb replacement
Before replacing a bulb , switch off ignition
and relevant switch.
Only hold new bulbs at base! Do not touch
the bulb glass with bare hands, otherwise
fingerprints on the glass evaporate and
residue builds up on the reflector
eventually resulting in a dull reflector.
Inadvertently stained bulbs may be
cleaned with a clean lint-free cloth, using
alcohol or white spirit.
Replacement bulb must be in accordance
with data on base of defective bulb. Do not
exceed wattage given on bulb base.
Headlamp aiming
We recommend that headlamp aiming be
carried out by a work shop, which will have
special equipment.
When aiming your headlamps, the manual
headlamp range adjustment 3 must be set
to 7. Headlamp removal
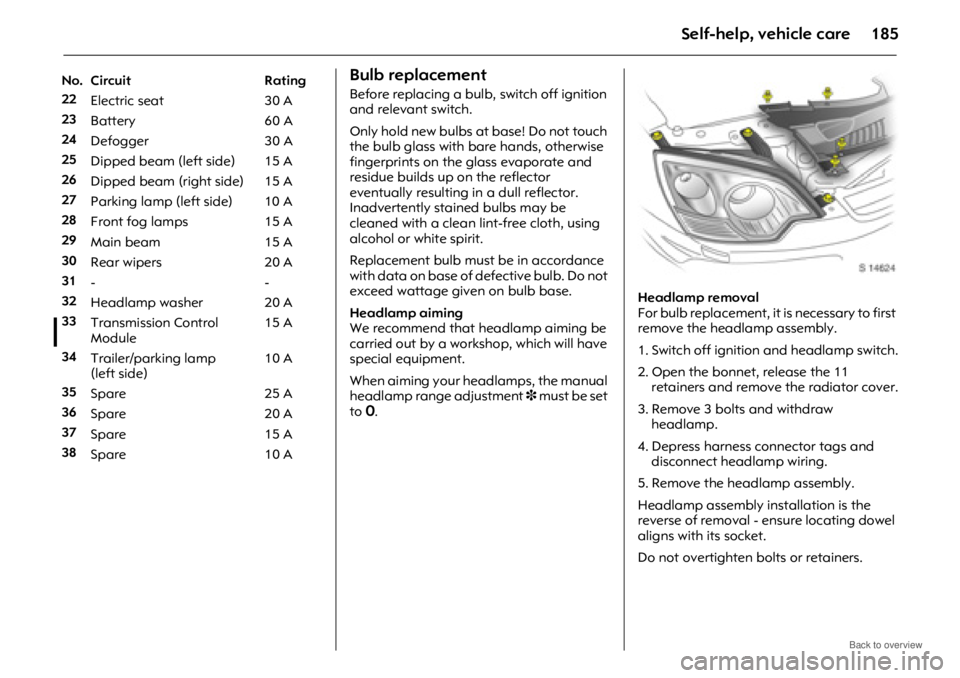
For bulb replacement, it is necessary to first
remove the headlamp assembly.
1. Switch off ignition and headlamp switch.
2. Open the bonnet, release the 11
retainers and remove the radiator cover.
3. Remove 3 bolts and withdraw headlamp.
4. Depress harness connector tags and disconnect head lamp wiring.
5. Remove the headlamp assembly.
Headlamp assembly installation is the
reverse of removal - ensure locating dowel
aligns with its socket.
Do not overtighten bolts or retainers.
No. Circuit Rating
22
Electric seat 30 A
23 Battery 60 A
24 Defogger 30 A
25 Dipped beam (left side) 15 A
26 Dipped beam (right side) 15 A
27 Parking lamp (left side) 10 A
28 Front fog lamps 15 A
29 Main beam 15 A
30 Rear wipers 20 A
31 --
32 Headlamp washer 20 A
33 Transmission Control
Module 15 A
34 Trailer/parking lamp
(left side) 10 A
35 Spare 25 A
36 Spare 20 A
37 Spare 15 A
38 Spare 10 A
Page 186 of 234
Self-help, vehicle care186
Halogen headlamp system
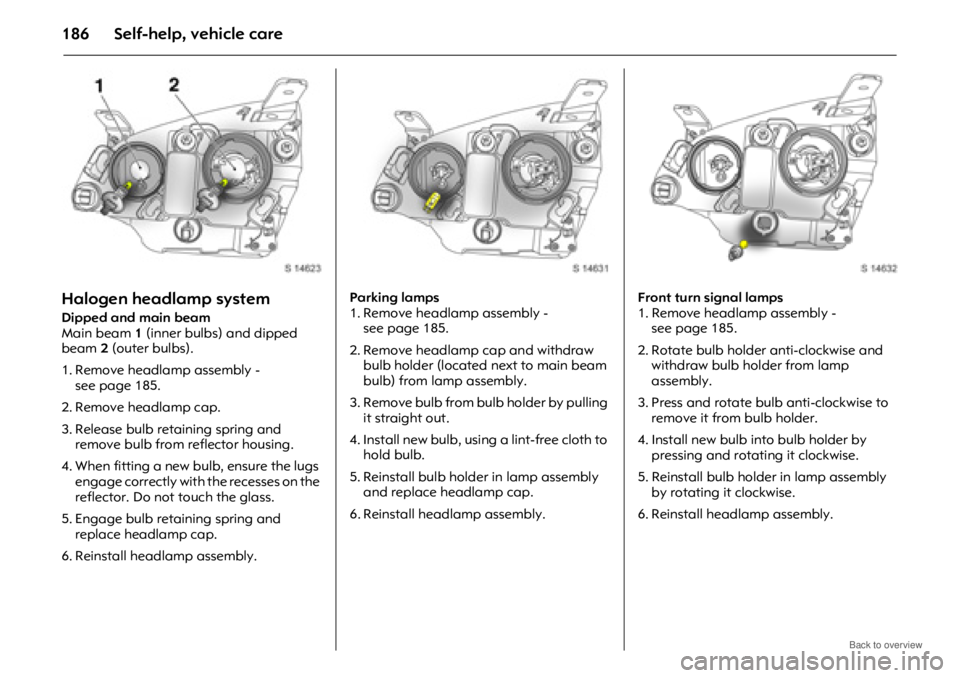
Dipped and main beam
Main beam 1 (inner bulbs) and dipped
beam 2 (outer bulbs).
1. Remove headlamp assembly - seepage185.
2. Remove headlamp cap.
3. Release bulb retaining spring and remove bulb from reflector housing.
4. When fitting a new bulb, ensure the lugs engage correctly with the recesses on the
reflector. Do not touch the glass.
5. Engage bulb retaining spring and replace headlamp cap.
6. Reinstall headlamp assembly. Parking lamps
1. Remove headlamp assembly -
seepage185.
2. Remove headlamp cap and withdraw bulb holder (located next to main beam
bulb) from lamp assembly.
3. Remove bulb from bulb holder by pulling it straight out.
4. Install new bulb, using a lint-free cloth to hold bulb.
5. Reinstall bulb holder in lamp assembly and replace headlamp cap.
6. Reinstall headlamp assembly. Front turn signal lamps
1. Remove headlamp assembly -
see page 185.
2. Rotate bulb holder anti-clockwise and withdraw bulb holder from lamp
assembly.
3. Press and rotate bulb anti-clockwise to remove it from bulb holder.
4. Install new bulb into bulb holder by pressing and rotating it clockwise.
5. Reinstall bulb holder in lamp assembly
by rotating it clockwise.
6. Reinstall headlamp assembly.
Page 187 of 234
Self-help, vehicle care187
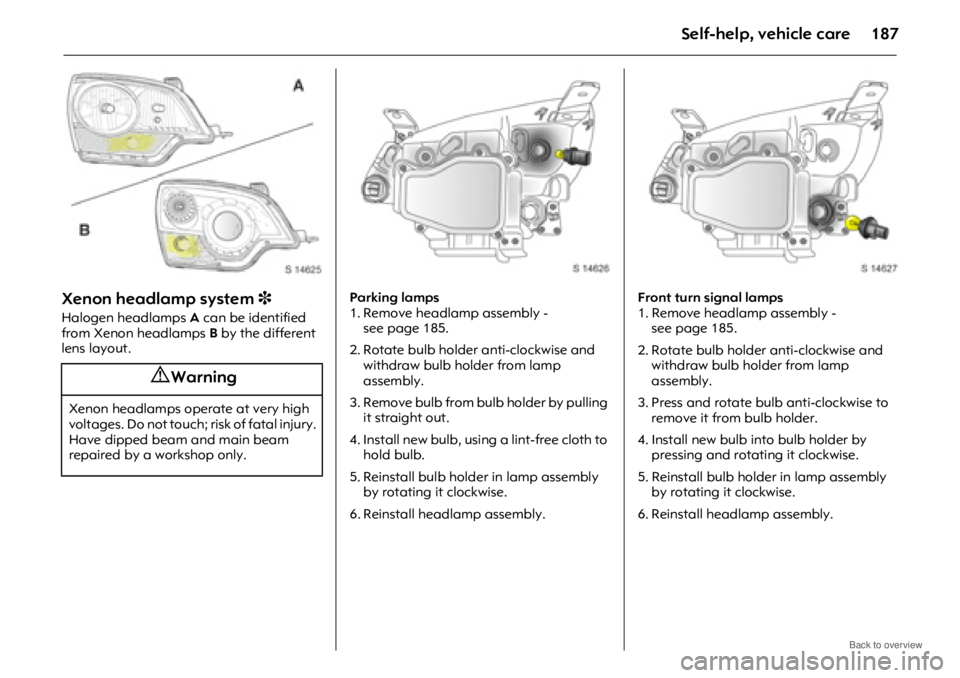
Xenon headlamp system 3
Halogen headlamps A can be identified
from Xenon headlamps B by the different
lens layout. Parking lamps
1. Remove headlamp assembly -
seepage185.
2. Rotate bulb holder anti-clockwise and withdraw bulb holder from lamp
assembly.
3. Remove bulb from bulb holder by pulling it straight out.
4. Install new bulb, using a lint-free cloth to hold bulb.
5. Reinstall bulb holder in lamp assembly by rotating it clockwise.
6. Reinstall headlamp assembly. Front turn signal lamps
1. Remove headlamp assembly -
see page 185.
2. Rotate bulb holder anti-clockwise and withdraw bulb holder from lamp
assembly.
3. Press and rotate bulb anti-clockwise to remove it from bulb holder.
4. Install new bulb into bulb holder by pressing and rotating it clockwise.
5. Reinstall bulb holder in lamp assembly
by rotating it clockwise.
6. Reinstall headlamp assembly.
9 Warning
Xenon headlamps operate at very high
voltages. Do not touch; risk of fatal injury.
Have dipped beam and main beam
repaired by a workshop only.
Page 188 of 234
Self-help, vehicle care188
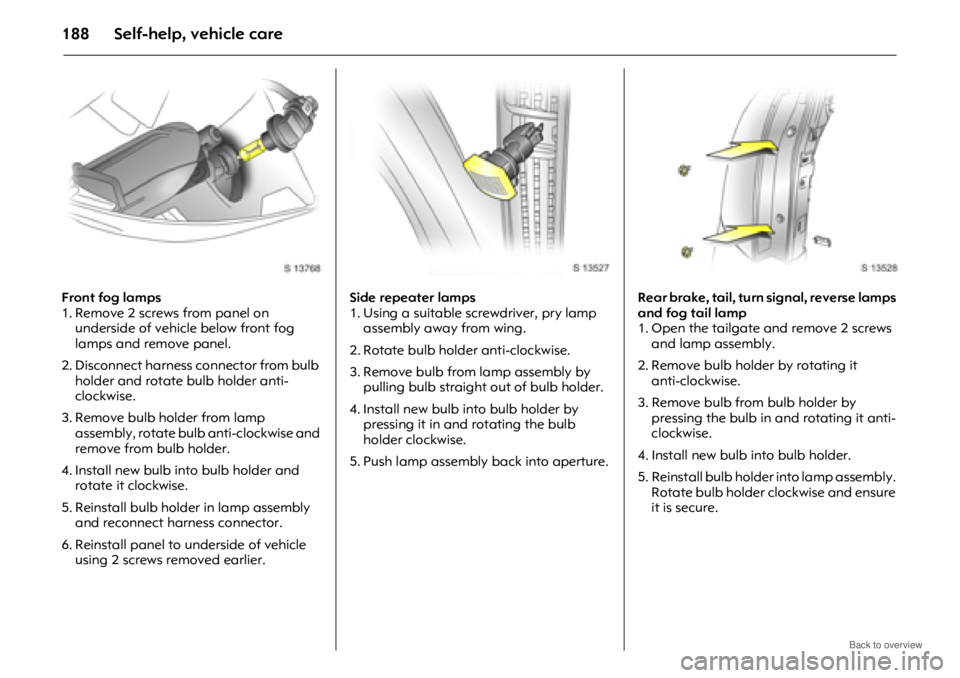
Front fog lamps
1. Remove 2 screws from panel on underside of vehicle below front fog
lamps and remove panel.
2. Disconnect harness connector from bulb holder and rotate bulb holder anti-
clockwise.
3. Remove bulb holder from lamp assembly, rotate bulb anti-clockwise and
remove from bulb holder.
4. Install new bulb in to bulb holder and
rotate it clockwise.
5. Reinstall bulb holder in lamp assembly
and reconnect harness connector.
6. Reinstall panel to underside of vehicle using 2 screws removed earlier. Side repeater lamps
1. Using a suitable screwdriver, pry lamp
assembly away from wing.
2. Rotate bulb holder anti-clockwise.
3. Remove bulb from lamp assembly by pulling bulb straight out of bulb holder.
4. Install new bulb into bulb holder by pressing it in and rotating the bulb
holder clockwise.
5. Push lamp assembly back into aperture. Rear brake, tail, turn signal, reverse lamps
and fog tail lamp
1. Open the tailgate and remove 2 screws
and lamp assembly.
2. Remove bulb holder by rotating it anti-clockwise.
3. Remove bulb from bulb holder by pressing the bulb in and rotating it anti-
clockwise.
4. Install new bulb into bulb holder.
5. Reinstall bulb holder into lamp assembly. Rotate bulb holder clockwise and ensure
it is secure.
Page 189 of 234
Self-help, vehicle care189
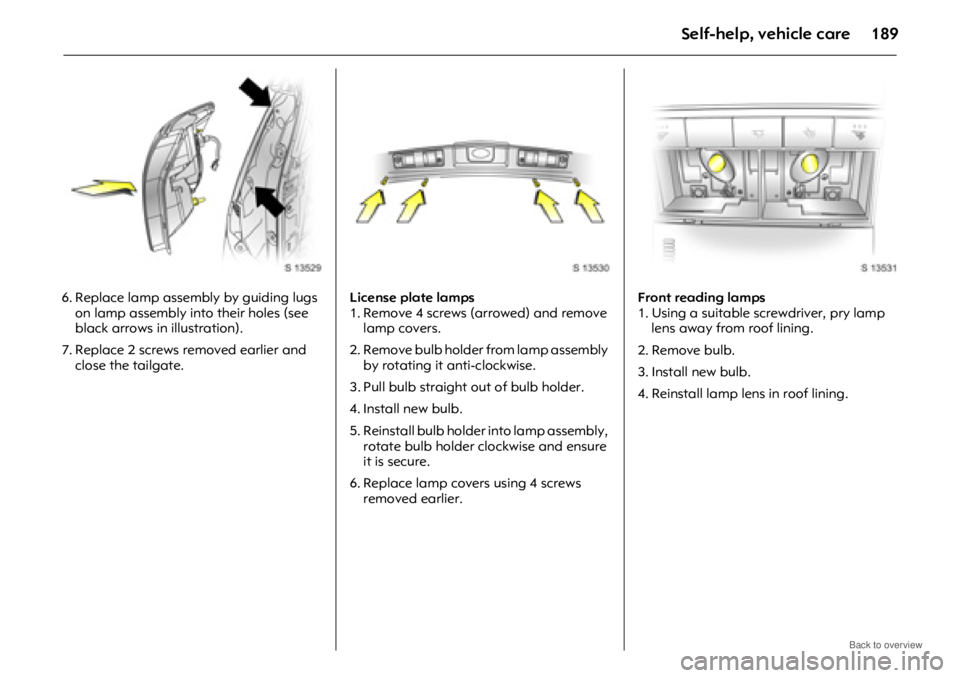
6. Replace lamp assembly by guiding lugs on lamp assembly into their holes (see
black arrows in illustration).
7. Replace 2 screws removed earlier and close the tailgate. License plate lamps
1. Remove 4 screws (arrowed) and remove
lamp covers.
2. Remove bulb holder from lamp assembly by rotating it anti-clockwise.
3. Pull bulb straight out of bulb holder.
4. Install new bulb.
5. Reinstall bulb holder into lamp assembly, rotate bulb holder clockwise and ensure
it is secure.
6. Replace lamp covers using 4 screws removed earlier. Front reading lamps
1. Using a suitable screwdriver, pry lamp
lens away from roof lining.
2. Remove bulb.
3. Install new bulb.
4. Reinstall lamp lens in roof lining.
Page 190 of 234
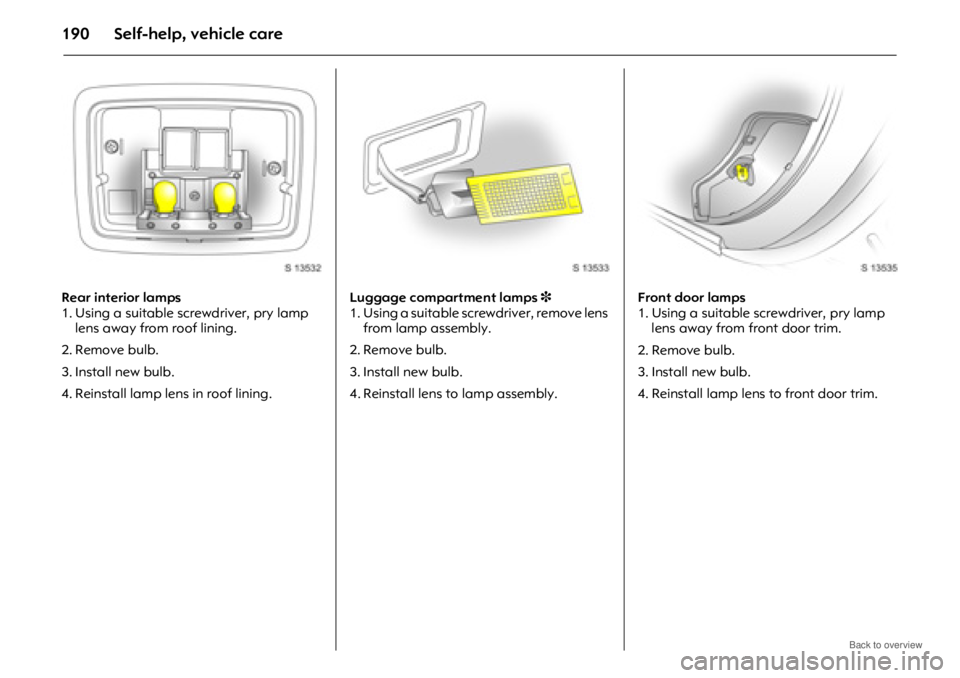
Self-help, vehicle care190
Rear interior lamps
1. Using a suitable screwdriver, pry lamp lens away from roof lining.
2. Remove bulb.
3. Install new bulb.
4. Reinstall lamp lens in roof lining. Luggage compartment lamps
3
1. Using a suitable screwdriver, remove lens from lamp assembly.
2. Remove bulb.
3. Install new bulb.
4. Reinstall lens to lamp assembly. Front door lamps
1. Using a suitable screwdriver, pry lamp
lens away from front door trim.
2. Remove bulb.
3. Install new bulb.
4. Reinstall lamp lens to front door trim.