OPEL ANTARA 2009 Owners Manual
Manufacturer: OPEL, Model Year: 2009, Model line: ANTARA, Model: OPEL ANTARA 2009Pages: 234, PDF Size: 3.01 MB
Page 151 of 234
Driving and operation151
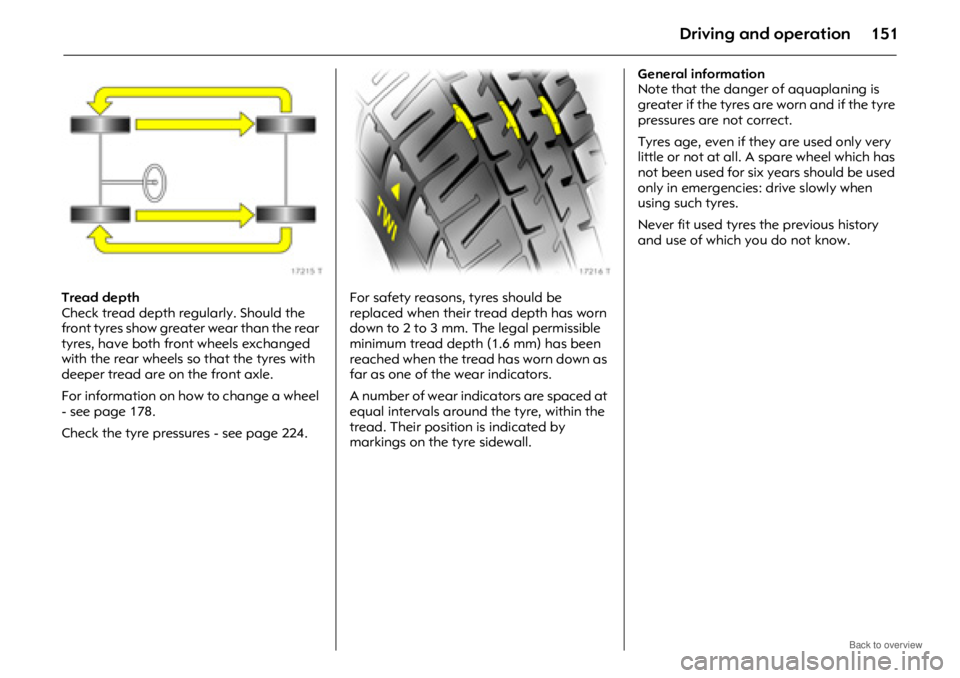
Tread depth
Check tread depth regularly. Should the
front tyres show greater wear than the rear
tyres, have both front wheels exchanged
with the rear wheels so that the tyres with
deeper tread are on the front axle.
For information on how to change a wheel
- see page 178.
Check the tyre pressures - see page 224.For safety reasons, tyres should be
replaced when their tread depth has worn
down to 2 to 3 mm. The legal permissible
minimum tread depth (1.6 mm) has been
reached when the tread has worn down as
far as one of the wear indicators.
A number of wear indicators are spaced at
equal intervals around the tyre, within the
tread. Their position is indicated by
markings on the tyre sidewall.General information
Note that the danger
of aquaplaning is
greater if the tyres are worn and if the tyre
pressures are not correct.
Tyres age, even if they are used only very
little or not at all. A spare wheel which has
not been used for six years should be used
only in emergencies: drive slowly when
using such tyres.
Never fit used tyres the previous history
and use of which you do not know.
Page 152 of 234
Driving and operation152
Tyre designations
Meanings:
e.g. 235/60 R 17 102 H
Speed code letters: Winter tyres
3
See page 223 for restrictions.
Winter tyres improve safety at extremely
low outside temperatures and should
therefore be fitted on all wheels.
The design of summer tyres means they
have limited qualities for winter driving.
If the maximum permissible speed for the
winter tyres is less than that of the vehicle,
a notice indicating the maximum
permissible speed for the tyres must be
affixed within the driver's field of vision 3
1).
If you use the spare wheel when it is fitted
with a summer tyre; the vehicle's
driveability may be affected, especially on
slippery road surfaces. Obtain a
replacement for the faulty tyre as soon as
possible, and have the wheel balanced
and fitted to the vehicle.
Ensure that winter tyres are inflated to the
correct pressure specified by the tyre
manufacturer.
If winter tyres are installed that have not
been approved for your vehicle, ESC
performance may be affected. Consult a
workshop regarding availability of
approved winter tyres.
Wheel trims 3
If the wheel trims and tyres used are not
Opel-approved, make sure the tyres do not
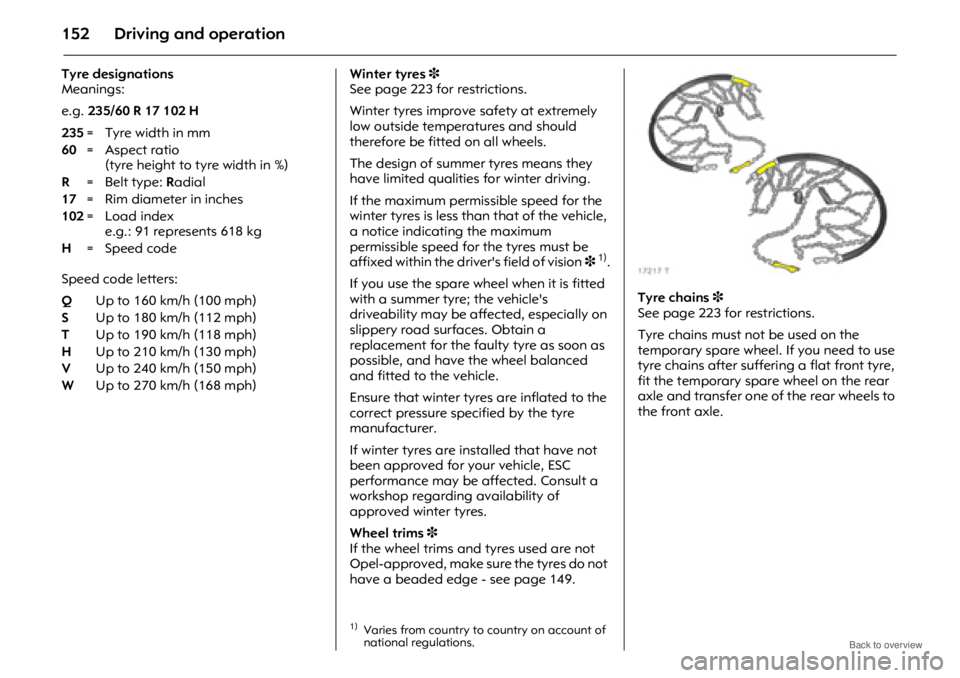
have a beaded edge - see page 149. Tyre chains
3
See page 223 for restrictions.
Tyre chains must not be used on the
temporary spare wheel. If you need to use
tyre chains after suffering a flat front tyre,
fit the temporary spare wheel on the rear
axle and transfer one of the rear wheels to
the front axle.
235
=Tyre width inmm
60 =Aspect ratio
(tyre height to tyre width in %)
R =Belt type: Radial
17 = Rim diameter in inches
102 =Load index
e.g.: 91 represents 618 kg
H = Speed code
Q Up to 160 km/h (100 mph)
S Up to 180 km/h (112 mph)
T Up to 190 km/h (118 mph)
H Up to 210 km/h (130 mph)
V Up to 240 km/h (150 mph)
W Up to 270 km/h (168 mph)
1)Varies from country to country on account of
national regulations.
Page 153 of 234

Driving and operation153
Always use fine-linked chains that add no
more than 15 mm to the tyre tread and the
inboard sides (including chain lock).
Tyre chains may only be used at speeds of
up to 50 km/h (30 mph)
1) or up to the tyre
chain manufacturer’s recommended
maximum speed, whichever is lower.
When travelling on road s that are free of
snow, they may only be used for brief
periods since they are subject to rapid wear
on a hard road and may snap.
Avoid sharp turns, bumps and holes and
do not lock the wheels when braking, to
avoid damaging the tyre chains.
Retighten the chains after driving for
approx. 1 km (0.6 miles). If, at any time,
you hear or suspect that the chains are
contacting the vehicle, stop and retighten
the chains.
Always read the instructions supplied with
the tyre chains. Temporary spare wheel
The temporary spare wheel is designed for
use on your vehicle only.
Do not attempt to use the spare tyre on a
different wheel, or use a different tyre on
the spare wheel, as they will not fit.
For notes on the temporary spare wheel -
see page 178.
Ensure the temporary spare wheel is
inflated to the correct tyre pressure -
see page 224.
Wheel changing - see page 178.
Roof racks 3
For reasons of safety and to avoid
damaging the roof, we recommend that
you use the Opel roof rack system
approved for your vehicle.
Fasten the roof rack to the roof rails
following the instructions that accompany
the system, ensuring that the roof load is
evenly distributed over the side or cross
rails. Loads must not be placed on the roof
surface.
To prevent damage or loss, check
frequently that roof loads are securely
fastened.
Driving with a roof load affects the
vehicle’s centre of gravity; drive carefully in
crosswinds and do not drive at high
speeds.
Driving hints - see page 127.
1)Varies from country to country on account of
national regulations.
9 Warning
Disregard of the instructions may lead to
injuries or endanger life. Vehicle
passengers must be informed
accordingly.
Page 154 of 234
Driving and operation154
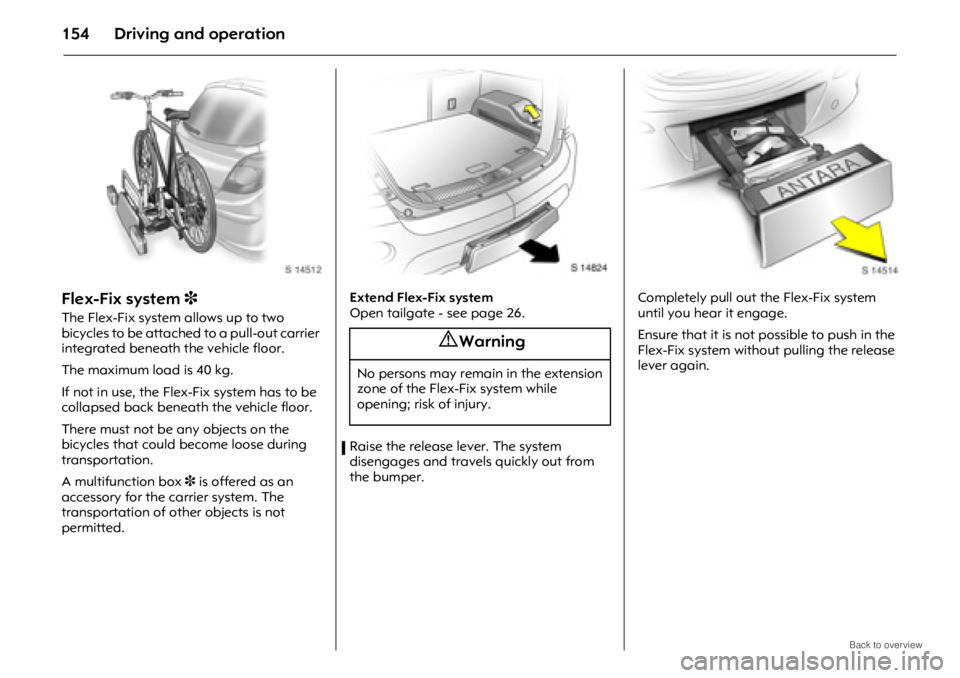
Flex-Fix system 3
The Flex-Fix system allows up to two
bicycles to be attached to a pull-out carrier
integrated beneath the vehicle floor.
The maximum load is 40 kg.
If not in use, the Flex-Fix system has to be
collapsed back beneath the vehicle floor.
There must not be any objects on the
bicycles that could become loose during
transportation.
A multifunction box 3 is offered as an
accessory for the carrier system. The
transportation of other objects is not
permitted. Extend Flex-Fix system
Open tailgate - see page 26.
Raise the release lever. The system
disengages and travels quickly out from
the bumper.
Completely pull out
the Flex-Fix system
until you hear it engage.
Ensure that it is not possible to push in the
Flex-Fix system without pulling the release
lever again.
9 Warning
No persons may remain in the extension
zone of the Flex-Fix system while
opening; risk of injury.
Page 155 of 234
Driving and operation155
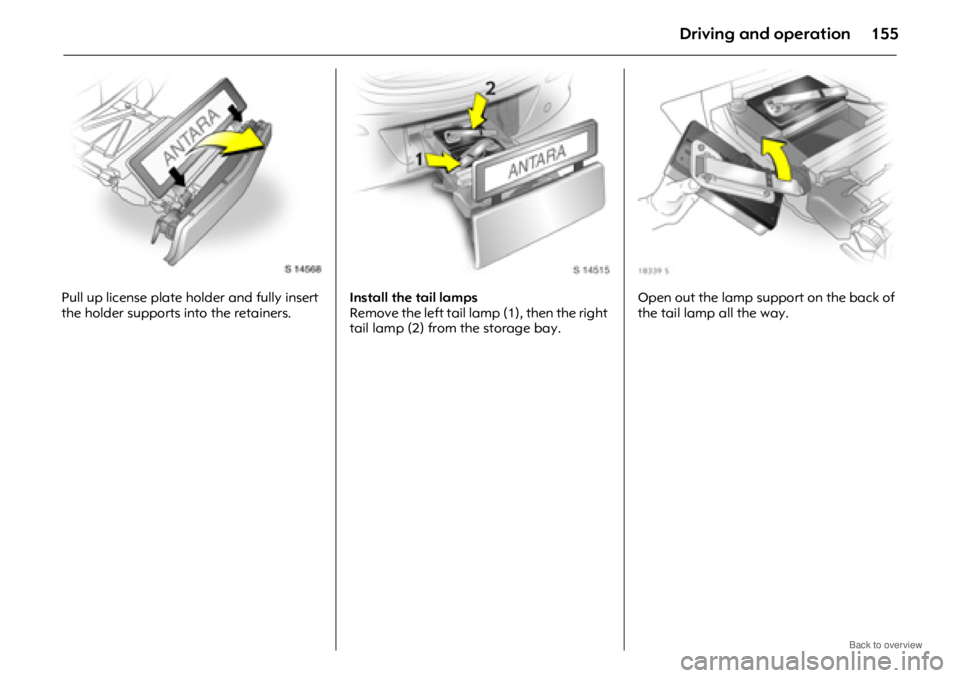
Pull up license plate holder and fully insert
the holder supports into the retainers. Install the tail lamps
R e m o v e th e l e f t t a i l l a m p ( 1 ) , t he n th e r i g h t
tail lamp (2) from the storage bay.Open out the lamp support on the back of
the tail lamp all the way.
Page 156 of 234
Driving and operation156
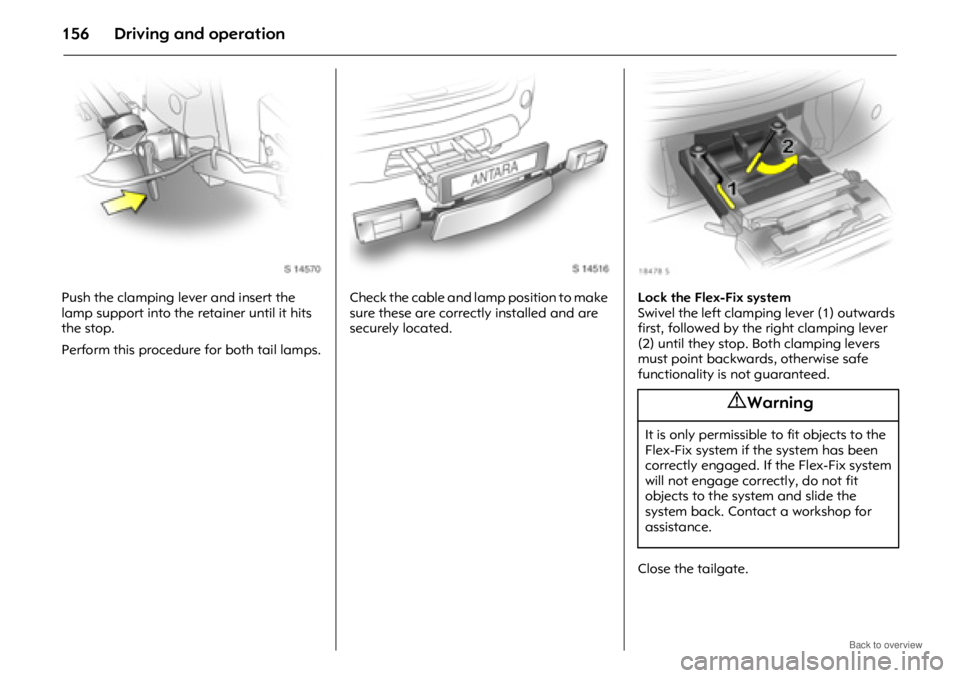
Push the clamping lever and insert the
lamp support into the retainer until it hits
the stop.
Perform this procedure for both tail lamps.Check the cable and lamp position to make
sure these are correctly installed and are
securely located.
Lock the Flex-Fix system
Swivel the left clamping lever (1) outwards
first, followed by the right clamping lever
(2) until they stop. Both clamping levers
must point backwards, otherwise safe
functionality is not guaranteed.
Close the tailgate.
9 Warning
It is only permissible to fit objects to the
Flex-Fix system if the system has been
correctly engaged. If the Flex-Fix system
will not engage correctly, do not fit
objects to the system and slide the
system back. Contact a workshop for
assistance.
Page 157 of 234
Driving and operation157
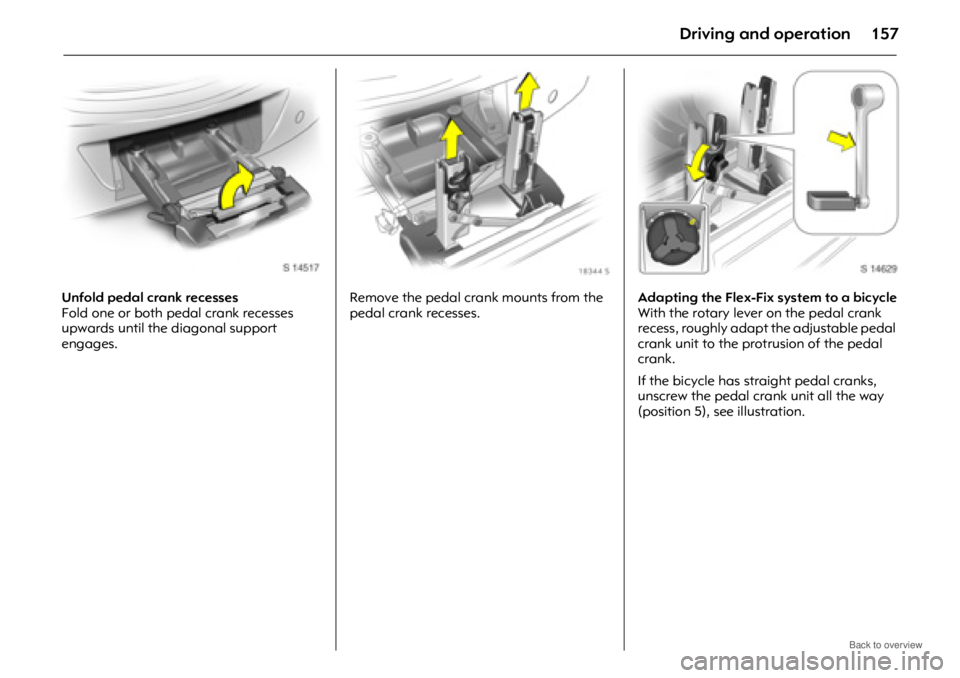
Unfold pedal crank recesses
Fold one or both pedal crank recesses
upwards until the diagonal support
engages.Remove the pedal crank mounts from the
pedal crank recesses.
Adapting the Flex-Fix system to a bicycle
With the rotary lever on the pedal crank
recess, roughly adapt the adjustable pedal
crank unit to the protrusion of the pedal
crank.
If the bicycle has straight pedal cranks,
unscrew the pedal crank unit all the way
(position 5), see illustration.
Page 158 of 234
Driving and operation158
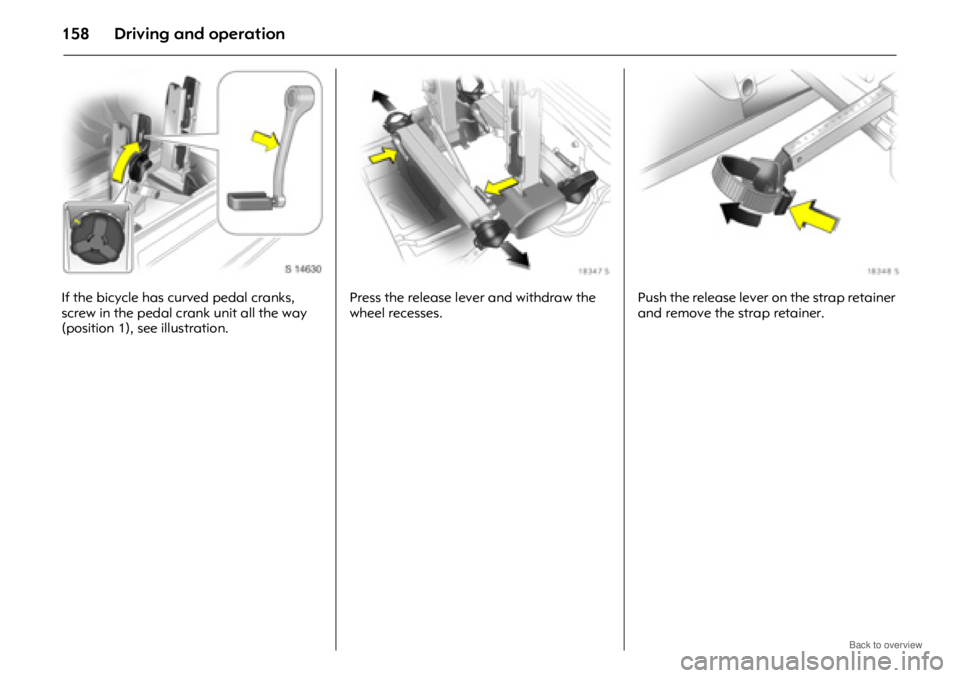
If the bicycle has curved pedal cranks,
screw in the pedal crank unit all the way
(position 1), see illustration.Press the release lever and withdraw the
wheel recesses.
Push the release lever on the strap retainer
and remove the strap retainer.
Page 159 of 234
Driving and operation159
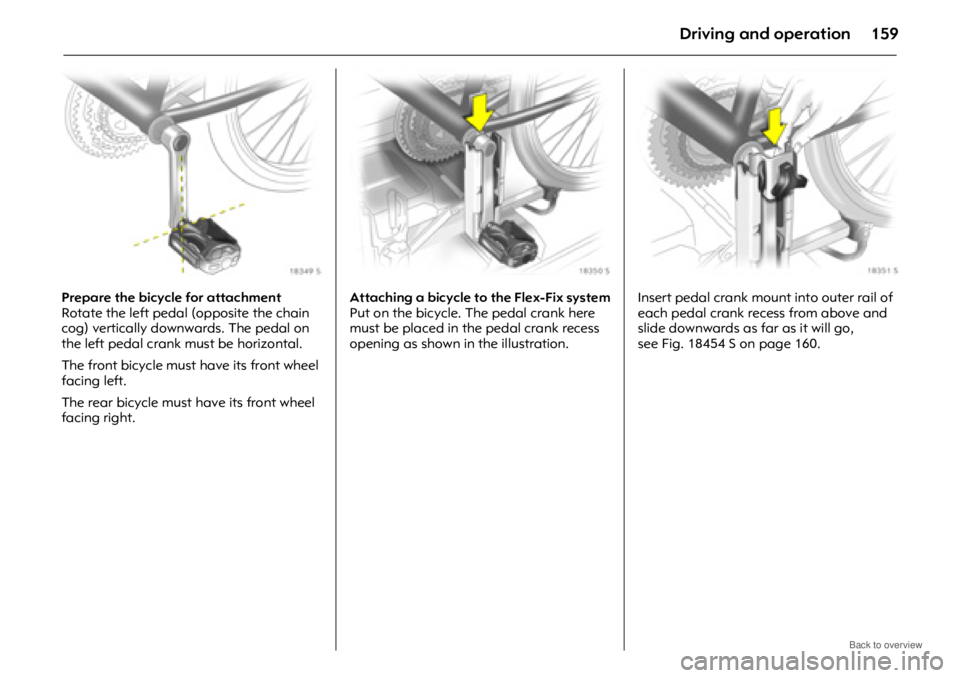
Prepare the bicycle for attachment
Rotate the left pedal (opposite the chain
cog) vertically downwards. The pedal on
the left pedal crank must be horizontal.
The front bicycle must have its front wheel
facing left.
The rear bicycle must have its front wheel
facing right.Attaching a bicycle to the Flex-Fix system
Put on the bicycle. The pedal crank here
must be placed in the pedal crank recess
opening as shown in the illustration.
Insert pedal crank mount
into outer rail of
each pedal crank recess from above and
slide downwards as far as it will go,
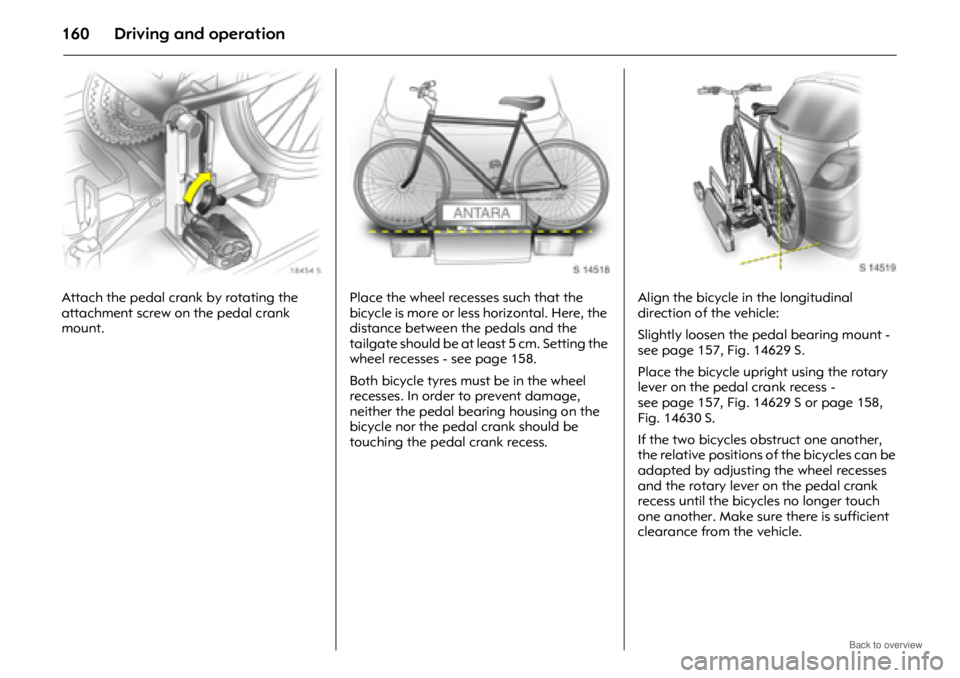
see Fig. 18454 S on page 160.
Page 160 of 234
Driving and operation160
Attach the pedal crank by rotating the
attachment screw on the pedal crank
mount.Place the wheel recesses such that the
bicycle is more or less horizontal. Here, the
distance between the pedals and the
tailgate should be at least 5 cm. Setting the
wheel recesses - see page 158.
Both bicycle tyres must be in the wheel
recesses. In order to prevent damage,
neither the pedal bearing housing on the
bicycle nor the pedal crank should be
touching the pedal crank recess.Align the bicycle in the longitudinal
direction of the vehicle:
Slightly loosen the pedal bearing mount -
see page 157, Fig. 14629 S.
Place the bicycle upright using the rotary
lever on the pedal crank recess -
see page 157, Fig. 14629 S or page 158,
Fig. 14630 S.
If the two bicycles obstruct one another,
the relative positions of the bicycles can be
adapted by adjusting the wheel recesses
and the rotary lever on the pedal crank
recess until the bicycles no longer touch
one another. Make sure there is sufficient
clearance from the vehicle.