relay OPEL FRONTERA 1998 Workshop Manual
[x] Cancel search | Manufacturer: OPEL, Model Year: 1998, Model line: FRONTERA, Model: OPEL FRONTERA 1998Pages: 6000, PDF Size: 97 MB
Page 1937 of 6000

6E–44
4JX1–TC ENGINE DRIVEABILITY AND EMISSIONS
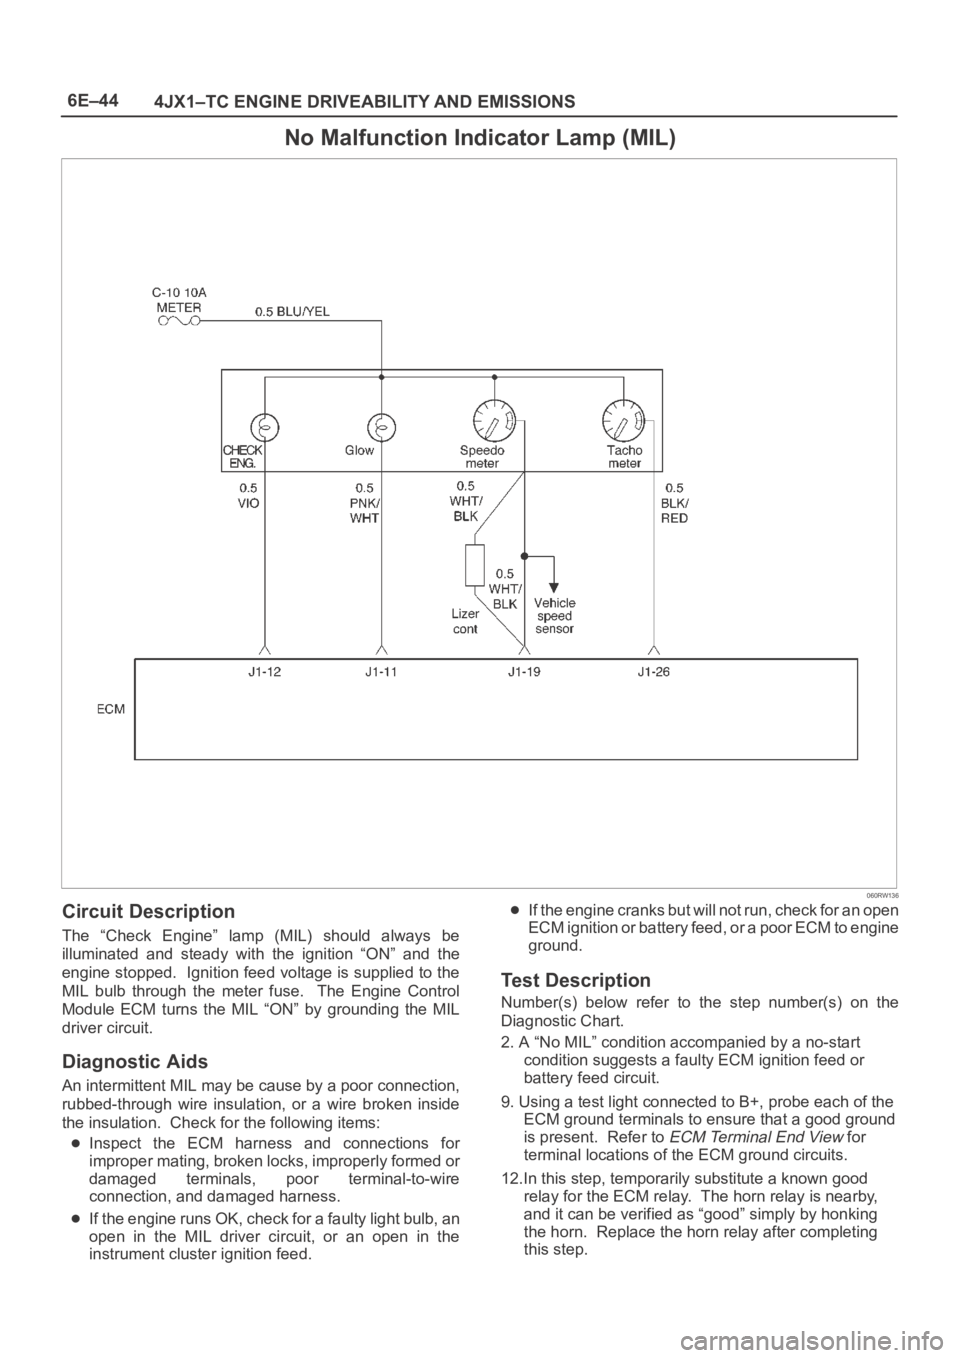
No Malfunction Indicator Lamp (MIL)
060RW136
Circuit Description
The “Check Engine” lamp (MIL) should always be
illuminated and steady with the ignition “ON” and the
engine stopped. Ignition feed voltage is supplied to the
MIL bulb through the meter fuse. The Engine Control
Module ECM turns the MIL “ON” by grounding the MIL
driver circuit.
Diagnostic Aids
An intermittent MIL may be cause by a poor connection,
rubbed-through wire insulation, or a wire broken inside
the insulation. Check for the following items:
Inspect the ECM harness and connections for
improper mating, broken locks, improperly formed or
damaged terminals, poor terminal-to-wire
connection, and damaged harness.
If the engine runs OK, check for a faulty light bulb, an
open in the MIL driver circuit, or an open in the
instrument cluster ignition feed.
If the engine cranks but will not run, check for an open
ECM ignition or battery feed, or a poor ECM to engine
ground.
Test Description
Number(s) below refer to the step number(s) on the
Diagnostic Chart.
2. A “No MIL” condition accompanied by a no-start
condition suggests a faulty ECM ignition feed or
battery feed circuit.
9. Using a test light connected to B+, probe each of the
ECM ground terminals to ensure that a good ground
is present. Refer to
ECM Terminal End View for
terminal locations of the ECM ground circuits.
12.In this step, temporarily substitute a known good
relay for the ECM relay. The horn relay is nearby,
and it can be verified as “good” simply by honking
the horn. Replace the horn relay after completing
this step.
Page 1938 of 6000

6E–45 4JX1–TC ENGINE DRIVEABILITY AND EMISSIONS
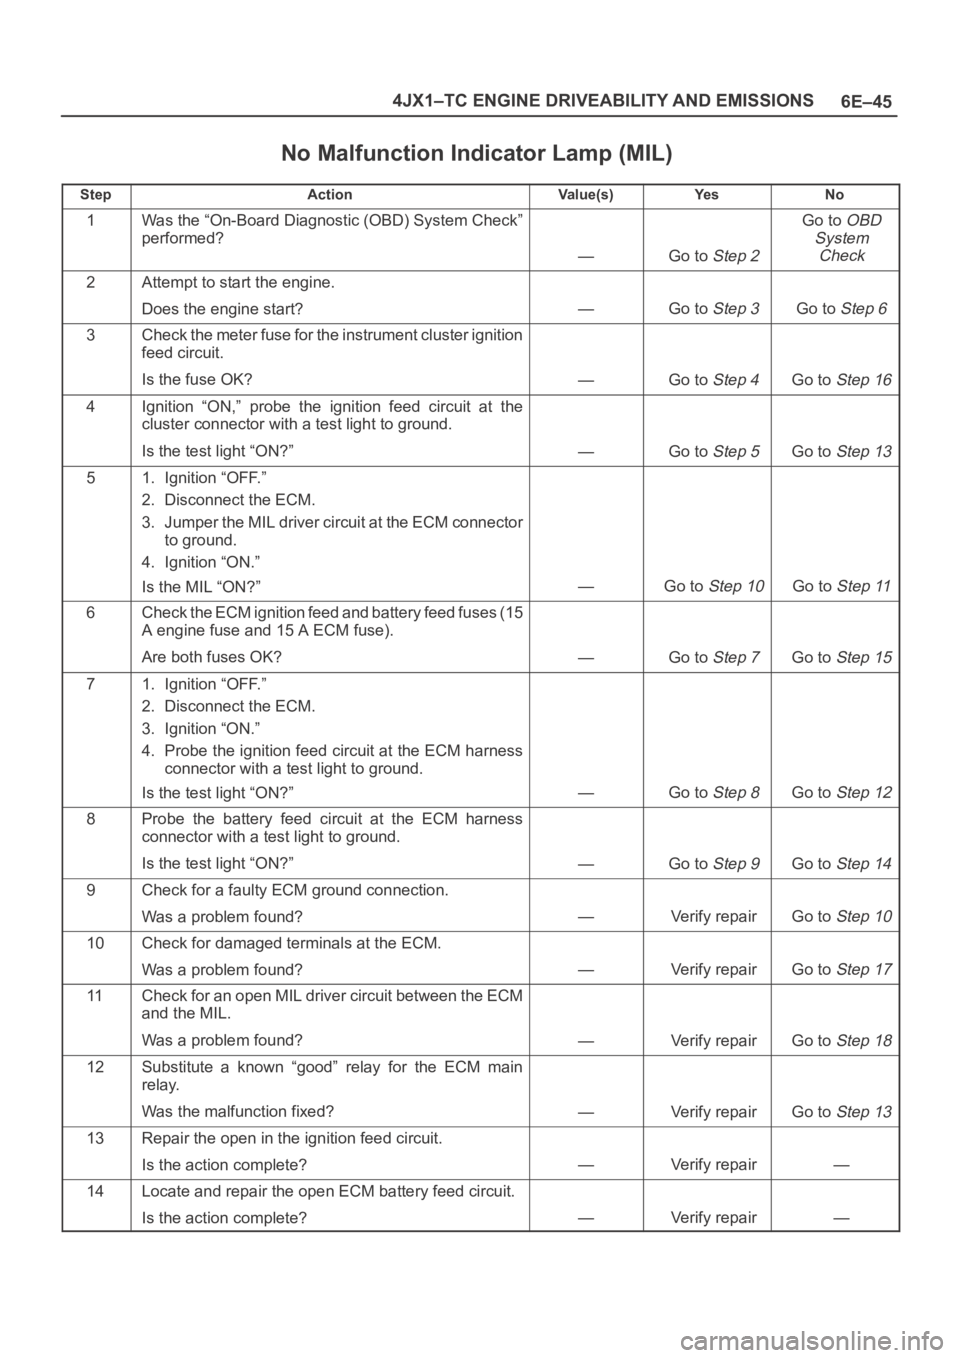
No Malfunction Indicator Lamp (MIL)
StepActionVa l u e ( s )Ye sNo
1Was the “On-Board Diagnostic (OBD) System Check”
performed?
—Go to Step 2
Go to OBD
System
Check
2Attempt to start the engine.
Does the engine start?
—Go to Step 3Go to Step 6
3Check the meter fuse for the instrument cluster ignition
feed circuit.
Is the fuse OK?
—Go to Step 4Go to Step 16
4Ignition “ON,” probe the ignition feed circuit at the
cluster connector with a test light to ground.
Is the test light “ON?”
—Go to Step 5Go to Step 13
51. Ignition “OFF.”
2. Disconnect the ECM.
3. Jumper the MIL driver circuit at the ECM connector
to ground.
4. Ignition “ON.”
Is the MIL “ON?”
—Go to Step 10Go to Step 11
6Check the ECM ignition feed and battery feed fuses (15
A engine fuse and 15 A ECM fuse).
Are both fuses OK?
—Go to Step 7Go to Step 15
71. Ignition “OFF.”
2. Disconnect the ECM.
3. Ignition “ON.”
4. Probe the ignition feed circuit at the ECM harness
connector with a test light to ground.
Is the test light “ON?”
—Go to Step 8Go to Step 12
8Probe the battery feed circuit at the ECM harness
connector with a test light to ground.
Is the test light “ON?”
—Go to Step 9Go to Step 14
9Check for a faulty ECM ground connection.
Was a problem found?
—Verify repairGo to Step 10
10Check for damaged terminals at the ECM.
Was a problem found?
—Verify repairGo to Step 17
11Check for an open MIL driver circuit between the ECM
and the MIL.
Was a problem found?
—Verify repairGo to Step 18
12Substitute a known “good” relay for the ECM main
relay.
Was the malfunction fixed?
—Verify repairGo to Step 13
13Repair the open in the ignition feed circuit.
Is the action complete?
—Verify repair—
14Locate and repair the open ECM battery feed circuit.
Is the action complete?
—Verify repair—
Page 1942 of 6000

6E–49 4JX1–TC ENGINE DRIVEABILITY AND EMISSIONS
Engine Cranks But Will Not Run
Circuit Description
In this type of injector system, the Engine Control Module
(ECM) triggers the correct driver inside the injector, which
then triggers the correct injector based on the 57X signal
received from the crankshaft position sensor (CKP).
During crank, the ECM monitors the CKP 57X signal. The
CKP signal is used to determine which cylinder will fire
first. After the CKP 57X signal has been processed by the
ECM, it will command all four injectors to allow a priming
shot of fuel for all the cylinders. After the priming, the
injectors are left “OFF” during the next four 57X reference
pulses from the CKP. This allows each cylinder a chance
to use the fuel from the priming shot. During this waiting
period, a camshaft position (CMP) signal pulse will have
been received by the ECM. The CMP signal allows the
ECM to operate the injectors sequentially based on
camshaft position. If the camshaft position signal is not
present at start-up, the ECM will begin sequential fuel
delivery with a 1-in-4 chance that fuel delivery is correct.
The engine will run without a CMP signal, but will set a
DTC code.
Diagnostic Aids
An intermittent problem may be caused by a poor
connection, rubbed-through wire insulation or a wirebroken inside the insulation. Check for the following
items:
Poor connection or damaged harness – Inspect the
ECM harness and connectors for improper mating,
broken locks, improperly formed or damaged
terminals, poor terminal-to-wore connection, and
damaged harness.
Faulty engine coolant temperature sensor – Using a
Tech 2, compare engine coolant temperature with
manifold air temperature on a completely cool engine.
Test Description
Number(s) below refer to the step number(s) on the
Diagnostic Chart.
4. An obvious cause of low fuel pressure would be an
empty fuel tank.
5. The engine will easily start and run if a few injectors
are disabled. It is not necessary to test all injectors
at this time since this step is only a test to verify that
all of the injectors have not been disabled by fuel
contamination.
8.If there is an open or shorted driver circuit, DTCs
0201-0204 should be set.
Engine Cranks But Will Not Run
StepActionVa l u e ( s )Ye sNo
1Was the “On-Board Diagnostic (OBD) System Check”
performed?
—Go to Step 2
Go to OBD
System
Check
2Check the 15 A injector fuse, the 15 A engine device
fuse, and the 15A ECM fuse.
Was a fuse blown?
—Go to Step 3Go to Step 4
3Check for a short to ground and replace the fuse.
Is the action complete?
—Verify repair—
4Is fuel tank empty?
—
Fill the fuel
tank
Go to Step 5
5Is the right fuel using?
—Go to Step 6
Replace the
fuel
6Is the right engine oil using?
—Go to Step 7
Replace the
engine oil
7Using the Tech–2.
Is DTC P0192 or P0193 set? (Check rail pressure
system)
—
Go to DTC
P0192 or
DTC P0193
Go to Step 8
8Using the Tech–2.
Is DTC P0201 – P0204 set? (Check inject circuit fault)
—
Go to DTC
P0201 –
P0204
Go to Step 9
9Using the Tech–2.
Is DTC P1657 set? (Check ECM Main relay)
—
Go to DTC
P1657
Go to Step 10
Page 1947 of 6000

6E–54
4JX1–TC ENGINE DRIVEABILITY AND EMISSIONS
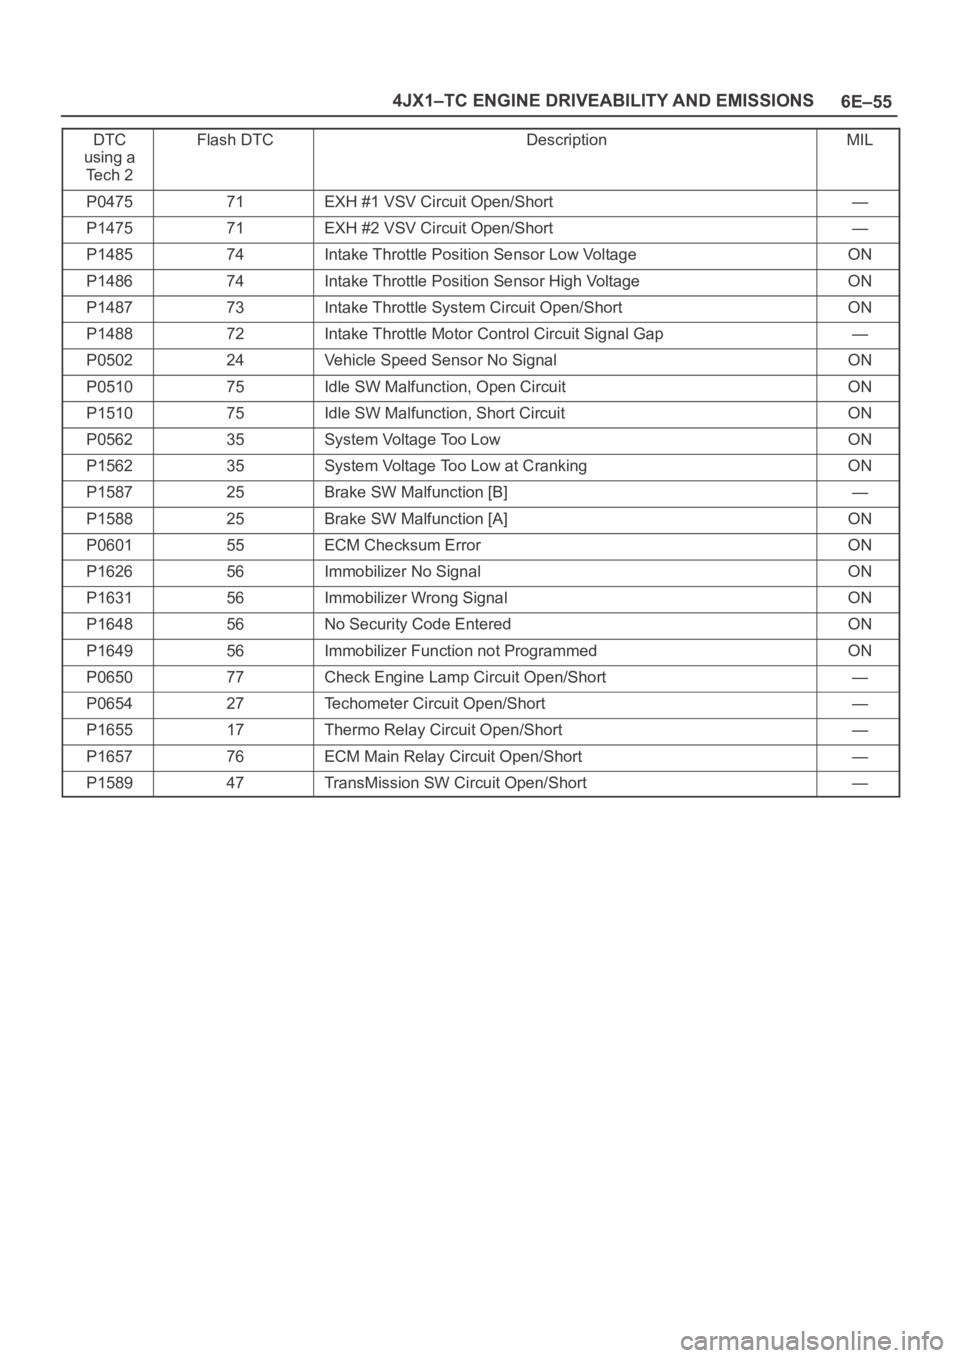
ECM Diagnostic Trouble Codes
The following table lists the diagnostic trouble codes
supported a Tech 2 and to flash.If any DTCs not listedhere are displayed by a Tech 2, the Tech 2 data may be
faulty; notify the Tech 2 manufacturer of any DTCs
displayed that are not included in the following table.
ECM Diagnostic Trouble Codes
DTC
using a
Te c h 2
Flash DTCDescriptionMIL
P010734MAP Sensor Low VoltageON
P010834MAP Sensor High VoltageON
P011223Intake Air temp Sensor Low VoltageON
P011323Intake Air temp Sensor High VoltageON
P011714Engine Coolant Temp Sensor Low VoltageON
P011814Engine Coolant Temp Sensor High VoltageON
P012133Accel Position Sensor RationalityON
P012221Accel Position Sensor Low VoltageON
P012321Accel Position Sensor High VoltageON
P018215Fuel Temp Sensor Low VoltageON
P018315Fuel Temp Sensor High VoltageON
P019263Rail Pressure Sensor Low VoltageON
P019363Rail Pressure Sensor High VoltageON
P119364RPCV Circuit Open/Short—
P119461Rail Pressure System Low VoltageON
P119561Rail Pressure System High VoltageON
P119662Rail Pressure System High WarningON
P019716Oil Temp sensor Low VoltageON
P019816Oil Temp sensor High VoltageON
P020151Injector #1 Circuit FaultON
P020252Injector #2 Circuit FaultON
P020353Injector #3 Circuit FaultON
P020454Injector #4 Circuit FaultON
P021722High Coolant Temp WarningON
P121736High Oil Temp WarningON
P021911Engine Over Speed WarningON
P033643Crank Position Sensor Out of SyncroON
P033743Crank Position Sensor No SignalON
P034141Cam Position Sensor Out of SyncroON
P034241Cam Position Sensor No SignalON
P038066Glow Relay Circuit Open/Short—
P038167Glow Lamp Circuit Open/Short—
P140332EGR EVRV Fault—
P140431EGR VSV Circuit—
P040526EGR Pressure Sensor Low VoltageON
P140537EGR EVRV Circuit Open/Short—
P040626EGR Pressure Sensor High VoltageON
Page 1948 of 6000

6E–55 4JX1–TC ENGINE DRIVEABILITY AND EMISSIONS
DTC
using a
Te c h 2Flash DTCDescriptionMIL
P047571EXH #1 VSV Circuit Open/Short—
P147571EXH #2 VSV Circuit Open/Short—
P148574Intake Throttle Position Sensor Low VoltageON
P148674Intake Throttle Position Sensor High VoltageON
P148773Intake Throttle System Circuit Open/ShortON
P148872Intake Throttle Motor Control Circuit Signal Gap—
P050224Vehicle Speed Sensor No SignalON
P051075Idle SW Malfunction, Open CircuitON
P151075Idle SW Malfunction, Short CircuitON
P056235System Voltage Too LowON
P156235System Voltage Too Low at CrankingON
P158725Brake SW Malfunction [B]—
P158825Brake SW Malfunction [A]ON
P060155ECM Checksum ErrorON
P162656Immobilizer No SignalON
P163156Immobilizer Wrong SignalON
P164856No Security Code EnteredON
P164956Immobilizer Function not ProgrammedON
P065077Check Engine Lamp Circuit Open/Short—
P065427Techometer Circuit Open/Short—
P165517Thermo Relay Circuit Open/Short—
P165776ECM Main Relay Circuit Open/Short—
P158947TransMission SW Circuit Open/Short—
Page 1950 of 6000

6E–57 4JX1–TC ENGINE DRIVEABILITY AND EMISSIONS
DTC P0107 – MAP Sensor Circuit Low Voltage
StepActionVa l u e ( s )Ye sNo
1Was the “On-Board Diagnostic (OBD) System Check”
performed?
—Go to Step 2
Go to OBD
System
Check
2Put the engine into an idling status.
Is the MAP voltage value displayed on the Tech 2 below
the specified value?
0.25 VGo to Step 3
Refer to
Diagnostic
Aids
and
Symptom
Diagnosis
31. Turn off the ignition switch.
2. Remove the sensor connector connection.
3. Jumper between harness pins “red” and “blue”
wires.
4. Turn on the ignition switch “ON”.
Is the MAP voltage reading above the specified value?
4 VGo to Step 5Go to Step 4
41. Turn off the ignition switch.
2. Remove the jumper wire.
3. Connect the relay & solenoid checker
(5-8840-0386-0) to the battery voltage, then check
the MAP signal circuit (blue wire).
4. Turn on the ignition switch.
Is the value displayed on the Tech 2 above the specified
value?
4 VGo to Step 6Go to Step 7
5Check the terminal connection at the MAP sensor and
repair or replace terminal if necessary.
Is the action complete?
—Verify repair—
6Repair the 5V power circuit (red) harness or Replace
the ECM (Refer to the Data Programming in Case of
ECM change).
Is the action complete?
—Verify repair—
7Repair the signal circuit (blue) harness or Replace the
ECM (Refer to the Data Programming in Case of ECM
change).
Is the action complete?
—Verify repair—
Page 1952 of 6000

6E–59 4JX1–TC ENGINE DRIVEABILITY AND EMISSIONS
Sensor Circuit High Voltage
StepActionVa l u e ( s )Ye sNo
1Was the “On-Board Diagnostic (OBD) System Check”
performed?
—Go to Step 2
Go to OBD
System
Check
2Put the engine into an idling status.
Is the MAP voltage value displayed on the Tech 2
above the specified value?
4 VGo to Step 3Go to Step 4
31. Turn off the ignition switch.
2. Remove the sensor connector connection.
3. Turn on the ignition switch “ON”.
Is the MAP voltage value displayed on the Tech 2 below
the specified value?
1 VGo to Step 5Go to Step 6
4Is the MAP voltage value displayed on the Tech 2 below
the specified value?
1 V
Refer to
Chart P0107
Refer to
Diagnostic
Aids
and
Symptom
Diagnosis
5Connect the relay and solenoid checker
(5-8840-0386-0) to the battery voltage, then check the
sensor grounding circuit.
Does the checker lamp come on?
—Go to Step 7Go to Step 8
6A voltage short circuit occurs in the MAP signal circuit
or this circuit is shorted with the 5V power circuit.
Repair the harness or Replace the ECM (Refer to the
Data Programming in Case of ECM change).
Is the action complete?
—Verify repair—
7Replace the MAP sensor hose or the MAP sensor.
Is the action complete?
—Verify repair—
8Repair the harness for open ground circuit.
Is the action complete?
—Verify repair—
Page 1985 of 6000

6E–92
4JX1–TC ENGINE DRIVEABILITY AND EMISSIONS
Diagnostic Trouble Code (DTC) P1196 (Flash DTC 62)
Rail Pressure System High Warning
060RW178
Legend
(1) ECM
(2) Meter Panel
(3) Battery
(4) Oil Temp Sensor
(5) Rail Pressure Sensor
(6) Glow Relay
(7) Oil Rail
(8) Tech–2
(9) A/C Comp Relay
(10) RPCV
(11) Intake Air Temp Sensor
(12) Engine Coolant Temp Sensor
(13) MAP Sensor
(14) EGR Valve
(15) EGR Pressure Sensor(16) High Pressure Oil Pump
(17) Fuel Pump
(18) VSV
(19) EXH Throttle VSV1
(20) EXH Throttle VSV2
(21) EVRV
(22) Engine Harness Connector
(23) QWS Relay
(24) AP Sensor
(25) T.O.D
(26) ECT
(27) OBD
(28) TDC
(29) Injector
(30) Edge Filter
Page 2019 of 6000

6E–126
4JX1–TC ENGINE DRIVEABILITY AND EMISSIONS
Diagnostic Trouble Code (DTC) P0380 (Flash DTC 66)
Glow Relay Circuit Open/Short
060RW132
Circuit Description
Glow relay circuit receives current through Glow 50A fuse
from the battery. Glow relay is circuited to Glow plug.
Action Taken When the DTC Sets
The ECM will store conditions which were present
when the DTC was set as Freeze Frame and in the
Failure Records data.
Conditions for Clearing the MIL/DTC
DTC P0380 can be cleared by using the Tech 2 “Clear
Info” function or by disconnecting the ECM battery
feed.
Diagnostic Aids
An intermittent may be caused by a poor connection,
rubbed-through wire insulation or a wire broken inside the
insulation. Check for:
Poor connection – Inspect the ECM harness and
connectors for improper mating, broken locks,
improperly formed or damaged terminals, and poor
terminal-to-wire connection.
Damaged harness – Inspect the wiring harness for
damage.
Page 2020 of 6000

6E–127 4JX1–TC ENGINE DRIVEABILITY AND EMISSIONS
DTC P0380 – Glow Relay Circuit Open/Short
StepActionVa l u e ( s )Ye sNo
1Was the “On-Board Diagnostic (OBD) System Check”
performed?
—Go to Step 2
Go to OBD
System
Check
2Attempt to start the engine.
Does the engine start?
—Go to Step 3Go to Chart 3
31. Review and record Failure Records information.
2. Clear DTC P0380.
3. Start the engine and idle for 1 minute.
4. Observe DTCs.
Is DTC P0380 set?
—Go to Step 4
Refer to
Diagnostic
Aid
4Check the glow fuse 50A.
Is the glow fuse 50A damage?
—Go to Step 5Go to Step 6
5Replace the glow fuse 50A.
Is the action complete?
—Verify repairGo to Step 6
61. Ignition “OFF.”
2. Check for an open or a short to ground in the Glow
relay circuit between the Glow relay connector and
the ECM harness connector.
3. If a problem is found, repair as necessary.
Was a problem found?
—Verify repairGo to Step 7
7Check the connections at the Glow relay and replace
the terminals if necessary.
Did any terminals require replacement?
—Verify repairGo to Step 8
8Replace the Glow relay.
Is the action complete?
—Verify repairGo to Step 9
9Check the connections at the ECM and replace the
terminals if necessary.
Did any terminals require replacement?
—Verify repair Go to Step 10
10Replace the ECM (Refer to the Data Programming in
Case of ECM change).
Is the action complete?
—Verify repair—