OPEL FRONTERA 1998 Workshop Manual
Manufacturer: OPEL, Model Year: 1998, Model line: FRONTERA, Model: OPEL FRONTERA 1998Pages: 6000, PDF Size: 97 MB
Page 261 of 6000

871RX013
Page 262 of 6000
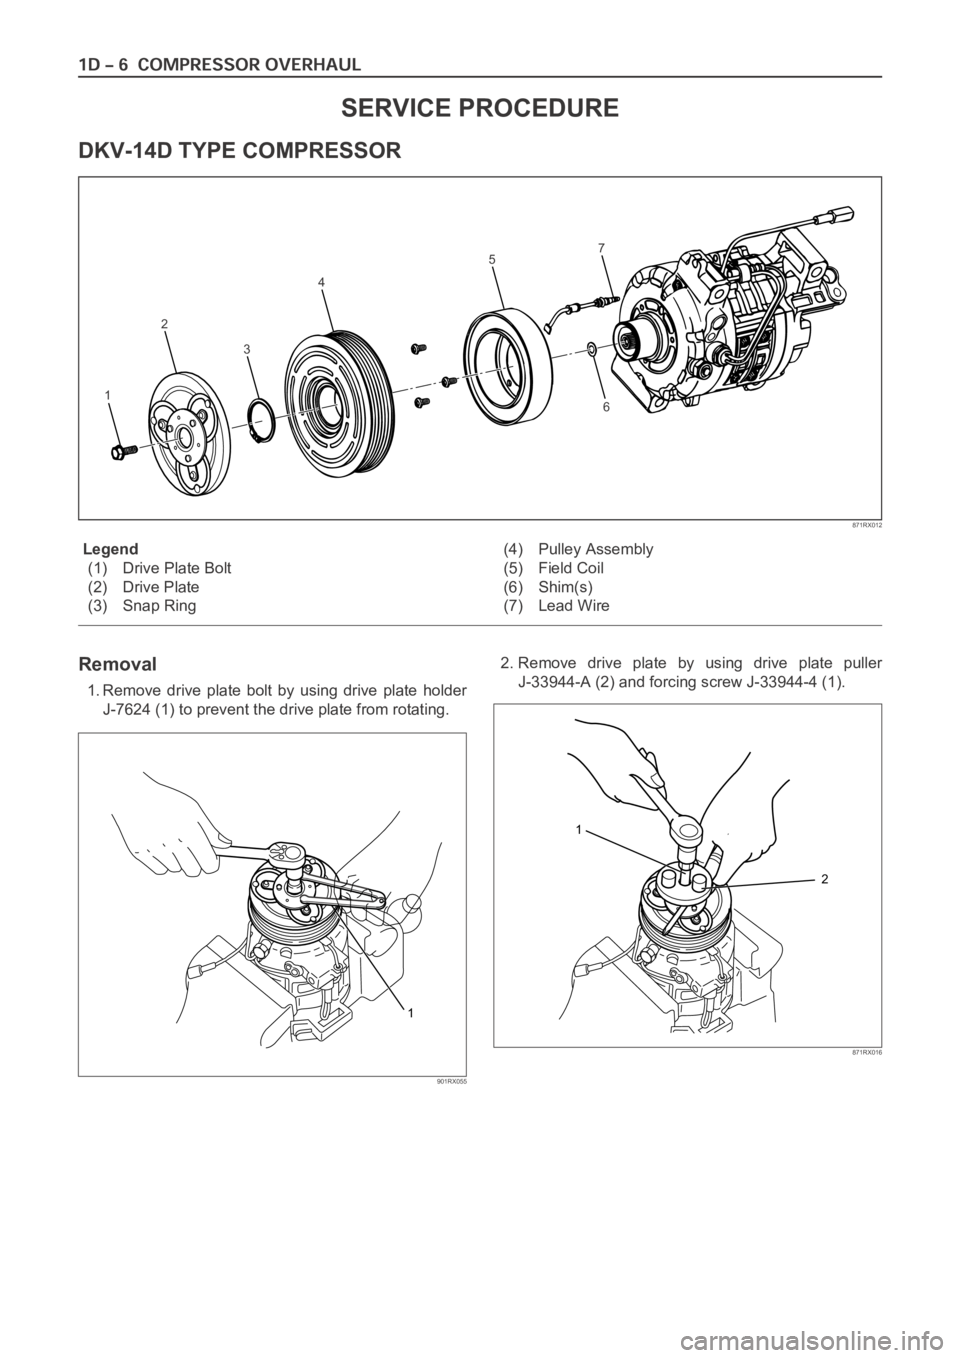
Legend
(1) Drive Plate Bolt
(2) Drive Plate
(3) Snap Ring(4) Pulley Assembly
(5) Field Coil
(6) Shim(s)
(7) Lead Wire
Removal
1. Remove drive plate bolt by using drive plate holder
J-7624 (1) to prevent the drive plate from rotating.2. Remove drive plate by using drive plate puller
J-33944-A (2) and forcing screw J-33944-4 (1).
SERVICE PROCEDURE
DKV-14D TYPE COMPRESSOR
1
2
3
4
5
67
871RX012
1
901RX055
1
2
871RX016
Page 263 of 6000
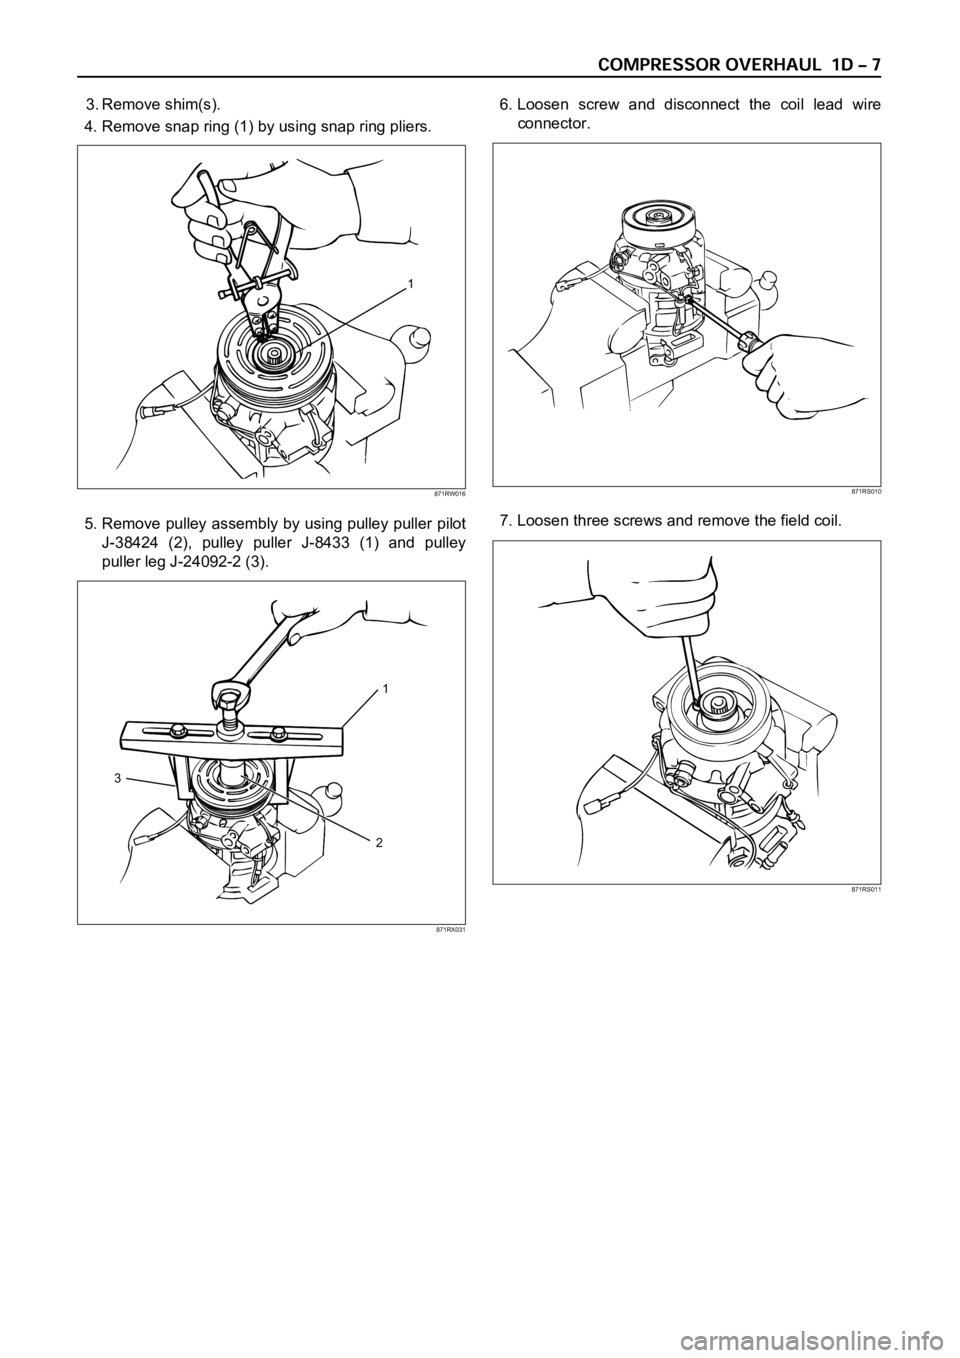
3. Remove shim(s).
4. Remove snap ring (1) by using snap ring pliers.
5. Remove pulley assembly by using pulley puller pilot
J-38424 (2), pulley puller J-8433 (1) and pulley
puller leg J-24092-2 (3).6. Loosen screw and disconnect the coil lead wire
connector.
7. Loosen three screws and remove the field coil.
1
871RW016871RS010
3
1
2
871RX031
871RS011
Page 264 of 6000
Inspection and Repair
Drive Plate
If the frictional surface shows signs of damage due to
excessive heat, the drive plate and pulley should be
replaced.
Pulley Assembly
Check the appearance of the pulley assembly. If the
frictional surface of the pulley shows signs of excessive
grooving due to slippage, both the pulley and drive
plate should be replaced. The frictional surfaces of the
pulley assembly should be cleaned with a suitable
solvent before reinstallation.
Coil
Check coil for loose connector or cracked insulation.
Installation
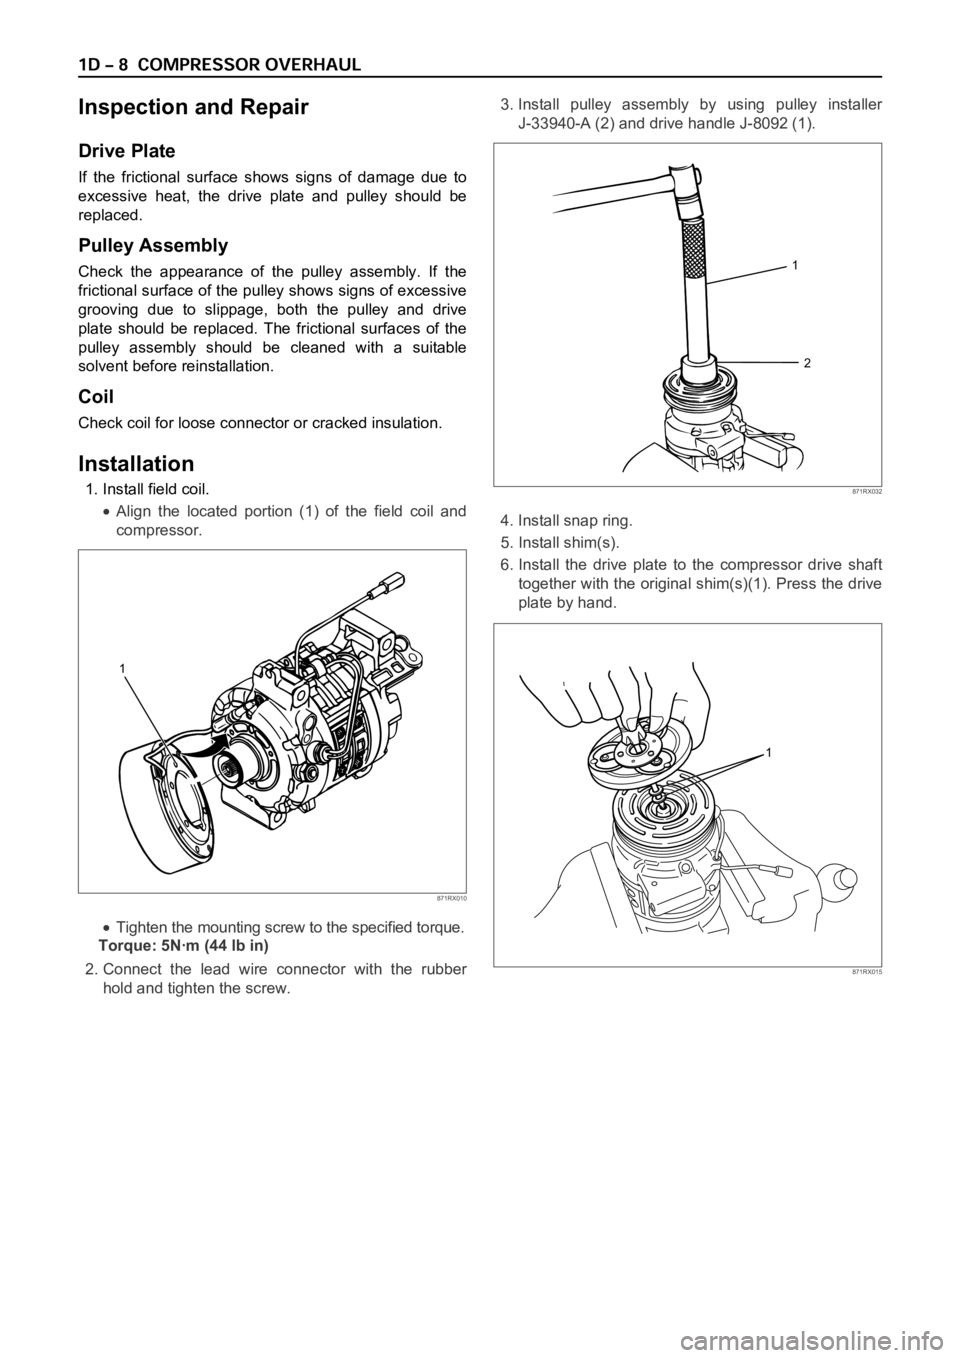
1. Install field coil.
Align the located portion (1) of the field coil and
compressor.
Tighten the mounting screw to the specified torque.
Torque: 5Nꞏm (44 lb in)
2. Connect the lead wire connector with the rubber
hold and tighten the screw.3. Install pulley assembly by using pulley installer
J-33940-A (2) and drive handle J-8092 (1).
4. Install snap ring.
5. Install shim(s).
6. Install the drive plate to the compressor drive shaft
together with the original shim(s)(1). Press the drive
plate by hand.
1
2
871RX032
1
871RX010
1
871RX015
Page 265 of 6000
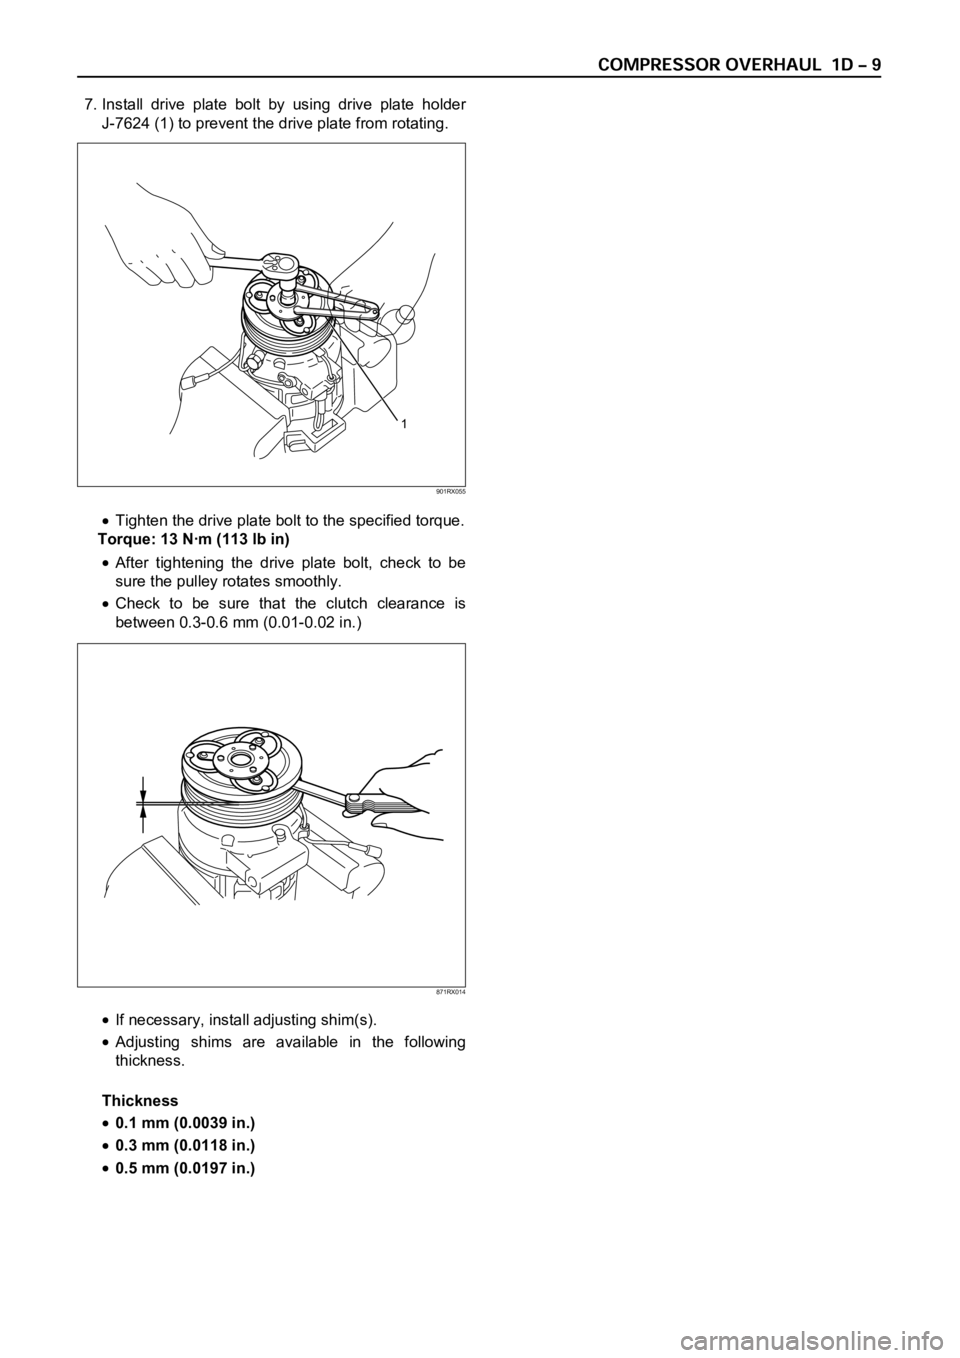
7. Install drive plate bolt by using drive plate holder
J-7624 (1) to prevent the drive plate from rotating.
Tighten the drive plate bolt to the specified torque.
Torque: 13 Nꞏm (113 lb in)
After tightening the drive plate bolt, check to be
sure the pulley rotates smoothly.
Check to be sure that the clutch clearance is
between 0.3-0.6 mm (0.01-0.02 in.)
If necessary, install adjusting shim(s).
Adjusting shims are available in the following
thickness.
Thickness
0.1 mm (0.0039 in.)
0.3 mm (0.0118 in.)
0.5 mm (0.0197 in.)
1
901RX055
871RX014
Page 266 of 6000
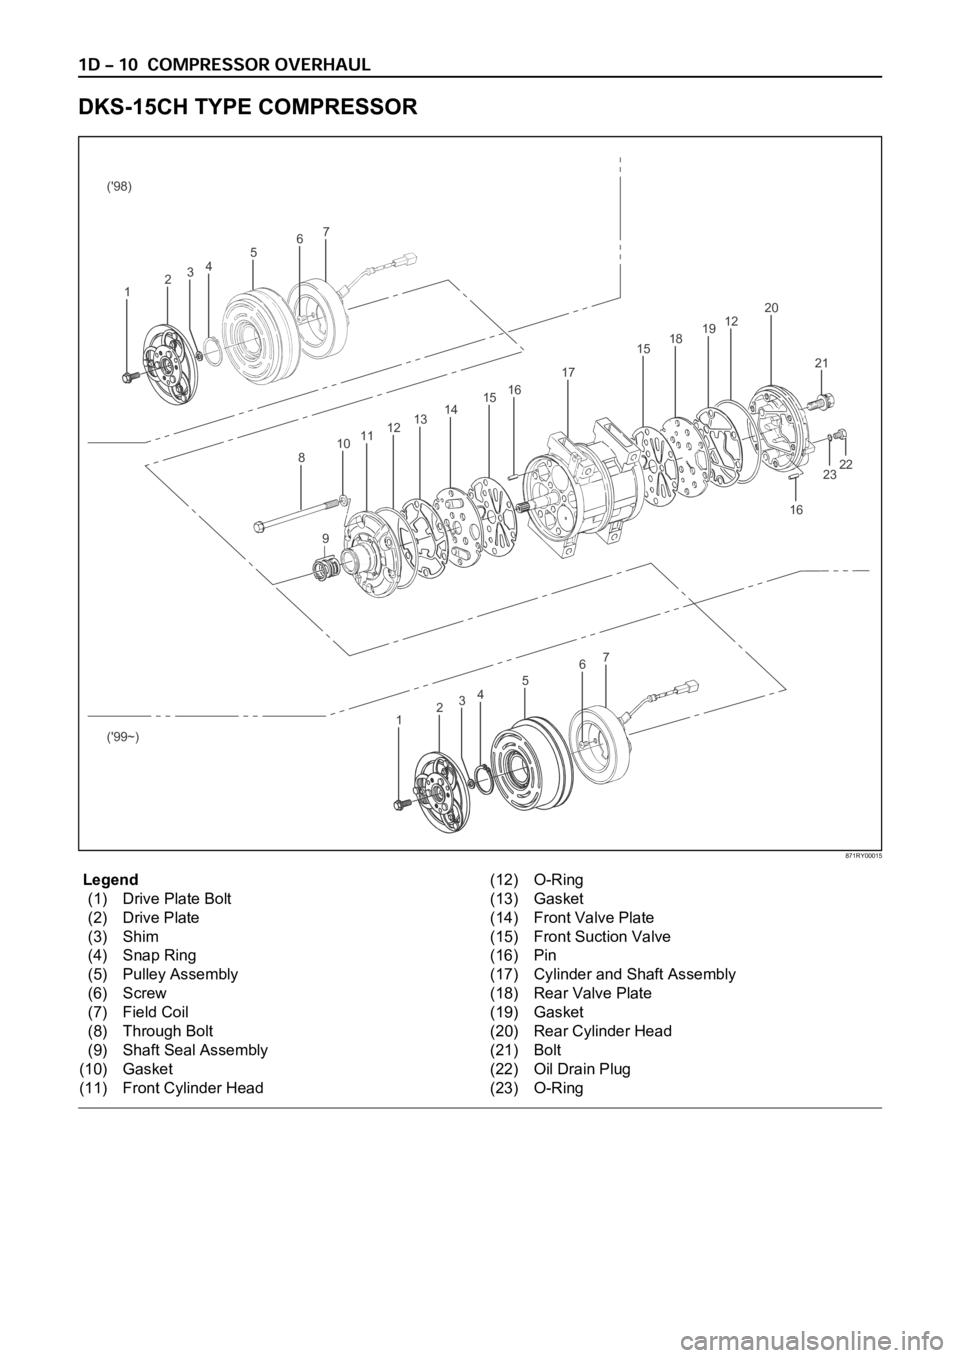
Legend
(1) Drive Plate Bolt
(2) Drive Plate
(3) Shim
(4) Snap Ring
(5) Pulley Assembly
(6) Screw
(7) Field Coil
(8) Through Bolt
(9) Shaft Seal Assembly
(10) Gasket
(11) Front Cylinder Head(12) O-Ring
(13) Gasket
(14) Front Valve Plate
(15) Front Suction Valve
(16) Pin
(17) Cylinder and Shaft Assembly
(18) Rear Valve Plate
(19) Gasket
(20) Rear Cylinder Head
(21) Bolt
(22) Oil Drain Plug
(23) O-Ring
DKS-15CH TYPE COMPRESSOR
16
23 2122 6
7
45
321 ('98)
('99~)
67
45
321
8
910111213141516
17
1518191220
871RY00015
Page 267 of 6000

Removal
1. Remove drive plate bolt by using drive plate holder
J-7624 (1) to prevent the drive plate from rotating.
2. Remove drive plate by using drive plate puller
J-33944-A (2) and forcing screw J-33944-4 (1).3. Remove shim(s).
4. Remove snap ring (1) by using snap ring pliers.
5. Remove pulley assembly by using pulley puller pilot
J-38424 (2), pulley puller J-8433 (1) and pulley
puller leg J-24092-2 (3).
1
901RX056
1
2
871RY00003
1
871RY00004
1
2 3
871RY00005
Page 268 of 6000
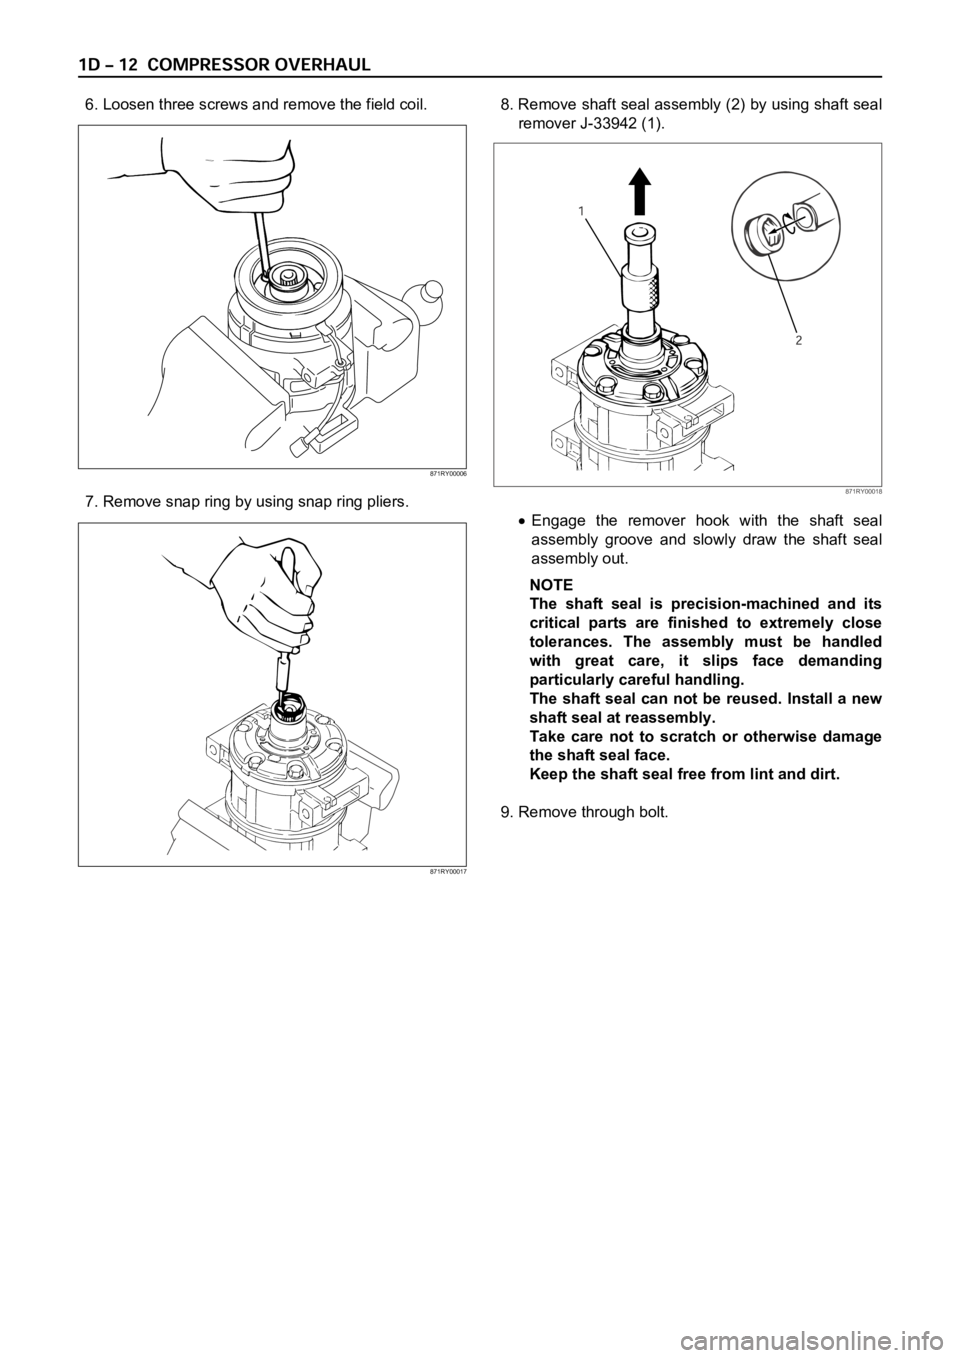
6. Loosen three screws and remove the field coil.
7. Remove snap ring by using snap ring pliers.8. Remove shaft seal assembly (2) by using shaft seal
remover J-33942 (1).
Engage the remover hook with the shaft seal
assembly groove and slowly draw the shaft seal
assembly out.
NOTE
The shaft seal is precision-machined and its
critical parts are finished to extremely close
tolerances. The assembly must be handled
with great care, it slips face demanding
particularly careful handling.
The shaft seal can not be reused. Install a new
shaft seal at reassembly.
Take care not to scratch or otherwise damage
the shaft seal face.
Keep the shaft seal free from lint and dirt.
9. Remove through bolt.
871RY00006
871RY00017
871RY00018
Page 269 of 6000

10. Remove front cylinder head.
11. Remove o-ring.
Alternately tap the projections on the
circumference of th front cylinder head with a
screwdriver and a plastic hammer to remove the
front cylinder head.
12. Remove gasket.
13. Remove front valve plate.
14. Remove front suction valve.
NOTE
Check the front valve plate for scratching and
bending.
Check the front valve plate and the front
cylinder head for nicks and burrs on the
sealing surface.
Buff or replace the valve plate and cylinder
head if nicks and burrs are present.
Check that the front valve plate passage is free
from obstructions.
Check the front valve plate and the cylinder
head for cracks.
Replace the valve plate and cylinder head if
cracks are present.15. Remove rear cylinder head.
16. Remove o-ring.Alternately tap the projections on the
circumference of the rear cylinder head with a
screwdriver and a plastic hammer to remove the
rear cylinder head.
17. Remove gasket.
18. Remove rear valve plate.
19. Remove rear suction valve.
20. Remove cylinder and shaft assembly.
NOTE
Check the rear valve plate for scratching and
bending.
Check the rear valve plate and the rear
cylinder head for nicks and burrs on the
sealing surface.
Buff or replace the valve plate and cylinder
head if nicks and burrs are present.
Check that the rear valve plate passage is free
from obstructions.
Check the rear valve plate and the cylinder
head for cracks.
Replace the valve plate and cylinder head if
cracks are present.
871RY00019871RY00020
Page 270 of 6000
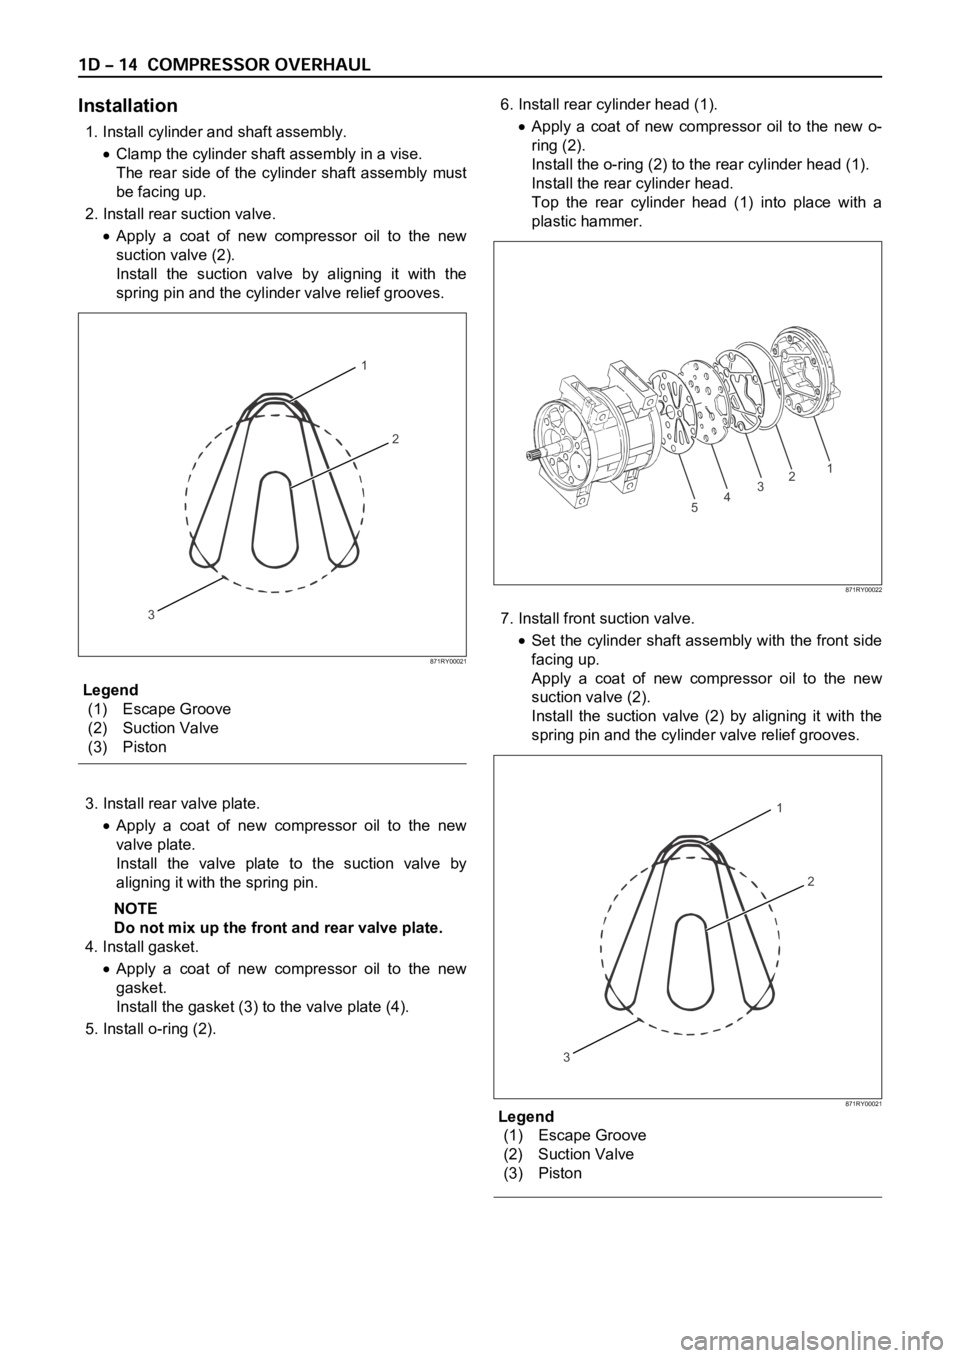
Installation
1. Install cylinder and shaft assembly.
Clamp the cylinder shaft assembly in a vise.
The rear side of the cylinder shaft assembly must
be facing up.
2. Install rear suction valve.
Apply a coat of new compressor oil to the new
suction valve (2).
Install the suction valve by aligning it with the
spring pin and the cylinder valve relief grooves.
Legend
(1) Escape Groove
(2) Suction Valve
(3) Piston
3. Install rear valve plate.
Apply a coat of new compressor oil to the new
valve plate.
Install the valve plate to the suction valve by
aligning it with the spring pin.
NOTE
Do not mix up the front and rear valve plate.
4. Install gasket.
Apply a coat of new compressor oil to the new
gasket.
Install the gasket (3) to the valve plate (4).
5. Install o-ring (2).6. Install rear cylinder head (1).
Apply a coat of new compressor oil to the new o-
ring (2).
Install the o-ring (2) to the rear cylinder head (1).
Install the rear cylinder head.
Top the rear cylinder head (1) into place with a
plastic hammer.
7. Install front suction valve.
Set the cylinder shaft assembly with the front side
facing up.
Apply a coat of new compressor oil to the new
suction valve (2).
Install the suction valve (2) by aligning it with the
spring pin and the cylinder valve relief grooves.
Legend
(1) Escape Groove
(2) Suction Valve
(3) Piston
1
2
3
871RY00021
54321
871RY00022
1
2
3
871RY00021