change time OPEL FRONTERA 1998 Owner's Manual
[x] Cancel search | Manufacturer: OPEL, Model Year: 1998, Model line: FRONTERA, Model: OPEL FRONTERA 1998Pages: 6000, PDF Size: 97 MB
Page 1244 of 6000
6E–127 ENGINE DRIVEABILITY AND EMISSIONS
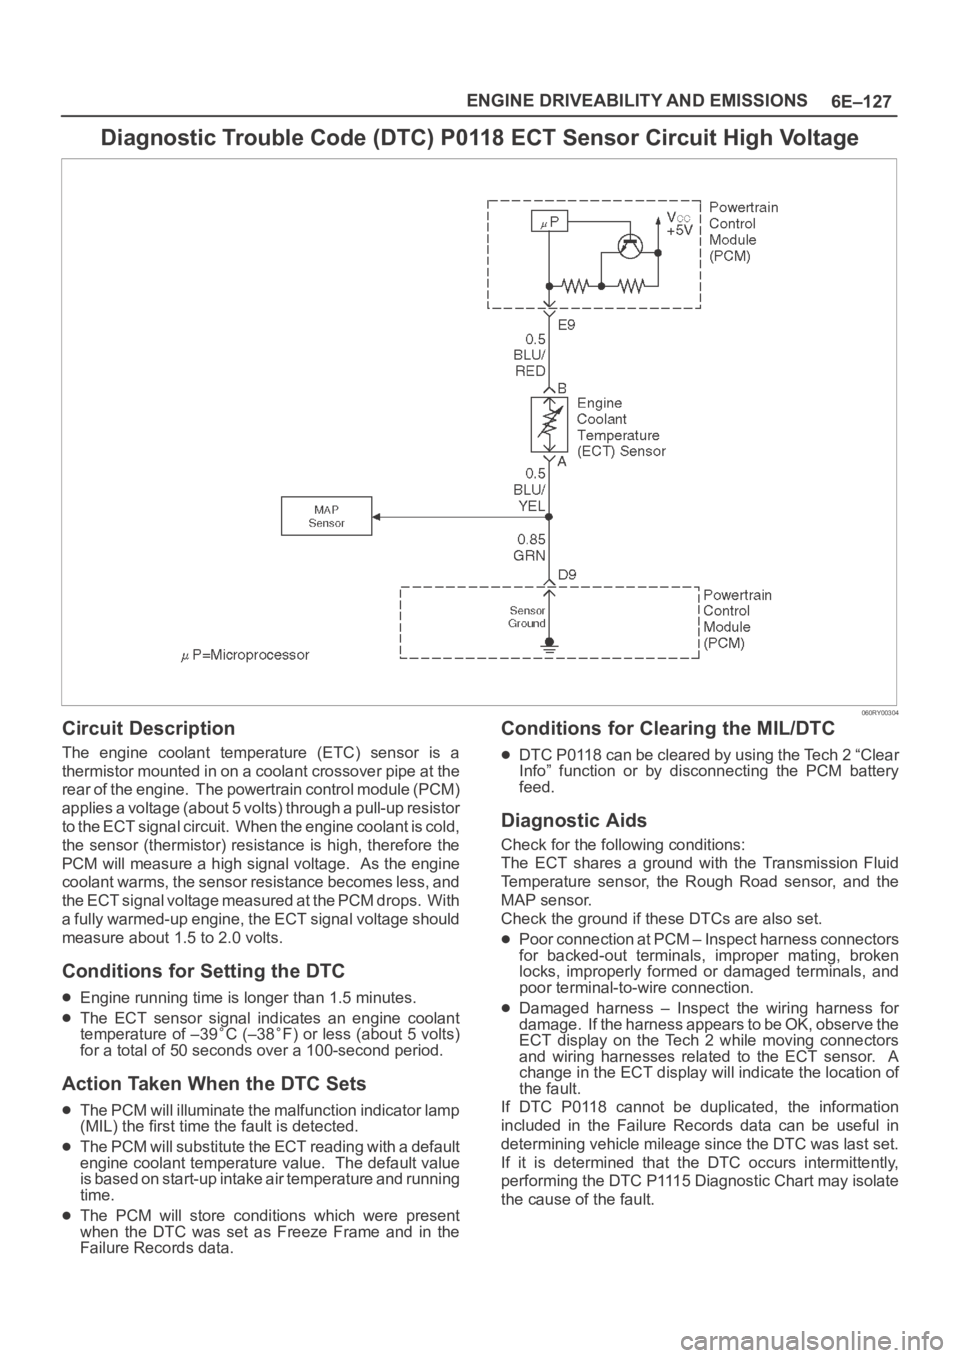
Diagnostic Trouble Code (DTC) P0118 ECT Sensor Circuit High Voltage
060RY00304
Circuit Description
The engine coolant temperature (ETC) sensor is a
thermistor mounted in on a coolant crossover pipe at the
rear of the engine. The powertrain control module (PCM)
applies a voltage (about 5 volts) through a pull-up resistor
to the ECT signal circuit. When the engine coolant is cold,
the sensor (thermistor) resistance is high, therefore the
PCM will measure a high signal voltage. As the engine
coolant warms, the sensor resistance becomes less, and
the ECT signal voltage measured at the PCM drops. With
a fully warmed-up engine, the ECT signal voltage should
measure about 1.5 to 2.0 volts.
Conditions for Setting the DTC
Engine running time is longer than 1.5 minutes.
The ECT sensor signal indicates an engine coolant
temperature of –39C (–38F) or less (about 5 volts)
for a total of 50 seconds over a 100-second period.
Action Taken When the DTC Sets
The PCM will illuminate the malfunction indicator lamp
(MIL) the first time the fault is detected.
The PCM will substitute the ECT reading with a default
engine coolant temperature value. The default value
is based on start-up intake air temperature and running
time.
The PCM will store conditions which were present
when the DTC was set as Freeze Frame and in the
Failure Records data.
Conditions for Clearing the MIL/DTC
DTC P0118 can be cleared by using the Tech 2 “Clear
Info” function or by disconnecting the PCM battery
feed.
Diagnostic Aids
Check for the following conditions:
The ECT shares a ground with the Transmission Fluid
Temperature sensor, the Rough Road sensor, and the
MAP sensor.
Check the ground if these DTCs are also set.
Poor connection at PCM – Inspect harness connectors
for backed-out terminals, improper mating, broken
locks, improperly formed or damaged terminals, and
poor terminal-to-wire connection.
Damaged harness – Inspect the wiring harness for
damage. If the harness appears to be OK, observe the
ECT display on the Tech 2 while moving connectors
and wiring harnesses related to the ECT sensor. A
change in the ECT display will indicate the location of
the fault.
If DTC P0118 cannot be duplicated, the information
included in the Failure Records data can be useful in
determining vehicle mileage since the DTC was last set.
If it is determined that the DTC occurs intermittently,
performing the DTC P1115 Diagnostic Chart may isolate
the cause of the fault.
Page 1247 of 6000
6E–130
ENGINE DRIVEABILITY AND EMISSIONS
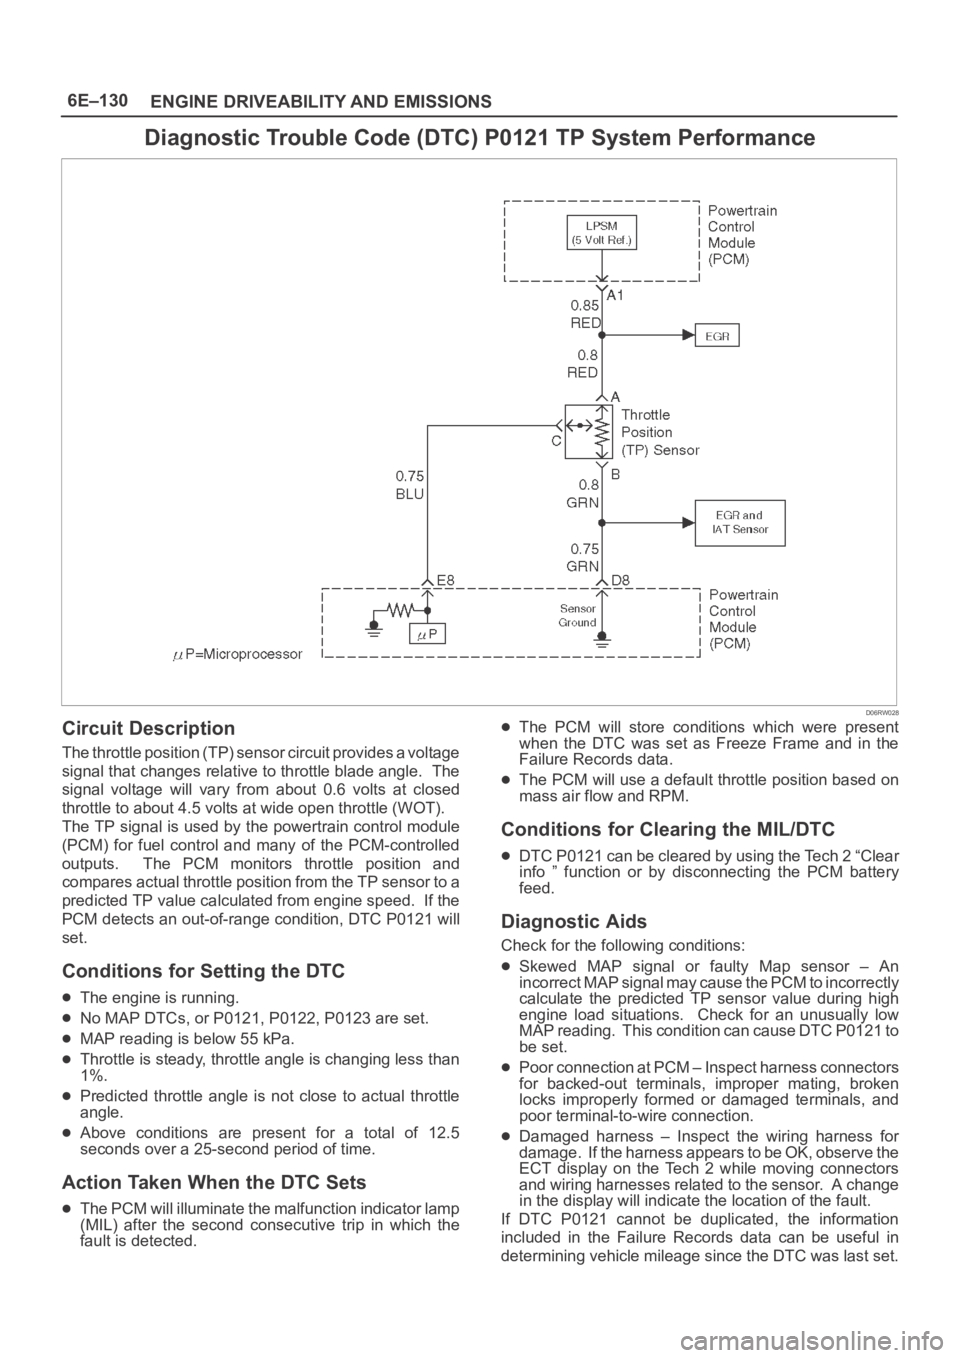
Diagnostic Trouble Code (DTC) P0121 TP System Performance
D06RW028
Circuit Description
The throttle position (TP) sensor circuit provides a voltage
signal that changes relative to throttle blade angle. The
signal voltage will vary from about 0.6 volts at closed
throttle to about 4.5 volts at wide open throttle (WOT).
The TP signal is used by the powertrain control module
(PCM) for fuel control and many of the PCM-controlled
outputs. The PCM monitors throttle position and
compares actual throttle position from the TP sensor to a
predicted TP value calculated from engine speed. If the
PCM detects an out-of-range condition, DTC P0121 will
set.
Conditions for Setting the DTC
The engine is running.
No MAP DTCs, or P0121, P0122, P0123 are set.
MAP reading is below 55 kPa.
Throttle is steady, throttle angle is changing less than
1%.
Predicted throttle angle is not close to actual throttle
angle.
Above conditions are present for a total of 12.5
seconds over a 25-second period of time.
Action Taken When the DTC Sets
The PCM will illuminate the malfunction indicator lamp
(MIL) after the second consecutive trip in which the
fault is detected.
The PCM will store conditions which were present
when the DTC was set as Freeze Frame and in the
Failure Records data.
The PCM will use a default throttle position based on
mass air flow and RPM.
Conditions for Clearing the MIL/DTC
DTC P0121 can be cleared by using the Tech 2 “Clear
info ” function or by disconnecting the PCM battery
feed.
Diagnostic Aids
Check for the following conditions:
Skewed MAP signal or faulty Map sensor – An
incorrect MAP signal may cause the PCM to incorrectly
calculate the predicted TP sensor value during high
engine load situations. Check for an unusually low
MAP reading. This condition can cause DTC P0121 to
be set.
Poor connection at PCM – Inspect harness connectors
for backed-out terminals, improper mating, broken
locks improperly formed or damaged terminals, and
poor terminal-to-wire connection.
Damaged harness – Inspect the wiring harness for
damage. If the harness appears to be OK, observe the
ECT display on the Tech 2 while moving connectors
and wiring harnesses related to the sensor. A change
in the display will indicate the location of the fault.
If DTC P0121 cannot be duplicated, the information
included in the Failure Records data can be useful in
determining vehicle mileage since the DTC was last set.
Page 1250 of 6000
6E–133 ENGINE DRIVEABILITY AND EMISSIONS
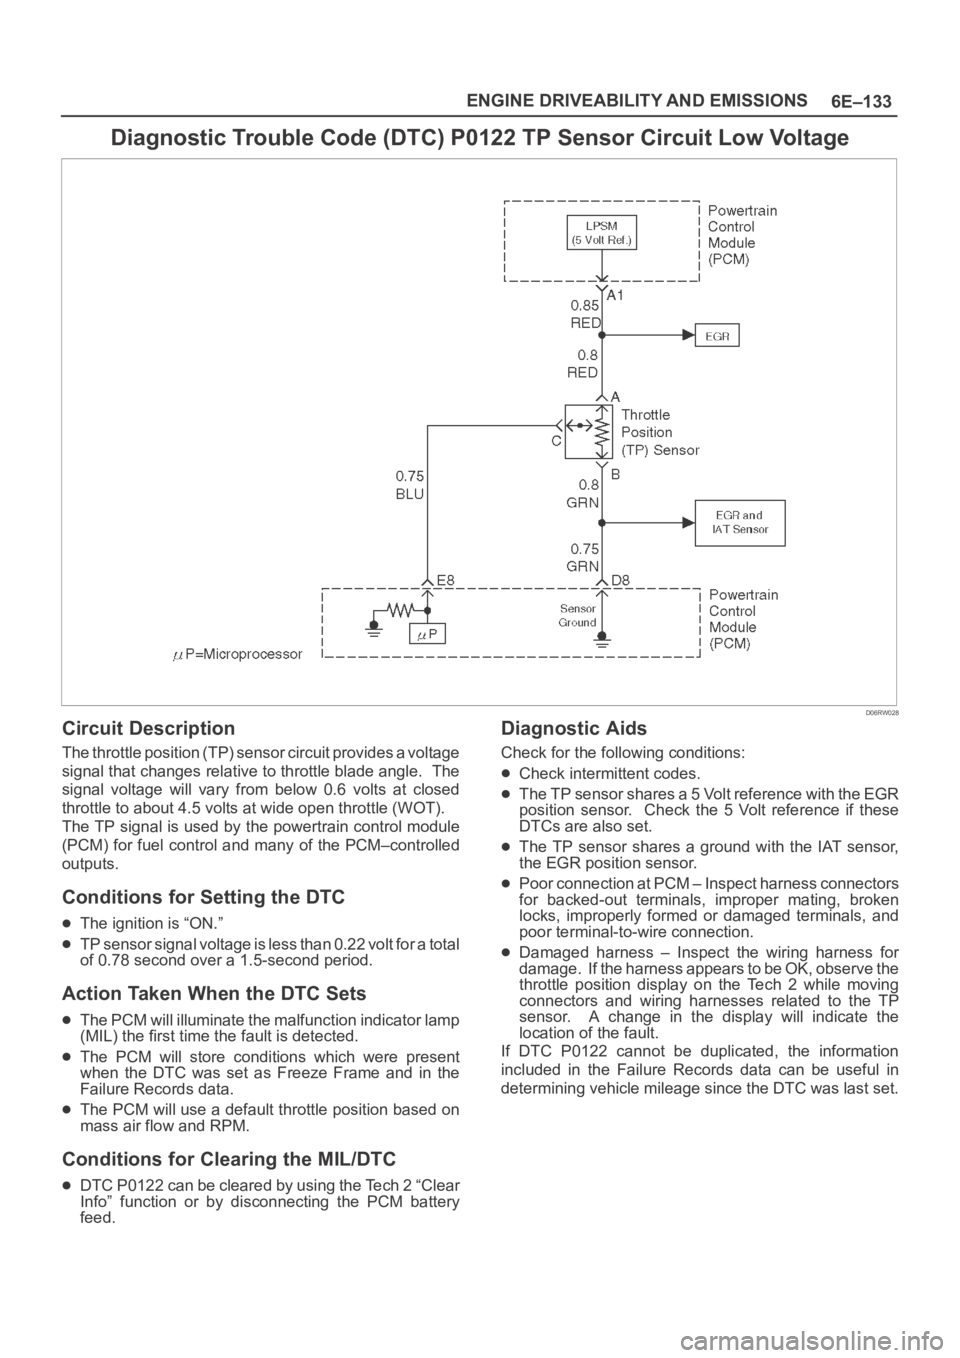
Diagnostic Trouble Code (DTC) P0122 TP Sensor Circuit Low Voltage
D06RW028
Circuit Description
The throttle position (TP) sensor circuit provides a voltage
signal that changes relative to throttle blade angle. The
signal voltage will vary from below 0.6 volts at closed
throttle to about 4.5 volts at wide open throttle (WOT).
The TP signal is used by the powertrain control module
(PCM) for fuel control and many of the PCM–controlled
outputs.
Conditions for Setting the DTC
The ignition is “ON.”
TP sensor signal voltage is less than 0.22 volt for a total
of 0.78 second over a 1.5-second period.
Action Taken When the DTC Sets
The PCM will illuminate the malfunction indicator lamp
(MIL) the first time the fault is detected.
The PCM will store conditions which were present
when the DTC was set as Freeze Frame and in the
Failure Records data.
The PCM will use a default throttle position based on
mass air flow and RPM.
Conditions for Clearing the MIL/DTC
DTC P0122 can be cleared by using the Tech 2 “Clear
Info” function or by disconnecting the PCM battery
feed.
Diagnostic Aids
Check for the following conditions:
Check intermittent codes.
The TP sensor shares a 5 Volt reference with the EGR
position sensor. Check the 5 Volt reference if these
DTCs are also set.
The TP sensor shares a ground with the IAT sensor,
the EGR position sensor.
Poor connection at PCM – Inspect harness connectors
for backed-out terminals, improper mating, broken
locks, improperly formed or damaged terminals, and
poor terminal-to-wire connection.
Damaged harness – Inspect the wiring harness for
damage. If the harness appears to be OK, observe the
throttle position display on the Tech 2 while moving
connectors and wiring harnesses related to the TP
sensor. A change in the display will indicate the
location of the fault.
If DTC P0122 cannot be duplicated, the information
included in the Failure Records data can be useful in
determining vehicle mileage since the DTC was last set.
Page 1253 of 6000
6E–136
ENGINE DRIVEABILITY AND EMISSIONS
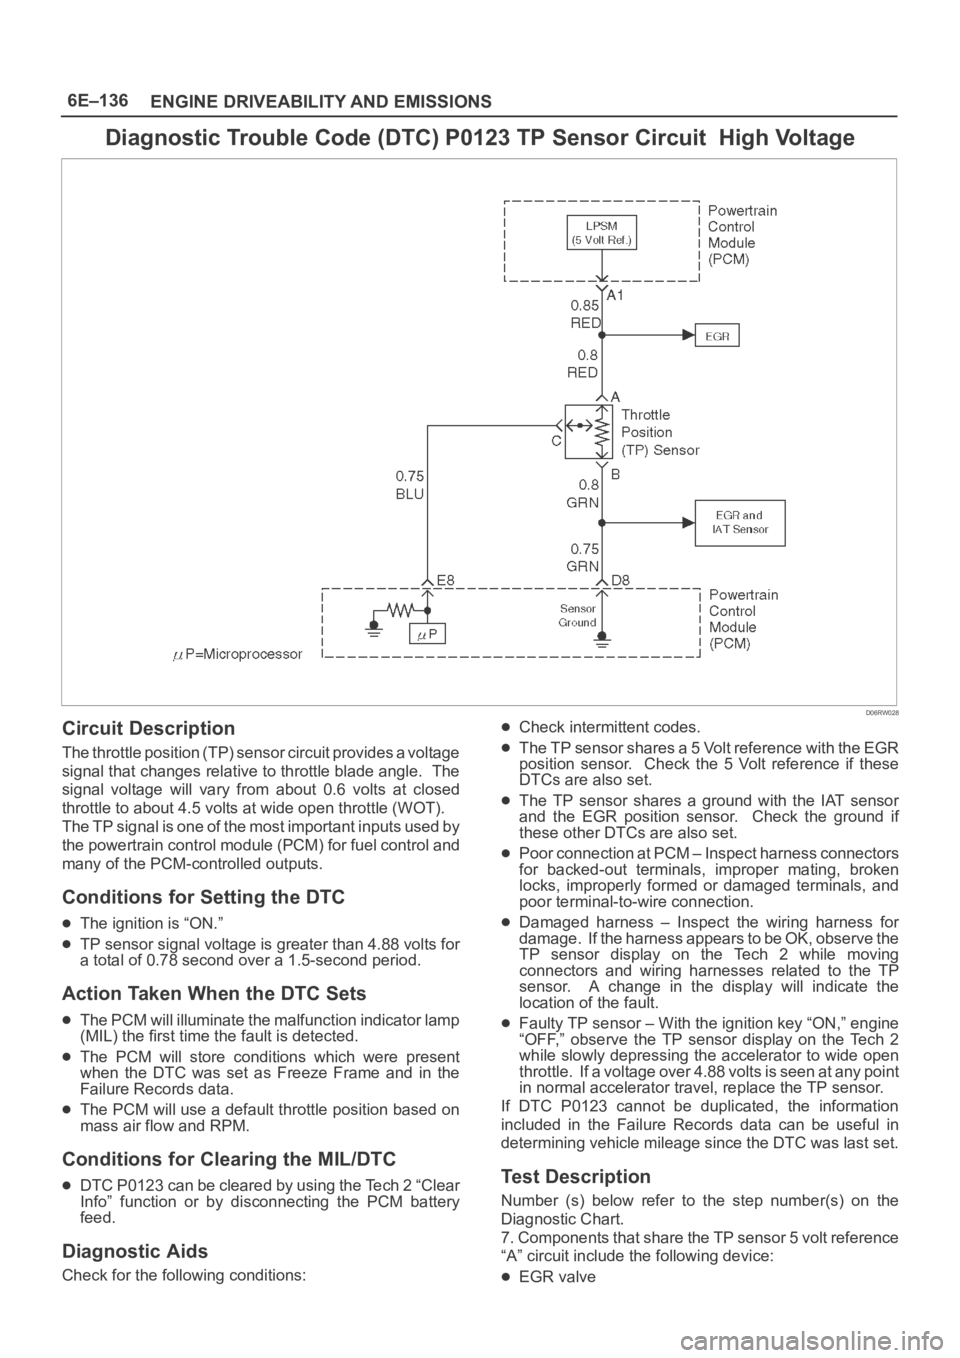
Diagnostic Trouble Code (DTC) P0123 TP Sensor Circuit High Voltage
D06RW028
Circuit Description
The throttle position (TP) sensor circuit provides a voltage
signal that changes relative to throttle blade angle. The
signal voltage will vary from about 0.6 volts at closed
throttle to about 4.5 volts at wide open throttle (WOT).
The TP signal is one of the most important inputs used by
the powertrain control module (PCM) for fuel control and
many of the PCM-controlled outputs.
Conditions for Setting the DTC
The ignition is “ON.”
TP sensor signal voltage is greater than 4.88 volts for
a total of 0.78 second over a 1.5-second period.
Action Taken When the DTC Sets
The PCM will illuminate the malfunction indicator lamp
(MIL) the first time the fault is detected.
The PCM will store conditions which were present
when the DTC was set as Freeze Frame and in the
Failure Records data.
The PCM will use a default throttle position based on
mass air flow and RPM.
Conditions for Clearing the MIL/DTC
DTC P0123 can be cleared by using the Tech 2 “Clear
Info” function or by disconnecting the PCM battery
feed.
Diagnostic Aids
Check for the following conditions:
Check intermittent codes.
The TP sensor shares a 5 Volt reference with the EGR
position sensor. Check the 5 Volt reference if these
DTCs are also set.
The TP sensor shares a ground with the IAT sensor
and the EGR position sensor. Check the ground if
these other DTCs are also set.
Poor connection at PCM – Inspect harness connectors
for backed-out terminals, improper mating, broken
locks, improperly formed or damaged terminals, and
poor terminal-to-wire connection.
Damaged harness – Inspect the wiring harness for
damage. If the harness appears to be OK, observe the
TP sensor display on the Tech 2 while moving
connectors and wiring harnesses related to the TP
sensor. A change in the display will indicate the
location of the fault.
Faulty TP sensor – With the ignition key “ON,” engine
“OFF,” observe the TP sensor display on the Tech 2
while slowly depressing the accelerator to wide open
throttle. If a voltage over 4.88 volts is seen at any point
in normal accelerator travel, replace the TP sensor.
If DTC P0123 cannot be duplicated, the information
included in the Failure Records data can be useful in
determining vehicle mileage since the DTC was last set.
Test Description
Number (s) below refer to the step number(s) on the
Diagnostic Chart.
7. Components that share the TP sensor 5 volt reference
“A” circuit include the following device:
EGR valve
Page 1254 of 6000
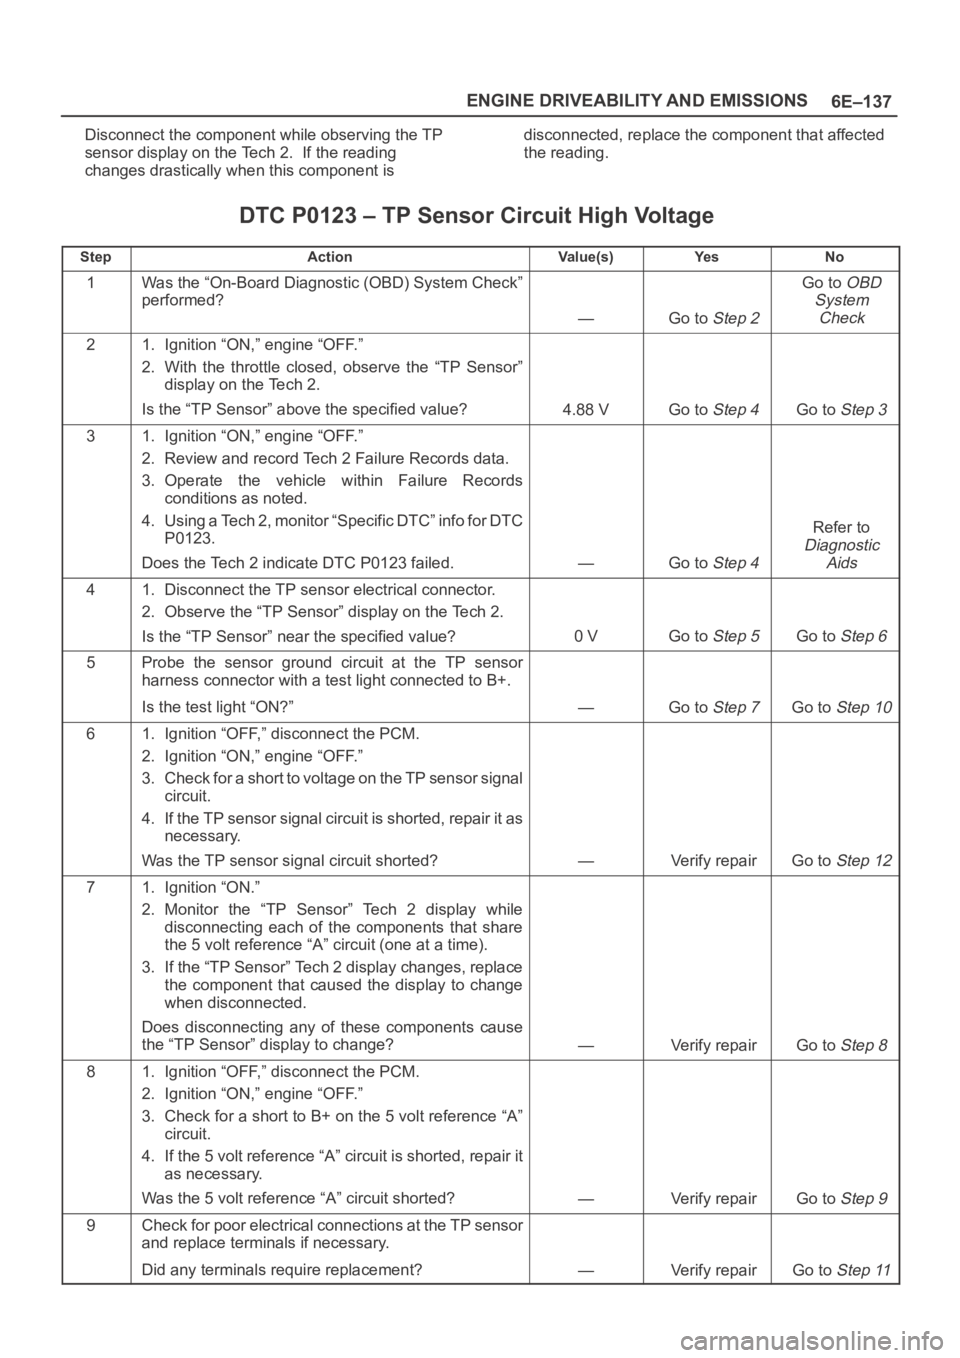
6E–137 ENGINE DRIVEABILITY AND EMISSIONS
Disconnect the component while observing the TP
sensor display on the Tech 2. If the reading
changes drastically when this component isdisconnected, replace the component that affected
the reading.
DTC P0123 – TP Sensor Circuit High Voltage
StepActionVa l u e ( s )Ye sNo
1Was the “On-Board Diagnostic (OBD) System Check”
performed?
—Go to Step 2
Go to OBD
System
Check
21. Ignition “ON,” engine “OFF.”
2. With the throttle closed, observe the “TP Sensor”
display on the Tech 2.
Is the “TP Sensor” above the specified value?
4.88 VGo to Step 4Go to Step 3
31. Ignition “ON,” engine “OFF.”
2. Review and record Tech 2 Failure Records data.
3. Operate the vehicle within Failure Records
conditions as noted.
4. Using a Tech 2, monitor “Specific DTC” info for DTC
P0123.
Does the Tech 2 indicate DTC P0123 failed.
—Go to Step 4
Refer to
Diagnostic
Aids
41. Disconnect the TP sensor electrical connector.
2. Observe the “TP Sensor” display on the Tech 2.
Is the “TP Sensor” near the specified value?
0 VGo to Step 5Go to Step 6
5Probe the sensor ground circuit at the TP sensor
harness connector with a test light connected to B+.
Is the test light “ON?”
—Go to Step 7Go to Step 10
61. Ignition “OFF,” disconnect the PCM.
2. Ignition “ON,” engine “OFF.”
3. Check for a short to voltage on the TP sensor signal
circuit.
4. If the TP sensor signal circuit is shorted, repair it as
necessary.
Was the TP sensor signal circuit shorted?
—Verify repairGo to Step 12
71. Ignition “ON.”
2. Monitor the “TP Sensor” Tech 2 display while
disconnecting each of the components that share
the 5 volt reference “A” circuit (one at a time).
3. If the “TP Sensor” Tech 2 display changes, replace
the component that caused the display to change
when disconnected.
Does disconnecting any of these components cause
the “TP Sensor” display to change?
—Verify repairGo to Step 8
81. Ignition “OFF,” disconnect the PCM.
2. Ignition “ON,” engine “OFF.”
3. Check for a short to B+ on the 5 volt reference “A”
circuit.
4. If the 5 volt reference “A” circuit is shorted, repair it
as necessary.
Was the 5 volt reference “A” circuit shorted?
—Verify repairGo to Step 9
9Check for poor electrical connections at the TP sensor
and replace terminals if necessary.
Did any terminals require replacement?
—Verify repairGo to Step 11
Page 1343 of 6000
6E–226
ENGINE DRIVEABILITY AND EMISSIONS
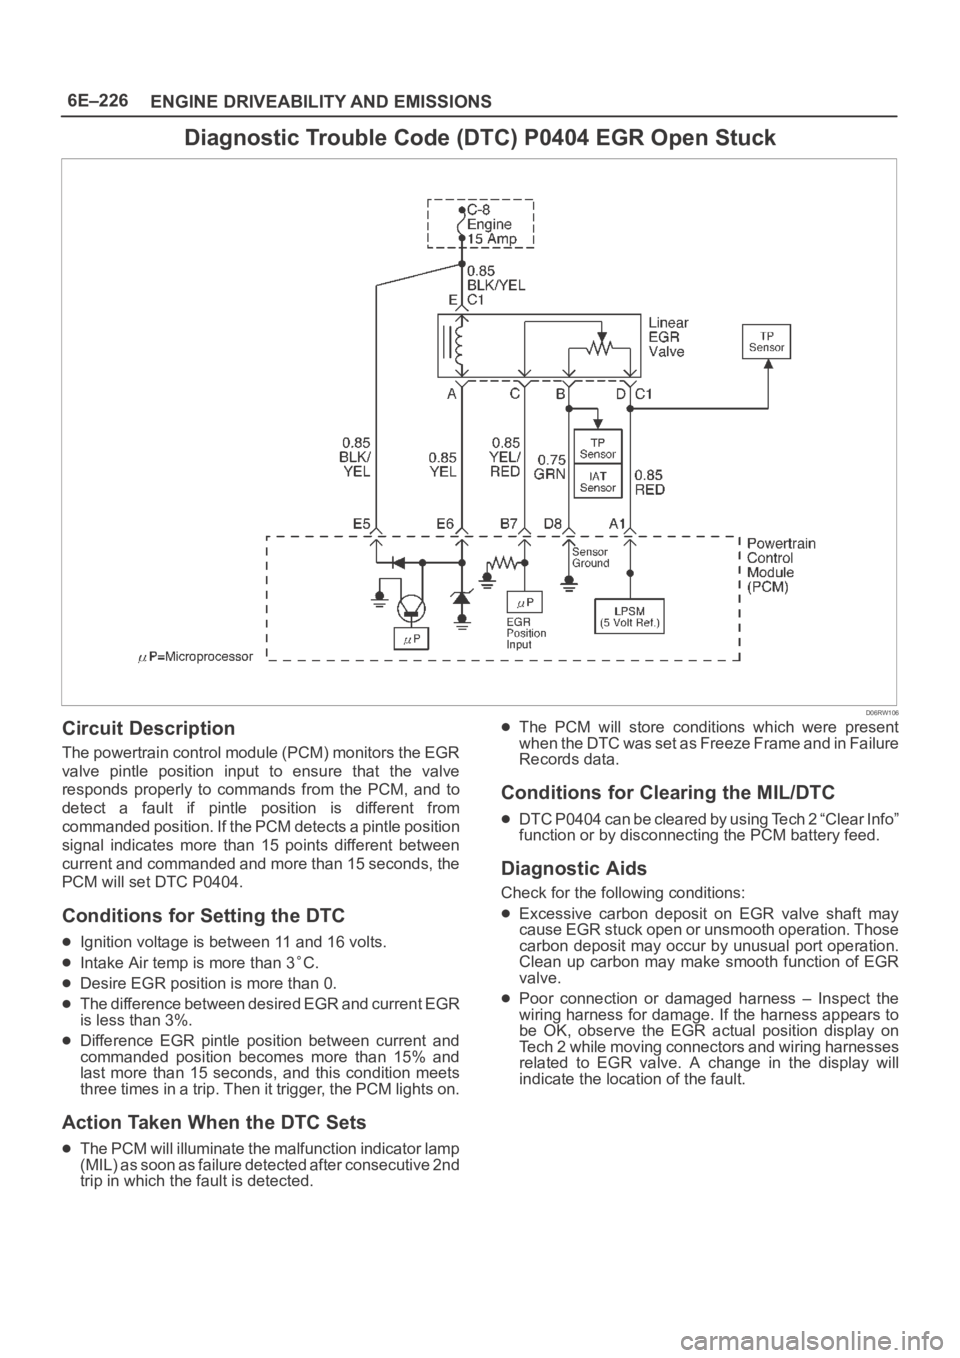
Diagnostic Trouble Code (DTC) P0404 EGR Open Stuck
D06RW106
Circuit Description
The powertrain control module (PCM) monitors the EGR
valve pintle position input to ensure that the valve
responds properly to commands from the PCM, and to
detect a fault if pintle position is different from
commanded position. If the PCM detects a pintle position
signal indicates more than 15 points different between
current and commanded and more than 15 seconds, the
PCM will set DTC P0404.
Conditions for Setting the DTC
Ignition voltage is between 11 and 16 volts.
Intake Air temp is more than 3C.
Desire EGR position is more than 0.
The difference between desired EGR and current EGR
is less than 3%.
Difference EGR pintle position between current and
commanded position becomes more than 15% and
last more than 15 seconds, and this condition meets
three times in a trip. Then it trigger, the PCM lights on.
Action Taken When the DTC Sets
The PCM will illuminate the malfunction indicator lamp
(MIL) as soon as failure detected after consecutive 2nd
trip in which the fault is detected.
The PCM will store conditions which were present
when the DTC was set as Freeze Frame and in Failure
Records data.
Conditions for Clearing the MIL/DTC
DTC P0404 can be cleared by using Tech 2 “Clear Info”
function or by disconnecting the PCM battery feed.
Diagnostic Aids
Check for the following conditions:
Excessive carbon deposit on EGR valve shaft may
cause EGR stuck open or unsmooth operation. Those
carbon deposit may occur by unusual port operation.
Clean up carbon may make smooth function of EGR
valve.
Poor connection or damaged harness – Inspect the
wiring harness for damage. If the harness appears to
be OK, observe the EGR actual position display on
Tech 2 while moving connectors and wiring harnesses
related to EGR valve. A change in the display will
indicate the location of the fault.
Page 1358 of 6000
6E–241 ENGINE DRIVEABILITY AND EMISSIONS
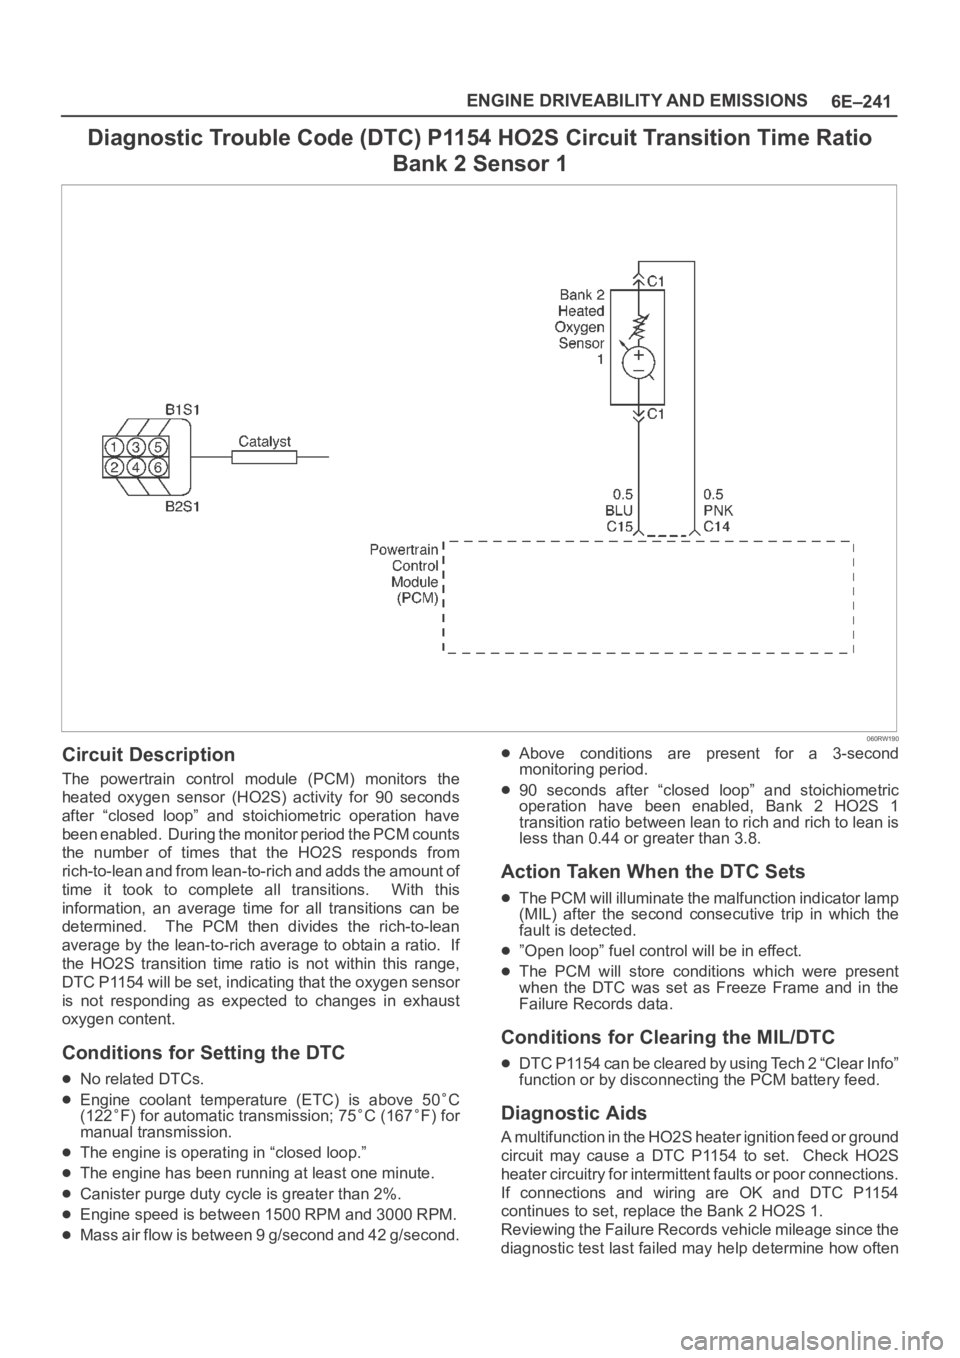
Diagnostic Trouble Code (DTC) P1154 HO2S Circuit Transition Time Ratio
Bank 2 Sensor 1
060RW190
Circuit Description
The powertrain control module (PCM) monitors the
heated oxygen sensor (HO2S) activity for 90 seconds
after “closed loop” and stoichiometric operation have
been enabled. During the monitor period the PCM counts
the number of times that the HO2S responds from
rich-to-lean and from lean-to-rich and adds the amount of
time it took to complete all transitions. With this
information, an average time for all transitions can be
determined. The PCM then divides the rich-to-lean
average by the lean-to-rich average to obtain a ratio. If
the HO2S transition time ratio is not within this range,
DTC P1154 will be set, indicating that the oxygen sensor
is not responding as expected to changes in exhaust
oxygen content.
Conditions for Setting the DTC
No related DTCs.
Engine coolant temperature (ETC) is above 50C
(122F) for automatic transmission; 75C (167F) for
manual transmission.
The engine is operating in “closed loop.”
The engine has been running at least one minute.
Canister purge duty cycle is greater than 2%.
Engine speed is between 1500 RPM and 3000 RPM.
Mass air flow is between 9 g/second and 42 g/second.
Above conditions are present for a 3-second
monitoring period.
90 seconds after “closed loop” and stoichiometric
operation have been enabled, Bank 2 HO2S 1
transition ratio between lean to rich and rich to lean is
less than 0.44 or greater than 3.8.
Action Taken When the DTC Sets
The PCM will illuminate the malfunction indicator lamp
(MIL) after the second consecutive trip in which the
fault is detected.
”Open loop” fuel control will be in effect.
The PCM will store conditions which were present
when the DTC was set as Freeze Frame and in the
Failure Records data.
Conditions for Clearing the MIL/DTC
DTC P1154 can be cleared by using Tech 2 “Clear Info”
function or by disconnecting the PCM battery feed.
Diagnostic Aids
A multifunction in the HO2S heater ignition feed or ground
circuit may cause a DTC P1154 to set. Check HO2S
heater circuitry for intermittent faults or poor connections.
If connections and wiring are OK and DTC P1154
continues to set, replace the Bank 2 HO2S 1.
Reviewing the Failure Records vehicle mileage since the
diagnostic test last failed may help determine how often
Page 1374 of 6000
6E–257 ENGINE DRIVEABILITY AND EMISSIONS
Diagnostic Trouble Code (DTC) P1618 Serial Peripheral Interface (SPI) PCM
Interprocessor Communication Error
Circuit Description
The serial peripheral interface (SPI) communication is
used internally by the PCM to send messages between
the engine processor and the automatic transmission
processor. Included in each message sent between the
two-processors is a checksum of the message. Both the
engine processor and automatic transmission processor
will compare this check sum value with the calculated
value. If the checksums don’t match, the processor will
view the new data as being corrupted and ignore the
values. The processor will then use the previous
message. The receiving processor will then send a
message to the sending processor informing it that it’s
last message was corrupted.
Conditions for Setting the DTC
Battery voltage is above 9.0 V for 2 seconds.
The PCM detects an internal program fault (check sum
of data communications error).
Check sum fault present for 3 out 6 seconds.
No TCM resets for 2 seconds.
Action Taken When the DTC Sets
The PCM will flash the “Check Trans” lamp the first
time the fault is detected.
The PCM will store conditions which were present
when the DTC was set as Freeze Frame and in the
Failure Records data.
The automatic transmission will operate in the “safety
mode” to protect the mechanical parts of the
transmission. Shift quality and/or gear changes may
not be normal.
Conditions for Clearing the MIL/DTC
DTC P1618 can be cleared by using the Tech 2 “Clear
Info” function or by disconnecting the PCM battery
feed.
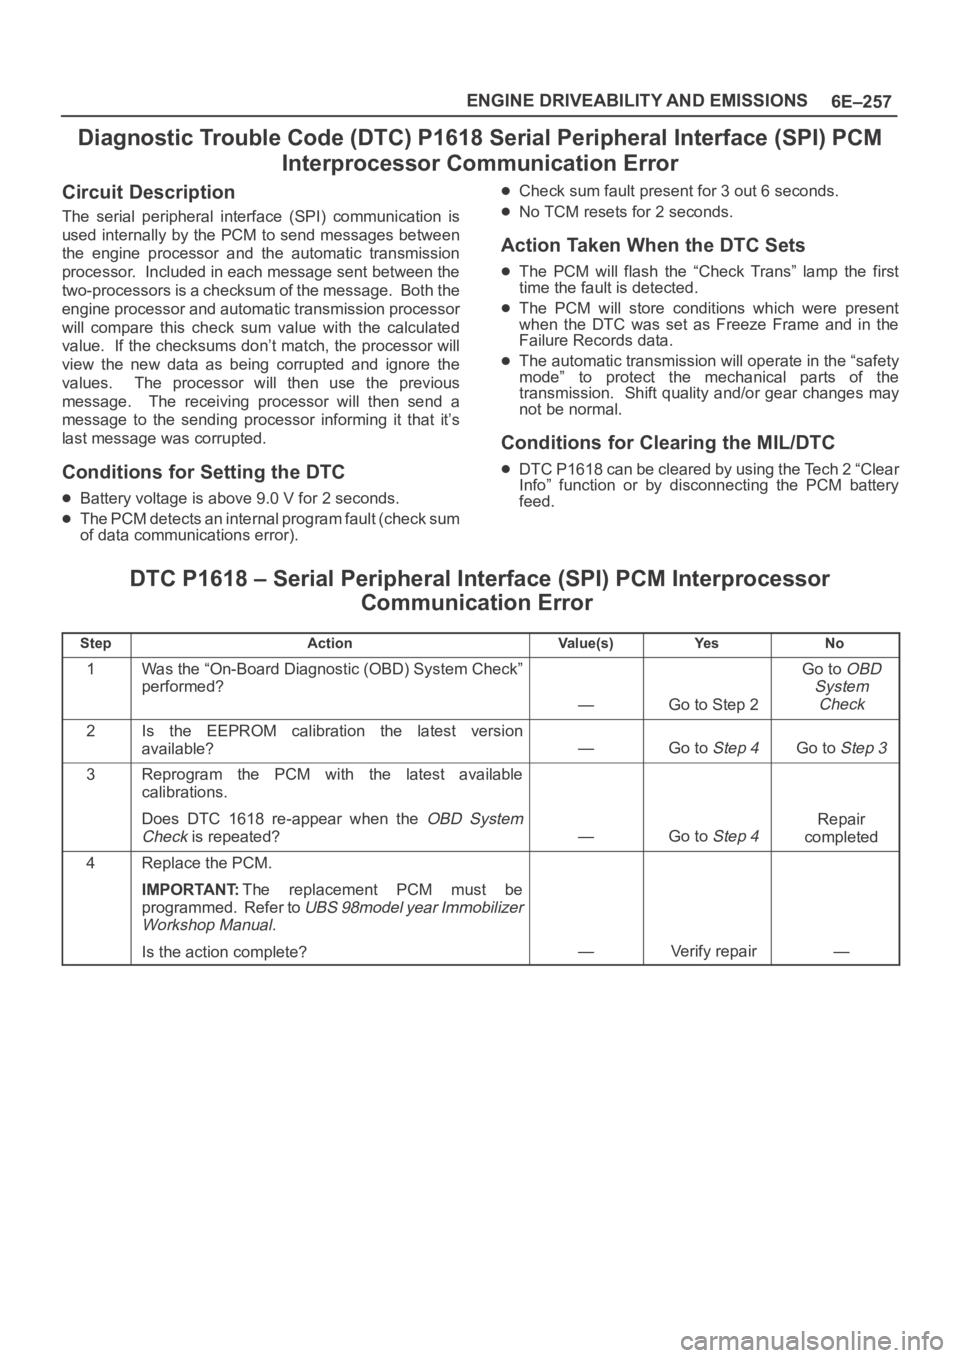
DTC P1618 – Serial Peripheral Interface (SPI) PCM Interprocessor
Communication Error
StepActionVa l u e ( s )Ye sNo
1Was the “On-Board Diagnostic (OBD) System Check”
performed?
—Go to Step 2
Go to OBD
System
Check
2Is the EEPROM calibration the latest version
available?
—Go to Step 4Go to Step 3
3Reprogram the PCM with the latest available
calibrations.
Does DTC 1618 re-appear when the
OBD System
Check
is repeated?—Go to Step 4
Repair
completed
4Replace the PCM.
IMPORTANT:The replacement PCM must be
programmed. Refer to
UBS 98model year Immobilizer
Workshop Manual.
Is the action complete?—Verify repair—
Page 1454 of 6000
6E–337 ENGINE DRIVEABILITY AND EMISSIONS
0018
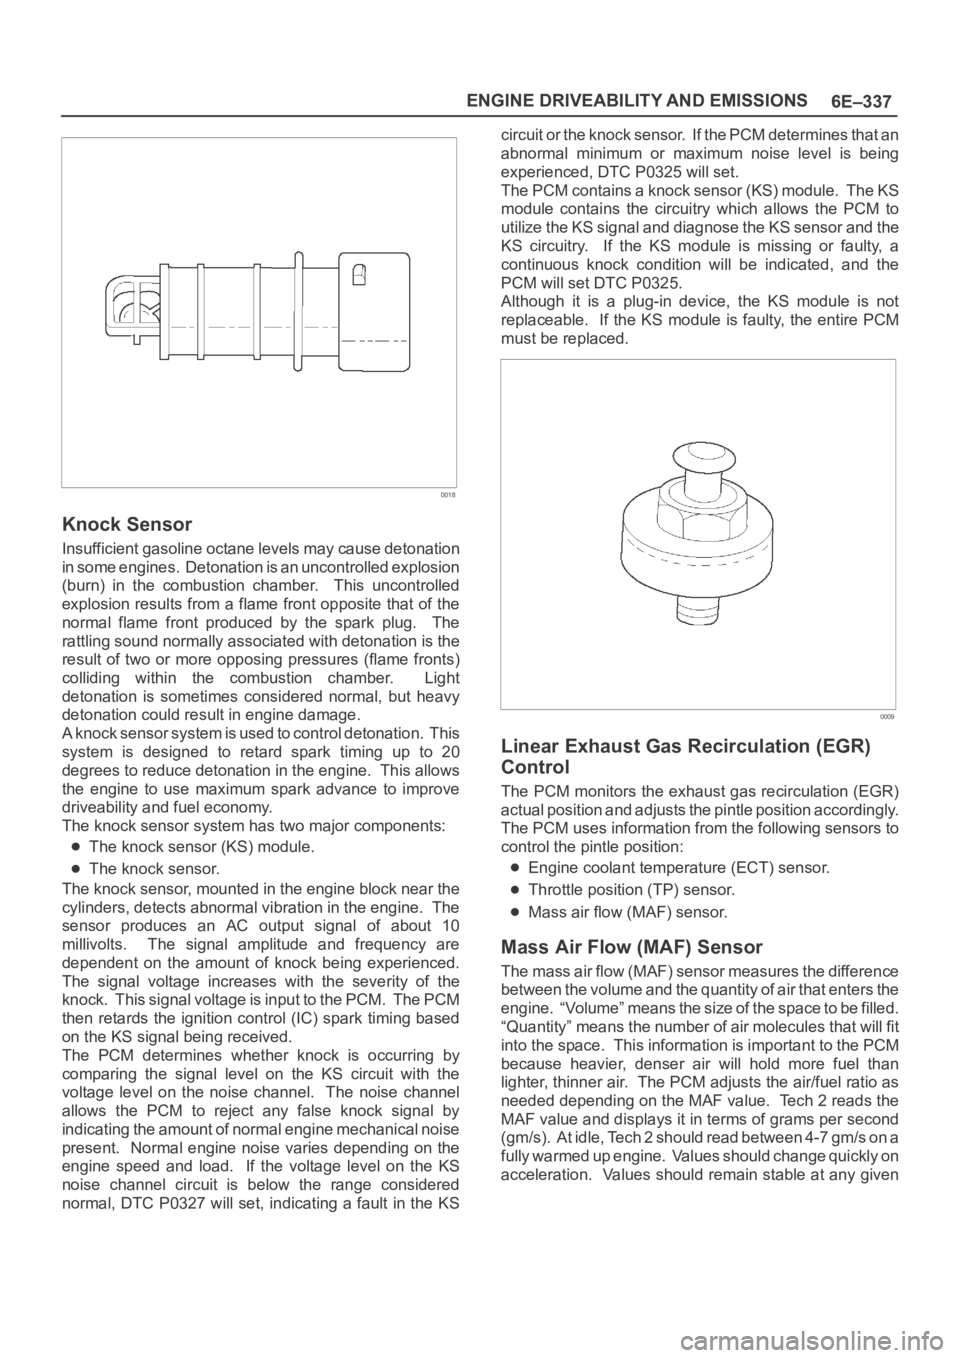
Knock Sensor
Insufficient gasoline octane levels may cause detonation
in some engines. Detonation is an uncontrolled explosion
(burn) in the combustion chamber. This uncontrolled
explosion results from a flame front opposite that of the
normal flame front produced by the spark plug. The
rattling sound normally associated with detonation is the
result of two or more opposing pressures (flame fronts)
colliding within the combustion chamber. Light
detonation is sometimes considered normal, but heavy
detonation could result in engine damage.
A knock sensor system is used to control detonation. This
system is designed to retard spark timing up to 20
degrees to reduce detonation in the engine. This allows
the engine to use maximum spark advance to improve
driveability and fuel economy.
The knock sensor system has two major components:
The knock sensor (KS) module.
The knock sensor.
The knock sensor, mounted in the engine block near the
cylinders, detects abnormal vibration in the engine. The
sensor produces an AC output signal of about 10
millivolts. The signal amplitude and frequency are
dependent on the amount of knock being experienced.
The signal voltage increases with the severity of the
knock. This signal voltage is input to the PCM. The PCM
then retards the ignition control (IC) spark timing based
on the KS signal being received.
The PCM determines whether knock is occurring by
comparing the signal level on the KS circuit with the
voltage level on the noise channel. The noise channel
allows the PCM to reject any false knock signal by
indicating the amount of normal engine mechanical noise
present. Normal engine noise varies depending on the
engine speed and load. If the voltage level on the KS
noise channel circuit is below the range considered
normal, DTC P0327 will set, indicating a fault in the KScircuit or the knock sensor. If the PCM determines that an
abnormal minimum or maximum noise level is being
experienced, DTC P0325 will set.
The PCM contains a knock sensor (KS) module. The KS
module contains the circuitry which allows the PCM to
utilize the KS signal and diagnose the KS sensor and the
KS circuitry. If the KS module is missing or faulty, a
continuous knock condition will be indicated, and the
PCM will set DTC P0325.
Although it is a plug-in device, the KS module is not
replaceable. If the KS module is faulty, the entire PCM
must be replaced.
0009
Linear Exhaust Gas Recirculation (EGR)
Control
The PCM monitors the exhaust gas recirculation (EGR)
actual position and adjusts the pintle position accordingly.
The PCM uses information from the following sensors to
control the pintle position:
Engine coolant temperature (ECT) sensor.
Throttle position (TP) sensor.
Mass air flow (MAF) sensor.
Mass Air Flow (MAF) Sensor
The mass air flow (MAF) sensor measures the difference
between the volume and the quantity of air that enters the
engine. “Volume” means the size of the space to be filled.
“Quantity” means the number of air molecules that will fit
into the space. This information is important to the PCM
because heavier, denser air will hold more fuel than
lighter, thinner air. The PCM adjusts the air/fuel ratio as
needed depending on the MAF value. Tech 2 reads the
MAF value and displays it in terms of grams per second
(gm/s). At idle, Tech 2 should read between 4-7 gm/s on a
fully warmed up engine. Values should change quickly on
acceleration. Values should remain stable at any given
Page 1459 of 6000
6E–342
ENGINE DRIVEABILITY AND EMISSIONS
PCM to calculate true sequential multiport fuel injection
(SFI). Loss of this signal will set a DTC P0341. If the CMP
signal is lost while the engine is running, the fuel injection
system will shift to a calculated sequential fuel injection
based on the last fuel injection pulse, and the engine will
continue to run. The engine can be restarted and will run
in the calculated sequential mode as long as the fault is
present, with a 1-in-6 chance of being correct.
Clear Flood Mode
Clear a flooded engine by pushing the accelerator pedal
down all the way. The PCM then de-energizes the fuel
injectors. The PCM holds the fuel injectors de-energized
as long as the throttle remains above 80% and the engine
speed is below 800 RPM. If the throttle position becomes
less than 80%, the PCM again begins to pulse the
injectors “ON” and “OFF,” allowing fuel into the cylinders.
Deceleration Mode
The PCM reduces the amount of fuel injected when it
detects a decrease in the throttle position and the air flow.
When deceleration is very fast, the PCM may cut off fuel
completely for short periods.
Engine Speed/Vehicle Speed/Fuel Disable
Mode
The PCM monitors engine speed. It turns off the fuel
injectors when the engine speed increase above 6400
RPM. The fuel injectors are turned back on when engine
speed decreases below 6150 RPM.
Fuel Cutoff Mode
No fuel is delivered by the fuel injectors when the ignition
is “OFF.” This prevents engine run-on. In addition, the
PCM suspends fuel delivery if no reference pulses are
detected (engine not running) to prevent engine flooding.
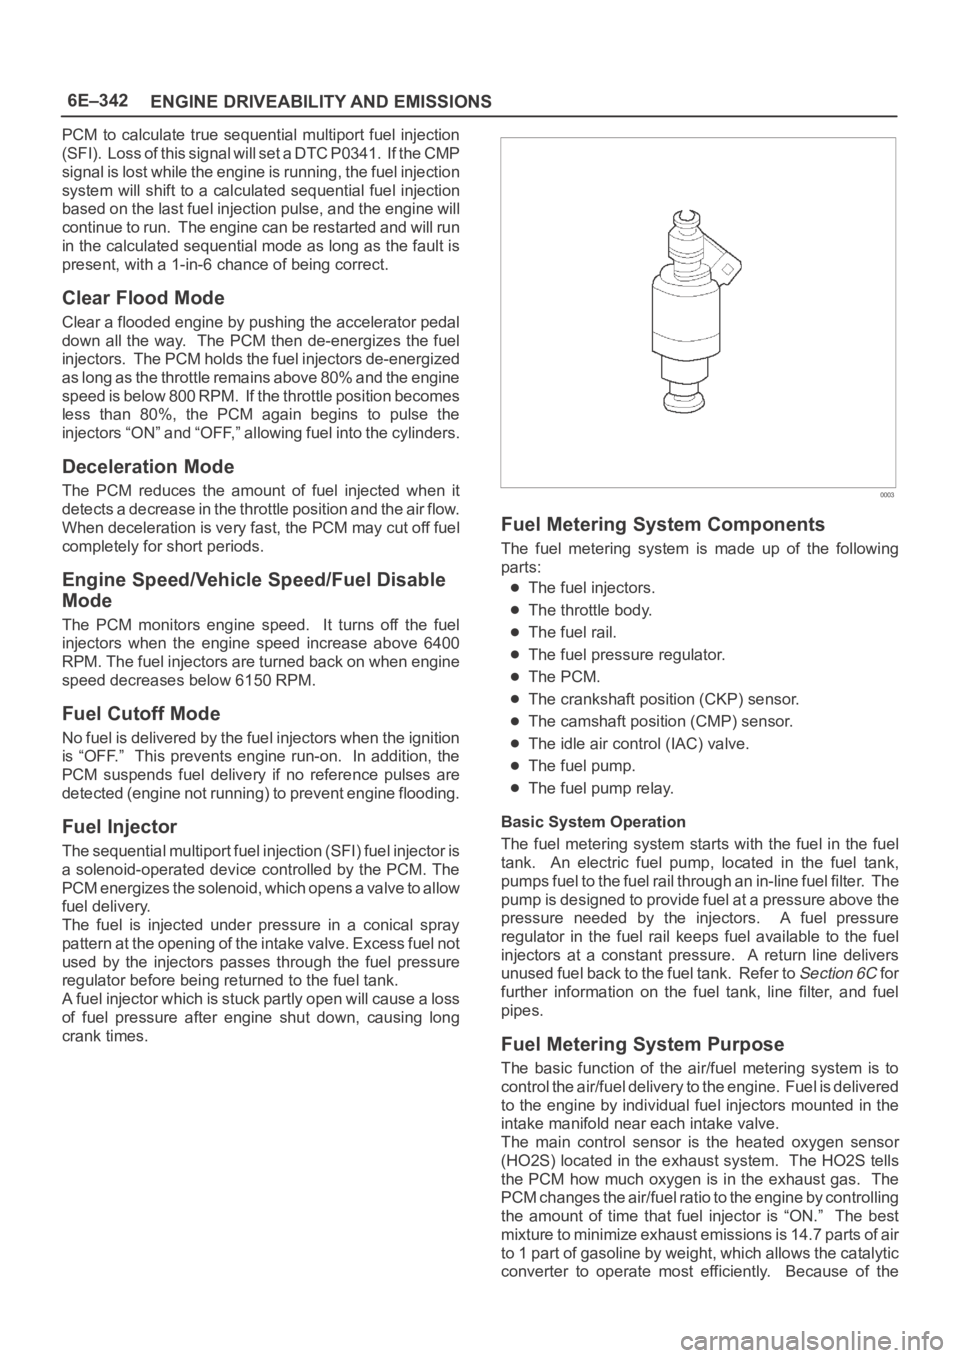
Fuel Injector
The sequential multiport fuel injection (SFI) fuel injector is
a solenoid-operated device controlled by the PCM. The
PCM energizes the solenoid, which opens a valve to allow
fuel delivery.
The fuel is injected under pressure in a conical spray
pattern at the opening of the intake valve. Excess fuel not
used by the injectors passes through the fuel pressure
regulator before being returned to the fuel tank.
A fuel injector which is stuck partly open will cause a loss
of fuel pressure after engine shut down, causing long
crank times.
0003
Fuel Metering System Components
The fuel metering system is made up of the following
parts:
The fuel injectors.
The throttle body.
The fuel rail.
The fuel pressure regulator.
The PCM.
The crankshaft position (CKP) sensor.
The camshaft position (CMP) sensor.
The idle air control (IAC) valve.
The fuel pump.
The fuel pump relay.
Basic System Operation
The fuel metering system starts with the fuel in the fuel
tank. An electric fuel pump, located in the fuel tank,
pumps fuel to the fuel rail through an in-line fuel filter. The
pump is designed to provide fuel at a pressure above the
pressure needed by the injectors. A fuel pressure
regulator in the fuel rail keeps fuel available to the fuel
injectors at a constant pressure. A return line delivers
unused fuel back to the fuel tank. Refer to
Section 6C f o r
further information on the fuel tank, line filter, and fuel
pipes.
Fuel Metering System Purpose
The basic function of the air/fuel metering system is to
control the air/fuel delivery to the engine. Fuel is delivered
to the engine by individual fuel injectors mounted in the
intake manifold near each intake valve.
The main control sensor is the heated oxygen sensor
(HO2S) located in the exhaust system. The HO2S tells
the PCM how much oxygen is in the exhaust gas. The
PCM changes the air/fuel ratio to the engine by controlling
the amount of time that fuel injector is “ON.” The best
mixture to minimize exhaust emissions is 14.7 parts of air
to 1 part of gasoline by weight, which allows the catalytic
converter to operate most efficiently. Because of the