mirror OPEL FRONTERA 1998 Owner's Manual
[x] Cancel search | Manufacturer: OPEL, Model Year: 1998, Model line: FRONTERA, Model: OPEL FRONTERA 1998Pages: 6000, PDF Size: 97 MB
Page 2964 of 6000

D08RW946
A
B-566
B-565B-56
8B-56
7B-56
4
H-2217H-2216 CLOSE OPEN
0.5
O/G
0.5
B
H 0.5
B
2.0
B0.5
GR/L
0.5
GR/L0.5
GR/G0.5
GR/G 0.5
B
D-32D-37
M
MIRROR-LH
H-1817H-1816 0.5
GR/L0.5
GR/G
0.5
GR/L0.5
GR/G
D-122D-127
M
MIRROR-RHMIRROR DEFOGGER SW
MIRROR
DEFOGGER
-LH MIRROR
FOLDING SW
3.0
B/Y
0.5
L/W
0.5
L/WC-4 10A
ELEC. IGN.
STARTER SW
(IG1)
8
H-22
B-18
1.25
B0.5
B 0.5
B 0.5
P/W 0.5
P/W
D-35
B-57B-57
7
H-22
1.25
B0.5
B
5
D-33
B-574
MIRROR
DEFOGGER
-RH
8
H-18
B-1
BODY-LH BODY-RH
0.5
B 0.5
P/W0.5
P/W0.5
B
D-127
H-18
5
D-123
I
3 I
Page 2993 of 6000

8D–400 WIRING SYSTEM
ITEM MALFUNCTION POSSIBLE CAUSE DETECTING METHOD REMARKS
Even when door
unlocked with
key, alarm
operates.
Alarm does not
operate even with
tailgate open.
Even when
tailgate is opened
with key, alarm
does not stop.
Even when
engine hood is
opened with
remote release,
alarm does not
operate
Even when
starter switch is
turned, alarm
does not stop
Indicator light
continues
flashingRefer to “Connector
check table” in this
system.
Refer to “Connector
check table” in this
system.
Refer to “Connector
check table” in this
system. Defective contact of detect
switch, or damaged switch wiring.
Door detect switch is assembled
to wrong door.
Defective contact of tailgate
switch, or defective wiring.
Defective contact of tailgate
detect switch, or damage wiring.
Damaged engine hood switch or
wiring.
Defective contact of starter
switch.
Damaged door switch, or a short
circuit in wiring.
Damaged tamper switch, or a
short circuit in wiring.Check the control unit connector.
When key is turned to lock
position, alarm stops.
When luggage room light switch
is turned on with tailgate open,
luggage room light does not
come on.
Check the control unit connector.
With starter switch turned to
“ACC” position, audio, cigarette
lighter and door mirrors (on
“ACC” circuit) do not operate.
After closing door, dome light and
courtesy light remain on.
Check the control unit connector. F
G
H
I
J
K
Page 3009 of 6000

D08RW 730
BODY-LH BODY-LH TAIL RELAY
(4)
(W/O SUNROOF) STARTER SW
(ACC)AMBIENT TEMPERATURE
SENSOR
0.5
B
2.0
B 2.0
B 2.0
B 0.5
P/G0.5
G/R0.5
G/R
0.5
O/G0.5
O/G3.0
L/B
0.5
P/G 0.5
P/L0.5
P/L
0.5
P/G 0.5
P/L0.85
B
4
H-21 4 6
H-21 H-21H-21
H-7
C-9L-5
5
8
H-212
3
H-78
2
C-91L-5
4 L-53
L-51 1
H-213
L-5
B-2 B-2
MULTI METER
C-11 10A
AUDIO(ACC), MIRROR
Page 3015 of 6000

D08RW 730
BODY-LH BODY-LH TAIL RELAY
(4)
(W/O SUNROOF) STARTER SW
(ACC)AMBIENT TEMPERATURE
SENSOR
0.5
B
2.0
B 2.0
B 2.0
B 0.5
P/G0.5
G/R0.5
G/R
0.5
O/G0.5
O/G3.0
L/B
0.5
P/G 0.5
P/L0.5
P/L
0.5
P/G 0.5
P/L0.85
B
4
H-21 4 6
H-21 H-21H-21
H-7
C-9L-5
5
8
H-212
3
H-78
2
C-91L-5
4 L-53
L-51 1
H-213
L-5
B-2 B-2
MULTI METER
C-11 10A
AUDIO(ACC), MIRROR
Page 3021 of 6000

D08RW730
BODY-LH BODY-LH TAIL RELAY
(4)
(W/O SUNROOF) STARTER SW
(ACC)AMBIENT TEMPERATURE
SENSOR
0.5
B
2.0
B 2.0
B 2.0
B 0.5
P/G0.5
G/R0.5
G/R
0.5
O/G0.5
O/G3.0
L/B
0.5
P/G 0.5
P/L0.5
P/L
0.5
P/G 0.5
P/L0.85
B
4
H-21 4 6
H-21 H-21H-21
H-7
C-9L-5
5
8
H-212
3
H-78
2
C-91L-5
4 L-53
L-51 1
H-213
L-5
B-2 B-2
MULTI METER
C-11 10A
AUDIO(ACC), MIRROR
Page 3029 of 6000

D08RW929
BODY-RH BODY-RH TAIL RELAY
(4)
(W/O SUNROOF) STARTER SW
(ACC)AMBIENT TEMPERATURE
SENSOR
0.5
B
2.0
B 2.0
B 2.0
B 0.5
P/G0.5
G/R0.5
G/R
0.5
O/G0.5
O/G3.0
L/B
0.5
P/G 0.5
P/L0.5
P/L
0.5
P/G 0.5
P/L0.85
B
4
H-21 4 6
H-21 H-21H-21
H-7
C-9L-5
5
8
H-212
20
H-711
2
C-91L-5
4 L-53
L-51 1
H-213
L-5
B-1 B-1
MULTI METER
C-11 10A
AUDIO(ACC), MIRROR
Page 3035 of 6000

D08RW919
BODY-RH BODY-RH TAIL RELAY
(4)
(W/O SUN ROOF) STARTER SW
(ACC)AMBIENT TEMPERATURE
SENSOR
0.5
B
2.0
B 2.0
B 2.0
B 0.5
P/G0.5
G/R0.5
G/R
0.5
O/G0.5
O/G3.0
L/B
0.5
P/G 0.5
P/L0.5
P/L
0.5
P/G 0.5
P/L0.85
B
4
H-21 4 6
H-21 H-21H-21
H-7
C-9L-5
5
8
H-212
20
H-711
2
C-91L-5
4 L-53
L-51 1
H-213
L-5
B-1 B-1
MULTI METER
C-11 10A
AUDIO(ACC), MIRROR
Page 3264 of 6000

8F–69 BODY STRUCTURE
Front Door Waist Seal
Parts Location
631RS009
Legend
(1) Nylon Washer(2) Door Mirror
(3) Front Door Waist Seal
Removal
1. Disconnect the battery ground cable.
2. Remove door mirror.
Refer to Exterior / Interrior Trim in this section.
3. Remove front door waist seal.
Remove the fixing screw and pull out the waist seal
(1) from the door frame while prying it up.
631RS010
Installation
1. Install the front door waist seal.
Apply soap and water to the inside of the waist seal
and align the screw hole of the waist seal to the door
panel hole, and gently tap the seal with a rubber
hammer.
Be sure not to tap the seal hard. This may result in
deforming the seal.
2. Install the door mirror.
Page 3285 of 6000

8F–90BODY STRUCTURE
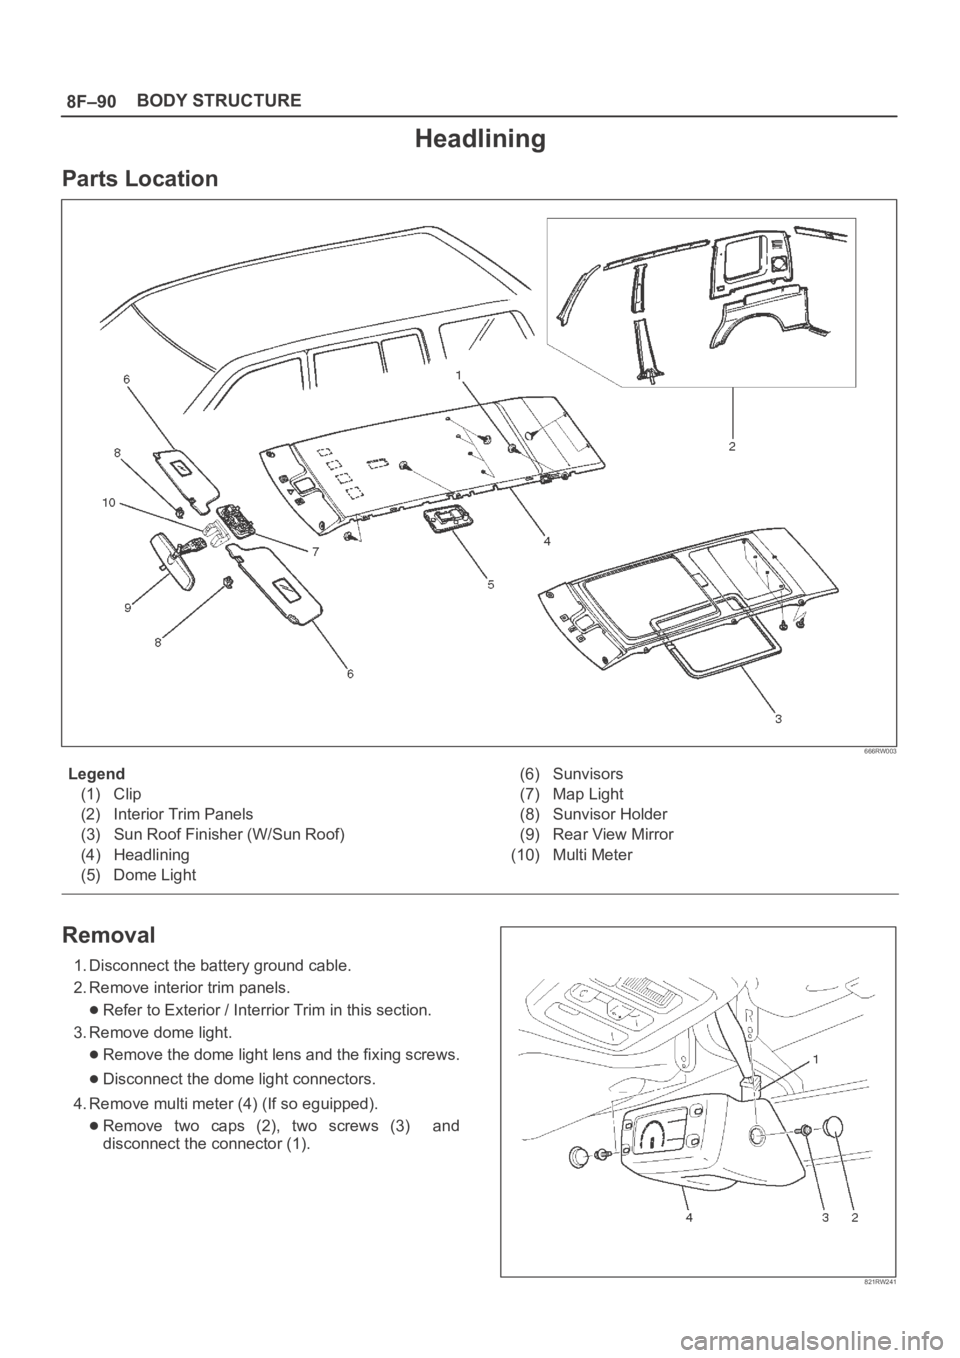
Headlining
Parts Location
666RW003
Legend
(1) Clip
(2) Interior Trim Panels
(3) Sun Roof Finisher (W/Sun Roof)
(4) Headlining
(5) Dome Light(6) Sunvisors
(7) Map Light
(8) Sunvisor Holder
(9) Rear View Mirror
(10) Multi Meter
Removal
1. Disconnect the battery ground cable.
2. Remove interior trim panels.
Refer to Exterior / Interrior Trim in this section.
3. Remove dome light.
Remove the dome light lens and the fixing screws.
Disconnect the dome light connectors.
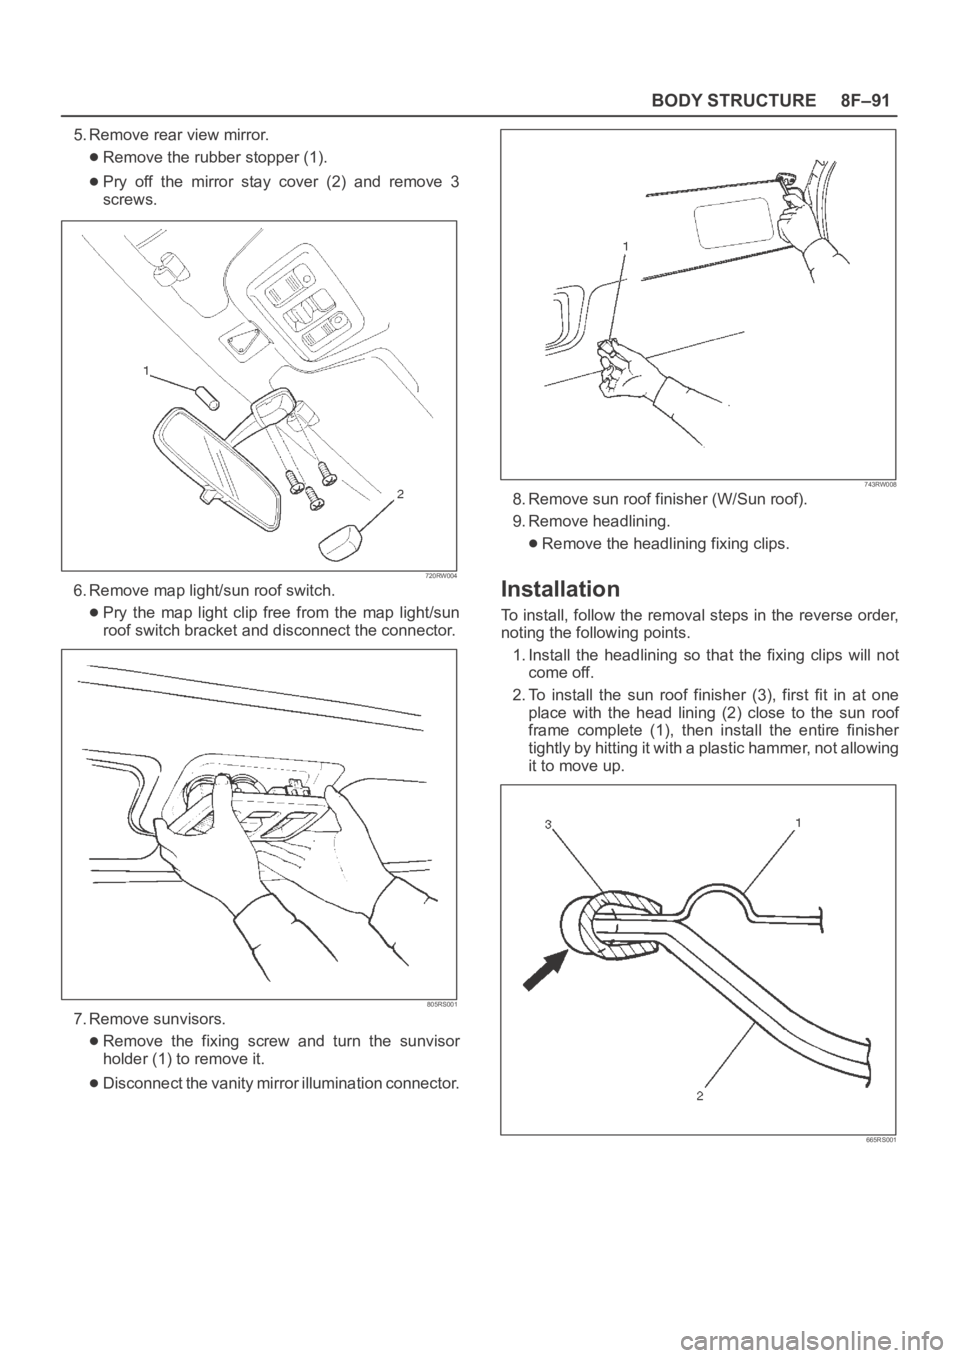
4. Remove multi meter (4) (If so eguipped).
Remove two caps (2), two screws (3) and
disconnect the connector (1).
821RW241
Page 3286 of 6000

8F–91 BODY STRUCTURE
5. Remove rear view mirror.
Remove the rubber stopper (1).
Pry off the mirror stay cover (2) and remove 3
screws.
720RW004
6. Remove map light/sun roof switch.
Pry the map light clip free from the map light/sun
roof switch bracket and disconnect the connector.
805RS001
7. Remove sunvisors.
Remove the fixing screw and turn the sunvisor
holder (1) to remove it.
Disconnect the vanity mirror illumination connector.
743RW008
8. Remove sun roof finisher (W/Sun roof).
9. Remove headlining.
Remove the headlining fixing clips.
Installation
To install, follow the removal steps in the reverse order,
noting the following points.
1. Install the headlining so that the fixing clips will not
come off.
2. To install the sun roof finisher (3), first fit in at one
place with the head lining (2) close to the sun roof
frame complete (1), then install the entire finisher
tightly by hitting it with a plastic hammer, not allowing
it to move up.
665RS001