OPEL KARL 2015 Workshop Manual
Manufacturer: OPEL, Model Year: 2015, Model line: KARL, Model: OPEL KARL 2015Pages: 217, PDF Size: 4.16 MB
Page 51 of 217
OPEL Karl Owner Manual (GMK-Localizing-EU RHD-9231168) - 2016 -
CRC - 5/7/15
50 Seats and Restraints
ISOFIX Child Restraint
Systems
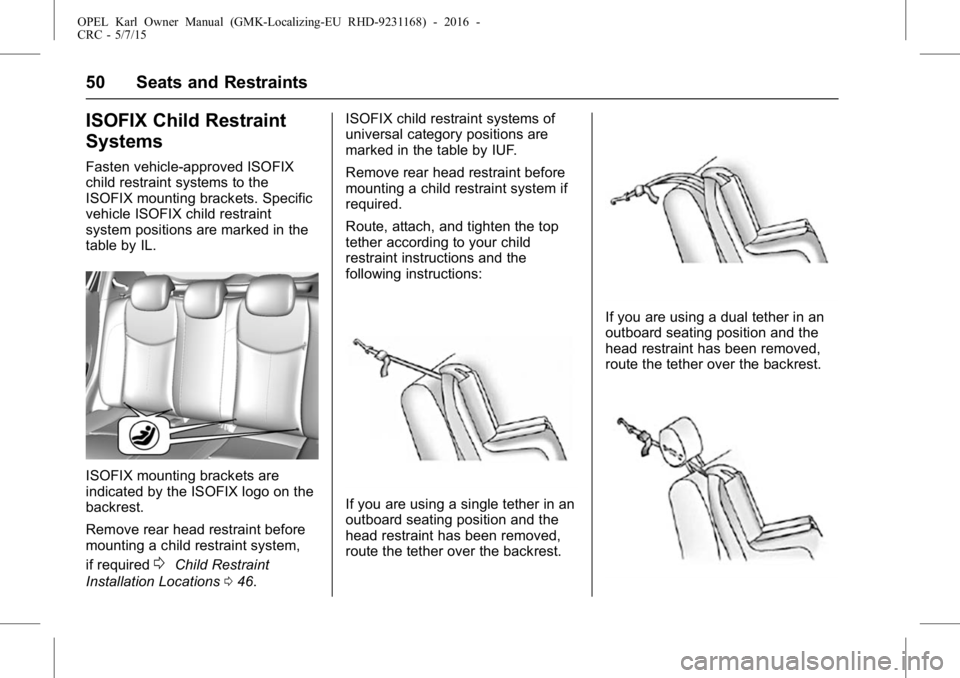
Fasten vehicle-approved ISOFIX
child restraint systems to the
ISOFIX mounting brackets. Specific
vehicle ISOFIX child restraint
system positions are marked in the
table by IL.
ISOFIX mounting brackets are
indicated by the ISOFIX logo on the
backrest.
Remove rear head restraint before
mounting a child restraint system,
if required
0Child Restraint
Installation Locations 046. ISOFIX child restraint systems of
universal category positions are
marked in the table by IUF.
Remove rear head restraint before
mounting a child restraint system if
required.
Route, attach, and tighten the top
tether according to your child
restraint instructions and the
following instructions:
If you are using a single tether in an
outboard seating position and the
head restraint has been removed,
route the tether over the backrest.
If you are using a dual tether in an
outboard seating position and the
head restraint has been removed,
route the tether over the backrest.
Page 52 of 217
OPEL Karl Owner Manual (GMK-Localizing-EU RHD-9231168) - 2016 -
CRC - 5/7/15
Seats and Restraints 51
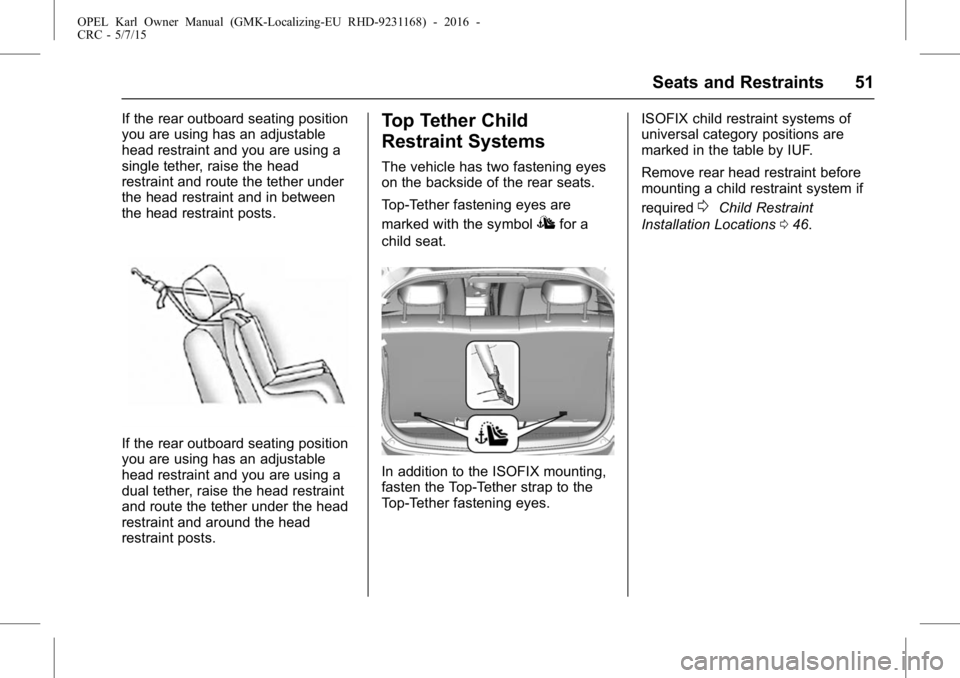
If the rear outboard seating position
you are using has an adjustable
head restraint and you are using a
single tether, raise the head
restraint and route the tether under
the head restraint and in between
the head restraint posts.
If the rear outboard seating position
you are using has an adjustable
head restraint and you are using a
dual tether, raise the head restraint
and route the tether under the head
restraint and around the head
restraint posts.
Top Tether Child
Restraint Systems
The vehicle has two fastening eyes
on the backside of the rear seats.
Top-Tether fastening eyes are
marked with the symbol
Ifor a
child seat.
In addition to the ISOFIX mounting,
fasten the Top-Tether strap to the
Top-Tether fastening eyes. ISOFIX child restraint systems of
universal category positions are
marked in the table by IUF.
Remove rear head restraint before
mounting a child restraint system if
required
0Child Restraint
Installation Locations 046.
Page 53 of 217
OPEL Karl Owner Manual (GMK-Localizing-EU RHD-9231168) - 2016 - crc -
5/7/15
52 Storage
Storage
Storage Compartments
Storage Compartments . . . . . . . . 52
Instrument Panel Storage . . . . . . 52
Glove Box . . . . . . . . . . . . . . . . . . . . . 53
Cupholders . . . . . . . . . . . . . . . . . . . . 53
Luggage/Load Locations
Load Compartment . . . . . . . . . . . . 53
Additional Storage Features
Rear Compartment/StoragePanel Cover . . . . . . . . . . . . . . . . . . 56
Convenience Net . . . . . . . . . . . . . . 56
Warning Triangle . . . . . . . . . . . . . . 56
First Aid Kit . . . . . . . . . . . . . . . . . . . . 57
Information on Loading the
Vehicle
Information on Loading the Vehicle . . . . . . . . . . . . . . . . . . . . . . . 57
Storage
Compartments
{Warning
Do not store heavy or sharp
objects in the storage
compartments. Otherwise, the
storage compartment lid could
open and vehicle occupants could
be injured by objects being
thrown around in the event of
hard braking, a sudden change in
direction or an accident.
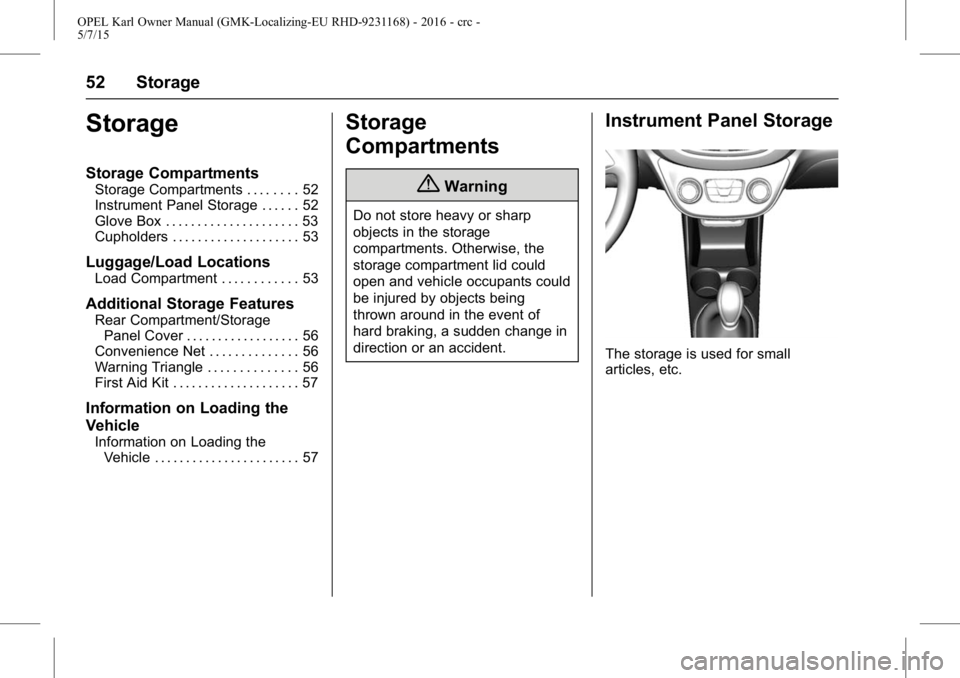
Instrument Panel Storage
The storage is used for small
articles, etc.
Page 54 of 217
OPEL Karl Owner Manual (GMK-Localizing-EU RHD-9231168) - 2016 - crc -
5/7/15
Storage 53
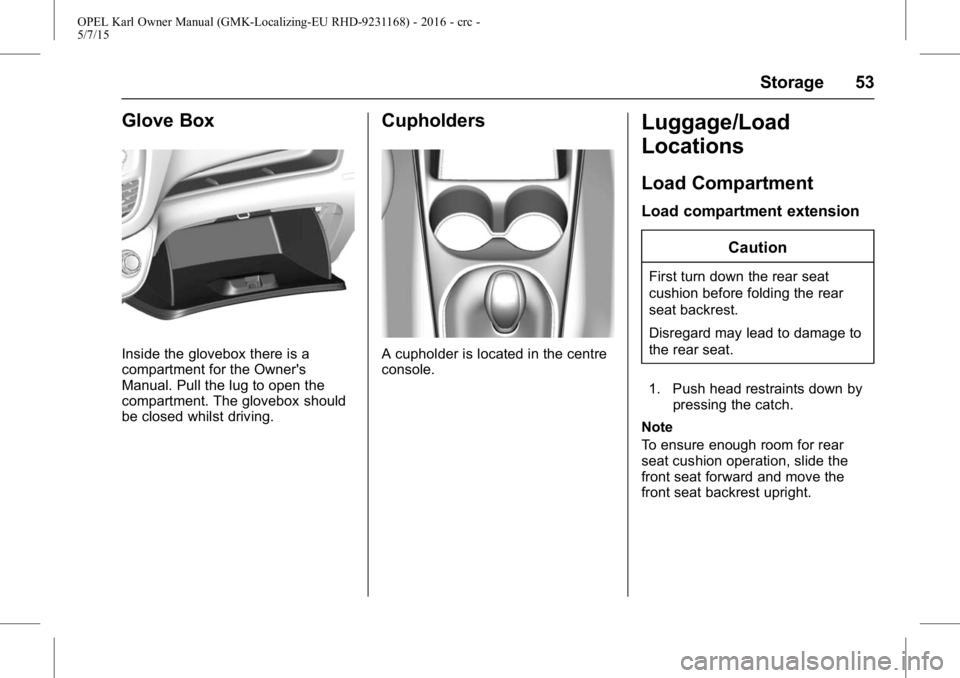
Glove Box
Inside the glovebox there is a
compartment for the Owner's
Manual. Pull the lug to open the
compartment. The glovebox should
be closed whilst driving.
Cupholders
A cupholder is located in the centre
console.
Luggage/Load
Locations
Load Compartment
Load compartment extensionCaution
First turn down the rear seat
cushion before folding the rear
seat backrest.
Disregard may lead to damage to
the rear seat.
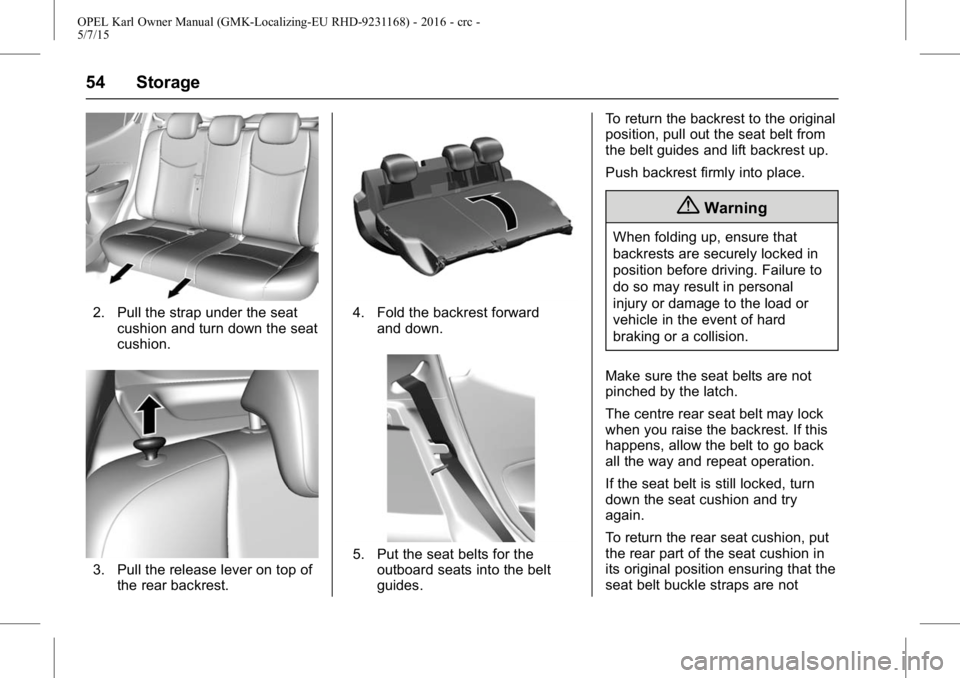
1. Push head restraints down by pressing the catch.
Note
To ensure enough room for rear
seat cushion operation, slide the
front seat forward and move the
front seat backrest upright.
Page 55 of 217
OPEL Karl Owner Manual (GMK-Localizing-EU RHD-9231168) - 2016 - crc -
5/7/15
54 Storage
2. Pull the strap under the seatcushion and turn down the seat
cushion.
3. Pull the release lever on top ofthe rear backrest.
4. Fold the backrest forward
and down.
5. Put the seat belts for theoutboard seats into the belt
guides. To return the backrest to the original
position, pull out the seat belt from
the belt guides and lift backrest up.
Push backrest firmly into place.
{Warning
When folding up, ensure that
backrests are securely locked in
position before driving. Failure to
do so may result in personal
injury or damage to the load or
vehicle in the event of hard
braking or a collision.
Make sure the seat belts are not
pinched by the latch.
The centre rear seat belt may lock
when you raise the backrest. If this
happens, allow the belt to go back
all the way and repeat operation.
If the seat belt is still locked, turn
down the seat cushion and try
again.
To return the rear seat cushion, put
the rear part of the seat cushion in
its original position ensuring that the
seat belt buckle straps are not
Page 56 of 217
OPEL Karl Owner Manual (GMK-Localizing-EU RHD-9231168) - 2016 - crc -
5/7/15
Storage 55
twisted or caught under the seat
cushion, then push the front part of
the seat cushion firmly down until it
latches.
Caution
When returning rear seat backrest
to the upright position, place the
rear seat belt and buckles
between the rear seat backrest
and one cushion. Make sure the
rear seat belt and buckles do not
get pinched under the rear seat
cushion.
Make sure the seat belts are not
twisted or caught in the seat
backrest and are arranged in their
proper position.
Notice: The luggage
compartment shall contain all
fittings installed in production by
the car manufacturer (spare
wheel, jack, etc.). Other features,
either not installed or only
optional, such as first-aid-kit or
fire extinguisher, shall not be
considered. Where special features such as a
folding or removable rear seat of
backrest have been provided by
the manufacturer to obtain
maximum loading volume, the
measurements shall be made with
the following loading limits.
Front loading limit: the rear side of
the backrest of the seats situated
immediately in front of the luggage
compartment set at the normal
driving or riding position as defined
by the manufacturer, and/or the
folded rear seats; the rear seats
and/or backrest folded or removed,
with the front loading limit above the
backrest being a vertical plane
tangential to the rear side of the
front seat backrest and the load
height limited by the roof headlining.
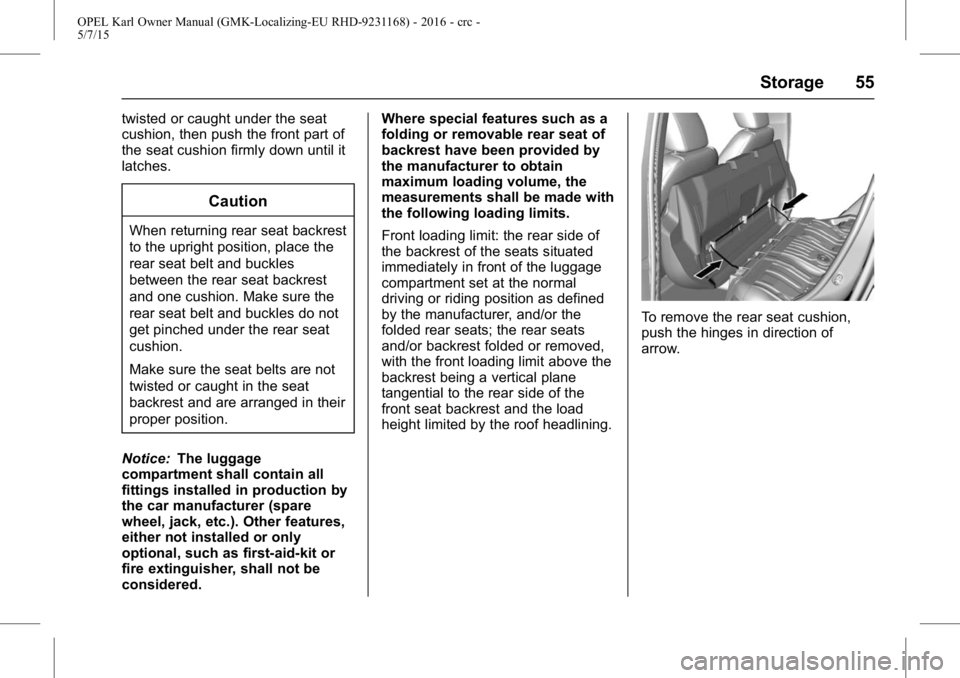
To remove the rear seat cushion,
push the hinges in direction of
arrow.
Page 57 of 217
OPEL Karl Owner Manual (GMK-Localizing-EU RHD-9231168) - 2016 - crc -
5/7/15
56 Storage
Additional Storage
Features
Rear Compartment/
Storage Panel Cover
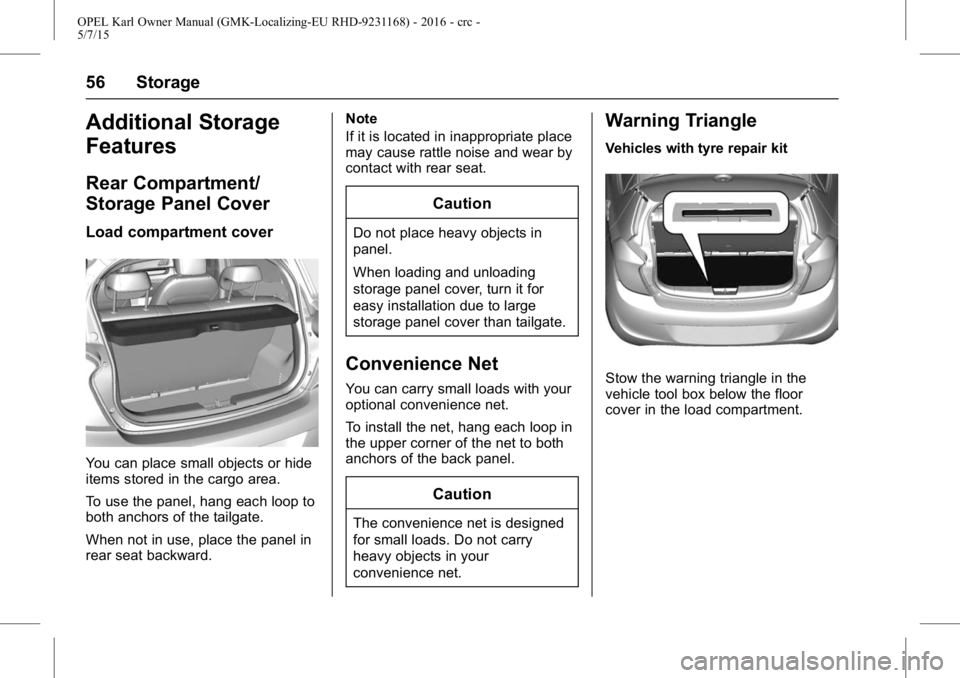
Load compartment cover
You can place small objects or hide
items stored in the cargo area.
To use the panel, hang each loop to
both anchors of the tailgate.
When not in use, place the panel in
rear seat backward.Note
If it is located in inappropriate place
may cause rattle noise and wear by
contact with rear seat.
Caution
Do not place heavy objects in
panel.
When loading and unloading
storage panel cover, turn it for
easy installation due to large
storage panel cover than tailgate.
Convenience Net
You can carry small loads with your
optional convenience net.
To install the net, hang each loop in
the upper corner of the net to both
anchors of the back panel.
Caution
The convenience net is designed
for small loads. Do not carry
heavy objects in your
convenience net.
Warning Triangle
Vehicles with tyre repair kit
Stow the warning triangle in the
vehicle tool box below the floor
cover in the load compartment.
Page 58 of 217
OPEL Karl Owner Manual (GMK-Localizing-EU RHD-9231168) - 2016 - crc -
5/7/15
Storage 57
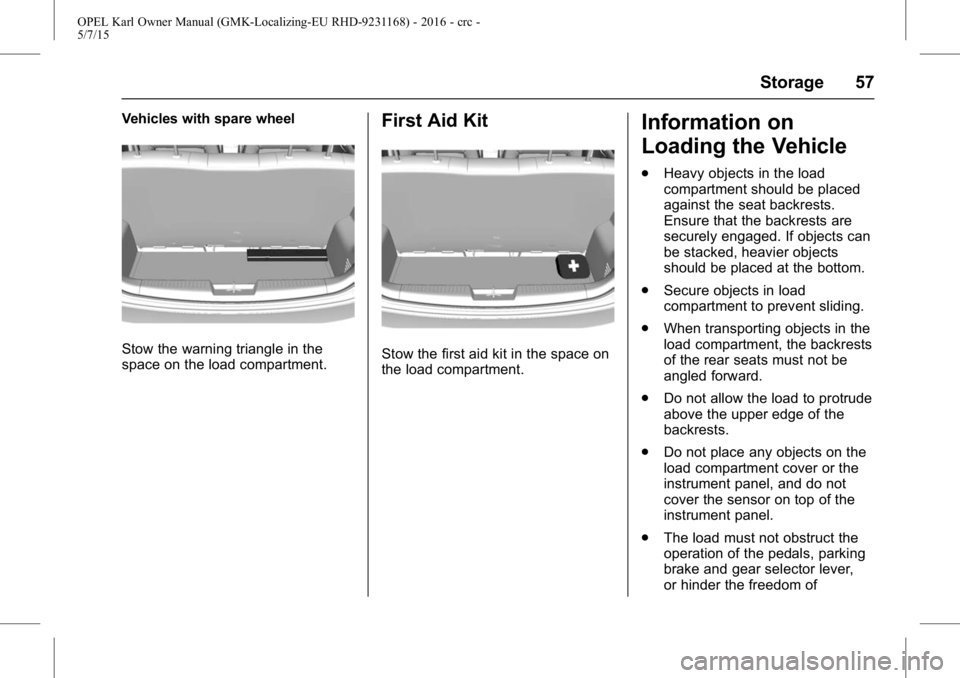
Vehicles with spare wheel
Stow the warning triangle in the
space on the load compartment.
First Aid Kit
Stow the first aid kit in the space on
the load compartment.
Information on
Loading the Vehicle
.Heavy objects in the load
compartment should be placed
against the seat backrests.
Ensure that the backrests are
securely engaged. If objects can
be stacked, heavier objects
should be placed at the bottom.
. Secure objects in load
compartment to prevent sliding.
. When transporting objects in the
load compartment, the backrests
of the rear seats must not be
angled forward.
. Do not allow the load to protrude
above the upper edge of the
backrests.
. Do not place any objects on the
load compartment cover or the
instrument panel, and do not
cover the sensor on top of the
instrument panel.
. The load must not obstruct the
operation of the pedals, parking
brake and gear selector lever,
or hinder the freedom of
Page 59 of 217
OPEL Karl Owner Manual (GMK-Localizing-EU RHD-9231168) - 2016 - crc -
5/7/15
58 Storage
movement of the driver. Do not
place any unsecured objects in
the interior.
. Do not drive with an open load
compartment.
{Warning
Always make sure that the load in
the vehicle is securely stowed.
Otherwise objects can be thrown
around inside the vehicle and
cause personal injury or damage
to the load or car.
. The payload is the difference
between the permitted gross
vehicle weight (see identification
plate
0Vehicle Identification
Number (VIN) 0200) and the
kerb weight. For the kerb weight
in detail, refer to the technical
data section.
The kerb weight includes
weights for the driver (68 kg),
luggage (7 kg) and all fluids
(tank 90% full). Optional equipment and
accessories increase the kerb
weight.
. Driving with a roof load
increases the sensitivity of the
vehicle to cross-winds and has a
detrimental effect on vehicle
handling due to the vehicle's
higher centre of gravity.
Distribute the load evenly and
secure it properly with retaining
straps. Adjust the tyre pressure
and vehicle speed according to
the load conditions. Check and
retighten the straps frequently.
Page 60 of 217
OPEL Karl Owner Manual (GMK-Localizing-EU RHD-9231168) - 2016 - crc -
5/7/15
Instruments and Controls 59
Instruments and
Controls
Controls
Steering Wheel Adjustment . . . . 60
Steering Wheel Controls . . . . . . . 60
Heated Steering Wheel . . . . . . . . 60
Horn . . . . . . . . . . . . . . . . . . . . . . . . . . . 61
Windscreen Wiper/Washer . . . . . 61
Rear Window Wiper/Washer . . . 62
Outside Temperature . . . . . . . . . . 63
Clock . . . . . . . . . . . . . . . . . . . . . . . . . . 63
Power Sockets . . . . . . . . . . . . . . . . 63
Warning Lights, Gauges, and
Indicators
Speedometer . . . . . . . . . . . . . . . . . . 64
Mileometer . . . . . . . . . . . . . . . . . . . . . 64
Trip Odometer . . . . . . . . . . . . . . . . . 64
Rev Counter . . . . . . . . . . . . . . . . . . . 65
Fuel Gauge . . . . . . . . . . . . . . . . . . . . 65
Control Indicators . . . . . . . . . . . . . . 65
Engine Coolant TemperatureGauge . . . . . . . . . . . . . . . . . . . . . . . . 68
Service Display . . . . . . . . . . . . . . . . 68
Indicator . . . . . . . . . . . . . . . . . . . . . . . 69
Seat Belt Reminders . . . . . . . . . . . 69
Airbag and Safety Belt Tensioner Light . . . . . . . . . . . . . . . 70 Airbag On-Off Light . . . . . . . . . . . . 70
Charging System Light . . . . . . . . . 70
Malfunction Indicator Lamp . . . . 70
Service Vehicle Soon Light . . . . 71
Brake and Clutch System
Warning Light . . . . . . . . . . . . . . . . 71
Antilock Brake System (ABS) Warning Light . . . . . . . . . . . . . . . . 71
Gear Shifting Light . . . . . . . . . . . . . 71
Variable Effort Steering Light . . . . . . . . . . . . . . . . . . . . . . . . . 71
Lane Departure Warning (LDW) Light . . . . . . . . . . . . . . . . . . . . . . . . . 72
Ultrasonic Parking Sensor Light . . . . . . . . . . . . . . . . . . . . . . . . . 72
Electronic Stability Control (ESC) Indicator Light . . . . . . . . . 72
Electronic Stability Control (ESC) Off Light . . . . . . . . . . . . . . . 72
Traction Control System (TCS) Off Light . . . . . . . . . . . . . . . . . . . . . . 72
Engine Coolant Temperature Warning Light . . . . . . . . . . . . . . . . 72
Tyre Pressure Monitoring System Light . . . . . . . . . . . . . . . . . 73
Engine Oil Pressure Light . . . . . . 73
Low Fuel Warning Light . . . . . . . . 73
Auto Stop Mode . . . . . . . . . . . . . . . 74
Immobiliser Light . . . . . . . . . . . . . . 74
Reduced Engine Power Light . . . . . . . . . . . . . . . . . . . . . . . . . 74 Main-Beam On Light . . . . . . . . . . . 74
Front Fog Lamp Light . . . . . . . . . . 74
Rear Fog Lamp Light . . . . . . . . . . 74
Tail lamp Indicator Light . . . . . . . . 74
Cruise Control Light . . . . . . . . . . . 74
Bonnet Ajar Light . . . . . . . . . . . . . . 74
Door Ajar Light . . . . . . . . . . . . . . . . 74
Information Displays
Driver Information
Centre (DIC) . . . . . . . . . . . . . . . . . 75
Vehicle Messages
Vehicle Messages . . . . . . . . . . . . . 80
Warning Buzzers . . . . . . . . . . . . . . 81
Vehicle Personalisation
Vehicle Personalisation . . . . . . . . 82