lock Peugeot 3008 Hybrid 4 2012 - RHD (UK. Australia) Service Manual
[x] Cancel search | Manufacturer: PEUGEOT, Model Year: 2012, Model line: 3008 Hybrid 4, Model: Peugeot 3008 Hybrid 4 2012Pages: 284, PDF Size: 14.08 MB
Page 154 of 284
D
R
I
152
In certain extreme weather
conditions (rain and/or snow,
bright sunshine, ...) the head-
up display may not be legible or may
suffer temporary interference.
Certain glasses (sunglasses, specta-
cles or polarised lenses) may hamper
reading of the information.
To clean the transparent strip, which
is made of organic glass, use a clean,
soft cloth (such as a spectacles cloth
or microfi bre cloth). Do not use a dry
or abrasive cloth or detergent or sol-
vent products as these could scratch
the strip or damage the anti-refl ection
coating.
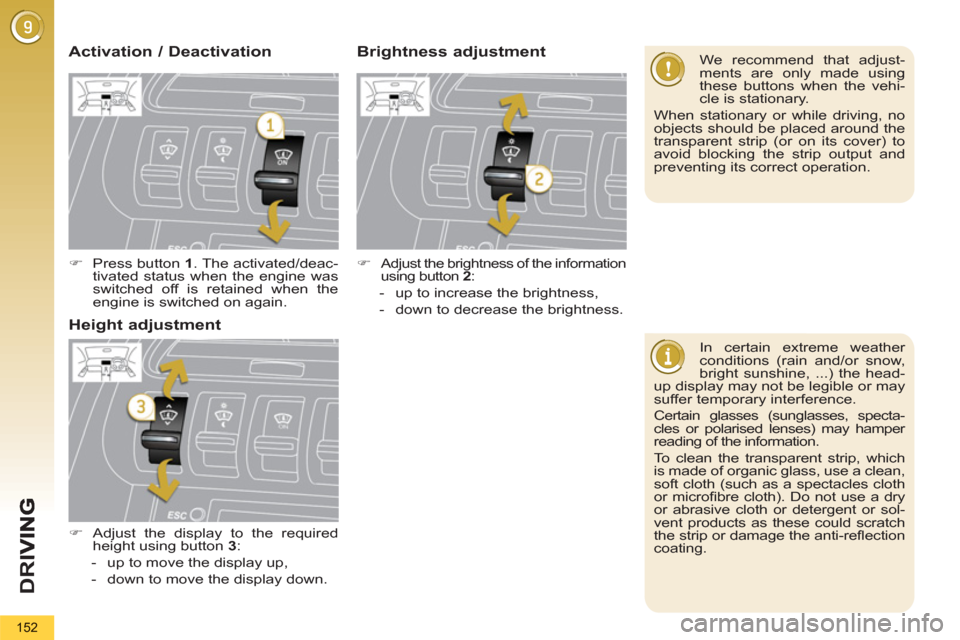
We recommend that adjust-
ments are only made using
these buttons when the vehi-
cle is stationary.
When stationary or while driving, no
objects should be placed around the
transparent strip (or on its cover) to
avoid blocking the strip output and
preventing its correct operation.
)
Press button 1
. The activated/deac-
tivated status when the engine was
switched off is retained when the
engine is switched on again.
)
Adjust the display to the required
height using button 3
:
- up to move the display up,
- down to move the display down.
Activation / Deactivation Brightness adjustment
)
Adjust the brightness of the information
using button 2
:
- up to increase the brightness,
- down to decrease the brightness.
Height adjustment
Page 179 of 284
PRACTICAL INFORMATION
177
Parking the vehicle
Immobilise the vehicle where
it does not block traffi c: the
ground must be level, stable and
non-slippery ground.
Apply the parking brake unless it
has been programmed to automatic
mode, switch off the ignition and put
the gear lever in position R
to lock
the wheels.
Check that the braking warning lamp
and the P
warning lamp on the parking
brake control come on.
If necessary, place a chock under the
wheel diagonally opposite the wheel
to be changed.
The occupants must get out of the ve-
hicle and wait where they are safe.
Never go underneath a vehicle raised
using a jack; use an axle stand.
Removing a wheel
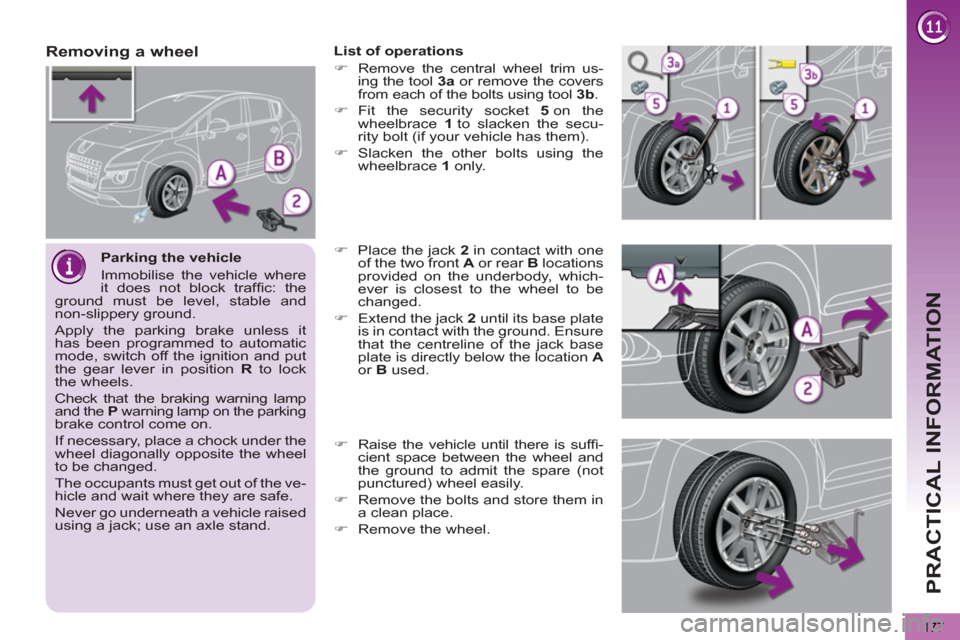
List of operations
)
Remove the central wheel trim us-
ing the tool 3a
or remove the covers
from each of the bolts using tool 3b
.
)
Fit the security socket 5
on the
wheelbrace 1
to slacken the secu-
rity bolt (if your vehicle has them).
)
Slacken the other bolts using the
wheelbrace 1
only.
)
Place the jack 2
in contact with one
of the two front A
or rear B
locations
provided on the underbody, which-
ever is closest to the wheel to be
changed.
)
Extend the jack 2
until its base plate
is in contact with the ground. Ensure
that the centreline of the jack base
plate is directly below the location A
or B
used.
)
Raise the vehicle until there is suffi -
cient space between the wheel and
the ground to admit the spare (not
punctured) wheel easily.
)
Remove the bolts and store them in
a clean place.
)
Remove the wheel.
Page 187 of 284
PRACTICAL INFORMATION
185
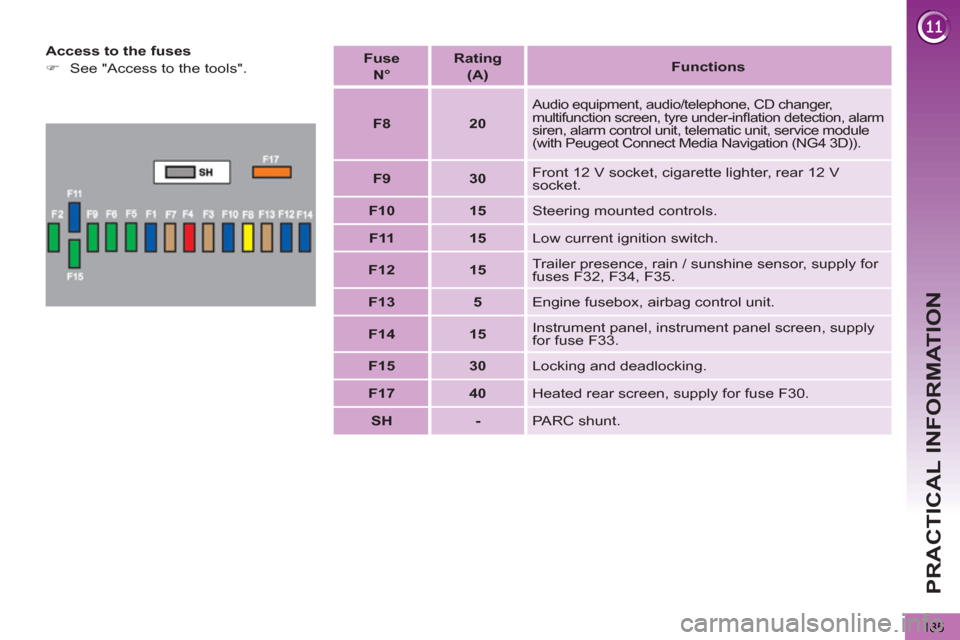
Access to the fuses
)
See "Access to the tools".
Fuse
N°
Rating
(A)
Functions
F8
20
Audio equipment, audio/telephone, CD changer,
multifunction screen, tyre under-infl ation detection, alarm
siren, alarm control unit, telematic unit, service module
(with Peugeot Connect Media Navigation (NG4 3D)).
F9
30
Front 12 V socket, cigarette lighter, rear 12 V
socket.
F10
15
Steering mounted controls.
F11
15
Low current ignition switch.
F12
15
Trailer presence, rain / sunshine sensor, supply for
fuses F32, F34, F35.
F13
5
Engine fusebox, airbag control unit.
F14
15
Instrument panel, instrument panel screen, supply
for fuse F33.
F15
30
Locking and deadlocking.
F17
40
Heated rear screen, supply for fuse F30.
SH
-
PARC shunt.
Page 192 of 284
PRACTICAL INFORMATION
190
12 V BATTERY
Procedure for charging your battery
when it is fl at or for starting the engine
using another battery.
Access to the battery
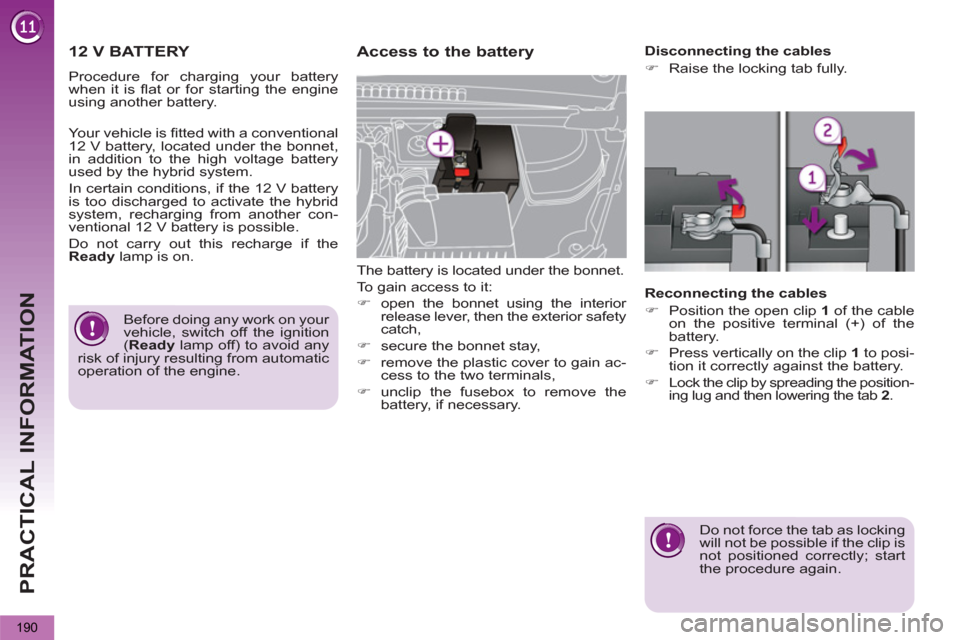
The battery is located under the bonnet.
To gain access to it:
)
open the bonnet using the interior
release lever, then the exterior safety
catch,
)
secure the bonnet stay,
)
remove the plastic cover to gain ac-
cess to the two terminals,
)
unclip the fusebox to remove the
battery, if necessary.
Disconnecting the cables
)
Raise the locking tab fully.
Reconnecting the cables
)
Position the open clip 1
of the cable
on the positive terminal (+) of the
battery.
)
Press vertically on the clip 1
to posi-
tion it correctly against the battery.
)
Lock the clip by spreading the position-
ing lug and then lowering the tab 2
.
Do not force the tab as locking
will not be possible if the clip is
not positioned correctly; start
the procedure again.
Before doing any work on your
vehicle, switch off the ignition
( Ready
lamp off) to avoid any
risk of injury resulting from automatic
operation of the engine.
Your vehicle is fi tted with a conventional
12 V battery, located under the bonnet,
in addition to the high voltage battery
used by the hybrid system.
In certain conditions, if the 12 V battery
is too discharged to activate the hybrid
system, recharging from another con-
ventional 12 V battery is possible.
Do not carry out this recharge if the
Ready
lamp is on.
Page 199 of 284
PRACTICAL INFORMATION
197
VERY COLD CLIMATE SCREEN
Removable protective screen which
prevents the accumulation of snow at
the radiator cooling fan.
Before fi tting or removing the screen,
ensure that the engine is off and the
cooling fan has stopped. It is recom-
mended that the screen be fi tted and
removed by a PEUGEOT dealer or a
qualifi ed workshop.
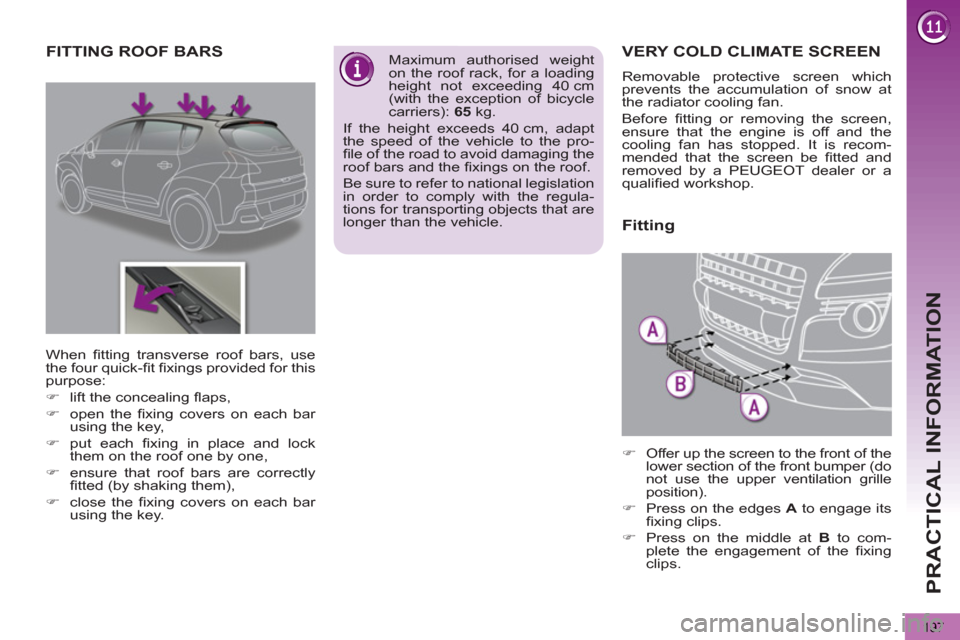
FITTING ROOF BARS
Maximum authorised weight
on the roof rack, for a loading
height not exceeding 40 cm
(with the exception of bicycle
carriers): 65
kg.
If the height exceeds 40 cm, adapt
the speed of the vehicle to the pro-
fi le of the road to avoid damaging the
roof bars and the fi xings on the roof.
Be sure to refer to national legislation
in order to comply with the regula-
tions for transporting objects that are
longer than the vehicle.
When fi tting transverse roof bars, use
the four quick-fi t fi xings provided for this
purpose:
)
lift the concealing fl aps,
)
open the fi xing covers on each bar
using the key,
)
put each fi xing in place and lock
them on the roof one by one,
)
ensure that roof bars are correctly
fi tted (by shaking them),
)
close the fi xing covers on each bar
using the key.
Fitting
)
Offer up the screen to the front of the
lower section of the front bumper (do
not use the upper ventilation grille
position).
)
Press on the edges A
to engage its
fi xing clips.
)
Press on the middle at B
to com-
plete the engagement of the fi xing
clips.
Page 218 of 284
216
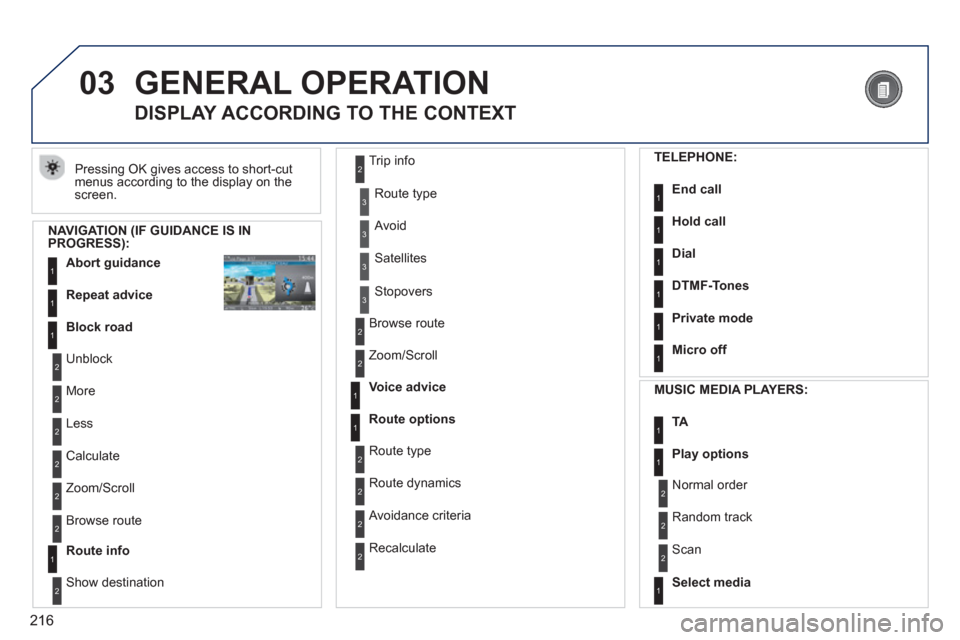
03GENERAL OPERATION
Pressing OK gives access to short-cut
menus according to the display on the screen.
DISPLAY ACCORDING TO THE CONTEXT
NAVIGATION (IF GUIDANCE IS IN PROGRESS):
Abort guidanc
e1
1
1
Repeat advice
Block road
2
2
Unblock
M
ore
2
Less
3
3
Route type
Avoid
3 Satellites
2
2
Calculate
Z
oom/Scroll
2
Browse route
1Route info
2
2
Show destination Trip in
fo
3
Stopovers
2
2
Browse route
Zoom/Scroll
1
1
Voice advice
Route options
2
2
Route type
Route dynamics
2 Avoidance criteria
2
Recalculate
TELEPHONE:
End call1
1
1
1
Hold call
Dial
DTMF-Tones
1Private mode
1Micro off
MU
SIC MEDIA PLAYERS:
TA1
1Play options
1Select media
2
2
Normal order
R
andom track
2 Scan
Page 250 of 284
248
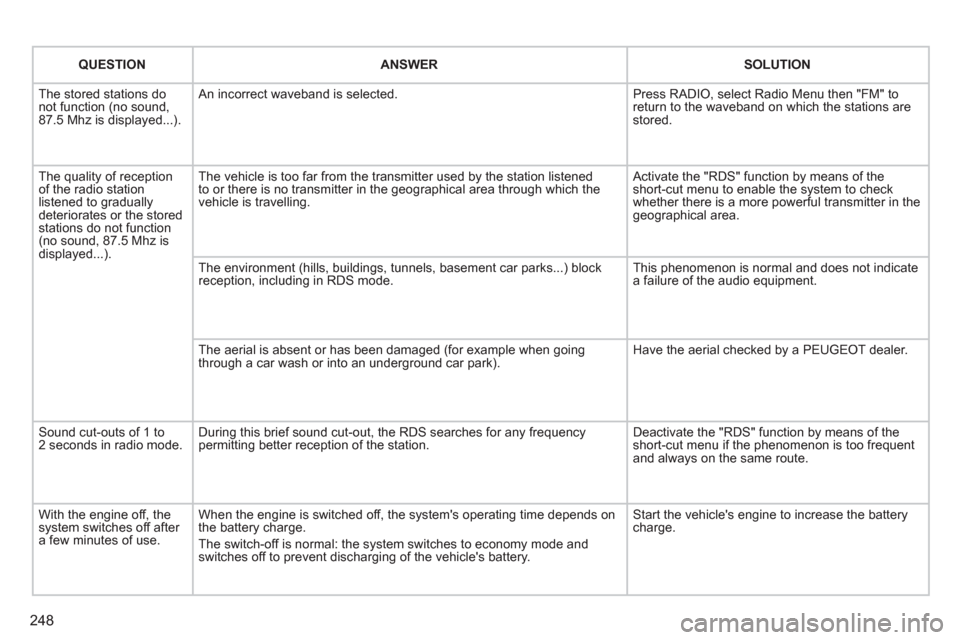
QUESTIONANSWERSOLUTION
The stored stations donot function (no sound, 87.5 Mhz is displayed...).
An incorrect waveband is selected.
Press RADIO, select Radio Menu then "FM" to return to the waveband on which the stations arestored.
The quality of receptionof the radio station listened to graduallydeteriorates or the stored stations do not function(no sound, 87.5 Mhz is displayed...).
The vehicle is too far from the transmitter used by the station listenedto or there is no transmitter in the geographical area through which the vehicle is travelling.
Activate the "RDS" function by means of theshort-cut menu to enable the system to check whether there is a more powerful transmitter in thegeographical area.
The environment (hills, buildings, tunnels, basement car parks...) block reception, including in RDS mode.
This phenomenon is normal and does not indicate a failure of the audio equipment.
The aerial is absent or has been damaged (for example when goingthrough a car wash or into an underground car park).
Have the aerial checked by a PEUGEOT dealer.
Sound cut-outs of 1 to2 seconds in radio mode.During this brief sound cut-out, the RDS searches for any frequency permitting better reception of the station.
Deactivate the "RDS" function by means of the short-cut menu if the phenomenon is too frequentand always on the same route.
With the engine off, the system switches off after a few minutes of use.
When the engine is switched off, the system's operating time depends on the battery charge.
The switch-off is normal: the system switches to economy mode and switches off to prevent discharging of the vehicle's battery.
Start the vehicle's engine to increase the batterycharge.
Page 259 of 284
257
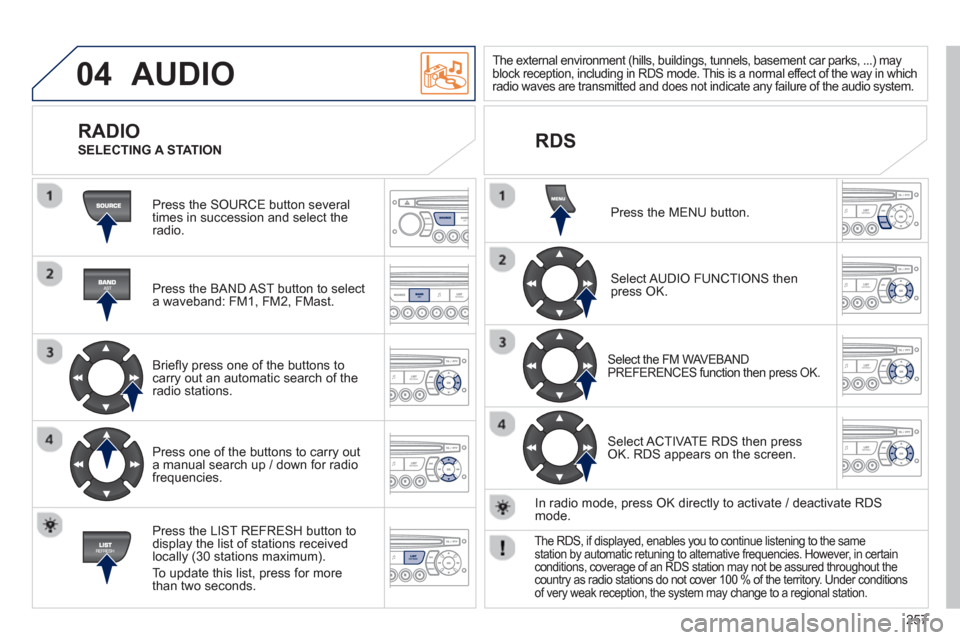
04 AUDIO
Press the SOURCE button several
times in succession and select theradio.
Press the BAND A
ST button to select
a waveband: FM1, FM2, FMast.
Briefl
y press one of the buttons tocarry out an automatic search of theradio stations.
Press one o
f the buttons to carry out
a manual search up / down for radiofrequencies.
Press the LI
ST REFRESH button to
display the list of stations received
locally (30 stations maximum).
To update this list, press for more
t
han two seconds.
The external environment (hills, buildings, tunnels, basement car parks, ...) may
block reception, including in RDS mode. This is a normal effect of the way in which radio waves are transmitted and does not indicate any failure of the audio system.
RDS
RADIO
SELECTING A STATION
Press the MENU button.
Select AUDIO FUNCTIONS thenpress OK.
Select the FM WAVEBAND PREFERENCES function then press OK.
Select ACTIVATE RDS then pressOK. RDS appears on the screen.
In radio mode, press
OK directly to activate / deactivate RDSmode.
The RDS, if displayed, enables you to continue listening to the samestation by automatic retuning to alternative frequencies. However, in certainconditions, coverage of an RDS station may not be assured throughout thecountry as radio stations do not cover 100 % of the territory. Under conditionsof very weak reception, the system may change to a regional station.
Page 272 of 284
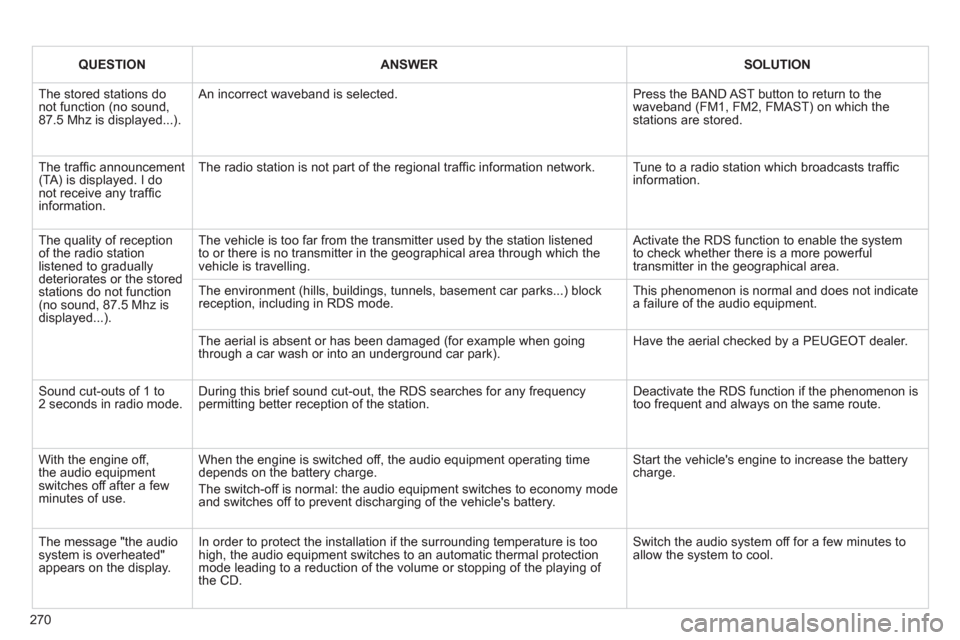
270
QUESTIONANSWERSOLUTION
The stored stations donot function (no sound, 87.5 Mhz is displayed...).
An incorrect waveband is selected.
Press the BAND AST button to return to the waveband (FM1, FM2, FMAST) on which the stations are stored.
The traffi c announcement(TA) is displayed. I donot receive any traffi c information.
The radio station is not part of the regional traffi c information network.
Tune to a radio station which broadcasts traffi c information.
The quality of receptionof the radio station listened to graduallydeteriorates or the stored stations do not function(no sound, 87.5 Mhz is displayed...).
The vehicle is too far from the transmitter used by the station listenedto or there is no transmitter in the geographical area through which the vehicle is travelling.
Activate the RDS function to enable the system to check whether there is a more powerful transmitter in the geographical area.
The environment (hills, buildings, tunnels, basement car parks...) block reception, including in RDS mode. This phenomenon is normal and does not indicate a failure of the audio equipment.
The aerial is absent or has been damaged (for example when goingthrough a car wash or into an underground car park).
Have the aerial checked by a PEUGEOT dealer.
Sound cut-outs of 1 to2 seconds in radio mode.During this brief sound cut-out, the RDS searches for any frequency permitting better reception of the station.
Deactivate the RDS function if the phenomenon is too frequent and always on the same route.
With the engine off, the audio equipment switches off after a few minutes of use.
When the engine is switched off, the audio equipment operating timedepends on the battery charge.
The switch-off is normal: the audio equipment switches to economy mode and switches off to prevent discharging of the vehicle's battery.
Start the vehicle's engine to increase the batterycharge.
The message "the audio system is overheated" appears on the display.
In order to protect the installation if the surrounding temperature is toohigh, the audio equipment switches to an automatic thermal protectionmode leading to a reduction of the volume or stopping of the playing of the CD.
Switch the audio system off for a few minutes toallow the system to cool.
Page 273 of 284
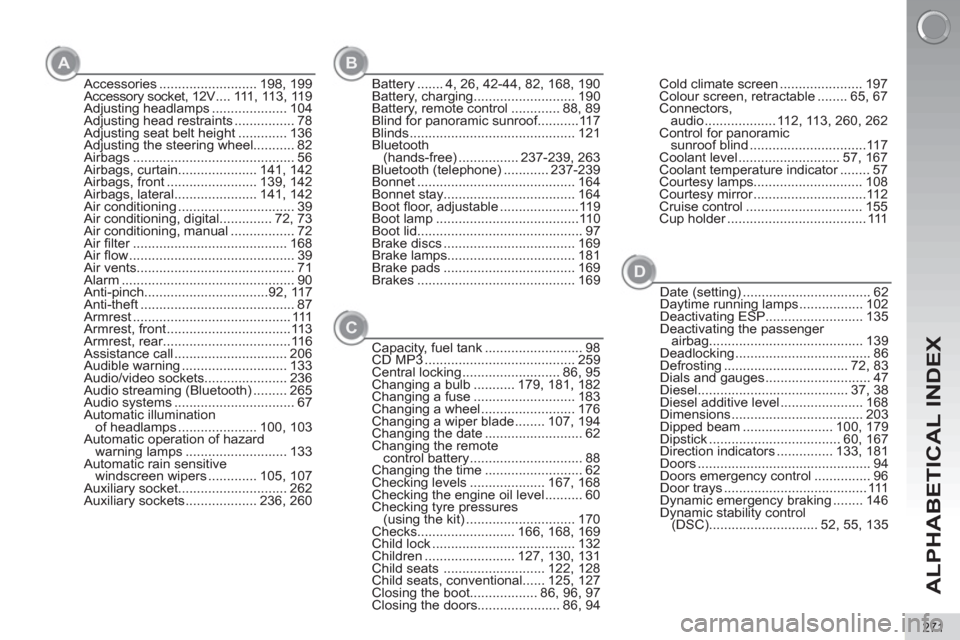
ALPHABETICAL INDEX
271
Accessories .......................... 198, 199
Accessory socket, 12V .... 111, 113, 119
Adjusting headlamps .................... 104
Adjusting head restraints ................ 78
Adjusting seat belt height ............. 136
Adjusting the steering wheel........... 82
Airbags ........................................... 56
Airbags, curtain..................... 141, 142
Airbags, front ........................ 139, 142
Airbags, lateral...................... 141, 142
Air conditioning ............................... 39
Air conditioning, digital.............. 72, 73
Air conditioning, manual ................. 72
Air fi lter ......................................... 168
Air fl ow ............................................ 39
Air vents.......................................... 71
Alarm .............................................. 90
Anti-pinch.................................92, 117
Anti-theft ......................................... 87
Armrest .......................................... 111
Armrest, front .................................113
Armrest, rear ..................................116
Assistance call .............................. 206
Audible warning ............................ 133
Audio/video sockets...................... 236
Audio streaming (Bluetooth) ......... 265
Audio systems ................................ 67
Automatic illumination
of headlamps ..................... 100, 103
Automatic operation of hazard
warning lamps ........................... 133
Automatic rain sensitive
windscreen wipers ............. 105, 107
Auxiliary socket............................. 262
Auxiliary sockets ................... 236, 260Battery ....... 4, 26, 42-44, 82, 168, 190
Battery, charging ........................... 190
Battery, remote control ............. 88, 89
Blind for panoramic sunroof...........117
Blinds ............................................ 121
Bluetooth
(hands-free) ................ 237-239, 263
Bluetooth (telephone) ............ 237-239
Bonnet .......................................... 164
Bonnet stay................................... 164
Boot fl oor, adjustable .....................119
Boot lamp ......................................110
Boot lid............................................ 97
Brake discs ................................... 169
Brake lamps.................................. 181
Brake pads ................................... 169
Brakes .......................................... 169
Capacity, fuel tank .......................... 98
CD MP3 ........................................ 259
Central locking .......................... 86, 95
Changing a bulb ........... 179, 181, 182
Changing a fuse ........................... 183
Changing a wheel ......................... 176
Changing a wiper blade ........ 107, 194
Changing the date .......................... 62
Changing the remote
control battery .............................. 88
Changing the time .......................... 62
Checking levels .................... 167, 168
Checking the engine oil level .......... 60
Checking tyre pressures
(using the kit) ............................. 170
Checks.......................... 166, 168, 169
Child lock ...................................... 132
Children ........................ 127, 130, 131
Child seats ........................... 122, 128
Child seats, conventional...... 125, 127
Closing the boot.................. 86, 96, 97
Closing the doors...................... 86, 94Cold climate screen ...................... 197
Colour screen, retractable ........ 65, 67
Connectors,
audio ................... 112, 113, 260, 262
Control for panoramic
sunroof blind ...............................117
Coolant level ........................... 57, 167
Coolant temperature indicator ........ 57
Courtesy lamps............................. 108
Courtesy mirror ..............................112
Cruise control ............................... 155
Cup holder ..................................... 111
AB
C
Date (setting) .................................. 62
Daytime running lamps ................. 102
Deactivating ESP .......................... 135
Deactivating the passenger
airbag......................................... 139
Deadlocking .................................... 86
Defrosting ................................. 72, 83
Dials and gauges ............................ 47
Diesel........................................ 37, 38
Diesel additive level ...................... 168
Dimensions ................................... 203
Dipped beam ........................ 100, 179
Dipstick ................................... 60, 167
Direction indicators ............... 133, 181
Doors .............................................. 94
Doors emergency control ............... 96
Door trays ...................................... 111
Dynamic emergency braking ........ 146
Dynamic stability control
(DSC)............................. 52, 55, 135
D