ESP Peugeot 508 2016 Repair Manual
[x] Cancel search | Manufacturer: PEUGEOT, Model Year: 2016, Model line: 508, Model: Peugeot 508 2016Pages: 371, PDF Size: 12.12 MB
Page 246 of 371
244
508_en_Chap08_en-cas-de-pannes_ed01-2016
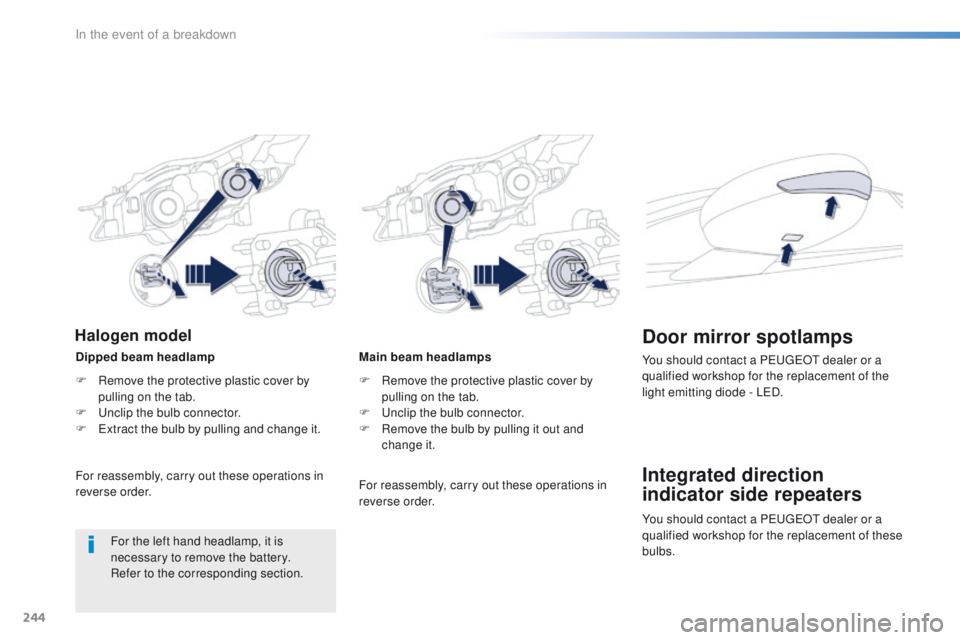
Main beam headlamps
F
R
emove the protective plastic cover by
pulling on the tab.
F
u
n
clip the bulb connector.
F
R
emove the bulb by pulling it out and
change it.
Integrated direction
indicator side repeaters Door mirror spotlamps
You should contact a Pe ugeOt dealer or a
qualified workshop for the replacement of the
light emitting diode - L
eD
.
For reassembly, carry out these operations in
reverse order.
Dipped beam headlamp
Halogen model
F Remove the protective plastic cover by
pulling on the tab.
F
u
n
clip the bulb connector.
F
e
x
tract the bulb by pulling and change it.
For reassembly, carry out these operations in
reverse order.
For the left hand headlamp, it is
necessary to remove the battery.
Refer to the corresponding section. You should contact a P
e
uge
Ot
dealer or a
qualified workshop for the replacement of these
bulbs.
In the event of a breakdown
Page 251 of 371
249
508_en_Chap08_en-cas-de-pannes_ed01-2016
Changing a fuseProcedure for replacing a failed fuse with a new fuse to rectify a failure of the corresponding function.
th
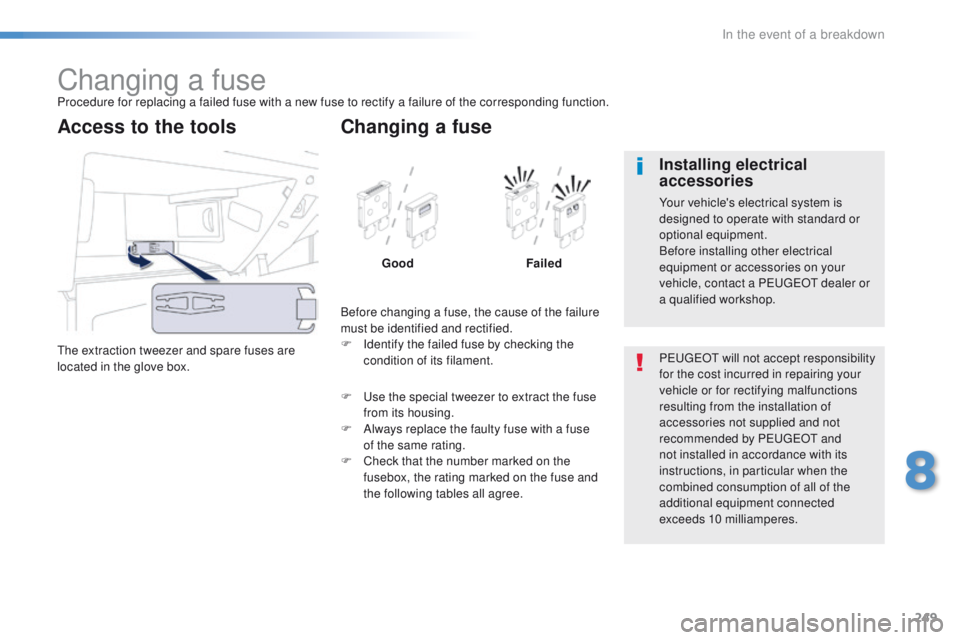
e extraction tweezer and spare fuses are
located in the glove box.
Access to the tools
Before changing a fuse, the cause of the failure
must be identified and rectified.
F
I
dentify the failed fuse by checking the
condition of its filament.
Changing a fuse
Good Failed
F
u
s
e the special tweezer to extract the fuse
from its housing.
F
A
lways replace the faulty fuse with a fuse
of the same rating.
F
C
heck that the number marked on the
fusebox, the rating marked on the fuse and
the following tables all agree. P
e
uge
Ot
will not accept responsibility
for the cost incurred in repairing your
vehicle or for rectifying malfunctions
resulting from the installation of
accessories not supplied and not
recommended by P
e
uge
Ot
and
not installed in accordance with its
instructions, in particular when the
combined consumption of all of the
additional equipment connected
exceeds 10 milliamperes.
Installing electrical
accessories
Your vehicle's electrical system is
designed to operate with standard or
optional equipment.
Before installing other electrical
equipment or accessories on your
vehicle, contact a P
e
uge
Ot
dealer or
a qualified workshop.
8
In the event of a breakdown
Page 254 of 371
252
508_en_Chap08_en-cas-de-pannes_ed01-2016
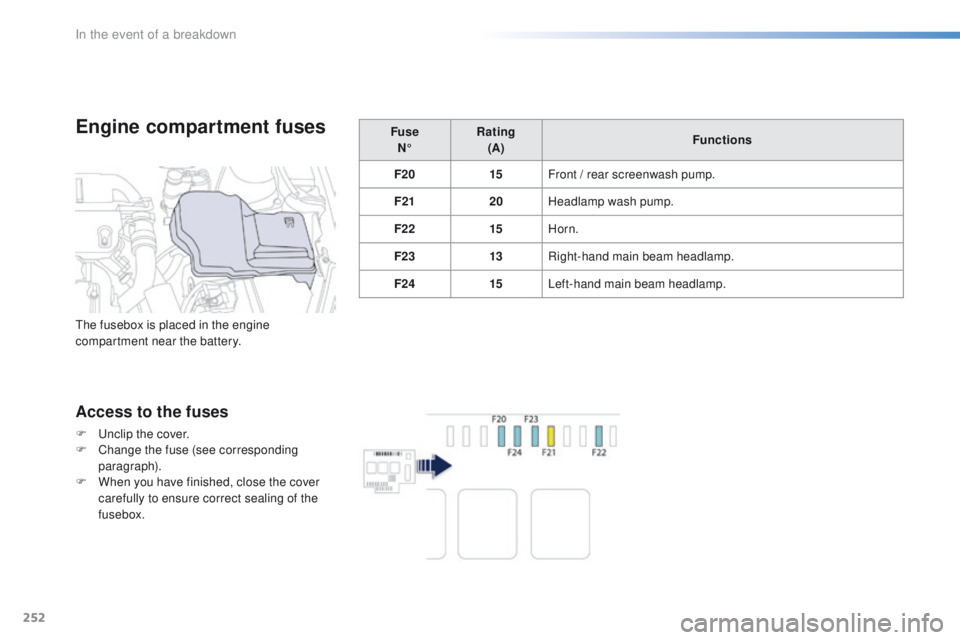
Engine compartment fuses
Access to the fuses
F unclip the cover.
F C hange the fuse (see corresponding
paragraph).
F
W
hen you have finished, close the cover
carefully to ensure correct sealing of the
fusebox. Fuse
N° Rating
(A) Functions
F20 15Front / rear screenwash pump.
F21 20Headlamp wash pump.
F22 15Horn.
F23 13Right-hand main beam headlamp.
F24 15Left-hand main beam headlamp.
th
e fusebox is placed in the engine
compartment near the battery.
In the event of a breakdown
Page 258 of 371
256
508_en_Chap08_en-cas-de-pannes_ed01-2016
Do not force the lever as locking will
not be possible if the clamp is not
positioned correctly; start the procedure
again.
Disconnecting the battery
In order to maintain an adequate state
of charge for starting the engine, it is
recommended that the battery be disconnected
if the vehicle is taken out of service for a long
period.
Wait 2 minutes after switching off the ignition
before disconnecting the battery.
F
c
lose the windows and the doors before
disconnecting the battery,
F
s
witch off all electrical consumers (audio
system, wipers, lighting, ...),
F
s
witch off the ignition and wait for
four
minutes.
Having exposed the battery, it is only
necessary to disconnect the (+) terminal.Following reconnection of
the battery
After reconnecting the battery, switch on the
ignition and wait 1 minute before starting to
allow initialisation of the electronic systems.
However, if minor problems persist following
this operation, contact a P
e
uge
Ot
dealer or a
qualified workshop.
Referring to the corresponding section, you
must yourself reinitialise or reset certain
systems, such as:
-
t
he remote control or electronic key
(depending on version),
-
t
he electric blind(s),
-
t
he electric windows
-
t
he date and time,
-
t
he radio preset stations.
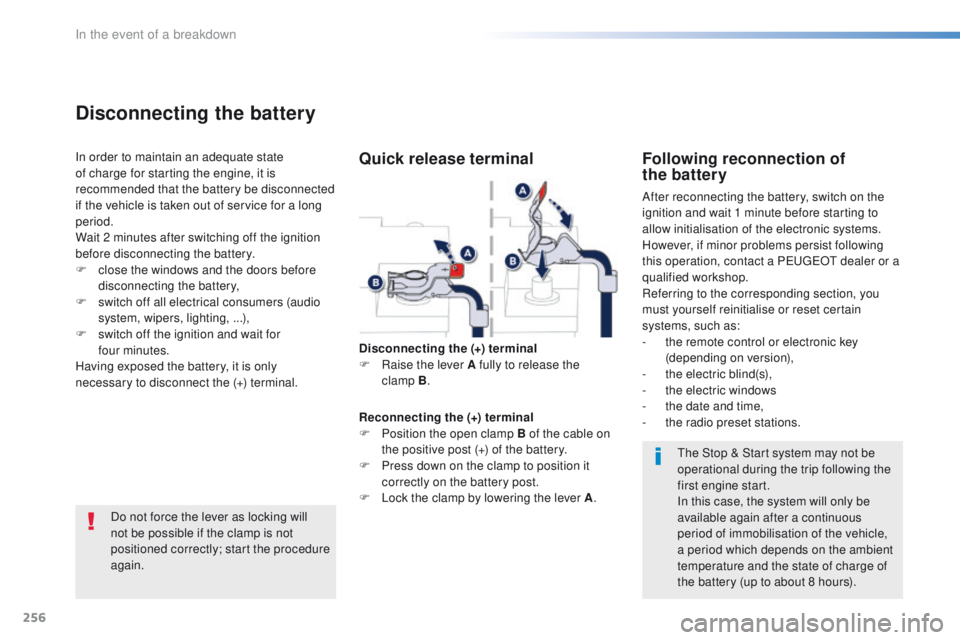
Quick release terminal
Disconnecting the (+) terminal
F Ra ise the lever A fully to release the
clamp
B.
Reconnecting the (+) terminal
F
P
osition the open clamp B of the cable on
the positive post (+) of the battery.
F
P
ress down on the clamp to position it
correctly on the battery post.
F
L
ock the clamp by lowering the lever A .
th
e Stop & Start system may not be
operational during the trip following the
first engine start.
In this case, the system will only be
available again after a continuous
period of immobilisation of the vehicle,
a period which depends on the ambient
temperature and the state of charge of
the battery (up to about 8 hours).
In the event of a breakdown
Page 263 of 371
261
508_en_Chap08_en-cas-de-pannes_ed01-2016
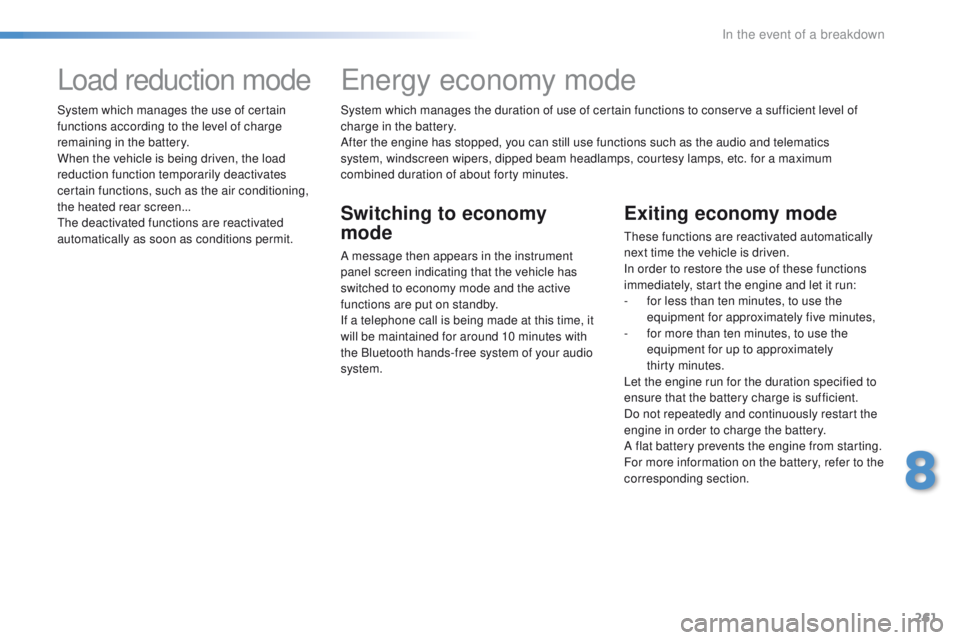
System which manages the duration of use of certain functions to conserve a sufficient level of
charge in the battery.
After the engine has stopped, you can still use functions such as the audio and telematics
system, windscreen wipers, dipped beam headlamps, courtesy lamps, etc. for a maximum
combined duration of about forty minutes.
energy economy mode
Switching to economy
mode
A message then appears in the instrument
panel screen indicating that the vehicle has
switched to economy mode and the active
functions are put on standby.
If a telephone call is being made at this time, it
will be maintained for around 10 minutes with
the Bluetooth hands-free system of your audio
system.
Exiting economy mode
these functions are reactivated automatically
next time the vehicle is driven.
In order to restore the use of these functions
immediately, start the engine and let it run:
-
f
or less than ten minutes, to use the
equipment for approximately five minutes,
-
f
or more than ten minutes, to use the
equipment for up to approximately
thirty
minutes.
Let the engine run for the duration specified to
ensure that the battery charge is sufficient.
Do not repeatedly and continuously restart the
engine in order to charge the battery.
A flat battery prevents the engine from starting.
For more information on the battery, refer to the
corresponding section.
Load reduction mode
System which manages the use of certain
functions according to the level of charge
remaining in the battery.
When the vehicle is being driven, the load
reduction function temporarily deactivates
certain functions, such as the air conditioning,
the heated rear screen...
th
e deactivated functions are reactivated
automatically as soon as conditions permit.
8
In the event of a breakdown
Page 266 of 371
264
508_en_Chap09_caracteristiques-techniques_ed01-2016
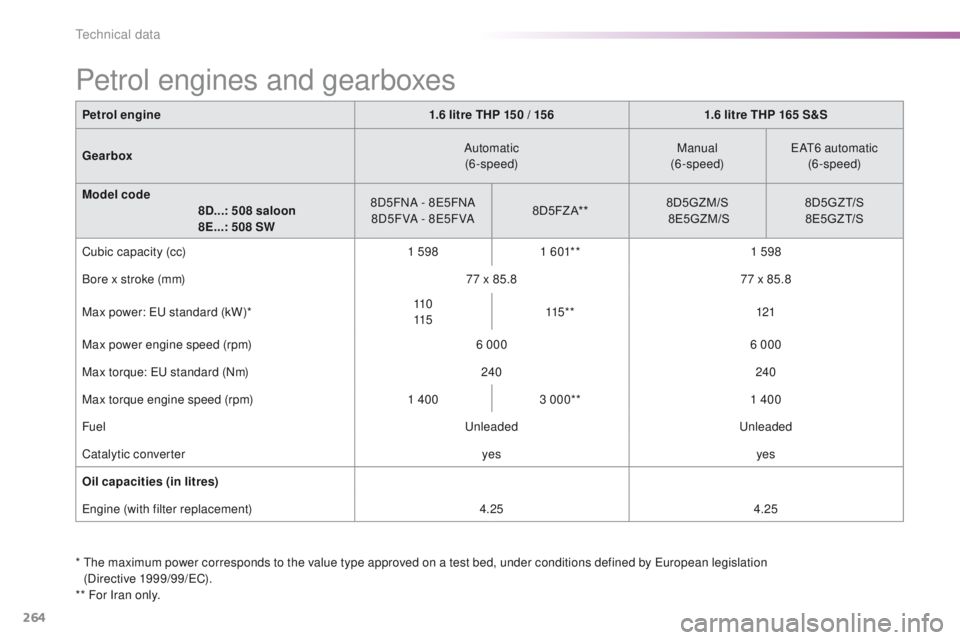
Petrol engine1.6 litre THP 15 0 / 15 61.6 litre THP 165 S&S
Gearbox Automatic
(6-speed) Manual
(6-speed)
eAt6
automatic
(6-speed)
Model code
8D...: 508 saloon
8E...: 508 SW 8D5FNA - 8
e5
FNA
8 D5 F VA - 8
e5
F VA8 D 5 F Z A* * 8D5GZM/S
8E5GZM/S 8 D5G Z T/S
8E5GZT/S
Cubic capacity (cc) 1 5981 6 01* * 1 598
Bore x stroke (mm) 77 x 85.877 x 85.8
Max power:
eu standard (kW)* 11 0
115 115 * *
121
Max power engine speed (rpm) 6 0006 000
Max torque:
eu standard (Nm) 240240
Max torque engine speed (rpm) 1 4003 000** 1 400
Fuel
u
nleaded
u
nleaded
Catalytic converter yesyes
Oil capacities (in litres)
eng
ine (with filter replacement) 4.254.25
Petrol engines and gearboxes
* the maximum power corresponds to the value type approved on a test bed, under conditions defined by eu ropean legislation
(Directive 1999/99/eC ).
** For Iran only.
technical data
Page 268 of 371
266
508_en_Chap09_caracteristiques-techniques_ed01-2016
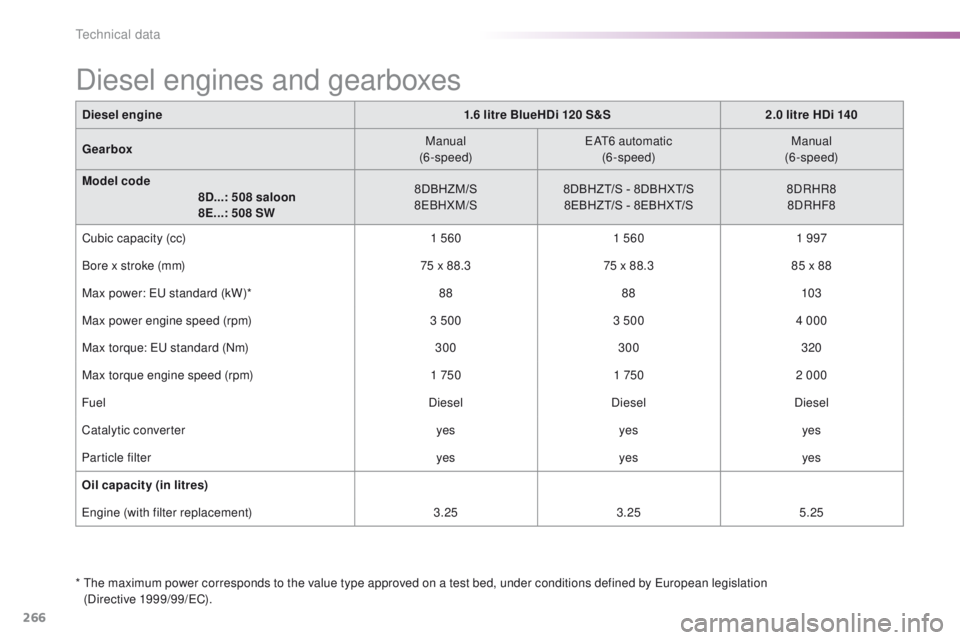
Diesel engine1.6 litre BlueHDi 120 S&S2.0 litre HDi 140
Gearbox Manual
(6-speed)
eAt6
automatic
(6-speed) Manual
(6-speed)
Model code
8D...: 508 saloon
8E...: 508 SW 8DBHZM/S
8
eB
HXM/S8DBHZT/S - 8DBHXT/S
8EBHZT/S - 8EBHXT/S 8DRHR8
8DRHF8
Cubic capacity (cc) 1 5601 560 1 997
Bore x stroke (mm) 75 x 88.375 x 88.3 85 x 88
Max power:
eu standard (kW)* 8888103
Max power engine speed (rpm) 3 5003 5004 000
Max torque:
eu standard (Nm) 300300 320
Max torque engine speed (rpm) 1 7501 7502 000
Fuel DieselDieselDiesel
Catalytic converter yesyesyes
Particle filter yesyesyes
Oil capacity (in litres)
eng
ine (with filter replacement) 3.253.25 5.25
Diesel engines and gearboxes
* the maximum power corresponds to the value type approved on a test bed, under conditions defined by eu ropean legislation
(Directive 1999/99/eC ).
technical data
Page 269 of 371
267
508_en_Chap09_caracteristiques-techniques_ed01-2016
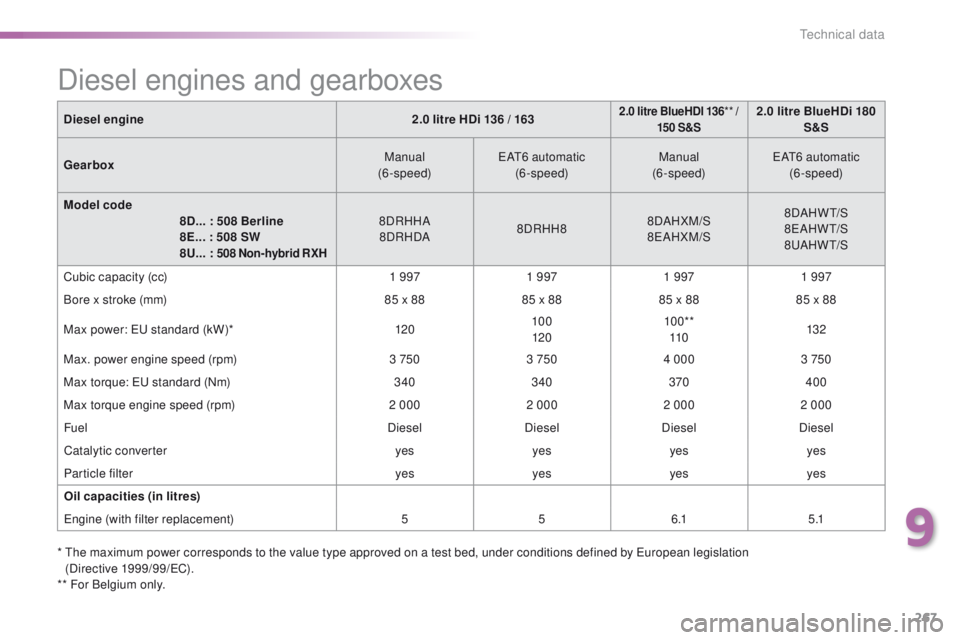
Diesel engine2.0 litre HDi 136 / 1632.0 litre BlueHDI 136** /
15 0 S&S2.0 litre BlueHDi 180 S&S
Gearbox Manual
(6-speed)
eAt6
automatic
(6-speed) Manual
(6-speed)
eAt6
automatic
(6-speed)
Model code
8
D... : 508 Berline
8
E... : 508 SW
8U... :
508 Non-hybrid RXH
8DRHHA
8DRHDA 8DRHH88DAHXM/S
8eAH XM/S8DAHWt/
S
8eA HWt /S
8
uA
HW
t
/S
Cubic capacity (cc) 1 9971 9971 9971 997
Bore x stroke (mm) 85 x 8885 x 8885 x 8885 x 88
Max power:
eu
standard (kW)* 12010 0
120 10 0**
11 0 132
Max. power engine speed (rpm) 3 7503 7504 000 3 750
Max torque:
eu
standard (Nm) 340340 370400
Max torque engine speed (rpm) 2 0002 0002 0002 000
Fuel DieselDieselDieselDiesel
Catalytic converter yesyesyesyes
Particle filter yesyesyesyes
Oil capacities (in litres)
eng
ine (with filter replacement) 556 .1 5 .1
Diesel engines and gearboxes
* the maximum power corresponds to the value type approved on a test bed, under conditions defined by eu ropean legislation
(Directive 1999/99/eC ).
** For Belgium only.
9
technical data
Page 274 of 371
272
508_en_Chap09_caracteristiques-techniques_ed01-2016
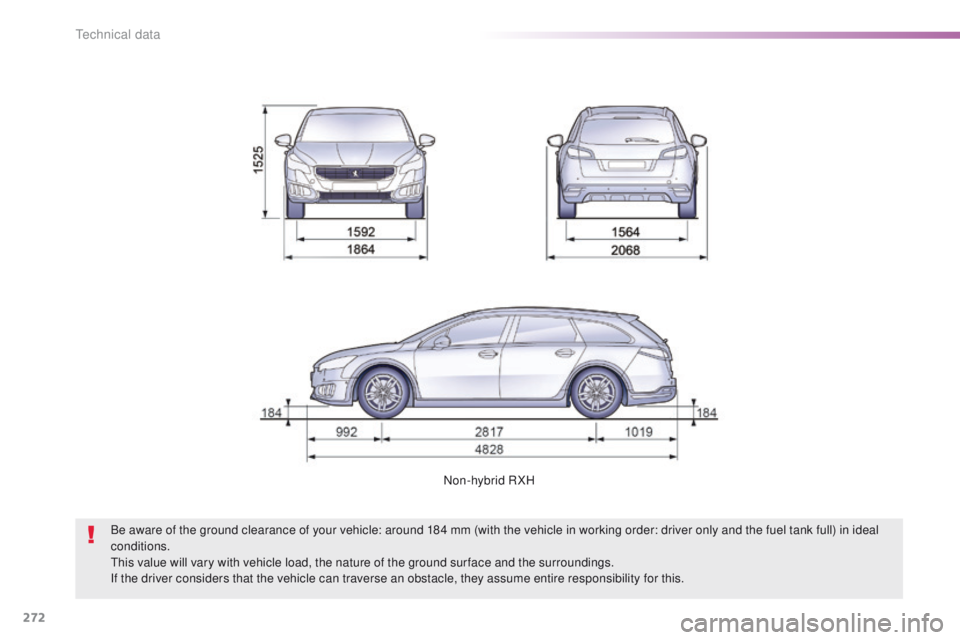
Non-hybrid RXH
Be aware of the ground clearance of your vehicle: around 184 mm (with the vehicle in working order: driver only and the fuel tank full) in ideal
conditions.
th
is value will vary with vehicle load, the nature of the ground sur face and the surroundings.
If the driver considers that the vehicle can traverse an obstacle, they assume entire responsibility for this.
technical data
Page 291 of 371
289
508_en_Chap10c_SMegplus_ed01-2016
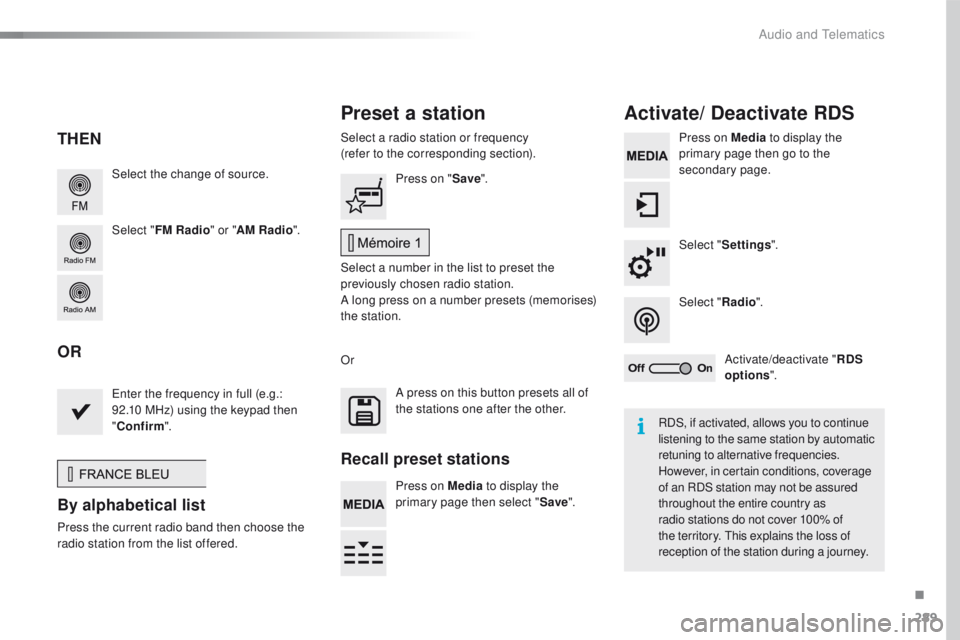
Select the change of source.
Select "FM Radio " or "AM Radio ".Select a radio station or frequency
(refer to the corresponding section).
Press on Media
to display the
primary page then go to the
secondary page.
Select " Settings ".
Select " Radio".
Activate/deactivate " RDS
options ".
Press on "
Save".
Select a number in the list to preset the
previously chosen radio station.
A long press on a number presets (memorises)
the station.
en
ter the frequency in full (e.g.:
92.10 MHz) using the keypad then
" Confirm ".
By alphabetical list
Press the current radio band then choose the
radio station from the list offered. Or
Press on Media to display the
primary page then select " Save".
Preset a station Activate/ Deactivate RDS
THEN
OR
A press on this button presets all of
the stations one after the other.
Recall preset stations
RDS, if activated, allows you to continue
listening to the same station by automatic
retuning to alternative frequencies.
However, in certain conditions, coverage
of an RDS station may not be assured
throughout the entire country as
radio stations do not cover 100% of
the territory.
t
h
is explains the loss of
reception of the station during a journey.
.
Audio and telematics