check engine Peugeot 508 RXH 2014 Owner's Guide
[x] Cancel search | Manufacturer: PEUGEOT, Model Year: 2014, Model line: 508 RXH, Model: Peugeot 508 RXH 2014Pages: 338, PDF Size: 10.81 MB
Page 212 of 338
210
508RXH_en_Chap08_info-pratiques_ed01-2014
Starting using another battery
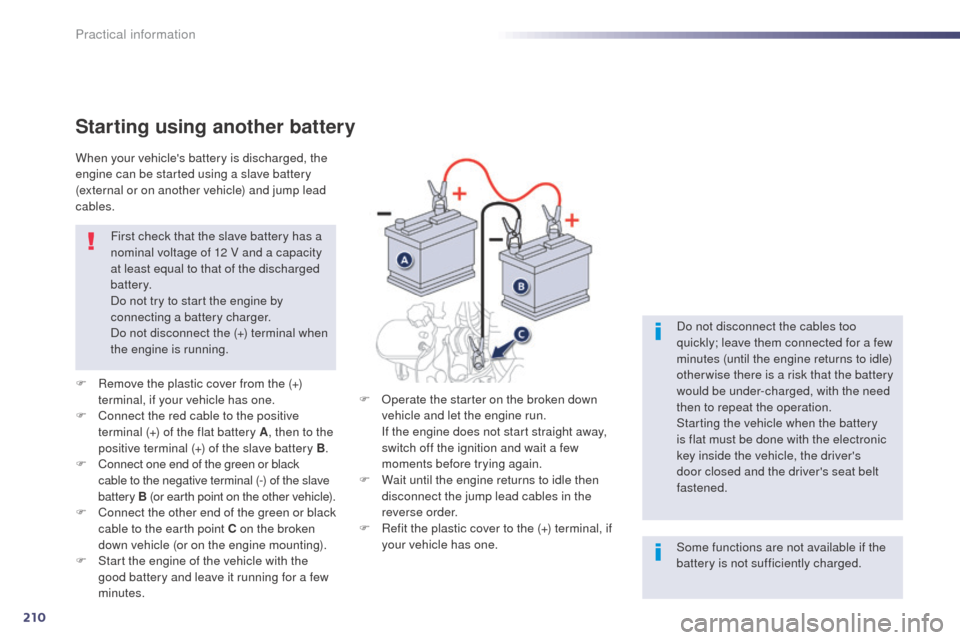
F Remove the plastic cover from the (+) terminal, if your vehicle has one.
F
C
onnect the red cable to the positive
terminal (+) of the flat battery A , then to the
positive terminal (+) of the slave battery B.
F
C
onnect one end of the green or black
cable to the negative terminal (-) of the slave
battery B (or earth point on the other vehicle).
F
C
onnect the other end of the green or black
cable to the earth point C on the broken
down vehicle (or on the engine mounting).
F
S
tart the engine of the vehicle with the
good battery and leave it running for a few
minutes. First check that the slave battery has a
nominal voltage of 12 V and a capacity
at least equal to that of the discharged
battery.
Do not try to start the engine by
connecting a battery charger.
Do not disconnect the (+) terminal when
the engine is running.
When your vehicle's battery is discharged, the
engine can be started using a slave battery
(external or on another vehicle) and jump lead
cables.
F O perate the starter on the broken down
vehicle and let the engine run.
I
f the engine does not start straight away,
switch off the ignition and wait a few
moments before trying again.
F
W
ait until the engine returns to idle then
disconnect the jump lead cables in the
reverse order.
F
R
efit the plastic cover to the (+) terminal, if
your vehicle has one. Do not disconnect the cables too
quickly; leave them connected for a few
minutes (until the engine returns to idle)
otherwise there is a risk that the battery
would be under-charged, with the need
then to repeat the operation.
Starting the vehicle when the battery
is flat must be done with the electronic
key inside the vehicle, the driver's
door closed and the driver's seat belt
fastened.
Some functions are not available if the
battery is not sufficiently charged.
Practical information
Page 213 of 338
211
508RXH_en_Chap08_info-pratiques_ed01-2014
Following reconnection of the battery
Following reconnection of the battery, switch on
the ignition and wait 1 minute before starting to
permit initialisation of the electronic systems.
However, if problems remain following this
operation, contact a P
e
uge
Ot
dealer or a
qualified workshop.
Referring to the corresponding section, you
must yourself reinitialise (depending on
version):
-
t
he remote control key,
-
t
he electric blind(s),
-
...
Before disconnecting the battery
Wait 2 minutes after switching off the ignition
before disconnecting the battery.
Close the windows and the doors before
disconnecting the battery.
Protect your eyes and face before
handling the battery.
All operations on the battery must be
carried out in a well ventilated area and
away from naked flames and sources
of sparks, so as to avoid the risk of
explosion or fire.
Do not try to charge a frozen battery;
the battery must first be thawed out to
avoid the risk of explosion. If the battery
has been frozen, before charging have
it checked by a P
e
uge
Ot
dealer or a
qualified workshop who will check that
the internal components have not been
damaged and the casing is not cracked,
which could cause a leak of toxic and
corrosive acid.
Do not push the vehicle to start the
engine. It is advisable to disconnect the battery
if the vehicle is to be left unused for
more than one month.
the batteries contain harmful substances
such as sulphuric acid and lead.
th ey
must be disposed of in accordance
with regulations and must not, in any
circumstances, be discarded with household
waste.
ta
ke used remote control batteries and
vehicle batteries to a special collection point.
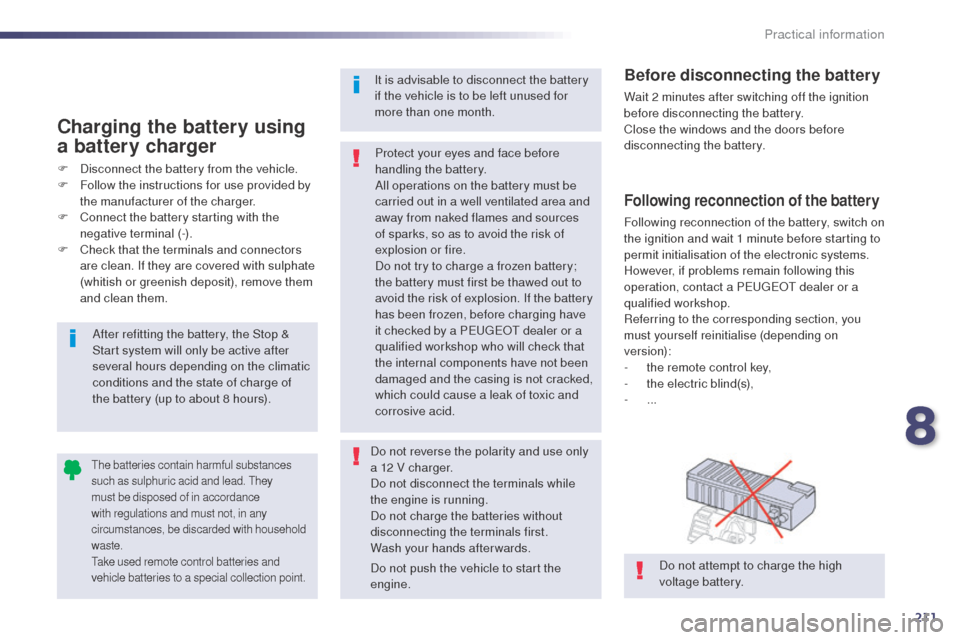
Do not attempt to charge the high
voltage battery.
After refitting the battery, the Stop &
Start system will only be active after
several hours depending on the climatic
conditions and the state of charge of
the battery (up to about 8 hours).
Charging the battery using
a battery charger
F Disconnect the battery from the vehicle.
F
F ollow the instructions for use provided by
the manufacturer of the charger.
F
C
onnect the battery starting with the
negative terminal (-).
F
C
heck that the terminals and connectors
are clean. If they are covered with sulphate
(whitish or greenish deposit), remove them
and clean them.
Do not reverse the polarity and use only
a 12 V charger.
Do not disconnect the terminals while
the engine is running.
Do not charge the batteries without
disconnecting the terminals first.
Wash your hands afterwards.
8
Practical information
Page 217 of 338
215
508RXH_en_Chap08_info-pratiques_ed01-2014
Refitting
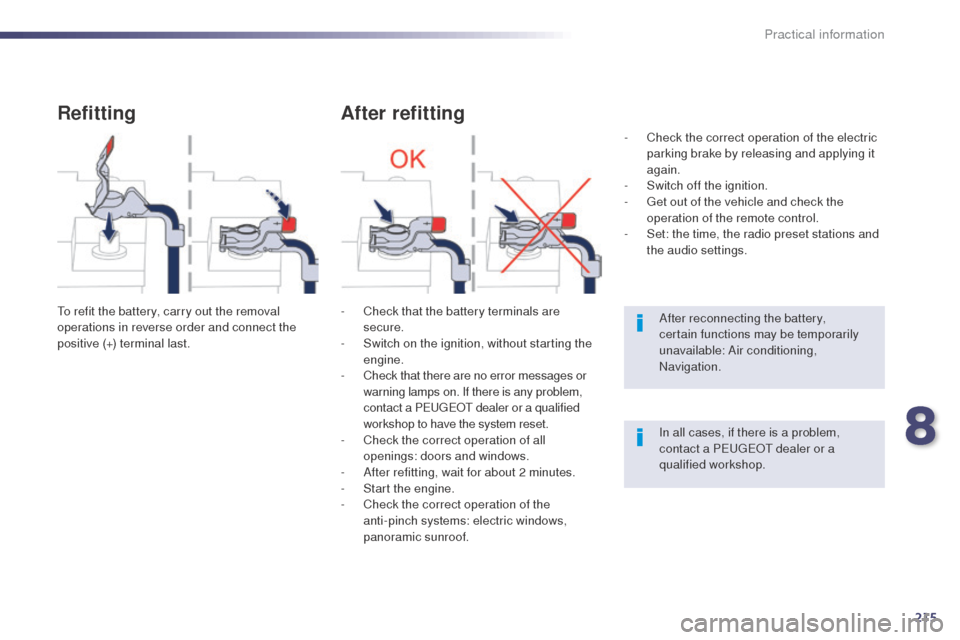
to refit the battery, carry out the removal
operations in reverse order and connect the
positive (+) terminal last.
After refitting
- Check that the battery terminals are secure.
-
S
witch on the ignition, without starting the
engine.
-
C
heck that there are no error messages or
warning lamps on. If there is any problem,
contact a P
e
uge
Ot
dealer or a qualified
workshop to have the system reset.
-
C
heck the correct operation of all
openings: doors and windows.
-
A
fter refitting, wait for about 2 minutes.
-
S
tart the engine.
-
C
heck the correct operation of the
anti-pinch systems: electric windows,
panoramic sunroof. After reconnecting the battery,
certain functions may be temporarily
unavailable: Air conditioning,
Navigation.
In all cases, if there is a problem,
contact a P
e
uge
Ot
dealer or a
qualified workshop.
-
C
heck the correct operation of the electric
parking brake by releasing and applying it
again.
-
S
witch off the ignition.
- g
e
t out of the vehicle and check the
operation of the remote control.
-
S
et: the time, the radio preset stations and
the audio settings.
8
Practical information
Page 223 of 338
221
508RXH_en_Chap08_info-pratiques_ed01-2014
Driving advice
Distribution of loads
F Distribute the load in the trailer so that the heaviest items are as close as possible to
the axle and the nose weight approaches the
maximum permitted without exceeding it.
Air density decreases with altitude, thus
reducing engine performance. Above
1
000 metres, the maximum towed load must
be reduced by 10
% for every 1 000 metres of
altitude.
Side wind
F take into account the increased sensitivity to side wind.
Cooling
towing a trailer on a slope increases the
temperature of the coolant.
As the fan is electrically controlled, its cooling
capacity is not dependent on the engine speed.
F
t
o l
ower the engine speed, reduce your
speed.
th
e maximum towed load on a long incline
depends on the gradient and the ambient
temperature.
In all cases, keep a check on the coolant
temperature.
F
I
f the warning lamp and the STOP
warning lamp come on, stop the
vehicle and switch off the engine
as soon as possible.
Braking
towing a trailer increases the braking distance.to a void overheating of the brakes on a long
mountain type of descent, the use of engine
braking is recommended.
Ty r e s
F Check the tyre pressures of the towing vehicle and of the trailer, observing the
recommended pressures.
Lighting
F Check the electrical lighting and signalling on the trailer.
th
e rear parking sensors will be
deactivated automatically if a genuine
P
e
uge
Ot
towbar is used.
Refer to the "
te
chnical data" section for details
of the weights and towed loads which apply to
your vehicle.
8
Practical information
Page 228 of 338
226
508RXH_en_Chap09_verifications_ed01-2014
PeugeOt & t O tA L,
A PARtNeRSHIP tO DeL IVe R
Be
tte R
P
e
RFORMANC
e
!
Innovation, the key to success
the tOtAL Research and Development and
Pe
ugeOt teams work together to develop high
quality lubricants that meet the requirements
of P
e
uge
Ot
vehicles. For you, this is the
assurance that the performance of your engine
is optimised while also ensuring its durability.
th
e 208 HYbrid F
e
demonstrates the ability of
P
e
uge
Ot
and
tOtA
L to develop innovative
technologies and provide other ways of moving
towards the future.
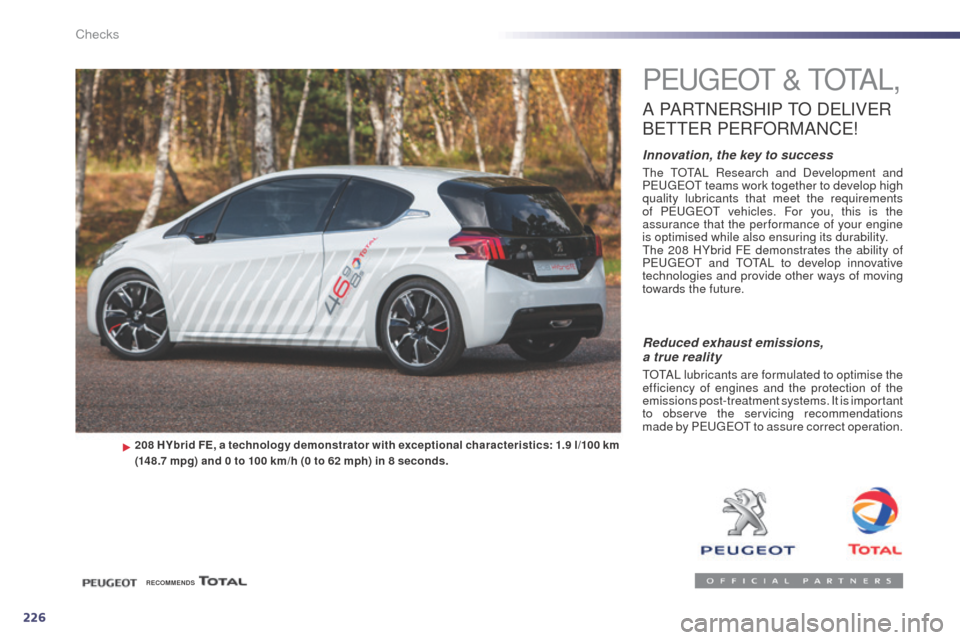
208 HYbrid FE, a technology demonstrator with exceptional characteristics: 1.9 l/100 km
( 148.7 mpg) and 0 to 100 km/h (0 to 62 mph) in 8 seconds.
Reduced exhaust emissions,
a true reality
tOtAL lubricants are formulated to optimise the
efficiency of engines and the protection of the
emissions post-treatment systems. It is important
to observe the servicing recommendations
made by P
e
uge
Ot
to assure correct operation.
RECOMMENDS
Checks
Page 229 of 338
227
508RXH_en_Chap09_verifications_ed01-2014
Opening the bonnet
Opening
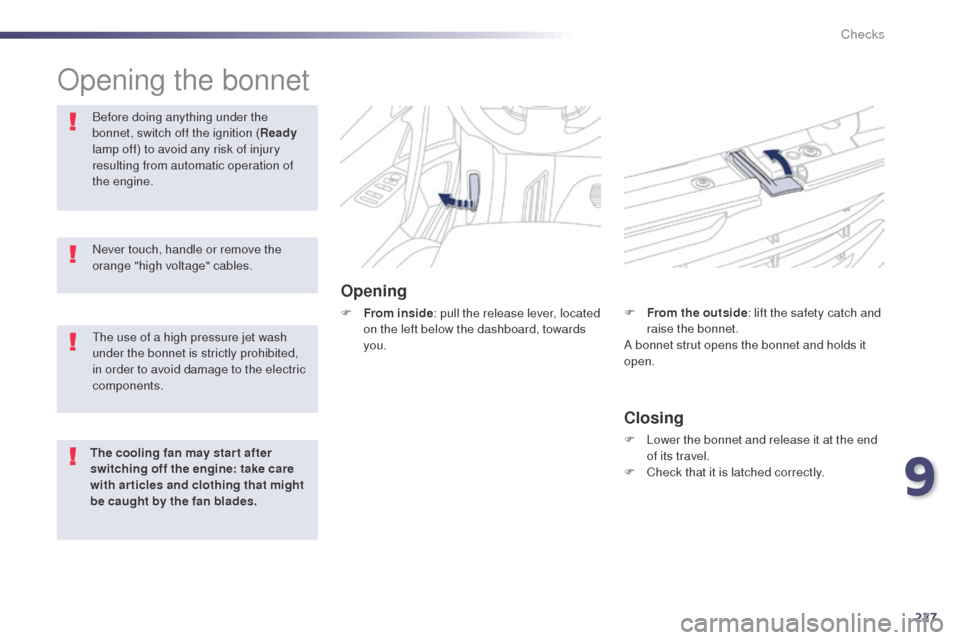
F From inside: pull the release lever, located
on the left below the dashboard, towards
you.
Before doing anything under the
bonnet, switch off the ignition (
Ready
lamp off) to avoid any risk of injury
resulting from automatic operation of
the engine.
Closing
F Lower the bonnet and release it at the end of its travel.
F
C
heck that it is latched correctly.
F
F
rom the outside
: lift the safety catch and
raise the bonnet.
A bonnet strut opens the bonnet and holds it
open.
Never touch, handle or remove the
orange "high voltage" cables.
th
e use of a high pressure jet wash
under the bonnet is strictly prohibited,
in order to avoid damage to the electric
components.
The cooling fan may star t after
switching off the engine: take care
with articles and clothing that might
be caught by the fan blades.
9
Checks
Page 230 of 338
228
508RXH_en_Chap09_verifications_ed01-2014
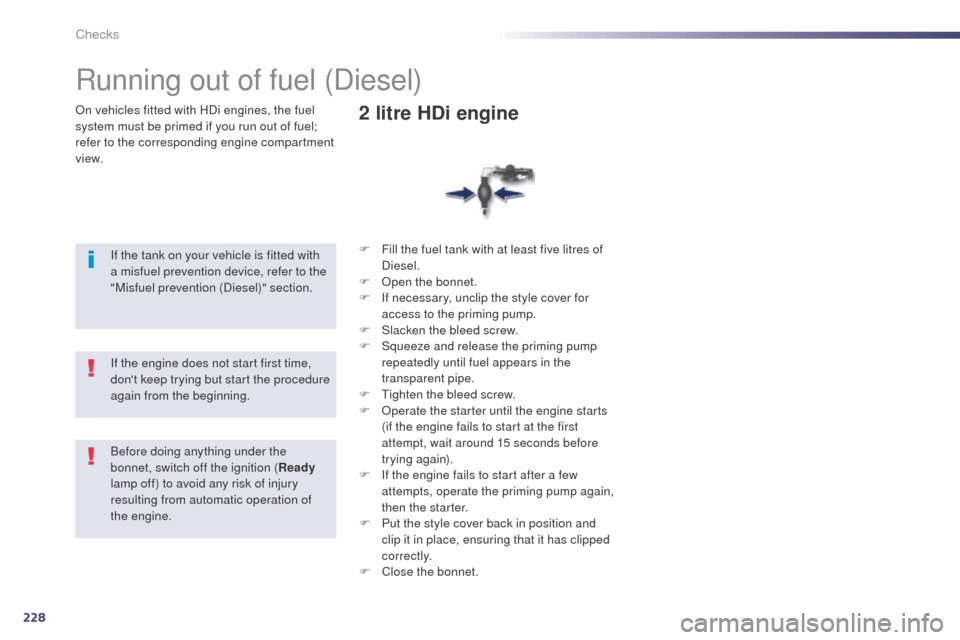
On vehicles fitted with HDi engines, the fuel
system must be primed if you run out of fuel;
refer to the corresponding engine compartment
view.
Running out of fuel (Diesel)
If the tank on your vehicle is fitted with
a misfuel prevention device, refer to the
"Misfuel prevention (Diesel)" section.F
F ill the fuel tank with at least five litres of
Diesel.
F
O
pen the bonnet.
F
I
f necessary, unclip the style cover for
access to the priming pump.
F
S
lacken the bleed screw.
F
S
queeze and release the priming pump
repeatedly until fuel appears in the
transparent pipe.
F
t
i
ghten the bleed screw.
F
O
perate the starter until the engine starts
(if the engine fails to start at the first
attempt, wait around 15 seconds before
trying again).
F
I
f the engine fails to start after a few
attempts, operate the priming pump again,
then the starter.
F
P
ut the style cover back in position and
clip it in place, ensuring that it has clipped
c o r r e c t l y.
F
C
lose the bonnet.
2 litre HDi engine
If the engine does not start first time,
don't keep trying but start the procedure
again from the beginning.
Before doing anything under the
bonnet, switch off the ignition (Ready
lamp off) to avoid any risk of injury
resulting from automatic operation of
the engine.
Checks
Page 231 of 338
229
508RXH_en_Chap09_verifications_ed01-2014
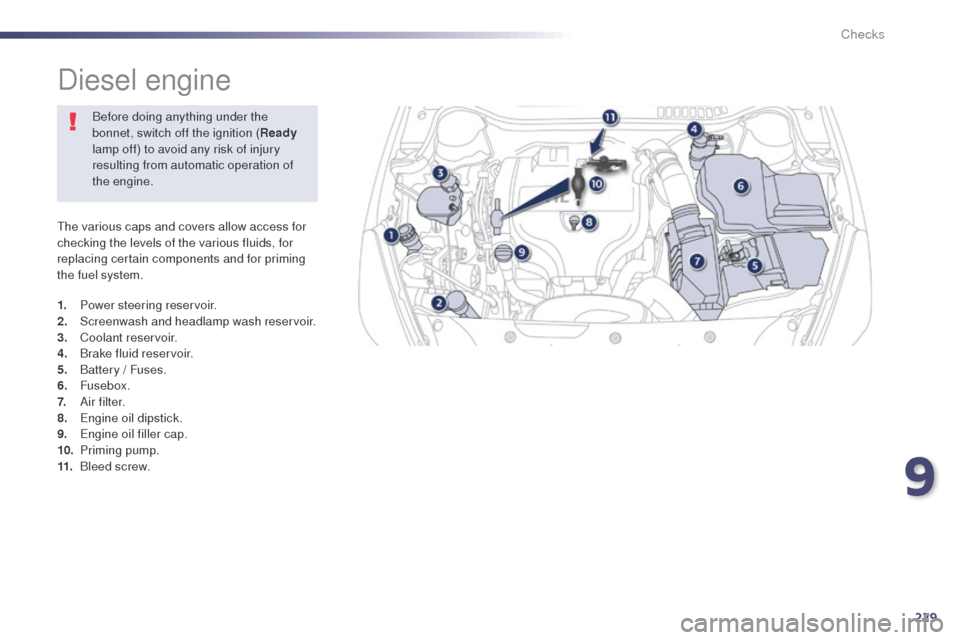
the various caps and covers allow access for
checking the levels of the various fluids, for
replacing certain components and for priming
the fuel system.
Diesel engine
1. Power steering reservoir.
2. Screenwash and headlamp wash reservoir.
3.
C
oolant reservoir.
4.
B
rake fluid reservoir.
5.
B
attery / Fuses.
6.
Fusebox.
7.
A
i r f i l t e r.
8.
e
n
gine oil dipstick.
9.
e
n
gine oil filler cap.
10.
P
riming pump.
11.
B
leed screw.Before doing anything under the
bonnet, switch off the ignition (
Ready
lamp off) to avoid any risk of injury
resulting from automatic operation of
the engine.
9
Checks
Page 232 of 338
230
508RXH_en_Chap09_verifications_ed01-2014
Checking levels
Before doing anything under the
bonnet, switch off the ignition (Ready
lamp off) to avoid any risk of injury
resulting from automatic operation of
the engine.
Engine oil level
the check is carried out either when
the ignition is switched on using the
oil level indicator in the instrument
panel for vehicles with and electric oil
level gauge, or using the dipstick.
to e
nsure that the reading is correct,
your vehicle must be parked on a level
sur face and the engine having been off
for more than 30 minutes.
It is normal to top up the oil level between
two services (or oil changes). P
e
uge
Ot
recommends that you check the level, and top
up if necessary, every 3 000 miles (5 000 kms). Check all of these levels regularly, in line with the warranty and maintenance record. t
o
p them up if necessary, unless other wise indicated.
If a level drops significantly, have the corresponding system checked by a P
e
uge
Ot
dealer or a qualified workshop.
ta
ke care when working under the bonnet, as certain areas of the engine may be extremely hot (risk of burns) and the cooling fan could start at
any time (even with the ignition off).
Checking using the dipstick
Refer to the "Diesel engine" section for
the location of the dipstick in the engine
compartment of your vehicle.
F
t
a
ke the dipstick by its coloured grip and
remove it completely.
F
W
ipe the end of the dipstick using a clean
non-fluffy cloth.
F
R
efit the dipstick and push fully down, then
pull it out again to make the visual check:
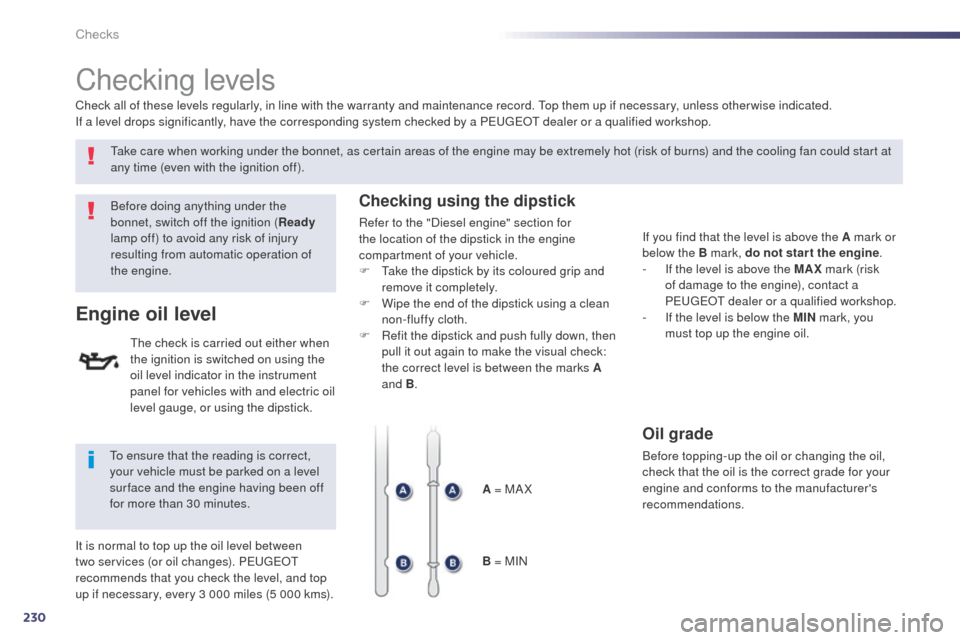
the correct level is between the marks A
and B .
A = MA X
B = MIN If you find that the level is above the A mark or
below the B mark, do not star t the engine
.
-
I
f the level is above the MAX mark (risk
of damage to the engine), contact a
P
e
uge
Ot
dealer or a qualified workshop.
-
I
f the level is below the MIN mark, you
must top up the engine oil.
Oil grade
Before topping-up the oil or changing the oil,
check that the oil is the correct grade for your
engine and conforms to the manufacturer's
recommendations.
Checks
Page 233 of 338
231
508RXH_en_Chap09_verifications_ed01-2014
the brake fluid level should be close
to the "MA X" mark. If it is not, check
the brake pad wear.
Brake fluid level
Changing the fluid
Refer to the warranty and maintenance record
for details of the interval for this operation.
Fluid specification
the brake fluid must conform to the
manufacturer's recommendations.
Power steering fluid level
the power steering fluid level should
be close to the "MA X" mark. With
the engine cold, unscrew the cap to
check the level.
Topping up the engine oil level
Refer to the "Diesel engine" section for the
location of the oil filler cap in the engine
compartment of your vehicle.
F u
n
screw the oil filler cap to reveal the filler
aperture.
F
A
dd oil in small quantities, avoiding any
spills on engine components (risk of fire).
F
W
ait a few minutes before checking the
level again using the dipstick.
F
A
dd more oil if necessary.
F
A
fter checking the level, carefully refit the
oil filler cap and the dipstick in its tube.
After topping up the oil, the check when
switching on the ignition with the oil level
indicator in the instrument panel is not valid
during the 30 minutes after topping up.
Engine oil change
Refer to the warranty and maintenance record
for the interval for this operation.
In order to maintain the reliability of the engine
and emission control system, the use of
additives in the engine oil is prohibited.
9
Checks