tow Peugeot Bipper 2015 User Guide
[x] Cancel search | Manufacturer: PEUGEOT, Model Year: 2015, Model line: Bipper, Model: Peugeot Bipper 2015Pages: 192, PDF Size: 7.97 MB
Page 43 of 192
41
Bipper_en_Chap03_pret-a-partir_ed02-2014
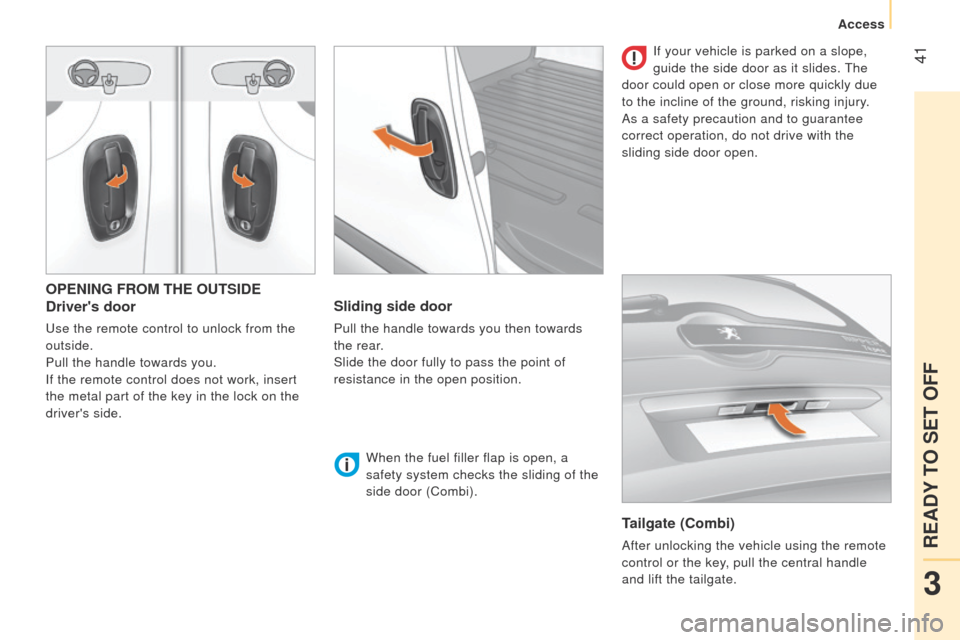
OPENING FROM THE OUTSIDE
Driver's door
use the remote control to unlock from the
outside.
Pull the handle towards you.
If the remote control does not work, insert
the metal part of the key in the lock on the
driver's side.
Sliding side door
Pull the handle towards you then towards
the rear.
Slide the door fully to pass the point of
resistance in the open position.
When the fuel filler flap is open, a
safety system checks the sliding of the
side door (Combi).
Tailgate (Combi)
After unlocking the vehicle using the remote
control or the key, pull the central handle
and lift the tailgate.If your vehicle is parked on a slope,
guide the side door as it slides.
t
he
door could open or close more quickly due
to the incline of the ground, risking injury.
As a safety precaution and to guarantee
correct operation, do not drive with the
sliding side door open.
3
READY TO SET OFF
Access
Page 44 of 192
42
Bipper_en_Chap03_pret-a-partir_ed02-2014
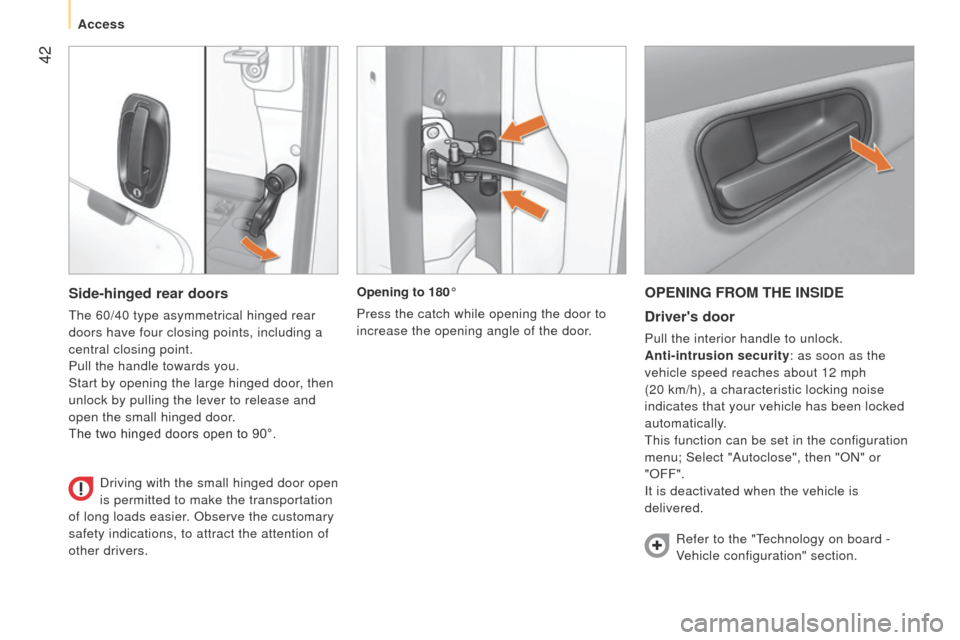
OPENING FROM THE INSIDEDriver's door
Pull the interior handle to unlock.
Anti-intrusion security: as soon as the
vehicle speed reaches about 12 mph
(20 km/h), a characteristic locking noise
indicates that your vehicle has been locked
automatically.
t
his function can be set in the configuration
menu; Select "Autoclose", then "ON" or
"OFF".
It is deactivated when the vehicle is
delivered.
Opening to 180°
Press the catch while opening the door to
increase the opening angle of the door.
Side-hinged rear doors
the 60/40 type asymmetrical hinged rear
doors have four closing points, including a
central closing point.
Pull the handle towards you.
Start by opening the large hinged door, then
unlock by pulling the lever to release and
open the small hinged door.
The two hinged doors open to 90°.
Driving with the small hinged door open
is permitted to make the transportation
of long loads easier. Observe the customary
safety indications, to attract the attention of
other drivers. Refer to the "
t
echnology on board -
Vehicle configuration" section.
Access
Page 45 of 192
43
Bipper_en_Chap03_pret-a-partir_ed02-2014
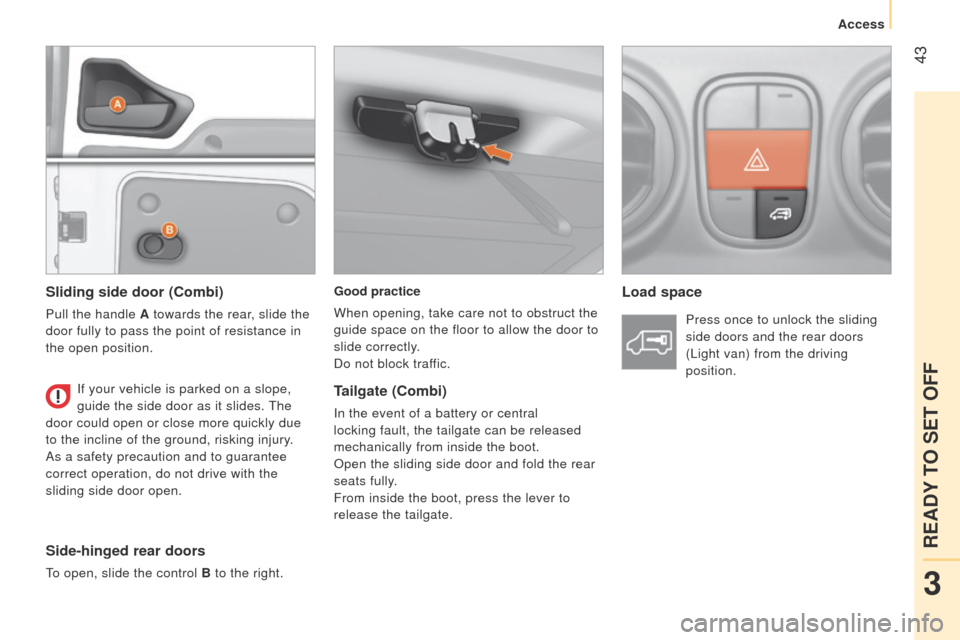
Good practice
When opening, take care not to obstruct the
guide space on the floor to allow the door to
slide correctly.
Do not block traffic.Load space
Sliding side door (Combi)
Pull the handle A towards the rear, slide the
door fully to pass the point of resistance in
the open position.
Side-hinged rear doors
to open, slide the control B to the right.
If your vehicle is parked on a slope,
guide the side door as it slides.
t
he
door could open or close more quickly due
to the incline of the ground, risking injury.
As a safety precaution and to guarantee
correct operation, do not drive with the
sliding side door open. Press once to unlock the sliding
side doors and the rear doors
( l ight van) from the driving
position.
Tailgate (Combi)
In the event of a battery or central
locking fault, the tailgate can be released
mechanically from inside the boot.
Open the sliding side door and fold the rear
seats fully.
From inside the boot, press the lever to
release the tailgate.
3
READY TO SET OFF
Access
Page 47 of 192
45
Bipper_en_Chap03_pret-a-partir_ed02-2014
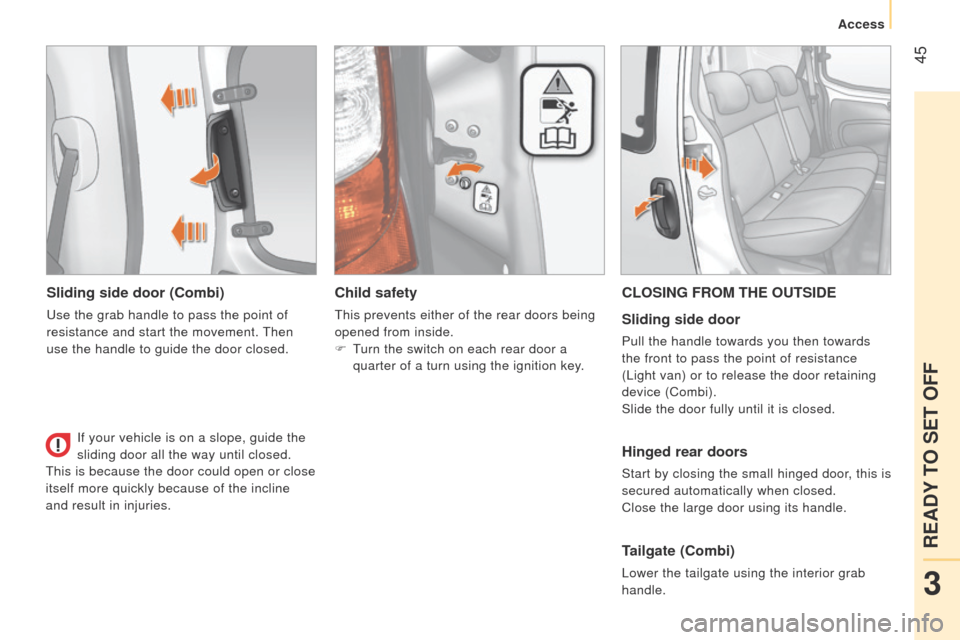
Sliding side door (Combi)
use the grab handle to pass the point of
resistance and start the movement.
t
hen
use the handle to guide the door closed.
Child safety
this prevents either of the rear doors being
opened from inside.
F
t
urn the switch on each rear door a
quarter of a turn using the ignition key.
CLOSING FROM THE OUTSIDE
Sliding side door
Pull the handle towards you then towards
the front to pass the point of resistance
(
l ight van) or to release the door retaining
device (Combi).
Slide the door fully until it is closed.
Hinged rear doors
Start by closing the small hinged door, this is
secured automatically when closed.
Close the large door using its handle.
Tailgate (Combi)
lower the tailgate using the interior grab
handle.
If your vehicle is on a slope, guide the
sliding door all the way until closed.
t
his is because the door could open or close
itself more quickly because of the incline
and result in injuries.
3
READY TO SET OFF
Access
Page 48 of 192
46
Bipper_en_Chap03_pret-a-partir_ed02-2014
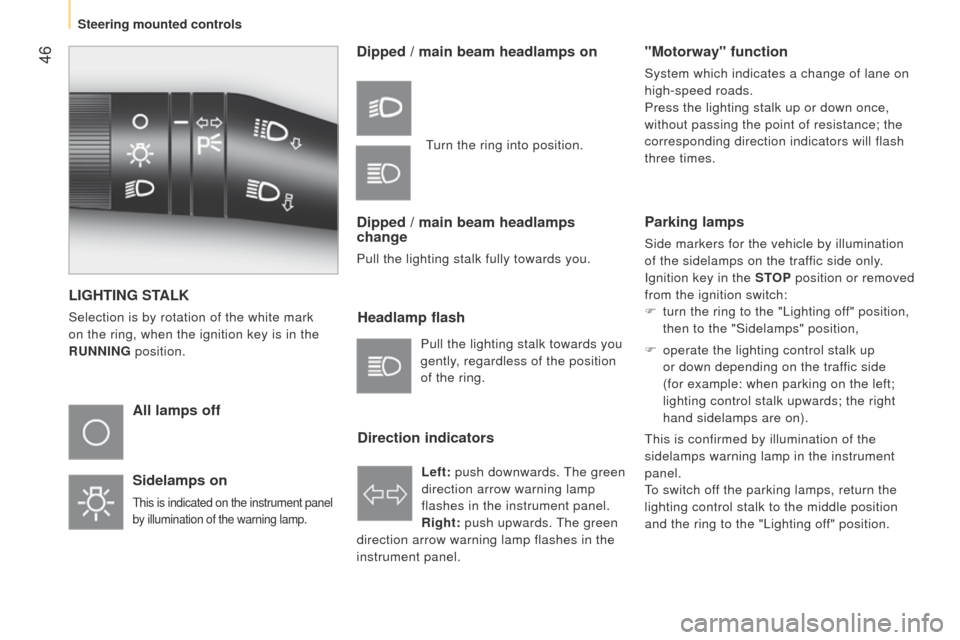
LIGHTING STALK
Selection is by rotation of the white mark
on the ring, when the ignition key is in the
RUNNING position.
All lamps off
Sidelamps on
this is indicated on the instrument panel
by illumination of the warning lamp.
Dipped / main beam headlamps on
Dipped / main beam headlamps
change
Pull the lighting stalk fully towards you.
Headlamp flash
Direction indicators "Motorway" function
System which indicates a change of lane on
high-speed roads.
Press the lighting stalk up or down once,
without passing the point of resistance; the
corresponding direction indicators will flash
three times.
Pull the lighting stalk towards you
gently, regardless of the position
of the ring. Left: push downwards.
t
he green
direction arrow warning lamp
flashes in the instrument panel.
Right: push upwards.
t
he green
direction arrow warning lamp flashes in the
instrument panel.
turn the ring into position.
Parking lamps
Side markers for the vehicle by illumination
of the sidelamps on the traffic side only.
Ignition key in the STOP position or removed
from the ignition switch:
F
turn the ring to the "
l ighting off" position,
then to the "Sidelamps" position,
F
operate the lighting control stalk up
or down depending on the traffic side
(for example: when parking on the left;
lighting control stalk upwards; the right
hand sidelamps are on).
t
his is confirmed by illumination of the
sidelamps warning lamp in the instrument
panel.
to switch of
f the parking lamps, return the
lighting control stalk to the middle position
and the ring to the "
l ighting off" position.
Steering mounted controls
Page 49 of 192
47
Bipper_en_Chap03_pret-a-partir_ed02-2014
Headlamp beam
You are advised to adjust the height of the
headlamp beams in accordance with the
load in your vehicle.
t
his function can only be accessed in
the main beam headlamps and dipped
headlamps position.
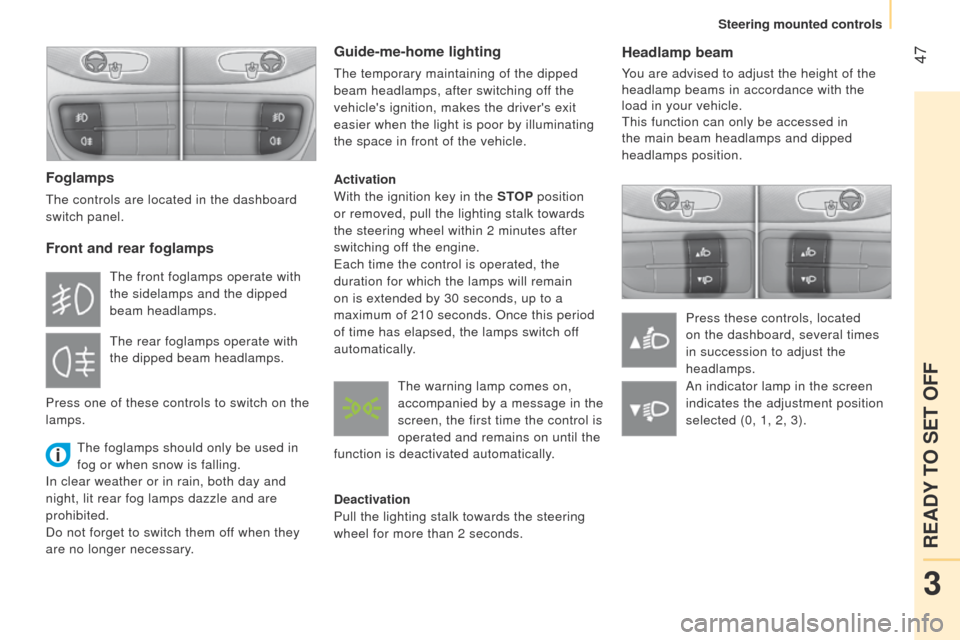
Press these controls, located
on the dashboard, several times
in succession to adjust the
headlamps.
Foglamps
the controls are located in the dashboard
switch panel.
Front and rear foglamps
the foglamps should only be used in
fog or when snow is falling.
In clear weather or in rain, both day and
night, lit rear fog lamps dazzle and are
prohibited.
Do not forget to switch them off when they
are no longer necessary.
Guide-me-home lighting
the temporary maintaining of the dipped
beam headlamps, after switching of f the
vehicle's ignition, makes the driver's exit
easier when the light is poor by illuminating
the space in front of the vehicle.
Activation
With the ignition key in the STOP position
or removed, pull the lighting stalk towards
the steering wheel within 2 minutes after
switching off the engine.
e
ach time the control is operated, the
duration for which the lamps will remain
on is extended by 30 seconds, up to a
maximum of 210 seconds. Once this period
of time has elapsed, the lamps switch off
automatically.
Deactivation
Pull the lighting stalk towards the steering
wheel for more than 2 seconds.
t
he front foglamps operate with
the sidelamps and the dipped
beam headlamps.
t
he rear foglamps operate with
the dipped beam headlamps.
Press one of these controls to switch on the
lamps.
t
he warning lamp comes on,
accompanied by a message in the
screen, the first time the control is
operated and remains on until the
function is deactivated automatically. An indicator lamp in the screen
indicates the adjustment position
selected (0, 1, 2, 3).
3
READY TO SET OFF
Steering mounted controls
Page 53 of 192
51
Bipper_en_Chap03_pret-a-partir_ed02-2014
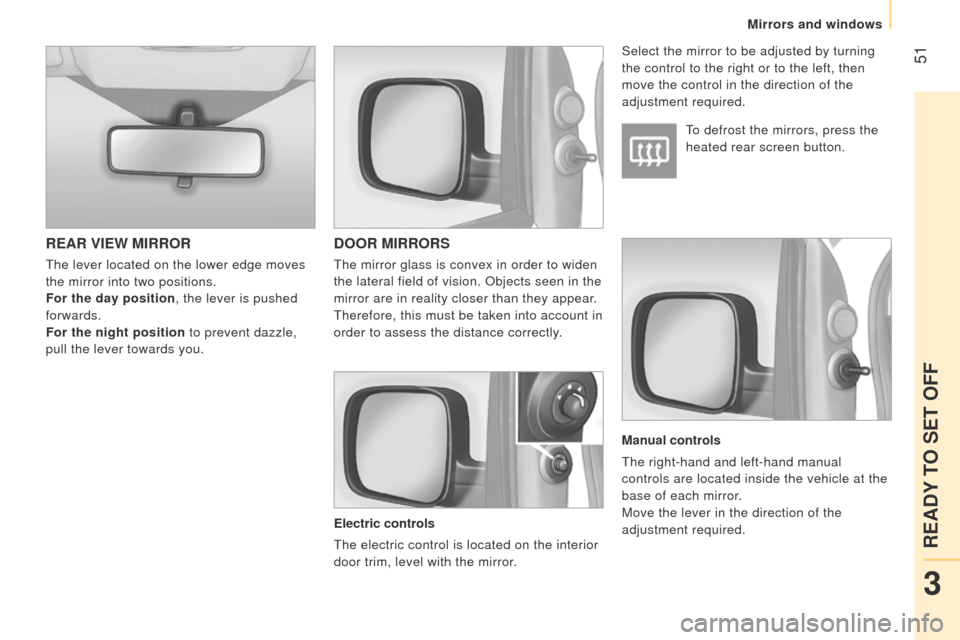
REAR VIEW MIRRORDOOR MIRRORS
Electric controls
t
he electric control is located on the interior
door trim, level with the mirror.
to defrost the mirrors, press the
heated rear screen button.
Select the mirror to be adjusted by turning
the control to the right or to the left, then
move the control in the direction of the
adjustment required.
Manual controls
t
he right-hand and left-hand manual
controls are located inside the vehicle at the
base of each mirror.
Move the lever in the direction of the
adjustment required.
t
he lever located on the lower edge moves
the mirror into two positions.
For the day position, the lever is pushed
forwards.
For the night position to prevent dazzle,
pull the lever towards you.
t
he mirror glass is convex in order to widen
the lateral field of vision. Objects seen in the
mirror are in reality closer than they appear.
t
herefore, this must be taken into account in
order to assess the distance correctly.
3
READY TO SET OFF
Mirrors and windows
Page 56 of 192
54
Bipper_en_Chap03_pret-a-partir_ed02-2014
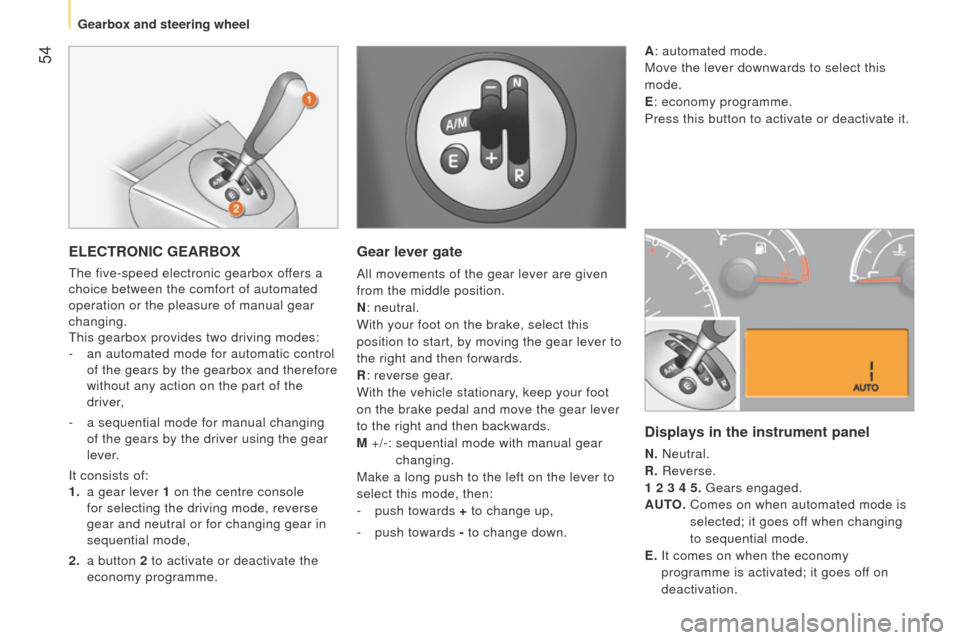
ELECTRONIC GEARBOX
the five-speed electronic gearbox offers a
choice between the comfort of automated
operation or the pleasure of manual gear
changing.
t
his gearbox provides two driving modes:
-
an automated mode for automatic control
of the gears by the gearbox and therefore
without any action on the part of the
driver,
-
a sequential mode for manual changing
of the gears by the driver using the gear
lever.
It consists of:
1.
a gear lever
1 on the centre console
for selecting the driving mode, reverse
gear and neutral or for changing gear in
sequential mode,
2.
a button
2 to activate or deactivate the
economy programme.
Gear lever gate
All movements of the gear lever are given
from the middle position.
N : neutral.
With your foot on the brake, select this
position to start, by moving the gear lever to
the right and then forwards.
R : reverse gear.
With the vehicle stationary, keep your foot
on the brake pedal and move the gear lever
to the right and then backwards.
M +/-:
sequential mode with manual gear
changing.
Make a long push to the left on the lever to
select this mode, then:
-
push towards
+ to change up,
-
push towards
- to change down.
Displays in the instrument panel
N. Neutral.
R. Reverse.
1 2 3 4 5.
g ears engaged.
AUTO.
Comes on when automated mode is
selected; it goes off when changing
to sequential mode.
E.
It comes on when the economy
programme is activated; it goes off on
deactivation.
A
: automated mode.
Move the lever downwards to select this
mode.
E : economy programme.
Press this button to activate or deactivate it.
Gearbox and steering wheel
Page 57 of 192
55
Bipper_en_Chap03_pret-a-partir_ed02-2014
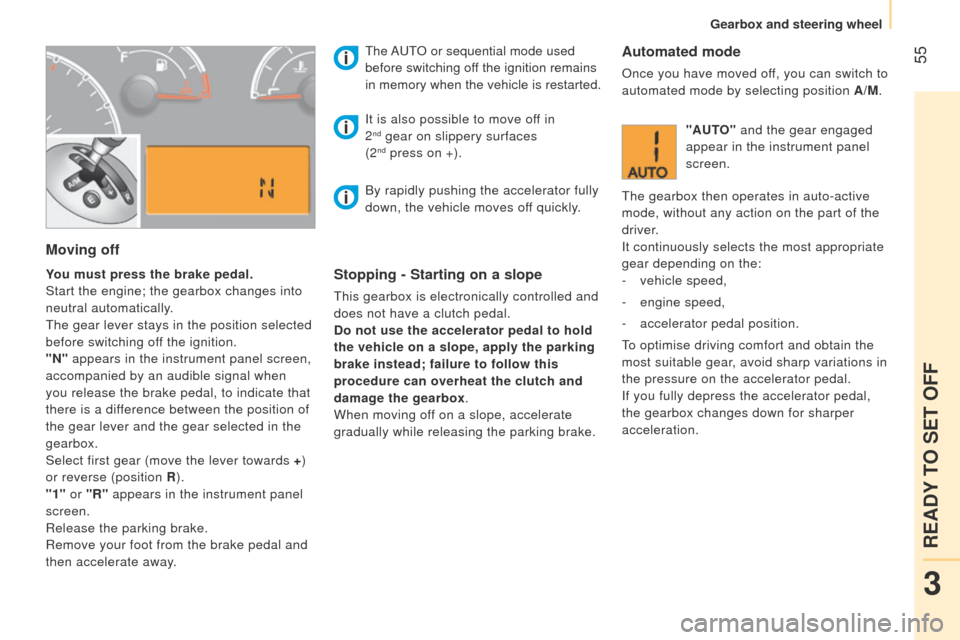
Moving off
You must press the brake pedal.
Start the engine; the gearbox changes into
neutral automatically.
t
he gear lever stays in the position selected
before switching off the ignition.
"N" appears in the instrument panel screen,
accompanied by an audible signal when
you release the brake pedal, to indicate that
there is a difference between the position of
the gear lever and the gear selected in the
gearbox.
Select first gear (move the lever towards + )
or reverse (position R ).
"1" or "R" appears in the instrument panel
screen.
Release the parking brake.
Remove your foot from the brake pedal and
then accelerate away.
t he A ut
O or sequential mode used
before switching off the ignition remains
in memory when the vehicle is restarted.Stopping - Starting on a slope
this gearbox is electronically controlled and
does not have a clutch pedal.
Do not use the accelerator pedal to
hold
the vehicle on a slope, apply the parking
brake instead; failure to follow this
procedure can overheat the clutch and
damage the gearbox.
When moving off on a slope, accelerate
gradually while releasing the parking brake.
It is also possible to move of
f in
2
nd gear on slippery surfaces
(2nd press on +).
Automated mode
Once you have moved off, you can switch to
automated mode by selecting position A/M.
"AUTO" and the gear engaged
appear in the instrument panel
screen.
t
he gearbox then operates in auto-active
mode, without any action on the part of the
driver.
It continuously selects the most appropriate
gear depending on the:
-
vehicle speed,
-
engine speed,
-
accelerator pedal position.
to optimise driving comfort and obtain the
most suitable gear, avoid sharp variations in
the pressure on the accelerator pedal.
If you fully depress the accelerator pedal,
the gearbox changes down for sharper
acceleration.
By rapidly pushing the accelerator fully
down, the vehicle moves off quickly.
3
READY TO SET OFF
Gearbox and steering wheel
Page 59 of 192

57
Bipper_en_Chap03_pret-a-partir_ed02-2014
Reinitialisation
turn the ignition key to the MAR position.
Within ten seconds, the gear engaged should
appear in the instrument panel screen.
Otherwise, turn the ignition key to the
STOP
position and wait until the instrument
panel screen goes off.
turn the ignition key to the
MAR position
again. t he illumination of this warning
lamp, accompanied by a message
in the instrument panel screen,
indicates incorrect use of the
gearbox by the driver.
With the ignition on, the flashing this warning
lamp, accompanied by an audible signal and
a message in the instrument panel screen,
indicates a fault with the gearbox.
Have it checked by a P
euge O t
dealer or a
qualified workshop.
If the problem persist, have the system
checked by a P
euge O t
dealer or a
qualified workshop.
Never select neutral N while the vehicle
is moving.
Only engage reverse gear R with the vehicle
immobilised and the brake pedal pressed.
You risk damaging the gearbox if you
press the accelerator and brake pedals
simultaneously.
Back-up mode - Slow move off
this procedure should be applied if pressing
the brake pedal is not recognised by the
system, or if the gearbox has fault on
starting the engine.
Press the brake pedal firmly.
turn the ignition key to the
AV V position for
at least seven seconds.
t
he engine starts.
t
he system is in back-up mode; the gearbox
will not go beyond the 3rd gear engaged and
automated mode is not available.
If the engine does not start, have the
system checked by a P
euge O t
dealer
or a qualified workshop.
Operating faultIn the event of a prolonged stop with
the engine running, it is recommended
that the gearbox be put into neutral
(position N).
With the vehicle stationary, the engine
running and first, second or reverse
gear engaged, the gearbox changes to
neutral automatically, accompanied
by
an audible signal, in the following
circumstances:
-
no action on the accelerator or brake
pedals for at least 3
minutes,
-
brake pedal applied for more than
10
minutes,
-
driver's door opened and no action on the
accelerator or brake pedals for at least
1.5
seconds,
-
a gearbox fault. When towing your vehicle, ensure that
the gearbox is in neutral (position N ).
When traversing a flooded road or a
ford, drive at walking pace.
3
READY TO SET OFF
Gearbox and steering wheel