tow Peugeot Bipper 2015 Owner's Guide
[x] Cancel search | Manufacturer: PEUGEOT, Model Year: 2015, Model line: Bipper, Model: Peugeot Bipper 2015Pages: 192, PDF Size: 7.97 MB
Page 68 of 192
66
Bipper_en_Chap04_ergonomie_ed02-2014
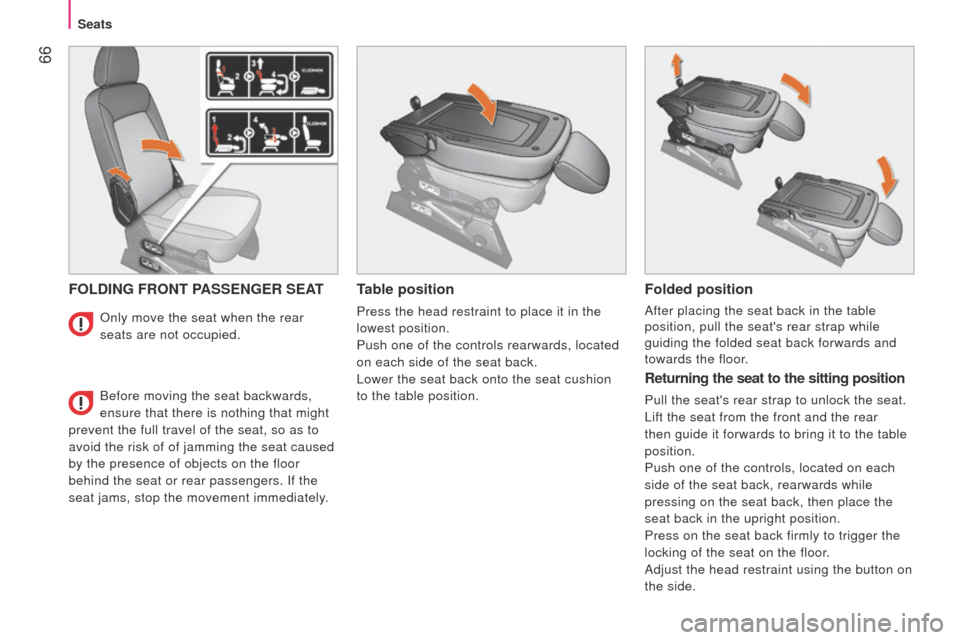
FOLDING FRONT PASSENGER SEATTable position
Press the head restraint to place it in the
lowest position.
Push one of the controls rearwards, located
on each side of the seat back.
l
ower the seat back onto the seat cushion
to the table position.
Folded position
After placing the seat back in the table
position, pull the seat's rear strap while
guiding the folded seat back forwards and
towards the floor.
Returning the seat to the sitting position
Pull the seat's rear strap to unlock the seat.
l
ift the seat from the front and the rear
then guide it forwards to bring it to the table
position.
Push one of the controls, located on each
side of the seat back, rearwards while
pressing on the seat back, then place the
seat back in the upright position.
Press on the seat back firmly to trigger the
locking of the seat on the floor.
Adjust the head restraint using the button on
the side.
Only move the seat when the rear
seats are not occupied.
Before moving the seat backwards,
ensure that there is nothing that might
prevent the full travel of the seat, so as to
avoid the risk of of jamming the seat caused
by the presence of objects on the floor
behind the seat or rear passengers. If the
seat jams, stop the movement immediately.
Seats
Page 70 of 192
68
Bipper_en_Chap04_ergonomie_ed02-2014
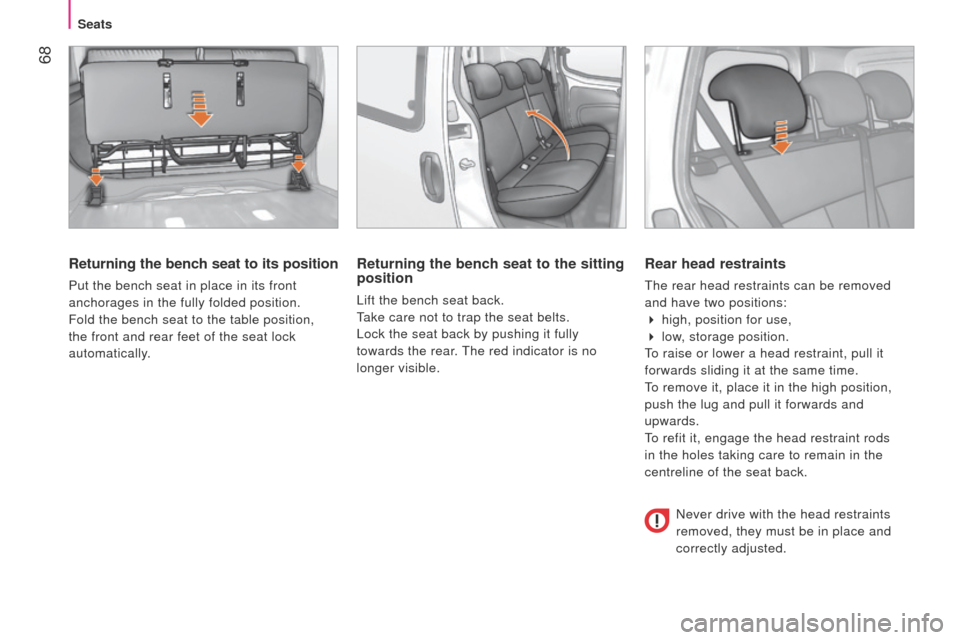
Returning the bench seat to its position
Put the bench seat in place in its front
anchorages in the fully folded position.
Fold the bench seat to the table position,
the front and rear feet of the seat lock
automatically.
Returning the bench seat to the sitting
position
lift the bench seat back.
take care not to trap the seat belts.
l
ock the seat back by pushing it fully
towards the rear.
t
he red indicator is no
longer visible.
Rear head restraints
the rear head restraints can be removed
and have two positions:
4 high, position for use,
4 low
, storage position.
to raise or lower a head restraint, pull it
forwards sliding it at the same time.
to remove it, place it in the high position,
push the lug and pull it forwards and
upwards.
to refit it, engage the head restraint rods
in the holes taking care to remain in the
centreline of the seat back.
Never drive with the head restraints
removed, they must be in place and
correctly adjusted.
Seats
Page 71 of 192
69
Bipper_en_Chap04_ergonomie_ed02-2014
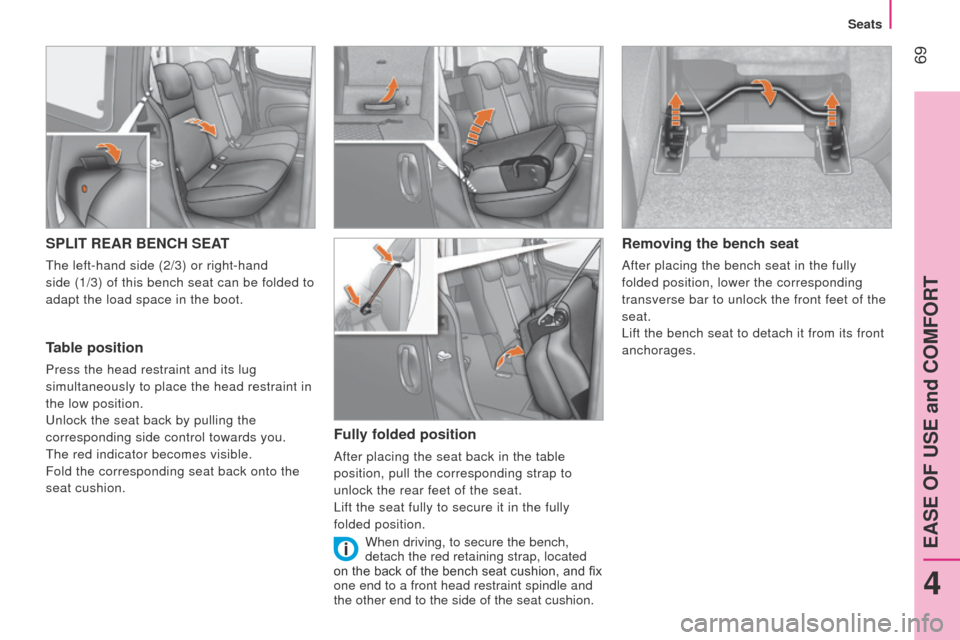
SPLIT REAR BENCH SEAT
the left-hand side (2/3) or right-hand
side (1/3) of this bench seat can be folded to
adapt the load space in the boot.
Table position
Press the head restraint and its lug
simultaneously to place the head restraint in
the low position.
u
nlock the seat back by pulling the
corresponding side control towards you.
t
he red indicator becomes visible.
Fold the corresponding seat back onto the
seat cushion.
Fully folded position
After placing the seat back in the table
position, pull the corresponding strap to
unlock the rear feet of the seat.
l
ift the seat fully to secure it in the fully
folded position.
Removing the bench seat
After placing the bench seat in the fully
folded position, lower the corresponding
transverse bar to unlock the front feet of the
seat.
l
ift the bench seat to detach it from its front
anchorages.
When driving, to secure the bench,
detach the red retaining strap, located
on the back of the bench seat cushion, and fix
one end to a front head restraint spindle and
the other end to the side of the seat cushion.
4
EASE OF USE and COMFORT
Seats
Page 72 of 192
70
Bipper_en_Chap04_ergonomie_ed02-2014
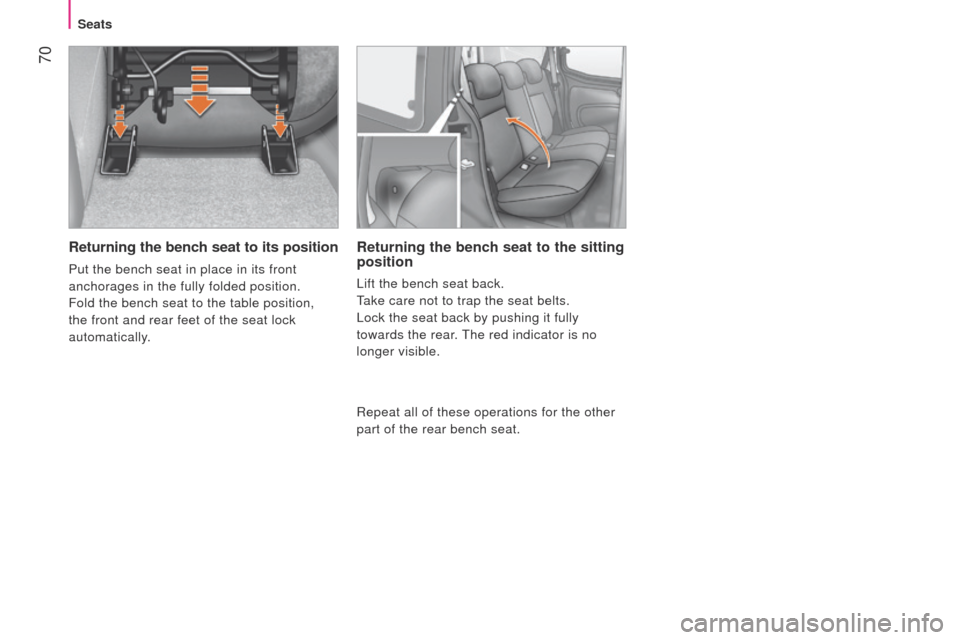
Returning the bench seat to its position
Put the bench seat in place in its front
anchorages in the fully folded position.
Fold the bench seat to the table position,
the front and rear feet of the seat lock
automatically.
Returning the bench seat to the sitting
position
lift the bench seat back.
take care not to trap the seat belts.
l
ock the seat back by pushing it fully
towards the rear.
t
he red indicator is no
longer visible.
Repeat all of these operations for the other
part of the rear bench seat.
Seats
Page 75 of 192
73
Bipper_en_Chap04_ergonomie_ed02-2014
CORRECT USE OF THE AIR
CONDITIONING
Operate the air conditioning system for
5 to 10 minutes, once or twice a month,
to keep it in perfect working order.
Have the filter elements (air filter and
passenger compartment filter) replaced
regularly. If you drive in a dusty environment,
have them replaced twice as often.
It is normal that the condensation created by
the air conditioning system results in a flow
of water which may form a puddle under the
vehicle when parked.
If the system does not produce cold air, do
not use it and contact a P
euge O t
dealer or
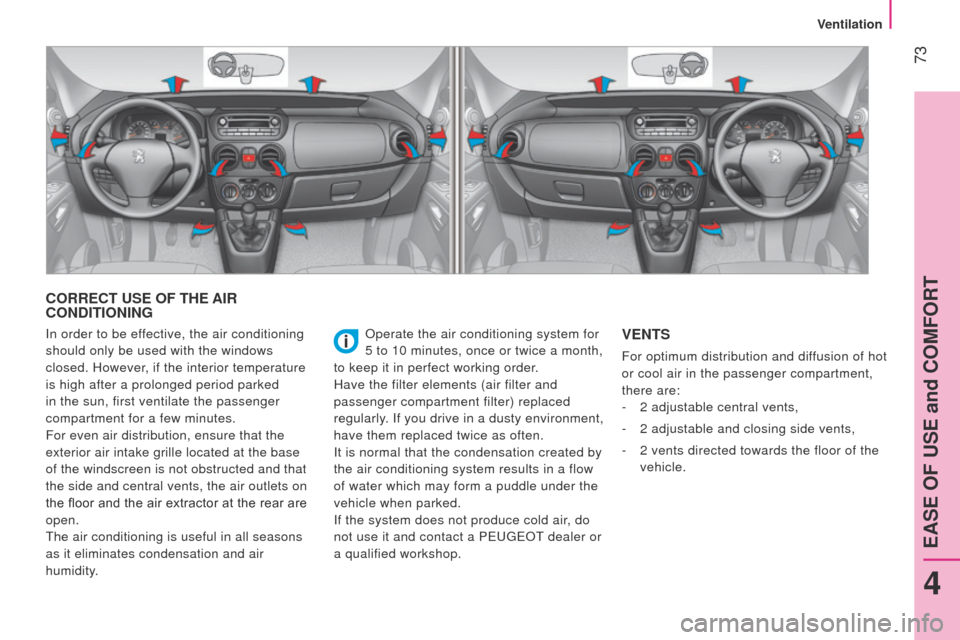
a qualified workshop.VENTS
For optimum distribution and diffusion of hot
or cool air in the passenger compartment,
there are:
-
2 adjustable central vents,
-
2 adjustable and closing side vents,
-
2 vents directed towards the floor of the
vehicle.
In order to be effective, the air conditioning
should only be used with the windows
closed. However, if the interior temperature
is high after a prolonged period parked
in the sun, first ventilate the passenger
compartment for a few minutes.
For even air distribution, ensure that the
exterior air intake grille located at the base
of the windscreen is not obstructed and that
the side and central vents, the air outlets on
the floor and the air extractor at the rear are
open.
t
he air conditioning is useful in all seasons
as it eliminates condensation and air
humidity.
4
EASE OF USE and COMFORT
Ventilation
Page 76 of 192
74
Bipper_en_Chap04_ergonomie_ed02-2014
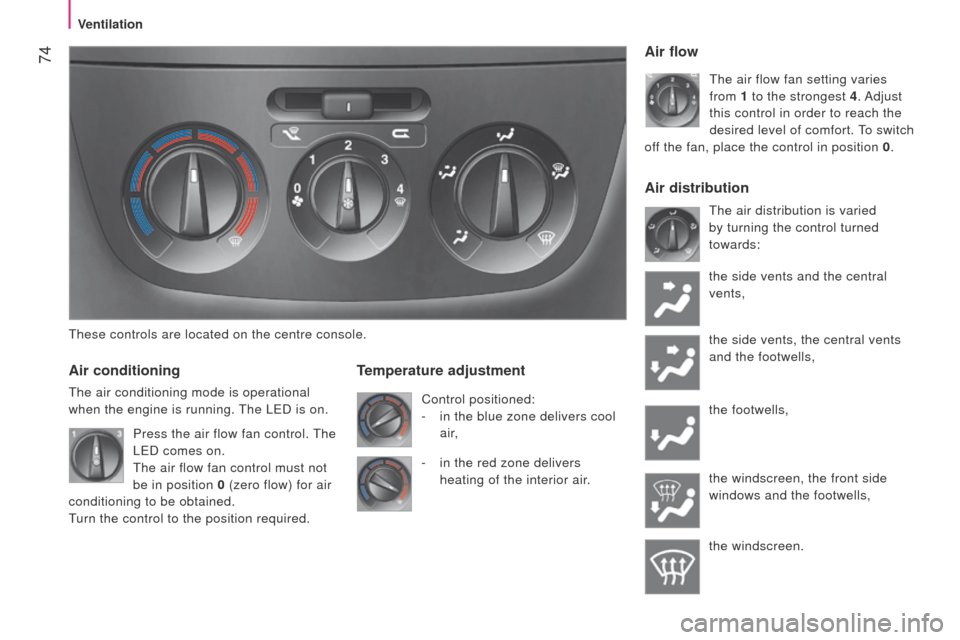
these controls are located on the centre console.
Air conditioning
the air conditioning mode is operational
when the engine is running.
t
he le D is on.
Temperature adjustment
Control positioned:
-
in the blue zone delivers cool
air,
Air flow
the air flow fan setting varies
from 1 to the strongest
4. Adjust
this control in order to reach the
desired level of comfort.
to switch
off the fan, place the control in position 0 .
t
he air distribution is varied
by turning the control turned
towards:
the side vents and the central
vents,
the side vents, the central vents
and the footwells,
the footwells,
the windscreen, the front side
windows and the footwells,
the windscreen.
Press the air flow fan control.
t
he
le
D comes on.
t
he air flow fan control must not
be in position 0 (zero flow) for air
conditioning to be obtained.
turn the control to the position required. -
in the red zone delivers
heating of the interior air.
Air distribution
Ventilation
Page 80 of 192
78
Bipper_en_Chap04_ergonomie_ed02-2014
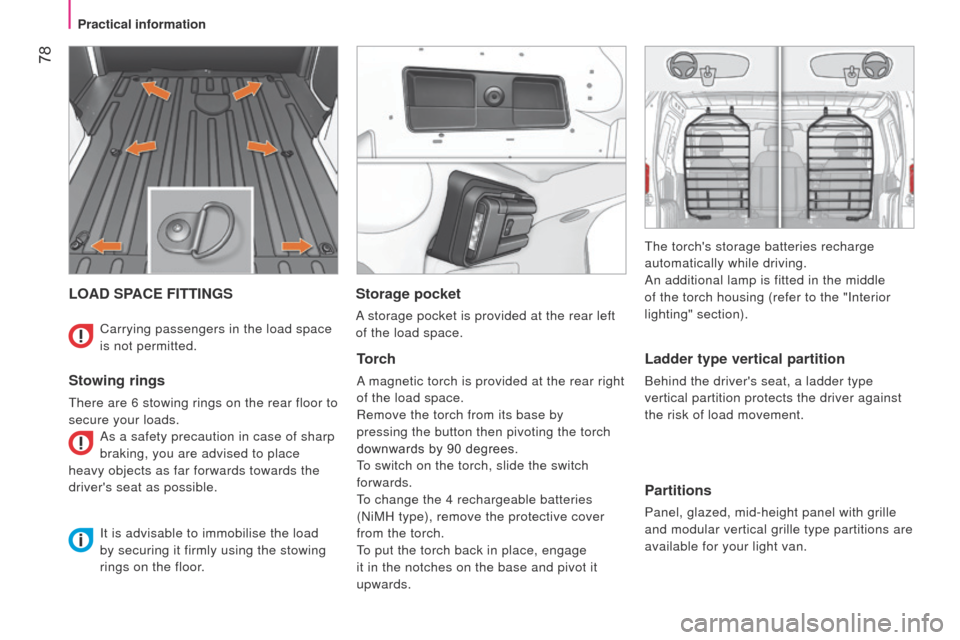
LOAD SPACE FITTINGS
Stowing rings
there are 6 stowing rings on the rear floor to
secure your loads. As a safety precaution in case of sharp
braking, you are advised to place
heavy objects as far forwards towards the
driver's seat as possible.
Storage pocket
A storage pocket is provided at the rear left
of the load space.
Torch
A magnetic torch is provided at the rear right
of the load space.
Remove the torch from its base by
pressing the button then pivoting the torch
downwards by 90 degrees.
to switch on the torch, slide the switch
forwards.
to change the 4 rechargeable batteries
(NiMH type), remove the protective cover
from the torch.
to put the torch back in place, engage
it in the notches on the base and pivot it
upwards.
Ladder type vertical partition
Behind the driver's seat, a ladder type
vertical partition protects the driver against
the risk of load movement.
Partitions
Panel, glazed, mid-height panel with grille
and modular vertical grille type partitions are
available for your light van.
Carrying passengers in the load space
is not permitted.
It is advisable to immobilise the load
by securing it firmly using the stowing
rings on the floor.
t
he torch's storage batteries recharge
automatically while driving.
An additional lamp is fitted in the middle
of the torch housing (refer to the "Interior
lighting" section).
Practical information
Page 82 of 192
80
Bipper_en_Chap04_ergonomie_ed02-2014
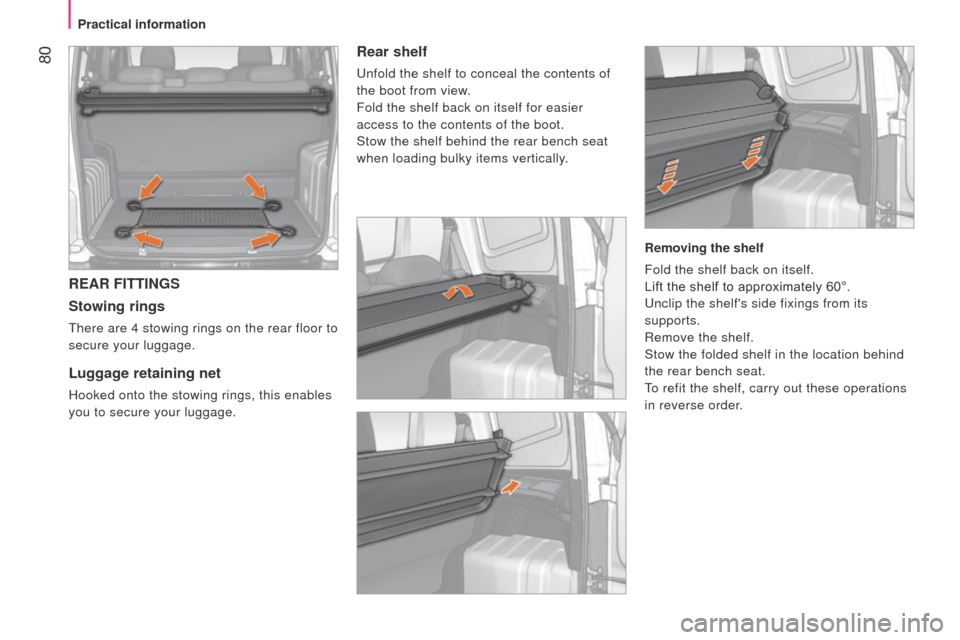
REAR FITTINGS
Stowing rings
there are 4 stowing rings on the rear floor to
secure your luggage.
Luggage retaining net
Hooked onto the stowing rings, this enables
you to secure your luggage.
Rear shelf
unfold the shelf to conceal the contents of
the boot from view .
Fold the shelf back on itself for easier
access to the contents of the boot.
Stow the shelf behind the rear bench seat
when loading bulky items vertically.
Removing the shelf
Fold the shelf back on itself.
Lift the shelf to approximately 60°.
u
nclip the shelf's side fixings from its
supports.
Remove the shelf.
Stow the folded shelf in the location behind
the rear bench seat.
to refit the shelf, carry out these operations
in reverse order.
Practical information
Page 90 of 192
88
Bipper_en_Chap05_technologie_ed02-2014
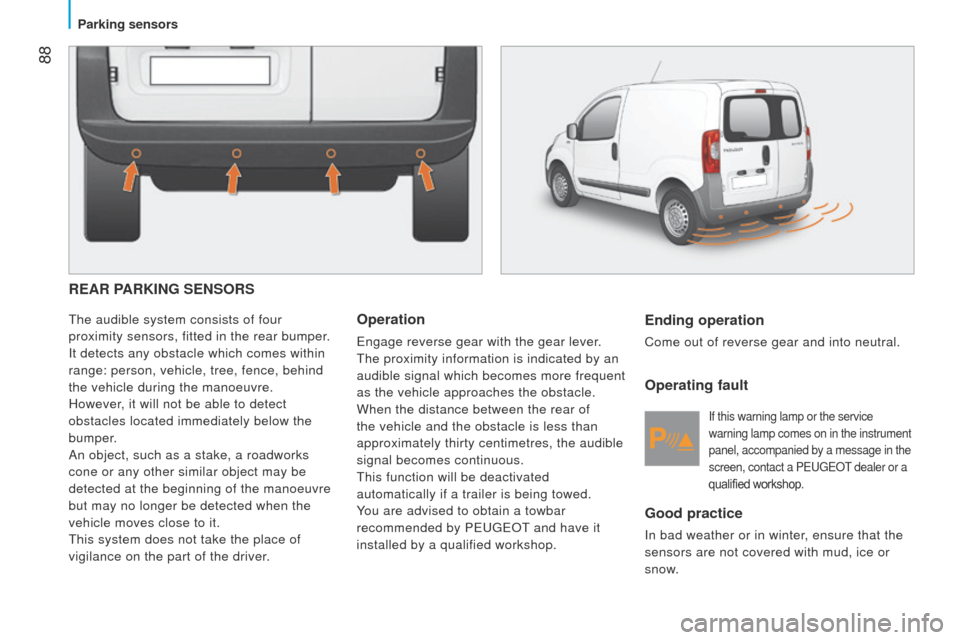
REAR PARKING SENSORS
the audible system consists of four
proximity sensors, fitted in the rear bumper .
It detects any obstacle which comes within
range: person, vehicle, tree, fence, behind
the vehicle during the manoeuvre.
However, it will not be able to detect
obstacles located immediately below the
bumper.
An object, such as a stake, a roadworks
cone or any other similar object may be
detected at the beginning of the manoeuvre
but may no longer be detected when the
vehicle moves close to it.
t
his system does not take the place of
vigilance on the part of the driver.Ending operation
Come out of reverse gear and into neutral.
Operating fault
If this warning lamp or the service
warning lamp comes on in the instrument
panel, accompanied by a message in the
screen, contact a P
euge O t
dealer or a
qualified workshop.
Good practice
In bad weather or in winter, ensure that the
sensors are not covered with mud, ice or
snow.
Operation
engage reverse gear with the gear lever.
t
he proximity information is indicated by an
audible signal which becomes more frequent
as the vehicle approaches the obstacle.
When the distance between the rear of
the vehicle and the obstacle is less than
approximately thirty centimetres, the audible
signal becomes continuous.
t
his function will be deactivated
automatically if a trailer is being towed.
You are advised to obtain a towbar
recommended by P
euge O t
and have it
installed by a qualified workshop.
88
Parking sensors
Page 113 of 192
111
Bipper_en_Chap06_securite_ed02-2014
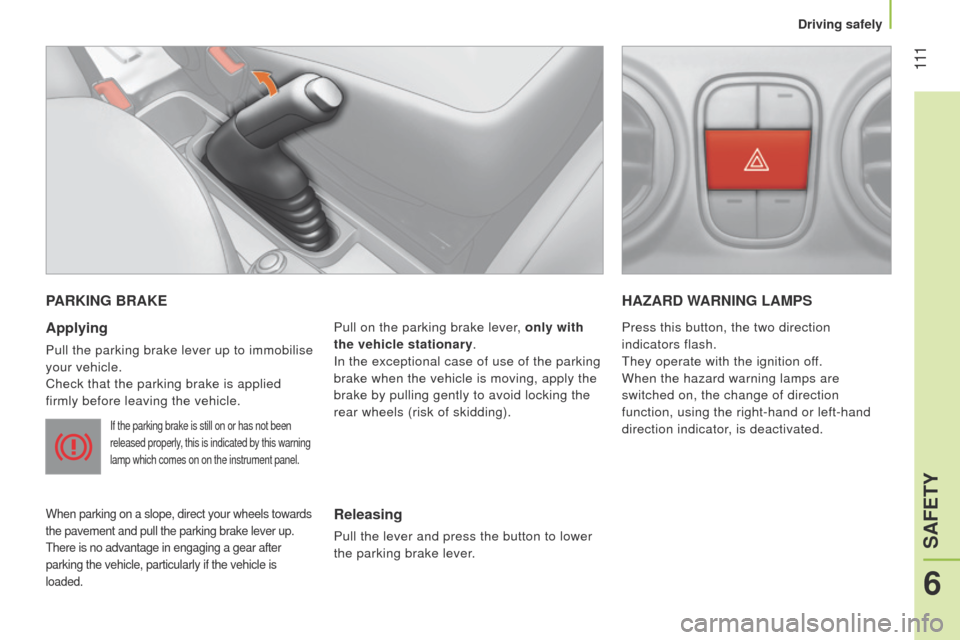
PARKING BRAKE
Applying
Pull the parking brake lever up to immobilise
your vehicle.
Check that the parking brake is applied
firmly before leaving the vehicle.
If the parking brake is still on or has not been
released properly, this is indicated by this warning
lamp which comes on on the instrument panel.
When parking on a slope, direct your wheels towards
the pavement and pull the parking brake lever up.
t
here is no advantage in engaging a gear after
parking the vehicle, particularly if the vehicle is
loaded.
Pull on the parking brake lever, only with
the vehicle stationary.
In the exceptional case of use of the parking
brake when the vehicle is moving, apply the
brake by pulling gently to avoid locking the
rear wheels (risk of skidding).
HAZARD WARNING LAMPS
Releasing
Pull the lever and press the button to lower
the parking brake lever. Press this button, the two direction
indicators flash.
t
hey operate with the ignition off.
When the hazard warning lamps are
switched on, the change of direction
function, using the right-hand or left-hand
direction indicator, is deactivated.
6
SAFETY
Driving safely