PONTIAC FIERO 1988 Service Repair Manual
Manufacturer: PONTIAC, Model Year: 1988, Model line: FIERO, Model: PONTIAC FIERO 1988Pages: 1825, PDF Size: 99.44 MB
Page 141 of 1825
3-16 STEERING, SUSPENSION, TIRES AND WHEELS DIAGNOSIS
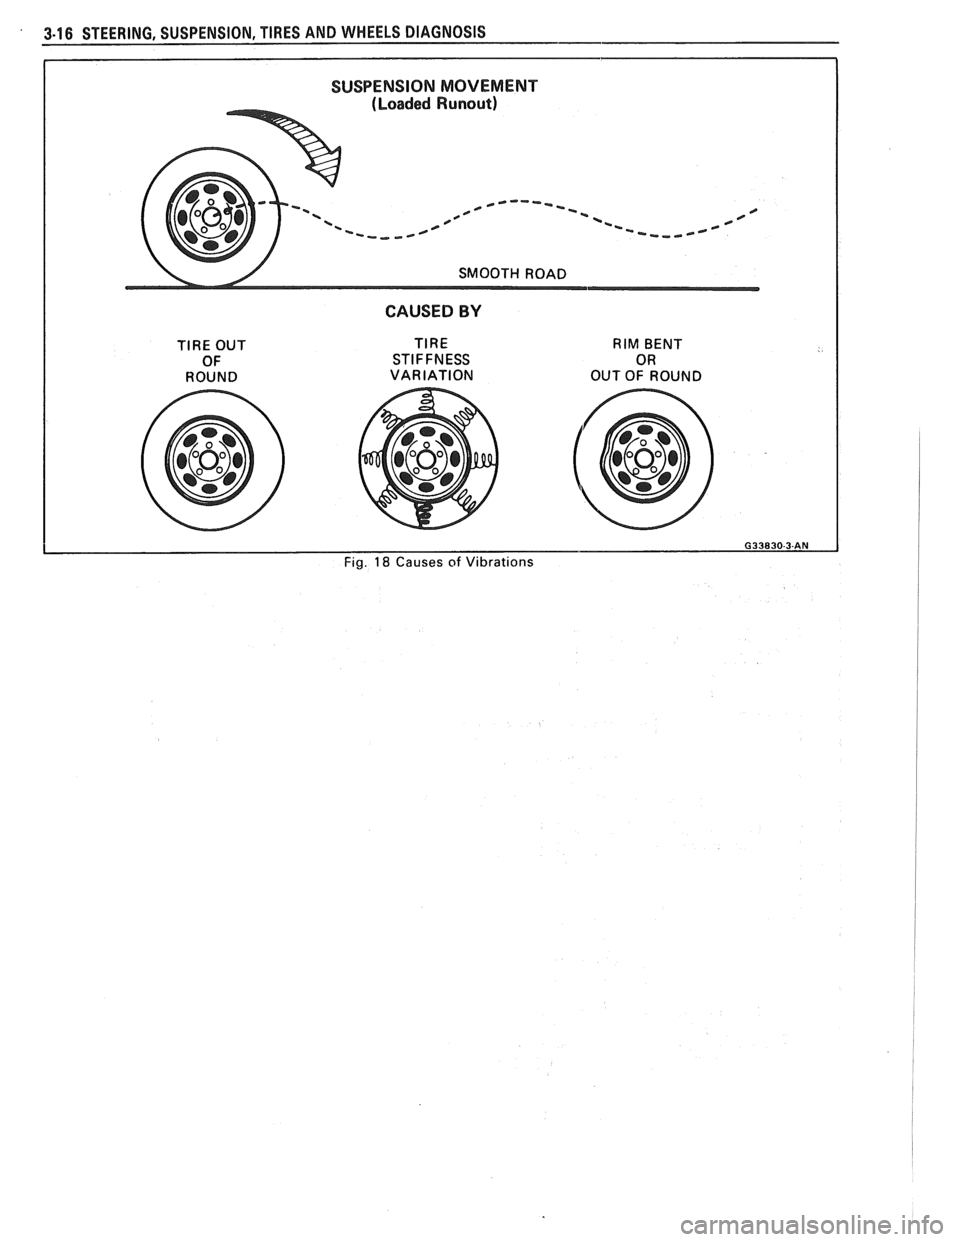
SUSPENSION MOVEMENT
(Loaded Runout)
. LC----- '-- / 0 B 0 -=---I --..,-----=-
CAUSED BY
TIRE OUT
0 F
ROUND
TIRE
STIFFNESS
VARIATION RIM
BENT 0 R OUT OF ROUND
G33830-3-AN
Fig. 18 Causes of Vibrations
Page 142 of 1825
STEERING, SUSPENSION, TIRES AND WHEELS DIAGNOSIS 3-17
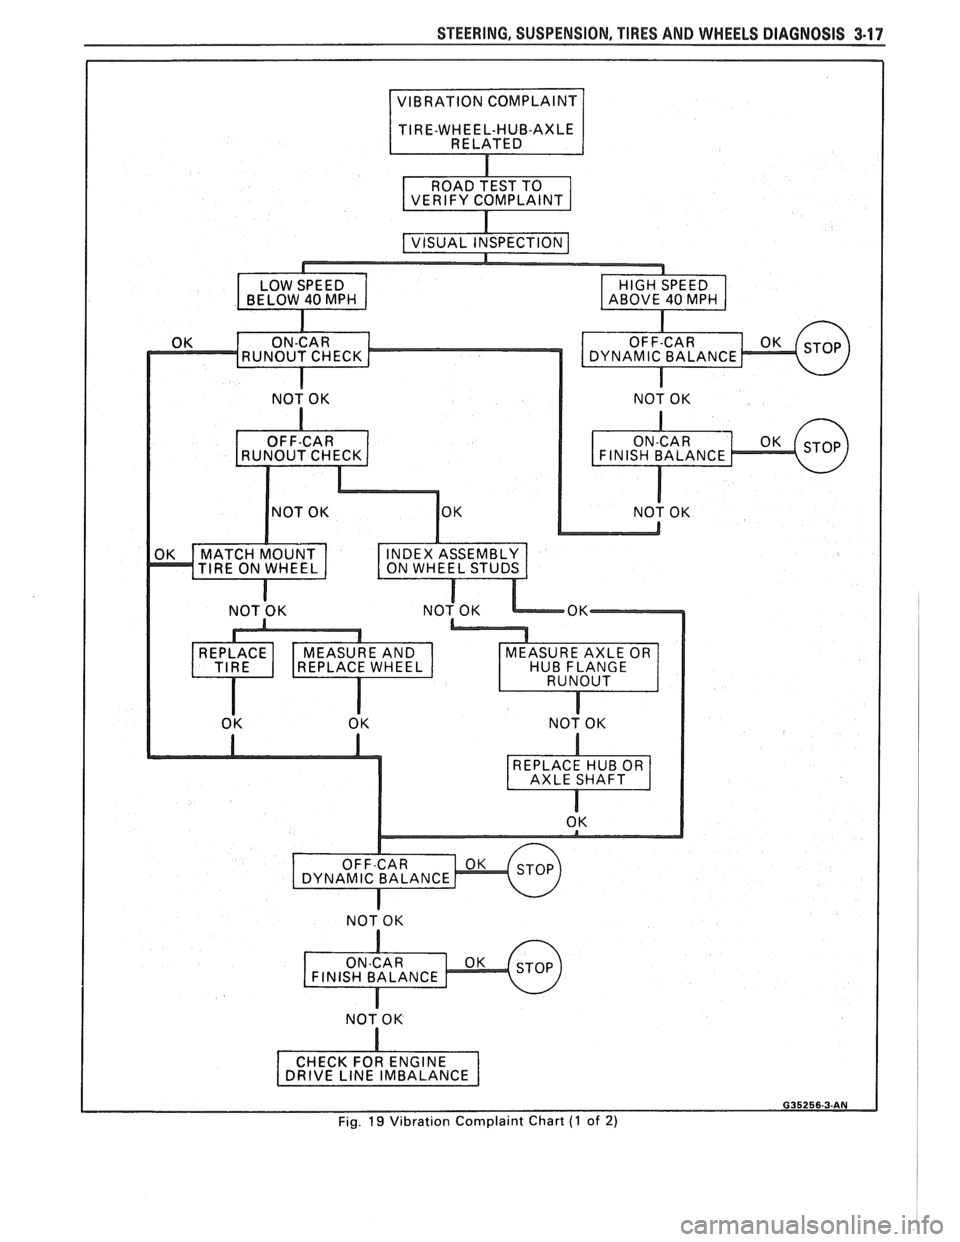
Fig. 19 Vibration Complaint Chart (1 of 2)
Page 143 of 1825
3-18 STEERING, SUSPENSION, TIRES AND WHEELS DIAGNOSIS
VIBRATION COMPLANT TIRE-WHEEL-HUB-AXLE RELATED
Vibrations that are tire or wheel induced can be caused
by two factors: imbalance or
runout. Low-speed vibrations, those less than 40 mph, are
usually runout related. Highway speed vibrations, those
above 40 mph, can be caused by either imbalance or runout. Prior to performing any work, always road test the car
and perform a careful visual inspection for:
- Obvious tire and wheel runout. - Obvious drive 'axle or propeller shaft runout. - Proper inflation pressure. - Wrong trim height. - Bent wheels. - Debris build-up on the tire or wheel. - Loose or missing wheel weights or wheel nuts. - Irregular or excessive tire wear. - Proper tire bead seating on rim. - Damaged tires, such as tread distortions,
separations, or bulges from impact damage. Slight sidewall indentations are normal and will not affect
ride quality.
Balance is the easiest procedure to perform and should,
therefore, be done fist if the vibration occurs at highway
speeds.
An off-car two-plane dynamic balance should first
be performed. This will correct any imbalance in the tire and
wheel assembly.
An oncar fiish balance may also be required. This will correct any brake drum, rotor, or wheel cover imbalance.
Follow the balancing procedures outlined in Section 3E. If balance does not correct the highway speed vibration,
or if the vibration is at low speeds, runout is the probable
cause. Runout can be caused by the tire, wheel, or the way
the wheel attaches to the car. The following procedure
should be used
: A. If runout is suspected, the free runout of the tire
and wheel assembly should first be measured on the car. A
dial indicator with a roller wheel is preferable, but a dial
indicator with button end may be used. Lateral
runout (side
to side) should be measured on the tire's sidewall as close to
the tread shoulder as possible. Radial
runout (up and down)
should be measured on the center tread rib. Some tread
designs may require tightly wrapping a piece of tape around
the center tread circumference for better dial indicator
contact. For measuring wheel
runout follow the "Measuring
Wheel Runout" procedure in Section 3E. Whether measuring
radial or lateral runout, disregard any instantaneous indicator
needle jumps due to sidewall depressions, tread blocks, etc.
Record the total indicator reading, and the location of the
high point of
runout. The,,total tire and wheel oncar runout should be less than ,060 , if either measurement exceeds ,060"~ proceed to Step B.
B. If
the oncy radial or lateral runout measured in
Step A exceeds .060 , mount the tire and wheel assembly on
a dynamic balance machine and again measure the amount of runout. Locate on the machine by the wheel's inside center
pilot hole. Using the same procedure as in Step A, record the
amount of tire and wheel
runout and its high point Location.
Next, measure wheel runout, see Section 3E. If the wheel
exceeds specifications replace the ~heel.,~If the tire and wheel
radial or lateral runout exceeds .050 at the tire tread,
proceed to Step C.
C. If the off-car tire and wheel radial or lateral runout measured in Step 18 exceeds .050", match mount the high radial runout point of tire to low radial runout point of
wheel. Weinflate, mount on the dynamic balance machine,
and again measure and record the radial and lateral runout and its location, as done in Step B. In many cases, match
mounting the tire on the wheel will bring the assembly's
runout into the acceptable range of less than .050". D. If the runout of the tire and wheel assembly is
within limits when measured off the car, yet exceeds the
limits when measured on the car, the attachment of the tire
and wheel assembly to the hub is the probable cause. Rotate
the assembly two wheel studs and recheck the
runout. Several positions may have to be tried to find the best
location.
E. If the assembly runout cannot be reduced to an
acceptable level, remove the tire and wheel assembly and
measure wheel stud
runout with a dial indicator. Zero
the dial indicator button on one stud. Lift button gently
off stud and rotate flange to position next stud against
dial indicator button. Record the
runout on all studs. Dial indicator should read zero when repositioned on first stud
that was checked. If runout exceeds .030", the hub or axle
shaft should be replaced.
Whenever a tire is rotated on the wheel, or a tire or
wheel is replaced, the assembly must be rebalanced.
In addition to balance and tire and wheel free
runout, tire stiffness variation (loaded radial runout) can also cause
a vibration. However, this is impossible to measure without
a TPD (Tire Problem Detector) or a loaded radial
runout buffer.
The TPD is a roller drum that slowly rotates the tire
while under load and mounted on the car. Tire stiffness
variation causes wheel spindle movement which can be
measured.
The loaded radial
runout buffer is a more automated
machine that slowly rotates the tire and wheel off the car
under load with a roller drum and measures the tire's
stiffness variation. It will then "match" the tire to the wheel
by buffing off small amounts of rubber from the outer tread
rows at the stiff spot. This procedure is usually effective,
especially when used
as a measuring device and for fine
buffing only.
The
TPD and loaded radial runout buffer are two
methods that will measure or correct tire stiffness variation,
tire
runout, and wheel runout at the same time. However,
because such equipment is not always available, and both
have their disadvantages, the more basic procedure of
measuring free
runout with a dial indicator, as previously
detailed, is usually more practical. The free runout of the
tire will usually correspond with the tire's stiff spot.
The substitution method of vibration diagnosis can also
be used. Install
a known good set of tire and wheel
assemblies. If these correct the vibration, the original
assemblies should be reinstalled one at
a time until the
vibration returns. This will point out the tire with excess
stiffness variation.
Tire stiffness variation will be higher or lower depending
on the direction of tire rotation.
Fig. 20 Vibration Complaint Chart (2 of 2)
Page 144 of 1825
STEERING, SUSPENSION, TIRES AND WHEELS DIAGNOSIS 3-19
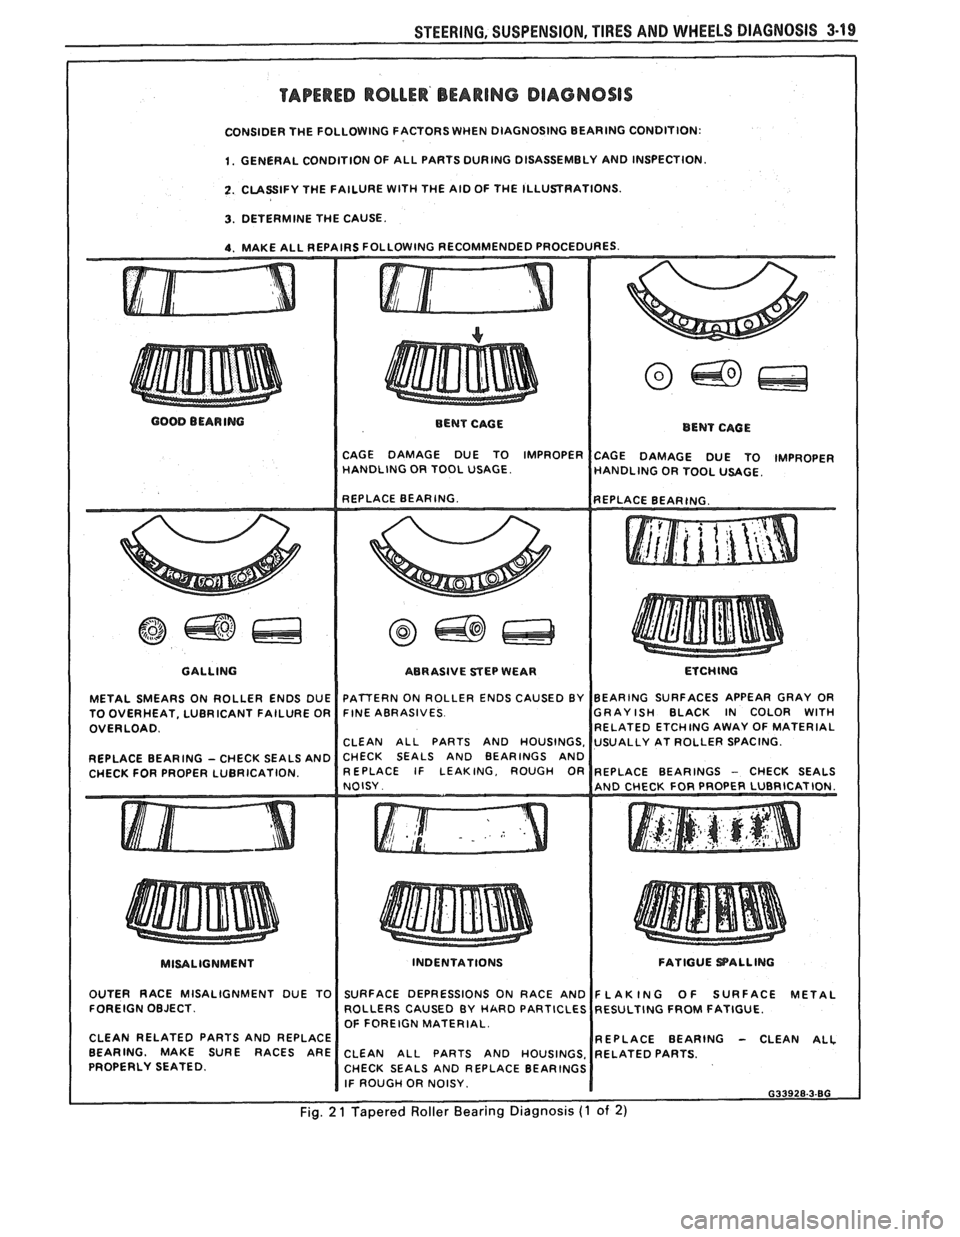
TAPERED ROLLER' BEARING DIAGNOSIS
CONSIDER THE FOLLOWING FACTORS WHEN DIAGNOSING BEARING CONDITION:
1. GENERAL CONDITION OF ALL PARTS DURING DISASSEMBLY AND INSPECTION.
2. CLASSIFY THE FAILURE WITH THE AID OF THE ILLUSTRATIONS.
3. DETERMINE THE CAUSE.
4. MAKE ALL REPAIRS FOLLOWING RECOMMENDED PROCEDURES.
GOOD BEARING
BENT CAGE
BENT CAGE
CAGE DAMAGE DUE TO IMPROPER
CAGE DAMAGE DUE TO )MPROPER HANDLING OR TOOL USAGE.
HANDLING OR TOOL USAGE.
GALLING
METAL SMEARS ON ROLLER ENDS DUE
TO OVERHEAT, LUBRICANT FAILURE OR
OVERLOAD.
REPLACE BEARING
- CHECK SEALS AND
CHECK FOR PROPER LUBRICATION. ABRASIVE
STEP WEAR
I ETCHING
FINE ABRASIVES GRAYISH BLACK IN COLOR
WITH RELATED ETCHING AWAY OF MATERIAL
CHECK SEALS AND BEARINGS AND
MISALIGNMENT
I
INDENTATIONS FATIGUE PALLING
OUTER RACE MISALIGNMENT DUE TO
FOREIGN OBJECT.
CLEAN RELATED PARTS AND REPLACE
BEARING. MAKE SURE RACES ARE
PROPERLY SEATED. SURFACE
DEPRESSIONS ON RACE AND
ROLLERS CAUSED BY
HARD PARTICLES
OF FOREIGN MATERIAL.
REPLACE BEARING
- CLEAN ALL CLEAN ALL PARTS AND HOUSINGS.
CHECK SEALS AND REPLACE BEARINGS
I IF ROUGH OR NOISY. I 633928.3-80
Fig. 2 1 Tapered Roller Bearing Diagnosis (1 of 2)
Page 145 of 1825
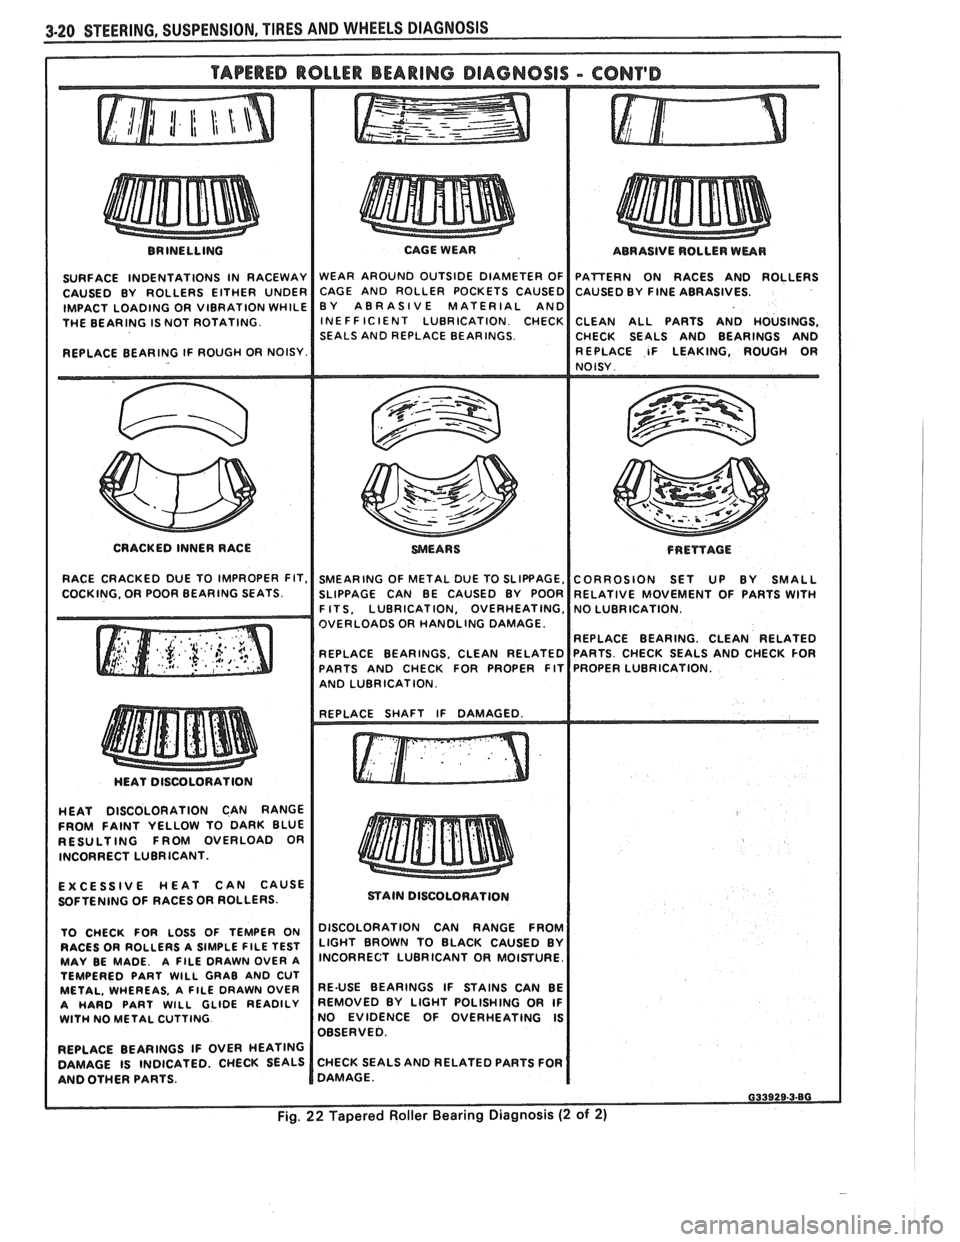
BRINELLING
SURFACE INDENTATIONS IN RACEWAY
CAUSED BY ROLLERS EITHER UNDER
IMPACT LOADING OR VIBRATION WHILE
THE BEARING IS NOT ROTATING.
REPLACE BEARING IF ROUGH OR NOISY. CAGE WEAR
WEAR AROUND OUTSIDE DIAMETER OF
CAGE AND ROLLER POCKETS CAUSED
BY ABRASIVE MATERIAL AND
INE FF IClENT LUBRICATION CHECK
SEALS AND REPLACE BEARINGS. ABRASIVE
ROLLER WEAR
PATTERN ON RACES AND ROLLERS
CAUSED BY
FINE ABRASIVES.
CLEAN ALL PARTS AND HOUSINGS,
CHECK SEALS AND BEARINGS AND
REPLACE IF LEAKING, ROUGH
OR NOISY
CRACKED INNER RACE
WEARS FRETfAGE
RACE CRACKED DUE TO IMPROPER FIT, SMEARING OF METAL DUE TO SLIPBAGE, CORROSION SET UP BY SMALL
COCKING. OR POOR BEARING SEATS. SLIPPAGE CAN BE CAUSED BY POOR RELATIVE MOVEMENT OF PARTS WITH I F ITS. LUBRICATION, OVERHEATING,
OVERLOADS OR HANDLING DAMAGE
REPLACE BEARING. CLEAN RELATED
REPLACE BEARINGS, CLEAN RELATED
PARTS AND CHECK FOR PROPER FIT
I AND LUBRICATION. I I
HEAT DISCOLORATION CAN RANGE
FROM FAINT YELLOW TO DARK BLUE
RESULTING FROM OVERLOAD OR
INCORRECT LUBRICANT.
EXCESSIVE HEAT CAN CAUSE
SOFTENING OF RACES
OR ROLLERS.
TO CHECK FOR LOSS OF TEMPER ON
RACES OR ROLLERS A SIMPLE
FlLE TEST MAY BE MADE. A FILE DRAWN OVER A
TEMPERED PART WlLL GRAB AND CUT
METAL. WHEREAS, A FlLE DRAWN OVER
A HARD PART WlLL GLIDE READILY WlTH NO METAL CUTTING
REPLACE BEARINGS IF OVER HEATING
DAMAGE IS INDICATED. CHECK SEALS
AND OTHER PARTS.
mAIN DISCOLORATION
I DISCOLORATION CAN RANGE FROM
LIGHT BROWN TO BLACK CAUSED BY
INCORRECT LUBRICANT OR MOISTURE.
RE-USE BEARINGS IF STAINS CAN BE
REMOVED BY LIGHT POLISHING OR IF
NO EVIDENCE OF OVERHEATING IS
OBSERVED.
CHECK SEALS AND RELATED PARTS FOR
DAMAGE.
Page 146 of 1825
STEERING, SUSPENSION. TIRES AND WHEELS DIAGNOSIS 3-21
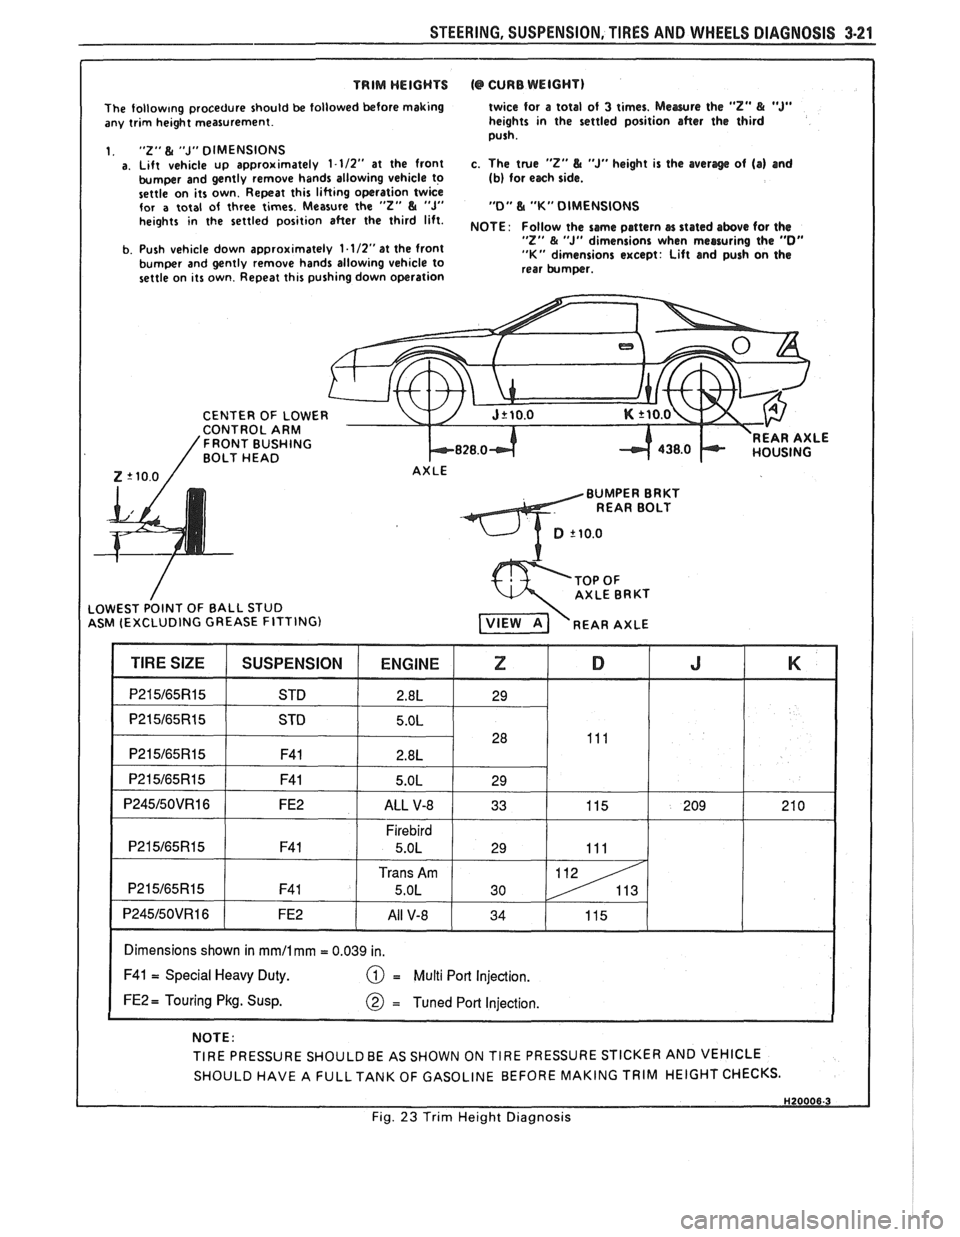
TRIM WEIGHTS (@ CURB WEIGHT) I
The follow~ng procedure should be followed before making
any trim height measurement.
1.
"2" & "J" DIMENSIONS a. Lift vehicle up approximately 1-112" at the front
bumper and gently remove hands allowing vehicle to
settle on its own. Repeat this lifting operation twice
for
a total of three times. Measure the "2" & "J" heights in the settled position after the third lift.
b. Push vehicle down approximately
1.1/2"at the front
bumper and gently remove hands allowing vehicle to
settle on its own. Repeat this pushing down operation twice for
a total
of 3 times. Mewre the "Z" & "J" heights in the settled position after the third
push.
c. The true
"2" L "J" height is the averlge of (a) and (b) for each side.
"0" L "K" DIMENSIONS
NOTE
: Follow the same pattern cn stated above for the "Z" & "J" dimensions when measuring the "0" "K" dimensions except: Lift and push on the
rear bumper.
CENTER OF
LOWE CONTROL ARM 'FRONT BUSHING BOLT HEAD k828.0-t REAR AXLE
Z '10.0 / AXLE
BUMPER BRKT
REAR BOLT
ASM (EXCLUDING GREASE FITTING)
I Dimensions shown in mmll mm = 0.039 in. I
F41 = Special Heavy Duty. = Multi Port Injection.
FE2 = Touring Pkg. Susp.
NOTE:
TIRE PRESSURE
SHOULDBE AS SHOWN ON TIRE PRESSURE STICKER AND VEHICLE
SHOULD HAVE A
FULLTANK OF GASOLINE BEFORE MAKING TRIM HEIGHT CHECKS.
I Fig. 23 Trim Height Diagnosis
Page 147 of 1825

Page 148 of 1825
-
WHEEL. ALIGNMENT 3A-1
SECTION 3A
WHEEL AL GNMENT
NOTICE: These fasteners are important attaching Do not use a replacement part of lesser quality or
parts, in that they could affect the performance of substitute
design. Torque values must be used as
vital components and systems, and/or could result specified during reassembly to assure proper
in major repair expense. They must be replaced retention of these parts. For prevailing torque
with one of the same part number or with an
nut(s) and bolt(s), refer to the "Reuse of Prevailing
equivalent part if replacement becomes necessary. torque
Nut(s) and Bolt(s)" chart in Section 0.
General Description ...................... .. ...... 3A- 1 On-Car Service ........................ .. ........... 3A-2
Caster .................... .. ............................ 3A- 1 Caster and Camber Adjustment .................. 3A-2
..................................... Camber ................... .. .............................. 3A-I Toe-In Adjustment 3A-2
Toe.. ................................................. 3A- 1 Axle Housing Alignment ......................... .... 3A-4
Preliminary Checks Prior to Specifications ....................... ... ............... 3A-4
Adjusting Alignment ..................... ...... 3A- 1
GENERAL DESCRIPmIOMI
Wheel alignment refers to the angular they tend to roll parallel on the road when the car is
relationship between the wheels, the suspension moving.
attaching parts and the ground.
PRELIMINARY CHECKS PRIOR TO ADJUSTING
CASTER ALIGNMENT
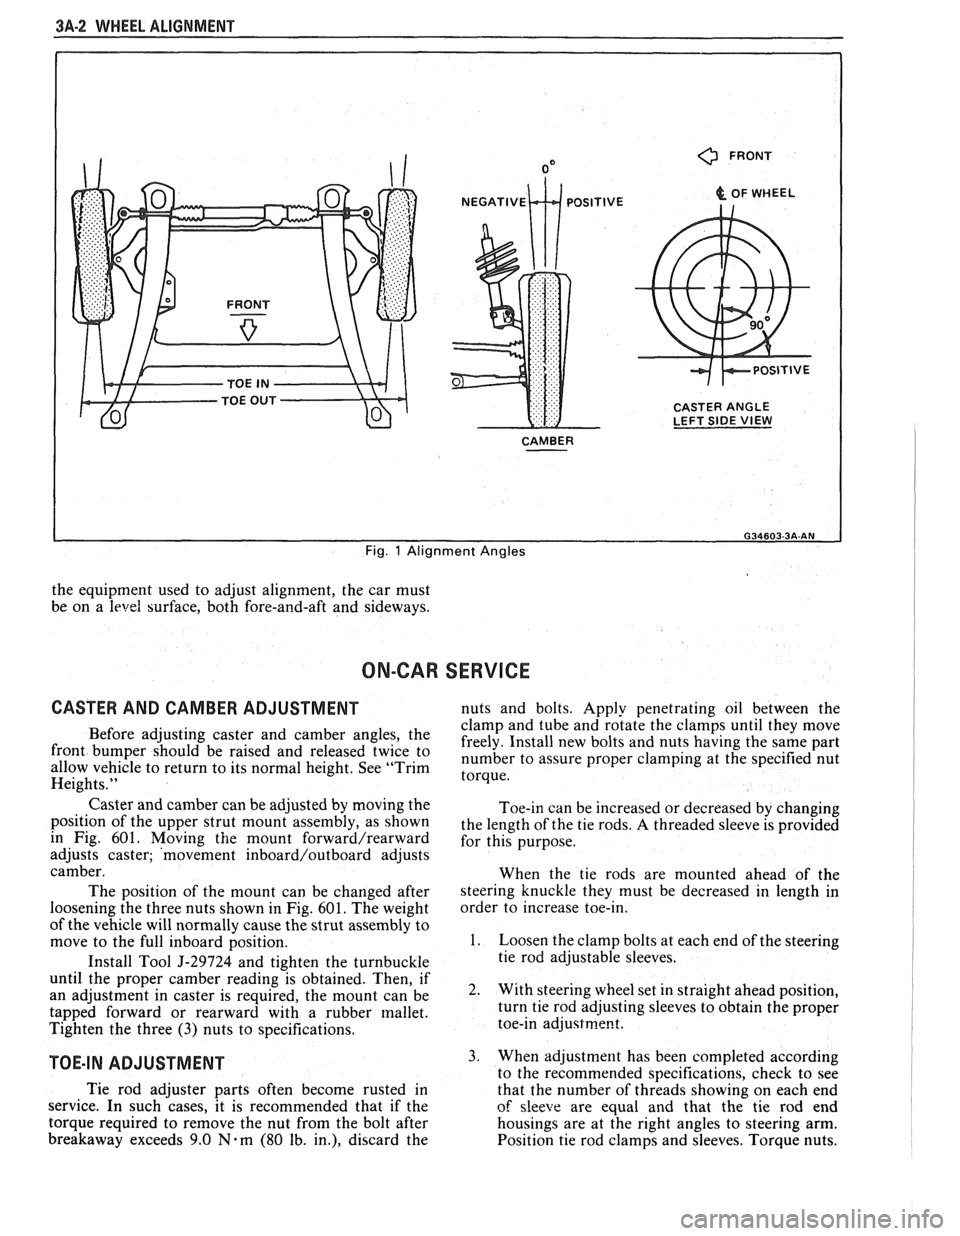
Figure 1
Caster is the amount the top of the strut is tilted
forward or rearward from the vertical. When the strut
tilts rearward, the center is "positive"
(+). The
amount of tilt is measured in degrees from vertical.
CAMBER
Figure 1
Camber is the tilting of the wheels from the
vertical when viewed from the front of the car. When
the wheels tilt outward at the top, the camber is said
to be positive
(+). When the wheels tilt inward at the
top, the camber is said to be negative
(-). The amount
of tilt is measured in degrees from the vertical and this
measurement is called the camber angle.
TOE
Figure i
Toe is a measurement of how much the front of
the wheels are turned in or out from a straight-ahead
position. When the wheels are turned in, toe is
"positive"
(+). When the wheels are turned out, toe
is "negative"
(-). The actual amount of toe-in is
normally only a fraction of a degree. The purpose of a
toe specification is to ensure parallel rolling of the
wheels (excessive toe-in or toe-out may increase tire
wear). Toe also serves to offset the small deflections of
the wheel support system which occur when the car is
rolling forward. In other words, even when the wheels
are set to toe-in slightly when the car is standing still, Steering
and vibration complaints are not always
the result of improper alignment. Another possibility
is tire "lead" due to worn or improperly manufactured
tires. "Lead" is the deviation of the car from a straight
path on a level road without hand pressure on the
steering wheel. Section
3 of this manual contains a
procedure for determining the presence of a tire lead
problem.
Before making any adjustment affecting wheel
alignment, make the following checks to ensure correct
alignment readings and alignment adjustments:
1. Check all tires for proper inflation pressures and
approximately the same tread wear.
2. Hub and bearing assemblies for excessive wear;
correct if necessary.
3. Ball joints and tie rod ends; if they are excessively
lcose, correct them before adjusting.
4. Run-out of wheels and tires.
5. Car trim height; if out of limits and a correction
is to be made, do so before adjusting alignment.
Refer to Section
3 for trim height specifications.
6. Strut dampeners for proper operation.
7. Control arms for loose bushings.
8. Loose or missing stabilizer bar attachments.
Consideration must be given to excess loads, such
as tool boxes, sample cases, etc. If these items are
normally carried in the car, they should remain in the
car during alignment adjustments. Consideration
should also be given to the condition of the equipment
used to adjust alignment. Be sure to follow the
equipment manufacturer's instructions. Regardless
of
Page 149 of 1825
3A-2 WHEEL ALIGNMENT
0 FRONT
& OF WHEEL
CASTER ANGLE
LEFT SIDE
VIEW
CAMBER
I
Fig. 1 Alignment Angles
the equipment used to adjust alignment, the car must
be on a
level surface, both fore-and-aft and sideways.
ON-CAR SERVICE
CASTER AND CAMBER ADJUSTMENT nuts and bolts. Apply penetrating oil between the
clamp and tube and rotate the clamps until they move
Before adjusting caster and camber the freely. Install new bolts and nuts having the same part front be 'aised and twice to number to assure proper at the specified nut allow vehicle to return to its normal height. See "Trim torque. Heights."
Caster and camber can be adjusted by moving the
position of the upper strut mount assembly, as shown
in Fig. 601. Moving
the mount forward/rearward
adjusts caster; 'movement inboard/outboard adjusts
camber.
The position of the mount can be changed after
loosening the three nuts shown in Fig.
601. The weight
of the vehicle will normally cause the strut assembly to
move to the full inboard position.
Install Tool
5-29724 and tighten the turnbuckle
until the proper camber reading is obtained. Then, if
an adjustment in caster is required, the mount can be
tapped forward or rearward with a rubber mallet.
Tighten the three
(3) nuts to specifications.
TOE-IN ADJUSTMENT
Toe-in can be increased or decreased by changing
the length of the tie rods.
A threaded sleeve is provided
for this purpose.
When the tie rods are mounted ahead of the
steering knuckle they must be decreased in length in
order to increase toe-in.
1. Loosen the clamp bolts at each end of the steering
tie rod adjustable sleeves.
2. With steering wheel set in straight ahead position,
turn tie rod adjusting sleeves to obtain the proper
toe-in
adjustrne~t.
3. When adjustment has been completed according
to the recommended snecifications. check to see
Tie rod adjuster parts often become rusted in
that the number of thrkads showing on each end
service. In such cases, it is recommended that if the
of sleeve are equal and that the tie rod end
torque required to remove the nut from the bolt after housings are at the right angles to steering arm.
breakaway exceeds 9.0
Nam (80 lb. in.), discard the
Position tie rod clamps and sleeves. Torque nuts.
Page 150 of 1825
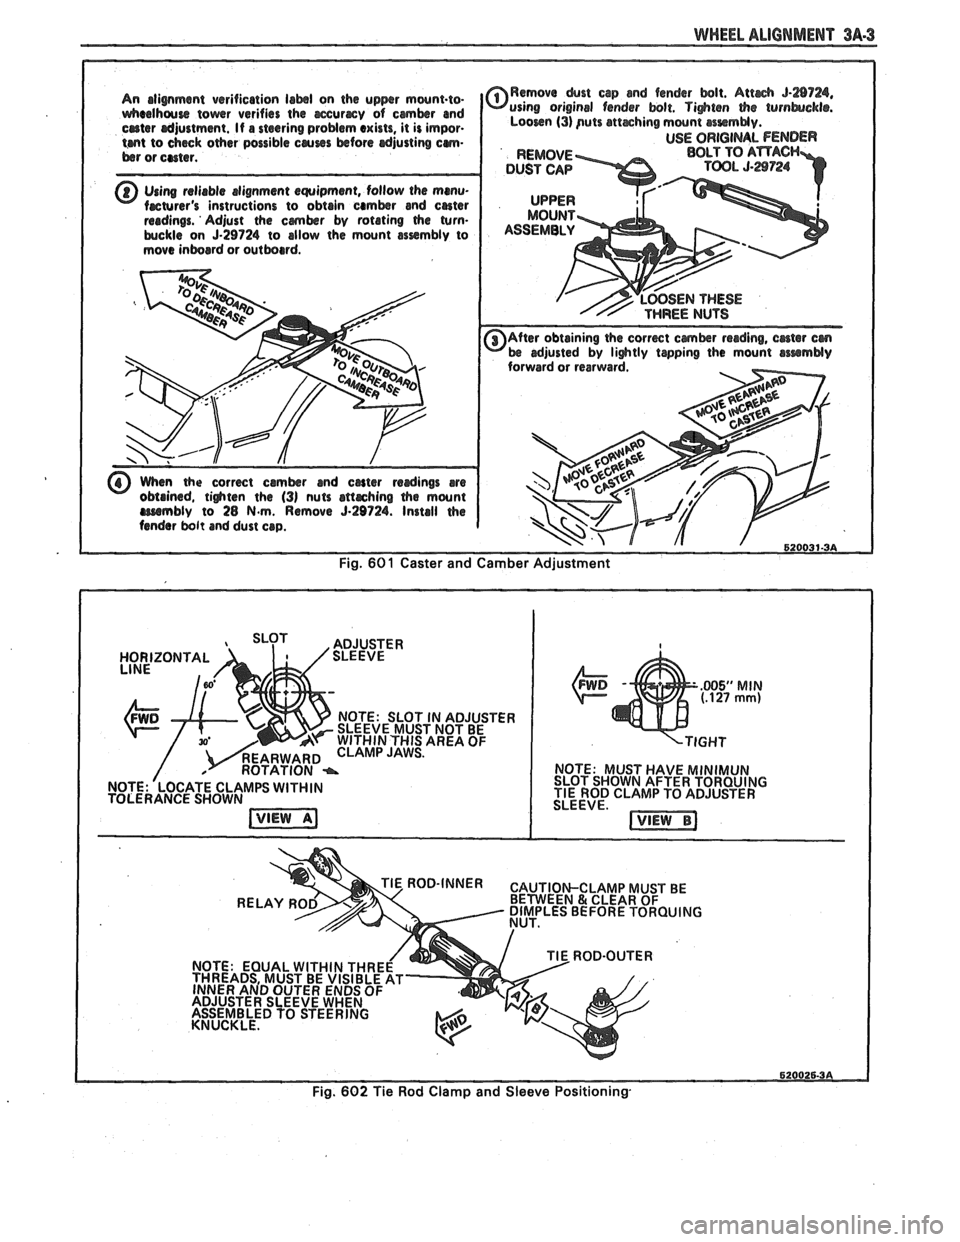
WHEEL ALIGNMENT 3A-3
Using reliable elignment equipment, follow the mmu-
When the correct camber and cater rerdings are
obtained, tighten the (31 nuts attrching the mount rrrembly to 28 N.m. Remove 5.29724. Install the
fender bolt and dust cap.
520031-38
Fig. 601 Caster and Camber Adjustment
HORIZONTAL NOTE: SLOT IN ADJUSTER
SLEEVE MUST NOT BE
WITHIN THIS AREA OF
CLAMP JAWS.
NOTE: 'LOCATE CLAMPS WITHIN
TOLERANCE SHOWN
.005" MIN (.I27 mm)
NOTE: MUST HAVE MlNlMUN SLOT SHOWN AFTER TORQUING
TIE ROD CLAMP TO ADJUSTER
SLEEVE.
ROD-'NNER CAUTION-CLAMP MUST BE
Fig.
602 Tie Rod Clamp and Sleeve Positioning*