PORSCHE 911 GT3 2010 5.G Repair Manual
Manufacturer: PORSCHE, Model Year: 2010, Model line: 911 GT3, Model: PORSCHE 911 GT3 2010 5.GPages: 251, PDF Size: 14.33 MB
Page 61 of 251
60
Operation, Safety Readiness for operation
PSM is switched on automatically every time you
start the engine.
PSM should always be switched on during
“normal” driving.
However, it may make sense to switch off PSM
temporarily in exceptional situations, for example:
– On a loose surface or in deep snow,
– when “rocking the vehicle free” and
– when using snow chains.
Switching off PSMPSM can be switched off in 2 stages:
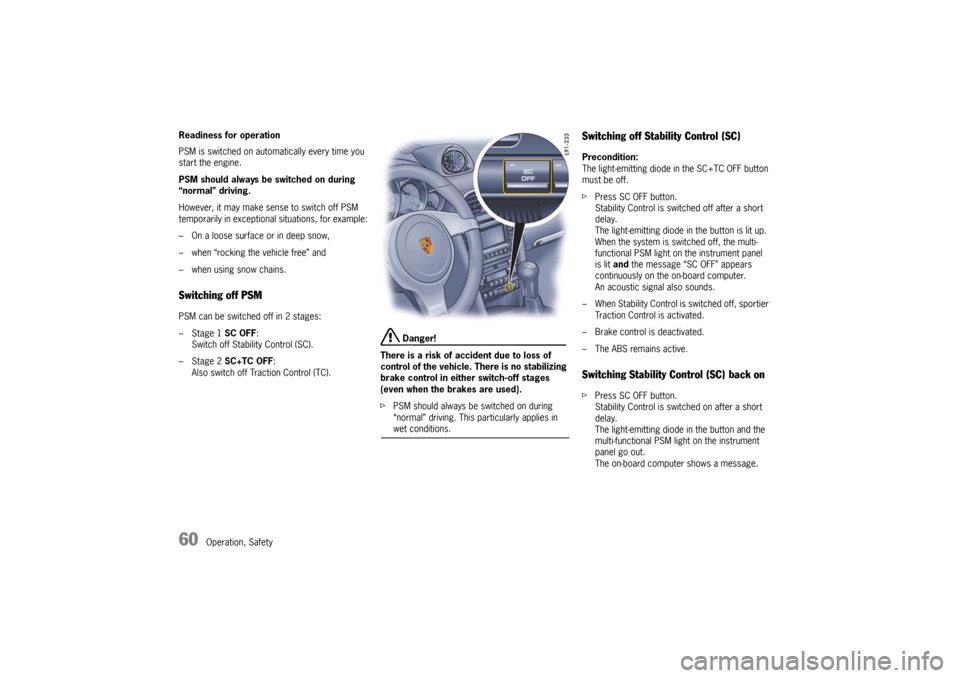
– Stage 1 SC OFF:
Switch off Stability Control (SC).
– Stage 2 SC+TC OFF:
Also switch off Traction Control (TC).
Danger!
There is a risk of accident due to loss of
control of the vehicle. There is no stabilizing
brake control in either switch-off stages
(even when the brakes are used).
fPSM should always be switched on during
“normal” driving. This particularly applies in wet conditions.
Switching off Stability Control (SC)Precondition:
The light-emitting diode in the SC+TC OFF button
must be off.
fPress SC OFF button.
Stability Control is switched off after a short
delay.
The light-emitting diode in the button is lit up.
When the system is switched off, the multi-
functional PSM light on the instrument panel
is lit and the message “SC OFF” appears
continuously on the on-board computer.
An acoustic signal also sounds.
– When Stability Control is switched off, sportier
Traction Control is activated.
– Brake control is deactivated.
– The ABS remains active.Switching Stability Control (SC) back onfPress SC OFF button.
Stability Control is switched on after a short
delay.
The light-emitting diode in the button and the
multi-functional PSM light on the instrument
panel go out.
The on-board computer shows a message.
10_GT3_21.book Seite 60 Donnerstag, 4. Juni 2009 12:48 12
Page 62 of 251
Operation, Safety
61
Switching off Stability Control (SC) and
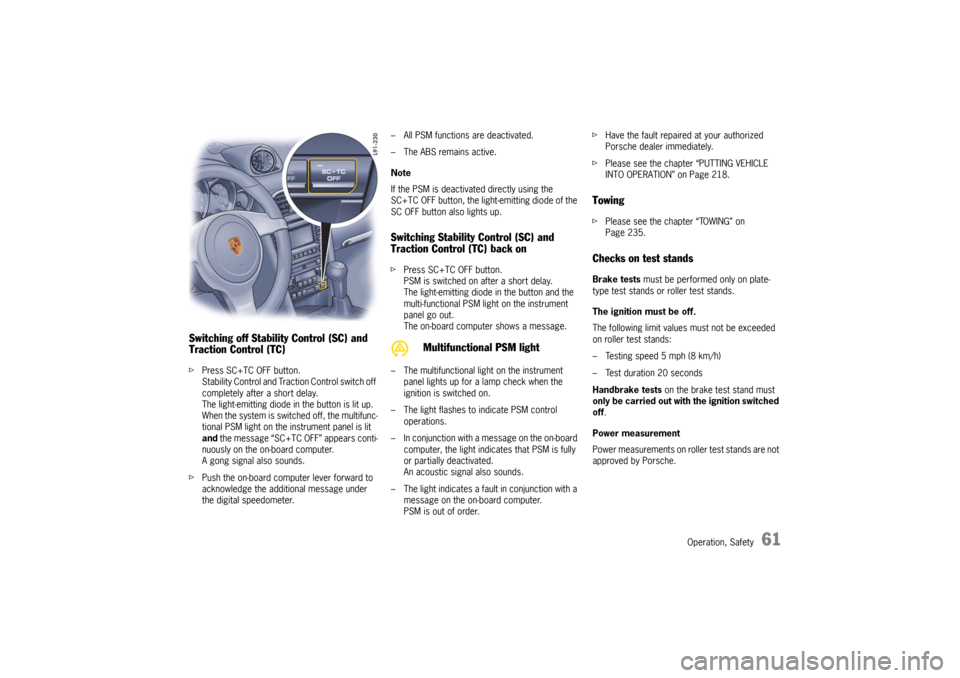
Traction Control (TC)fPress SC+TC OFF button.
Stability Control and Traction Control switch off
completely after a short delay.
The light-emitting diode in the button is lit up.
When the system is switched off, the multifunc-
tional PSM light on the instrument panel is lit
and the message “SC+TC OFF” appears conti-
nuously on the on-board computer.
A gong signal also sounds.
fPush the on-board computer lever forward to
acknowledge the additional message under
the digital speedometer.– All PSM functions are deactivated.
– The ABS remains active.
Note
If the PSM is deactivated directly using the
SC+TC OFF button, the light-emitting diode of the
SC OFF button also lights up.
Switching Stability Control (SC) and
Traction Control (TC) back onfPress SC+TC OFF button.
PSM is switched on after a short delay.
The light-emitting diode in the button and the
multi-functional PSM light on the instrument
panel go out.
The on-board computer shows a message.
– The multifunctional light on the instrument
panel lights up for a lamp check when the
ignition is switched on.
– The light flashes to indicate PSM control
operations.
– In conjunction with a message on the on-board
computer, the light indicates that PSM is fully
or partially deactivated.
An acoustic signal also sounds.
– The light indicates a fault in conjunction with a
message on the on-board computer.
PSM is out of order.fHave the fault repaired at your authorized
Porsche dealer immediately.
fPlease see the chapter “PUTTING VEHICLE
INTO OPERATION” on Page 218.
TowingfPlease see the chapter “TOWING” on
Page 235.Checks on test standsBrake tests must be performed only on plate-
type test stands or roller test stands.
The ignition must be off.
The following limit values must not be exceeded
on roller test stands:
– Testing speed 5 mph (8 km/h)
– Test duration 20 seconds
Handbrake tests on the brake test stand must
only be carried out with the ignition switched
off.
Power measurement
Power measurements on roller test stands are not
approved by Porsche.
Multifunctional PSM light
10_GT3_21.book Seite 61 Donnerstag, 4. Juni 2009 12:48 12
Page 63 of 251
62
Operation, Safety
Sport modeWhen the Sport mode is switched on, the exhaust
gas back pressure in the lower and middle ranges
is reduced in the variable exhaust system. This
serves to produce a marked increase in torque in
the engine speed range from approx. 3000 rpm
and 4000 rpm. The best values for vehicle accele-
ration and low-end torque are achieved when
Sport mode is switched on.
Switching Sport mode on and off
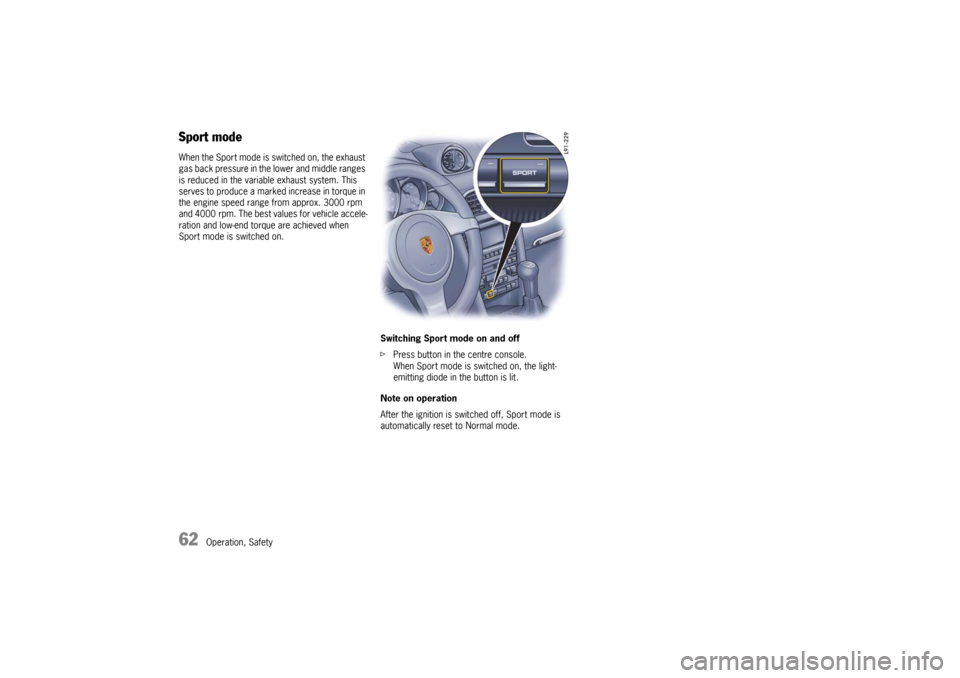
fPress button in the centre console.
When Sport mode is switched on, the light-
emitting diode in the button is lit.
Note on operation
After the ignition is switched off, Sport mode is
automatically reset to Normal mode.10_GT3_21.book Seite 62 Donnerstag, 4. Juni 2009 12:48 12
Page 64 of 251
Operation, Safety
63
The previously selected PASM mode is always
activated after the engine is started.
There is no automatic return to Normal mode after
the ignition is switched off.
PASM makes two running-gear setups available to
the driver: “Normal” and “Sport”.
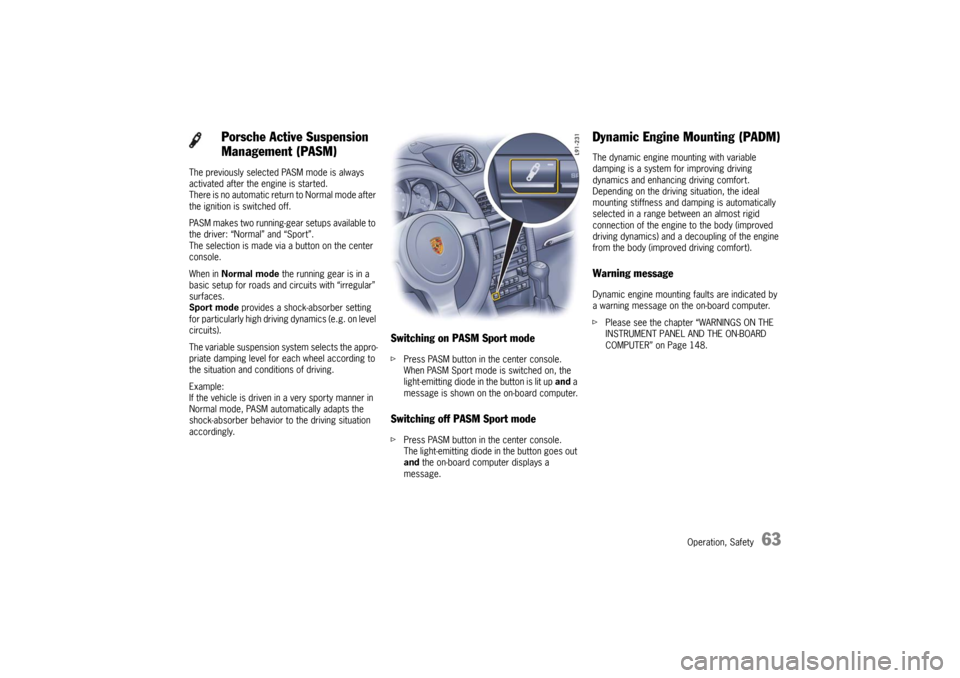
The selection is made via a button on the center
console.
When in Normal mode the running gear is in a
basic setup for roads and circuits with “irregular”
surfaces.
Sport mode provides a shock-absorber setting
for particularly high driving dynamics (e.g. on level
circuits).
The variable suspension system selects the appro-
priate damping level for each wheel according to
the situation and conditions of driving.
Example:
If the vehicle is driven in a very sporty manner in
Normal mode, PASM automatically adapts the
shock-absorber behavior to the driving situation
accordingly.
Switching on PASM Sport modefPress PASM button in the center console.
When PASM Sport mode is switched on, the
light-emitting diode in the button is lit up and a
message is shown on the on-board computer.Switching off PASM Sport modefPress PASM button in the center console.
The light-emitting diode in the button goes out
and the on-board computer displays a
message.
Dynamic Engine Mounting (PADM)The dynamic engine mounting with variable
damping is a system for improving driving
dynamics and enhancing driving comfort.
Depending on the driving situation, the ideal
mounting stiffness and damping is automatically
selected in a range between an almost rigid
connection of the engine to the body (improved
driving dynamics) and a decoupling of the engine
from the body (improved driving comfort).Warning messageDynamic engine mounting faults are indicated by
a warning message on the on-board computer.
fPlease see the chapter “WARNINGS ON THE
INSTRUMENT PANEL AND THE ON-BOARD
COMPUTER” on Page 148.
Porsche Active Suspension
Management (PASM)
10_GT3_21.book Seite 63 Donnerstag, 4. Juni 2009 12:48 12
Page 65 of 251
64
Operation, Safety
Front Axle Lift SystemThe front axle lift system enables the body to be
electropneumatically raised at the front by about
1.18 in. (30 mm) (front edge of front spoiler).
This in turn enables damage to the body to be
prevented, which e. g. may occur when driving
into multi-level parking garages with steep ramps
or over speed bumps.Readiness for operationThe front axle lift system is operational when the
engine is running and the vehicle is at a standstill
or up to a speed of approx. 30 mph (50 km/h).
The vehicle is automatically lowered to the basic
level again when a speed of approx. 30 mph
(50 km/h) is exceeded.
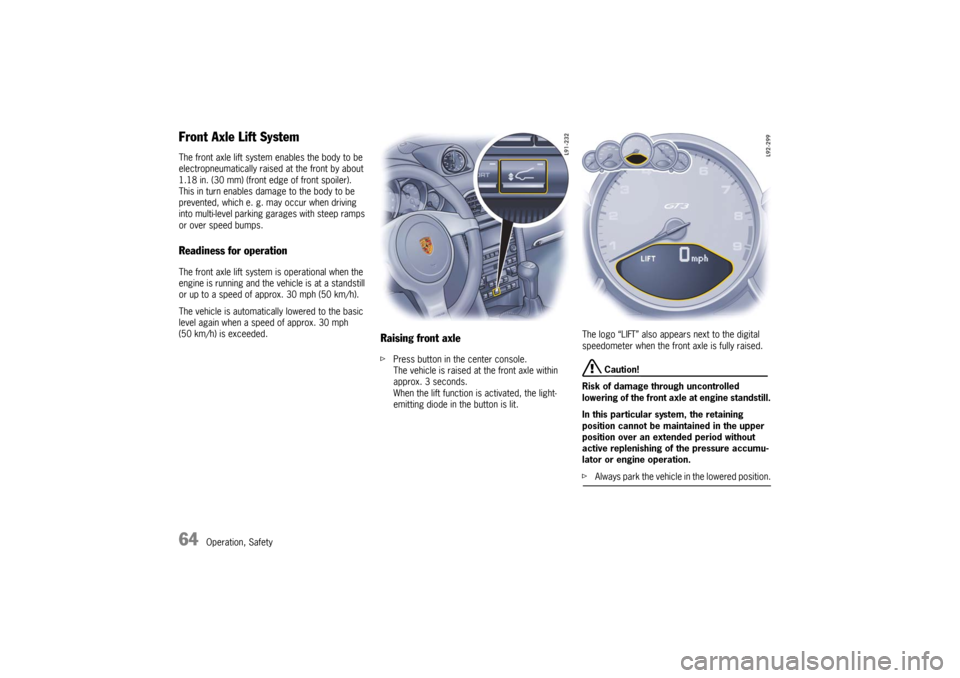
Raising front axle fPress button in the center console.
The vehicle is raised at the front axle within
approx. 3 seconds.
When the lift function is activated, the light-
emitting diode in the button is lit.The logo “LIFT” also appears next to the digital
speedometer when the front axle is fully raised.
Caution!
Risk of damage through uncontrolled
lowering of the front axle at engine standstill.
In this particular system, the retaining
position cannot be maintained in the upper
position over an extended period without
active replenishing of the pressure accumu-
lator or engine operation.
fAlways park the vehicle in the lowered position.
10_GT3_21.book Seite 64 Donnerstag, 4. Juni 2009 12:48 12
Page 66 of 251

Operation, Safety
65
Lowering front axle fPress button in the center console.
The vehicle is lowered to the basic level.
The light-emitting diode in the button and in the
tachometer goes out.
Caution!
Risk of damage through bottoming out the
vehicle.
fDo not lower the vehicle when it is positioned above an obstacle.
Notes on operation
Warning messageFront axle lift system faults are indicated by
a warning message on the on-board computer.
fPlease see the chapter “WARNINGS ON THE
INSTRUMENT PANEL AND THE ON-BOARD
COMPUTER” on Page 148.
– When raised, the damping properties of the
front axle change and noise may be heard in
the area of the front axle coil springs during
steering movements.
– The doors must be closed when lowering the
front axle.
–The blowing-off procedure may result in
system-related hissing noise. This does not
represent a malfunction in the lift system.– During extended vehicle immobilization, the
pressure accumulator may be completely
emptied. In this case, the first time the axle is
raised, a period of up to 2 minutes may elapse
before the vehicle height is reached and “LIFT”
is displayed.
– A flashing LED in the button indicates that the
system is currently not available. Possible
causes may be:
> Automatic overload protection is active.
The system will be available again
following a brief cooling-down phase.
The cooling-down phase may be
extended when outside temperatures
are very high.
> The speed threshold of 30 mph
(50 km/h) has been exceeded. The
system will be available again once the
speed falls below the threshold.
> If automatic lowering is actuated by
exceeding a speed of approx. 30 mph
(50 km/h) in combination with hard
acceleration, the required lowering
duration may mean that “LIFT not
lowered” is displayed. The display goes
out again as soon as the front axle has
been completely lowered.
10_GT3_21.book Seite 65 Donnerstag, 4. Juni 2009 12:48 12
Page 67 of 251
66
Operation, Safety
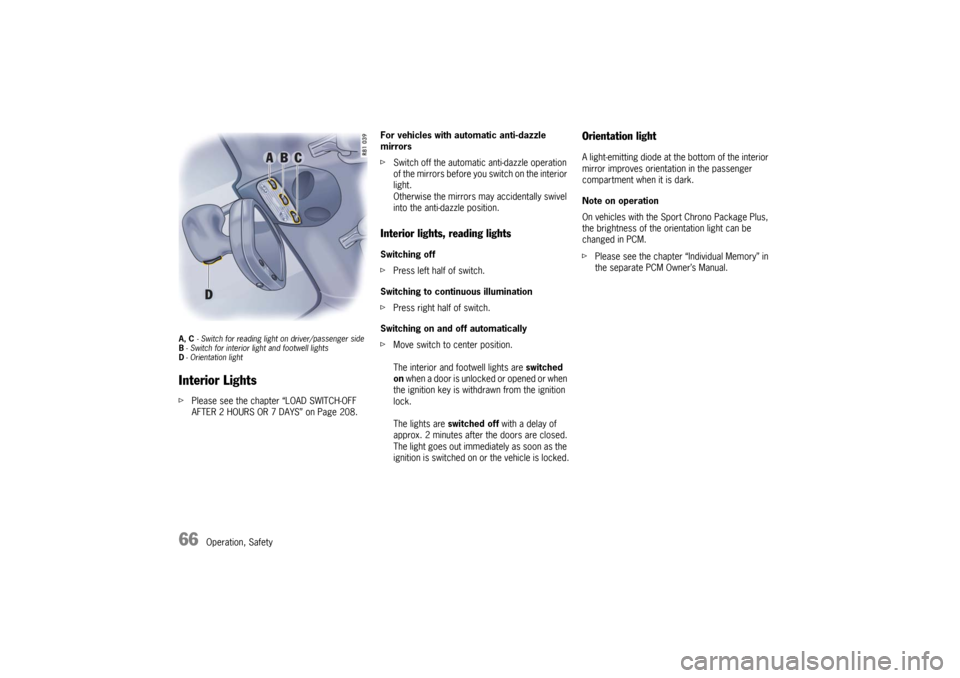
A, C - Switch for reading light on driver/passenger side
B- Switch for interior light and footwell lights
D-Orientation lightInterior LightsfPlease see the chapter “LOAD SWITCH-OFF
AFTER 2 HOURS OR 7 DAYS” on Page 208.For vehicles with automatic anti-dazzle
mirrors
fSwitch off the automatic anti-dazzle operation
of the mirrors before you switch on the interior
light.
Otherwise the mirrors may accidentally swivel
into the anti-dazzle position.
Interior lights, reading lightsSwitching off
fPress left half of switch.
Switching to continuous illumination
fPress right half of switch.
Switching on and off automatically
fMove switch to center position.
The interior and footwell lights are switched
on when a door is unlocked or opened or when
the ignition key is withdrawn from the ignition
lock.
The lights are switched off with a delay of
approx. 2 minutes after the doors are closed.
The light goes out immediately as soon as the
ignition is switched on or the vehicle is locked.
Orientation lightA light-emitting diode at the bottom of the interior
mirror improves orientation in the passenger
compartment when it is dark.
Note on operation
On vehicles with the Sport Chrono Package Plus,
the brightness of the orientation light can be
changed in PCM.
fPlease see the chapter “Individual Memory” in
the separate PCM Owner’s Manual.
10_GT3_21.book Seite 66 Donnerstag, 4. Juni 2009 12:48 12
Page 68 of 251
Operation, Safety
67
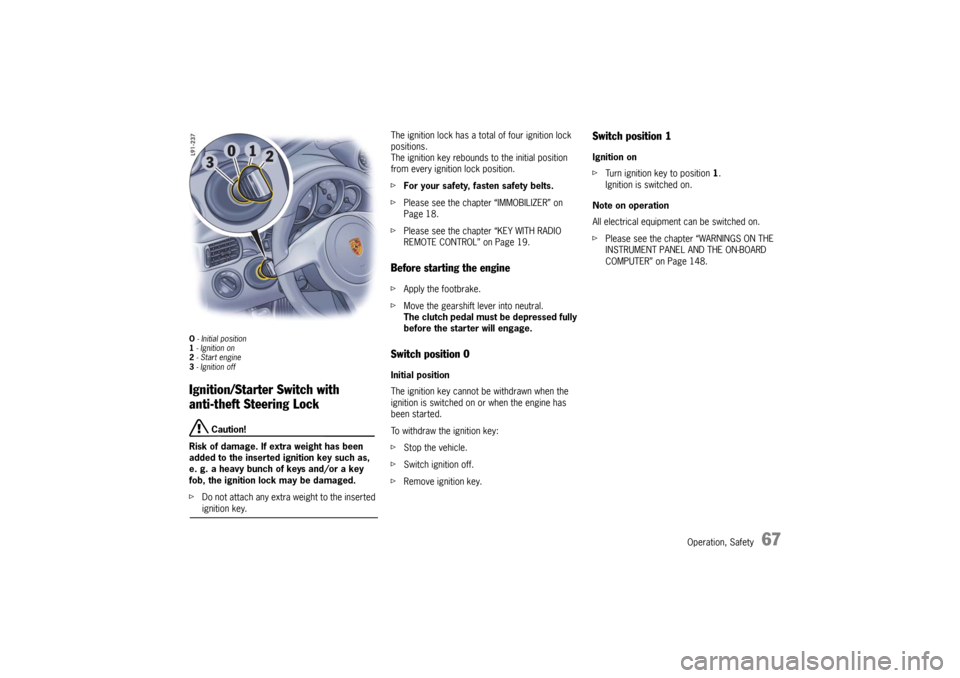
O - Initial position
1 - Ignition on
2 - Start engine
3 - Ignition offIgnition/Starter Switch with
anti-theft Steering Lock
Caution!
Risk of damage. If extra weight has been
added to the inserted ignition key such as,
e. g. a heavy bunch of keys and/or a key
fob, the ignition lock may be damaged.
fDo not attach any extra weight to the inserted ignition key.The ignition lock has a total of four ignition lock
positions.
The ignition key rebounds to the initial position
from every ignition lock position.
fFor your safety, fasten safety belts.
fPlease see the chapter “IMMOBILIZER” on
Page 18.
fPlease see the chapter “KEY WITH RADIO
REMOTE CONTROL” on Page 19.
Before starting the enginefApply the footbrake.
fMove the gearshift lever into neutral.
The clutch pedal must be depressed fully
before the starter will engage.Switch position 0 Initial position
The ignition key cannot be withdrawn when the
ignition is switched on or when the engine has
been started.
To withdraw the ignition key:
fStop the vehicle.
fSwitch ignition off.
fRemove ignition key.
Switch position 1 Ignition on
fTurn ignition key to position 1.
Ignition is switched on.
Note on operation
All electrical equipment can be switched on.
fPlease see the chapter “WARNINGS ON THE
INSTRUMENT PANEL AND THE ON-BOARD
COMPUTER” on Page 148.
10_GT3_21.book Seite 67 Donnerstag, 4. Juni 2009 12:48 12
Page 69 of 251

68
Operation, Safety
Switch position 2Start engine
fTurn ignition key to ignition lock position 2.
fPlease see the chapter “STARTING PROCE-
DURES” on Page 70.Switch position 3Ignition off
fTurn ignition key to ignition lock position 3.
Note on operation
The vehicle battery discharges if the ignition key is
left inserted.
If the vehicle battery is dead, the key can only be
pulled out of the ignition lock if the emergency
operation is performed:
fPlease see the chapter “EMERGENCY OPERA-
TION – PULLING OUT THE IGNITION KEY” on
Page 69.
Locking the steering columnAutomatic locking
The steering column is automatically locked when
the ignition key is withdrawn from the ignition lock.
Warning!
Risk of an accident, resulting in serious
personal injury or death.
The steering wheel will lock and will cause
loss of steering.
fNever remove key from the ignition lock or turn
the key off while the vehicle is moving.
fAlways withdraw the ignition key when leaving the vehicle.Automatic unlocking
The steering column is unlocked when the vehicle
is unlocked with the radio remote control.
Note
fTo avoid discharging the battery, always
remove the ignition key from the ignition lock.
Please see the chapter “BATTERY” on
Page 211.
Gong If you leave the key in the ignition/steering lock, a
gong will sound when the driver’s door is opened.
This is a reminder to remove the key.
10_GT3_21.book Seite 68 Donnerstag, 4. Juni 2009 12:48 12
Page 70 of 251
Operation, Safety
69
Emergency operation – pulling out the
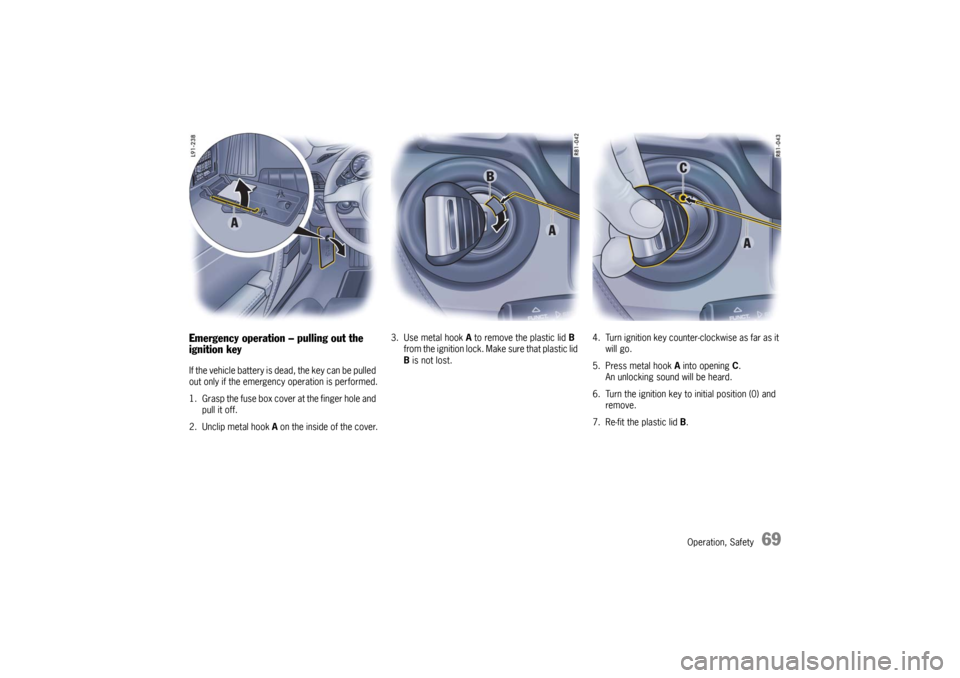
ignition keyIf the vehicle battery is dead, the key can be pulled
out only if the emergency operation is performed.
1. Grasp the fuse box cover at the finger hole and
pull it off.
2. Unclip metal hook A on the inside of the cover.3. Use metal hook A to remove the plastic lid B
from the ignition lock. Make sure that plastic lid
B is not lost.4. Turn ignition key counter-clockwise as far as it
will go.
5. Press metal hook A into opening C.
An unlocking sound will be heard.
6. Turn the ignition key to initial position (0) and
remove.
7. Re-fit the plastic lid B.
10_GT3_21.book Seite 69 Donnerstag, 4. Juni 2009 12:48 12