warning RAM PROMASTER 2021 Service Manual
[x] Cancel search | Manufacturer: RAM, Model Year: 2021, Model line: PROMASTER, Model: RAM PROMASTER 2021Pages: 288, PDF Size: 15.22 MB
Page 67 of 288

STARTING AND OPERATING65
Electronic Range Select (ERS) Operation
The Electronic Range Select (ERS) shift control
allows the driver to limit the highest available
gear. For example, if you set the transmission
gear limit to FOURTH gear, the transmission will
not shift above FOURTH gear, but will shift
through the lower gears normally. You can switch between DRIVE and ERS mode
at any vehicle speed. When the gear selector is
in the DRIVE position, the transmission will
operate automatically, shifting between all
available gears. Moving the gear selector to
the ERS position (beside DRIVE) will activate
ERS mode, display the current gear in the
instrument cluster, and set that gear as the top
available gear. Once in ERS mode, moving the
gear selector forward (-) or rearward (+) will
change the top available gear.To exit ERS mode, simply return the gear
selector to the DRIVE position.
NOTE:
To select the proper gear position for maximum deceleration (engine braking), move the gear selector into the ERS position, then tap it forward (-)
repeatedly as the vehicle slows. The transmission will shift to the range from which the vehicle can best be slowed down.
WARNING!
Do not downshift for additional engine braking
on a slippery surface. The drive wheels could
lose their grip and the vehicle could skid,
causing a collision or personal injury.
Instrument Cluster Display 1
23456D
Actual Gear(s)
Allowed 1
1–2 1–31–41–51–61–6
4
21_VF_OM_EN_USC_t.book Page 65
Page 69 of 288

STARTING AND OPERATING67
NOTE:
Increased noise levels at the end of the
steering wheel travel are considered normal
and do not indicate that there is a problem
with the power steering system.
Upon initial start-up in cold weather, the
power steering pump may make noise for a
short amount of time. This is due to the cold,
thick fluid in the steering system. This noise
should be considered normal, and it does not
in any way damage the steering system.
POWER STEERING FLUID CHECK
Checking the power steering fluid level at a
defined service interval is not required. The fluid
should be checked at every oil change if a leak
is suspected, abnormal noises are apparent, and/or the system is not functioning as
anticipated. Coordinate inspection efforts
through an authorized dealer.
If necessary, add fluid to restore to the proper
indicated level. With a clean cloth, wipe any
spilled fluid from all surfaces Ú
page 270.
CRUISE CONTROL — IF EQUIPPED
When engaged, the Cruise Control takes over
accelerator operations at speeds greater than
25 mph (40 km/h) up to the maximum speed of
100 mph (160 km/h).
The Cruise Control lever is located on the left
side of the steering column.
Cruise Control Lever
NOTE:
In order to ensure proper operation, the Cruise
Control system has been designed to shut down
if multiple Cruise Control functions are operated
at the same time. If this occurs, the Cruise
Control system can be reactivated by rotating
the Cruise Control ON/OFF center ring and
resetting the desired vehicle set speed.
CAUTION!
Prolonged operation of the steering system at
the end of the steering wheel travel will
increase the steering fluid temperature and it
should be avoided when possible. Damage to
the power steering pump may occur.
WARNING!
Fluid level should be checked on a level
surface and with the engine off to prevent
injury from moving parts and to ensure
accurate fluid level reading. Do not overfill.
Use only FCA recommended power steering
fluid.
CAUTION!
Do not use chemical flushes in your power
steering system as the chemicals can
damage your power steering components.
Such damage is not covered by the New
Vehicle Limited Warranty.
4
21_VF_OM_EN_USC_t.book Page 67
Page 70 of 288

68STARTING AND OPERATING
TO ACTIVATE
Rotate the center ring upward on the Cruise
Control lever to turn the system on. The Cruise
Indicator Light in the instrument cluster display
will illuminate. To turn the system off, rotate the
center ring upward a second time. The Cruise
Indicator Light will turn off. The system should
be turned off when not in use.
TO SET A DESIRED SPEED
Turn the Cruise Control on. When the vehicle
has reached the desired speed, move the
Cruise Control lever upward SET (+) and
release. Release the accelerator and the
vehicle will operate at the selected speed.
NOTE:
The vehicle should be traveling at a steady
speed and on level ground before moving the
Cruise Control lever upward SET (+).
TO VARY THE SPEED SETTING
To Increase or Decrease The Set Speed
When the Cruise Control is set, you can increase
speed by tapping the Cruise Control lever up
SET (+) or decrease the speed by tapping the
Cruise Control lever down (-).
U.S. Speed (mph)
Tapping the Cruise Control lever up SET (+),
or tapping the Cruise Control lever down (-)
once will result in a 1 mph speed adjustment.
Each subsequent tap of the lever results in
an adjustment of 1 mph.
If the lever is continually held up or down, the
set speed will continue to adjust until the
lever is released, then the new set speed will
be established.
Metric Speed (km/h)
Tapping the Cruise Control lever up SET (+),
or tapping the Cruise Control lever down (-)
once will result in a 1 km/h speed adjust -
ment. Each subsequent tap of the lever
results in an adjustment of 1 km/h.
If the lever is continually held up or down, the
set speed will continue to adjust until the
lever is released, then the new set speed will
be established.
WARNING!
Leaving the Cruise Control system on when
not in use is dangerous. You could
accidentally set the system or cause it to go
faster than you want. You could lose control
and have an accident. Always ensure the
system is off when you are not using it.
21_VF_OM_EN_USC_t.book Page 68
Page 71 of 288
STARTING AND OPERATING69
TO ACCELERATE FOR PASSING
While the Cruise Control system is set, press the
accelerator to pass as you would normally.
When the pedal is released, the vehicle will
return to the set speed.
Using Cruise Control On Hills
The transmission may downshift on hills to
maintain the vehicle set speed.
The Cruise Control system maintains speed up
and down hills. A slight speed change on
moderate hills is normal. On steep hills, a
greater speed loss or gain may occur so it may
be preferable to drive without Cruise Control.
TO RESUME SPEED
To resume a previously set speed, push the RES
button and release. Resume can be used at any
speed above 20 mph (32 km/h) up to the
maximum speed of 100 mph (160 km/h).
TO DEACTIVATE
A soft tap on the brake pedal, pushing the RES
button, or normal brake pressure while slowing
the vehicle will deactivate Cruise Control
without erasing the set speed memory. Rotating
the center ring upward to turn the system off or
placing the ignition in the STOP (OFF/LOCK)
position erases the set speed memory.
PARKSENSE REAR PARK ASSIST — IF
EQUIPPED
The ParkSense Rear Park Assist system
provides an audible indication of the distance
between the rear fascia/bumper and a
detected obstacle when backing up (e.g. during
a parking maneuver) Úpage 72.
The ParkSense Rear Park Assist is
automatically activated when the transmission
is placed into REVERSE. As the distance from an
obstacle behind the vehicle decreases, the
audible alert becomes more frequent.
Interaction With Trailer Towing
The Rear Park Assist system is automatically
deactivated when a trailer is hitched to the
vehicle. The system will be automatically
activated as soon as the trailer is removed.
WARNING!
Cruise Control can be dangerous where the
system cannot maintain a constant speed.
Your vehicle could go too fast for the
conditions, and you could lose control and
have an accident. Do not use Cruise Control
in heavy traffic or on roads that are winding,
icy, snow-covered or slippery.
4
21_VF_OM_EN_USC_t.book Page 69
Page 73 of 288

STARTING AND OPERATING71
While audible signals are emitted, the audio system is not muted.
The audible signal is turned off immediately if the distance increases. The tone cycle remains constant if the distance measured by the inner sensors
is constant. If this condition occurs for the external sensors, the signal is turned off after three seconds (stopping warnings during maneuvers parallel
to walls).
Audible And Visual Signals Supplied By The ParkSense Rear Park Assist System
SIGNAL MEANING INDICATION
Obstacle DistanceAn obstacle is present within the
sensors' field of view Audible Signal
(dashboard loudspeaker)
• Sound pulses emitted at a rate that increases as the distance
decreases.
• Emits continuous tone at 12 inches (30 cm).
• Adjustable volume level programmable through personal
settings in the instrument cluster display Ú page 44.
Failure Sensor or System failures Visual Signal
(instrument panel)
• Icon appears on display.
• Message is displayed in instrument cluster display (if equipped).
4
21_VF_OM_EN_USC_t.book Page 71
Page 74 of 288
72STARTING AND OPERATING
(Continued)
PARKSENSE REAR PARK ASSIST
F
AILURE INDICATIONS
A malfunction of the ParkSense Rear Park
Assist sensors or system is indicated, during
REVERSE gear engagement, by the instrument
panel warning icon.
The warning icon is illuminated and a
message is displayed in the
instrument cluster display (if
equipped) Ú page 48.
The sensors and wiring are tested continuously
when the ignition is in the MAR (ACC/ON/RUN)
position. Failures are indicated immediately if
they occur when the system is on.
Even if the system is able to identify that a
specific sensor is in failure condition, the
instrument cluster display shall indicate that
the ParkSense Rear Park Assist system is
unavailable, without reference to the sensor in
failure condition. If even a single sensor fails,
the entire system must be disabled. The system
is turned off automatically.
CLEANING THE PARKSENSE SYSTEM
Clean the Rear Park Assist sensors with water,
car wash soap and a soft cloth. Do not use
rough or hard cloths. In washing stations, clean
sensors quickly keeping the vapor jet/high
pressure washing nozzles at least 4 inches
(10 cm) from the sensors. Do not scratch or
poke the sensors.
PARKSENSE REAR PARK ASSIST
S
YSTEM USAGE PRECAUTIONS
NOTE:
Ensure that the outer surface and the under -
side of the rear fascia/bumper is clean and
clear of snow, ice, mud, dirt or other obstruc -
tion to keep the Rear Park Assist system
operating properly.
Jackhammers, large trucks, and other vibra -
tions could affect the performance of Rear
Park Assist.
Clean the Rear Park Assist sensors regularly,
taking care not to scratch or damage them.
The sensors must not be covered with ice,
snow, slush, mud, dirt or debris. Failure to do
so can result in the system not working prop -erly. The Rear Park Assist system might not
detect an obstacle behind the fascia/
bumper, or it could provide a false indication
that an obstacle is behind the fascia/
bumper.
Objects such as bicycle carriers, etc., must
not be placed within 12 inches (30 cm) from
the rear fascia/bumper while driving the
vehicle. Failure to do so can result in the
system misinterpreting a close object as a
sensor problem, causing a failure indication
to be displayed in the instrument cluster
display.
WARNING!
Drivers must be careful when backing up
even when using ParkSense. Always check
carefully behind your vehicle, look behind
you, and be sure to check for pedestrians,
animals, other vehicles, obstructions, and
blind spots before backing up. You are
responsible for safety and must continue to
pay attention to your surroundings. Failure
to do so can result in serious injury or
death.
21_VF_OM_EN_USC_t.book Page 72
Page 75 of 288
STARTING AND OPERATING73
(Continued)
If it’s necessary to keep the ball mount and
hitch ball assembly mounted for a long period,
it is possible to filter out the ball mount and
hitch ball assembly presence in the sensor field
of view. The filtering operation must be
performed only by an authorized dealer.
PARKVIEW REAR BACK UP CAMERA
Your vehicle is equipped with the ParkView Rear
Back Up Camera that allows you to see an
on-screen image of the rear surroundings of
your vehicle whenever the gear selector is put
into REVERSE and/or when the rear doors are
opened. The image will be displayed on the
touchscreen display along with a caution note to “Check Entire Surroundings” across the top
of the screen. After five seconds this note will
disappear. The ParkView Rear Back Up Camera
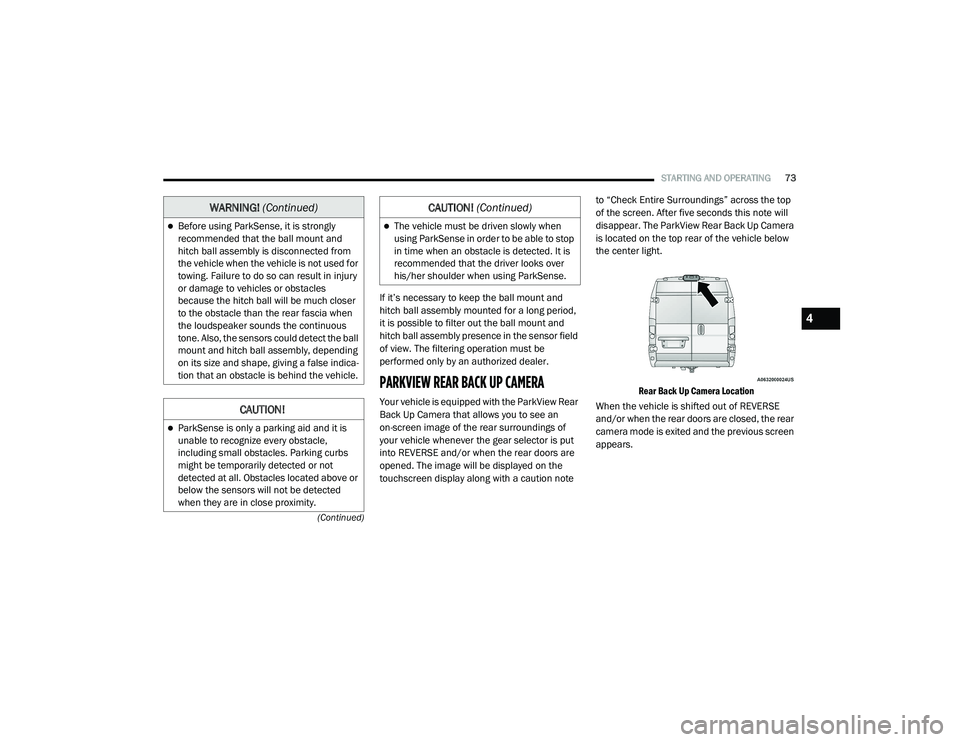
is located on the top rear of the vehicle below
the center light.
Rear Back Up Camera Location
When the vehicle is shifted out of REVERSE
and/or when the rear doors are closed, the rear
camera mode is exited and the previous screen
appears.
Before using ParkSense, it is strongly
recommended that the ball mount and
hitch ball assembly is disconnected from
the vehicle when the vehicle is not used for
towing. Failure to do so can result in injury
or damage to vehicles or obstacles
because the hitch ball will be much closer
to the obstacle than the rear fascia when
the loudspeaker sounds the continuous
tone. Also, the sensors could detect the ball
mount and hitch ball assembly, depending
on its size and shape, giving a false indica -
tion that an obstacle is behind the vehicle.
CAUTION!
ParkSense is only a parking aid and it is
unable to recognize every obstacle,
including small obstacles. Parking curbs
might be temporarily detected or not
detected at all. Obstacles located above or
below the sensors will not be detected
when they are in close proximity.
WARNING! (Continued)
The vehicle must be driven slowly when
using ParkSense in order to be able to stop
in time when an obstacle is detected. It is
recommended that the driver looks over
his/her shoulder when using ParkSense.
CAUTION! (Continued)
4
21_VF_OM_EN_USC_t.book Page 73
Page 76 of 288
74STARTING AND OPERATING
When displayed, static grid lines will illustrate the width of the vehicle and will show separate zones that will help indicate the distance to the rear of
the vehicle. The following table shows the approximate distances for each zone:
NOTE:
If snow, ice, mud, or any foreign substance
builds up on the camera lens, clean the lens,
rinse with water, and dry with a soft cloth.
Do not cover the lens.
Zone
Distance To The Rear Of The Vehicle
Red 0 - 1 ft (0 - 30 cm)
Yellow 1 ft - 3 ft (30 cm - 1 m)
Green 3 ft or greater (1 m or greater)
WARNING!
Drivers must be careful when backing up
even when using the Rear Back Up Camera.
Always check carefully behind your vehicle,
and be sure to check for pedestrians,
animals, other vehicles, obstructions, or blind
spots before backing up. You are responsible
for the safety of your surroundings and must
continue to pay attention while backing up.
Failure to do so can result in serious injury or
death.
CAUTION!
To avoid vehicle damage, ParkView should
only be used as a parking aid. The ParkView
camera is unable to view every obstacle or
object in your drive path.
To avoid vehicle damage, the vehicle must
be driven slowly when using ParkView to be
able to stop in time when an obstacle is
seen. It is recommended that the driver
look frequently over his/her shoulder when
using ParkView.
21_VF_OM_EN_USC_t.book Page 74
Page 77 of 288

STARTING AND OPERATING75
(Continued)
REFUELING THE VEHICLE
The gas cap is located behind the fuel filler door
on the left side of the vehicle. If the gas cap is
lost or damaged, be sure the replacement cap
is used with this vehicle.
Fuel Filler
NOTE:
During fuel fill, nozzle position could affect the
flow of fuel. For best results, allow the nozzle to
rest naturally in the filler tube - do not raise the
handle to increase the fill angle. NOTE:
When the fuel nozzle “clicks” or shuts off, the
fuel tank is full.
Tighten the fuel filler cap until you hear a
“clicking” sound. This is an indication that the
fuel filler cap is properly tightened.
If the gas cap is not tightened properly, the
MIL may come on. Be sure the gas cap is
tightened every time the vehicle is refueled.
WARNING!
Never have any smoking materials lit in or
near the vehicle when the fuel door is open
or the tank is being filled.
Never add fuel when the engine is running.
This is in violation of most state and federal
fire regulations and may cause the
“Malfunction Indicator Light” to turn on.
A fire may result if fuel is pumped into a
portable container that is inside of a
vehicle. You could be burned. Always place
fuel containers on the ground while filling.
CAUTION!
Damage to the fuel system or emissions
control system could result from using an
improper fuel tank filler tube cap.
A poorly fitting fuel filler cap could let impu
-
rities into the fuel system.
A poorly fitting fuel filler cap may cause the
“Malfunction Indicator Light (MIL)” to turn
on.
To avoid fuel spillage and overfilling, do not
“top off” the fuel tank after filling. When the
fuel nozzle “clicks” or shuts off, the fuel
tank is full.
CAUTION! (Continued)
4
21_VF_OM_EN_USC_t.book Page 75
Page 78 of 288
76STARTING AND OPERATING
LOOSE FUEL FILLER CAP MESSAGE
If the vehicle diagnostic system determines that
the fuel filler cap is loose, improperly installed,
or damaged, a “Check fuel cap” message will be
displayed in the instrument cluster display
Úpage 44. Tighten the fuel filler cap until a
“clicking” sound is heard. This is an indication
that the fuel filler cap is properly tightened.
If the problem continues, the message will
appear the next time the vehicle is started. See
an authorized dealer as soon as possible.
VEHICLE LOADING
As required by National Highway Traffic Safety
Administration regulations, your vehicle has a
certification label affixed to the driver's side
door or B-pillar.
If seats are removed for carrying cargo, do not
exceed the specified GVWR and GAWR.
VEHICLE CERTIFICATION LABEL
Your vehicle has a Vehicle Certification Label
affixed to the driver’s side B-pillar or the rear of
the driver’s door.
The label contains the following information:
Name of manufacturer
Month and year of manufacture
Gross Vehicle Weight Rating (GVWR)
Gross Axle Weight Rating (GAWR) front and
rear
Vehicle Identification Number (VIN)
Type of vehicle
Month, Day, and Hour of manufacture (MDH)
The bar code allows a computer scanner to read
the VIN.
GROSS VEHICLE WEIGHT RATING
(GVWR)
The GVWR is the total allowable weight of your
vehicle. This includes driver, passengers, and
cargo. The total load must be limited so that you
do not exceed the GVWR.
GROSS AXLE WEIGHT RATING (GAWR)
The GAWR is the maximum capacity of the front
and rear axles. Distribute the load over the front
and rear axles evenly. Make sure that you do
not exceed either front or rear GAWR.
WARNING!
Because the front wheels steer the vehicle, it
is important that you do not exceed the
maximum front or rear GAWR. A dangerous
driving condition can result if either rating is
exceeded. You could lose control of the
vehicle and have a collision.
21_VF_OM_EN_USC_t.book Page 76