RENAULT KOLEOS 2012 1.G Owners Manual
Manufacturer: RENAULT, Model Year: 2012, Model line: KOLEOS, Model: RENAULT KOLEOS 2012 1.GPages: 233, PDF Size: 7.81 MB
Page 141 of 233
JauneNoirNoir texte
3.21
ENG_UD23659_3
Eclairage intérieur (X45 - H45 - Renault)
ENG_NU_977-2_H45_Ph2_Renault_3
INTERIoR lIghTINg (2/2)
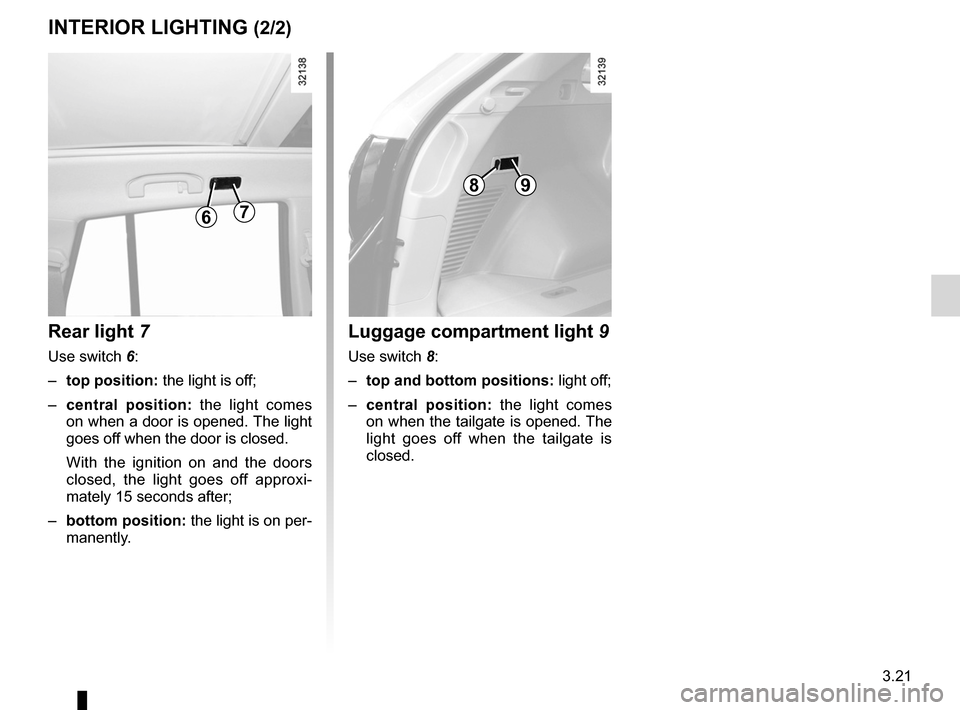
Rear light 7
Use switch 6:
– top position: the light is off;
– central position: the light comes
on when a door is opened. The light
goes off when the door is closed.
With the ignition on and the doors
closed, the light goes off approxi -
mately 15 seconds after;
– bottom position: the light is on per-
manently.
luggage compartment light 9
Use switch 8:
– top and bottom positions: light off;
– central position: the light comes
on when the tailgate is opened. The
light goes off when the tailgate is
closed.
67
89
Page 142 of 233
glove box ............................................................... (current page)
storage compartments .......................... (up to the end of the DU)
storage compartment ............................(up to the end of the DU)
fittings ................................................... (up to the end of the DU)
3.22
ENG_UD23672_6
Rangements, aménagements habitacle (X45 - H45 - Renault)
ENG_NU_977-2_H45_Ph2_Renault_3
Jaune NoirNoir texte
Passenger compartment storage/fittings
PASSENgER coMPARTMENT ST oRAgE, FITTINgS (1/6)
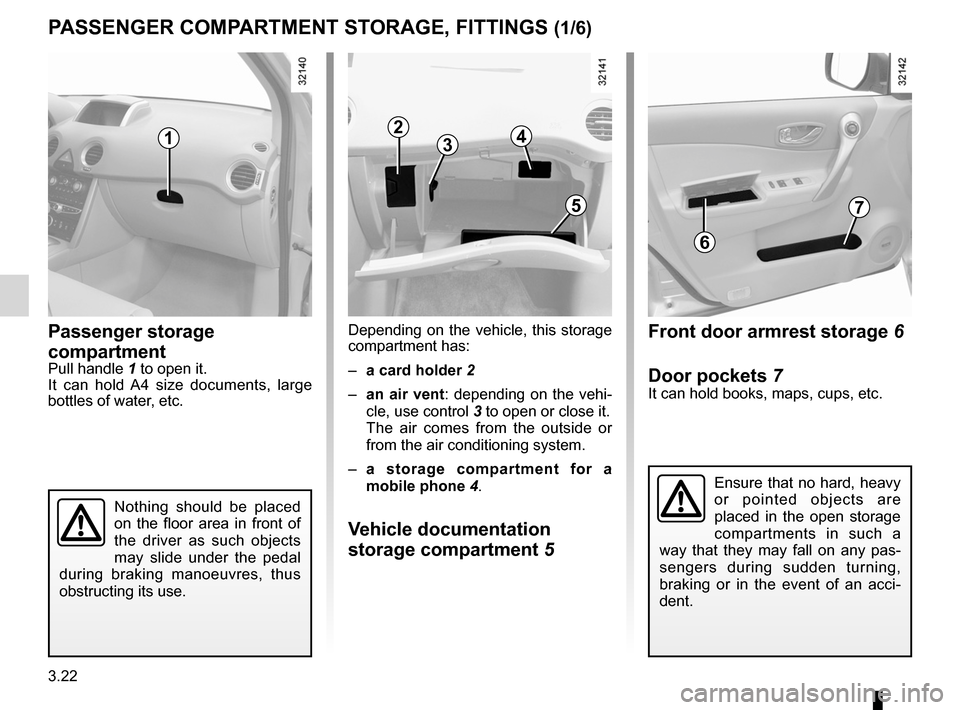
Passenger storage
compartment
Pull handle 1 to open it.
It can hold A4 size documents, large
bottles of water, etc. Depending on the vehicle, this storage
compartment has:
–
a card holder 2
– an air vent: depending on the vehi-
cle, use control 3 to open or close it.
The air comes from the outside or
from the air conditioning system.
– a storage compartment for a
mobile phone 4.
Vehicle documentation
storage compartment 5
Front door armrest storage 6
Door pockets 7
It can hold books, maps, cups, etc.
Ensure that no hard, heavy
or pointed objects are
placed in the open storage
compartments in such a
way that they may fall on any pas -
sengers during sudden turning,
braking or in the event of an acci -
dent.
12
34
5
6
7
Nothing should be placed
on the floor area in front of
the driver as such objects
may slide under the pedal
during braking manoeuvres, thus
obstructing its use.
Page 143 of 233

armrest:front .................................................................. (current page)
JauneNoirNoir texte
3.23
ENG_UD23672_6
Rangements, aménagements habitacle (X45 - H45 - Renault)
ENG_NU_977-2_H45_Ph2_Renault_3
PASSENgER coMPARTMENT ST oRAgE, FITTINgS (2/6)
Sunglasses holder 8
Sun visor storage 9
This can be used for storing motorway
tickets, road maps, etc.
Front centre armrest storage
compartment A
Lift control 13 then lift cover 12.
Removable storage
compartment
(depending on vehicle)
To remove the storage compartment:
lift handle 14 , then pull upwards. To fit
the storage compartment back in place,
push down handle 14 and press the
storage compartment (movement B).
coin holder 15
89
10
11
12
13
15
14
A
B
W h e n t u r n i n g c o r n e r s ,
accelerating or braking,
ensure that the recepta -
cle being held by the cup
holder is not dislodged.
There is a risk of burning if hot liquid
escapes.
Mobile phone storage
compartment and ashtray 10
(depending on vehicle)
Note: do not use this storage compart-
ment for bottles or cups.
cup holder 11
Page 144 of 233
armrest:rear .................................................................. (current page)
3.24
ENG_UD23672_6
Rangements, aménagements habitacle (X45 - H45 - Renault)
ENG_NU_977-2_H45_Ph2_Renault_3
Jaune NoirNoir texte
PASSENgER coMPARTMENT ST oRAgE, FITTINgS (3/6)
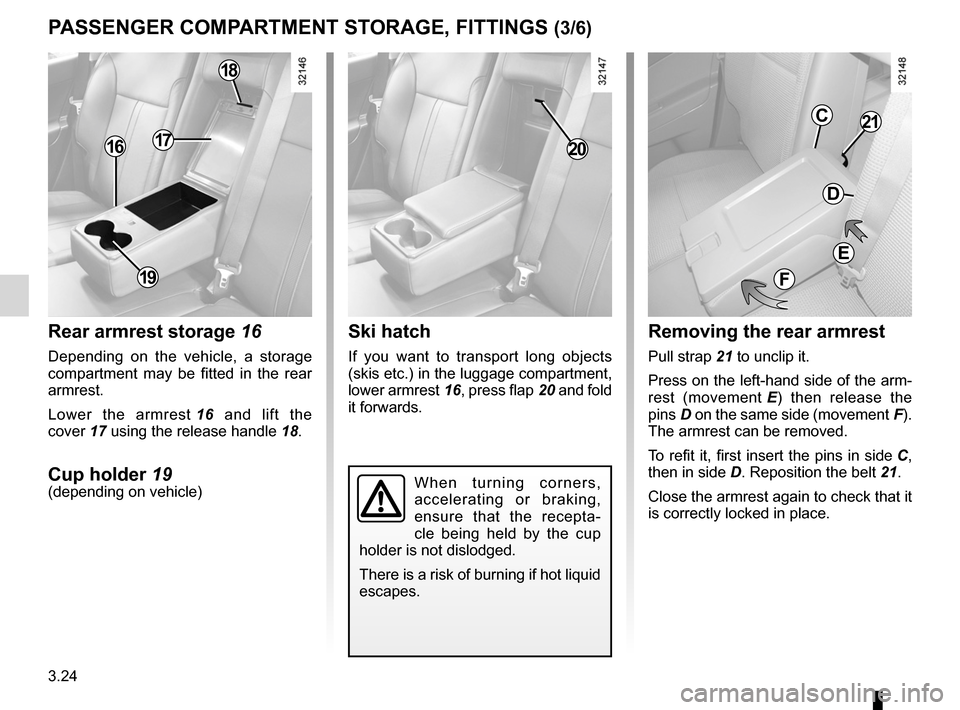
Rear armrest storage 16
Depending on the vehicle, a storage
compartment may be fitted in the rear
armrest.
Lower the armrest 16 and lift the
cover 17 using the release handle 18.
cup holder 19(depending on vehicle)
Ski hatch
If you want to transport long objects
(skis etc.) in the luggage compartment,
lower armrest 16, press flap 20 and fold
it forwards.
Removing the rear armrest
Pull strap 21 to unclip it.
Press on the left-hand side of the arm-
rest (movement E ) then release the
pins D on the same side (movement F).
The armrest can be removed.
To refit it, first insert the pins in side C,
then in side D. Reposition the belt 21.
Close the armrest again to check that it
is correctly locked in place.
19
1617
18
20
21
W h e n t u r n i n g c o r n e r s ,
accelerating or braking,
ensure that the recepta -
cle being held by the cup
holder is not dislodged.
There is a risk of burning if hot liquid
escapes.
F
E
c
D
Page 145 of 233
JauneNoirNoir texte
3.25
ENG_UD23672_6
Rangements, aménagements habitacle (X45 - H45 - Renault)
ENG_NU_977-2_H45_Ph2_Renault_3
PASSENgER coMPARTMENT ST oRAgE, FITTINgS (4/6)
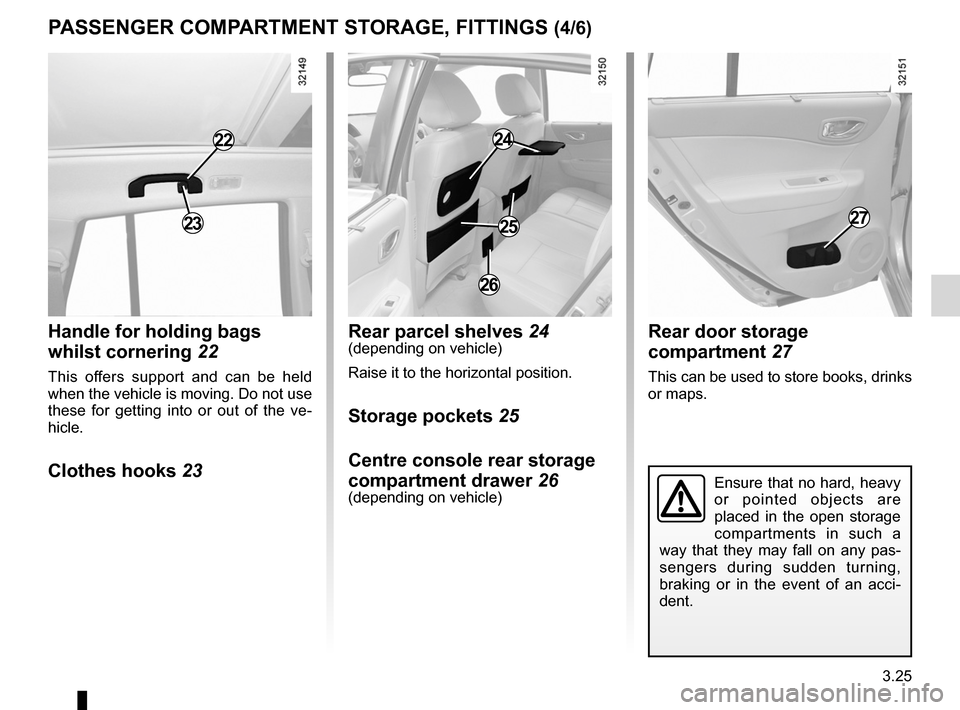
handle for holding bags
whilst cornering 22
This offers support and can be held
when the vehicle is moving. Do not use
these for getting into or out of the ve -
hicle.
clothes hooks 23 Rear parcel shelves
24
(depending on vehicle)
Raise it to the horizontal position.
Storage pockets 25
centre console rear storage
compartment drawer 26
(depending on vehicle)
Rear door storage
compartment 27
This can be used to store books, drinks
or maps.
23
22
26
27
24
25
Ensure that no hard, heavy
or pointed objects are
placed in the open storage
compartments in such a
way that they may fall on any pas -
sengers during sudden turning,
braking or in the event of an acci -
dent.
Page 146 of 233
3.26
ENG_UD23672_6
Rangements, aménagements habitacle (X45 - H45 - Renault)
ENG_NU_977-2_H45_Ph2_Renault_3
Jaune NoirNoir texte
PASSENgER coMPARTMENT ST oRAgE, FITTINgS (5/6)
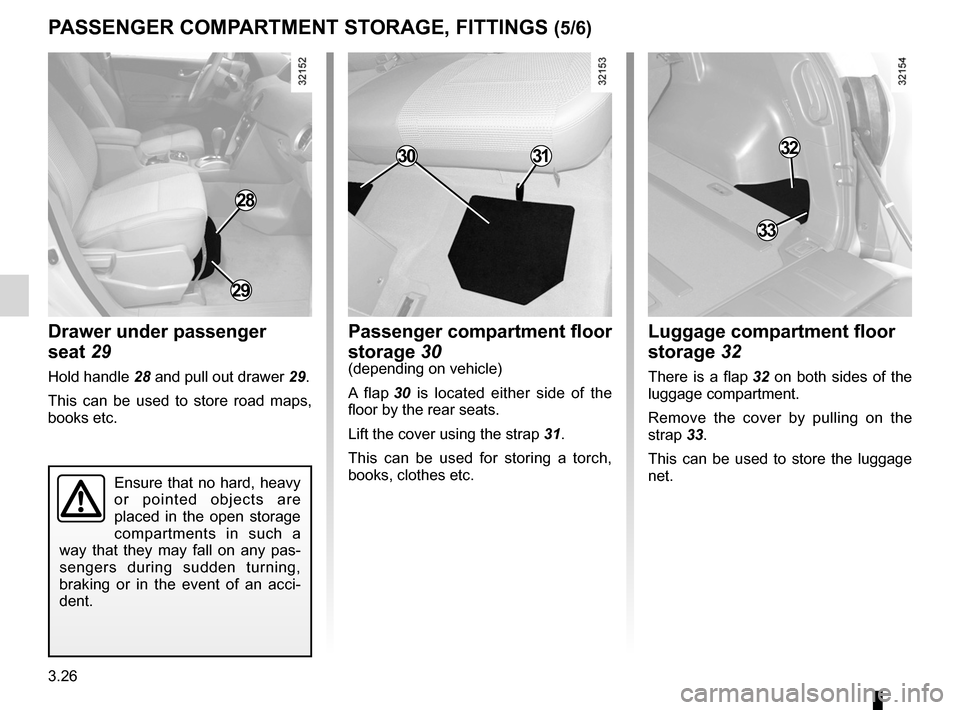
Drawer under passenger
seat 29
Hold handle 28 and pull out drawer 29.
This can be used to store road maps,
books etc.
Passenger compartment floor
storage 30
(depending on vehicle)
A flap 30 is located either side of the
floor by the rear seats.
Lift the cover using the strap 31.
This can be used for storing a torch,
books, clothes etc.
luggage compartment floor
storage 32
There is a flap 32 on both sides of the
luggage compartment.
Remove the cover by pulling on the
strap 33.
This can be used to store the luggage
net.
28
29
3132
33
30
Ensure that no hard, heavy
or pointed objects are
placed in the open storage
compartments in such a
way that they may fall on any pas -
sengers during sudden turning,
braking or in the event of an acci -
dent.
Page 147 of 233
JauneNoirNoir texte
3.27
ENG_UD23672_6
Rangements, aménagements habitacle (X45 - H45 - Renault)
ENG_NU_977-2_H45_Ph2_Renault_3
PASSENgER coMPARTMENT ST oRAgE, FITTINgS (6/6)
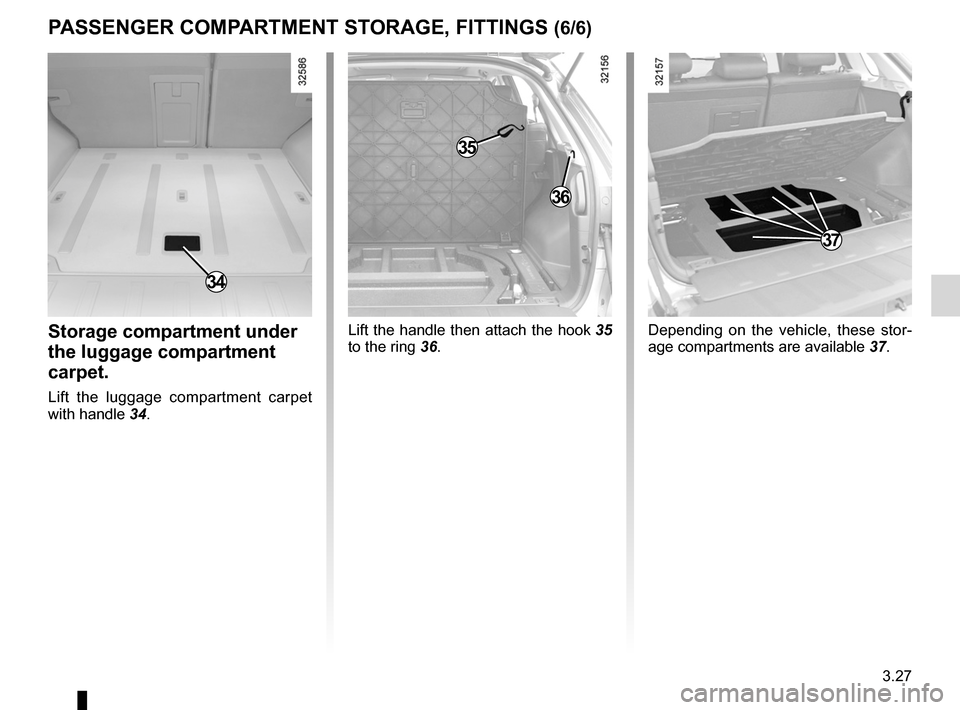
Storage compartment under
the luggage compartment
carpet.
Lift the luggage compartment carpet
with handle 34.
34
35
36
37
Lift the handle then attach the hook 35
to the ring 36. Depending on the vehicle, these stor
-
age compartments are available 37.
Page 148 of 233

ashtray .................................................. (up to the end of the DU)
cigar lighter ........................................... (up to the end of the DU)
accessories socket ............................... (up to the end of the DU)
3.28
ENG_UD23662_5
Cendrier, allume-cigares, prise accessoires (X45 - H45 - Renault)
ENG_NU_977-2_H45_Ph2_Renault_3
Accessories sockets
Ashtray/cigarette lighter
AShTRA y/cIgAR lIghTER/AccESSoRIES SocKET
Ashtray 1
This is a removable ashtray which may
be fitted into one of the cup holders or
storage compartments 3 in the vehicle.
cigar lighter 2
With the ignition on, push in cigar
lighter 2.
It will spring back with a click when it is
ready. Pull it out to use. After use, re -
place it without pushing it all the way in.
Accessories socket 4 and 5(depending on vehicle)
Depending on the vehicle, this can be
fitted instead of cigar lighter 2.
These sockets are designed for con -
necting accessories with a maximum
power rating of 120 Watts (voltage:
12 V) which have been approved by our
Technical Department. Contact an au -
thorised dealer for further information.
1
2
4
5
3
If your vehicle is not fitted with a
cigar lighter and an ashtray, these
can be obtained from an approved
Dealer.
C o n n e c t a c c e s s o r i e s
with a maximum power of
120 Watts only.
Fire hazard.
Page 149 of 233
headrest................................................ (up to the end of the DU)
3.29
ENG_UD23933_3
Appuis-tête arrière (X45 - H45 - Renault)
ENG_NU_977-2_H45_Ph2_Renault_3
Rear headrests
REAR hEADRESTS
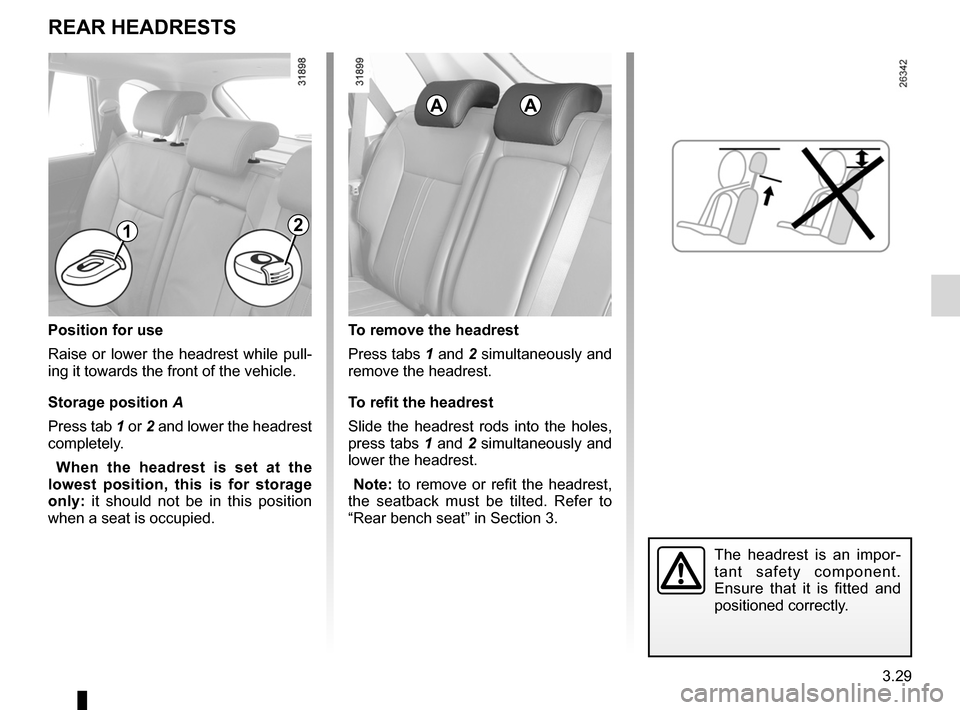
Position for use
Raise or lower the headrest while pull -
ing it towards the front of the vehicle.
Storage position A
Press tab 1 or 2 and lower the headrest
completely.
w hen the headrest is set at the
lowest position, this is for storage
only: it should not be in this position
when a seat is occupied.To remove the headrest
Press tabs 1 and 2 simultaneously and
remove the headrest.
To refit the headrest
Slide the headrest rods into the holes,
press tabs 1 and 2 simultaneously and
lower the headrest.
Note: to remove or refit the headrest,
the seatback must be tilted. Refer to
“Rear bench seat” in Section 3.
The headrest is an impor -
tant safety component.
Ensure that it is fitted and
positioned correctly.
AA
12
Page 150 of 233

rear seatsfunctions ......................................... (up to the end of the DU)
rear bench seat ..................................... (up to the end of the DU)
3.30
ENG_UD8576_2
Banquette arri re (X45 - H45 - Renault)
ENG_NU_977-2_H45_Ph2_Renault_3
Jaune NoirNoir texte
Rear bench seat functions
REAR BENch SEAT FuNcTIoNS (1/2)
When adjusting the seat, always ensure that the seat belt can return to
its original position.
When refitting the seatback, make sure it is correctly locked in place.
2
3
4
5
1
To fold down the rear seats
from inside the passenger
compartment
– lower the headrest;
– move the front seat as far forward as
necessary;
– feed the seat belt into the clip 5;
– pull lever 3: the seat base is raised;
– pull handle 4 and fold down the seat-
back.
Check that no-one, includ -
ing animals, is in the vicin -
ity of the rear bench seat
before pulling handle 1.
Risk of injury.
To fold down the rear
seats from the luggage
compartment
(depending on vehicle)
– lower the headrests;
– move the front seat as far forward as
necessary;
– feed the seat belt into the clip 5;
– use the controls 1.
To return the seat to its
original position
– lift the seatback and return it to its
original position;
– fold down the seat base 2;
– ensure that the seat is correctly
locked in position.
When the seat belt is not being used,
attach it to hook 5.