RENAULT SCENIC 2012 J95 / 3.G Engine And Peripherals EDC16CP33 Workshop Manual
Manufacturer: RENAULT, Model Year: 2012, Model line: SCENIC, Model: RENAULT SCENIC 2012 J95 / 3.GPages: 510, PDF Size: 2.98 MB
Page 151 of 510
13B-151
AFTER REPAIRDeal with any other faults. Clear the fault memory.
Switch off the ignition until the end of the power-latch phase, and carry out a road test
followed by a check with the diagnostic tool.
V12 MR-372-J84-13B300$073.mif
DIESEL INJECTION
Fault finding – Interpretation of faults13B
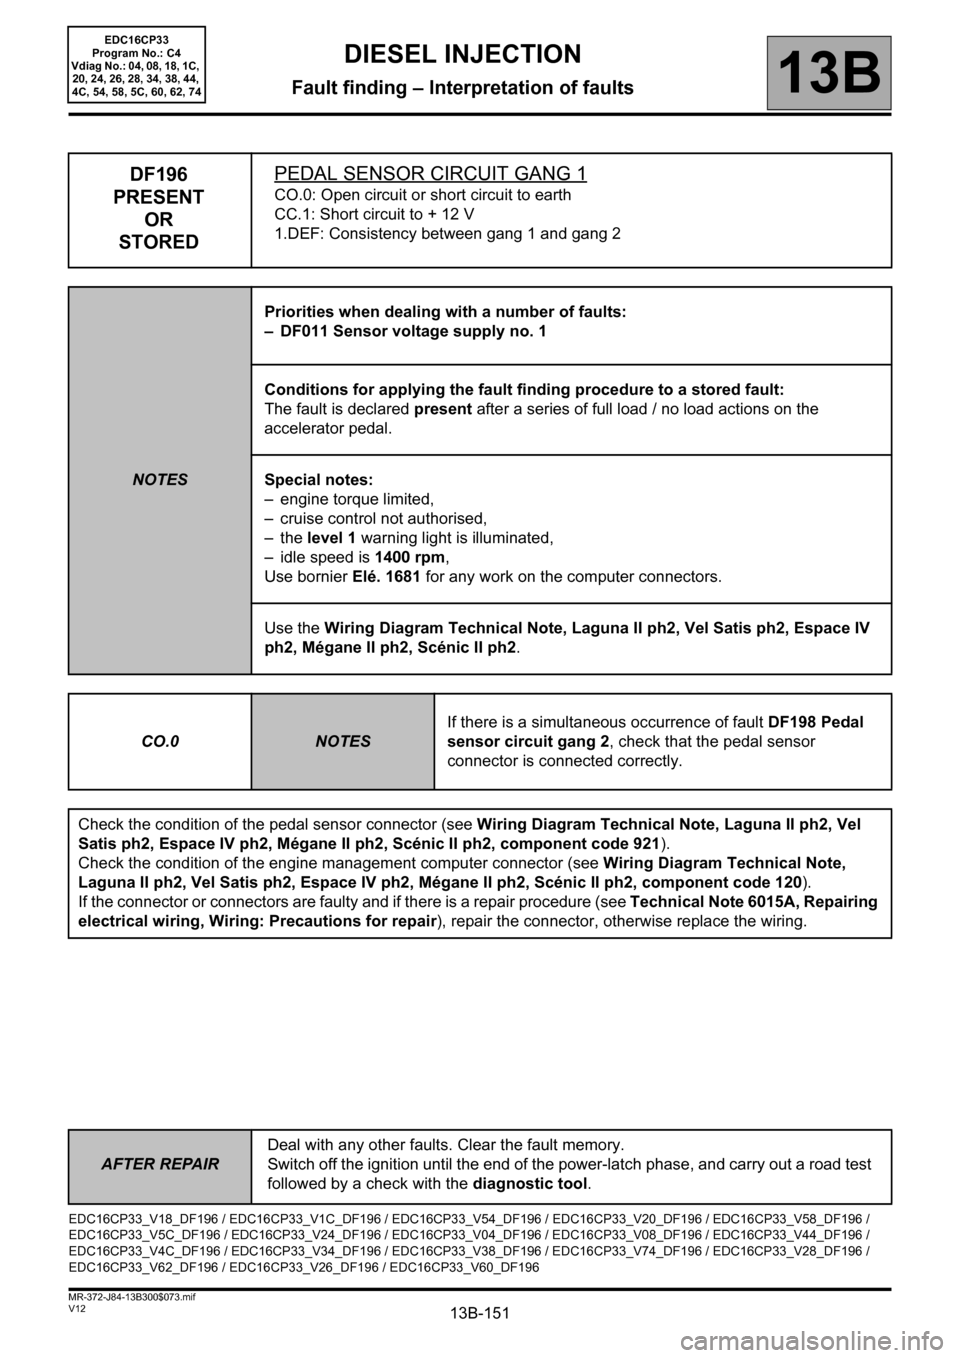
DF196
PRESENT
OR
STOREDPEDAL SENSOR CIRCUIT GANG 1
CO.0: Open circuit or short circuit to earth
CC.1: Short circuit to + 12 V
1.DEF: Consistency between gang 1 and gang 2
NOTESPriorities when dealing with a number of faults:
– DF011 Sensor voltage supply no. 1
Conditions for applying the fault finding procedure to a stored fault:
The fault is declared present after a series of full load / no load actions on the
accelerator pedal.
Special notes:
– engine torque limited,
– cruise control not authorised,
–the level 1 warning light is illuminated,
– idle speed is 1400 rpm,
Use bornier Elé. 1681 for any work on the computer connectors.
Use the Wiring Diagram Technical Note, Laguna II ph2, Vel Satis ph2, Espace IV
ph2, Mégane II ph2, Scénic II ph2.
CO.0
NOTESIf there is a simultaneous occurrence of fault DF198 Pedal
sensor circuit gang 2, check that the pedal sensor
connector is connected correctly.
Check the condition of the pedal sensor connector (see Wiring Diagram Technical Note, Laguna II ph2, Vel
Satis ph2, Espace IV ph2, Mégane II ph2, Scénic II ph2, component code 921).
Check the condition of the engine management computer connector (see Wiring Diagram Technical Note,
Laguna II ph2, Vel Satis ph2, Espace IV ph2, Mégane II ph2, Scénic II ph2, component code 120).
If the connector or connectors are faulty and if there is a repair procedure (see Technical Note 6015A, Repairing
electrical wiring, Wiring: Precautions for repair), repair the connector, otherwise replace the wiring.
EDC16CP33_V18_DF196 / EDC16CP33_V1C_DF196 / EDC16CP33_V54_DF196 / EDC16CP33_V20_DF196 / EDC16CP33_V58_DF196 /
EDC16CP33_V5C_DF196 / EDC16CP33_V24_DF196 / EDC16CP33_V04_DF196 / EDC16CP33_V08_DF196 / EDC16CP33_V44_DF196 /
EDC16CP33_V4C_DF196 / EDC16CP33_V34_DF196 / EDC16CP33_V38_DF196 / EDC16CP33_V74_DF196 / EDC16CP33_V28_DF196 /
EDC16CP33_V62_DF196 / EDC16CP33_V26_DF196 / EDC16CP33_V60_DF196
EDC16CP33
Program No.: C4
Vdiag No.: 04, 08, 18, 1C,
20, 24, 26, 28, 34, 38, 44,
4C, 54, 58, 5C, 60, 62, 74
Page 152 of 510
13B-152
AFTER REPAIRDeal with any other faults. Clear the fault memory.
Switch off the ignition until the end of the power-latch phase, and carry out a road test
followed by a check with the diagnostic tool.
V12 MR-372-J84-13B300$073.mif
DIESEL INJECTION
Fault finding – Interpretation of faults13B
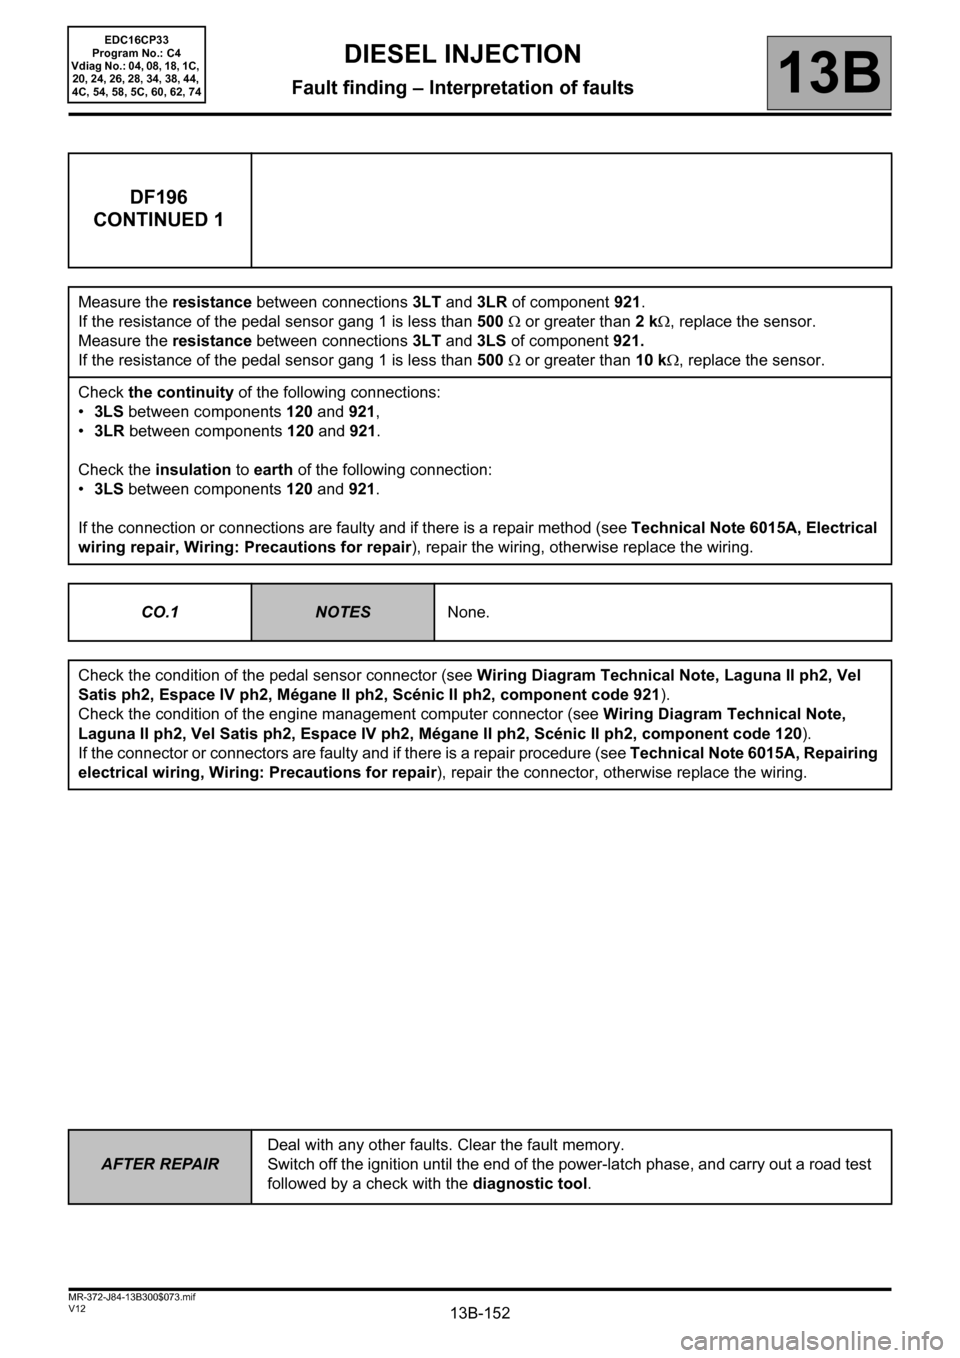
DF196
CONTINUED 1
Measure the resistance between connections 3LT and 3LR of component 921.
If the resistance of the pedal sensor gang 1 is less than 500 Ω or greater than 2 kΩ, replace the sensor.
Measure the resistance between connections 3LT and 3LS of component 921.
If the resistance of the pedal sensor gang 1 is less than 500 Ω or greater than 10 kΩ, replace the sensor.
Check the continuity of the following connections:
•3LS between components 120 and 921,
•3LR between components 120 and 921.
Check the insulation to earth of the following connection:
•3LS between components 120 and 921.
If the connection or connections are faulty and if there is a repair method (see Technical Note 6015A, Electrical
wiring repair, Wiring: Precautions for repair), repair the wiring, otherwise replace the wiring.
CO.1
NOTESNone.
Check the condition of the pedal sensor connector (see Wiring Diagram Technical Note, Laguna II ph2, Vel
Satis ph2, Espace IV ph2, Mégane II ph2, Scénic II ph2, component code 921).
Check the condition of the engine management computer connector (see Wiring Diagram Technical Note,
Laguna II ph2, Vel Satis ph2, Espace IV ph2, Mégane II ph2, Scénic II ph2, component code 120).
If the connector or connectors are faulty and if there is a repair procedure (see Technical Note 6015A, Repairing
electrical wiring, Wiring: Precautions for repair), repair the connector, otherwise replace the wiring.
EDC16CP33
Program No.: C4
Vdiag No.: 04, 08, 18, 1C,
20, 24, 26, 28, 34, 38, 44,
4C, 54, 58, 5C, 60, 62, 74
Page 153 of 510
13B-153
AFTER REPAIRDeal with any other faults. Clear the fault memory.
Switch off the ignition until the end of the power-latch phase, and carry out a road test
followed by a check with the diagnostic tool.
V12 MR-372-J84-13B300$073.mif
DIESEL INJECTION
Fault finding – Interpretation of faults13B
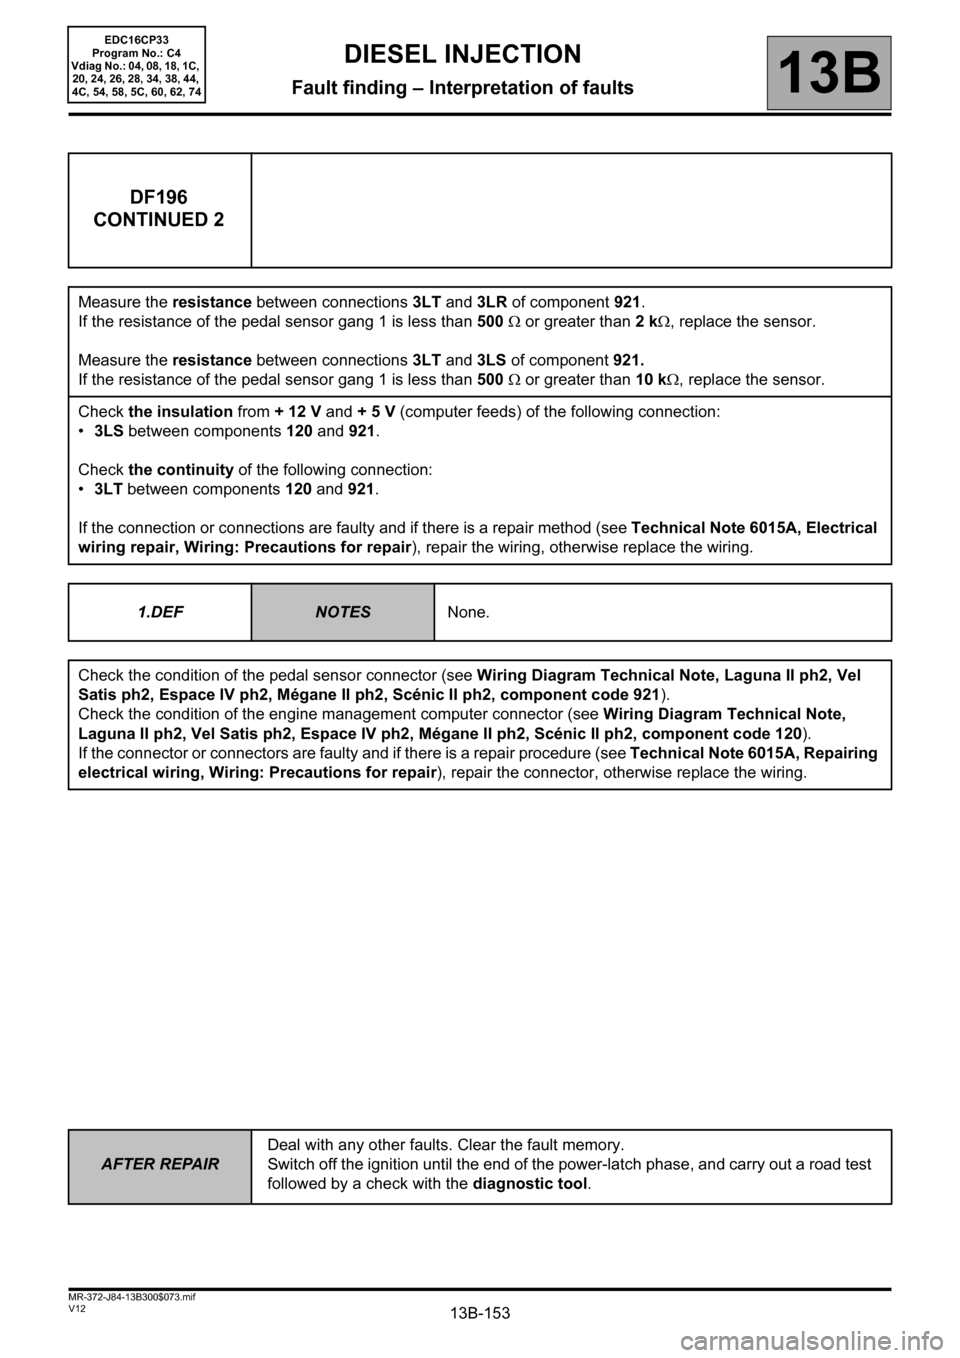
DF196
CONTINUED 2
Measure the resistance between connections 3LT and 3LR of component 921.
If the resistance of the pedal sensor gang 1 is less than 500 Ω or greater than 2 kΩ, replace the sensor.
Measure the resistance between connections 3LT and 3LS of component 921.
If the resistance of the pedal sensor gang 1 is less than 500 Ω or greater than 10 kΩ, replace the sensor.
Check the insulation from + 12 V and + 5 V (computer feeds) of the following connection:
•3LS between components 120 and 921.
Check the continuity of the following connection:
•3LT between components 120 and 921.
If the connection or connections are faulty and if there is a repair method (see Technical Note 6015A, Electrical
wiring repair, Wiring: Precautions for repair), repair the wiring, otherwise replace the wiring.
1.DEF
NOTESNone.
Check the condition of the pedal sensor connector (see Wiring Diagram Technical Note, Laguna II ph2, Vel
Satis ph2, Espace IV ph2, Mégane II ph2, Scénic II ph2, component code 921).
Check the condition of the engine management computer connector (see Wiring Diagram Technical Note,
Laguna II ph2, Vel Satis ph2, Espace IV ph2, Mégane II ph2, Scénic II ph2, component code 120).
If the connector or connectors are faulty and if there is a repair procedure (see Technical Note 6015A, Repairing
electrical wiring, Wiring: Precautions for repair), repair the connector, otherwise replace the wiring.
EDC16CP33
Program No.: C4
Vdiag No.: 04, 08, 18, 1C,
20, 24, 26, 28, 34, 38, 44,
4C, 54, 58, 5C, 60, 62, 74
Page 154 of 510
13B-154
AFTER REPAIRDeal with any other faults. Clear the fault memory.
Switch off the ignition until the end of the power-latch phase, and carry out a road test
followed by a check with the diagnostic tool.
V12 MR-372-J84-13B300$073.mif
DIESEL INJECTION
Fault finding – Interpretation of faults13B
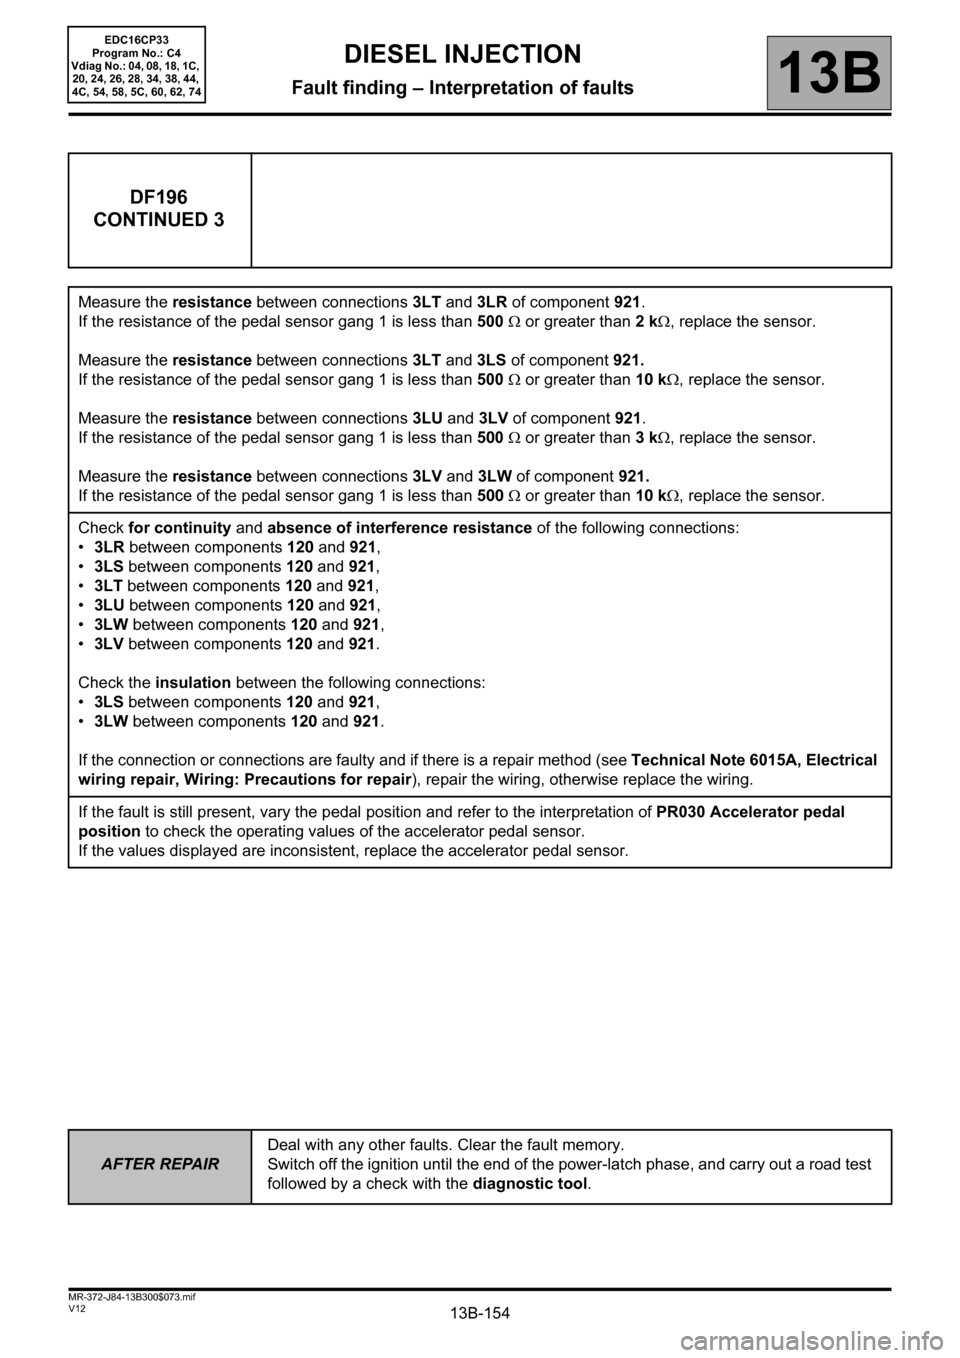
DF196
CONTINUED 3
Measure the resistance between connections 3LT and 3LR of component 921.
If the resistance of the pedal sensor gang 1 is less than 500 Ω or greater than 2 kΩ, replace the sensor.
Measure the resistance between connections 3LT and 3LS of component 921.
If the resistance of the pedal sensor gang 1 is less than 500 Ω or greater than 10 kΩ, replace the sensor.
Measure the resistance between connections 3LU and 3LV of component 921.
If the resistance of the pedal sensor gang 1 is less than 500 Ω or greater than 3 kΩ, replace the sensor.
Measure the resistance between connections 3LV and 3LW of component 921.
If the resistance of the pedal sensor gang 1 is less than 500 Ω or greater than 10 kΩ, replace the sensor.
Check for continuity and absence of interference resistance of the following connections:
•3LR between components 120 and 921,
•3LS between components 120 and 921,
•3LT between components 120
and 921,
•3LU between components 120 and 921,
•3LW between components 120 and 921,
•3LV between components 120 and 921.
Check the insulation between the following connections:
•3LS between components 120 and 921,
•3LW between components 120 and 921.
If the connection or connections are faulty and if there is a repair method (see Technical Note 6015A, Electrical
wiring repair, Wiring: Precautions for repair), repair the wiring, otherwise replace the wiring.
If the fault is still present, vary the pedal position and refer to the interpretation of PR030 Accelerator pedal
position to check the operating values of the accelerator pedal sensor.
If the values displayed are inconsistent, replace the accelerator pedal sensor.
EDC16CP33
Program No.: C4
Vdiag No.: 04, 08, 18, 1C,
20, 24, 26, 28, 34, 38, 44,
4C, 54, 58, 5C, 60, 62, 74
Page 155 of 510
13B-155
AFTER REPAIRDeal with any other faults. Clear the fault memory.
Switch off the ignition until the end of the power-latch phase, and carry out a road test
followed by a check with the diagnostic tool.
V12 MR-372-J84-13B300$073.mif
DIESEL INJECTION
Fault finding – Interpretation of faults13B
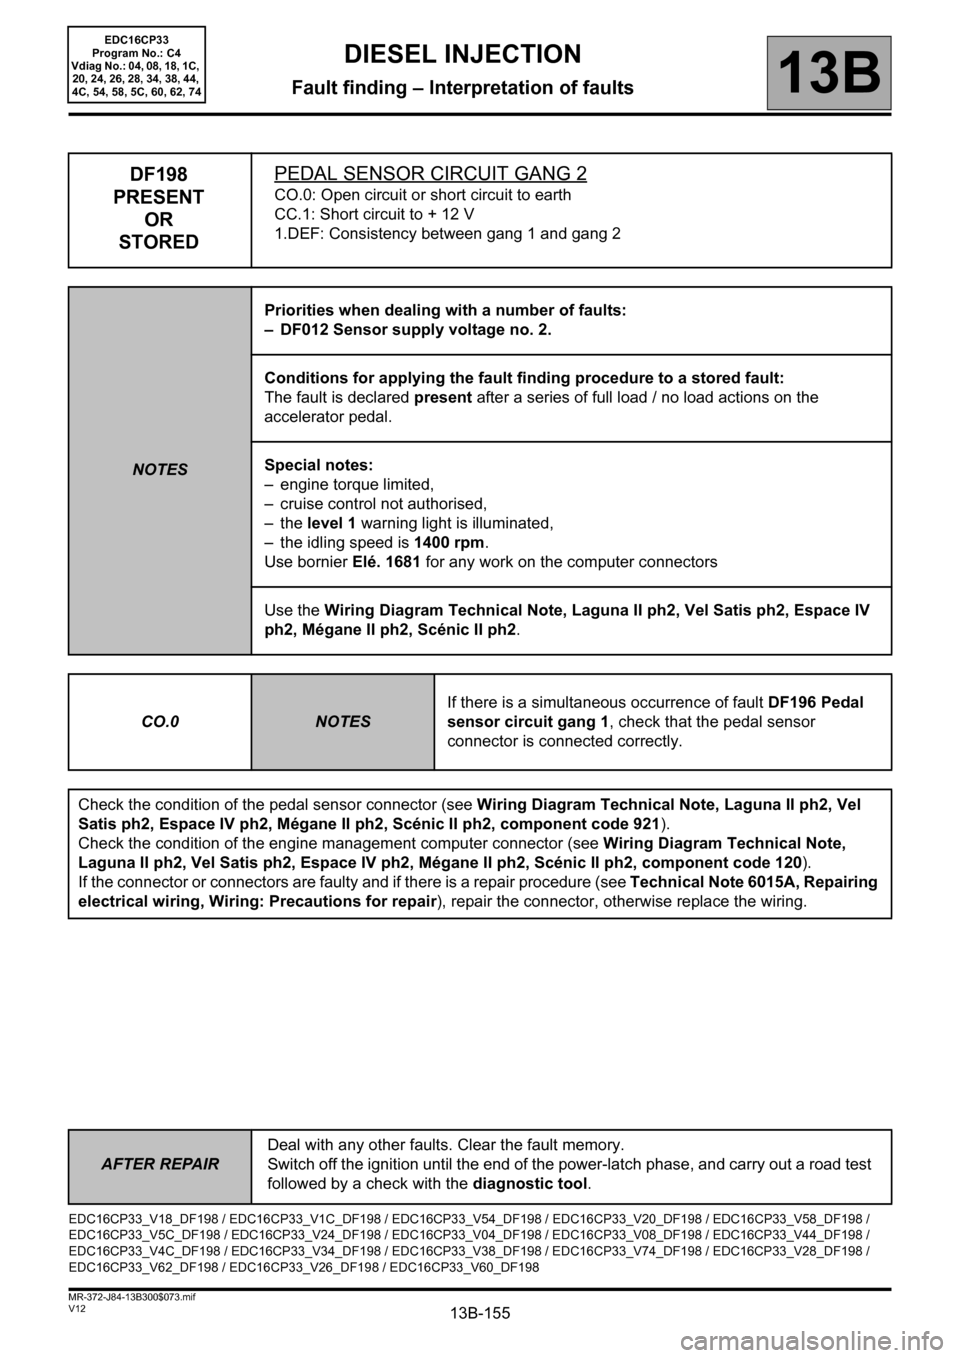
DF198
PRESENT
OR
STOREDPEDAL SENSOR CIRCUIT GANG 2
CO.0: Open circuit or short circuit to earth
CC.1: Short circuit to + 12 V
1.DEF: Consistency between gang 1 and gang 2
NOTESPriorities when dealing with a number of faults:
– DF012 Sensor supply voltage no. 2.
Conditions for applying the fault finding procedure to a stored fault:
The fault is declared present after a series of full load / no load actions on the
accelerator pedal.
Special notes:
– engine torque limited,
– cruise control not authorised,
–the level 1 warning light is illuminated,
– the idling speed is 1400 rpm.
Use bornier Elé. 1681 for any work on the computer connectors
Use the Wiring Diagram Technical Note, Laguna II ph2, Vel Satis ph2, Espace IV
ph2, Mégane II ph2, Scénic II ph2.
CO.0
NOTESIf there is a simultaneous occurrence of fault DF196 Pedal
sensor circuit gang 1, check that the pedal sensor
connector is connected correctly.
Check the condition of the pedal sensor connector (see Wiring Diagram Technical Note, Laguna II ph2, Vel
Satis ph2, Espace IV ph2, Mégane II ph2, Scénic II ph2, component code 921).
Check the condition of the engine management computer connector (see Wiring Diagram Technical Note,
Laguna II ph2, Vel Satis ph2, Espace IV ph2, Mégane II ph2, Scénic II ph2, component code 120).
If the connector or connectors are faulty and if there is a repair procedure (see Technical Note 6015A, Repairing
electrical wiring, Wiring: Precautions for repair), repair the connector, otherwise replace the wiring.
EDC16CP33_V18_DF198 / EDC16CP33_V1C_DF198 / EDC16CP33_V54_DF198 / EDC16CP33_V20_DF198 / EDC16CP33_V58_DF198 /
EDC16CP33_V5C_DF198 / EDC16CP33_V24_DF198 / EDC16CP33_V04_DF198 / EDC16CP33_V08_DF198 / EDC16CP33_V44_DF198 /
EDC16CP33_V4C_DF198 / EDC16CP33_V34_DF198 / EDC16CP33_V38_DF198 / EDC16CP33_V74_DF198 / EDC16CP33_V28_DF198 /
EDC16CP33_V62_DF198 / EDC16CP33_V26_DF198 / EDC16CP33_V60_DF198
EDC16CP33
Program No.: C4
Vdiag No.: 04, 08, 18, 1C,
20, 24, 26, 28, 34, 38, 44,
4C, 54, 58, 5C, 60, 62, 74
Page 156 of 510
13B-156
AFTER REPAIRDeal with any other faults. Clear the fault memory.
Switch off the ignition until the end of the power-latch phase, and carry out a road test
followed by a check with the diagnostic tool.
V12 MR-372-J84-13B300$073.mif
DIESEL INJECTION
Fault finding – Interpretation of faults13B
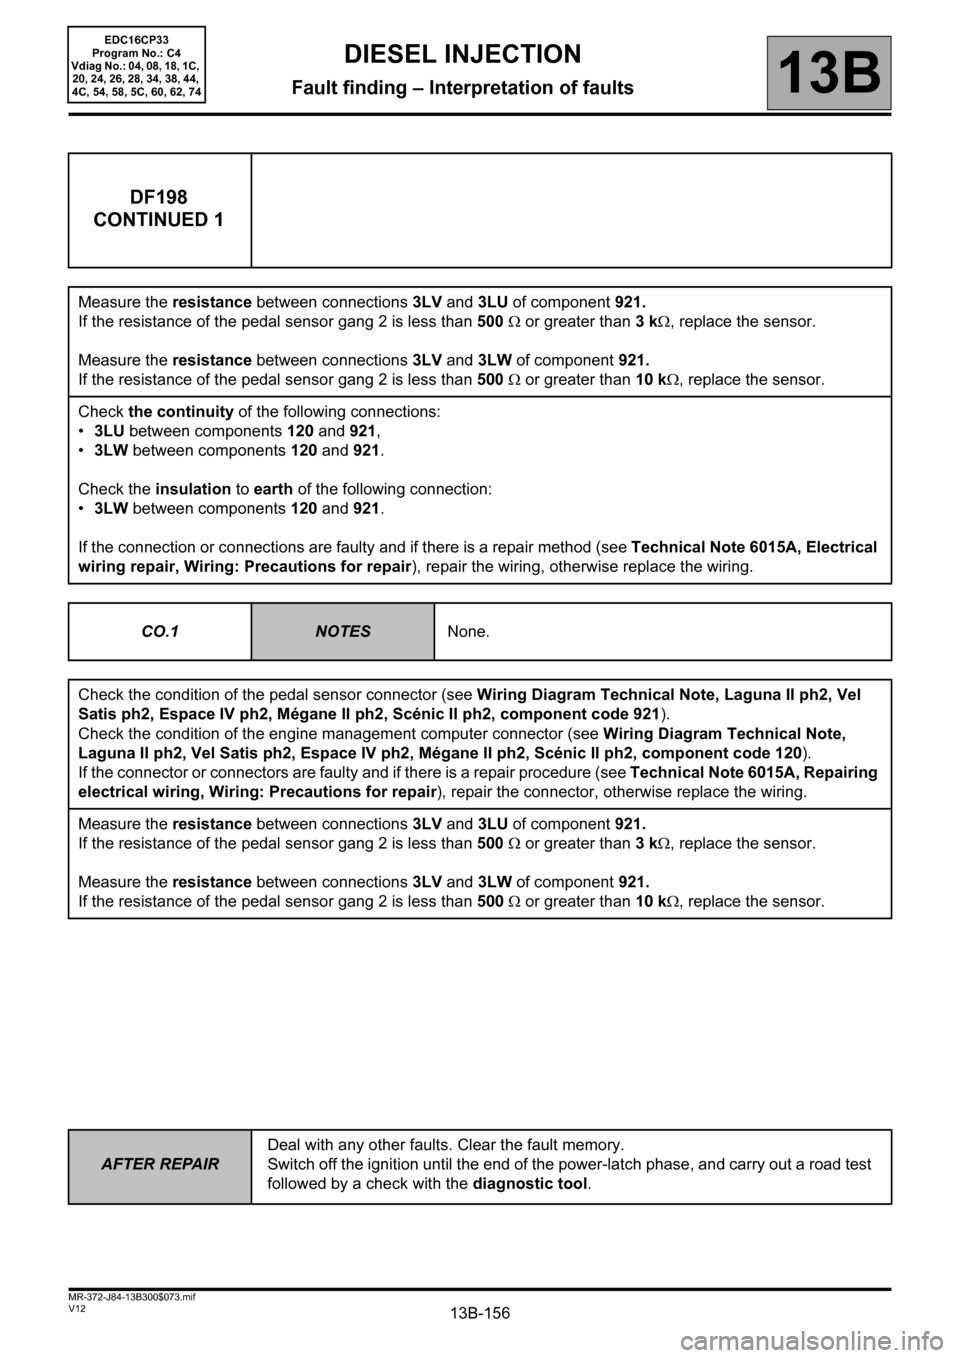
DF198
CONTINUED 1
Measure the resistance between connections 3LV and 3LU of component 921.
If the resistance of the pedal sensor gang 2 is less than 500 Ω or greater than 3 kΩ, replace the sensor.
Measure the resistance between connections 3LV and 3LW of component 921.
If the resistance of the pedal sensor gang 2 is less than 500 Ω or greater than 10 kΩ, replace the sensor.
Check the continuity of the following connections:
•3LU between components 120 and 921,
•3LW between components 120 and 921.
Check the insulation to earth of the following connection:
•3LW between components 120 and 921.
If the connection or connections are faulty and if there is a repair method (see Technical Note 6015A, Electrical
wiring repair, Wiring: Precautions for repair), repair the wiring, otherwise replace the wiring.
CO.1
NOTESNone.
Check the condition of the pedal sensor connector (see Wiring Diagram Technical Note, Laguna II ph2, Vel
Satis ph2, Espace IV ph2, Mégane II ph2, Scénic II ph2, component code 921).
Check the condition of the engine management computer connector (see Wiring Diagram Technical Note,
Laguna II ph2, Vel Satis ph2, Espace IV ph2, Mégane II ph2, Scénic II ph2, component code 120).
If the connector or connectors are faulty and if there is a repair procedure (see Technical Note 6015A, Repairing
electrical wiring, Wiring: Precautions for repair), repair the connector, otherwise replace the wiring.
Measure the resistance between connections 3LV and 3LU of component 921.
If the resistance of the pedal sensor gang 2 is less than 500 Ω or greater than 3 kΩ, replace the sensor.
Measure the resistance between connections 3LV and 3LW of component 921.
If the resistance of the pedal sensor gang 2 is less than 500 Ω or greater than 10 kΩ, replace the sensor.
EDC16CP33
Program No.: C4
Vdiag No.: 04, 08, 18, 1C,
20, 24, 26, 28, 34, 38, 44,
4C, 54, 58, 5C, 60, 62, 74
Page 157 of 510
13B-157
AFTER REPAIRDeal with any other faults. Clear the fault memory.
Switch off the ignition until the end of the power-latch phase, and carry out a road test
followed by a check with the diagnostic tool.
V12 MR-372-J84-13B300$073.mif
DIESEL INJECTION
Fault finding – Interpretation of faults13B
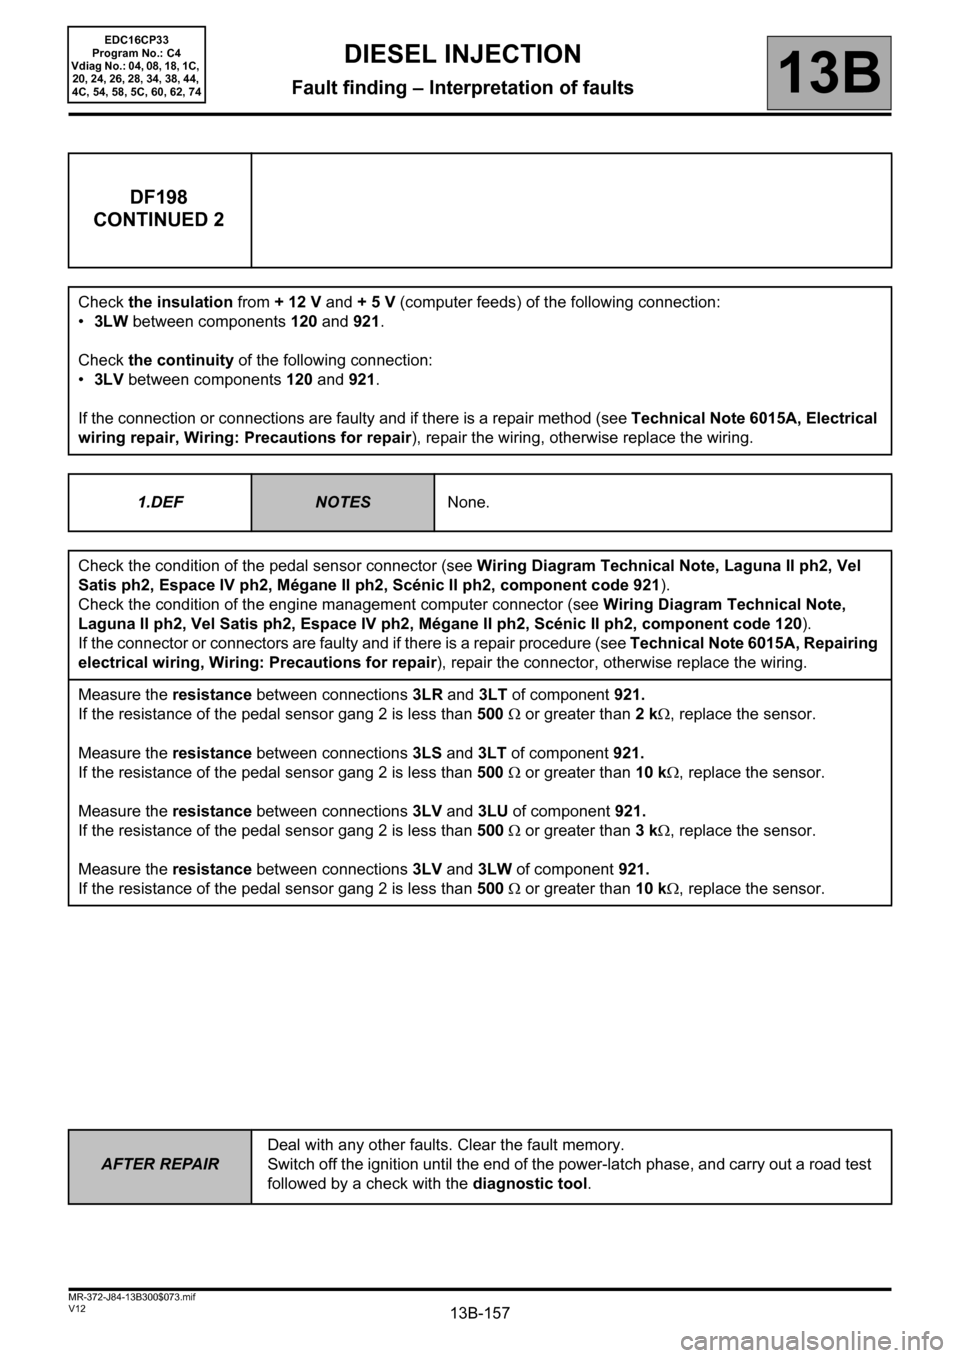
DF198
CONTINUED 2
Check the insulation from + 12 V and + 5 V (computer feeds) of the following connection:
•3LW between components 120 and 921.
Check the continuity of the following connection:
•3LV between components 120 and 921.
If the connection or connections are faulty and if there is a repair method (see Technical Note 6015A, Electrical
wiring repair, Wiring: Precautions for repair), repair the wiring, otherwise replace the wiring.
1.DEF
NOTESNone.
Check the condition of the pedal sensor connector (see Wiring Diagram Technical Note, Laguna II ph2, Vel
Satis ph2, Espace IV ph2, Mégane II ph2, Scénic II ph2, component code 921).
Check the condition of the engine management computer connector (see Wiring Diagram Technical Note,
Laguna II ph2, Vel Satis ph2, Espace IV ph2, Mégane II ph2, Scénic II ph2, component code 120).
If the connector or connectors are faulty and if there is a repair procedure (see Technical Note 6015A, Repairing
electrical wiring, Wiring: Precautions for repair), repair the connector, otherwise replace the wiring.
Measure the resistance between connections 3LR and 3LT of component 921.
If the resistance of the pedal sensor gang 2 is less than 500 Ω or greater than 2 kΩ, replace the sensor.
Measure the resistance between connections 3LS and 3LT of component 921.
If the resistance of the pedal sensor gang 2 is less than 500 Ω or greater than 10 kΩ, replace the sensor.
Measure the resistance between connections 3LV and 3LU of component 921.
If the resistance of the pedal sensor gang 2 is less than 500 Ω or greater than 3 kΩ, replace the sensor.
Measure the resistance between connections 3LV and 3LW of component 921.
If the resistance of the pedal sensor gang 2 is less than 500 Ω or greater than 10 kΩ, replace the sensor.
EDC16CP33
Program No.: C4
Vdiag No.: 04, 08, 18, 1C,
20, 24, 26, 28, 34, 38, 44,
4C, 54, 58, 5C, 60, 62, 74
Page 158 of 510
13B-158
AFTER REPAIRDeal with any other faults. Clear the fault memory.
Switch off the ignition until the end of the power-latch phase, and carry out a road test
followed by a check with the diagnostic tool.
V12 MR-372-J84-13B300$073.mif
DIESEL INJECTION
Fault finding – Interpretation of faults13B
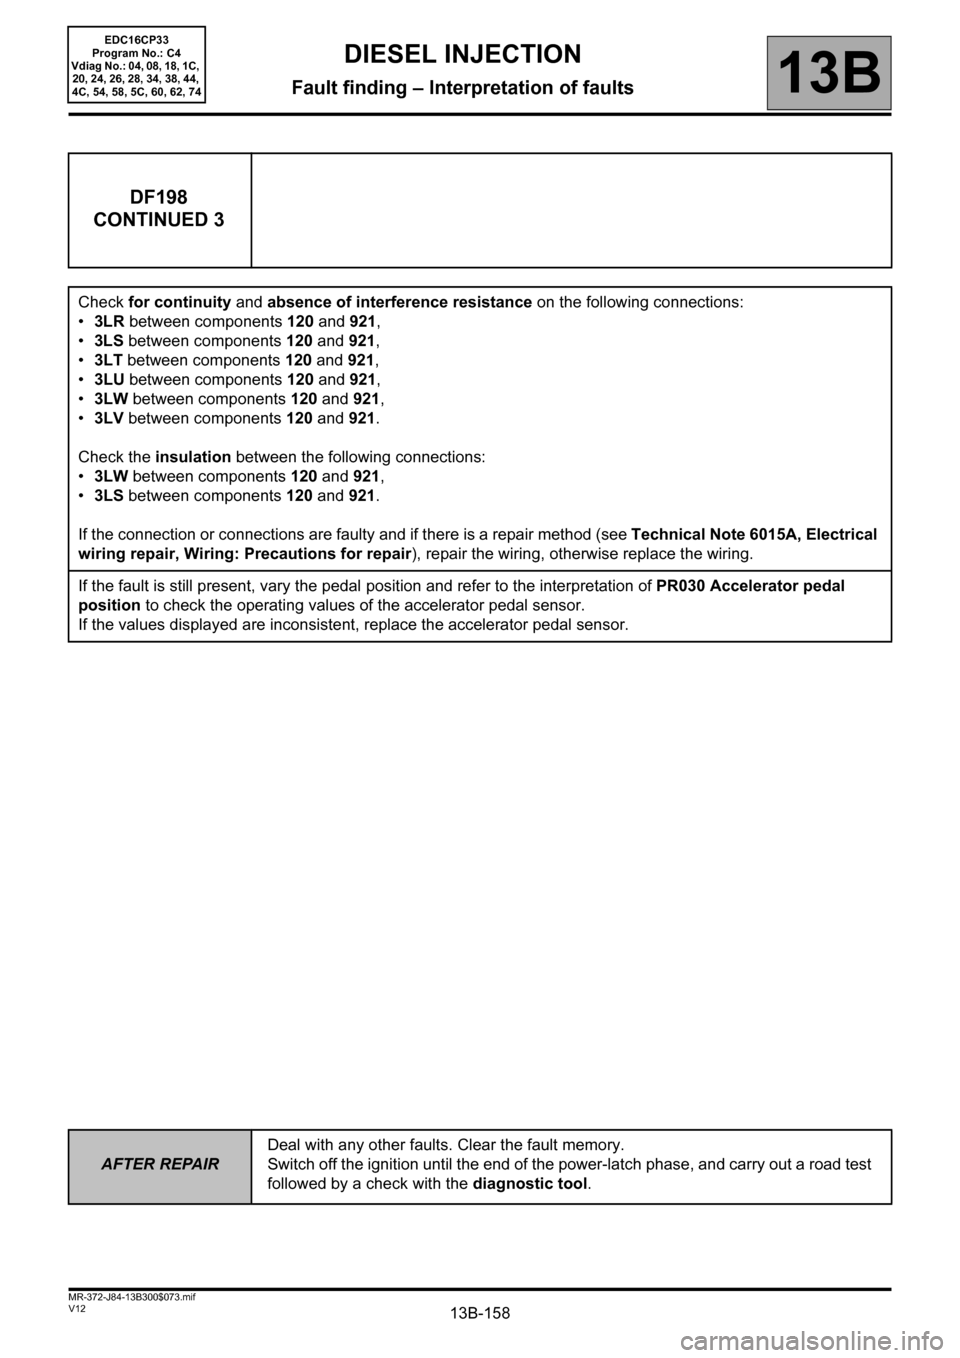
DF198
CONTINUED 3
Check for continuity and absence of interference resistance on the following connections:
•3LR between components 120 and 921,
•3LS between components 120 and 921,
•3LT between components 120 and 921,
•3LU between components 120 and 921,
•3LW between components 120 and 921,
•3LV between components 120 and 921.
Check the insulation between the following connections:
•3LW between components 120 and 921,
•3LS between components 120 and 921.
If the connection or connections are faulty and if there is a repair method (see Technical Note 6015A, Electrical
wiring repair, Wiring: Precautions for repair), repair the wiring, otherwise replace the wiring.
If the fault is still present, vary the pedal position and refer to the interpretation of PR030 Accelerator pedal
position to check the operating values of the accelerator pedal sensor.
If the values displayed are inconsistent, replace the accelerator pedal sensor.
EDC16CP33
Program No.: C4
Vdiag No.: 04, 08, 18, 1C,
20, 24, 26, 28, 34, 38, 44,
4C, 54, 58, 5C, 60, 62, 74
Page 159 of 510
13B-159
AFTER REPAIRDeal with any other faults. Clear the fault memory.
Switch off the ignition until the end of the power-latch phase, and carry out a road test
followed by a check with the diagnostic tool.
V12 MR-372-J84-13B300$073.mif
DIESEL INJECTION
Fault finding – Interpretation of faults13B
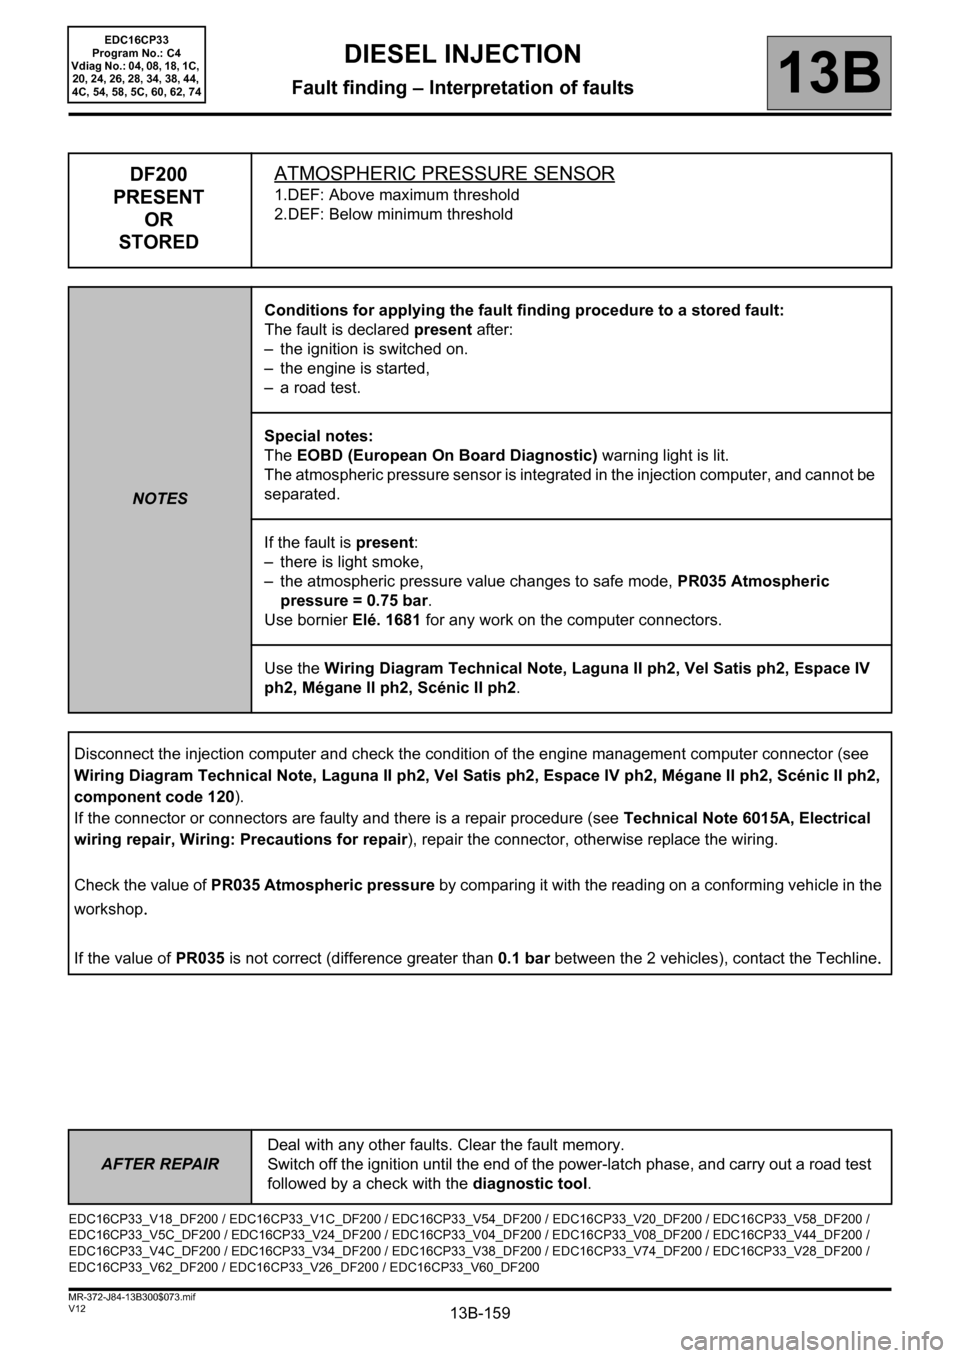
DF200
PRESENT
OR
STOREDATMOSPHERIC PRESSURE SENSOR
1.DEF: Above maximum threshold
2.DEF: Below minimum threshold
NOTESConditions for applying the fault finding procedure to a stored fault:
The fault is declared present after:
– the ignition is switched on.
– the engine is started,
– a road test.
Special notes:
The EOBD (European On Board Diagnostic) warning light is lit.
The atmospheric pressure sensor is integrated in the injection computer, and cannot be
separated.
If the fault is present:
– there is light smoke,
– the atmospheric pressure value changes to safe mode, PR035 Atmospheric
pressure = 0.75 bar.
Use bornier Elé. 1681 for any work on the computer connectors.
Use the Wiring Diagram Technical Note, Laguna II ph2, Vel Satis ph2, Espace IV
ph2, Mégane II ph2, Scénic II ph2.
Disconnect the injection computer and check the condition of the engine management computer connector (see
Wiring Diagram Technical Note, Laguna II ph2, Vel Satis ph2, Espace IV ph2, Mégane II ph2, Scénic II ph2,
component code 120).
If the connector or connectors are faulty and there is a repair procedure (see Technical Note 6015A, Electrical
wiring repair, Wiring: Precautions for repair), repair the connector, otherwise replace the wiring.
Check the value of PR035 Atmospheric pressure by comparing it with the reading on a conforming vehicle in the
workshop
.
If the value of PR035 is not correct (difference greater than 0.1 bar between the 2 vehicles), contact the Techline.
EDC16CP33_V18_DF200 / EDC16CP33_V1C_DF200 / EDC16CP33_V54_DF200 / EDC16CP33_V20_DF200 / EDC16CP33_V58_DF200 /
EDC16CP33_V5C_DF200 / EDC16CP33_V24_DF200 / EDC16CP33_V04_DF200 / EDC16CP33_V08_DF200 / EDC16CP33_V44_DF200 /
EDC16CP33_V4C_DF200 / EDC16CP33_V34_DF200 / EDC16CP33_V38_DF200 / EDC16CP33_V74_DF200 / EDC16CP33_V28_DF200 /
EDC16CP33_V62_DF200 / EDC16CP33_V26_DF200 / EDC16CP33_V60_DF200
EDC16CP33
Program No.: C4
Vdiag No.: 04, 08, 18, 1C,
20, 24, 26, 28, 34, 38, 44,
4C, 54, 58, 5C, 60, 62, 74
Page 160 of 510
13B-160
AFTER REPAIRDeal with any other faults. Clear the fault memory.
Switch off the ignition until the end of the power-latch phase, and carry out a road test
followed by a check with the diagnostic tool.
V12 MR-372-J84-13B300$073.mif
DIESEL INJECTION
Fault finding – Interpretation of faults13B
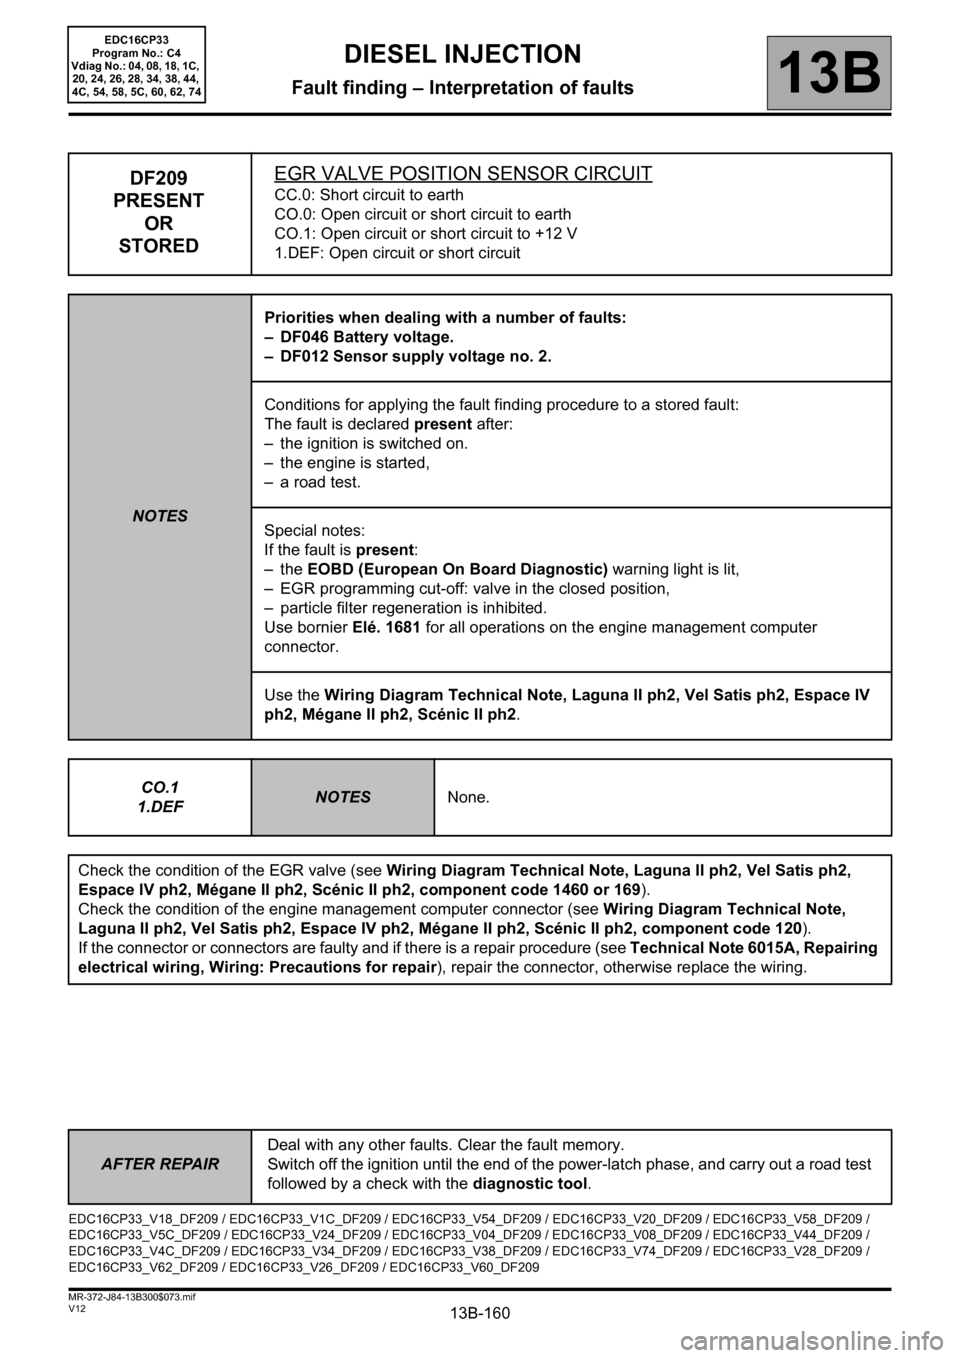
DF209
PRESENT
OR
STOREDEGR VALVE POSITION SENSOR CIRCUITCC.0: Short circuit to earth
CO.0: Open circuit or short circuit to earth
CO.1: Open circuit or short circuit to +12 V
1.DEF: Open circuit or short circuit
NOTESPriorities when dealing with a number of faults:
– DF046 Battery voltage.
– DF012 Sensor supply voltage no. 2.
Conditions for applying the fault finding procedure to a stored fault:
The fault is declared present after:
– the ignition is switched on.
– the engine is started,
– a road test.
Special notes:
If the fault is present:
–the EOBD (European On Board Diagnostic) warning light is lit,
– EGR programming cut-off: valve in the closed position,
– particle filter regeneration is inhibited.
Use bornier Elé. 1681 for all operations on the engine management computer
connector.
Use the Wiring Diagram Technical Note, Laguna II ph2, Vel Satis ph2, Espace IV
ph2, Mégane II ph2, Scénic II ph2.
CO.1
1.DEF
NOTESNone.
Check the condition of the EGR valve (see Wiring Diagram Technical Note, Laguna II ph2, Vel Satis ph2,
Espace IV ph2, Mégane II ph2, Scénic II ph2, component code 1460 or 169).
Check the condition of the engine management computer connector (see Wiring Diagram Technical Note,
Laguna II ph2, Vel Satis ph2, Espace IV ph2, Mégane II ph2, Scénic II ph2, component code 120).
If the connector or connectors are faulty and if there is a repair procedure (see Technical Note 6015A, Repairing
electrical wiring, Wiring: Precautions for repair), repair the connector, otherwise replace the wiring.
EDC16CP33_V18_DF209 / EDC16CP33_V1C_DF209 / EDC16CP33_V54_DF209 / EDC16CP33_V20_DF209 / EDC16CP33_V58_DF209 /
EDC16CP33_V5C_DF209 / EDC16CP33_V24_DF209 / EDC16CP33_V04_DF209 / EDC16CP33_V08_DF209 / EDC16CP33_V44_DF209 /
EDC16CP33_V4C_DF209 / EDC16CP33_V34_DF209 / EDC16CP33_V38_DF209 / EDC16CP33_V74_DF209 / EDC16CP33_V28_DF209 /
EDC16CP33_V62_DF209 / EDC16CP33_V26_DF209 / EDC16CP33_V60_DF209
EDC16CP33
Program No.: C4
Vdiag No.: 04, 08, 18, 1C,
20, 24, 26, 28, 34, 38, 44,
4C, 54, 58, 5C, 60, 62, 74