RENAULT TWINGO 2012 2.G Owners Manual
Manufacturer: RENAULT, Model Year: 2012, Model line: TWINGO, Model: RENAULT TWINGO 2012 2.GPages: 220, PDF Size: 6.73 MB
Page 171 of 220
rear lightschanging bulbs ................................................. (current page)
lights: brake lights ...................................................... (current page)
lights: direction indicator lights ................................... (current page)
lights: fog lights .......................................................... (current page)
lights: reversing lights ................................................. (current page)
changing a bulb .................................... (up to the end of the DU)
5.17
ENG_UD29236_5
Feux arrière : remplacement des lampes (X44 - Renault)
ENG_NU_952-4_X44_Renault_5
Rear lights
reAr LIgHtS: changing bulbs (1/4)
rear side lights and stop
light, indicator lights and fog
lights
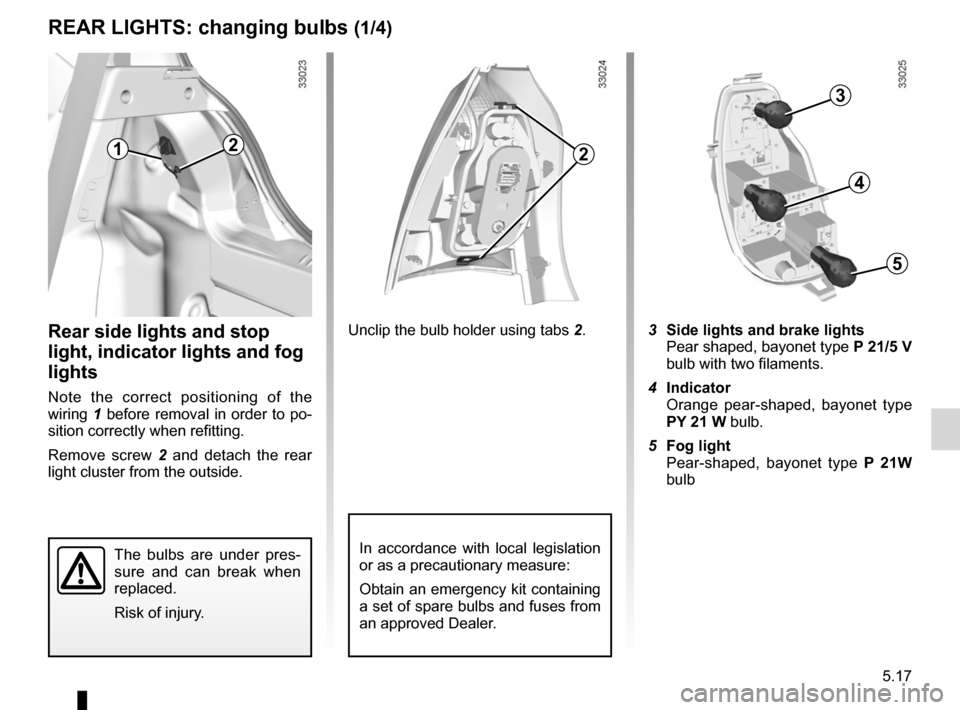
Note the correct positioning of the
wiring 1 before removal in order to po-
sition correctly when refitting.
Remove screw 2 and detach the rear
light cluster from the outside. Unclip the bulb holder using tabs
2.
3 Side lights and brake lights
Pear shaped, bayonet type P 21/5 V
bulb with two filaments.
4 Indicator
Orange pear-shaped, bayonet type
PY 21 W bulb.
5 Fog light
Pear-shaped, bayonet type P 21W
bulb
The bulbs are under pres -
sure and can break when
replaced.
Risk of injury.
212
3
4
5
In accordance with local legislation
or as a precautionary measure:
Obtain an emergency kit containing
a set of spare bulbs and fuses from
an approved Dealer.
Page 172 of 220
5.18
ENG_UD29236_5
Feux arrière : remplacement des lampes (X44 - Renault)
ENG_NU_952-4_X44_Renault_5
Jaune NoirNoir texte
reAr LIgHtS: changing bulbs (2/4)
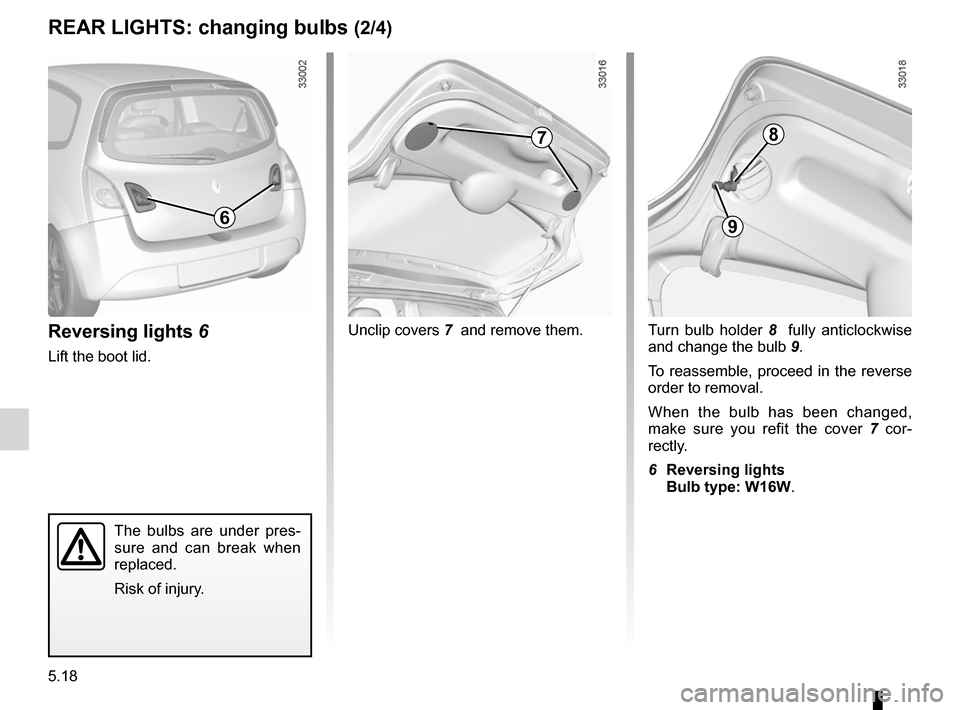
reversing lights 6
Lift the boot lid. Unclip covers
7 and remove them. Turn bulb holder 8 fully anticlockwise
and change the bulb 9.
To reassemble, proceed in the reverse
order to removal.
When the bulb has been changed,
make sure you refit the cover 7 cor -
rectly.
6 reversing lights
Bulb type: W16W.
The bulbs are under pres -
sure and can break when
replaced.
Risk of injury.
6
7
9
8
Page 173 of 220
brake lightschanging bulbs ................................................. (current page)
JauneNoirNoir texte
5.19
ENG_UD29236_5
Feux arrière : remplacement des lampes (X44 - Renault)
ENG_NU_952-4_X44_Renault_5
reAr LIgHtS: changing bulbs (3/4)
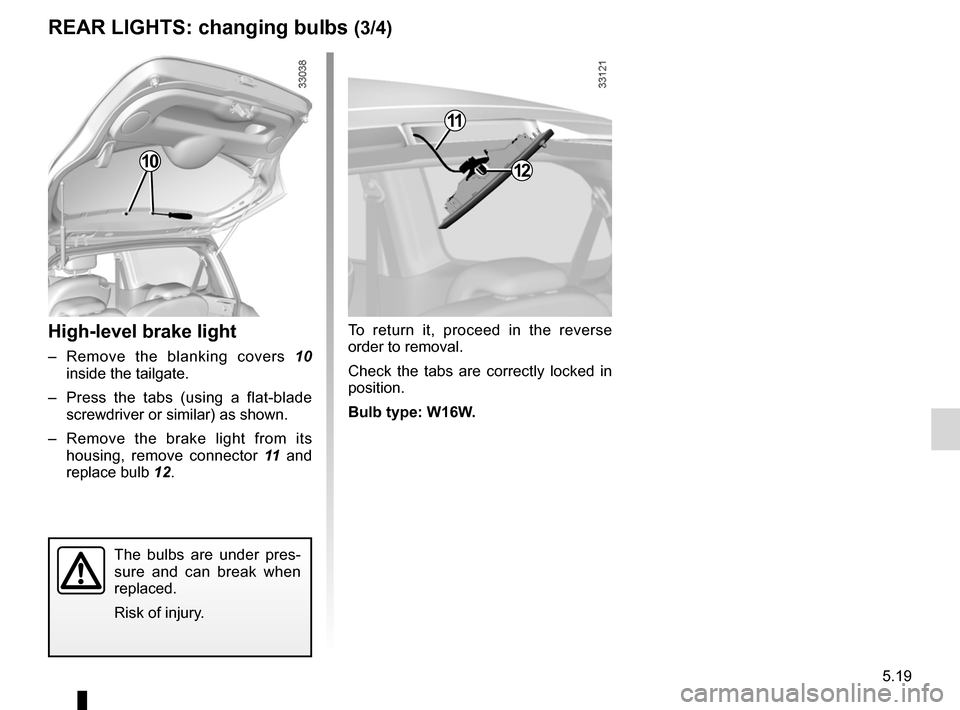
High-level brake light
– Remove the blanking covers 10
inside the tailgate.
– Press the tabs (using a flat-blade
screwdriver or similar) as shown.
– Remove the brake light from its
housing, remove connector 11 and
replace bulb 12. To return it, proceed in the reverse
order to removal.
Check the tabs are correctly locked in
position.
Bulb type: W16W.
10
11
12
The bulbs are under pres
-
sure and can break when
replaced.
Risk of injury.
Page 174 of 220
rear lightsnumber plate lights .......................................... (current page)
lights: number plate lights .......................................... (current page)
5.20
ENG_UD29236_5
Feux arrière : remplacement des lampes (X44 - Renault)
ENG_NU_952-4_X44_Renault_5
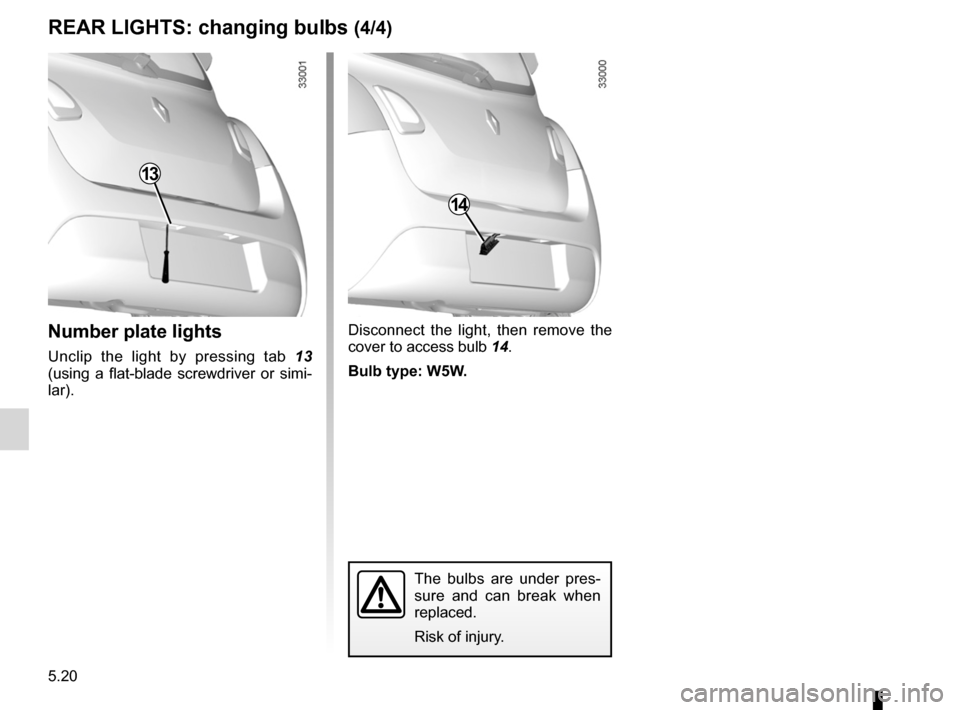
Disconnect the light, then remove the
cover to access bulb 14.
Bulb type: W5W.
The bulbs are under pres -
sure and can break when
replaced.
Risk of injury.
number plate lights
Unclip the light by pressing tab 13
(using a flat-blade screwdriver or simi-
lar).
14
13
reAr LIgHtS: changing bulbs (4/4)
Page 175 of 220
lights:indicator lights .................................................. (current page)
side indicator lights changing bulbs ................................................. (current page)
5.21
ENG_UD1405_1
Répétiteurs latéraux : remplacement des lampes (X44 - Renault)\
ENG_NU_952-4_X44_Renault_5
Répétiteurs latéraux
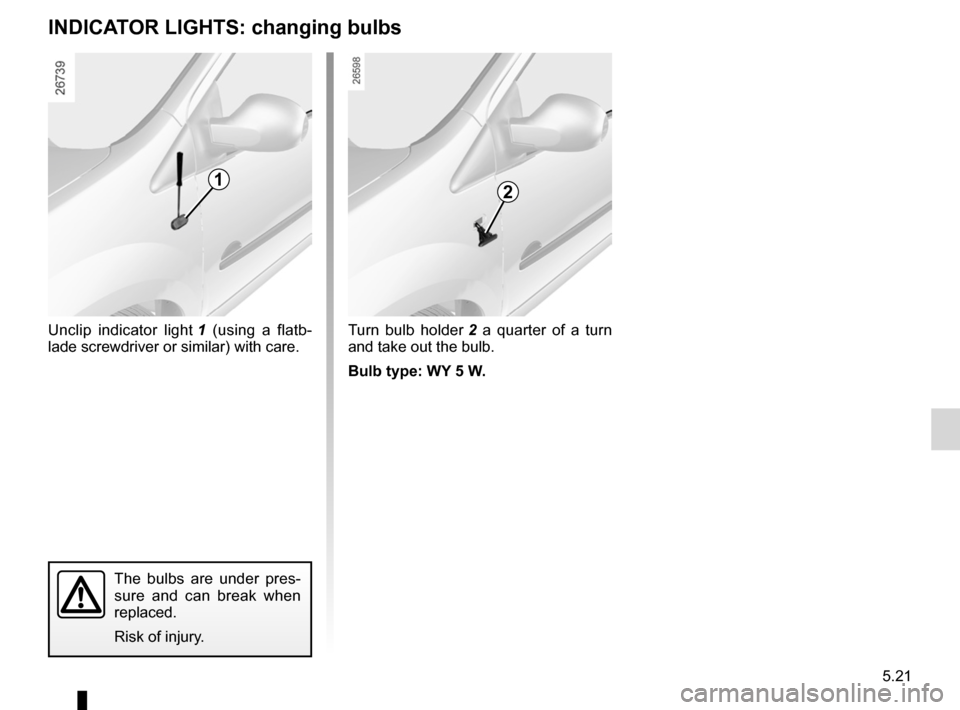
InDIcA tOr LIgHtS: changing bulbs
Unclip indicator light 1 (using a flatb -
lade screwdriver or similar) with care.Turn bulb holder 2 a quarter of a turn
and take out the bulb.
Bulb type: WY 5 W.
The bulbs are under pres -
sure and can break when
replaced.
Risk of injury.
12
Page 176 of 220
lighting:interior ............................................. (up to the end of the DU)
interior lighting: changing bulbs ................................ (up to the end of the DU)
courtesy light ......................................................... (current page)
5.22
ENG_UD24751_4
Eclairage intérieur : remplacement des lampes (X44 - Renault)
ENG_NU_952-4_X44_Renault_5
Jaune NoirNoir texte
Interior lighting
InterIOr LIgHtS: changing bulbs (1/2)
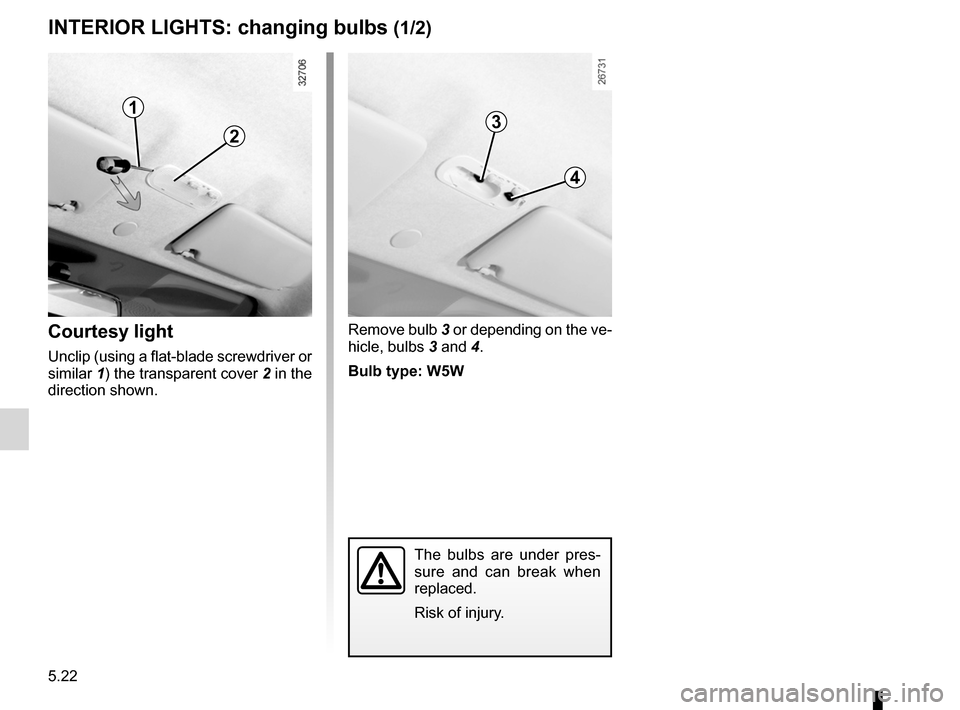
courtesy light
Unclip (using a flat-blade screwdriver or
similar 1) the transparent cover 2 in the
direction shown. Remove bulb
3 or depending on the ve-
hicle, bulbs 3 and 4.
Bulb type: W5W
The bulbs are under pres -
sure and can break when
replaced.
Risk of injury.
3
4
1
2
Page 177 of 220

luggage compartment lightingchanging bulbs ................................................. (current page)
JauneNoirNoir texte
5.23
ENG_UD24751_4
Eclairage intérieur : remplacement des lampes (X44 - Renault)
ENG_NU_952-4_X44_Renault_5
InterIOr LIgHtS: changing bulbs (2/2)
Luggage compartment light 5
Unclip light 5 by pressing the tabs on
each side (using a flat-blade screw -
driver or similar).
Disconnect the light. Press tab
6 to release the lens and
access bulb 7.
Bulb type: W5W.
567
Page 178 of 220
batterytroubleshooting ............................... (up to the end of the DU)
5.24
ENG_UD24705_3
Batterie : dépannage (X44 - Renault)
ENG_NU_952-4_X44_Renault_5
Jaune NoirNoir texte
Battery: troubleshooting
BAtter Y: troubleshooting
to avoid all risk of sparks:
– Ensure that any consumers are
switched off before disconnecting or
reconnecting the battery;
– When charging, stop the charger
before connecting or disconnecting
the battery.
– Do not place metal objects on the
battery to avoid creating a short cir-
cuit between the terminals.
connecting a battery charger
the battery charger should be com-
patible with a battery with nominal
voltage of 12 Volts.
With the engine off, it is essential to dis-
connect the leads connected to both
battery terminals , starting with the
negative terminal.
Do not disconnect the battery when the
engine is running. Follow the instruc-
tions given by the manufacturer of
the battery charger you are using. Only a fully charged and well
-main -
tained battery will have a long and
useful service life and enable you to
start the vehicle’s engine normally.
The battery must be kept clean and dry.
Have the battery’s charge status
checked regularly:
– especially if you use your vehicle for
short journeys or for frequent driving
in town;
– when the exterior temperature drops
(in winter), the charge decreases .
In winter, only use the electrical
equipment that is really necessary;
– finally, you should understand that
the charge decreases naturally as a
result of certain permanent electrical
consumers such as the clock, after-
sales accessories, etc.
When many accessories are fitted to
the vehicle, have them connected to
the + after ignition feed. In this case,
it is advisable to have your vehicle
fitted with a battery which has an in -
creased nominal capacity. Contact an
approved Dealer. If your vehicle is to
be left stationary for a relatively long
time, disconnect the battery or have it
recharged regularly, particularly during
cold weather. The equipment with a
memory, radio, etc. will then have to
be reprogrammed. The battery must
be stored in a cool dry place, protected
from frost.
Special procedures may be
required to charge some
batteries. Contact an ap -
proved Dealer.
Avoid all risk of sparks which may
cause an immediate explosion, and
charge the battery in a well-venti -
lated area. Risk of serious injury.
Page 179 of 220
JauneNoirNoir texte
5.25
ENG_UD24705_3
Batterie : dépannage (X44 - Renault)
ENG_NU_952-4_X44_Renault_5
BA tter Y: troubleshooting (continued)
Starting the vehicle using the
battery from another vehicle
Proceed as follows when starting your
vehicle from another vehicle’s battery:
Obtain suitable jump leads (large) from
an approved Dealer or, if you already
have jump leads, ensure that they are
in perfect condition.
the two batteries must have an iden-
tical nominal voltage of 12 volts. The
battery supplying the current should
have a capacity (amp-hours, Ah) which
is at least the same as that of the dis-
charged battery.
Ensure that there is no risk of contact
between the two vehicles (risk of short
circuiting when the positive terminals
are connected) and that the discharged
battery is properly connected. Switch
off your vehicle ignition.
Start the engine of the vehicle supply -
ing the current and run it at an interme-
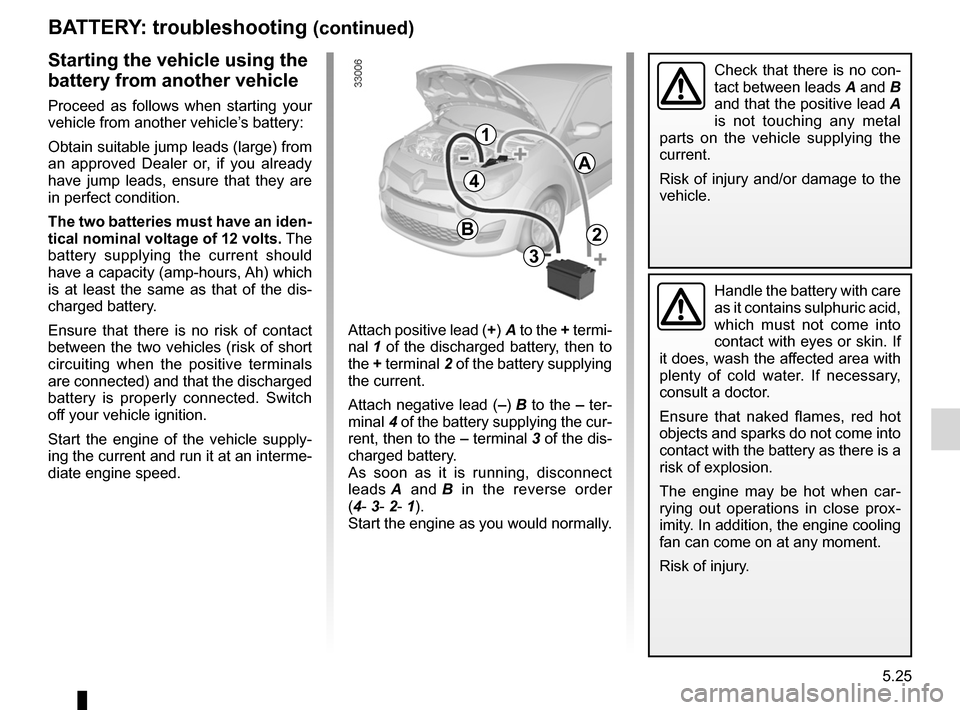
diate engine speed. Attach positive lead (+) A to the
+ termi-
nal 1 of the discharged battery, then to
the + terminal 2 of the battery supplying
the current.
Attach negative lead (–) B to the – ter-
minal 4 of the battery supplying the cur-
rent, then to the – terminal 3 of the dis-
charged battery.
As soon as it is running, disconnect
leads A and B in the reverse order
(4- 3- 2- 1).
Start the engine as you would normally.
A
B
1
4
2
3
Handle the battery with care
as it contains sulphuric acid,
which must not come into
contact with eyes or skin. If
it does, wash the affected area with
plenty of cold water. If necessary,
consult a doctor.
Ensure that naked flames, red hot
objects and sparks do not come into
contact with the battery as there is a
risk of explosion.
The engine may be hot when car -
rying out operations in close prox -
imity. In addition, the engine cooling
fan can come on at any moment.
Risk of injury.
Check that there is no con-
tact between leads A and B
and that the positive lead A
is not touching any metal
parts on the vehicle supplying the
current.
Risk of injury and/or damage to the
vehicle.
Page 180 of 220
remote control electric door lockingbatteries ........................................................... (current page)
battery (remote control) ......................................... (current page)
5.26
ENG_UD14469_2
Télécommande à radiofréquence : piles (X44 - E33 - X33 - Re\
nault)
ENG_NU_952-4_X44_Renault_5
Radio frequency remote control: batteries
rADIO FreQuencY reMOte cOntrOL: BAtterIeS
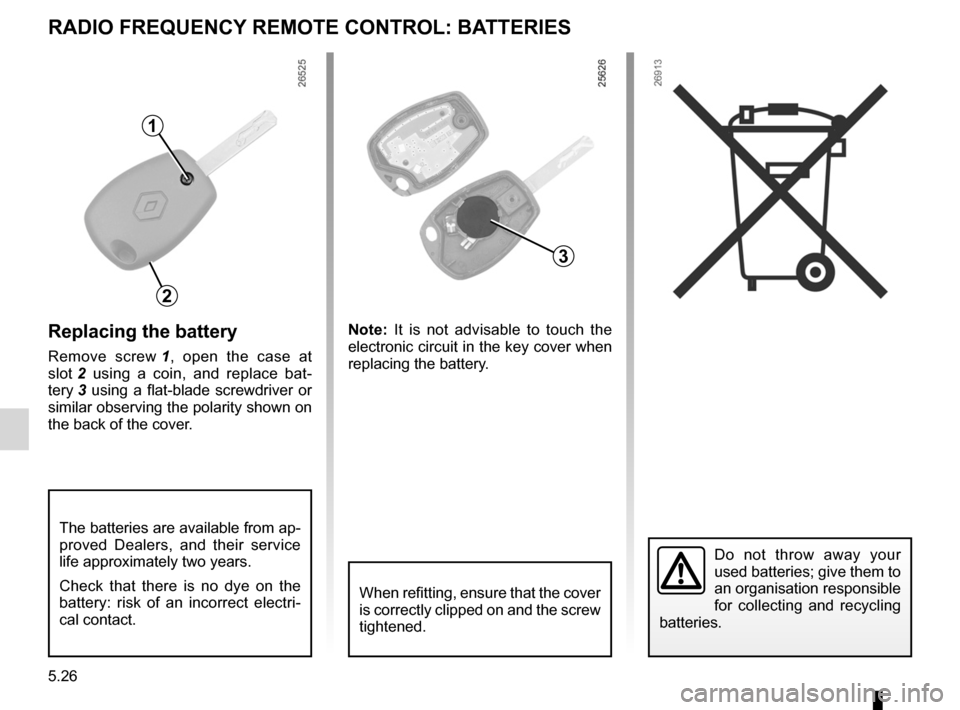
replacing the battery
Remove screw 1 , open the case at
slot 2 using a coin, and replace bat -
tery 3 using a flat-blade screwdriver or
similar observing the polarity shown on
the back of the cover. n
ote: It is not advisable to touch the
electronic circuit in the key cover when
replacing the battery.
Do not throw away your
used batteries; give them to
an organisation responsible
for collecting and recycling
batteries.
1
3
2
When refitting, ensure that the cover
is correctly clipped on and the screw
tightened.
The batteries are available from ap-
proved Dealers, and their service
life approximately two years.
Check that there is no dye on the
battery: risk of an incorrect electri -
cal contact.