Seat Alhambra 2015 Owner's Manual
Manufacturer: SEAT, Model Year: 2015, Model line: Alhambra, Model: Seat Alhambra 2015Pages: 305, PDF Size: 5.46 MB
Page 201 of 305
Care and maintenance
Cleaning chrome parts Clean chrome parts with a damp cloth. SEAT
recommends the use of a chrome care prod-
uct to clean stains and dirt from chrome sur-
faces. Use a soft dry cloth to polish chrome
parts.
CAUTION
To prevent scratching chrome surfaces:
● Do not use abrasive products.
● Do not clean or polish chrome parts in a
sandy or dusty environment.
● Do not polish dirty surfaces. Caring for and cleaning anodized
surfaces
It is not easy to detect the difference between
aluminium and an anodized surface, for ex-
ample, a radiator grille. However, anodized
surfaces must not be treated in the same way
as aluminium surfaces. Never use rough
sponges or cloths to wipe away insect re-
mains.
● Use a clean, damp, lint-free cloth to clean
anodized surfaces.
● If there is a lot of dirt, use a special clean-
ing product which does not contain solvents. CAUTION
To prevent damage to the anodized surfaces: ● Do not use products containing solvents.
● Do not use polish or hard wax.
● Do not use abrasive products.
● Do not polish anodized surfaces in sandy or
dusty environments.
● Do not polish dirty surfaces. Cleaning wheels
Cleaning steel wheels
Use an industrial cleaner to remove brake
dust. Therefore, clean wheels regularly with a
separate sponge.
Any damage to the paint on steel wheels
should be touched up before the metal starts
to rust.
Caring for and cleaning alloy wheels
Remove road salt and brake dust by washing
the wheels approximately
once a fortnight.
Use an acid free detergent to clean the wheel
rims. SEAT recommends treating the wheels
thoroughly with a wax compound about once
every three months.
It is important to remove road salt and brake
dust by washing the wheels at regular inter-
vals, otherwise the finish will be impaired. Always use an acid-free detergent for alloy
wheel rims. Car polish or other abrasive
agents should not be used for maintaining
the rims.
If the protective coating on the paint has
been damaged (e.g. hit by a stone), it should
be repaired immediately.
Caring for rubber seals The rubber seals on doors, windows, etc., re-
main flexible, provide a better seal and last
longer if they are regularly treated with a
product specifically designed for use on rub-
ber.
Before applying the product, use a soft cloth
to remove dust and dirt from the rubber
seals.
De-icing the door lock cylinder To de-ice the lock cylinders, SEAT recommend
the use of genuine SEAT spray with lubricat-
ing and anti-corrosive properties.
CAUTION
The use of products containing degreasing
agents to de-ice the locks may rust the lock
cylinder. 199Technical specifications
Advice
Operation
Safety
Page 202 of 305
Advice
Protection of vehicle undercarriage The vehicle underbody is coated to protect it
from chemical and mechanical damage. The
protective coat on the undercarriage may
wear from use while driving. Therefore, SEAT
recommends that the protective coating on
the undercarriage and on the running gear
should be regularly checked, and repaired if
necessary.
WARNING
Additional underseal or anti-corrosion prod-
ucts could catch fire due to the high tempera-
tures reached by the exhaust gas system and
other engine components.
● Do not apply additional underseal or anti-
corrosion products to the exhaust pipes, cat-
alytic converters, heat shields or other parts
of the vehicle which reach high temperatures. Cleaning the engine compartment
The engine compartment of any motor vehi-
cle is a potentially hazardous area
››› page 214 .
The en gine c
ompartment should only be
cleaned by qualified personnel. If it is not
correctly cleaned, the anti-corrosion coating
and consequently electrical components may
be damaged. Moreover, water may filter di- rectly into the vehicle interior through the wa-
ter chamber
››› .
If the engine compartment is very dirty, al-
ways take the vehicle to a specialised work-
shop for professional cleaning. SEAT recom-
mends taking your car in for technical serv-
ice.
Water box
The water box is in the engine compartment,
between the windscreen and the engine, and
beneath a perforated cover. Air is taken in
through the water box from outside to the ve-
hicle interior via the heating and air condi-
tioner.
Leaves and other loose objects should be
regularly cleaned away from the water box ei-
ther by hand or with a vacuum. WARNING
When working on the engine or in the engine
compartment, there is a risk of injury, burns,
accident or fire.
● Before starting work, please ensure you are
familiar with the required procedure and the
safety precautions ››› page 214.
● SEAT recommends getting a specialised
workshop to do these jobs. CAUTION
If water is manually poured into the water box
(e.g. using a high pressure cleaning appli-
ance), this could cause significant damage to
the vehicle. For the sake of the environment
Only wash the engine compartment in areas
allocated for this purpose, to prevent dirty
water which may be contaminated by oil,
grease or fuel, from entering the drains. In
some places, washing this compartment out-
side the planned areas is even banned. Caring for and cleaning the
vehicle interior
Introduction The dye used in many modern garments, for
example dark jeans, is not always sufficiently
colour-fast. Seat upholstery (material and
leather), especially when light-coloured, may
visibly discolour if the dye comes out of
clothing (even when used correctly). This is
not an upholstery defect but indicates that
the dye in the item of clothing is not suffi-
ciently colour-fast.
The longer stains or dirt remain on the vehi-
cle surfaces, especially the fabrics covering
the padded upholstery, the more difficult it
200
Page 203 of 305
Care and maintenance
becomes to clean and maintain them. If
stains and dirt are left for a long time, it may
be that they are impossible to remove. WARNING
Car-care products may be toxic and hazard-
ous. Using unsuitable car-care products or,
using them in the wrong way, may cause acci-
dents, serious injury, burns or intoxication.
● Keep your car-care products in their origi-
nal containers.
● Read the instructions.
● Never keep car-care products in empty food
containers, bottles or other similar contain-
ers. Other people may confuse them.
● Keep all car-care products out of the reach
of children.
● Some products may give off harmful va-
pours during use. Therefore, they should be
used outdoors in well-ventilated places.
● Never use fuel, turpentine, engine oil, nail-
varnish remover or any other volatile product
for washing, maintenance or cleaning. These
are toxic and highly flammable. WARNING
Unsuitable maintenance and cleaning of vehi-
cle components may impair proper operation
of safety equipment and cause serious injury.
● Maintain and clean vehicle components ac-
cording to the manufacturer's instructions. ●
Only use approved or recommended clean-
ing products. CAUTION
● Cleaning products which contain solvents
have a corrosive effect and may damage the
material irreparably.
● Stains and dirt containing aggressive sub-
stances or solvents attack the material and
may damage it irreparably, even when they
are cleaned quickly.
● Dirt and stains should not be allowed to dry
and should be cleaned as quickly as possible.
● In the case of stubborn stains, take the ve-
hicle to a specialised workshop to avoid dam-
age. Treating your upholstery
To treat and maintain your seat upholstery,
keep the following in mind
››› :
● Before entering the vehicle, close any Vel-
cro fasteners that might snag on the uphols-
tery or trim fabric. Any open Velcro fasteners
may damage the trim or upholstery fabrics.
● To prevent damage, avoid direct contact
between sharp decorative objects and the
upholstery and trim fabrics. Decorative ob-
jects include zips, rivets and rhinestones on
clothing and belts. ●
From time to time, clean the dust that gath-
ers in the perforations, folds and seams so
that the surfaces of the seats are not dam-
aged by its abrasive effect.
● Make sure clothes are colour-fast to avoid
them running and staining the upholstery.
This is especially important if the upholstery
is light in colour. CAUTION
If you ignore this advice, which is important
for maintaining your seat upholstery, the fab-
ric may be damaged or stained. Note
SEAT recommends you take the vehicle to a
specialised workshop to treat any stains on
the upholstery caused by the discolouration
of clothing. How to clean the upholstery, trim
fabrics and Alcantara
® Cleaning the fabric on heated seats and
electrically adjustable seats or seats with
airbag components
It is possible that there are important airbag
components and electrical connections in-
side the driver seat, passenger seat and pos-
sibly the outer rear seats. If these seats and
seat backrests are damaged, or are cleaned
»
201Technical specifications
Advice
Operation
Safety
Page 204 of 305
Advice
and are treated incorrectly, or if they get wet,
the vehicle electric system may be destroyed
and the airbag system damaged ››› .
Electric and heated seats contain compo-
nents and electrical connections that may be
damaged if the seats are cleaned or incor-
rectly treated ››› . Similarly, damage might
be caused at other points in the vehicle's
electric system.
For this reason, bear the following indica-
tions in mind for cleaning:
● Do not use high-pressure or steam cleaning
equipment or cold aerosols.
● Do not use cream detergents or detergent-
based solutions for delicate garments.
● Prevent the fabric from getting wet at all
times.
● Only use cleaning products approved by
SEAT.
● If in doubt, take the vehicle to a professio-
nal cleaning company.
Cleaning the fabric on unheated seats, non-
electrically adjustable seats and seats
without airbag components
● Before using any cleaning products, con-
sult and keep in mind the instructions of use,
indications and warnings on the container.
● Use a vacuum cleaner (with the brush at-
tachment) on the trim and seat fabrics, the Alcantara
®
upholstery of the seats and the
carpet.
● Do not use high-pressure or steam cleaning
equipment or cold aerosols.
● For general cleaning, use a soft sponge or
an ordinary lint-free microfibre cloth ››› .
● Clean Alcantara ®
surfaces with a slightly
damp cotton or woollen cloth, or a standard
lint-free microfibre cloth ››› .
If the dirt on the trim and upholstery fabrics
is only superficial, you can use a standard
foam cleaner.
If the upholstery and trim are very dirty, be-
fore cleaning them we recommend you find
out about the most suitable cleaning options
from a professional cleaning company. If nec-
essary, the cleaning should be carried out by
a specialised company.
Stain removal
When removing stains, it may be necessary
to clean the whole surface and not just the
stain itself. Especially if the surface has been
dirtied through normal use. If you only clean
the stained area, that part may then look
lighter than the rest. If in doubt, take the ve-
hicle to a professional cleaning company. WARNING
If there is a fault in the airbag system, it is
likely that the airbag will not deploy correct- ly, not deploy at all, or do so unexpectedly,
which could cause serious or fatal injuries.
●
Have the system checked immediately by a
specialised workshop. CAUTION
If the upholstery on electrically operated
seats or seats with airbag components gets
soaked, the vehicle's electric system and cer-
tain other components may be damaged.
● If the seat gets soaked, take the vehicle im-
mediately to a specialised workshop to be
dried and for the system components to be
inspected.
● Do not use steam cleaning equipment as
the dirt becomes more encrusted and fixed in
the material.
● High-pressure cleaning equipment and cold
aerosols may damage the upholstery. CAUTION
● Brushes should only be used to clean the
carpet and floor mats! Other fabrics may be
damaged if cleaned with a brush.
● If cream detergents or detergents for deli-
cate garments are applied with a damp cloth
or sponge, they may, for example, leave rings
when dry because of the surfactant compo-
nents they contain. Generally, such rings are
very difficult or almost impossible to remove. 202
Page 205 of 305
Care and maintenance
CAUTION
● Do not let water soak into Alcantara ®
under
any circumstances.
● Do not use leather cleaning products, sol-
vents, wax polish, shoe cream, stain remov-
ers or similar products on Alcantara ®
.
● Never use brushes for cleaning damp mate-
rial as they could damage the surface. Cleaning and maintenance of natural
leather upholstery
Consult a professional cleaning workshop if
you have any doubts on cleaning and main-
taining the leather equipment in your vehicle.
Maintenance and treatment
Nappa natural leather is delicate because it
has no additional protective layer.
● After cleaning, regularly apply a condition-
er with sun-screen and impregnating action.
These products nourish the leather, soften it
and make it more breathable, as well as re-
hydrating it. They also provide it with a pro-
tective film.
● Clean the leather every 2 or 3 months and
remove stains as they appear.
● Treat the leather every 6 months with a
suitable maintenance product. ●
Apply as few cleaning and maintenance
products as possible, always using a dry, lint-
free cotton or woollen cloth. Do not apply
cleaning and maintenance products directly
to the leather.
● Remove recent ball-point pen and ink
stains, lipstick, shoe cream and similar
stains as soon as possible.
● Maintain the colour of the leather. To do
this, use a special cream especially coloured
for leather to achieve the same overall colour,
if necessary.
● Afterwards, go over it with a soft cloth.
Cleaning the vehicle
SEAT recommends using a slightly damp cot-
ton or woollen cloth for general cleaning pur-
poses.
Generally, the leather should never be
soaked at any point, nor should water pene-
trate the seams.
Before cleaning the leather upholstery, bear
in mind the f o
llowing recommendations
››› page 201, Cleaning the fabric on heated
seats and electrically adjustable seats or
seats with airbag components . CAUTION
● On no account use solvents, wax polish,
shoe cream, stain removers or similar materi-
als on leather. ●
If the stain remains on the leather for long,
it will soak in and be impossible to remove.
● In the event of spilt liquids, dry immediate-
ly with an absorbent cloth to prevent the liq-
uid penetrating through the leather or seams.
● If the vehicle is left standing in the sun for
long periods, the leather should be protected
against direct sunlight to prevent it from fad-
ing. Note
The leather will usually change colour slight-
ly with use. Cleaning synthetic leather upholstery
Before cleaning synthetic leather upholstery,
bear in mind the following recommendations
››› page 201, Cleaning the fabric on heated
seats and electrically adjustable seats or
seats with airbag components
Only use water and neutral cleaning products
to clean synthetic leather upholstery. CAUTION
Do not use solvents, floor wax, shoe cream,
stain removers or similar products on syn-
thetic leather. These will stiffen the material,
causing it to crack prematurely. 203
Technical specifications
Advice
Operation
Safety
Page 206 of 305
Advice
Cleaning storage compartments,
drinks holders and ashtray Cleaning storage compartments and drinks
holders
Some storage compartments and drinks
holders have a removable rubber mat.
● Use a clean, damp, lint-free cloth to clean
parts.
● If this does not provide satisfactory results,
we recommend using a special solvent-free
plastic cleaning product.
Cleaning the ashtray
● Extract the ashtray and empty it.
● Clean the ashtray with a dishcloth.
Use a toothpick or similar to remove ash from
the area where cigarettes are stubbed out.
Care and cleaning of plastic parts,
wooden trim and the instrument
panel ●
Use a clean, damp, lint-free cloth to clean
parts.
● Clean plastic parts (inside and outside the
vehicle) and the dash panel with a special
solvent-free product for the care and clean-
in g of
plastic, approved by SEAT ››› .●
Wash wooden trims
w
ith a mi
ld soap and
water solution. WARNING
Solvents cause the surfaces of the airbag
modules to become porous. If an airbag is ac-
cidentally triggered, the detachment of plas-
tic parts could cause serious injury.
● Never clean the dash panel and the surfa-
ces of the airbag modules with cleaners con-
taining solvents. Cleaning seat belts
If the seat belt is very dirty, the belt retractor
may not work correctly thus preventing the
seat belt from operating correctly.
The seat belts should never be removed from
the vehicle for cleaning.
● Use a soft brush to remove the worst dirt
››› .
● Pull the seat belt right out and leave it out.
● Clean dirty seat belts with a gentle soap
and w at
er solution.
● Wait until they are completely dry.
● Only allow the seat belt to retract when it is
completely dry. WARNING
Check the condition of all the seat belts at
regular intervals. If the webbing or other
parts of the belt are damaged, the vehicle
should be taken to a specialised workshop
immediately and the belts should be re-
placed. It is extremely dangerous to drive us-
ing damaged seat belts and could result in
serious injury or loss of life.
● Seat belts and their components must nev-
er be cleaned with chemical products, nor
should they be allowed to come into contact
with corrosive liquids, solvents or sharp ob-
jects. This could affect the strength of the
seat belt webbing.
● Seat belts should be completely dry before
retracting. Damp could damage the belt re-
tractor so that it is does not operate correct-
ly.
● Do not allow liquids or foreign bodies to en-
ter the buckle fastenings. This could damage
the buckles and seat belts.
● Never attempt to repair, modify or remove a
seat belt yourself.
● Always have damaged seatbelts replaced
immediately by seat belts approved for the
vehicle in question by SEAT. Seat belts which
have been worn in an accident and stretched
must be replaced by a specialised workshop.
Renewal may be necessary even if there is no
apparent damage. The belt anchorage should
also be checked. 204
Page 207 of 305
Care and maintenance
Notes for the user Labels and plates Some parts in the engine compartment come
from the factory with certificates of safety, la-
bels or plates containing important informa-
tion regarding the operation of the vehicle,
for example, on the petrol cap, on the pas-
senger's sun visor, on the driver door strut, or
on the floor of the boot.
● Never remove these certificates of safety,
labels or plates, and ensure they are kept in
good condition and are legible.
● If a vehicle part, bearing a certificate of
safety, label or plate, is replaced, the special-
ised workshop should attach the information
back in the same place.
Certificate of safety
A certificate of safety on the door strut states
that all the safety standards and regulations
established by the national traffic authorities
responsible for road safety were met at the
time of manufacture. It may also give the
month and year of manufacture, together
with the chassis number.
Warning of high voltage label*
There is a label close to the bonnet lock
which warns of high voltage in the vehicle's
electrical system. The vehicle ignition system complies with several standards, including
the Canadian standard, ICES-002.
Using your vehicle in other countries
and continents The vehicle is manufactured at the factory for
use in a particular country in accordance with
the national legislation in force at the time of
manufacture.
If the vehicle is sold in another country or
used in another country for an extended peri-
od of time, the applicable legislation of that
country should be observed.
It may be necessary to fit or remove certain
pieces of equipment or to deactivate certain
functions. Service work may also be affected.
This is particularly true if the vehicle is used
in a different climate for an extended period
of time.
As there are different types of frequency
bands around the world, you may find that
the radio or navigation system supplied at
the factory does not work in another country.
CAUTION
● SEAT does not accept liability for any dam-
age to the vehicle due to the use of a lower
quality fuel, an inadequate service or the
non-availability of genuine spare parts. ●
SEAT does not accept liability if the vehicle
does not comply in part or in full with the le-
gal requirements of other countries or conti-
nents. Radio reception and the aerial
The aerial of radio and navigation systems
fitted at the factory may be mounted in differ-
ent parts of the vehicle:
● On the inside of the rear window, next to
the rear window heating,
● on the inside of the rear side windows,
● on the inside of the windscreen,
● on the roof of the vehicle.
Aerials mounted on the inside of a window
can be recognised by the fine wires. CAUTION
Aerials on the inside of windows may be dam-
aged if knocked or if cleaned with corrosive or
acid cleaning products. Do not stick adhesive
labels over the heating elements and never
clean the inside of the rear window with cor-
rosive or acid products or other similar chem-
ical cleaning products. » 205Technical specifications
Advice
Operation
Safety
Page 208 of 305
Advice
Note
If electrical equipment is used near an aerial
built-into the window, you may observe inter-
ference in the reception of AM stations. Notes on SEAT repairs
WARNING
Repairs or modifications which are not per-
formed correctly may result in damage or er-
rors in the vehicle operation, affecting the ef-
fectiveness of the driver assist and airbag
systems. This could result in serious acci-
dent.
● Have any repairs or modifications carried
out at a specialised workshop. Collection and scrapping of end-of-life
vehicles
Collection of end-of-life vehicles
An extensive network of used car reception
centres already exists in much of Europe. Af-
ter the vehicle has been delivered, you will
receive a certificate of destruction describing
the environmentally friendly scrapping of the
vehicle in accordance with applicable legisla-
tion. We will collect the used vehicle free of
charge, provided it complies with all national
legislation.
Please see your technical service for further
information about the collection and scrap-
ping of end-of-life vehicles.
Scrapping
The relevant safety requirements must be ob-
served when the vehicle or components of
the airbag or belt tensioner systems are
scrapped. These requirements are known to
specialised workshops. Checking and refilling levels
Filling the tank Introduction The fuel tank flap is on the rear right of the
vehicle.
WARNING
Refuelling or handling fuel carelessly can
cause an explosion or fire resulting in serious
burns and injuries.
● Always make sure that you correctly close
the fuel cap to avoid evaporation and fuel
spillage.
● Fuels are highly explosive and inflammable
substances that can cause serious burns and
injuries.
● Fuel could leak out or be spilt if the engine
is not switched off or if the filler fuel nozzle is
not fully inserted into the tank filler neck
when refuelling. This could lead to a fire, ex-
plosion and severe injuries.
● When refuelling, turn off the engine, the
auxiliary heating ( ››› page 128) and turn off
the ignition f or s
afety reasons.
● Always turn off mobile telephones, radio
apparatus and other radio wave emitting
equipment before refuelling. Electromagnetic
waves could cause sparks and lead to a fire. 206
Page 209 of 305
Checking and refilling levels
●
Never enter the vehicle while refuelling. If it
is absolutely necessary to enter, close the
door and touch a metal surface before touch-
ing the filler nozzle again. This will prevent
the generation of static electricity. Sparks
could cause a fire when refuelling.
● Never handle fuel close to flames, sparks or
objects with slow combustion (e.g. ciga-
rettes).
● Avoid static electricity and electro-magnet-
ic radiation when refuelling.
● Observe the safety regulations of the serv-
ice station.
● Never spill fuel on the vehicle or in the lug-
gage compartment. WARNING
For safety reasons, SEAT does not recommend
carrying a spare fuel canister in the vehicle.
Fuel could be spilled and catch fire, above all
in case of an accident and this applies to a
full container as well as empty containers.
This could lead to explosions, fires and inju-
ries.
● Observe the following if you exceptionally
have to carry fuel in a canister:
–Never place a fuel container to fill it in-
side the vehicle or on the vehicle, for ex-
ample, in the boot or on the hatch. Filling
in these circumstances could create an
electrostatic charge and spark that could
ignite fuel fumes. –
Always place the canister on the ground
to fill it.
– Insert the fuel nozzle into the neck of the
canister as far as possible.
– If you are using a metal fuel canister, the
nozzle must always touch the canister
while it is being filled to avoid static elec-
tricity.
– Follow the legal requirements for the use,
storage and transport of spare fuel canis-
ters.
– Insure that the fuel container complies
with manufacturing standards, for exam-
ple, ANSI or ASTM F852-86. CAUTION
● Always remove any fuel spilled on the vehi-
cle paintwork immediately to avoid damage
to the wheel housing, the tyre and vehicle
paintwork.
● Refuelling a petrol engine with diesel or a
diesel engine with petrol can cause serious
engine and fuel system damage; the resulting
malfunctions are not covered by the SEAT
warranty. If you refuel with the wrong type of
fuel, never start the engine. This applies to
even the smallest amount of the wrong fuel.
Seek specialist assistance. With the engine
running, the composition of the wrong fuel
could significantly damage the fuel system
and the engine itself.
● In vehicles with a diesel engine, under no
circumstances should you refuel or drive with petrol, kerosene, heating oil or any other
type of different fuel. Other types of fuels
could cause serious damage to the engine
and to the fuel supply system and the result-
ing problems are not covered by the SEAT
warranty.
For the sake of the environment
Fuels can contaminate the environment. Col-
lect any spilt service fluids and allow a pro-
fessional to dispose of them. Note
There is no emergency mechanism for the
manual release of the tank flap. If necessary,
request assistance from specialised person-
nel. 207Technical specifications
Advice
Operation
Safety
Page 210 of 305
Advice
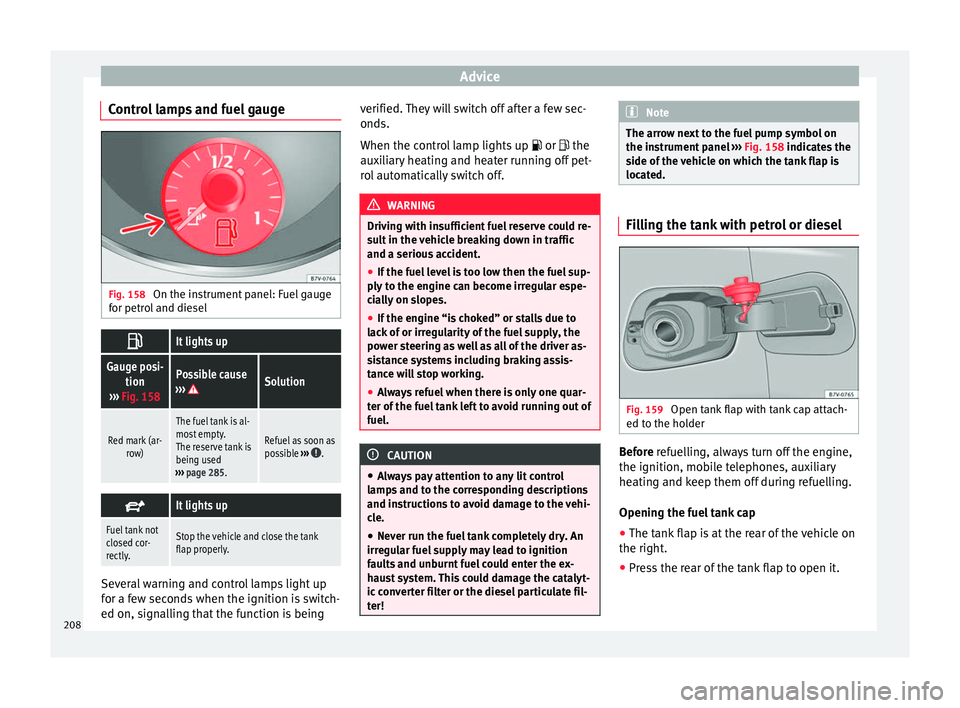
Control lamps and fuel gauge Fig. 158
On the instrument panel: Fuel gauge
for petrol and diesel It lights up
Gauge posi-
tion
››› Fig. 158Possible cause
››› Solution
Red mark (ar- row)
The fuel tank is al-most empty.
The reserve tank is
being used
››› page 285.
Refuel as soon as
possible ››› .
It lights up
Fuel tank not
closed cor-
rectly.Stop the vehicle and close the tank
flap properly.
Several warning and control lamps light up
for a few seconds when the ignition is switch-
ed on, signalling that the function is being verified. They will switch off after a few sec-
onds.
When the control lamp lights up
or
the
auxiliary heating and heater running off pet-
rol automatically switch off. WARNING
Driving with insufficient fuel reserve could re-
sult in the vehicle breaking down in traffic
and a serious accident.
● If the fuel level is too low then the fuel sup-
ply to the engine can become irregular espe-
cially on slopes.
● If the engine “is choked” or stalls due to
lack of or irregularity of the fuel supply, the
power steering as well as all of the driver as-
sistance systems including braking assis-
tance will stop working.
● Always refuel when there is only one quar-
ter of the fuel tank left to avoid running out of
fuel. CAUTION
● Always pay attention to any lit control
lamps and to the corresponding descriptions
and instructions to avoid damage to the vehi-
cle.
● Never run the fuel tank completely dry. An
irregular fuel supply may lead to ignition
faults and unburnt fuel could enter the ex-
haust system. This could damage the catalyt-
ic converter filter or the diesel particulate fil-
ter! Note
The arrow next to the fuel pump symbol on
the instrument panel ››› Fig. 158 indicates the
s ide of
the vehicle on which the tank flap is
located. Filling the tank with petrol or diesel
Fig. 159
Open tank flap with tank cap attach-
ed to the holder Before
refuelling, always turn off the engine,
the ignition, mo b
ile telephones, auxiliary
heating and keep them off during refuelling.
Opening the fuel tank cap
● The tank flap is at the rear of the vehicle on
the right.
● Press the rear of the tank flap to open it.
208